
«I am running Microsoft 365 on my Windows 10 computer. I need to insert PNG images into my document, but after I try to insert the pictures it is showing a box with a red x mark and the message «This image cannot currently be displayed.»
Many users experience an odd issue with their Word document regarding a picture or an object is not showing up in Word. Whenever you open the Microsoft Word file, you can see white spaces or rectangles instead of the images that you have inserted earlier. This is a common issue in MS Word 2007 and 2010. Though the problem can also occur in the later versions of Microsoft Word.
Many MS Office users complained that they can’t insert pictures in a Word document. In a Word document, when I select insert, then picture, and select picture from my folder, it fails to insert. It only shows me a blank outline of the image but can’t insert the picture in Word.
Moreover, it can also happen with a Word file that contains an object or graphic image. If this is the case, let us understand why such an error is caused and how to fix the Word Document not showing pictures issue with a few easy methods.
Table of Contents
Why does Word say “This image cannot currently be displayed”?
How do I Fix this “Image Cannot Currently be Displayed” Error?
- Use the «In line with text» wrapping style option
- Change the view of the MS Word Application
- Enable the Show drawings and text boxes on-screen option
- Enable Print drawings created in Word option
- Disable Use of draft quality
- Disable Picture Placeholders
- Change the problematic Video driver settings
Why does Word say “This image cannot currently be displayed”?
“The images that cannot be displayed currently”
The main reason behind the issue “This image cannot currently be displayed” in Word is using the “wrapping style” option instead of the «In Line with text» Option with the pictures in the Word document.
a) Word Wrapping Style
Generally, Text Wrapping is used to manage well the text surrounding the image. However, in some cases using the “Wrapping style” option with your image might make Microsoft Word not show the images. Using the inline option might fix the error. Along with the Word Wrapping style, the following are a few other reasons that can also cause Word not to show images.
b) Picture Placeholder is Enabled
In some cases even after selecting the inline with text option, your image might not show up in the Word document. It might be because the Picture Placeholder option is enabled. Generally, the Picture placeholder is used when the Word document has numerous images or items.
In conditions where word files have a lot of images can be hard to process for a low-spec computer. If you enable the Picture Placeholder option, it will cease all the images to display. Yet images will be in the same position, they just won’t be displayed. This is the best way to reduce the load on the computer. Disabling the picture placeholder might fix your error. In the following sections, you find the instructions on how to change the settings.
c) Other Settings
Following are a few other settings that can be a reason behind the missing photos in the Word file:
- Word document view is set to Draft view or Outline View.
- If you Show drawings and text boxes on-screen preference in the Options menu is disabled.
- When Print drawings are created in Word choice is deactivated.
- If you have enabled the Use draft quality option.
d) Glitches in Windows Video Driver
Finally, your images on the Word document might not show up content or pictures due to any glitches Windows video driver. However, this is highly rare and there is no possibility of this happening.
In the following section, you will find every little detail on how to fix the error.
How do I Fix this “Image Cannot Currently be Displayed” Error?
Try the below-explained troubleshoots to solve your Word document not showing pictures problem. The following steps are according to Word in Office 365. The steps will be slightly different for Word 2007 and 2010 but the results will be the same. The difference in Word 2007 is that there is no File option, instead, you have to use the Microsoft Office button.
1. Use the «In line with text» wrapping style option
- Click on the inserted image
- Switch to the Right-click on the image
- Click on Wrap Text
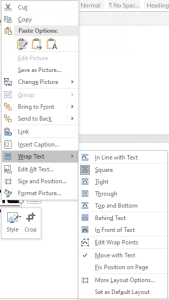
- Select In line with Text option
2. Change the view of the MS Word Application
If you are using Draft or Outline view, then select one of the following views:
- Print Layout
- Full-Screen Reading
- Web Layout
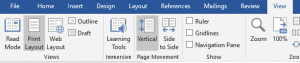
In MS Word 2016 or Office 365 just go to View and select on Print Layout.
For Word 2010: Click File, and then click Print.
3. Enable the Show drawings and text boxes on-screen option
- Go to File and select Options
- Click on the Advanced tab
- Scroll down to see Show document content
- Enable Show drawings and text boxes on-screen option
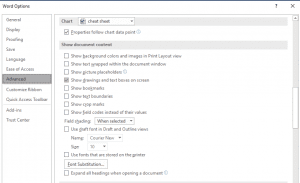
- Hit OK
- If you are using Word 2007, click on the Microsoft Office Button and click Word Options. As in Word 2007, instead of File, there is a Microsoft Office button.
4. Enable Print drawings created in Word option
- Hit the File tab and go to Options
- Jump to Display
- In Printing options, enable Print drawings created in Word option
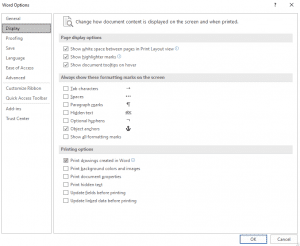
- Apply changes
5. Disable Use draft quality
- Hit the File tab and go to Options
- Jump to Display
- In Printing options
- Uncheck Use the draft quality option
- Opt OK
6. Disable Picture Placeholders
- Go to File and select Options
- Click on the Advanced tab
- Scroll down to see Show document content
- Uncheck Show Picture Placeholders Preference

- Hit OK
7. Change the problematic Video driver settings
For Windows 10:
- Go to Desktop and right-click
- Select Graphics Properties and then in the next window select Video
- Change your Windows video driver color quality settings and screen resolution.
- Try updating the video driver as well if a new update is available
If none of the above fixations help you, then there might be a possibility that your word file is damaged and as a result of that, it is not showing some content. In such situations, you have to adapt to a Word repair tool to fix the error. To do so, try to repair your DOC file / DOCX file using the Remo Word Repair utility. The Remo Repair Word is capable of solving any issues related to the Word document, regardless of the reason behind the corruption.
The best possible way to avoid any kind of error on Word doc is by creating multiple copies as a backup. However, you should know for a fact that even those copies are exposed to issues. Hence, it is strongly suggested to have Remo Repair on your Hands to fix any word-related issues.
![]()
Download Article
Step-by-step guide to inserting pictures in Word
![]()
Download Article
- Windows
- Mac
- Web App
- Video
- Q&A
- Tips
|
|
|
|
|
Whether you’re working on a hefty research project or a friendly holiday greeting card, adding images to your Word document can really add value to your project. Whether you want to insert a picture from your computer or find one online, it’s easy to add photos in Word. This wikiHow teaches you how to insert an image into a Microsoft Word document using Windows, a Mac, and the free web version of Word.
Things You Should Know
- Use the Insert tab on Windows, Mac, and the web app to add a picture.
- Select Pictures > This Device to use an image on your computer.
- Click the image to resize and reformat it.
-

1
Click the place in your document where you want to insert the picture. Word’s insertion cursor, a vertical blinking bar, will appear at this point. When you insert the image, its bottom-left corner will be at this point.
- This method works for all modern versions of Word beginning with Word 2016. You can also use it as a guide for earlier versions of Windows, although there will be fewer tools and features.
- Changing the background is done through a different method, using the Design tab.
-
2
Click the Insert tab. It’s near the top of Word between «Home» and «Draw» (or «Home» and «Design» in some versions).
Advertisement
-
3
Click the Pictures tool. It’s in the «Illustrations» section of the toolbar running along the top of Word. Some location options will appear. If you’re using Word 2019 or later, a menu will expand. If you’re using Word 2016 or earlier, your file browser will appear.
-
4
Select the type of image you want to insert. You can choose an image on your computer, a stock image from Microsoft, or an image from the internet.
- Word 2019 or later:
- Click This Device if the picture is on your computer.
- Click Stock Images to select a free stock image from Microsoft’s collection.
- Click Online Pictures to use Bing’s image search to find photos on the web.
- If the photo is on your OneDrive, select Online Pictures and click OneDrive at the bottom-left corner.
- Word 2016:
- If the picture is on your computer, simply navigate to it in the file browser.
- If you want to search for a photo online or insert one from Facebook, Flickr, or your OneDrive, close the file browser and click the Online Pictures icon next to the «Pictures» in the toolbar. You can then select an image from Bing image search, Flickr, or Facebook.
- If the picture is on your OneDrive, click Online Pictures instead of Pictures and click Browse next to «OneDrive.»
- Word 2019 or later:
-
5
Select the image you want to insert. When you find the picture, click it once to select it.
- If you’re selecting from stock images or online images, you can click multiple pictures to add more than one.
- If you’re choosing files from your computer and want to add more than one picture, hold the Ctrl button down as you click each image.
-
6
Click Insert. It’ll be near the bottom-right corner of the window no matter where you’ve selected your image(s). You’re done! Continue to the next steps for formatting information, or print the document when you’re ready.
-
7
Resize the picture. If you want to change the picture’s size, click it once to select it, and then drag any of the corner circles in or out.[1]
- You can also specify the size if you want. Double-click the picture to open the Picture Format tab at the top, and then set your desired measurements next to «Height» and «Width.»
-
8
Use the curved arrow at the top of the picture to rotate it. It’s above the dot at the top-center part of the picture. To rotate, place the mouse cursor over the curved arrow, and then click and drag the cursor left or right until you’re satisfied.
-
9
Double-click the picture to access more editing tools. This opens the «Picture Format» (2019 and later) or «Format» (2016) tab at the top of Word. On this tab, you can:
- In the «Arrange» panel in the top-right area, click Wrap Text to choose how to situate the picture in blocks of text. You can also set alignment preferences here. Wrapping the text is a good way to get your document formatted exactly the way you want.
- To crop the picture, click the Crop tool in the «Size» panel at the top-right corner.
- The «Adjust» panel near the top-left corner has additional tools for background removal, color effects, and corrections.
- To add a border or effect around the picture, select one of the «Picture Styles» at the center of the Format bar, or choose any of the other options in the section to have more control over the style.


Advertisement
-
1
Click the place in your document where you’d like to insert a picture. This places the cursor at that location.
-
2
Click the Insert tab. It’s at the top of Word between the «Home» and «Design» or «Home» and «Draw» tabs.
-
3
Click the Pictures icon. It’s on the toolbar that runs along the top of Word. Look for an icon of a green mountain with a yellow sun between «Tables» and «Shapes.»
-
4
Click Photo Browser or Picture from File. If you want to browse images in your Mac’s Photos app, use Photo Browser. To select an image file using Finder, choose Picture from File.
-
5
Insert the picture into the document. If you’re using the Photo Browser option, simply drag the photo into your document. If you’re using Picture from File, select the image and click Insert.
-
6
Resize the picture. If you want to increase or reduce the picture’s size, click the image to select it, and then do one of the following:
- To maintain the picture’s proportions so it doesn’t stretch or warp, hold down the Shift key as you drag any of the sizing handles (the circles) inward or outward.[2]
- To keep the image’s center in place as you resize, hold down the Option key as you drag the handles.
- You can also specify a size. Double-click the Picture to open the Picture Format tab, then enter your desired measurements next to «Height» and «Width.»
- To maintain the picture’s proportions so it doesn’t stretch or warp, hold down the Shift key as you drag any of the sizing handles (the circles) inward or outward.[2]
-
7
Drag the curved arrow at the top of the picture to rotate it. It’s above the dot at the top-center edge of the picture. Just place the mouse cursor over the curved arrow, and then click and drag it left or right until it’s correct.
-
8
Double-click the picture to access more editing tools. This opens the «Picture Format» tab at the top of Word, which has a bunch of editing features, including the ability to remove the background and add styles.
- Click Corrections near the top-left corner to correct lighting and color problems.
- Click Artistic Effects to play around with filters, and Transparency to make the picture more see-through.
- To crop the picture, click the Crop tool next to the height and width controls.
- Click Wrap Text to choose how to situate the picture in blocks of text, and use Align and Position to ensure correct placement.
- Click Quick Styles to choose pre-styled borders, shadows, and other options.


Advertisement
-
1
Click the place in your document where you’d like to insert a picture. This places the cursor at that location.
- If it’s your first time using Office Online on the web, go to https://www.office.com, sign in with your Microsoft account, and select Word to get started.
-
2
Click Insert. This opens the Insert tab.
-
3
Click Pictures. This opens a drop down options menu.
-
4
Select a picture type. There are four options to choose from:
- This Device — choose a picture on your computer
- OneDrive — choose an image from your OneDrive
- Stock Images — insert a stock image or sticker
- Bing Pictures — search Bing for an image
-
5
Select an image. If you choose the This Device option, you’ll be prompted to select an image from your computer. Click it to select it.
-
6
Click Open. This is in the bottom right corner of the image selection window. This will confirm your selected image and insert it into the document.
-
7
Resize the picture. If you want to change the picture’s size, click it once to select it, and then drag any of the corner circles in or out.
- You can also specify the size if you want. Double-click the picture to open the Picture tab at the top, and then set your desired measurements next to «Height» and «Width.»
-
8
Use the curved arrow at the top of the picture to rotate it. It’s above the dot at the top-center part of the picture. To rotate, place the mouse cursor over the curved arrow, and then click and drag the cursor left or right until you’re satisfied.
-
9
Double-click the picture to access more editing tools. This opens the «Picture» tab at the top of the Word web app. On this tab, you can:
- In the «Arrange» panel in the top-right area, click Wrap Text to choose how to situate the picture in blocks of text. You can also set alignment preferences here.
- To crop the picture, click the Crop tool in the «Image Size» panel at the top-right corner.
- To add a border or effect around the picture, select one of the «Picture Styles» at the center of the bar, or choose any of the other options in the section to have more control over the style.


Advertisement
Add New Question
-
Question
How do I take screenshots?

On a Mac, shift command 3 to screenshot the whole screen. If you want to take a screenshot of a certain area on the screen, press shift command 4. On a Windows PC, press control and print screen at the same time, then you can paste the image into Paint or Microsoft Word.
-
Question
When I insert several photos on an age in a Word document, the photos often won’t stay in place. How do I stop the photos from bumping each other around?
You can right-click the image, hold the cursor over the «Wrap Text» menu option, and select an option from the list that is NOT «In Line with Text» (usually selected by default), such as «Tight» or «Behind/In Front of Text.» Then you should be able to move the image freely around the page.
-
Question
How do I format images in a Word document?
Try double-tapping the photo. A photo format menu should come up on the right side.
See more answers
Ask a Question
200 characters left
Include your email address to get a message when this question is answered.
Submit
Advertisement
Video
-
Adding photos to your Word document increases its size.
-
Other photo modification features available in newer versions of Microsoft Word include the ability to add borders, cutout styles, shadows, beveled edges, glows, and drop shadows.
-
When you crop a picture, the actual cropped part of the picture is hidden, not removed; unless you check the «Delete Cropped Areas of Pictures» box in the «Compression Settings» dialog box. Any compressed pictures with their cropped areas deleted cannot be restored to their original appearance.
Show More Tips
Thanks for submitting a tip for review!
Advertisement
About This Article
Article SummaryX
1. Click the place you want to insert the image.
2. Click the Insert tab.
3. Click Pictures.
4. Choose a location.
5. Select the image and click Insert.
6. Double-click the picture to open editing and format tools.
Did this summary help you?
Thanks to all authors for creating a page that has been read 650,440 times.
Is this article up to date?

- Remove From My Forums
-
Question
-
I used to be able to inset a picture file (.jpg, or TIFF) into a Word document. When I try it now all I see is an blank rectangular box. I tried this on two different computers, one a PC and the other a MAC. I am using Word version 15.32.
Is this an error in Word?
How can I do this?
-
Moved by
Carey FrischMVP
Sunday, April 22, 2018 4:17 PM
Relocated
-
Moved by
All replies
-
Go to File|Options|Advanced>Show document content, and uncheck ‘show picture placeholders’.
Cheers
Paul Edstein
[MS MVP — Word]-
Proposed as answer by
Steve Fan
Thursday, April 26, 2018 3:50 PM
-
Proposed as answer by
-
Hi,
Did you try testing with new documents or existing documents? Please try creating a new document to see whether the same issue continues.
Besides, please also make sure that you are not in Draft
or Outline views as pictures are not showing up in these views.Regards,
Steve Fan
Please remember to mark the replies as answers if they helped. If you have feedback for TechNet Subscriber Support, contact
tnsf@microsoft.com.
Click
here to learn more. Visit the dedicated
forum to share, explore and talk to experts about Microsoft Teams.-
Proposed as answer by
Steve Fan
Thursday, April 26, 2018 3:50 PM
-
Proposed as answer by
-
Hi,
Just checking in to see if the information were helpful. Please let us know if you would like further assistance.
Best Regards,
Steve Fan
Please remember to mark the replies as answers if they helped. If you have feedback for TechNet Subscriber Support, contact
tnsf@microsoft.com.
Click
here to learn more. Visit the dedicated
forum to share, explore and talk to experts about Microsoft Teams. -
Your version of Word for the Mac 2016 is over a year old, if that is what your are referring to with version 15.32.. As of April 2018, unless you are on a corporate volume license, you should be running 16.12 on the Mac and even then the corporate volume
version of Mac Word should be 15.47.Until you bring yourself up to current, trying to figure out what is going wrong in your system is useless at least on the Mac side … In My Opinion.
Kind Regards, Rich … http://greatcirclelearning.com
-
Edited by
Rich Michaels, Word MVPMVP
Thursday, April 26, 2018 10:10 PM
clarifying my initial response -
Proposed as answer by
Steve Fan
Monday, April 30, 2018 2:12 AM
-
Edited by
-
Thanks
I installed the newest version of Word and the problem was corrected.
Louisdr
-
Glad to read that Louis. Do me a favor and mark it as the answer so that the thread is properly closed.
Also, you might take a look at a free add-in that I provide for inserting pictures in Mac Word and Windows Word. It’s called
AuthorTec Insert and the link I’ve provided here takes you to the tutorial about it. If you think it will help, then you can go to the download page on the website and get it. Again,
it’s free and there are no strings attached.Simply a Microsoft Community Service that I provide as an MVP.
Kind Regards, Rich … http://greatcirclelearning.com
-
Thanks
I installed the newest version of Word and the problem was corrected.
Louisdr
Hi Louisdr, glad to hear that this issue has been resolved. By the way, could you help mark Rich’s reply as the answer since the issue was fixed according to his suggestion? This would help other community members who may encounter a similar issue to quickly
find the verified answer.Thank you for the understanding and support.
Regards,
Steve Fan
Please remember to mark the replies as answers if they helped. If you have feedback for TechNet Subscriber Support, contact
tnsf@microsoft.com.
Click
here to learn more. Visit the dedicated
forum to share, explore and talk to experts about Microsoft Teams.

Asked by: Cyril Harris II
Score: 4.5/5
(20 votes)
Click the Microsoft Office Button, and then click Word Options. Click Advanced. Under Display document content, clear the Picture Placeholders check box. Click OK.
How do I insert a picture into a Word document?
To insert a picture from a file:
- Place your insertion point where you want the image to appear.
- Select the Insert tab.
- Click the Picture command in the Illustrations group. The Insert Picture dialog box appears. …
- Select the desired image file, then click Insert to add it to your document. Selecting an image file.
How do you enable insert object in Word?
Open Document and Click «Insert»
- Open Document and Click «Insert»
- Open the Word document and click the “Insert” tab on the ribbon menu at the top of the screen.
- Click the «Object» Button.
- Click the «Object» button in the Text group to open the Object dialog box.
- Open the Browse Dialog Box.
How do you insert a picture freely in Word?
Double-click the picture to add it to your Word document. Back on Word’s editing screen, right-click the image that you just added and select Wrap Text > In Front of Text from the menu. Your picture is now freely movable. Drag and drop it anywhere you want in your document.
How do you move an object freely in Word?
First, confirm that the object is not set to In Line with Text: With the object selected click the Arrange button on the Shape Format contextual tab. From the Wrap Text choices select the method you prefer. You then should be able to freely drag the object to any location.
31 related questions found
How do I lock a picture in Word so it doesn’t move?
Click on the Picture Position tab. Under both the Horizontal and Vertical selections, select Absolute Position, and pick «Page» from the drop-down menu at the right. Also, click on the checkbox that says «Lock anchor.» Now, your pictures won’t move around the page.
How do I unblock an embedded object in Word?
Right-click a file that has been block by Office and select Properties from the context menu. On the General tab, click the Unblock button at the bottom of the dialog and then click OK.
Where is object in insert?
On the Insert tab, in the Text group, click Object. Click the Create from File tab. In the File name box, type the name of the file, or click Browse to select from a list.
Why do I have to insert object in Word?
Microsoft Word allows you to embed objects created in other programs into one document. Inserting objects in MS Word can offer data and other resources to support your document’s objectives and create a visually pleasing layout for your recipients’ view.
Why can’t I insert pictures in Word?
The Insert > Pictures option is grayed out. … If you can’t select Pictures from the Insert tab on the ribbon, your message is probably in plain text format. In Word, click on But it wont let me move pictures. Navigate to the location of the image file, select it, then select “Insert.” The image will now be inserted.
How do I insert a picture into a Word document on a Mac?
To insert an image into your document, follow these steps:
- Click where you want the image to appear.
- On the Insert menu, select Photo, then click Picture from File.
- Select the image file you want and click Insert.
What is the use of insert object?
Insert Object is used to insert any type of content you wish into a document. The type of objects that can be inserted vary according to the programs you have installed on your computer that support embedded objects. Inserted objects can either be new or they can be files already existing on your computer.
What is insert object in Word?
Depending on the version of Word or Outlook you’re using, you can insert a variety of objects (such as PDF files, Excel charts or worksheets, or PowerPoint presentations) into a Word document or an email message by linking or embedding them. To insert an object, click Object on the Insert tab.
What is the use of object in MS Word?
An object is a combination of data and the application needed to modify that data. You can thus embed objects in or link them to documents created with a different application. For instance, an Excel spreadsheet can be embedded within a Microsoft Word document using OLE.
Where is insert object in Powerpoint?
Insert an embedded object
On the Insert tab, in the Text group, click Object. Do one of the following: If the object does not already exist, click Create new. In the Object type box, click the type of object that you want to create.
How do you search for an object in Word?
Press [Ctrl]+[G] to display the Find dialog with the Go To tab current. Choose the object or element you’re searching for in the Go to what list (Figure C). Click Next or Previous. Click Close when you’re done.
How do you insert and format objects?
Under «Insert» tab on the ribbon menu, select «Pictures» from the ribbon. 2. A new window will open and from there you’ll be able to select the picture you want to add to your document. Navigate the folders on your computer to the left until you find the picture, select it, and click «Insert.»
How do I get rid of blocked content in Word?
Resolution
- Select File > Options. …
- In the Options window, select Trust Center > Trust Center Settings.
- In the Trust Center window, select File Block Settings, and then clear the «Open» or «Save» check box for the file type that you want to open or save. …
- Select OK two times.
How do I enable macros blocked by administrator?
Click Administrative templates > Microsoft Word 2016 > Word options > Security Trust Center. Open the Block macros from running in Office files from the Internet setting to configure and enable it.
Why is my upload blocked on Microsoft Word?
If you get an error message saying Upload blocked, Sign into save this file, or Save a copy, you may need to remove and reconnect OneDrive. In the Office app you’re using (such as Word, Excel, or PowerPoint), click File. … Once it’s removed, to reconnect, click Add a service, then hover over Storage and select OneDrive.
What is lock anchor in Word?
When you turn on “Lock Anchor,” you can then move your image to any position on the same page as the anchor paragraph, and the object will stay in that position. However, if you move the anchor paragraph to another page, the object will also move to that page, but stay in the same relative position on the page.
How do I fix the position of a picture in Word?
Open Layout Options
Select a picture. Select the Layout Options icon. To bring your picture in front of the text and set it so it stays at a certain spot on the page, select In Front of Text (under With Text Wrapping), and then select Fix position on page.
How do you lock things in Word?
You can lock all or selected users out of the specified areas.
- Open the document you want to lock within Microsoft Word. …
- Select the «Review» tab and go to the «Protect» group. …
- Go to «Editing restrictions» and tick «Allow only this type of editing in the document.» Choose «No changes» from the list of options.
Which of these is an object in Word?
Depending on the version of Word or Outlook you’re using, you can insert a variety of objects (such as PDF files, Excel charts or worksheets, or PowerPoint presentations) into a Word document or an email message by linking or embedding them.
What is insert option in Word processing?
When you first install Word, the Insert key is used to turn overtype mode on and off. To some people this is very awkward, particularly if they are used to working with other word processors that use the Insert key differently.
This article will mainly focus on showing you to insert a picture which can automatically update itself in Word document.
Inserting picture into Word document has been a common tip for users to make their file attractive. However, when you modify the picture, the one you insert into Word file fails to update accordingly. So you may have to delete the original image and insert the new one into your Word file again. This is definitely not a pleasing way to conduct your work. Therefore we will offer you effective ways to insert a picture into Word document as well as make it update automatically.
Insert a Picture in Usual Ways
Firstly, let’s look at the methods to insert a picture into Word file in usual ways.
Method 1: Use “Insert” Tab
- To begin with, place your cursor right at the position where a picture goes.
- Then click “Insert” tab.
- Next, click “Picture” in “Illustrations” group.
- Now choose a picture in “Insert Picture” window.
- Click “Insert” button to finish the job.


Method 2: Paste a Picture
- Locate the picture you need first.
- Then right click it.
- Choose “Copy”.

- Next right click on your Word document.
- Choose “Paste (P)” option.
\"")

\"")
Method 3: Drag and Drop
- Similarly, locate the target picture first.
- Then click to select it.
- Drag and drop it on your document.


Insert an Automatically Updating Picture
As we say, inserting pictures in usual ways is not enough for our work sometimes. Then the following two methods can well meet your higher demands.
Method 1: Choose “Link to File”
- First repeat from step 1 to step 4 in “Use ‘Insert’ Tab”.
- Now click the upside-down triangle behind “Insert” button.
- Next choose “Link to File” option on the menu.


When using the above steps to insert a picture, you can go to change the original picture. For example, we add a rectangle mark on the picture, as below:
Now you reopen the documents, and you can see the picture has been updated.
However, this method also has its limitation. If you rename or relocate the original picture, then you won’t be able to view it on your document. Instead you will get the following look on the document:
To overcome the display error, here is another method.
Method 2: Choose “Insert and Link”
- Repeat step 1 and 2 in “Choose ‘Link to File’”.
- Only this time you choose “Insert and Link” option.


Similarly, this method enables you to insert an automatically updating picture. The good thing is that you can still have the original picture on Word document even if you rename and relocate the picture.
Comparison of 5 Methods
| Methods | Advantages | Disadvantages |
| 1. Use “Insert” Tab
2. Paste a Picture 3. Drag and Drop |
It’s convenient when you don’t need an updated picture. | You cannot get an updated picture automatically in Word document. |
|
Choose “Link to File” |
You can always get an updated picture. | You cannot rename or relocate the picture otherwise the picture will not display in Word document. |
|
Choose “Insert and Link” |
1. You can always get an updated picture.
2. You can always get the original picture even you rename or relocate the picture. |
You cannot get an updated picture if you rename or remove the original picture. |
Deal with File Loss Disaster
As one of the mainstay office programs, Word has won its supporters worldwide. While hail its excellent performance, we cannot eliminate Word’s possibility to collapse. So it’s time to get a Word doc repair product beforehand.
Author Introduction:
Vera Chen is a data recovery expert in DataNumen, Inc., which is the world leader in data recovery technologies, including Excel repair and pdf repair software products. For more information visit www.datanumen.com