
Word for Microsoft 365 Word for Microsoft 365 for Mac Word 2019 Word 2019 for Mac Word 2016 Word 2016 for Mac Word 2013 Word 2010 Word 2007 More…Less
If your document is in Print Layout view and the top and bottom margins appear to be cut off, the option for hiding margins has been switched on. Here’s how to switch it off:
-
Point to the top or bottom of a page until the pointer becomes a double-pointed arrow, and then double-click.

-
To hide the margins again, repeat step 1.
See also
Set page margins in Word
Need more help?
Want more options?
Explore subscription benefits, browse training courses, learn how to secure your device, and more.
Communities help you ask and answer questions, give feedback, and hear from experts with rich knowledge.
![]()
Download Article
Displaying text boundary lines to show margins in Word
![]()
Download Article
This wikiHow teaches you how to display the margin lines around your text in a Microsoft Word document. You can show the margins on PC and Mac, but the mobile version of Word doesn’t allow you to do this.
-
1
Open a Word document on your Mac. You can open a saved document from your computer or open Microsoft Word, and create a new document.
-
2
Click the Word tab on the menu bar. You can find this button next to the Apple icon near the upper-left corner of your screen. It will open a drop-down menu.
Advertisement
-
3
Click Preferences. This will open your Word settings.
-
4
Click View in Preferences. This is the second option on the top row of the Preferences window. You can find it under the «Authoring and Proofing Tools» heading.
-
5
Find the Text boundaries option. It’s near the upper-right corner under the «Show in Document» heading.
-
6
Click and check the box
next to Text boundaries. When this option is checked, you’ll see the margin lines around your text in the document.


Advertisement
-
1
Open a Word document on your computer. You can open a saved document or open Microsoft Word, and create a new document.
-
2
Click the File tab. You can find this button above the toolbar ribbon in the upper-left corner of Word. It will open your file options.
- If you’re using Word 2007, click the Office icon on the top-left.
-
3
Click Options on the file menu. This will open your Word options in a new window.
- In Word 2007, click Word Options on the bottom-right.
-
4
Click the Advanced tab in Options. It’s on the left-hand side of the Options window.
-
5
Find the Show text boundaries option. It’s under the «Show document content» heading in the Advanced tab.
-
6
Click and check the box
next to Show text boundaries. This will show your margin lines around the text in your document.


Advertisement

Ask a Question
200 characters left
Include your email address to get a message when this question is answered.
Submit
Advertisement
Thanks for submitting a tip for review!
About This Article
Article SummaryX
1. Open Word.
2. Click the File tab.
3. Click Options.
4. Click Advanced.
5. Check the Show text boundaries box.
Did this summary help you?
Thanks to all authors for creating a page that has been read 21,451 times.
Is this article up to date?
If your document is in Print Layout view and the top and bottom margins appear to be cut off, the option for hiding margins has been switched on. Here’s how to switch it off: Point to the top or bottom of a page until the pointer becomes a double-pointed arrow, and then double-click.
Contents
- 1 How do I fix the top margin in Word 2010?
- 2 How do I show the top margin in Word?
- 3 Where is the top margin in Word?
- 4 How do I make the margins visible in Word 2010?
- 5 Why is my Microsoft Word not showing pages?
- 6 Why can’t I see my whole Word document?
- 7 How do you get to the top of a Word document on a Mac?
- 8 How do you show top and bottom margins in Word?
- 9 How do I show margins in Word 2013?
- 10 Which are margin settings in Word 2016?
- 11 Why is Microsoft Word starting at the top of the page?
- 12 How do I fix Microsoft Word Problems?
- 13 How do you fix Microsoft Word on a Mac?
- 14 How do I reset Word to default settings?
- 15 Why does my Word document only show one page?
- 16 How do you make pages appear in Word?
- 17 How do you show pages in Word Online?
- 18 How do I scroll to the top of my MacBook?
- 19 How do you return to the top of a Word document?
- 20 How do I view thumbnails in Word for Mac?
How do I fix the top margin in Word 2010?
Answer:Select the Page Layout tab in the toolbar at the top of the screen. Then in the Page Setup group, click on the Margins button. This will open a popup menu where you can select one of the preset margins or “Custom Margins”.
How do I show the top margin in Word?
View page margins
- Click the Microsoft Office Button. , and then click Word Options.
- Click Advanced, and then click the Show text boundaries check box under Show document content. The page margins appear in your document as dotted lines.
Where is the top margin in Word?
To set the top margin of the first page of your proposed order to 4 inches:
- Place the cursor at the top of the first page (Ctrl+Home)
- Click Page Layout > Margins > Custom Margins.
- In the Page Setup Window, type “4” into the Top Margin input box.
- Click OK.
How do I make the margins visible in Word 2010?
Step 1: Open Microsoft Word 2010. Step 2: Click the View tab at the top of the window. Step 3: Check the box to the left of Ruler in the Show section of the navigational ribbon at the top of the window. The ruler visibility setting should then remain the same once you close Microsoft Word.
Why is my Microsoft Word not showing pages?
Make sure that you are displaying your documents in Print Layout view (View tab | Print Layout). If you still don’t see the page breaks, most likely white space between pages has been hidden.
Why can’t I see my whole Word document?
Try going to File>Options>Display and check the box for “Show white space between pages in Print Layout View”.
How do you get to the top of a Word document on a Mac?
To the top of the next page: Command + Page Down or Command + Fn + Down arrow. To the top of the previous page: Command + Page Up or Command + Fn + Up arrow. To the beginning of the document: Command + Home or Command + Fn + Left arrow.
How do you show top and bottom margins in Word?
Missing Top and Bottom Margins
- Display the Word Options dialog box. (In Word 2007 click the Office button and then click Word Options.
- At the left side of the dialog box, click Display. (See Figure 1.)
- Set or clear the Show White Space between Pages in Print Layout View checkbox, as desired.
- Click OK.
How do I show margins in Word 2013?
- Click PAGE LAYOUT > Margins.
- At the bottom, click Custom Margins.
- In the Page Setup box, enter new values for the margins.
Which are margin settings in Word 2016?
To use custom margins:
- From the Layout tab, click Margins. Select Custom Margins from the drop-down menu.
- The Page Setup dialog box will appear.
- Adjust the values for each margin, then click OK.
- The margins of the document will be changed.
Why is Microsoft Word starting at the top of the page?
It’s referred to as Show/Hide White Space. To turn it off you can either; Double-click the top or bottom edge of a ‘page’ or one of the page break lines, or. Go to Word> Preferences- View to check the White space between pages…
How do I fix Microsoft Word Problems?
Luckily, there are multiple ways to fix these issues with Word on your computer.
- Launch Word In Safe Mode & Disable Add-Ins.
- Fix The Corrupted Word Document.
- Repair The Microsoft Office Suite.
- Change Your Default Printer.
- Update Your Printer Drivers.
- Turn Off Your Antivirus Software.
- Uninstall Recent Windows & Office Updates.
How do you fix Microsoft Word on a Mac?
Start MS Word and click on the File menu. Choose the Open option, and it will open up a dialog box where you can select the Word file which needs repair. While you are selecting the file, at the right bottom side of the window, choose the Repair option and click on the Ok button.
How do I reset Word to default settings?
Change the default layout
On the Format menu, click Document, and then click the Layout tab. Make any changes that you want, and then click Default.
Why does my Word document only show one page?
As you adjust the zoom settings used by Word, you may notice that Word automatically displays multiple pages of your document at the same time.As you zoom in and Word discovers that it can no longer display two pages on the screen, it should switch automatically to show only a single page.
How do you make pages appear in Word?
How to Enable Side to Side View in Word
- Click the View tab and in the Views section of the ribbon, select Print Layout.
- Next, on the View tab, go to the Page Movement section of the ribbon and select Side to Side.
- You’ll immediately see the window adjust to show two pages at the same time.
How do you show pages in Word Online?
Step 2: Open the document. Step 3: Click the View tab at the top of the window. Step 4: Click the Page Ends button to toggle it on or off. The Page Ends that we are hiding or displaying in this guide are identified in the image below.
How do I scroll to the top of my MacBook?
How to scroll on a Mac
- If you’re on a page (and your cursor is not clicked into a text box), you can also press the spacebar to scroll down to the bottom of the page.
- You can also accomplish this task using the arrow keys on your keyboard, using the down-arrow key to go down and the up-arrow key to go up.
How do you return to the top of a Word document?
Scroll to the bottom of the page or to the spot where you want to insert the hyperlink. Type in a short phrase, such as “Back to Top,” indicating that you will jump to the top of the page by clicking on the text.
How do I view thumbnails in Word for Mac?
Show or hide Page Thumbnails view
- To show page thumbnails, click in the toolbar, then choose Page Thumbnails.
- To hide page thumbnails, click , then choose Document Only.
Using Word 2016 (and apparently 2013, and 365), there is no longer an option for showing a page’s text boundaries. Rather it defaults to essentially paragraph boundaries. How can I get my page’s text boundaries (i.e. margins) displayed again?
According to this site and this site Microsoft, in their infinite wisdom, has declared this beloved, long-standing feature a bug, and fixed it in their recent editions (with no apparent intention of returning).
You can visit here to try and convince Microsoft to correct this egregious offense.
And no Google, the page margins/text boundaries are not the same as the guides/rulers.
asked Jan 18, 2018 at 20:19
![]()
davdav
9,8365 gold badges29 silver badges50 bronze badges
Thanks to bagwell005, I found a variation that works for my purposes. I went to File>Options>Advanced. Under «Show document content» I selected «Show crop marks.» IMHO, this provides a workable sense of the margins. I hope it helps!
answered Oct 17, 2018 at 17:23
![]()
Here is my macro lifehack that makes use of the gridlines to display text boundaries in the pre-2013 style. The macro switches boundaries on/off.
The produced boundaries are a bit improved: they extend at the full page width and height, crossing in the corners. If you like boundaries that look just like a rectangle, like it was in Office before 2013, remove ‘ at the start of this line:
' ActiveDocument.GridOriginFromMargin = True
Downside: There will be the same boundaries for the whole document, so if you have multiple sections with different size margins, their boundaries will be like those of the section that is current at the moment when you run the macro.
The macro:
Sub view_page_boundaries()
' provide page boundaries using a customised page grid
    With Selection
        ActiveDocument.GridOriginFromMargin = False
        ' uncomment to have page boundaries like standard for pre-2013
        ' ActiveDocument.GridOriginFromMargin = True
        If ActiveDocument.GridOriginFromMargin = False Then
            ' display crossing boundaries at full width and height
            ActiveDocument.GridDistanceHorizontal = .PageSetup.PageWidth - .PageSetup.LeftMargin - .PageSetup.Gutter - .PageSetup.RightMargin
            ActiveDocument.GridDistanceVertical = .PageSetup.PageHeight - .PageSetup.TopMargin - .PageSetup.BottomMargin
        Else
            ' display boundaries like those in pre-2013
            ' 0.05 is half-millimeter to prevent cutting off the right and bottom boundaries by the margins
            ActiveDocument.GridDistanceHorizontal = CentimetersToPoints(Round(PointsToCentimeters( _
            .PageSetup.PageWidth - .PageSetup.LeftMargin - .PageSetup.Gutter - .PageSetup.RightMargin), 1) - 0.05)
            ActiveDocument.GridDistanceVertical = CentimetersToPoints(Round(PointsToCentimeters( _
            .PageSetup.PageHeight - .PageSetup.TopMargin - .PageSetup.BottomMargin), 1) - 0.05)
            ActiveDocument.GridOriginHorizontal = .PageSetup.LeftMargin + .PageSetup.Gutter
            ActiveDocument.GridOriginVertical = .PageSetup.TopMargin
        End If
        If Options.DisplayGridLines = False Then
            Options.DisplayGridLines = True
            ' do not need cropmarks at all with crossing boundaries
            ActiveWindow.View.ShowCropMarks = False
            ActiveDocument.GridSpaceBetweenHorizontalLines = 1
            ActiveDocument.GridSpaceBetweenVerticalLines = 1
        Else
            ActiveDocument.GridOriginFromMargin = True
            ' display cropmarks when there are no boundaries
            ActiveWindow.View.ShowCropMarks = True
            ActiveDocument.GridSpaceBetweenHorizontalLines = 2
            ActiveDocument.GridSpaceBetweenVerticalLines = 2
            ActiveDocument.GridDistanceHorizontal = CentimetersToPoints(0.18)
            ActiveDocument.GridDistanceVertical = CentimetersToPoints(0.32)
        End If
    End With
End Sub
answered Sep 21, 2018 at 14:59
![]()
hoonosehoonose
711 silver badge4 bronze badges
One possible work-around, using grid lines:
- Layout > Align > Grid Settings
-
Set grid settings (assuming 8 1/2″ x 11″ paper with 1″ margins):
- Horizontal spacing 6.5″
- Vertical spacing 8.99″
- Check Display gridlines on screen
- Vertical every 1
- Horizontal every 1
-
Click OK
![]()
phuclv
25.2k13 gold badges107 silver badges224 bronze badges
answered Jan 18, 2018 at 20:33
![]()
davdav
9,8365 gold badges29 silver badges50 bronze badges
According to tips.net, «Showing Text Boundaries for Pages, not for Paragraphs» (Allen Wyatt, 2016), «The short answer is no, there is no way to make it work like it used to. Microsoft redid the programming behind the page layout capabilities of Word 2013, and that «redo» made the text boundaries into what you see now.»
Wyatt suggests for Word 2013 and Word 2016 that «If you used text boundaries to simply show the limits of your text area, you may be able to achieve the same thing by turning on crop marks.».
Go to File> Options> Advanced (scroll down)> Show crop marks.
answered May 16, 2020 at 22:31
![]()
IanSIanS
1831 silver badge10 bronze badges
I am not sure if anyone else is still having the issue.
I was just able to enable it in Microsoft Office Word 2016 to show margins — the way we are so used to…
Go to Word’s File>Options>Display>check the first item «Show white space between pages in Print Layout view».
Hope this helps!
answered Aug 9, 2019 at 16:38
![]()
text boundaries are located here—> File>Options>Advanced..scroll down a bit to «Show document content» Simply check the «Show text boundaries» and enjoy the mess, they’re not the same as previous versions of Word 
answered Sep 6, 2018 at 21:25
![]()
1
 Please Note:
This article is written for users of the following Microsoft Word versions: 2007, 2010, 2013, 2016, 2019, and Word in Microsoft 365. If you are using an earlier version (Word 2003 or earlier), this tip may not work for you. For a version of this tip written specifically for earlier versions of Word, click here: Missing Top and Bottom Margins.
![]()
Written by Allen Wyatt (last updated December 5, 2020)
This tip applies to Word 2007, 2010, 2013, 2016, 2019, and Word in Microsoft 365
Rodney notes that when he opens a new document in Word the on-screen display of the pages shows the correct left and right margins, but not the correct top and bottom margins. The «pages» of paper shown on-screen in Print Layout view show no top and bottom margin at all. Rodney is wondering why this is happening.
What Rodney is seeing is actually a feature of Word that hides white space (including headers and footers) at the top and bottom of a page. This feature provides a way to display more real information on the screen and is particularly useful if you have a document that uses a lot of white space at the top and bottom of the page.
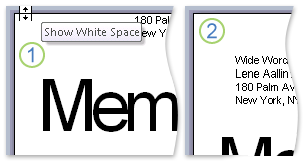
If you move the mouse pointer to the top or bottom border of the on-screen page representation, you’ll notice that it changes to a small icon that has two arrows facing each other vertically. If you double-click on the mouse when the pointer is in this condition, Word toggles the display of the top and bottom white space.
If you prefer, you can also change the settings by using Word’s dialog boxes:
- Display the Word Options dialog box. (In Word 2007 click the Office button and then click Word Options. In Word 2010 or later versions, display the File tab of the ribbon and then click Options.)
- At the left side of the dialog box, click Display. (See Figure 1.)
- Set or clear the Show White Space between Pages in Print Layout View checkbox, as desired.
- Click OK
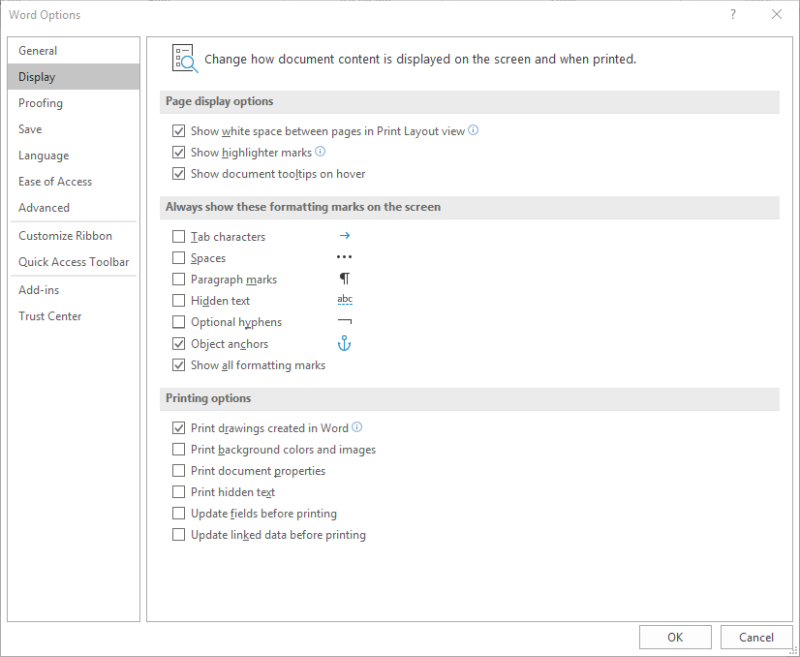
Figure 1. The Display options of the Word Options dialog box.
WordTips is your source for cost-effective Microsoft Word training.
(Microsoft Word is the most popular word processing software in the world.)
This tip (13149) applies to Microsoft Word 2007, 2010, 2013, 2016, 2019, and Word in Microsoft 365. You can find a version of this tip for the older menu interface of Word here: Missing Top and Bottom Margins.
Author Bio
With more than 50 non-fiction books and numerous magazine articles to his credit, Allen Wyatt is an internationally recognized author. He is president of Sharon Parq Associates, a computer and publishing services company. Learn more about Allen…
MORE FROM ALLEN
Turning Track Changes Off for Selected Areas
Track Changes is a great tool to use so that you can, well, «track» what changes are made during the development of a …
Discover More
Converting Tables to Text
Need to convert all the tables in your document into plain text? This tip provides a macro that can make quick work of a …
Discover More
Quickly Entering Dates and Times
Excel provides keyboard shortcuts for a variety of purposes. This tip examines two such shortcuts, designed to allow …
Discover More
More WordTips (ribbon)
Understanding Views
Want to see how your document will look before it’s printed? Or, do you want to see what things will look like if you put …
Discover More
Understanding the Normalize Text Command
Word includes tons of internal commands that you can access as you customize your system. One of these is the Normalize …
Discover More
Changing the Document Window Background Color
Word’s default black text and a white background may not appeal to everyone. There are a couple of ways to change the …
Discover More