Word for Microsoft 365 Word for the web Word 2021 Word 2019 Word 2016 Word 2013 More…Less
Moving or repositioning a picture on page in Word is as simple as dragging it with your mouse. But sometimes it doesn’t work. The key to getting the results you want is to select Layout Options.

-
Select a picture.
-
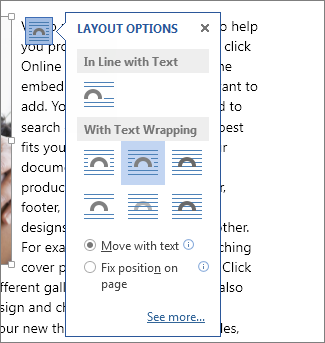
Select the Layout Options icon.
-
Choose the layout options you want:
-
To bring your picture in front of the text and set it so it stays at a certain spot on the page, select In Front of Text (under With Text Wrapping), and then select Fix position on page.
-
To wrap text around the picture but have the picture move up or down as text is added or deleted, select Square (under With Text Wrapping), and then select Move with text.
-
For or more information and examples of text wrapping, see Wrap text around pictures in Word
The picture is probably behind another object, like a block of text:

To select the picture, use the Selection pane:
-
Select Home > Select > Selection Pane.
-
In the Selection pane, select the picture.
To move a picture a tiny amount, select the picture, then hold down the Ctrl key and press an arrow key.
To move several objects at the same time, group them together:
-
Select the first object.
-
Hold down the Ctrl key and select the other objects.
-
Right-click one of the objects, point to Group, and then select Group.
Tip: If you are unable to group or multi-select pictures, it’s possible that the layout of your picture is inline with text. If so, please refer to Open Layout Options to change the picture layout to any option under With Text Wrapping.
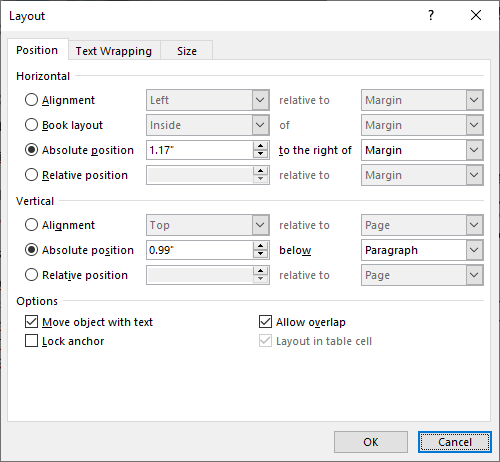
For absolute control over the alignment and positioning of a picture, use the Layout box to set alignment relative to margins or columns, absolute position in inches, or relative position by percentage. This comes in handy when you want to place a picture a certain distance from something else, like a page margin.
-
Select the picture.
-
Select the Layout Options icon.
-
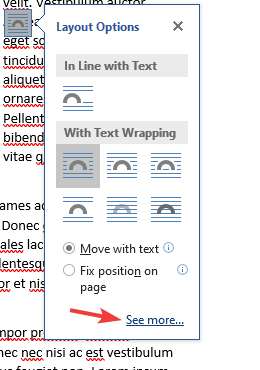
Select See more, and then make alignment and position adjustments on the Position tab.
If you can’t select any of the position options on the Position tab, select the Text Wrapping tab, and then select any option except the In line with text option.
If you have more than one picture that you want to overlap on a page, you can enable this in the Layout box.
-
Select a picture.
-
Select the Layout Options icon.
-
Select See more.
-
On the Position tab, in the Options group at the bottom, select the Allow overlap check box.
-
Repeat for each picture for which you want to enable overlapping.
In addition to aligning and positioning pictures on a page, you can also align pictures to each other, or to other objects on the page. Although picture-to-picture alignment is not available from the Layout Options icon or the Layout dialog box, it’s a common task that you might do while working with picture positioning and alignment.
-
Hold down the Ctrl key and select each object that you want to align.
-
Go to Picture Format or Picture Tools Format > Align, and then choose an option, such as Center, Top, or Bottom.
An object anchor 
All other wrapping options (Square, Tight, Through, Top and Bottom, Behind Text, In Front of Text) are anchored to a particular place in the document; the anchor indicates the paragraph with which the object is associated. Select a picture, and then select the Layout Options icon to find out how your picture is inserted.

Notes: If you select a picture and it’s not inline with text, but you don’t see an object anchor, you can ensure that anchors are shown in two ways:
-
Show formatting marks On the Home tab, in the Paragraph group, select Show/Hide ¶.
-
Always show anchors Select File > Options > Display, and then select Object anchors.
Because anchors are simply a visual indication of a picture’s relative position on a page, they cannot be removed. However, by trying different text wrapping options, you should find all the flexibility you need in positioning a picture, regardless of its anchor.
For or more information and examples of text wrapping, see Wrap text around pictures in Word.
If you want to ensure that an image stays put even if the text around it is deleted, you can lock its anchor:
-
Select the picture.
-
Select the Layout Options icon.
-
Select See more, and then select Lock anchor.
Note: Because anchors are not used for pictures placed In Line with Text, anchor locking and all other positioning options are unavailable for inline images.
See also
Wrap text around pictures in Word
Rotate a text box, shape, WordArt, or picture in Word
Group or ungroup shapes, pictures, or other objects
If you inserted a picture into your document while using Word for the web, you can cut and paste it to move it within a document, and you can apply paragraph formatting, like vertical spacing and centering, to it. However, you cannot move a picture that was inserted while using the desktop version of Word if the picture has text wrapping or a fixed position on the page.
If you find that you cannot make changes to a picture, and you have the desktop version of Word, select Open in Word to open your document in Word and make changes to its layout.
When you are done, press Ctrl+S to save your document to its original location. You can then open the document again in Word for the web, and continue editing. Word for the web will retain the layout settings that you applied in the desktop version of Word.
Need more help?
Want more options?
Explore subscription benefits, browse training courses, learn how to secure your device, and more.
Communities help you ask and answer questions, give feedback, and hear from experts with rich knowledge.
By default, you can’t freely move pictures (by drag-and-drop) to any position in a Microsoft Word document without also placing them somewhere in the text. But with a small change, you can drag images anywhere. Here’s how.
Make a Picture Freely Move in a Word Document
Using the method below, you can move a picture anywhere you want in your Word document—outside of the normal flow of text. You can even place the picture on top of an existing block of text if you want.
We’ll use a blank document to do this. Start by opening Microsoft Word on your Windows or Mac computer. On Word’s first screen, select “Blank Document” to create a new document.
In Word’s editing window that opens, click the “Insert” tab at the top.
In the “Insert” tab under the “Illustrations” section, click Pictures > This Device. This lets you add a picture from your computer.
Use the “File Explorer” window that opens to navigate to the folder containing your picture. Double-click the picture to add it to your Word document.
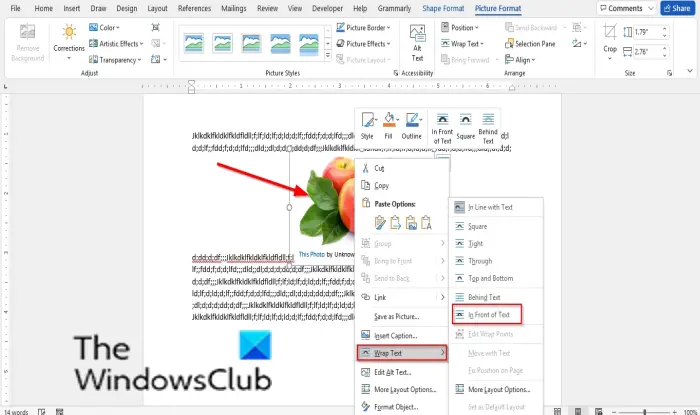
Back on Word’s editing screen, right-click the image that you just added and select Wrap Text > In Front of Text from the menu.
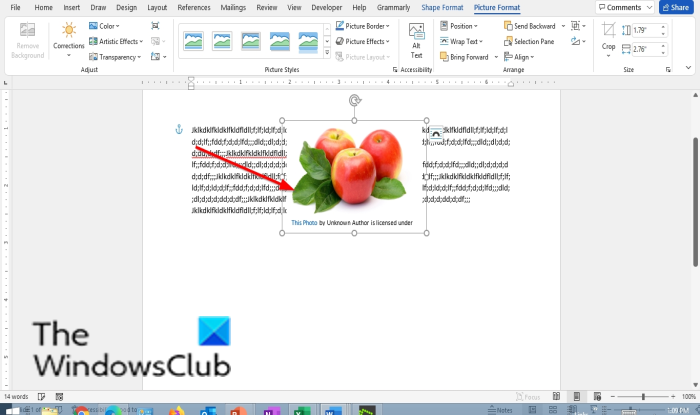
Your picture is now freely movable. Drag and drop it anywhere you want in your document.
Make All Future Pictures Freely Move in a Word Document
If you’d like to make all of your future pictures freely move in your Word documents, you can modify an option in Word’s settings menu. To do so, first, open Microsoft Word on your Windows or Mac computer.
On Word’s main screen in the lower-left corner, click “Options.”
Note: If you’re on Word’s document editing screen instead, click “File” at the top to see the “Options” option.
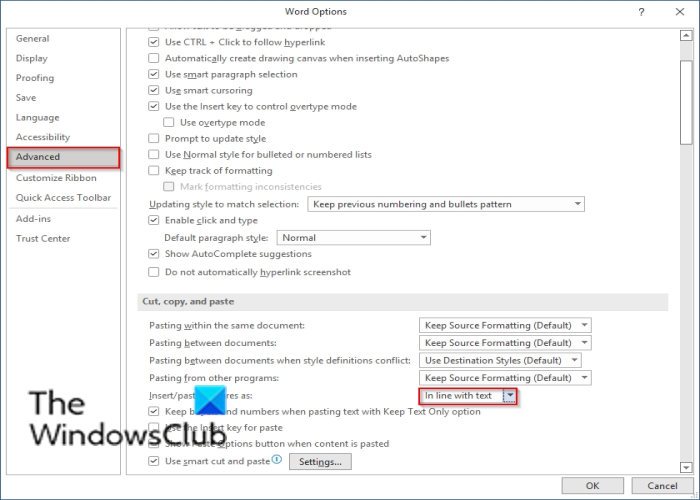
In the “Word Options” window, select “Advanced” in the sidebar on the left.
Scroll down the right pane to the “Cut, Copy, and Paste” section. In this section, find the “Insert/Paste Pictures As” option and click the drop-down menu next to it.
Select “In Front of Text” in the drop-down menu.
Click “OK” at the bottom of the “Word Options” window to close the window.
And that’s it. From now on, Word will allow you to freely move pictures on top of text in your documents.
If you ever need to remove many images from your Word document, it’s easy to remove all of them at once. This handy tip can save you a lot of time in the future. Good luck!
RELATED: How to Quickly Remove All Images from a Word Document
READ NEXT
- › How to Move Images in Google Docs
- › How to Prevent Accidentally Dragging and Dropping Text in Microsoft Word
- › How to Move a Table in Microsoft Word
- › How to Overlay Images in Microsoft Word
- › 8 Microsoft Word Tips for Professional Looking Documents
- › How to Perfectly Align Objects and Images in Microsoft Word
- › The New Winamp Is Here, but It’s Not What You’d Expect
- › Five Types of Phone Damage That Aren’t Covered by Your Free Warranty
How-To Geek is where you turn when you want experts to explain technology. Since we launched in 2006, our articles have been read billions of times. Want to know more?
Learn how to freely move your pictures without restrictions
by Milan Stanojevic
Milan has been enthusiastic about technology ever since his childhood days, and this led him to take interest in all PC-related technologies. He’s a PC enthusiast and he… read more
Updated on February 13, 2023
Reviewed by
Vlad Turiceanu
Passionate about technology, Windows, and everything that has a power button, he spent most of his time developing new skills and learning more about the tech world. Coming… read more
- Word is one of the most popular applications in the Microsoft Office suite.
- Word can do all sorts of things, and in this article, we’ll show you how to move an image in Word.
- We will also show you how to wrap text around a picture.
Microsoft Word is the most popular word processor in the world, and it is heavily used by both home and office users.
Word has a wide array of features, and in today’s article, we’re going to show you how to move a picture in Word and how to wrap text around it.
How can I move pictures in Word?
1. Wrap text around it
- Open Word, create a new document, and add a picture to it.
- Now select the picture that you added.
- Go to the Layout tab and choose Wrap Text.
- Select any option from the menu except In Line with Text.
- The text will now wrap around the image.
- To move the image, simply click the image and drag it to the desired position.
You can also experiment with different layout options in order to find suitable text wrapping for your needs.
2. Move an image to an exact position
- Go to Layout > Wrap Text > More Layout Options. Alternatively, you can select the image, and go to Layout Options > See more.
- Now you’ll be able to set the exact position relative to column, page, characters, and other elements.
For more precision, you can also use the advanced layout options. To do that, follow the steps above.
This option is useful if you’re planning to print a document, and you need to ensure that your images are positioned perfectly for printing.
- How to Make a Checklist in Microsoft Word
- Fix: Microsoft Office not opening [Word, Excel, PowerPoint]
- Word Autosave Location: Where Is It And How to Access It
3. Freely move a picture using arrow keys
1. Open Microsoft Word.
2. Upload the image you want to add to it, then select it.
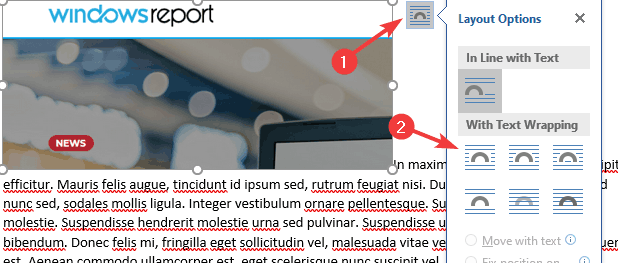
3. Go to Layout options.
4. Select any option from the With Text Wrapping section.
5. The text will now wrap around your image and you can move it freely.
An easy method to move a picture in Word is to change the Layout Option right from the image itself. You can also move your image pixel by pixel by using the arrow keys.
Wrapping text around an image in Word and moving the image is pretty simple, and you just need to use the Wrap Text feature in Word. Thus, you will be able to freely move a picture in Word.
After doing that, you should be able to move the image freely simply by dragging it to the desired position.
If you found this guide useful, let us know in the comments below.
Still having issues? Fix them with this tool:
SPONSORED
If the advices above haven’t solved your issue, your PC may experience deeper Windows problems. We recommend downloading this PC Repair tool (rated Great on TrustPilot.com) to easily address them. After installation, simply click the Start Scan button and then press on Repair All.
Newsletter
Download PC Repair Tool to quickly find & fix Windows errors automatically
Microsoft Word is a great Word processing software developed by Microsoft. You can create and edit documents in Microsoft Word. It has many options to create a document, like adding images, formatting the text, etc. Sometimes, we need to adjust the position of an inserted image in Microsoft Word by moving it. By default, Word does not let users move an image. In this article, we will see how to move a picture freely in Microsoft Word.
Which option is used to move a picture?
In Microsoft Word, you can move a picture by using the Wrap Text feature. Right-click on an image and select Wrap Text. After that, you will see a number of options. The In Line with Text option does not let you move an image. Therefore, you have to select other options in the Wrap Text to move an image.
What is the Wrap Text feature in MS Word?
The Wrap Text feature in Microsoft Word enables text to wrap around the image so that the image does not interfere with line spacing. The feature lets Microsoft Word users choose how to wrap the text wraps around the selected object.
Why can’t I move pictures in Word?
When inserting an image into a document with text, you cannot move it around the text easily due to it being in line with text by default. To freely move a picture in your Microsoft Word, you should use the Wrap Text feature.
Follow the methods below to move pictures freely in Microsoft Word:
Enable a picture to move freely in a Word document
Open a Word document file.
Insert a picture into it.
Right-click the picture, hover the cursor over Wrap Text and select In Front of Text.
Now, you can move your picture freely around the text in your document.
Enable all pictures to move freely overall in a Word document
You can allow your future images to move freely in your document by customizing the Word settings.
Click the File tab on the menu bar.
Click Options in the backstage view.
A Word Options dialog box will open.
Click Advanced on the left pane.
In the section Cut, copy and paste, click the list button for Insert/paste picture as.
Then select In front of text from the list box.
Click OK.
Try to insert a photo into the Word document and try to move the image freely around the text.
Read: How to add Templates and insert Videos in Microsoft Word.
We hope this tutorial helps you understand how to move a picture freely in Microsoft Word.
Shantel has studied Data Operations, Records Management, and Computer Information Systems. She is quite proficient in using Office software. Her goal is to become a Database Administrator or a System Administrator.
Back on Word’s editing screen, right-click the image that you just added and select Wrap Text > In Front of Text from the menu. Your picture is now freely movable. Drag and drop it anywhere you want in your document.
Contents
- 1 Why can’t I move images freely in Word?
- 2 How do you freely move in Word?
- 3 How do I drag an image in Word?
- 4 How do you move a picture in Word that is locked?
- 5 Why is it so hard to move pictures in Word?
- 6 How do you move a floating object in Word?
- 7 How do you move an object in Word?
- 8 How do you move objects in Word?
- 9 How do you move pictures on Microsoft Word 2007?
- 10 How do I change the anchored image in Word?
- 11 How do you lock an image in Word so it Cannot be deleted?
- 12 What is lock anchor in Word?
- 13 Why is Microsoft Word terrible?
- 14 How do I move a picture in Word 2013?
- 15 Where is layout options in Word?
- 16 How do you move floating pictures?
- 17 What is an anchored object in Word?
- 18 Can you float an image in Word?
- 19 How do you move a picture on word without snapping it?
- 20 How do you move a picture in WPS Office?
Why can’t I move images freely in Word?
Select the picture. Select the Layout Options icon. Select See more, and then make alignment and position adjustments on the Position tab. If you can’t select any of the position options on the Position tab, select the Text Wrapping tab, and then select any option except the In line with text option.
Move a picture, shape, text box, or WordArt
- Click the border of the WordArt, text box, or shape that you want to move. To move multiple text boxes or shapes, press and hold Ctrl while you click the borders.
- When the cursor changes to the four headed arrow, drag it to the new location.
How do I drag an image in Word?
Position the mouse over the image so that the cursor shape turns into a 4-way arrow, then click and drag the image. Be careful that you don’t drag the resize handles!
How do you move a picture in Word that is locked?
Click on the Picture Position tab. Under both the Horizontal and Vertical selections, select Absolute Position, and pick “Page” from the drop-down menu at the right. Also, click on the checkbox that says “Lock anchor.” Now, your pictures won’t move around the page.
Why is it so hard to move pictures in Word?
Make a Picture Freely Move in a Word Document
We’ll use a blank document to do this. Start by opening Microsoft Word on your Windows or Mac computer. On Word’s first screen, select “Blank Document” to create a new document. In Word’s editing window that opens, click the “Insert” tab at the top.
How do you move a floating object in Word?
Click on the object anchor icon and drag it either up (towards the beginning of the document) or down (towards the end of the document). Release the mouse button when the mouse pointer is next to the paragraph where you want the object anchored.
How do you move an object in Word?
Move a picture, shape, text box, or WordArt
- Drag it to the new location.
- Press and hold Ctrl while pressing an arrow key to move in small increments.
- Press and hold Shift while you drag it to move the object horizontally or vertically only.
How do you move objects in Word?
Click the frame border to display the pull handles. Click the handle and drag on the document to resize the object. Click in the object and drag to move the object around your Word document.
How do you move pictures on Microsoft Word 2007?
How to Move a Picture in Word 2007
- Launch Microsoft Word 2007 and open a document that contains a picture.
- Click the picture that you would like to move to select it.
- Hold down your left mouse button and drag the picture to a new location in the document.
How do I change the anchored image in Word?
Here are the steps to accomplish this.
- Step 1: Find and open the document that contains the image you will anchor.
- Step 2: Enable the Object Anchors option.
- Step 3: Change the layout of the selected image through text wrapping.
- Step 4: Position the selected image to your desired area on the page.
How do you lock an image in Word so it Cannot be deleted?
You just have to click on the Protect button under the Review tab and select Restrict Editing. It will launch a menu on the side of the screen. From there, just click on Stop Protection and then enter the password you used to enforce protection to the document.
What is lock anchor in Word?
When you turn on “Lock Anchor,” you can then move your image to any position on the same page as the anchor paragraph, and the object will stay in that position. However, if you move the anchor paragraph to another page, the object will also move to that page, but stay in the same relative position on the page.
Why is Microsoft Word terrible?
And Microsoft Word is an atrocious tool for Web writing. Its document-formatting mission means that every piece of text it creates is thickly wrapped in metadata, layer on layer of invisible, unnecessary instructions about how the words should look on paper.
How do I move a picture in Word 2013?
In your Word 2013 document, select the picture you would like to move. Choose Picture Tools Format→Position button to open a menu of positions. Choose the position that shows the picture in the upper-right corner of the document. Drag the picture downward so that its top aligns with the top of the first body paragraph.
Where is layout options in Word?
The layout options and compatibility options in Word 2007 and later versions are found near the bottom of the Word Options dialog box > Advanced category. This illustration shows the options found in Word 2013, 2016, 2019, 2021, and Word for Microsoft 365.
How do you move floating pictures?
Firstly, right click on the picture and move cursor over “Wrap Text” option on the contextual menu. Next choose any style other than “In line with text”. Then you will be able to drag the picture to wherever you like.
What is an anchored object in Word?
Inline objects are those that reside on the same layer as your text and are positioned within the stream of text that surrounds the object.The thing that indicates essentially where a floating object is located in relation to the text in your document is referred to as an object anchor.
Can you float an image in Word?
The key point is that Word has two ways to position an image: an image can float (which is cool, because you can drag it around the page) or. an image can be in line (which is cool, because you can’t drag it around the page).
How do you move a picture on word without snapping it?
Turn off the snap-to options
- Click a chart, picture, or object in the document.
- On the right end of the ribbon, select Format > Align > Grid Settings.
- To turn off the Snap objects to grid when the gridlines are not displayed or Snap objects to other objects settings, clear the respective box.
How do you move a picture in WPS Office?
Click the picture, and choose Picture Tools → Wrapping Style → Square. Then we can move the picture around. Perfect your work with WPS Writer like Microsoft word.

