
Select index entries in Word 2016
- Select the text you want to reference.
- On the References tab in the Index group, click the Mark Entry button.
- If the entry needs a subentry, type that text in the Mark Index Entry dialog box.
- Click one of the buttons, either Mark or Mark All.
Contents
- 1 How do I mark all occurrences in Word?
- 2 How do you highlight repeated words in Word?
- 3 How do I autofill in Word 2016?
- 4 How do you do index entries in Word?
- 5 How do you select all of one character in Word?
- 6 How do I enter data in one place in a document and have it automatically repeated in other places?
- 7 How do I update all fields in Word?
- 8 How do I change my autofill settings?
- 9 What are index entries?
- 10 How do you create an index score?
- 11 How do you write an index?
- 12 Is Index same as indices?
- 13 How do you cross index?
- 14 How do I change the markup view in Word?
- 15 How do I select all text without clicking and dragging?
- 16 What are the 4 alignment options?
- 17 How do I stop Word from selecting everything?
- 18 How do I paste repeatedly in Word?
- 19 How do you repeat a page in Word?
- 20 How do I change the toggle field code in Word?
Click Mark to mark the index entry. To mark this text everywhere it shows up in the document, click Mark All. To mark additional index entries, select the text, click in the Mark Index Entry dialog box, and then repeat steps 3 and 4.
How do you highlight repeated words in Word?
Click the “Reading Highlight” button and then “Highlight All” to find all duplicate words and highlight them.
How do I autofill in Word 2016?
- Type the text you want AutoComplete to insert.
- Highlight the text.
- Click “Insert” in the Word menu bar.
- Click “OK” to add the text.
- Check the box labeled “Show AutoComplete Suggestions.” Click “OK.”
- Type “Iron” anywhere in your document.
- Press “Enter” to insert “Ironfoundersson Inc.” into your Word document.
How do you do index entries in Word?
Insert an Index Entry
- Select the text you want to include in the index.
- Click the References tab.
- Click the Mark Entry in the Index group.
- Adjust the index entry’s settings and choose an index entry option:
- Click the Mark or Mark All button.
- Repeat the process for your other index entries.
- Click Close when you’re done.
How do you select all of one character in Word?
Press Ctrl+A on your keyboard to select all text in the document.
How do I enter data in one place in a document and have it automatically repeated in other places?
Authors simply double-click the text field to open the Text Form Field Options dialog, enter the text they want to repeat in the “Default text” box, and click OK. After they save and reopen the document, that text will appear in the text box as well as all bookmarked locations in the document.
How do I update all fields in Word?
Update all fields in a document
- Press Ctrl + A.
- Press F9.
- If your document has tables with fields or formulas, you might need to select each table separately and press F9.
How do I change my autofill settings?
Chrome (Android)
- Open up the Chrome app on your Android device.
- At the top right, tap the More button (three dots), select Settings.
- Tap Autofill and Payments.
- Tap either Address and more or Payment Methods.
- Edit both Address and more or Payment Methods to reflect your new name and information.
What are index entries?
An index entry is a technique which helps us in defining some areas in a document which we might need to be used as the headings in a table of contents. This simply means that using index entries, we can define some particular areas in a document to make them a heading in our table of contents.
How do you create an index score?
There are four steps for constructing an index: 1) selecting the possible items that represent the variable of interest, 2) examining the empirical relationship between the selected items, 3) providing scores to individual items that are then combined to represent the index, and 4) validating the index.
How do you write an index?
A good index will:
- be arranged in alphabetical order.
- include accurate page references that lead to useful information on a topic.
- avoid listing every use of a word or phrase.
- be consistent across similar topics.
- use sub-categories to break up long blocks of page numbers.
- use italics for publications and Acts.
Is Index same as indices?
Index is one of those rare words that have two different plurals in English. “Indices” is originally a Latin plural, while “Indexes” has taken the English way of making plurals, using –s or –es. Though both are still widely used, they take on different usage in their senses.
How do you cross index?
To insert a cross-reference in an index entry, follow these steps:
- Select the text you wish to appear as the main index entry.
- Press Alt+Shift+X.
- Select the Cross-reference radio button.
- In the text box to the right of the Cross-reference radio button, enter the cross reference, as you want it to appear.
- Click on Mark.
How do I change the markup view in Word?
Turn on Track Changes
- Open Microsoft Word.
- Choose the Review tab at the top of the document.
- Either click the Track Changes button (PC) or toggle the Track Changes switch (Mac).
- Make sure that you change ‘Simple Markup’ to ‘All Markup’ from the drop down bar next to Track Changes.
How do I select all text without clicking and dragging?
Click the “Select” drop-down menu in the Editing group on the ribbon and choose “Select All.” All of the body text on the pages will be highlighted. You can now format it, cut, copy, align the text and more. The keyboard shortcut “Ctrl-A” will accomplish the same result.
What are the 4 alignment options?
There are four main alignments: left, right, center, and justified. Left-aligned text is text that is aligned with a left edge. Right-aligned text is text that is aligned with a right edge.
How do I stop Word from selecting everything?
Go to File, Options, then Advanced. Look for the option When selecting, automatically select entire word (it is enabled by default). You can disable the ‘feature’ by deselecting it (checkbox).
How do I paste repeatedly in Word?
Press Ctrl+C to copy the control to the Clipboard. Position the cursor where you want to repeat the control’s selected value. Don’t press Ctrl+V as you normally would to paste something. Instead, choose Paste Special from the Paste dropdown in the Clipboard group on the Home tab (Figure D).
How do you repeat a page in Word?
Right-click the thumbnail of the page you want to duplicate and select Copy. Scroll to the section of the document where you want to insert the duplicated page. Right-click the page where you’d like to insert the page after, and select Paste. This will insert the duplicated page at that point in the document.
How do I change the toggle field code in Word?
- Right-click the field, and then click Edit Field.
- Do one of the following: If Field properties and Field options are displayed, select the formatting options that you want. If only the field code is displayed, click Options, and then select the formatting options that you want.

Добавление текста
Чтобы добавить на слайд текст, щелкните заполнитель и начните вводить слова.
-
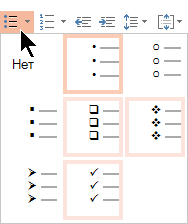
Чтобы добавить текстовые маркеры, поместите курсор в строку текста и на вкладке Главная выберите стиль маркеров.

-
Нажмите клавишу ВВОД, чтобы перейти к следующему маркеру.
Добавление вложенного маркера
-
Поместите курсор в строку текста, к которому вы хотите добавить отступ.
-
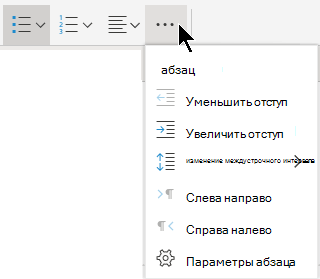
На вкладке Главная нажмите кнопку с многоточием (...) рядом с кнопками списка (как показано ниже), а затем выберите пункт изменить уровень списка.
Сочетание клавиш для улучшения списка на уровне: Tab.
Сочетание клавиш для уменьшения уровня списка: Shift + Tab.
Чтобы сочетание клавиш вступило в силу, курсор должен находиться в начале абзаца.
Выделение текста
Чтобы выделить слово: наведите указатель мыши на слово и дважды щелкните мышью.
Чтобы выделить абзац, наведите указатель мыши на слово в абзаце и трижды щелкните его.
Чтобы добавить рисунки, смотрите раздел Вставка рисунка.
Нужна дополнительная помощь?
In this tutorial, we look at how to mark index entries in MS Word. In other words, how to identify and add text to the index at the end of your document.
To create an index, you need to:
- Mark the entries,
- Select a design, then
- Build the index
Step 1: Mark index entries
To mark index entries, do one of the following:
- Mark words or phrases
- Mark entries for text that spans a range of pages
Mark words or phrases
- To use existing text as an indexentry, select the text.
- To enter your own text as an indexentry, click where you want to insert the index entry.
- On the References tab, in the Index group, click Mark Entry.

- To create the Main indexentry that uses your own text, type or edit the text in the Main entry box.

- If you want, you can customize the entry by creating a third-level entry or a cross-reference to another entry:
- To create a Subentry, type the text in the Subentry
- To include a third-level entry, type the Subentry text followed by a colon (:), and then type the text of the third-level entry.
- To create a cross-reference to another entry, click Cross-reference under Options, and then type the text for the other entry in the box.
- To format the page numbers that will appear in the index, select Bold or Italic below Page number format.

To format the text for the index, select the text in the Main entry or Subentry box, right-click, and then click Font. Select the formatting options that you want to use.
- To mark the indexentry, click Mark. To mark all occurrences of this text in the document, click Mark All.
- To mark additional indexentries, select the text, click in the Mark Index Entry dialog box, and then repeat step 3 through step 6.
Mark words or phrases for text that spans a range of pages
- Select the range of text that you want the indexentry to refer to.
- On the Insert tab, in the Links group, click Bookmark.
- In the Bookmark name box, type a name, and then click Add.
In the document, click at the end of the text that you marked with a bookmark.
- On the References tab, in the Index group, click Mark Entry.
- In the Main entry box, type the indexentry for the marked text.
- To format the page numbers, select Bold or Italic below Page number format.
To format the text for the index, select the text in the Main entry or Subentry box, right-click, click Font, and then format the text.
- Under Options, click Page
- In the Bookmark box, type or select the bookmark name that you typed in step 3, and then click Mark.
Step 2: Create the index
After you mark the entries, you are ready to select an index design and insert the index into your document.
- Click where you want to add the index.
- On the References tab, in the Index group, click Insert Index.
- Do one of the following:
- Click a design in the Formats box to use one of the available index
- Design a custom indexlayout:
- In the Formats box, click From template, and then click Modify.
- In the Style dialog box, click the indexstyle that you want to change, and then click Modify.
- Under Formatting, select the options that you want.
- To add the style changes to your template, click All documents based on the template.
- Click OK
- Select any other index options that you want.
Note: To update the index, click the index, and then press F9. Or click Update Index in the Index group on the References tab.
If you find an error in the index, locate the index entry that you want to change, make the change, and then update the index.
If you create an index in a master document, expand the subdocuments before you insert or update the index.
Edit or format an index entry and update the index
- If you don’t see the XE fields, click Show/Hide in the Paragraph group on the Home It looks like a backwards P.
- Find the XE field for the entry that you want to change, for example, { XE “Poodle” t “See Dogs” }.

- To edit or format an indexentry, change the text inside the quotation marks.
- To update the index, click the index, and then press F9. Or click Update Index in the Index group on the References tab.

To find the next XE field, press CTRL+F, click Special, and then click Field. If you don’t see the Special button, click More.
Delete an index entry and update the index
- Select the index entry field, including the braces ({}), and press DELETE.
If you don’t see the XE fields, click Show/Hide in the Paragraph group on the Home tab.
- To update the index, click the index, and then press F9. Or click Update Index in the Index group on the References tab.
-
1
Open the Word document. You can double-click the document’s name to open it in Word. Alternatively, open Word (it’s in the Windows menu on a PC and the Applications folder on a Mac), click File, click Open, then select the document.
-
2
Click the Review tab. It’s at the top of the screen.
Advertisement
-
3
Click Track Changes. It’s also at the top of the screen. Look for the sheet of paper icon with a yellow pencil. Now all future changes to the document will appear as colored markup.
- For example, if you delete something you’ve typed, it won’t actually disappear. Instead, it’ll will appear crossed-out. Newly typed text will be underlined.[1]
- Click Track Changes again to turn off further markups.
- For example, if you delete something you’ve typed, it won’t actually disappear. Instead, it’ll will appear crossed-out. Newly typed text will be underlined.[1]


Advertisement
Ask a Question
200 characters left
Include your email address to get a message when this question is answered.
Submit
Advertisement
Thanks for submitting a tip for review!
About This Article
Article SummaryX
1. Open the document.
2. Click Review.
3. Click Track Changes.
Did this summary help you?
Thanks to all authors for creating a page that has been read 66,523 times.
Is this article up to date?
Как использовать маркеры в ворде?
Когда при работе с текстовым редактором Microsoft Wordнам нужно выделить какие – либо отдельные кусочки текста, например когда мы пишем о видах чего – либо, перечисляем что — либо или просто выделяем определенный абзац и по каким – либо причинам не хотим использовать циферную нумерацию можно использовать маркеры в ворде.
Что такое маркеры? Это в принципе то же самое, что циферная нумерация, только в место цифр, здесь используются разнообразные миниатюрные графические иконки. Маркеры как и циферная нумерация ставится сразу около нового абзаца и могут ставится до бесконечности, то есть у вас, если это нужно, может быть хоть весь документ в маркерах.
Как вставить маркеры в ворде?
Это делается очень просто и быстро. Вам нужно открыть документ, в котором нужны маркеры, набрать в этом документе абзацы для маркировки, выделить этот текст и перейти в верхнее меню программы (см. скриншот) и выбрать нужный вам маркер (я открыл меню маркеров, чтобы вы могли увидеть их все), как только вы нажмете на маркер, текст будет промаркирован.

Как сделать свой маркер в word?
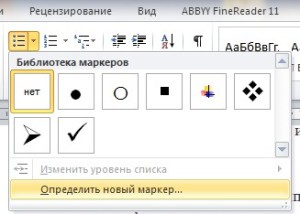
Как вы видите, маркеров доступно слишком ограниченное количество. То есть каких – то особых символов в списке нет, но они там и не нужны. Каждый пользователь может сам определить себе символ, который будет служить маркером. (Также вы этом меню вы можете определить, где будет находится ваш маркер, слева как обычно, по центру или даже справа). Для этого вы опять открываете меню маркеров и находите там пункт, который называется «определить новый маркер».
 Перед вами появится окошечко настройки нового маркера. Здесь вы можете определить новый символ в библиотеке символов ворда для маркера или выбрать новый рисунок опять – же из библиотеки рисунков ворда.

Если нужного вам графического изображения не нашлось, вы можете загрузить изображение маркера с вашего компьютера в этом же меню. (Это находится в «Рисованный маркер»-«Импорт»).
Старайтесь использовать маркеры в тексте там, где это возможно и уместно, так вы сделаете свой текст намного более читаемым и понятным.
Посмотрите также

Как удалить пустую страницу в ворде?
Сегодня многие пользуются ПК. Однако далеко не все знают как правильно им пользоваться. Эта умная …