
Word can generate a list of all the tables in a document. Like a Table of Contents, this list of tables or Table of tables can include page references or links to each table.
A Table of tables can be useful for creating a proper appendix or reference within more formal documentation. It can be handy to have a list of all the tables used in a document either for publication or just for ‘in-house’ reference use during writing.
Before you can add a Table of tables to your document, you must add captions to all the tables in your document, as described in Adding Captions in Word. Yes, there is an alternative way making the list from styles but captions works better because each table gets a individual label.
Two Tables in Word
Before we begin, lets try to sort out a linguistic mess. Word has two features both called ‘tables’.
Table – a list of captions etc within a document e.g. Table of Contents, Table of Figures etc.
table – a grid of boxes or cells placed in a Word document from Insert | Table.
Normally the two are separate and it’s clear from the context which one we’re talking about.
For this article we’ll try to make it clear which ‘table’ we’re talking about by using the term ‘list’ but mostly with a capital letter ‘Table’ for the list and lower case ‘table’ for the grid. E.g. a Table of tables.
Slightly less confused? Good, let’s get on with it.
Making a simple Table of tables
Once you have some tables captioned in the document you can make a reference Table of them.
Click where you want the Table to appear (most likely as an appendix or close to your Table of Contents).
Go to References | Captions | Insert Table of Figures (yes, ‘Figures’) to bring up the “Table of Figures” dialog.
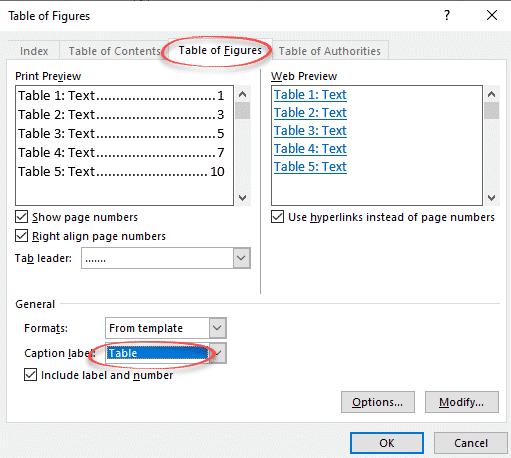
First thing to do is change the Caption Label from Figures to table. And lo! you have a Table of tables!
The “Print Preview” and “Web Preview” panes show how the Table will appear. By default, page numbers are displayed and aligned to the right, although you can change this by deselecting the appropriate checkboxes.
The “Tab leader” dropdown changes what appears between the text and the right-aligned page numbers.
“Use hyperlinks instead of page numbers” for the web preview gives you a clickable table with links to each table in the Word document.
Table Formats
The “Formats” drop-down list directly affects the appearance of the Table of tables. The available options are:
- From template
- Classic
- Distinctive
- Centered
- Formal
- Simple
Select a format to see how it will look in the preview panes. Most people use ‘From template’ because that will match the font etc in the current document or template.
To design a custom Table of tables layout, select “From template” and click the “Modify” button to create your own style.
When you are happy with the layout, click “OK” to build your Table of tables. Word will search for the captions, sort them by number, and display the Table of tables in the document.
Word déjà vu
If all this seems familiar, that’s because it’s almost exactly the same as the ‘Table of Contents’ and Table of Figure options. In fact, a Table of tables uses the same underlying Word technology as Table of Contents (the {TOC } field).
All Word’s Table of Contents options
Four Word tricks to shrink a Table of Contents
Table of Contents basics in Word
In this post, we will look at 2 useful ways to apply the same style to all tables in your Word document.
Every so often, we need to create tables in our Word document to place and arrange various data. And if there are a number of tables, it would be better to apply the same style to them so as to make the file appear more professional. For this reason, we’d like to exhibit you 2 methods in the coming texts.
Method 1: Apply the Same Style to a Table Individually
Once you insert a table in document, put cursor inside the table to trigger the “Table Tools” tab. Then click “Design” and choose a table style in the “Table Styles” library.
However, in case you may want a novel style for your tables, you are fine to customize a new one by following the succeeding steps.
- Firstly, click the “More” button in “Table Styles” group.
- Then choose “New Table Style”.

- Now in the “Create New Style from Formatting” dialog box, name the new style first.
- Next set such formatting as font, font size, borders, Fill Color, etc.
- And select the “New documents based on this template” option.
- Lastly, click “OK”.


If you want to format the table template in a more unique way, take a glance at this article: 2 Methods to Alternate Row or Column Colors in Your Word Table
Method 2: Manipulate Tables in Batches
In method 2, we have a macro for you to select all existing tables in an active document. Once tables are selected, you can apply whatever style for them in batches.
- First off, click “Developer” tab in the Ribbon.
- Then click “Visual Basic” to trigger the VBA editor.

- Next insert a new module by click “Normal” and then “Insert”.
- On the drop-down menu, choose “Module”.

- Double click new module to open coding area and paste the codes:


'Select all tables in a Word document.
Sub SelectAllTables()
  Dim objDoc As Document
  Dim objTable As Table

  Application.ScreenUpdating = False

  'Initialization
  Set objDoc = ActiveDocument

  'Set each table in document as a range editable to everyone.
  With objDoc
  For Each objTable In .Tables
    objTable.Range.Editors.Add wdEditorEveryone
  Next
  objDoc.SelectAllEditableRanges wdEditorEveryone
  objDoc.DeleteAllEditableRanges wdEditorEveryone
  Application.ScreenUpdating = True
  End With
End Sub
- Finally, hit “Run” button.


Now all tables shall be selected already. You can apply a built-in or newly created style to all tables in the current document.
Cope with Word Data Loss
Loss of critical data can be a bane of people’s digital life. What’s sarcastic is we feel regret only after what’s done has been done. Since there is no use of mourning for the loss, we suggest you to get a tool to recover Word docx document error as soon as possible.
Author Introduction:
Vera Chen is a data recovery expert in DataNumen, Inc., which is the world leader in data recovery technologies, including Excel xls recovery product and pdf repair software products. For more information visit www.datanumen.com
 As shown in this tutorial, you can quickly create a list of tables or figures in Microsoft Word if you used Word’s caption tool to number your tables and figures. (See “How to Insert Figure Captions in Microsoft Word” for step-by-step instructions on using the caption tool.)
We will also look at how to update the list as you add, move, or delete tables or figures.
Terminology Note: This tutorial uses the terms list of tables and list of figures, which are common terms in the publishing industry. However, Word refers to a list of tables or figures as a table of figures.
This tutorial is also available as a YouTube video showing all the steps in real time.
Watch more than 200 other writing-related software tutorials on my YouTube channel.
The images below are from Word in Microsoft 365 (formerly Office 365). The steps are the same in Word 2021, Word 2019, Word 2016, and Word 2013. However, your interface may look different in those older versions of the software.
Remember that these steps will only work if you used Word’s caption tool to number your tables or figures before creating the list.
- Insert your cursor where you want to place your list.
- Select the References tab in the ribbon.

- Select Insert Table of Figures from the Captions group.

- Select a visual style from the Formats menu in the Table of Figures dialog box. (The From Template option is based on the styles established in your current template.)

- Select Figure or Table from the Caption label menu. (There is no option for listing figures and tables together.)

- Ensure that Include label and number is checked if you want the label (i.e., Figure or Table) and the number to be included in the list. (Recommended)

- (Optional Step) Select additional options concerning page numbers and the tab leaders, which are the dots, dashes, or lines that appear before the page numbers.

Pro Tip: The Web Preview section shows how your list will look if you convert your Word file to a web page.
- Select the OK button.

- Manually type a title above your list.

- Save your file to save your changes.
The next section shows how to update a list of tables or figures.
How to Update a List of Tables or Figures
Word will not automatically update your list as you add or delete tables or figures. Instead, you can manually trigger updates, as necessary.
- Right-click the list and select Update Field from the shortcut menu.

- Select Update entire table from the Update Table of Figures dialog box.

- Select the OK button.

Your updates should appear immediately.
- Save your file to save your changes.
Important Note: Word’s caption tool, which inserts table titles and figure captions, will automatically number new tables and figures as you add titles and captions (e.g., Table 1, Table 2, Table 3). However, Word will not automatically update the numbering if you move or delete tables or figures.
See “How to Update Table and Figure Numbers in Microsoft Word” to learn how to force an update after moving or deleting a table or figure.
Related Resources
How to Create and Customize Charts in Microsoft Word
How to Insert and Modify Images in Microsoft Word
Three Ways to Insert Tables in Microsoft Word
How to Change the Style of Table Titles and Figure Captions in Microsoft Word
How to Cross-Reference Tables and Figures in Microsoft Word
How to Reference Tables and Figures in Text
Updated December 14, 2022
|
09-10-2012, 11:32 AM |
|||
|
|||
|
Formatting all tables Hello,
I have about 60 tables in a document I’m working on, I need to apply AutoFit to all of them but I’m having several difficulties. The first problem I found was that I didn’t know how to select all the tables at once, I managed to do that using the Visual Basic method and a second possibility is to download KuTools which lets you select the tables by just clicking one button, the results are pretty much the same. Now the problem is that AutoFit is disabled when all the tables are selected, it normally works for one but not for multiple tables. Does anybody have any workaround solution? thanks.
|


|
09-10-2012, 02:53 PM |
|||
|
|||
|
Well, I’m replying to myself, just for people having the same problem in the future Code: Sub Macro1() ' Dim pT As Word.Table For Each pT In ActiveDocument.Tables pT.PreferredWidth = MillimetersToPoints(170) Next MsgBox "done" End Sub 170 is the width of the tables given in mm.
Last edited by macropod; 09-10-2012 at 10:42 PM. Reason: Added code tags & formatting
|
|
09-10-2012, 10:53 PM |
|
Hi knightmetal, Your macro doesn’t actually apply the autofit attrinbute. Rather, it sets a preferred width which will remain fixed regardless of changes to margins etc. A true autofit macro is more like: Code: Sub Autofit() Application.ScreenUpdating = False Dim Tbl As Table For Each Tbl In ActiveDocument.Tables Tbl.AutoFitBehavior (wdAutoFitWindow) Tbl.AllowAutoFit = True Next Application.ScreenUpdating = True Application.ScreenRefresh MsgBox "Done", vbOKOnly End Sub
__________________
|
Create, Modify and Apply Table Styles in Word Documents
by Avantix Learning Team | Updated August 21, 2022
Applies to: Microsoft® Word® 2013, 2016, 2019, 2021 or 365 (Windows)
You can apply table styles to your Word tables to format them quickly and consistently. Word is shipped with several built-in table styles or you can create your own. You can edit table styles by modifying borders, shading, character formatting, paragraph formatting and table properties. If your document includes multiple tables, table styles can save a lot of time.
Note: Buttons and Ribbon tabs may display in a different way (with or without text) depending on your version of Word, the size of your screen and your Control Panel settings. For newer versionns of Word, Ribbon tabs may appear with different names. For example, the Table Tools Design tab may appear as Table Design.
Recommended article: How to Keep a Microsoft Word Table Together on One Page
Do you want to learn more about Microsoft Word? Check out our virtual classroom or live classroom Word courses >
Table styles and themes
Every Word document uses a document theme which includes a font theme and color theme. The colors used in table styles are based on the color theme.
You can select document themes, color themes and font themes using the Themes, Colors or Fonts drop-down menus on the Design tab in the Ribbon:

You can also create your own custom color themes so your tables can be formatted using your organization’s colors.
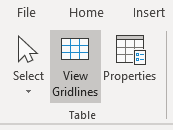
Display gridlines
When you are working with tables, it’s a good idea to turn gridlines on. Borders, which are a format, will print. Gridlines do not print.
To display gridlines:
- Click in a table.
- Click the Table Tools Layout or Table Layout tab.
- Click View Gridlines. Gridlines will stay on for all Word documents.
View Gridlines appears on the Table Tools Layout or Table Layout tab when you click in a table:
Apply a table style
If your Word document contains multiple tables that you want to format in a consistent way, it’s best to use table styles rather than applying manual or direct formatting to each table.
To apply a table style to a table:
- Click in the table.
- Click the Table Tools Design or Table Design tab in the Ribbon.
- Click the More down arrow on the bottom right in the Table Styles gallery. A drop-down menu appears.
- Hover over the various table styles. The table formatting will change as you move over different table styles in the gallery.
- Click the table style you want to apply.
Below is the Table Styles gallery (the current theme is the Office theme):
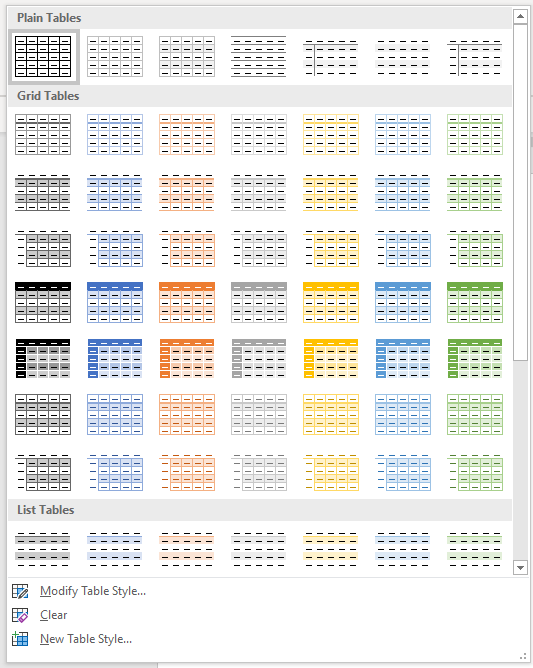
Note: Table styles do not include row height, column width or custom cell formatting for individual cells. If a user applies manual or direct formatting to a table (such as fills and borders) on the Table Tools Design or Table Design tab, this formatting will override the table style.
Apply Table Style Options
Once you have selected a table style, you can select or check different Table Style Options (which are affected by the formats in the selected table style).
The six Table Style Options that you can apply are: Header Row, Total Row, Banded Rows, First Column, Last Column and Banded Columns. If you have selected a plain table style, you may not notice any changes in the table formatting if you select different Table Style Options.
Table Style Options appear on the Table Tools Design or Table Design tab as follows when you click in a table:
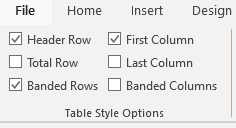
To select Table Style Options:
- Click in the table.
- Click the Table Tools Design or Table Design tab in the Ribbon.
- In Table Style Options, check or uncheck Header Row. If this option is checked, the header row will be formatted differently from the body rows.
- In Table Style Options, check or uncheck Total Row. If this option is checked, the last row will be formatted differently from the body rows.
- In Table Style Options, check or uncheck Banded Rows or Banded Columns for alternate row or column shading.
- In Table Style Options, check First Column or Last Column if you want the first or last column formatted differently from the other columns.
In the following table, Header Row and Banded Rows are checked in Table Style Options:

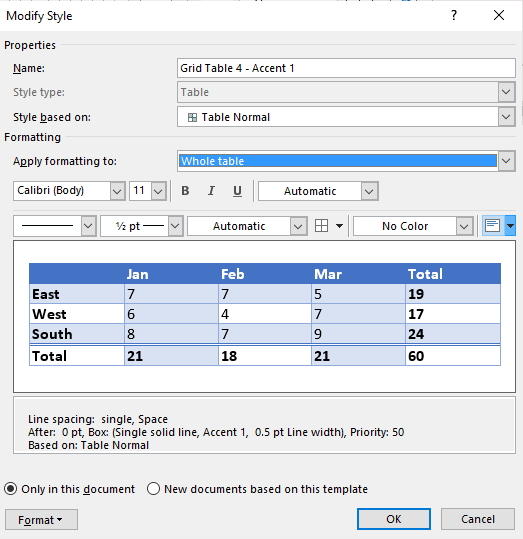
Modify a table style
You can modify a table style in a Word document and all tables using that table style will change.
To modify a table style:
- Click in the table.
- Click the Table Tools Design or Table Design tab in the Ribbon.
- Click the More down arrow on the bottom right in the Table Styles gallery. A drop-down menu appears.
- Click Modify Table Style. A dialog box appears. You can also right-click a table style and select Modify.
- From the Apply Formatting to drop-down menu, select the element that you want to modify (such as Header row).
- Select the desired formatting such as font, font size, font color, fill and border.
- From the Apply Formatting to drop-down menu, select the next element that you want to modify.
- Select the desired formatting such as font, font size, font color, fill and border.
- Repeat for other elements.
- Select Only in this document or New documents based on this template. If you select Only in this document, the modified style will only be available for the current document. If you select New documents based on this template, then the table style will be modified for future documents based on the current template (usually the Normal template).
- Click OK.
Below is the Modify Style dialog box:
You can also click Format at the bottom of the dialog box and choose other options such as Font or Paragraph.
If you modify a table style and the tables using that style do not change, it’s likely that direct or manual formatting has been applied to the table which then overrides the table style. You may need to clear formatting in the table by selecting the table and clicking Clear Formatting on the Home tab in the Font group.
You can also modify Table Properties in a table style. Table properties include table alignment, row settings and cell margins.
To modify Table Properties in a table style:
- Click in the table.
- Click the Table Tools Design or Table Design tab in the Ribbon.
- Click the More down arrow on the bottom right in the Table Styles gallery. A drop-down menu appears.
- Click Modify Table Style. A dialog box appears. You can also right-click a table style and select Modify.
- Click Format on the bottom left of the dialog box. A drop-down menu appears.
- Click Table Properties. A dialog box appears.
- Click the Table tab and select an Alignment.
- Click the Row tab and select the desired options. For example, turn off Allow row to break across pages.
- Select any other formatting options you want to apply to the entire table.
- Click OK.
- Select Only in this document or New documents based on this template.
- Click OK.
Below is the Table Properties dialog box with the Table tab selected:

Create a new table style
You can also create a new or custom table style.
To create a custom table style:
- Click in the table.
- Click the Table Tools Design or Table Design tab in the Ribbon.
- Click the More down arrow on the bottom right in the Table Styles gallery. A drop-down menu appears.
- Click a table style to apply it as a base style.
- Click the More down arrow on the bottom right in the Table Styles gallery. A drop-down menu appears.
- Click New Table Style. A dialog box appears.
- Enter a name for the new table style in the Name box.
- Select the desired formatting.
- Select Only in this document or New documents based on this template.
- Click OK.
New Table Style appears at the bottom of the Table Styles gallery:
The new table style will appear in the Table Styles gallery under Custom (at the top of the gallery). If you want to delete it, right-click it in the gallery and select Delete Table Style.
Clear a table style
To clear a table style and remove formatting:
- Click in the table.
- Click the Table Tools Design or Table Design tab in the Ribbon.
- Click the More down arrow on the bottom right in the Table Styles gallery. A drop-down menu appears.
- Click Clear.
Clear appears at the bottom of the Table Styles gallery:
Set a default table style
You can also set a default table style for new tables in the current document or all new documents.
To set a default table style:
- Click in the table.
- Click the Table Tools Design or Table Design tab in the Ribbon.
- Click the More down arrow on the bottom right in the Table Styles gallery. A drop-down menu appears.
- Right-click the table style you want to use as the default style and select Set as Default from the drop-down menu. A dialog box appears.
- Select This document only or All documents based on the Normal.dotm template (the default template in Word is the Normal template).
- Click OK.
If you are working with documents with multiple tables, formatting with table styles can ensure that your tables are formatted consistently and save a lot of time.
Subscribe to get more articles like this one
Did you find this article helpful? If you would like to receive new articles, JOIN our email list.
More resources
4 Ways to Create a Table in Word
14 Shortcuts to Quickly Select Text in Microsoft Word
How to Create Headings in Word (Using Heading Styles)
How to Quickly Remove Hard Returns in Word Documents
10 Microsoft Word Tips, Tricks and Shortcuts for Selecting in Tables
Related courses
Microsoft Word: Intermediate / Advanced
Microsoft Excel: Intermediate / Advanced
Microsoft PowerPoint: Intermediate / Advanced
Microsoft Word: Long Documents Master Class
Microsoft Word: Styles, Templates and Tables of Contents
Microsoft Word: Designing Dynamic Word Documents Using Fields
VIEW MORE COURSES >
Our instructor-led courses are delivered in virtual classroom format or at our downtown Toronto location at 18 King Street East, Suite 1400, Toronto, Ontario, Canada (some in-person classroom courses may also be delivered at an alternate downtown Toronto location). Contact us at info@avantixlearning.ca if you’d like to arrange custom instructor-led virtual classroom or onsite training on a date that’s convenient for you.
Copyright 2023 Avantix® Learning
Microsoft, the Microsoft logo, Microsoft Office and related Microsoft applications and logos are registered trademarks of Microsoft Corporation in Canada, US and other countries. All other trademarks are the property of the registered owners.
Avantix Learning |18 King Street East, Suite 1400, Toronto, Ontario, Canada M5C 1C4 | Contact us at info@avantixlearning.ca