
Create a bibliography, citations, and references

-
Put your cursor at the end of the text you want to cite.
-
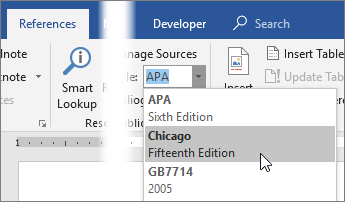
Go to References > Style, and choose a citation style.

-
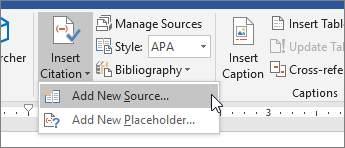
Select Insert Citation.
-
Choose Add New Source and fill out the information about your source.
Once you’ve added a source to your list, you can cite it again:
-
Put your cursor at the end of the text you want to cite.
-
Go to References > Insert Citation, and choose the source you are citing.
-
To add details, like page numbers if you’re citing a book, select Citation Options, and then Edit Citation.


Create a bibliography
With cited sources in your document, you’re ready to create a bibliography.
-
Put your cursor where you want the bibliography.
-
Go to References > Bibliography, and choose a format.
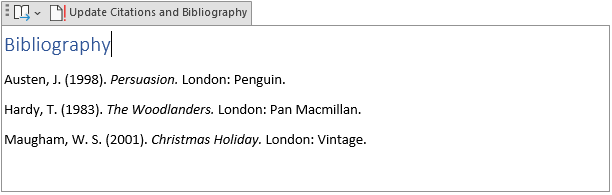
Tip: If you cite a new source, add it to the bibliography by clicking anywhere in the bibliography and selecting Update Citations and Bibliography.
Need more help?
Содержание
- Добавление ссылки и литературного источника в документ
- Поиск источника литературы
- Редактирование заполнителя ссылок
- Создание списка литературы
- Вопросы и ответы
Списком литературы называют перечень литературных источников в документе, на которые ссылался пользователь при его создании. Также, к списку литературы причисляют цитируемые источники. В программе MS Office предусмотрена возможность быстрого и удобного создания списков литературы, в которых будут использоваться сведения об источнике литературы, указанные в текстовом документе.
Урок: Как в Ворде сделать автоматическое содержание
Добавление ссылки и литературного источника в документ
Если вы добавляете к документу новую ссылку, также будет создан новый литературный источник, он будет отображаться в списке литературы.
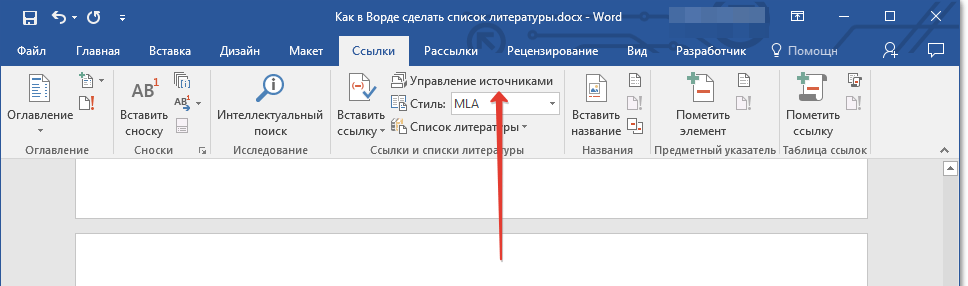
1. Откройте документ, в котором необходимо создать список литературы, и перейдите во вкладку “Ссылки”.

2. В группе “Списки литературы” кликните по стрелке, расположенной рядом с пунктом “Стиль”.
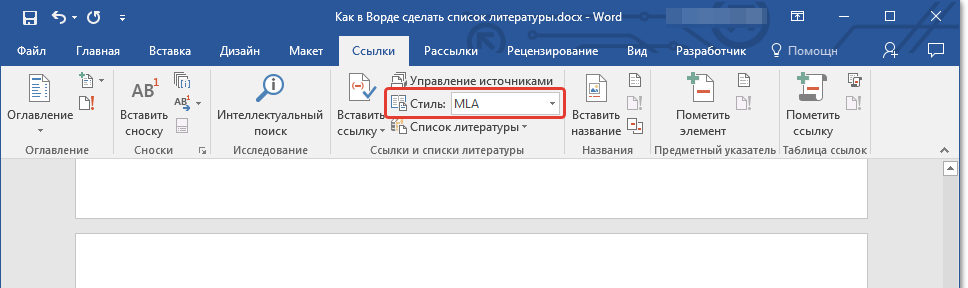
3. Из выпадающего меню выберите стиль, который нужно применить к литературному источнику и ссылке.
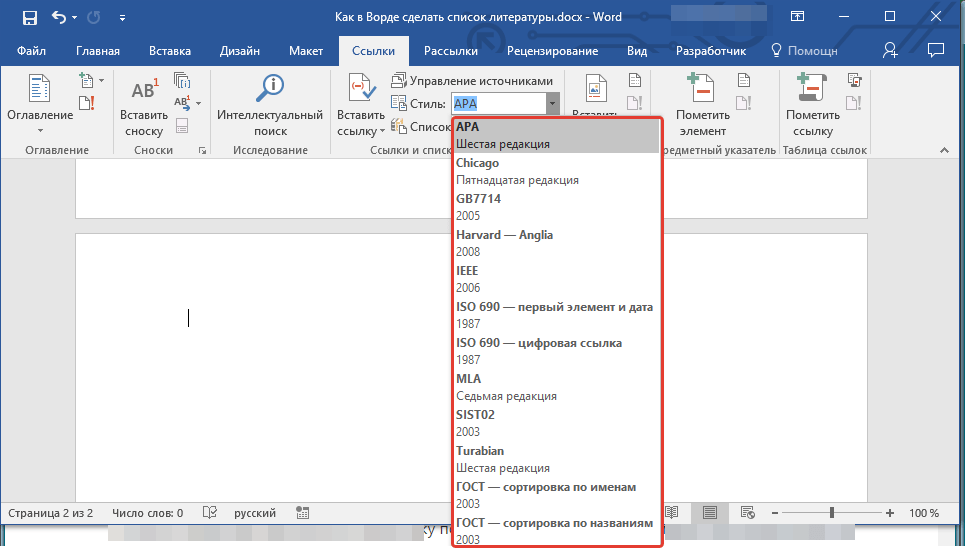
Примечание: Если документ, в который вы добавляете список литературы, относится к области общественных наук, для литературных источников и ссылок рекомендовано применять стили “APA” и “MLA”.
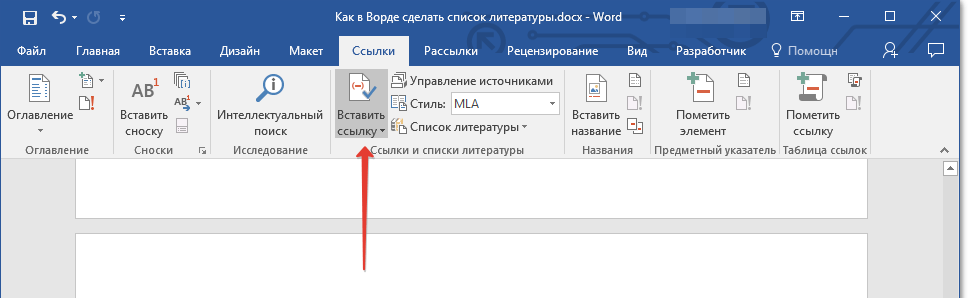
4. Кликните по месту в конце документа или выражению, которое будет использоваться в качестве ссылки.
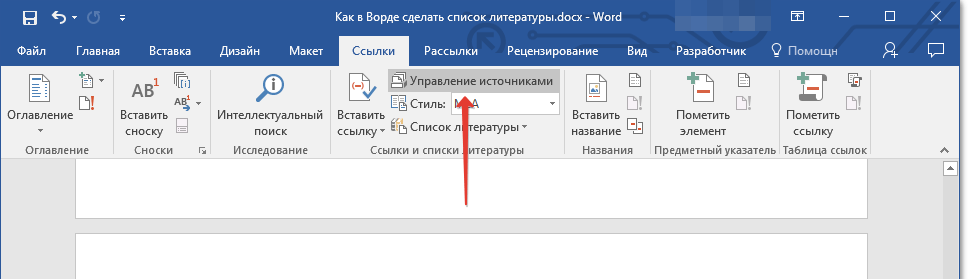
5. Нажмите кнопку “Вставить ссылку”, расположенную в группе “Ссылки и списки литературы”, вкладка “Ссылки”.
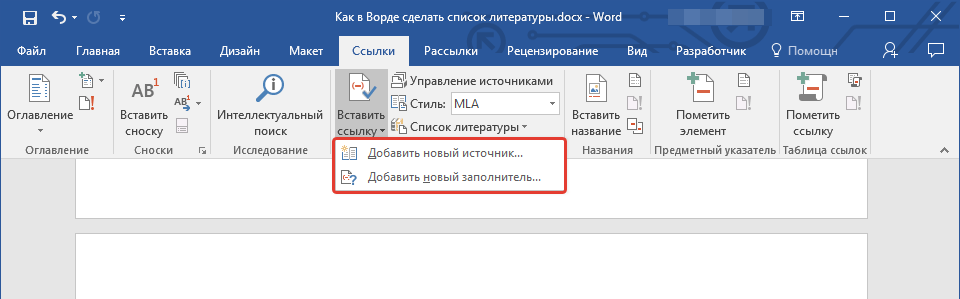
6. Выполните необходимое действие:

- Добавить новый источник: добавление сведений о новом источнике литературы;
- Добавить новый заполнитель: добавление заполнителя, необходимого для отображения нахождения цитаты в тексте. Эта команда также позволяет вводить дополнительные сведения. В диспетчере источников около источников заполнителей появится вопросительный знак.
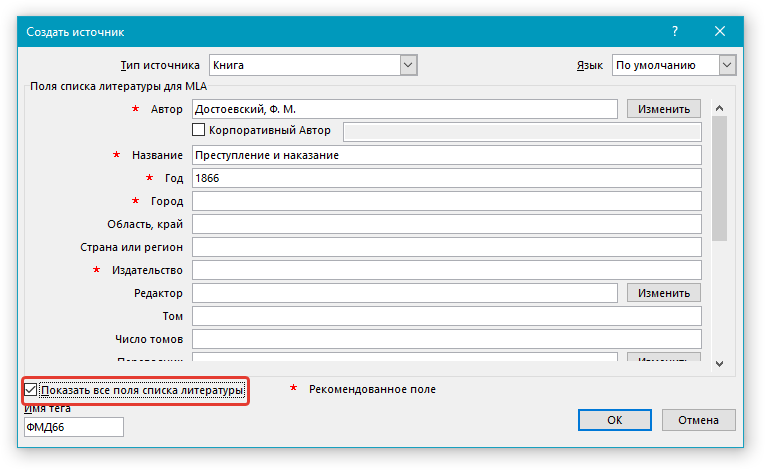
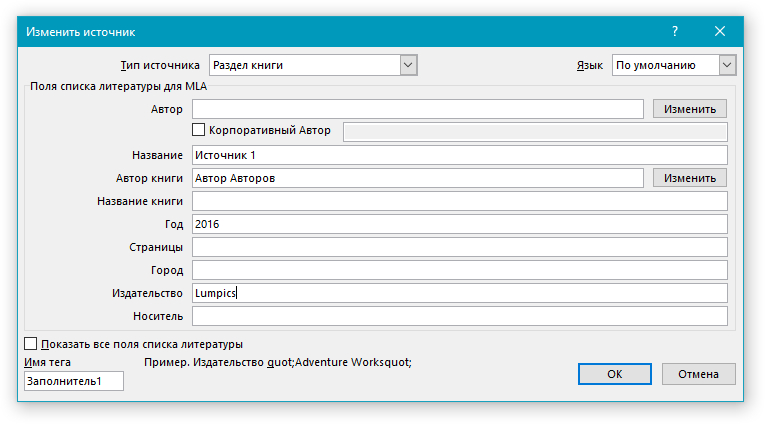
7. Нажмите стрелку, расположенную рядом с полем “Тип источника”, чтобы ввести сведения об источнике литературы.
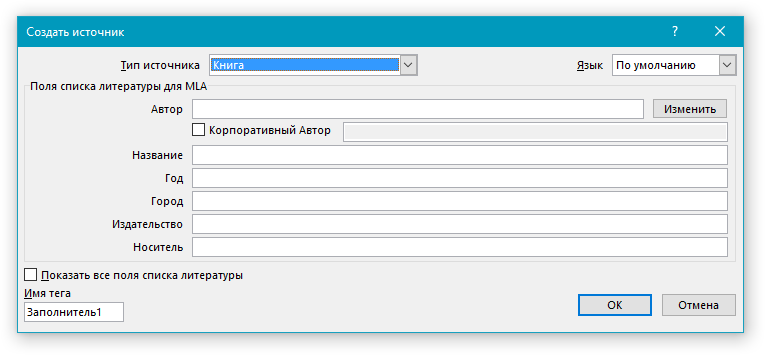
Примечание: В качестве литературного источника может выступать книга, веб-ресурс, отчет и т.д.
8. Введите необходимые библиографические сведения о выбранном источнике литературы.
- Совет: Для ввода дополнительных сведений установите галочку напротив пункта “Показать все поля списка литературы”.
Примечания:
- Если в качестве стиля для источников вы выбрали ГОСТ или ISO 690, при этом ссылка не является уникальной, к коду необходимо добавить буквенный символ. Пример такой ссылки: [Pasteur, 1884a].
- Если в качестве стиля для источника используется “ISO 690 — цифровая последовательность”, а ссылки при этом располагаются непоследовательно, для корректного отображения ссылок кликните по стилю “ISO 690” и нажмите “ENTER”.
Урок: Как в MS Word сделать штамп по ГОСТу
Поиск источника литературы
В зависимости от того, какой тип документа вы создаете, а также от того, какой его объем, список литературных источников тоже может быть разным. Хорошо, если перечень литературы, к которой обращался пользователь, небольшой, но ведь и противоположное вполне возможно.
В случае, если список литературных источников действительно большой, не исключено, что ссылка на некоторые из них будет указана в другом документе.
1. Перейдите во вкладку “Ссылки” и нажмите кнопку “Управление источниками”, расположенную в группе “Ссылки и списки литературы”.
Примечания:
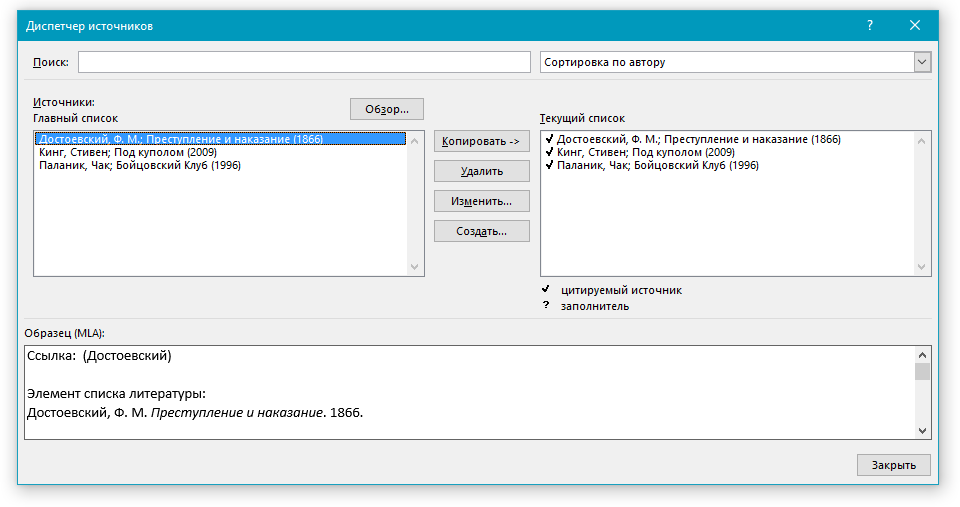
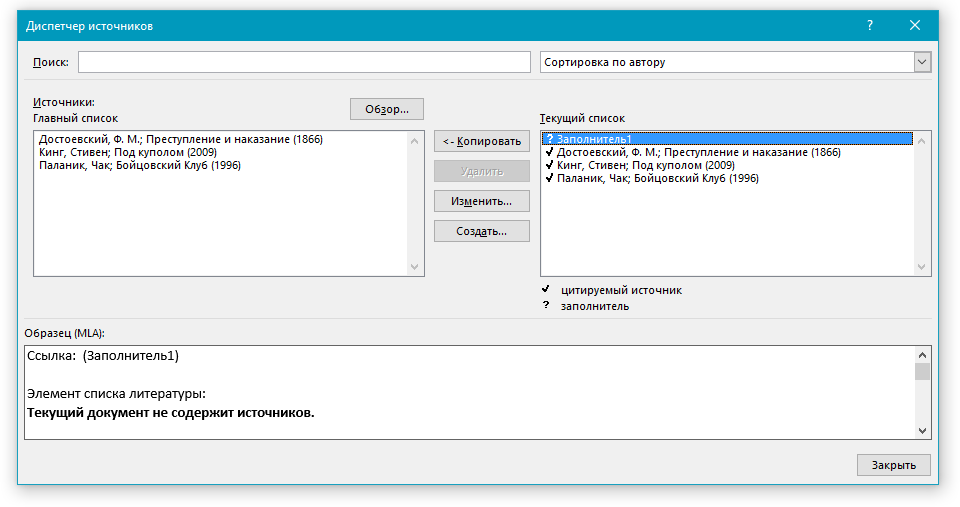
- Если вы откроете новый документ, еще не содержащий в своем составе ссылок и цитат, литературные источники, которые были использованы в документах и созданные ранее, будут располагаться в списке “Главный список”.
- Если вы откроете документ, в котором уже есть ссылки и цитаты, их литературные источники будут отображены в списке “Текущий список”. Литературные источники, на которые были ссылки в данном и/или созданных ранее документах, тоже будут находиться в списке “Главный список”.
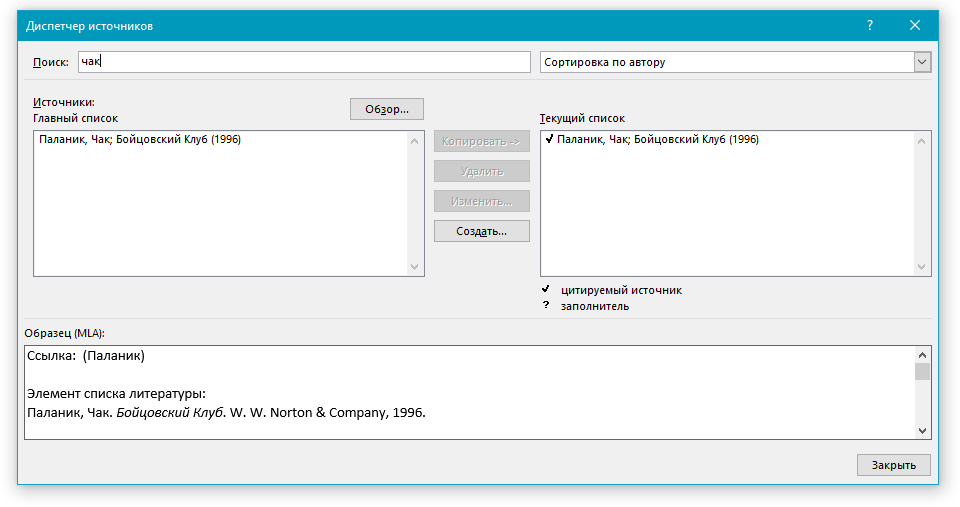
2. Для поиска необходимого литературного источника, выполните одно из следующих действий:
- Выполните сортировку по заголовку, имени автора, тегу ссылки или году. В полученном списке найдите нужный литературный источник;
- Введите в строке поиска имя автора или заголовок литературного источника, который необходимо найти. В динамически обновленном списке будут показаны элементы, соответствующие вашему запросу.
Урок: Как в Ворде сделать заголовок
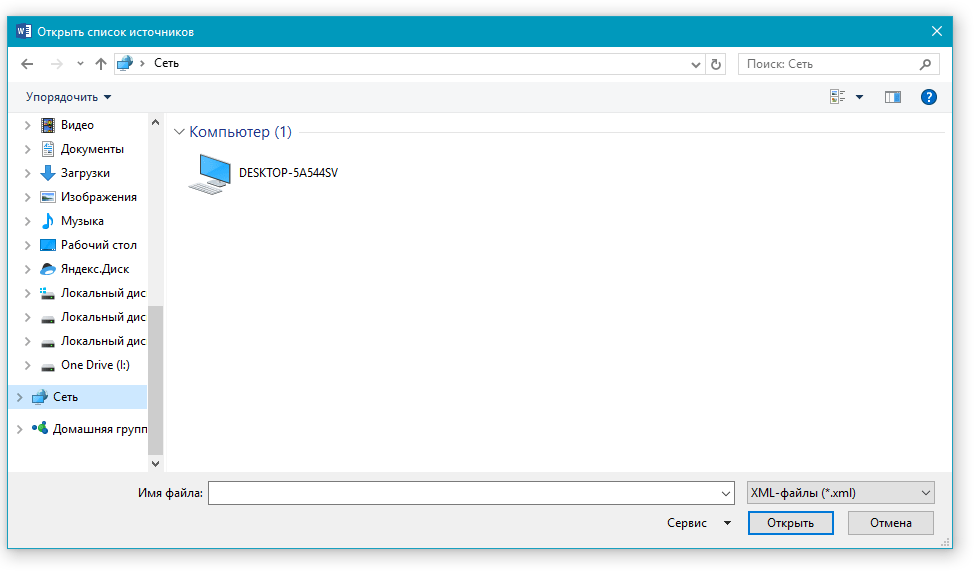
- Совет: Если вам необходимо выбрать другой основной (главный) список, из которого можно будет импортировать литературные источники в документ, с которым вы работаете, нажмите кнопку “Обзор” (ранее “Обзор в диспетчере ресурсов”). Этот метод особенно удобно использовать при наличии совместного доступа к файлу. Таким образом в качестве списка с источником литературы может использоваться документ, расположенный на компьютере коллеги или, к примеру, на веб-узле учебного заведения.
Редактирование заполнителя ссылок
В некоторых ситуациях может возникнуть необходимость создать заполнитель, в котором будет отображаться местоположение ссылки. При этом, полные библиографические сведения об источнике литературы планируется добавить позже.
Так, если список уже создан, то изменения сведений об источнике литературы автоматически будут отражены в списке литературы, если ранее он уже был создан.
Примечание: Около заполнителя в диспетчере источников появится вопросительный знак.
1. Нажмите кнопку “Управление источниками”, расположенную в группе “Ссылки и списки литературы”, вкладка “Ссылки”.
2. Выберите в разделе “Текущий список” заполнитель, который требуется добавить.
Примечание: В диспетчере источников источники заполнителей представлены в алфавитном порядке в соответствии с именами тегов (точно так же, как и у остальных источников). По умолчанию имена тегов заполнителей являются номерами, но при желании вы всегда можете указать для них любое другое имя.
3. Нажмите “Изменить”.
4. Нажмите стрелку, установленную рядом с полем “Тип источника”, чтобы выбрать подходящий тип, а затем начните вводить сведения об источнике литературы.
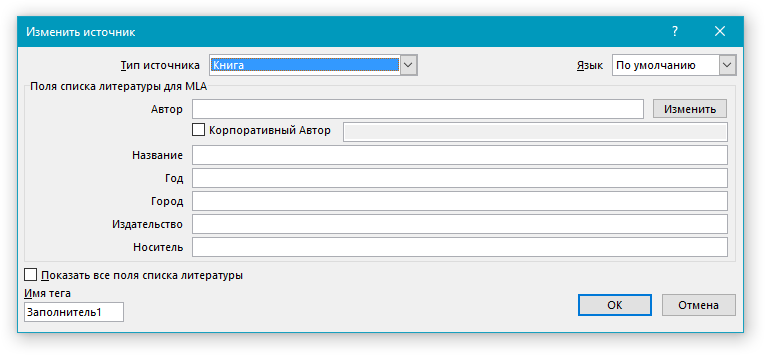
Примечание: В качестве литературного источника может выступать книга, журнал, отчет, веб-ресурс и т.д.
5. Введите необходимые библиографические сведения об источнике литературы.
- Совет: Если вы не желаете вручную вводить имена в требуемом или необходимом формате, для упрощения задачи используйте кнопку “Изменить” для заполнения.
Установите галочку напротив пункта “Показать все поля списка литературы”, чтобы ввести больше сведений об источнике литературы.
Урок: Как В Word упорядочить список в алфавитном порядке
Создание списка литературы
Вы можете создать список литературы в любой момент после того, как в документ был добавлен один или несколько литературных источников. В случае, если для создания законченной ссылки сведений недостаточно, можно использовать заполнитель. При этом, ввести дополнительные сведения можно будет позже.
Примечание: В списке литературы не отображаются заполнители ссылок.
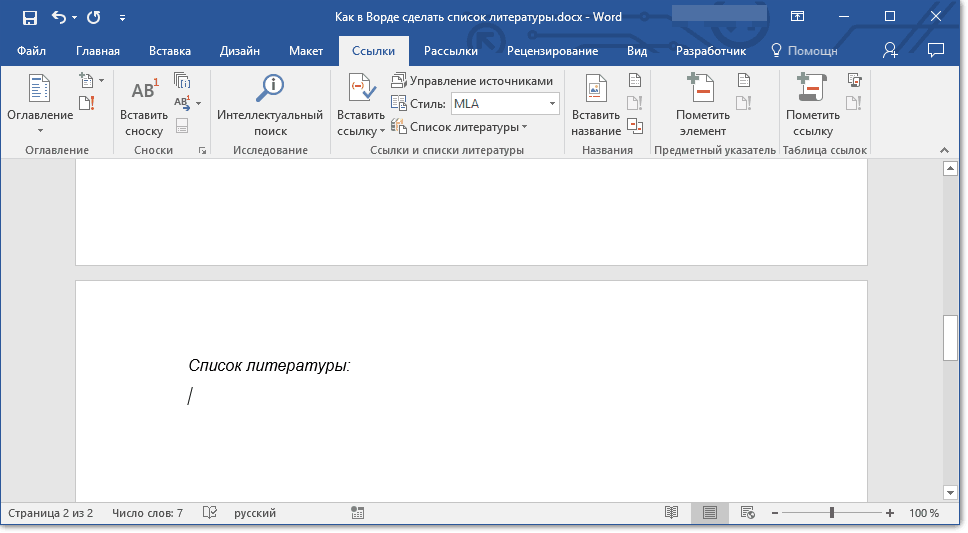
1. Кликните в том месте документа, где должен находиться список литературы (вероятнее всего, это будет конец документа).
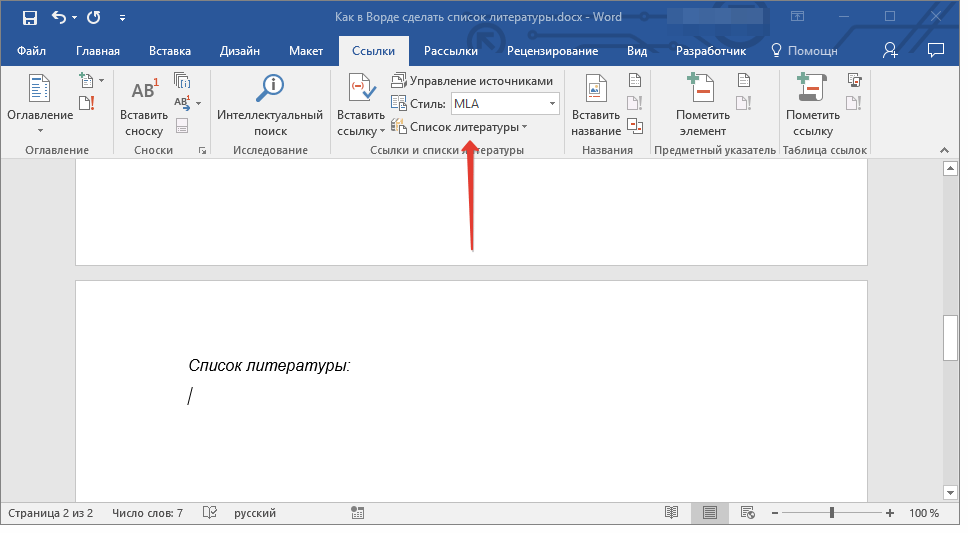
2. Нажмите кнопку “Список литературы”, расположенную в группе “Ссылки и списки литературы”, вкладка “Ссылки”.
3. Для добавления списка литературы в документ, выберите пункт “Список литературы” (раздел “Встроенные”) — это стандартный формат списка литературы.
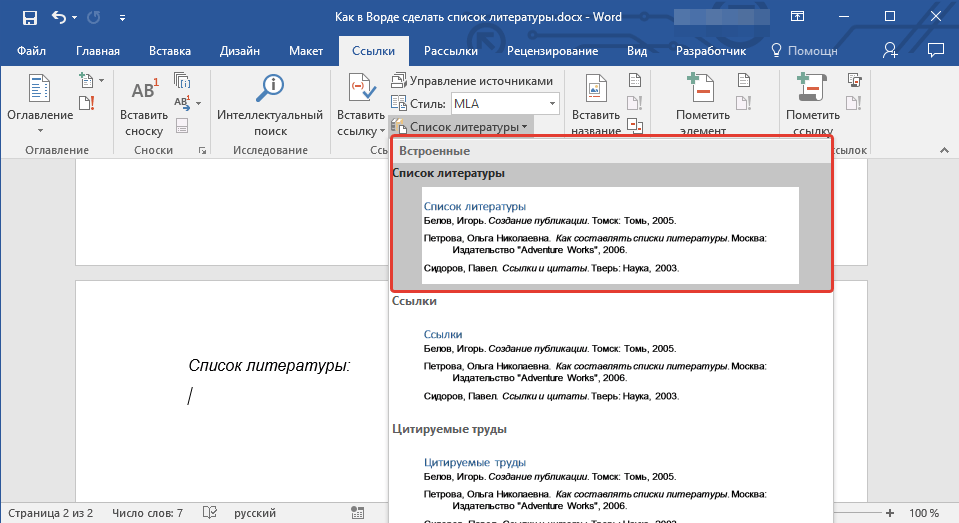
4. В указанное место документа будет добавлен созданный вами список литературы. Если это необходимо, измените его внешний вид.

Урок: Форматирование текста в Ворде
Вот, собственно, и все, ведь теперь вы знаете, как создать список литературы в Microsoft Word, предварительно подготовив список литературных источников. Желаем вам легкого и результативного обучения.
If you use citations in your Word documents, you might need the bibliographic items for each source that you have referenced. Microsoft Word offers a useful tool to create a list of these bibliographic references, also named as Bibliography, References, or Works Cited, as a list of the citations added in the document.
A Bibliography is a list of all the sources in the document. In the MLA format (Modern Language Association), the list of sources is called Works Cited, that is a type of bibliography, which can include sources other than books. In the APA format (American Psychological Association), it is called a References list.
Before you create the Bibliography, References, or Works Cited, make sure you have replaced all placeholders with a proper citation (for more details, see how to create a citation, how to create a multi-source citation). If you inserted a placeholder for a citation, the source would not appear in the bibliography. However, if you later replace the placeholder with source information, the bibliography will be automatically updated, and the new source will be added to the bibliography.
Create a Bibliography, References, and Works Cited
To create a bibliography, follow the next steps:
1. Place the cursor where you want to insert the bibliography:
- Press Ctrl+End to get to the end of the document.
- Press Ctrl+Enter to insert a page break.
2. On the References tab, in the Citations & Bibliography group, click the Bibliography button and then do one of the following:

- Choose one of the built-in styles in the drop-down menu.
- Select Insert Bibliography at the bottom of the list:

Note: If you choose the Insert Bibliography option, you will need to add a heading such as Bibliography, References, or Works Cited.

Word creates the Bibliography, References, or the Works Cited based on the sources. For example, the Bibliography in the IEEE style (see more about styles below):

Note: The automatically created bibliography, it does not matter how you created it, contains all sources of the document, even if some were removed or added by mistake. See how to manage sources for the Bibliography, References, and Works Cited for more details.
Empty Bibliography, References, and Works Cited
After inserting a Bibliography, References, and Works Cited, Word can create a message “There are no sources in the current document.”:
![]()
The leading cause for this message is that Word could not find the citations created using the Citations & Bibliography functionality (see how to create a citation in a Word document). It is possible that there are placeholders in the document, but they are still empty.
To solve that problem, check the placeholders and citations. See how to manage sources for more details.
Don’t forget to update bibliography in a document!
Citation and bibliography formats
Depending on the selected style, the Bibliography, References, and Works Cited look quite different. For example, the Works Cited using the APA style:

To change the style, on the References tab, in the Citations & Bibliography group, open the Style drop-down list:

Choose the format you need:
- The American Psychological Association (APA) style is used for academic documents such as scholarly journal articles and books and in many social sciences.
- The Chicago style is used in history and economics and some social sciences.
- The Modern Language Association (MLA) style is most often used in the arts and the humanities, especially in English studies, modern languages and kinds of literature, comparative literature, literary criticism, media studies, cultural studies, and related disciplines.
- The American Sociological Association (ASA) style is used for writing university research papers in the field of sociology.
- The Institute of Electrical and Electronics Engineers (IEEE) style is used for writing research papers, commonly used in technical fields, particularly in computer science.
- Oxford, Harvard, and others.
The specified format for citations and a bibliography can be the requirement for some types of the document.
Note: You do not need to create a bibliography to see how it will look for selected style. After choosing the bibliography style, you can preview the format in the Bibliography list:

Update a Bibliography, References, and Works Cited
Microsoft Word inserts a Bibliography, References, and Works Cited as a field:

or ![]() , if the Bibliography is inserted by clicking the Insert Bibliography command.
, if the Bibliography is inserted by clicking the Insert Bibliography command.
See how to turn on or turn off highlighting of fields in a Word document to display all fields in a document with a gray background.
Word will not automatically update any type of Bibliography after adding, deleting, or modifying sources or placeholders. You need manually update it, to do so, click on the Bibliography and do one of the following:
- Right-click anywhere in the sources list and select Update Field from the popup menu:

- Click anywhere in the Bibliography to show the field options. At the top of the field borders, click the Update Citations and Bibliography… button:


See also how to lock and unlock updating for fields.
Modify a Bibliography, References, and Works Cited
Word offers very simple way to change Bibliography to Works Cited or to References, and vice versa. To do so, click on the Bibliography to show the field options. At the top of the field borders, click the Bibliographies button:

Choose the bibliography type you need: Bibliography, References, or Works Cited.
Word also proposed the commands:
- Convert bibliography to static text.
You can use this command for the final version of the document to avoid any changes for sources, updates, or style changes.
- Filter Languages to show the sources of different languages (see how to create citations for more details).
Note: If the source has the default language, it can be shown for any selected language.
Delete a Bibliography, References, and Works Cited
To delete a Bibliography, it isn’t enough to delete only visible information, it is necessary to delete all the field. To do so, do the following:
1. Select the total Bibliography lines, including the last, empty line right after the Bibliography entries.
Note: If possible, click inside to show the field options. At the top of the field borders, click the Field button to select all the bibliography lines:

2. Click the Delete key.
Note: All the citations and placeholders (source information) are still saved in the current document, as well as in Word’s Master list (see manage sources for more details).
See also this tip in French:
Comment créer une bibliographie.

Managing citations for research papers, theses, dissertations, and other nonfiction works can be overwhelming. However, you can ease the process by learning how to insert citations in Microsoft Word using the software’s citation and bibliography tools.
This tutorial covers six topics:
- How to select a citation style
- How to insert citations for new sources
- How to insert citations for existing sources
- How to edit sources
- How to use citation placeholders
- How to insert bibliographies, reference lists, or works cited lists
Important Note: At the time this tutorial was published, Microsoft Word did not offer the most up-to-date formatting for several of our primary style guides, including APA, Chicago, MLA, and Turabian. Therefore, I encourage you to review the available styles before using the citation and bibliography tools. We will cover the steps to customize citation and bibliography styles in a separate tutorial.
This tutorial is also available as a YouTube video showing all the steps in real time.
Watch more than 150 other writing-related software tutorials on my YouTube channel.
The images below are from Word in Microsoft 365. The steps are the same in Word 2021, Word 2019, and Word 2016. However, your interface may look slightly different in those older versions of the software.
How to Select a Citation Style in Microsoft Word
- Select the References tab in the ribbon.

- Select your citation style from the Style menu in the Citations & Bibliography group.

How to Insert Citations for New Sources in Microsoft Word
- Place your cursor where you want to insert the citation.

- Select the References tab in the ribbon (see figure 1).
- Select the Insert Citation button in the Citations & Bibliography group.

- Select Add New Source from the drop-down menu.

- Select the source type from the Type of Source menu in the Create Source dialog box.

- Enter the source information into the bibliography fields.

- (Optional Step) Select Show All Bibliography Fields if you need to add additional information.

- (Optional Step) Enter the source information into the additional fields.

- Select the OK button.

Your citation should appear in your text.

How to Insert Citations for Existing Sources in Microsoft Word
Once you enter a source, as shown in the section above, you can create additional citations for that source without reentering the information.
- Place your cursor where you want to insert the citation (see figure 3).
- Select the References tab in the ribbon (see figure 1).
- Select the Insert Citation button in the Citations & Bibliography group (see figure 4).
- Select the source from the drop-down menu.

Your citation should appear in your text (see figure 11).
How to Edit Sources in Microsoft Word
When you edit an existing source, you will also edit any existing citations for that source in your current document.
- Select the References tab in the ribbon (see figure 1).
- Select the Manage Sources button in the Citations & Bibliography group.

- Select the source you want to edit in the Master List or the Current List in the Source Manager dialog box.

Pro Tip: The Master List is stored in your computer and is accessible in all your documents. The Current List is part of your current file and is only accessible in that file. By default, Word stores new sources in the Master List and the Current List.
- Select the Edit button.

- Enter your edits in the Edit Source dialog box. (Select Show All Bibliography Fields, if necessary.)

- Select the OK button.

- Select Yes or No in the alert box stating that you will be updating the source in both the Master List and the Current List. (Strongly consider selecting Yes to update both lists if you plan to cite this source in future documents.)

- Select the Close button in the Source Manager dialog box.

How to Use Citation Placeholders in Microsoft Word
You can use placeholders if your source information is not available.
- Place your cursor where you want to insert the citation placeholder.
- Select the References tab in the ribbon (see figure 1).
- Select the Insert Citation button in the Citations & Bibliography group (see figure 4).
- Select Add New Placeholder from the drop-down menu.

- (Optional Step) Change the name of the placeholder in the Placeholder Name dialog box.

- Select the OK button.

Pro Tip: You can use the same placeholder in the future by selecting it from the Insert Citation drop-down menu (see figure 12).
- When you are ready to replace the placeholder with a source, complete the steps in How to Edit Sources above.
How to Insert Bibliographies, Reference Lists, or Works Cited Lists in Microsoft Word
These steps will only work if you inserted your sources using Word’s citation and bibliography tools.
- Place your cursor where you want to insert the bibliography, reference list, or works cited list.
- Select the References tab in the ribbon (see figure 1).
- Select the Bibliography button in the Citations & Bibliography group.

- Select Bibliography, References, or Works Cited from the drop-down menu.

Your bibliography, reference list, or works cited list should appear in your document.
Related Resources
How to Create Hanging Indents in Microsoft Word
How to Insert Footnotes and Endnotes in Microsoft Word
How to Convert Individual Footnotes to Endnotes in Microsoft Word (and Individual Endnotes to Footnotes)
How to Create a Cover Page in Microsoft Word (Built-In and Custom)
Updated August 22, 2022
To add a Bibliography to the document:
- Place the cursor in the document where you want the bibliography.
- Click the References Tab on the Ribbon.
- Click the Bibliography Button on the Citations & Bibliography Group.
- Choose Insert Built-in Bibliography/Works Cited or Insert Bibliography.
In this manner, do References go on a separate page in APA?
Yes, your list of references will go on a separate page at or towards the end of your paper, whether you are using APA Style, MLA Style, or Chicago/Turabian Style.
What is the APA style of referencing?
Cite in APA Automatically with BibMe. APA (American Psychological Association) style is most frequently used within the social sciences, in order to cite various sources. For more information, please consult the Publication Manual of the American Psychological Association, (6th ed.).
What is the reference page?
A references page is the last page of an essay or research paper that’s been written in APA style. It lists all the sources you’ve used in your project, so readers can easily find what you’ve cited.
Write Your Answer
Add citations to your document Click at the end of the sentence or phrase that you want to cite, and then on the References tab, in the Citations & Bibliography group, click Insert Citations. From the list of citations under Insert Citation, select the citation you want to use.
Contents
- 1 How do you add References manually?
- 2 Can I add a referencing style to Word?
- 3 How do I turn on References in Word?
- 4 How do you add more references?
- 5 How do you do apa style referencing?
- 6 How do I add Oxford Referencing to Microsoft Word?
- 7 How do I insert references in Word 2010?
- 8 How do you put references in a research paper?
- 9 Is APA the same as Harvard?
- 10 How do you write references?
- 11 How do I reference a website in APA?
- 12 How do I install Oscola in Word?
- 13 How do you reference in-text Harvard style?
- 14 How do you reference a website Harvard style?
- 15 How do you copy and paste references in Word?
- 16 How do I insert a reference in Word 2016?
- 17 How do you add references to a research paper in Word?
- 18 How do you incorporate references in an essay?
- 19 Which referencing style is the best?
- 20 Is APA 6th Harvard?
How do you add References manually?
Select “References” and then “New Reference”, or press “Ctrl+N” on your keyboard or click the “New Reference” button (a clipboard with a plus sign). Choose the appropriate reference type from the “Reference Type” drop-down menu.
Can I add a referencing style to Word?
In your Word document, click on the References tab in the Ribbon. In the Citations & Bibliography group, click the arrow next to Style. Click the style that you want to use for the citation and source. Click at the end of the sentence or phrase that you want to cite.
How do I turn on References in Word?
Go to Add-In tab -> Reference Manager -> Instant Formatting. Click the Enable Instant Formatting box to toggle Instant Formatting. Click OK to save changes to the Instant Formatting settings. Click OK to format all citations and build the bibliography.
How do you add more references?
Put your cursor at the end of the text you want to cite. Go to References > Style, and choose a citation style. Select Insert Citation. Choose Add New Source and fill out the information about your source.
How do you do apa style referencing?
About APA Style
The APA referencing style is an “author-date” style, so the citation in the text consists of the author(s) and the year of publication given wholly or partly in round brackets. Use only the surname of the author(s) followed by a comma and the year of publication.
How do I add Oxford Referencing to Microsoft Word?
The Oxford referencing system
On any Microsoft Word document, simply click on the ‘Insert’ menu and select ‘Footnote’ (or ‘Reference’ and then choose ‘Footnote’ from the drop-down list).
How do I insert references in Word 2010?
- On the References tab, in the Citation & Bibliography group, choose the style of citation you want to use.
- Position the cursor where you want the citation to appear, and then click Insert Citation, Add New Source.
- In the Create Source dialog box, select the type of source and then fill in the fields shown.
How do you put references in a research paper?
Book: online / electronic
- Author/Editor (if it is an editor always put (ed.)
- Title (this should be in italics)
- Series title and number (if part of series)
- Edition (if not the first edition)
- [Online]
- Place of publication (if there is more than one place listed, use the first named)
- Publisher.
- Year of publication.
Is APA the same as Harvard?
APA (American Psychological Association)
APA referencing is a variant on Harvard style. Many of the conventions are the same, with brief author-date citations in brackets in the body of the text and full citations in the reference list.
How do you write references?
References
- author(s) name and initials.
- title of the article (between single quotation marks)
- title of journal (in italics)
- any publication information (volume, number etc.)
- page range.
- accessed day month year (the date you accessed the article)
- from name of database.
- item number (if given).
How do I reference a website in APA?
When citing a web page or online article in APA Style, the in-text citation consists of the author’s last name and year of publication. For example: (Worland & Williams, 2015). Note that the author can also be an organization. For example: (American Psychological Association, 2019).
How do I install Oscola in Word?
To create a footnote in Microsoft Word, click your mouse on the place you want it to refer to. Click on ‘References’ at the top and then on ‘Insert Footnote‘. A number will appear in the text, and also at the bottom of the page, where you write your citation.
How do you reference in-text Harvard style?
An in-text citation should appear wherever you quote or paraphrase a source in your writing, pointing your reader to the full reference. In Harvard style, citations appear in brackets in the text. An in-text citation consists of the last name of the author, the year of publication, and a page number if relevant.
How do you reference a website Harvard style?
To reference a website in Harvard style, include the name of the author or organization, the year of publication, the title of the page, the URL, and the date on which you accessed the website. Author surname, initial. (Year) Page Title. Available at: URL (Accessed: Day Month Year).
How do you copy and paste references in Word?
Use the keyboard shortcut CTRL+C (CMD+C for Mac) to copy. Alternatively you can use the menu “Edit > Copy”. In your email, IM, Google Docs or any other text editing field, paste the content you just copied. Do so by pressing CTRL+V (CMD+V for Mac) or the menu “Edit > Paste”.
How do I insert a reference in Word 2016?
To add a citation to your document, first add the source you used.
- On the References tab, click the arrow next to Bibliography Style, and click the style that you want to use for the citation and source.
- Click at the end of the sentence or phrase that you want to cite.
- On the References tab, click Insert Citation.
How do you add references to a research paper in Word?
Add citations to your document
- Click at the end of the sentence or phrase that you want to cite, and then on the References tab, in the Citations & Bibliography group, click Insert Citations.
- From the list of citations under Insert Citation, select the citation you want to use.
How do you incorporate references in an essay?
You must cite all information used in your paper, whenever and wherever you use it. When citing sources in the body of your paper, list the author’s last name only (no initials) and the year the information was published, like this: (Dodge, 2008). (Author, Date).
Which referencing style is the best?
How to do I choose a citation style?
- APA (American Psychological Association) is used by Education, Psychology, and Sciences.
- MLA (Modern Language Association) style is used by the Humanities.
- Chicago/Turabian style is generally used by Business, History, and the Fine Arts.
Is APA 6th Harvard?
The Harvard (APA 6th) system of referencing requires you to set this information out in a certain way, and the examples below will show you how to do this.
How do you make a numbered reference list in Word?
Place your cursor to where the reference is to be inserted, then click “Insert” -> “Reference” -> “Cross-reference”. In the dialog box, select “Numbered item”, “Paragraph number”, then the reference you want to insert, click “Insert”. This inserts the reference into the text.
What is included in reference list apa?
A references list is a formatted list of all sources you cited within your paper. Any time you quote, paraphrase, summarize, or include information that you’ve read from an outside source, you must include that source in your references list, correctly formatted in APA style.
How do you create a numbered reference list?

Create in-text citations
- Arrange the sources you cite alphabetically and then number them; or.
- Number the citations consecutively according to the first mention of each source in the text (using the same number for subsequent references to the same source).
What are the two main components of the APA citation format?
All APA reference list entries contain four main components: author, date, title, and source.
How should reference list be alphabetized?
Reference List Order

- Arrange entries in alphabetical order by the surname of the first author followed by the initials of the author’s given name(s).
- When alphabetizing names, disregard any spaces or punctuation marks in two-word surnames. Also disregard anything in parentheses or square brackets.
Is the reference page in APA double-spaced?
In general, the list of references is double-spaced and listed alphabetically by first author’s last name. For each reference, the first line is typed flush with the left margin, and any additional lines are indented as a group a few spaces to the right of the left margin (this is called a hanging indent).
What is a numbered reference style?
Numbered reference citations (also called author–number or Vancouver references) are often used in scientific and medical texts. In this system, each reference used is assigned a number. When that reference is cited in the text, its number appears, either in parentheses or brackets or as a superscript.
How do you organize a reference list in APA?
How to alphabetize your print sources
- Organize your Reference page by the last names of the authors (or editors).
- If a work has no author or editor, alphabetize by the first word of the title other than a, an, or the.
- Arrange same author sources using their last names every time.
How do you number references in EndNote?
Information
- Open EndNote, Edit> Output Styles> Open Style manager.
- Select the Output Style ‘Numbered. Click on Edit.
- On the Left, select Layout, under Bibliography.
- On the right, you will have “Bibliography Number.”.
- Click on File> Save As and save the file with the new name.
- Open Word, select the edited style.
Do you put page numbers in reference list?
Page numbers also appear in reference entries for book chapters, journal, magazine, and newspaper articles, if available.
- In the reference list entry, the page numbers indicate the start and end page of the entire article.
- If the document doesn’t have a page number, omit the page range from the reference list entry.
What is the purpose of a reference list in APA?
A reference list lists only the sources you refer to in your writing. The purpose of the reference list is to allow your sources to be be found by your reader. It also gives credit to authors you have consulted for their ideas.
Which reference style has square brackets?
IEEE citation style
What is reference document?
A reference document is a document that provides pertinent details for consultation about a subject. Context: – Reference document title is the title of the Reference document. – Reference document type description is a description of the type of Reference document.
What is the proper sequence of APA formatted citation?
Order: Entries should be arranged in alphabetical order by authors’ last names. Sources without authors are arranged alphabetically by title within the same list. The references are arranged alphabetically, by the last name of the first author or, if author is not available – by title.
The citation tools in Microsoft Word make it easy to add references to your work. But how do these citation tools work? This post will look at the basics.
Adding a Citation in Microsoft Word
The citation tools in Microsoft Word are designed for use with systems that use in-text citations and a reference list, like APA or MLA. And if you’re using one of these systems, these tools make it easy to manage references in your work (for information on using footnotes in your work, see this post).
The first thing we’ll look at is how to add an in-text citation for a source:
- Place your cursor where you want to add a citation.
- Go to the References on the ribbon.
- Select a referencing system from the drop-down Style list (e.g. APA).
- Click Insert Citation and then Add New Source.
This will open a new dialog box where you can fill in the source details.
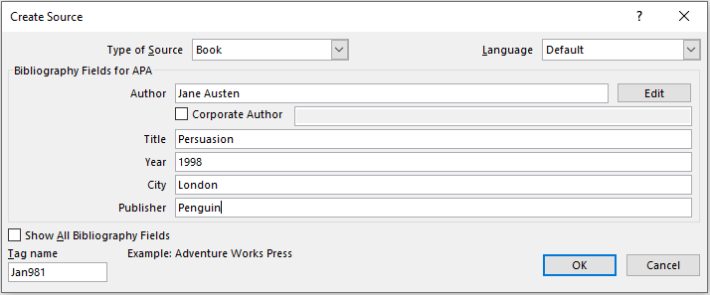
The options here should be clear enough, but there is also an ‘Example’ shown at the bottom of the window when you click on each of the fields. This can help you format the source information (e.g. it will show that you need to add a semicolon between author names when a source has more than one author).
For extra options, you can also select Show All Bibliography Fields. This gives you plenty of scope to customise the source information, such as adding volume and issue numbers of a journal when citing an article.
When you are done, click OK to add a citation to your work. This will appear in the place selected and use the format of your chosen referencing system.
![]()
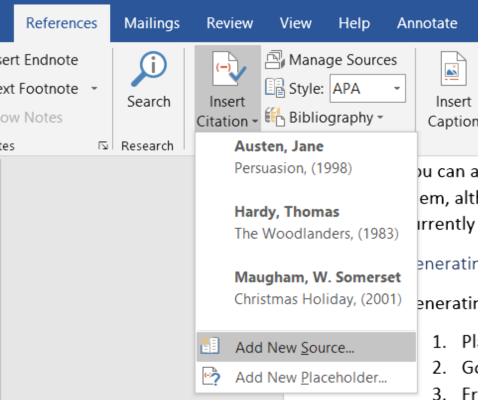
Cited sources will also appear in the Insert Citation list. To cite a source more than once, then, all you need to do is place the cursor where you want the new citation, click Insert Citation, and select the source from the list.
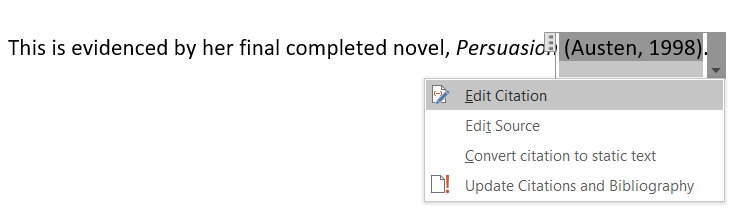
Editing Citations
After entering a citation, you can edit it to add page numbers or remove certain details. To do this, you’ll need to:
- Click on the citation you want to edit.
- Via the drop-down menu, select Edit Citation.
- Add any page numbers required or tick any elements you want to leave out of the citation (e.g. the author’s surname).
Find this useful?
Subscribe to our newsletter and get writing tips from our editors straight to your inbox.
Suppressing part of a citation can be useful, for example, if you have mentioned the name of the author in the text already, as you can then leave it out of the citation to prevent unnecessary repetition.
Managing Sources
If you click the Manage Sources button on the ribbon, a new window will open showing two lists of sources:
- Current List – A list of all sources cited in the current document.
- Master List – A list of every source you’ve added to Microsoft Word’s library. This lets you cite the same sources in multiple documents.
You can move sources between these lists by selecting them and clicking the Copy button. Once added to the current list, you’ll be able to quickly add citations via the Insert Citation list, as described above.

You can also edit source details from this area, as well as add new sources or delete them. However, you will not be able to delete any sources you have cited in any document you are currently working on.
Generating a Reference List or Bibliography
Generating a reference list is easy if you have used these citation tools:
- Place your cursor where you want your list to go.
- Go to References > Bibliography.
- In the drop-down, select a list and heading (or just click Insert Bibliography at the bottom if you prefer to add your own a heading).
Your reference list will then appear in the place selected, with the entries formatted according to your chosen system.
And if you add any sources to your work after creating your bibliography, simply click anywhere on the list and you will see an option to Update Citations and Bibliography. This will integrate any new citations into your list.
Proofreading Citations and References
While the citation tools in Microsoft Word are useful, be careful when using them! Unless you know the reference system you’re using well, it is easy to miss out information from reference or format citations incorrectly.
In addition, some referencing styles, such as Harvard, have many variations. As such, you need to be sure your references match your university’s requirements. This makes it important to check your citations carefully.
Remember, though, that if you need any help using citations, you can ask our referencing experts to look at your work! You can even get a 500-word trial document checked for free today to find out more.
Adding citations and references is essential for students for their academic projects. Failing to add relevant references can not only lead to a deduction of marks but might even result in the project being rejected by the teacher. Furthermore, it can be difficult to keep up with different types of referencing styles to meet the criteria set by your teachers. Fortunately, Microsoft Word makes it quite easy to add citations and references to your Word documents.
How to Create References in Microsoft Word
The References tab in MS Word provides a comprehensive set of features for adding citations and references. The below guide will help you to add references in your Word documents, using Microsoft Word and older versions.
Step 1: To create a reference, head over to the References tab in MS Word and select a referencing style. By default Microsoft Word provides a variety of referencing styles, including the most commonly used styles like the Chicago and Harvard style of referencing.
Step 2: To add a citation click Insert Citation and select Add New Source.
Step 3: This will open a dialog box where you can select a source type and add relevant details. The available source types include Book, Book Section, Journal Article, Article in a Periodical, Conference Proceedings, Report.
Step 4: Once your reference has been created, go to Insert Citation and select it to add it as an inline reference.
Editing Your Citations and References in Microsoft Word
You can edit your citation anytime by clicking on the inline citation. The available options in the drop down menu will allow you to edit the citation and source, convert the citation to static format, as well as to update citation and bibliography.
You can also manage your added references by going to Manage Sources in the References tab. This section can be used to edit and remove added sources, as well as to copy and add new sources.
Adding Bibliographies to MS Word
In the References section you can use the Bibliography menu to add a Bibliography to your Microsoft Word document.
Adding End Notes to Your Microsoft Word Document
You can add end notes to your MS Word documents via References –> Insert Endnote.
As we could see, adding citations in Microsoft Word is possible with these simple steps. These tips can be helpful for Academic research or when preparing business documents. If you need more help you can learn Microsoft Word and how to accomplish simple tasks to be more productive at work.