

on
July 19, 2006, 12:00 AM PDT
How do I… Even up columns in a Word document?
Balancing columns in a document is not a monumental task, yet there’s a trick to it that few users are aware of. If you find yourself supporting Word users (or simply want to fine-tune your own skills), this is a good technique to know. Learn (and share) the answer to this How do I…? riddle with the help of this graphical walk-through.
Creating a multiple-column layout on the page in Word is
easy enough–but users often hit a snag. Word creates snaking columns,
which means they run from the top of the column to the bottom until they run
out of text. Figure A shows how this works.
|
Figure A |
 |
| Word’s snaking columns often mean uneven columns–generally not the layout effect of choice. |
A lot of times, users want the columns evenly balanced to
avoid all that white space in the second column. The
solution is easy but not remotely intuitive, so it’s worth learning the trick
for future reference. Here’s a quick walk-through to illustrate the process.
Applying a column format
To apply a multiple-column layout to a Word document, you
just click the Columns button on the Standard toolbar and use the drop-down
grid to specify the number of columns you want (Figure B). We’ll go with
two columns for this demo.
|
Figure B |
 |
| Use the Columns button to specify the number of columns you want for your document. |
Word will immediately change the document layout to reflect
your selection. (Note that you’ll need to be in Print Layout view or Print
Preview so see the effect.)
Achieving balance
To force Word to balance the columns, click at the end of the
text and choose Insert | Break. In the Break dialog box (Figure C),
select Continuous under Section Break Types and click OK. Figure D shows
the effect on the sample document we looked at earlier.
|
Figure C |
 |
| Enter a Continuous section break at the end of the text. |
|
Figure D |
 |
| The section break forces the text to balance between columns. |
Depending on how your text is formatted (and whether the
number of total lines of text is evenly divisible by the number of columns),
you might have to do a little tweaking to achieve perfect alignment. For
instance, we cheated a little with our example, applying the Keep With Next
format to the heading “M” to push it to the top of the next column.
This created proper alignment as well as ensuring that the heading stayed with its
entries.
An extra twist
This trick works fine on such a simple example. But users
may be grappling with a more complex document–say, one with more than one
section. Let’s suppose that they already have a section break at the bottom of
the sample document–a Next Page break they threw in to keep the alphabetical
listing on the first page, begin the main text on the second page, and return
to one-column formatting for the second and subsequent pages.
You’d think that having a section break already there would balance
the columns, but that’s not the case. The break that evens up columns must be a
Continuous one. Luckily, you can put in two breaks to achieve the desired
effect. Just insert the Continuous section break right above the Next Page
break, as shown in Figure E.
|
Figure E |
 |
| Even if you have a Next Page section break at the end of your text, you’ll still need to enter a Continuous break to force Word to balance the columns. |
-
Software
Table of Contents
- How do I format two columns in Word?
- What is a two column format?
- How do I format a document in two columns?
- How do I balance columns equally in Word?
- How do you change the text so it is justified?
- How do you make justified text look good?
- What must you do before formatting a paragraph?
Make multiple columns or rows the same size
How do I format two columns in Word?
Click the Page Layout tab, and then select Columns…. Choose the format of your columns. You can select a preset, automatically formatted number of columns with equal spacing by clicking One, Two, Three, or Four. You can also manually select the number, width, and spacing of the columns by clicking More columns….
What is a two column format?
The title and author data is in one-column format, while the rest of the paper is in two-column format. To accomplish this, most word processors have a section break that is installed to separate the one and two-column format. For example, in Word, under the Insert menu select Breaks – Continuous.
How do I format a document in two columns?
On the Page Layout tab, click Columns, then click the layout you want.
- To apply columns to only part of your document, with your cursor, select the text that you want to format.
- On the Page Layout tab, click Columns, then click More Columns.
- Click Selected text from the Apply to box.
- Select the columns or rows you want to make the same size. You can press CTRL while you select to choose several sections that are not next to each other.
- On the Layout tab, in the Cell Size group, click Distribute Columns. or Distribute Rows .
How do I balance columns equally in Word?
Word inserts a continuous section break that automatically balances the text equally among the columns….Balance text in Word columns in three easy steps
- Click at the end of the columns you want to balance.
- Go to Insert | Break.
- Select Continuous and click OK.
How do you change the text so it is justified?
Justify text
- In the Paragraph group, click the Dialog Box Launcher. , and select the Alignment drop-down menu to set your justified text.
- You can also use the keyboard shortcut, Ctrl + J to justify your text.
How do you make justified text look good?
Right-click on the text, and click Paragraph. On the Indents and Spacing tab, click the drop-down next to Alignment, and click Justified, OK.
What must you do before formatting a paragraph?
What must you do before formatting a paragraph? Make sure the insertion point is in the paragraph. What are elements that can have borders and shading applied to them? What is the best reason why you should avoid using red with green for your text and shading options?
Make multiple columns or rows the same sizeSelect the columns or rows you want to make the same size. You can press CTRL while you select to choose several sections that are not next to each other.On the Layout tab, in the Cell Size group, click Distribute Columns. or Distribute Rows .
How do I make everything even in Word?
5:43Suggested clip 114 secondsHow to perfectly align your text using Tab Stops in Microsoft WordYouTubeStart of suggested clipEnd of suggested clip
How do you make cells even in Word?
Select the columns or rows that you want to make the same size, and then click the Table Layout tab.Under Cells, click Distribute Rows or Distribute Columns.
How do I make three columns the same in Word?
Follow these steps:Position the insertion point at the end of the text in the third column.Display the Page Layout (Layout in later versions of Word) tab of the ribbon.Click on the drop-down arrow at the right of the Breaks tool. Word displays a number of types of breaks you could enter.Choose the Continuous option.
How do I move to the next column in Word?
There are different ways to switch columns in Word If you are in next column you can switch to the top of the previous column by pressing Alt+Page Up on your keyboard. Another option to use is Ctrl+Shift+Enter to switch between columns in Word. That is also called “inserting a column break”.
What word feature lets you capture a portion of your screen?
In your Word document, select the Insert tab. Click Screenshot. A drop down menu will appear with the option to take a screenshot of a window open on your desktop, or take a screen clipping of only a portion of your screen. Select the option that suits your need.
Which key is used to move the cell?
Move around a workbook using the keyboard To move to the next cell, press the Arrow Keys. To move to the next cell to the right, press TAB. To move to the next cell to the left, press SHIFT + TAB. To move to the edge of a data region, press CONTROL + Arrow Keys.
Which function key is used for spell check?
Here’s a quick tip to run a spell check using the only the keyboard. Just hit Alt + F7 on your keyboard and it will start with the first misspelled word. If the first highlighted word at the top of the list is correct, just hit Enter. Or you can arrow to the correct one, ignore it, or Add to Dictionary.
What is primary key in data base?
Each table in a relational database must be assigned a primary key. The primary key is a column, or set of columns, whose values uniquely identify each row in the table.
What is a primary key give an example?
A primary key is either an existing table column or a column that is specifically generated by the database according to a defined sequence. For example, students are routinely assigned unique identification (ID) numbers, and all adults receive government-assigned and uniquely-identifiable Social Security numbers.
How we can find primary key?
Primary Keys The primary key consists of one or more columns whose data contained within are used to uniquely identify each row in the table. You can think of them as an address. If the rows in a table were mailboxes, then the primary key would be the listing of street addresses.
What is unique key example?
As the id of each employee is unique and no two employees can have the same Emp_id. Unique key is a constraint that is used to uniquely identify a tuple in a table. Multiple unique keys can present in a table….Difference between Primary Key and Unique Key.Primary KeyUnique KeyCannot be NULLCan be NULL4 •
In this article, we want to offer you 4 effective ways to distribute rows and columns evenly in your Word table.
By default, when you insert a table, row height and column width are distributed evenly. But as you input texts and numeric data into table cells, each row and column takes different height and width. This diminishes visual effect more or less. Therefore, we are delighted to show you approach to distribute tows and columns evenly.
Method 1: Distribute Rows and Columns with Command in the Ribbon
- First of all, put cursor inside the target table.
- Then click on the plus sign on the upper left corner of the table to select it.
- Next click “Layout” under “Table Tools”.
- In “Cell Size” group, click “Distribute Rows” to set row height equally. And then click “Distribute Columns” to set column width evenly.


Method 2: Distribute Rows and Columns with Contextual Menu
- Repeat the first 2 steps in method 1 to select table.
- Next right click and click “Distribute Rows Evenly” and “Distribute Columns Evenly”.


Method 3: Distribute Rows and Columns by Specifying Height and Width
- Similarly, repeat first 2 steps in method 1 to select table.
- Then right click on table to choose “Table Properties” on contextual menu.
- In the box open, click “Row” tab first.
- Then check the “Specify height” box and enter a value.
- Remember to choose “Exactly” for the row height.
- Next click “Column” tab.
- Likewise, check “Preferred width” box and then enter a width value.
- Lastly, click “OK”.


Method 4: Distribute Rows and Columns in All Tables in the Document via VBA
Above 3 methods all focus on distributing rows and columns in a single table. This way below shall allow you to batch process all tables in a document at one time.
- To start off, press “Alt+ F11” to trigger VBA editor.
- Next click “Normal” project on the left column.
- Then click “Insert”.
- And choose “Module” on its drop-down menu.

- Double click on new module to open it and paste following macro there:

Sub DistributeSameColumnWidthAndRowHeight()
  ' Check if there are any table in the document.
  If ActiveDocument.Tables.Count > 0 Then
    Dim objTable As Table

    For Each objTable In ActiveDocument.Tables
      objTable.Select
      ' Distribute same column width for table.
      objTable.Range.Cells.DistributeWidth
      ' Distribute same row height for table.
      objTable.Range.Cells.DistributeHeight
    Next
  Else
    MsgBox ("There is no table in this document!")
  End If
End Sub
- Last but not the least, click “Run”.


Then you can find rows and columns in all tables in this document are distributed evenly.
Address Word Errors
Now and then, we run into Word issues, such as corrupt word and broken documents. Under such circumstances, we must take action immediately to fix problems as to minimize the downtime and economic cost. And our best choice is to purchase an excellent repairing tool.
Author Introduction:
Vera Chen is a data recovery expert in DataNumen, Inc., which is the world leader in data recovery technologies, including recover xlsx and pdf repair software products. For more information visit www.datanumen.com
Excel for Microsoft 365 PowerPoint for Microsoft 365 PowerPoint for Microsoft 365 for Mac Excel 2021 PowerPoint 2021 PowerPoint 2021 for Mac Excel 2019 PowerPoint 2019 PowerPoint 2019 for Mac Excel 2016 PowerPoint 2016 PowerPoint 2016 for Mac Excel 2013 PowerPoint 2013 More…Less
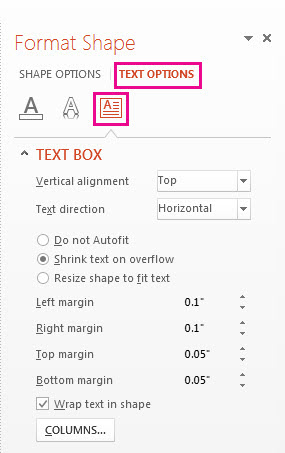
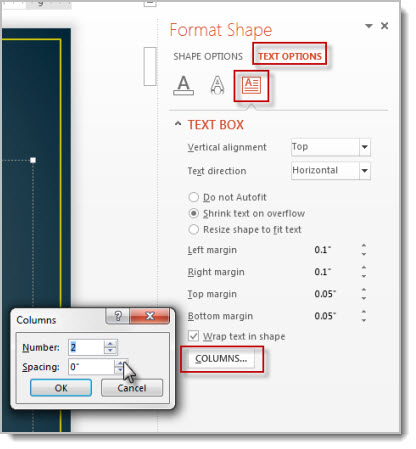
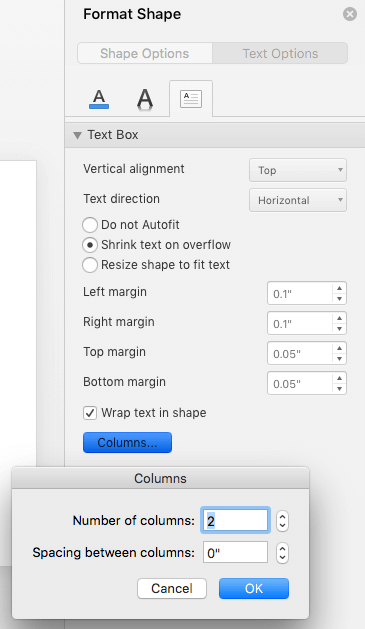
You can arrange your text into columns in a Text Box or shape. You can also specify the spacing (in inches) between the columns. Here’s how:
-
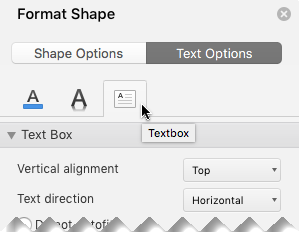
Right-click the text box, placeholder, or shape border, and click Format Shape.
-
On the right side of the window, click Text Options > Textbox
 .
. -
Click Columns, enter the number of columns in the Number box, and the space between each column (in inches) in the Spacing box.
If the Columns button is grayed out, it’s likely because you are working on a table. Columns for tables are described in a separate article. See Add or delete table rows and columns.
-
Any text you now enter will appear in columns. If the object you right-clicked in step 1 already contained text, you’ll see that the text now appears in columns.
You can adjust balance of text in your columns by adding or remove line breaks: Press Enter to add blank lines and move text to the next column, or press Backspace or Delete or remove blank lines and move text to the previous column.
You can also resize the box that contains the columns to make the columns more even, if you like.
 .
.
-
Right-click the text box, placeholder, or shape border, and click Format Shape.
-
On the right side of the window, click Text Options > Textbox.
. -
Click Columns, enter the number of columns in the Number box, and the space between each column (in inches) in the Spacing box.
If the Columns button is grayed out, it’s likely because you are working on a table. Columns for tables are described in a separate article. See Add or delete table rows and columns.
-
Any text you now enter will appear in columns. If the object you right-clicked in step 1 already contained text, you’ll see that the text now appears in columns.
You can adjust balance of text in your columns by adding or remove line breaks: Press Enter to add blank lines and move text to the next column, or press Backspace or Delete or remove blank lines and move text to the previous column.
You can also resize the box that contains the columns to make the columns more even, if you like.
 .
.
Column breaks
You can’t insert a column break in a multi-column text box. If this is a feature you’d like to request, please send us your feedback to help us prioritize new features in future updates. See How do I give feedback on Microsoft Office? for more information.
Making columns in a table
If you’re using a table, the feature for making columns is different. Read Add or delete table rows and columns instead of this article.
See Also
Add a table to a slide
Move or resize a table
Change the look of a table
Need more help?
Want more options?
Explore subscription benefits, browse training courses, learn how to secure your device, and more.
Communities help you ask and answer questions, give feedback, and hear from experts with rich knowledge.
joejoejoe
-
#1
how do you make the columns in a table even in word 2000???
Advertisements
Anne Troy
-
#2
Divide the table width by the number of columns, then set the width of the
columns this big. You can use the Alt key to have more control if you want
to resize by dragging cell borders.
*******************
~Anne Troy
www.OfficeArticles.com
www.MyExpertsOnline.com
Advertisements
Andrea Jones
Want to reply to this thread or ask your own question?
You’ll need to choose a username for the site, which only take a couple of moments. After that, you can post your question and our members will help you out.
Ask a Question
| How to make scroll bar permanently visible, Word 365 | 0 | Nov 25, 2021 |
| Publisher 2010 — distribute columns evenly | 0 | Jan 3, 2018 |
| How to make a large Word file sendable by email? | 0 | Jan 24, 2021 |
| To make pdf to work as word | 1 | May 14, 2021 |
| New computer, how do i move outlook 365 ENTIRELY? | 0 | Nov 28, 2022 |
| Format column widths from one table to a separate table on same page | 1 | Apr 19, 2020 |
| Booklet in Word, Merge Directory from Excel | 0 | Oct 21, 2019 |
| Make elements in a row space between instead of wrapping when choosing multiple columns | 0 | Oct 11, 2021 |
Adjust Table Columns in Word (Auto Fit)
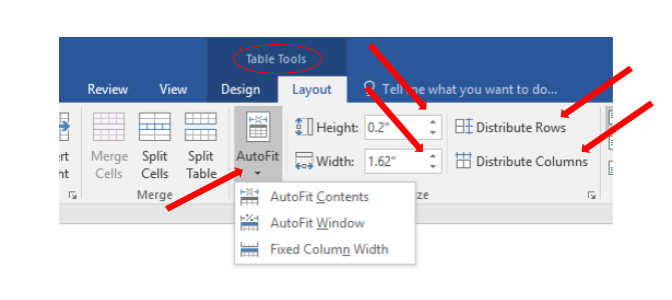
You can manually adjust the width of any table; however, the following tips may allow you to fine-tune your tables with less effort.
To adjust table row and column size in Word:
- Click anywhere in the table.
- In «Table Tools» click the [Layout] tab > locate the «Cell Size» group and choose from of the following options:
- To fit the columns to the text (or page margins if cells are empty), click [AutoFit] > select «AutoFit Contents.»
- To fit the table to the text, click [AutoFit] > select «AutoFit Window.»
- To keep Word from automatically adjusting your column size, click [AutoFit] > select «Fixed Column Width.»
- To adjust the row height, click the up and down arrows within the «Height» field. Highlight multiple cells to adjust more than 1 row.
- To adjust the column width, click the up and down arrows within the «Width» field.
- To make all columns the same width, click [Distribute Columns].
- To make each row the same height, click [Distribute Rows].
Keywords: Microsoft Word, tables, format columns, resize, even, adjust columns
Share This Post
-
Facebook
-
Twitter
-
LinkedIn