
Word for Microsoft 365 Word for Microsoft 365 for Mac Word for the web Word 2021 Word 2021 for Mac Word 2019 Word 2019 for Mac Word 2016 Word 2016 for Mac Word 2013 Word 2010 Word for Mac 2011 More…Less
You can control the vertical space between the lines of text in your document by setting the line spacing. Or, you can change the vertical space between paragraphs in your document by setting the spacing before or spacing after paragraphs. You can also choose to keep lines of text together or keep paragraphs together on a page.
Change the line spacing in an entire document
-
Go to Design > Paragraph Spacing.
-
Choose an option. To single space your document, select No Paragraph Space.
To return to the original settings later, go to Design > Paragraph Spacing and choose the option under Style Set. This may be Default or the name of style you’re currently using.
Change the line spacing in a portion of the document
-
Select one or more paragraphs to update. Press Ctrl + A to select all.
-
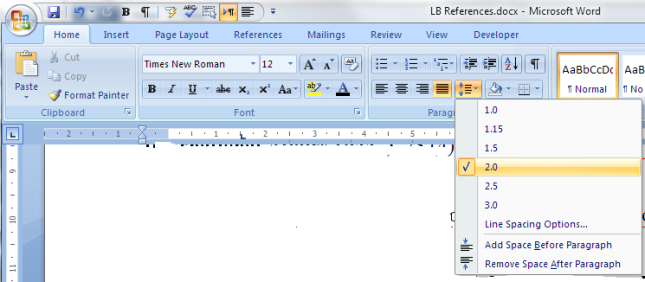
Go to Home > Line and Paragraph Spacing

-
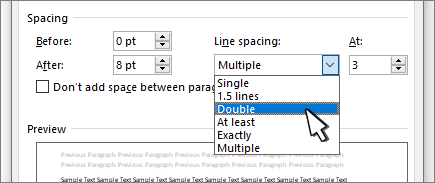
Select Line Spacing Options and choose an option in the Line spacing box.
-
Adjust the Before and After settings to change spacing between paragraphs.
-
Select OK.

For more info, see Adjust indents and spacing.
Change the line spacing in an entire document
-
Go to Design > Paragraph Spacing.
-
Choose the option you want. If you want to single space your document, choose No Paragraph Space.

This overrides the settings of the style you’re currently using. If you decide later to return to the original settings, go to Design > Paragraph Spacing and choose the option under Style Set. The option might be Default, as shown above, or it will show the name of style you’re currently using.
Change the line spacing in a portion of the document
-
Select the paragraphs you want to change.
-
Go to Home > Line and Paragraph Spacing.
-
Choose the number of line spaces you want or select Line Spacing Options, and then select the options you want under Spacing.
-
To change the spacing before or after each of the paragraphs in the text you selected, click the arrow next to Before or After and enter the amount of space that you want.
-
Select OK.

-
Select the paragraph whose lines you want to keep together.
-
Go to Format > Paragraph >Line and Page Breaks.
-
Select Keep lines together.
-
Select the first of the two paragraphs that you want to keep together.
Tip: If you want to keep more than two paragraphs together, select all but the last paragraph.
-
Go to Format > Paragraph.
-
Go to Line and Page Breaks.
-
Select Keep with next.
-
Select OK.
-
Select the paragraphs you want to change, or press Ctrl+A to select everything.
-
Go to Home > Line Spacing.
-
Choose the number of line spaces you want, or select Line Spacing Options and then select the options you want in the Paragraph dialog box under Spacing:
Tip: If you want to change the spacing before or after the selected paragraphs, select the arrows in the Before or After boxes, or type a number directly.
Need more help?
Change the line spacing in a portion of the document
- Select one or more paragraphs to update.
- Go to Home > Line and Paragraph Spacing.
- Select Line Spacing Options and choose an option in the Line spacing box.
- Adjust the Before and After settings to change spacing between paragraphs.
- Select OK.
Contents
- 1 How do you do 1.5 line spacing in Word?
- 2 How do I change line spacing to 1.0 in Word?
- 3 How do I change the spacing between lines in Word 2010?
- 4 What is 1.5 spacing word?
- 5 How do I change line spacing in Word 2016?
- 6 How do you change line spacing in Word 2007?
- 7 Is 1.0 single spacing?
- 8 What is a line spacing in Word?
- 9 How do you change line spacing in docs?
- 10 Which line spacing is invalid?
- 11 How do I change the spacing between lines in Word 2013?
- 12 How do I make the space between paragraphs smaller in Word?
- 13 How do I change the spacing in Word for Mac?
- 14 How do I change the line spacing in Word 2008?
- 15 How do I change the line spacing in Word 2003?
- 16 What is line spacing in MS Word 2007?
- 17 Why is line spacing not working in Word?
- 18 How do I change line spacing to 1.2 in Word?
- 19 What is the shortcut key for 1.5 line spacing?
- 20 Why is my Line spacing off in docs?
How do you do 1.5 line spacing in Word?
To format line spacing:
- Click Format on the menu bar.
- Select Paragraph. The Paragraph dialog box appears.
- Click the Indents and Spacing tab.
- In the line spacing drop-down menu, you can select single, 1.5, or double spacing. The default is single spacing.
- Click OK.
How do I change line spacing to 1.0 in Word?
Choose 1.0
- Select the paragraphs you want to change.
- Go to Home > Line and Paragraph Spacing .
- Choose 1.0.
How do I change the spacing between lines in Word 2010?
To format line spacing:
- Select the text you want to format.
- Click the Line and Paragraph Spacing command in the Paragraph group on the Home tab.
- Select the desired spacing option from the drop-down menu.
- From the drop-down menu, you can also select Line Spacing Options to open the Paragraph dialog box.
What is 1.5 spacing word?
Press Ctrl+1 for single-spacing, Ctrl+5 for 1.5 spacing, or Ctrl+2 for double-spacing. Click to view larger image.
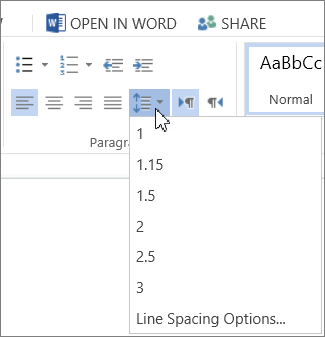
How do I change line spacing in Word 2016?
Go to Home > Line and Paragraph Spacing. Select Line Spacing Options, and then choose the options you want under Spacing. To change the spacing before or after the selected paragraphs, select the arrow next to Before or After and enter the amount of space that you want. Select Set as Default.
How do you change line spacing in Word 2007?
Select the text you want to format. Click the Line spacing command in the Paragraph group on the Home tab. Select a spacing option.
The Paragraph dialog box appears.
- Use the Line spacing drop-down menu to select a spacing option.
- Modify the before and after points to adjust line spacing as needed.
- Click OK.
Is 1.0 single spacing?
Line spacing is the distance between lines. In earlier versions of Word, the default line spacing distance is “1.0,” or single-spacing, which stacks lines closely together with minimal space between. The amount of that space varies depending on the font used.
What is a line spacing in Word?
Line spacing is the distance between lines of text.To change the line spacing, select the lines you want to change. Then go to the Home tab and find the line spacing button in the Paragraph section.
How do you change line spacing in docs?
Change line & paragraph spacing
- On your computer, open a document in Google Docs.
- Select the lines you want to change.
- Click Format. Line & paragraph spacing.
- Select a line spacing option: To change your paragraph spacing, click Single, 1.15, 1.5, or Double.
Which line spacing is invalid?
The correct answer is Triple. Line spacing feature in MS word or any other word processing tool gives us the flexibility to adjust the space between two lines of text. To set the line spacing, we need to select the lines of text and go to the spacing option on the ribbon.
How do I change the spacing between lines in Word 2013?
To format line spacing:
- Select the text you want to format. Selecting text to format.
- On the Home tab, click the Line and Paragraph Spacing command. A drop-down menu will appear.
- Move the mouse over the various options.
- The line spacing will change in the document.
How do I make the space between paragraphs smaller in Word?
Change spacing between paragraphs
- Click anywhere in the paragraph you want to change.
- Go to Layout, and under Spacing, click the up or down arrows to adjust the distance before or after the paragraph. You can also type a number directly.
How do I change the spacing in Word for Mac?
Change the line spacing in Word for Mac
- Click Design > Paragraph Spacing.
- Click the option you want. If you want to single space your document, choose No Paragraph Space.
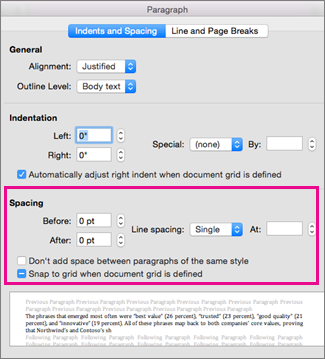
How do I change the line spacing in Word 2008?
Word 2011 and 2008
- Select the document text for which you want to change the line spacing.
- From the Format menu, select Paragraph…. The Paragraph dialog box will open.
- Select the Indents and Spacing tab.
- Click OK to apply your changes.
How do I change the line spacing in Word 2003?
Adjusting Line Spacing
- Place the insertion point in the desired paragraph.
- From the Format menu, select Paragraph… The Paragraph dialog box appears.
- Select the Indents and Spacing tab.
- In the Spacing section, from the Line spacing pull-down list, select the desired spacing option.
- Click OK.
What is line spacing in MS Word 2007?
By Dan Gookin. Word 2007 enables you to change the line spacing within your paragraphs using the Line Spacing command. Changing the line spacing inserts extra space between all lines of text in a paragraph. Word adds the space, or extra blank lines, below each line of text in the paragraph.
Why is line spacing not working in Word?
A couple of things to check: For the style in question, look at the paragraph formatting and make sure that “Don’t add space between paragraphs of the same style” is not checked. At Tools | Options | Compatibility, make sure that “Don’t use HTML paragraph auto spacing” is checked.
How do I change line spacing to 1.2 in Word?
Change the line spacing in a portion of the document
- Select one or more paragraphs to update.
- Go to Home > Line and Paragraph Spacing.
- Select Line Spacing Options and choose an option in the Line spacing box.
- Adjust the Before and After settings to change spacing between paragraphs.
- Select OK.
What is the shortcut key for 1.5 line spacing?
Ctrl+5
Pressing Ctrl+5 changes to 1.5 line spacing.
Why is my Line spacing off in docs?
You will need to change that on the computer/desktop app (not the mobile app). When you’re on a computer, drag your cursor through the problem lines or press Ctrl + A to select your entire document. Then go to the line-spacing tool in the action bar and select Add/remove space before paragraph.
- Remove From My Forums
-
Question
-
Hi,
We have a default style set pushed out to all computers. This works fine.
We have received a document and the style just does not work. We have line spacing set to ‘at least 22pt’ but in this particular document it shows much bigger.
If I clear formatting and re-assign the style the issue is still there. If I copy all the text and past as text into a new document and re-assign the style it is fine.
So the style is fine. Does Word have something where you set a ‘base’ size for some things. I cannot work out what is wrong with this document!
Thanks
Wrong:
Right:
Answers
-
In Word jargon «style set» is short for «Quick Style Set» which is a template that holds those styles set to appear in the Quick Style Gallery of the document/template
on which the style set is based.Applying such a style set to an existing document changes the definition of the styles that are in the document to match those of in the Quick Style Gallery of the style set. It does nothing to styles that have different names.
Further, if any of the styles in the style set are based on styles not in the style set, the definition of the base style will not be changed by applying the style set.
The best way of formatting is generally the one you use that gives you the «right» result. That is, paste as plain text and reformat using styles. This may not be what you wanted to hear.
I or someone else might be able to tell you more about why with actual document samples rather than screen shots. (Your screen shots are far more informative than most that we see, but they don’t let us actually look at the styles or the underlying xml.)
Charles Kenyon Madison, WI
-
Edited by
Thursday, August 2, 2018 3:44 PM
-
Proposed as answer by
Winnie LiangMicrosoft contingent staff
Friday, August 3, 2018 9:27 AM -
Marked as answer by
Lanky Doodle
Thursday, November 8, 2018 8:37 PM
-
Edited by
-
The challenge with variable Line Spacing is that it will also depend on the chosen font. Sometimes, you have to specify an exact value for the Spacing.
Whenever you add an inline picture, you can put it in a paragraph whose Line Spacing is set to «Single.»
Stefan Blom, Microsoft Word MVP
-
Marked as answer by
Lanky Doodle
Thursday, November 8, 2018 8:37 PM
-
Marked as answer by
Spruce up the formatting in your Word docs
What to Know
- To fix spacing between words, go to Find and Replace. Enter a space in both fields, then go to More > Format > Font and choose a font size.
- To adjust spacing between characters, go to Home, select Expand (the down-arrow) next to Font, and select the Advanced tab.
- To change spacing between lines, go to Home and select Expand (the down-arrow) next to Paragraph and adjust the Spacing options.
This article explains how to fix spacing in Word 2021, 2019, 2016, and Word for Microsoft 365.
How to Fix Spacing Between Words in Word
Using different fonts or font sizes in your document can lead to inconsistent spacing between words. Follow these steps to adjust the spacing between words without affecting the space between letters:
To show paragraph breaks and spaces, go to the Home tab and select the Show/Hide icon (¶) in the Paragraph group.
-
Highlight the text you want to change and select the Home tab. Press Ctrl+A (Windows) or Cmd+A (Mac) to highlight the entire document.
-
Select Replace in the Editing group.
On Mac, go to Edit > Find > Advanced Find and Replace, then select the Replace tab.
-
Click in the Find what text field and press your spacebar to create a space.
-
Click in the Replace with field and press your spacebar to create a space.
-
Select More to expand the window.
-
Select Format and choose Font.
-
Under Size, choose the font size you use most consistently throughout the document, then select OK.
-
Select Replace All.
-
In a new window, Word will report the number of replacements. Select Yes to apply changes to the entire document, or select No to change only the highlighted text.
The spacing between words should now be consistent. You can now close the Find and Replace window.
Don’t add multiple spaces between words because it makes formatting the entire document more difficult.
You can justify text in Word if you want to expand word spacing so the right margin is always straight (like a newspaper column).
How Do I Fix Spacing Between Characters?
To adjust the spacing between characters (letters, numbers, symbols, etc.), follow these steps:
-
Highlight the text you want to change and select the Home tab.
-
Next to Font, select Expand (the down-arrow).
-
Go to the Advanced tab. To stretch or compress the text, increase or decrease Scaling. For Spacing, choose Expanded or Condensed to adjust the spacing between all characters.
Select Kerning for fonts to enable text kerning. This feature automatically adjusts the spacing between characters to be more aesthetically pleasing. You can choose to kern characters above a certain size.
How to Fix Line Spacing in Word
Follow these steps to change the amount of space between lines within a paragraph:
To adjust the spacing between paragraphs, go to the Design tab, select Paragraph Spacing and choose from the options. For single spacing, choose No Paragraph Space.
-
Highlight the text you want to change and select the Home tab.
-
Next to Paragraph, select Expand (the down-arrow).
-
In the Spacing section, manually set the amount of space before and after line breaks, or choose one of the options under Line spacing. Select the Line and Page Breaks tab for more advanced options like text wrapping and pagination settings.
When you’re done, select OK to save changes.
FAQ
-
How do I change the tab spacing in Word?
The quickest way to set tab stops is to click the ruler where you want a tab. Alternatively, go to the Home tab and select Paragraph Settings in the Paragraph group. Next, select the Tabs button. Finally, set the desired Tab stop position, click Set, and click OK.
-
How do I fix the spacing between bullet points in Word?
To change line spacing between bullets in a list, select the list and then click the Paragraph Dialog Box Launcher. On the Indents and Spacing tab, under Spacing, clear the Don’t add space between paragraphs of the same style check box.
Thanks for letting us know!
Get the Latest Tech News Delivered Every Day
Subscribe
This article tells you what to do if you think you’ve set your paragraph line spacing for the whole document but individual paragraphs refuse to behave. This is valid for Word 2007 and Word 2010, with Word 2013 to follow soon.
My spaces between paragraphs are uneven – help!
This just happened to me, which is why I’ve written up this article.
I was working on a bibliography for a client.
I set the paragraph and line spacing as I normally do: highlight the whole document, go to the Home tab, Paragraph section, and click the down arrow on the Spacing button:

This gives you the Spacing menu:
from which you choose your line spacing and lines after paragraphs options (I will write up a main post about this soon).
But it didn’t work!
Individual paragraphs still had no automatic spaces between then, even if I removed the line feed and pressed Enter again.
How to solve the problem of inconsistent paragraph spacing
Here’s how I did it.
I highlighted all of the text.
I right-clicked on the highlighted text and chose Paragraph from the options:

I then stayed on the Indents and Spacing tab and set my After spacing to 12pt and my line spacing to 2 (just in case). I also unticked Don’t add space between paragraphs of the same style (it was filled in with blue rather than ticked so I clicked twice to get a tick and then no tick):

I pressed OK and the paragraphs all behaved beautifully.
I’m not entirely sure why this method works over the previous one, to be honest, but it worked for me and it was hard for me to find an easy, quick answer, so hopefully this will help a few people!
————————–
If you have enjoyed this post or found it useful, please share the link!
Please note, these hints work with versions of Microsoft Word currently in use – Word 2007 and Word 2010, for PC. Mac compatible versions of Word should have similar options. Always save a copy of your document before manipulating it. I bear no responsibility for any pickles you might get yourself into!
Find all the short cuts here …

There are several ways to adjust line spacing in Microsoft Word. Today’s tutorial explains the basic method using the ribbon and a more advanced method using the Paragraph dialog box.
See the Quick Tip at the bottom of this tutorial to learn how to single-space an entire document from the Paragraph dialog box.
This tutorial is available as a YouTube video showing all the steps in real time.
Watch more than 150 other document software tutorials on my YouTube channel.
The images below are from Word for Microsoft 365.The steps are the same in Word 2021, Word 2019, and Word 2016, and similar for Word 2013 and Word 2010. However, your interface may look slightly different in those older versions of the software.
Basic Method: Adjust Line Spacing from the Ribbon
- Select the Home tab in the ribbon.

- (Optional Step) Select the Show/Hide button in the Paragraph group to show paragraph break symbols and other formatting that may affect line spacing.

- Select the text with the line spacing that needs to be changed.

- Select the Line and Paragraph Spacing button in the Paragraph group.

- Select an option from the drop-down menu:
A. Numbers 1.0 through 3.0 add space between lines.
B. Add Space Before Paragraph adds space before paragraphs but not before the lines within them.
C. Remove Space After Paragraph removes space after paragraphs but not after the lines within them.
These three options are based on your current font size with 1.0 being the equivalent of single-spacing.

Your changes will be applied immediately.

Note that you can apply the individual line spacing (the numbers 1.0 through 3.0) and the paragraph spacing to the same text to further customize your results.
- (Optional Step) Select the Show/Hide button again to hide paragraph symbols and other formatting (see figure 2).
Now, let’s move on to an advanced method offering additional spacing options.
Advanced Method: Adjust Line Spacing from the Paragraph Dialog Box
- Select the Home tab in the ribbon (see figure 1).
- (Optional Step) Select the Show/Hide button in the Paragraph group to show paragraph break symbols and other formatting that may affect line spacing (see figure 2).
- Select the text with the line spacing that needs to be changed (see figure 3).
Pro Tip: PC users can press Ctrl + A to select the entire document if all the line spacing needs to be changed. However, this includes items you may not want to alter, including headings, tables, table titles, figure captions, tables of contents, footnotes, endnotes, and reference lists.
- Select the dialog box launcher in the Paragraph group.

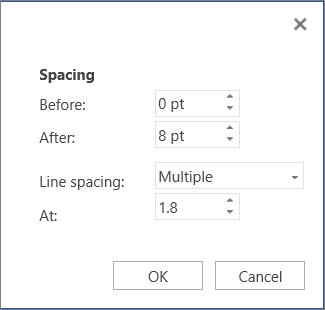
- Make changes in the Spacing section of the Paragraph dialog box:
A. The Before and After boxes represent the spaces before and after paragraphs measured in points with one point being 1/72 of an inch tall. Use the increment arrows to choose a whole number or enter a number with a decimal (e.g., 2.75) directly into the box.
B. The Line spacing drop-down menu offers six options:
1. Single—Creates single-spacing based on your current font size.
2. 1.5 Lines—Creates a space and a half as large as your current font size.
3. Double—Creates double-spacing based on your current font size.
4. At Least—Determines the minimum amount of space between lines based on the number of points entered in the At box.
5. Exactly—Creates space between lines based on the number of points entered in the At box.
6. Multiple—Creates spacing multiplied by the number entered in the At box. For example, if you enter four in the At box, your spacing will be four times as large as your current single-spacing.
C. Don’t add space between paragraphs of the same style—For many users, this will remove spaces between all paragraphs because general documents commonly have only one paragraph style.

Note that the Preview box updates as you make adjustments in the Spacing section.
- Select the OK button to close the Paragraph dialog box.

- (Optional Step) Select the Show/Hide button again to hide paragraph symbols and other formatting (see figure 2).
Quick Tip: Single-Space an Entire Document from the Paragraph Dialog Box
- Select the Home tab in the ribbon (see figure 1).
- Select the entire document. (PC users can press Ctrl + A.)
- Select the dialog box launcher in the Paragraph group (see figure 7).
- Enter 0 in the Before box in the Paragraph dialog box (see figure 8).
- Enter 0 in the After box in the Paragraph dialog box (see figure 8).
- Select Single in the Line spacing drop-down menu (see figure 8).
- Select the OK button (see figure 9).
Related Resources
How to Adjust Letter Spacing in Microsoft Word (PC & Mac)
How to Adjust the Space between Words in Microsoft Word
How to Adjust Page Margins in Microsoft Word
Updated June 25, 2022
Download PC Repair Tool to quickly find & fix Windows errors automatically
Readability is a crucial factor when it comes to preparing documents. If the space between two lines, aka Line Spacing, is too less, it will be hard to read. If it’s too much, there will be too much distraction. When reading the newspaper, you must have noticed that space between lines is way too little than what you read online. Saving space is crucial for newspapers because of the cost, while it is not so much when it comes to online reading. That said, in this post, we will share how you can change line spacing in Microsoft Word.
What is Double Spacing?
Along with other options, one popular way to increase space is Double Spacing. It instantly doubles the space between the lines of the document. In simple words, with Double Spacing, you add a full line of space between each line of writing. Depending on the amount of text, it definitely helps you to increase readability.

In Microsoft Office 365, you can instantly increase the line space with predefined options.
- Open the Word document
- Click on the Design tab
- Locate Paragraph Spacing under Document formatting, and click on it.
- You have the following options
- Default,
- No Paragraph Space,
- Compact,
- Tight,
- Open,
- Relaxed, and
- Double Space
- Select one.
When you choose any of the options, it is applied to the entire document. If you want to apply only to a certain paragraph, you can select it and apply the change.
Custom Line Spacing

If the default line spacing doesn’t work, you can create your line spacing. It is specifically useful when you need to print or when that’s how you need the document to be. It can specifically be helpful when there is a lot of text, and you do not want many pages, even if they are going to be used on the computer.
Go to Design > Paragraph Spacing > Custom Paragraph Spacing. It will open the Manage Styles windows where you can change the spacing for before and after fir paragraphs, and then you can also change line spacing as well.
You can then choose to apply the setting for the current document or new documents for the current template.
Office 2007-2010
If you are using an older version of Office, then you need to follow these steps:
Double-space the entire document
- On the Home tab, in the Styles group, right-click Normal and then click Modify.
- Under Formatting, click the Double Space button, and then click OK.
- Formatting for the entire document changes to double spacing.
Double-space the selected text
- Select the text that you want to change.
- On the Home tab, in the Paragraph group, click Line and Paragraph Spacing (Line Spacing in Word 2007)
- Click 2.0 and apply the changes.
What Is Standard Double Spacing in Word?
Microsoft Word defaults to a spacing of 1.08 lines, which is slightly larger than single-spaced. Within paragraphs, a space-and-a-half is best for line spacing, according to UX standards. Approximately 150 percent is 1.5 times the size of the font.
I hope the post was easy to follow, and you were able to clearly understand the concept of Line Spacing and how to use it in your document.

Ashish holds a Bachelor’s in Computer Engineering and is a veteran Windows and Xbox user. He has work experience as a Database and Microsoft.NET Developer. He has been a Microsoft MVP (2008-2010) and excels in writing tutorials to improve the day-to-day experience with your devices.
Matthew W. I. Dunn
-
#1
I have used Word 2000 intensively for years. If I was writing a bibliography
or taking notes, then I could insert Paragraph marks between text to keep
things clear (I hit Enter twice at end. Yes, MVP’s, I know that’s «caveman
style;» but, it worked). I had no problem highlighting and moving text with
the paragraph marks in-between, either within a document or between two
documents.
Now, with 2007 there are 10 (invisible) spaces added when one hits Enter for
a new paragraph or line of text. This is really screwing me up: *NOW*, if I
try to highlight and move chunks of text with the paragraph marks/10-points
at the end, Word removes the spaces between the paragraphs, giving me a big
mess of unseparated text (which, of course, I then have to go through and hit
Enter again between the text I want clearly separated).
Someone told me to go Office Button > Styles > No Spacing. That’s worked
sporadically for about a week. Sometimes it works; sometimes it doesn’t.
You know: Microsoft’s programs are «intuitive»! 
If I change a document’s style to No Spacing, then it seems to work okay
within that doc. However, if I try to drag text from one document to another
— even if they are BOTH No Spacing style, it will remove the 10-point
spacing from the highlighted, dragged text . . . and, I have another annoying
«text mess» on my hands.
As you can guess, my work has s- — l — — o — — w — — e — -d while trying to
get around 2007’s unintuitive and problematic program. (Glitches in the
Scroll Bar, anyone?)
Is there some way to solve this without dumping 2007 altogether and
reinstalling my old Word 2000?
Advertisements
Herb Tyson [MVP]
-
#2
I’m not sure what you mean by «10 (invisible) spaces». Do you mean 10 points
of additional vertical spacing?
Try this…
Press Ctrl+Alt+Shift+S (or click the Styles launcher in the SE corner of the
Styles section in the Home ribbon tab).
Click the Manage Styles button near the bottom of the Style pane.
In Manage Styles, click the Set Defaults tab.
Under Paragraph Spacing, set the After spacing as desired, and change Line
spacing to Single. This will give you what it sounds like you want… I
think. While here, notice the other defaults… which you can change if you
like.
Herb Tyson [MVP]
-
#3
Having said that, however, while I hate the Multiple 1.15 line spacing, I’ve
used After spacing for most of my paragraph spacing for years (albeit 12
points, not 10, and my default point size for text is 12, not 11, which is
absurdly small for my purposes). It prevents me from having to press Enter
twice after each paragraph (and for the kind of writing I do, double-spacing
between paragraphs is needed). When I need paragraphs to use single or other
spacing, then I switch to a different style.
However… we all work differently, and you should be able to achieve what
you want by changing the defaults.
—
Herb Tyson MS MVP
Author of the Word 2007 Bible
Blog: http://word2007bible.herbtyson.com
Web: http://www.herbtyson.com
Advertisements
Matthew W. I. Dunn
-
#4
Thanks for the reply.
I wrongly thought Word was deleting or adding extra Paragraph Marks when I
was trying to move text. However, another MVP told me that that was not the
case: By default, Word would now be adding 10 points (spaces?) to the end of
text whenever I hit Enter.
I followed your instructions, but all the settings are *already* set the way
you describe: The Manage Styles box showed 0 point before and after and
single line spacing, for both the Normal the No Spacing styles. Why, then,
would it still be doing what it’s doing? If I move a block of text, it
removes the spacing, and I get what appears to be a big block of text.
Could you, please, explain why Word 2007 does this now? I haven’t really
gotten a clear explanation from other MVP’s as to the benefits of the
program’s placement of 10 points after hitting Enter. In other words, what
is this feature *doing* for me now — other than frustrating me.