
I am trying to extract all the words in a Word document. I am able to do it all in one go as follows…
Word.Application word = new Word.Application();
doc = word.Documents.Open(@"C:SampleText.doc");
doc.Activate();

foreach (Word.Range docRange in doc.Words) // loads all words in document
{
    IEnumerable<string> sortedSubstrings = Enumerable.Range(0, docRange.Text.Trim().Length)
        .Select(i => docRange.Text.Substring(i))
        .OrderBy(s => s.Length < 3 ? s : s.Remove(2, Math.Min(s.Length - 2, 2)));

    wordPosition =
        (int)
        docRange.get_Information(
            Microsoft.Office.Interop.Word.WdInformation.wdFirstCharacterColumnNumber);

    foreach (var substring in sortedSubstrings)
    {
        index = docRange.Text.IndexOf(substring) + wordPosition;
        charLocation[index] = substring;
    }
}
However I would have preferred to load the document one line at a time… is it possible to do so?
I can load it by paragraph however I am unable to iterate through the paragraphs to extract all words.
foreach (Word.Paragraph para in doc.Paragraphs)
{
    foreach (Word.Range docRange in para) // Error: type Word.para is not enumeranle**
    {
        IEnumerable<string> sortedSubstrings = Enumerable.Range(0, docRange.Text.Trim().Length)
            .Select(i => docRange.Text.Substring(i))
            .OrderBy(s => s.Length < 3 ? s : s.Remove(2, Math.Min(s.Length - 2, 2)));

        wordPosition =
            (int)
            docRange.get_Information(
                Microsoft.Office.Interop.Word.WdInformation.wdFirstCharacterColumnNumber);

        foreach (var substring in sortedSubstrings)
        {
            index = docRange.Text.IndexOf(substring) + wordPosition;
            charLocation[index] = substring;
        }

    }
}
![]()
asked Aug 3, 2011 at 9:06
![]()
This helps in you getting string line by line.
    object file = Path.GetDirectoryName(Application.ExecutablePath) + @"Answer.doc";

    Word.Application wordObject = new Word.ApplicationClass();
    wordObject.Visible = false;

    object nullobject = Missing.Value;
    Word.Document docs = wordObject.Documents.Open
        (ref file, ref nullobject, ref nullobject, ref nullobject,
        ref nullobject, ref nullobject, ref nullobject, ref nullobject,
        ref nullobject, ref nullobject, ref nullobject, ref nullobject,
        ref nullobject, ref nullobject, ref nullobject, ref nullobject);

    String strLine;
    bool bolEOF = false;

    docs.Characters[1].Select();

    int index = 0;
    do
    {
        object unit = Word.WdUnits.wdLine;
        object count = 1;
        wordObject.Selection.MoveEnd(ref unit, ref count);

        strLine = wordObject.Selection.Text;
        richTextBox1.Text += ++index + " - " + strLine + "rn"; //for our understanding

        object direction = Word.WdCollapseDirection.wdCollapseEnd;
        wordObject.Selection.Collapse(ref direction);

        if (wordObject.Selection.Bookmarks.Exists(@"EndOfDoc"))
            bolEOF = true;
    } while (!bolEOF);

    docs.Close(ref nullobject, ref nullobject, ref nullobject);
    wordObject.Quit(ref nullobject, ref nullobject, ref nullobject);
    docs = null;
    wordObject = null;
Here’s the genius behind the code. Follow the link for some more explanation on how it works.
answered Feb 7, 2012 at 21:26
![]()
nawfalnawfal
69.1k56 gold badges322 silver badges368 bronze badges
2
I would suggest following the code on this page here
The crux of it is that you read it with a Word.ApplicationClass (Microsoft.Interop.Word) object, although where he’s getting the «Doc» object is beyond me. I would assume you create it with the ApplicationClass.
EDIT: Document is retrieved by calling this:
Word.Document doc = wordApp.Documents.Open(ref file, ref nullobj, ref nullobj,
                                      ref nullobj, ref nullobj, ref nullobj,
                                      ref nullobj, ref nullobj, ref nullobj,
                                      ref nullobj, ref nullobj, ref nullobj);
Sadly the formatting of the code on the page I linked wasn’t all to easy.
EDIT2: From there you can loop through doc paragraphs, however as far as I can see there is no way of looping through lines. I would suggest using some pattern matching to find linebreaks.
In order to extract the text from a paragraph, use Word.Paragraph.Range.Text, this will return all the text inside a paragraph. Then you must search for linebreak characters. I’d use string.IndexOf().
Alternatively, if by lines you want to extract one sentence at a time, you can simply iterate through Range.Sentences
answered Aug 3, 2011 at 9:44
![]()
Nick UdellNick Udell
2,4025 gold badges44 silver badges83 bronze badges
2
        Microsoft.Office.Interop.Word.Application word = new Microsoft.Office.Interop.Word.Application();
        object miss = System.Reflection.Missing.Value;
        object path = @"D:viewstate.docx";
        object readOnly = true;
        Microsoft.Office.Interop.Word.Document docs = word.Documents.Open(ref path, ref miss, ref readOnly, ref miss, ref miss, ref miss, ref miss, ref miss, ref miss, ref miss, ref miss, ref miss, ref miss, ref miss, ref miss, ref miss);
        string totaltext = "";

        object unit = Microsoft.Office.Interop.Word.WdUnits.wdLine;
        object count = 1;
        word.Selection.MoveEnd(ref unit, ref count);
        totaltext = word.Selection.Text;

        TextBox1.Text = totaltext;
        docs.Close(ref miss, ref miss, ref miss);
        word.Quit(ref miss, ref miss, ref miss);
        docs = null;
        word = null;
Increment the count for each line
answered Feb 7, 2013 at 10:30
![]()
shibashiba
2,7791 gold badge15 silver badges9 bronze badges
I recommend using DocX library. It is lightweight and doesn’t require Word to be installed on the machine. Here is the code that use to get text line by line :
using(DocX doc = DocX.Load("sample.docx"))
{
     for (int i = 0; i < doc.Paragraphs.Count; i++ )
     {
          foreach (var item in doc.Paragraphs[i].Text.Split(new string[]{"n"}
                    , StringSplitOptions.RemoveEmptyEntries))
          {
                Console.WriteLine(item);
          }
     }
}
answered Apr 22, 2014 at 21:32
![]()
HamdiHamdi
93113 silver badges31 bronze badges
- Remove From My Forums
-
Question
-
What I would like to do is write text to a word doc line by line not in «paragraphs».
for example:
|————————————————————|
|
Hello |
|World
|
|
|
|
|
| !!
|
|
|lets pretend the value of my variable is a whole bunch of spaces then Hello for that first line, for the second line it’s «World» and that’s it, next 2 lines are just «» and «», and lastly that final line is a bunch of space and !!
I need to be able to transfer something along those lines to the word doc and I can’t seem to find much out there that doesn’t have you doing a block of text at a time. I’ve tried
‘it prints to the document, not right but it prints.
thanks
in advance…I’ll be ok… I’m using VB.Net 2010 and Word 2000… sorry it’s been a long day
wrdDoc.Range.InsertAfter(strLine)
-
Edited by
Monday, April 18, 2011 7:11 PM
forgot system info
-
Edited by
Answers
-
Use Chr(11) to insert the line feeds
wdDoc.Range.InsertAfter «Line1» & Chr(11) & «Line2»
Hope this helps.
Doug Robbins — Word MVP,
dkr[atsymbol]mvps[dot]org
Posted via the Community Bridge«temlehdrol» wrote in message news:ad75904d-891a-4761-a878-121d21667fd1@communitybridge.codeplex.com…
I tried to edit the post but that doesn’t seem to be work that well… as I said it’s been a long day. Anyways I tried to use:
wrdDoc.Range.InsertAfter(strLine) 'it prints to the document, not right
but it prints.
and when I do that I get one continious stream of text…
Doug Robbins — Word MVP dkr[atsymbol]mvps[dot]org
-
Marked as answer by
temlehdrol
Tuesday, April 19, 2011 11:55 AM -
Unmarked as answer by
temlehdrol
Tuesday, April 19, 2011 1:21 PM -
Marked as answer by
temlehdrol
Tuesday, April 19, 2011 1:44 PM
-
Marked as answer by
Hi, I am new in VBScript. i used a VBScript for reading MSWord file word by word. here is the code of my Script.
Option Explicit


Dim objWord

Dim wordPath

Dim currentDocument

Dim numberOfWords
Dim i
Dim objDialog
Set objDialog = CreateObject("UserAccounts.CommonDialog")
objDialog.Filter = "VBScript Scripts|*.vbs|All Files|*.*"
objDialog.FilterIndex = 1
objDialog.InitialDir = "C:"
intResult = objDialog.ShowOpen
If intResult = 0 Then
    Wscript.Quit
Else
    Wscript.Echo objDialog.FileName
End If

wordPath = "C:Documents and SettingssapuserDesktopharry.doc"
WScript.Echo "Extract Data from " & wordPath

Set objWord = CreateObject("Word.Application")


objWord.DisplayAlerts = 0


objWord.Documents.Open wordPath, false, true

Set currentDocument = objWord.Documents(1)

NumberOfWords = currentDocument.words.count
WScript.Echo "There are " & NumberOfWords & " words " & vbCRLF
For i = 1 to NumberOfWords
	WScript.Echo currentDocument.words(i)
Next

currentDocument.Close

Set currentDocument = Nothing

objWord.Quit
Set objWord = Nothing
In this line we count the total number of words in my doc files
NumberOfWords = currentDocument.words.count
and this for loop display the contents of my doc file word by word
For i = 1 to NumberOfWords<br />
	WScript.Echo currentDocument.words(i)<br />
Next<br />
But I want to read my doc file line by line. Is there any function which gets a line rather than a word?
Please suggest me a way to get a line by line display of my doc.
Thanks.
Updated 18-Oct-11 23:37pm
Try using Paragraphs
For Each p In currentDocument.Paragraphs
    WScript.Echo p.Range.Text
Next p
This content, along with any associated source code and files, is licensed under The Code Project Open License (CPOL)
CodeProject,
20 Bay Street, 11th Floor Toronto, Ontario, Canada M5J 2N8
+1 (416) 849-8900
Hi All,
I have done word document comparison tool (windows application) using ASP.NET. I have used Microsoft word object library to read word document. It is working fine. When I started to do the project client wanted to compare documents text only I mean need not to compare formats, Header and footer. So I easily did that using document.text property. Now client wants to compare even header and footers. I am unable to read header and footer in sequential manner. Anybody could help me in this regard.
Note.
I want to read document in following manner
- Read Header if document contain header
- Read paragraph contain text
- Read Footer
Each page have to be read in above mentioned manner.
I can easily read Header, footer and document contains text alone. As I need to compare source document and destination document line by line and expose mismatched record in report format, I need to read the word document line by line. Please help me
Thanks and Regards
Ramadurai Jayaraman
Insert Lines in Microsoft Word Documents
by Avantix Learning Team | Updated October 9, 2021
Applies to: Microsoft® Word® 2010, 2013, 2016, 2019 and 365 (Windows)
You can insert a line in Word using the Ribbon or by using keyboard shortcuts. It’s best to avoid drawing lines and instead insert border lines in Microsoft Word (normally paragraph borders) so the line or lines will move as you edit the document.
In this article, we’ll focus on inserting lines using borders attached to paragraphs. In Microsoft Word, anything with a hard return after it is a paragraph. If you use border lines, you can customize the type of border, line thickness and color. You can also include paragraph border lines in styles so they will appear throughout your document. If you draw lines using Insert Shapes, you’ll have to worry about the line being inline or floating.
You can insert a line in Word in 3 ways using borders:
- Use the Borders command on the Home tab in the Ribbon
- Select and apply different types of lines using the Borders and Shading dialog box
- Insert different types of lines using keyboard shortcuts (which add lines using AutoCorrect)
Recommended article: How to Keep Text Together in Microsoft Word
Do you want to learn more about Microsoft Word? Check out our virtual classroom or live classroom Word courses >
Inserting a line using the Borders button
To insert a line in Word above and / or below a paragraph using the Borders button:
- Select the paragraph(s) to which you want to add a line.
- Click the Home tab in the Ribbon.
- Click Borders in the Paragraph group. A drop-down menu appears.
- Select the line you want to use.
Below is the Borders command in the Ribbon in Word:
![]()
Removing lines using the Borders command
To remove a border line or lines from one or more paragraphs:
- Select the paragraph(s) with the border lines you want to remove.
- Click the Home tab in the Ribbon and then click Borders. A drop-down menu appears.
- Choose No Border from the drop-down menu.
Inserting a line using the Borders and Shading dialog box
You can apply a line or custom border lines to one or more paragraphs using the Borders and Shading dialog box.
To insert a line in Word above and / or below a paragraph using the Borders and Shading dialog box:
- Select the paragraph(s) to which you want to add a line.
- Click the Home tab in the Ribbon.
- Click Borders in the Paragraph group. A drop-down menu appears.
- Select Borders and Shading. A dialog box appears.
- Select a border style, color and width.
- Click between the guides in the sample area on the right (above or below the sample).
- Click Options (if required), enter any offset amounts to control the distance between the line and the paragraph and click OK.
- In Apply to, ensure Paragraph is selected.
- Click OK.
Below is the Borders and Shading dialog box where you can add a line or lines to paragraphs:

Removing lines using the Borders and Shading dialog box
To remove lines from one or more paragraphs using the Borders and Shading dialog box:
- Select the paragraph(s) with the lines you want to remove.
- Click the Home tab in the Ribbon and click Borders. A drop-down menu appears.
- Select Borders and Shading. A dialog box appears.
- Click None in the Setting area.
- In Apply to, ensure Paragraph is selected.
- Click OK.
Inserting a line using keyboard shortcuts
You can also insert a horizontal line using keyboard shortcuts (which insert border lines as AutoCorrect entries).
Type the following characters and then press Enter or Return to insert lines:
- To insert a plain single line, type three hyphens (—).
- To insert a plain double line, type three equal signs (===).
- To insert a dotted line, type three asterisks (***).
- To insert a bold single line, type three underlines (___).
- To insert a wavy line, type three tildes (~~~).
- To insert a triple line, type three number signs or hash tags (###).
To remove these lines, select the paragraph with the line, click the Borders button on the Home tab and select No Border.
Subscribe to get more articles like this one
Did you find this article helpful? If you would like to receive new articles, join our email list.
More resources
How to Double Space in Word (4 Ways)
14 Shortcuts to Quickly Select Text in Microsoft Word
4 Ways to Insert or Type the Pound Symbol in Word (£)
How to Create a Hanging Indent or First Line Indent in Microsoft Word
How to Insert an Em or En Dash in Microsoft Word (4 Ways with Shortcuts)
Related courses
Microsoft Word: Intermediate / Advanced
Microsoft Excel: Intermediate / Advanced
Microsoft PowerPoint: Intermediate / Advanced
Microsoft Word: Long Documents Master Class
Microsoft Word: Styles, Templates and Tables of Contents
Microsoft Word: Designing Dynamic Word Documents Using Fields
VIEW MORE COURSES >
Our instructor-led courses are delivered in virtual classroom format or at our downtown Toronto location at 18 King Street East, Suite 1400, Toronto, Ontario, Canada (some in-person classroom courses may also be delivered at an alternate downtown Toronto location). Contact us at info@avantixlearning.ca if you’d like to arrange custom instructor-led virtual classroom or onsite training on a date that’s convenient for you.
Copyright 2023 Avantix® Learning
Microsoft, the Microsoft logo, Microsoft Office and related Microsoft applications and logos are registered trademarks of Microsoft Corporation in Canada, US and other countries. All other trademarks are the property of the registered owners.
Avantix Learning |18 King Street East, Suite 1400, Toronto, Ontario, Canada M5C 1C4 | Contact us at info@avantixlearning.ca
Word for Microsoft 365 Outlook for Microsoft 365 Word 2021 Outlook 2021 Word 2019 Outlook 2019 Word 2016 Outlook 2016 Word 2013 Outlook 2013 Word 2010 Outlook 2010 Word 2007 Outlook 2007 More…Less
You can add horizontal lines, sometimes called horizontal rules, to a document or email message to help separate sections of text and add visual appeal.
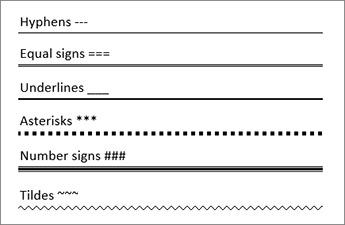
By default, Word and Outlook have a three-character shortcuts that inserts a full-width horizontal rule in your document or message. The appearance of that rule—thinner, thicker, double-line, dotted, wavy—depends on which shortcut you use, as illustrated in the image below.
If this automatic line feature doesn’t suit you, you can turn off this feature in Word or turn it off in Outlook.
If you want to draw a line for illustration purposes, see Draw a line in Word or Outlook instead.
Insert a horizontal line by typing a few characters
The fastest way to add a horizontal line or rule is to use the AutoFormat feature. When you type certain characters three times in their own paragraph and then press Enter, those characters instantly become a full-width horizontal line.
-
Place the cursor where you want to insert the horizontal line.
-
Type three of the characters illustrated below, and then press Enter.

The line is inserted for the full width of the page. When inserted into a column, the line is inserted to match the width of the column. To add text above the line, put your cursor where you want the text and begin typing.
Format the horizontal line after you create it
The shortcut described above creates an empty paragraph with a bottom border. You can change the look of that border line by using the Borders options:
-
In Word, on the Home tab of the ribbon, select the down arrow next to
Borders.In Outlook, on the Format Text tab of the ribbon, select the down arrow next to
Borders. -
At the bottom of the menu, select Borders and Shading.
-
In the dialog, you can change the line’s style (solid, dotted, wavy, double, and so on), color, or width as you see fit.
-
When you’re done formatting the line, select OK. Then, on the ribbon, select the
Borders button to apply your changes.
 Borders.
 Borders button to apply your changes.
 Word: Turn off the automatic line feature
To prevent Word or Outlook from automatically inserting a horizontal line when you type the three shortcut characters, do the following:
-
On the ribbon, select File > Options.
-
In the dialog box, select Proofing > AutoCorrect Options > AutoFormat As You Type.
-
Clear the Border Lines option.
-
Select OK.
Outlook: Turn off the automatic line feature
-
On the ribbon, select File > Options.
-
In the dialog box, select the Mail tab, then select Editor Options.
-
On the Proofing tab, select AutoCorrect Options > AutoFormat As You Type.
-
Under Apply as you type, clear the Border Lines option.
-
Select OK.
Want to draw a line?
See Draw a line in Word or Outlook.
See Also
Add a border to some text
Draw shapes
Need more help?
![]()
Download Article
A user-friendly guide to making different types of lines in Microsoft Word
![]()
Download Article
- Using Shapes to Draw a Line
- Using Borders to Add a Line
- Using Keyboard Shortcuts
- Using the Mobile App
- Q&A
- Tips
|
|
|
|
|
Do you want to create a horizontal line in your resumé or other Microsoft Word document? If you want to customize the color and format of the line, you can use the Shapes tool. If you need to make a quick, basic line, you can use the keyboard shortcut. While you can use the keyboard shortcut on Windows and Mac, you cannot use it on the mobile app. This wikiHow will show you how to insert different lines in Microsoft Word on your Windows, Mac, iPhone, or Android device.
Things You Should Know
- On desktop, go to the Insert tab. Click Shapes, then select a line. Click and drag across the document to create a line.
- To customize the line, double-click it. Click Shape Outline to change the color.
- On mobile, click the three dots. Tap Home and select Insert. Tap Shapes to select a line. Tap and drag across the document to create a line.
-
1
Open Microsoft Word on your Windows or Mac computer. Click or double-click the Word app icon, which resembles a white «W» on a dark-blue background.
- If you want to draw a line in an existing Word document, double-click the Word document to open it and skip the next step.
- You’ll need a subscription to use Office 365.
-
2
Click Blank document. It’s in the upper-left side of the page.
Advertisement
-
3
Click the Insert tab. This tab is in the blue ribbon at the top of the Word window, between Home and Draw.
-
4
Click Shapes. It’s in the Insert toolbar, next to the icon of an overlapping circle and square.
- A drop-down menu will appear.
-
5
Select a line shape. In the «Lines» heading, click one of the line templates. You can choose a line, line arrow, double line arrow, and more.
-
6
Draw your line. Click and drag across the document to create your line.
- If you need to adjust the line’s length and orientation, click the left or right circle. Drag it left or right to adjust the length, or drag it up and down to adjust the orientation.
- To move the line, double-click and drag it to the desired position.


Advertisement
-
1
Open Microsoft Word on your Windows or Mac computer. Click or double-click the Word app icon, which resembles a white «W» on a dark-blue background.
- If you want to draw a line in an existing Word document, double-click the Word document to open it and skip the next step.
-
2
Click Blank document. It’s in the upper-left side of the page.
-
3
Click the Home tab. This tab is in the blue ribbon at the top of the Word window, between File and Insert.
- You may already be on this tab by default.
-
4
Click the «Borders» arrow. This is next to the icon of the dotted square with a solid bottom line.
- A drop-down menu will open.
-
5
Click Horizontal Line. This will be towards the bottom, above Draw Table.
- A horizontal line will be added.
-
6
Format your line. Double-click the line; a dialogue box will appear.
- To change the line thickness, use the up and down arrow below Height. The higher the number, the thicker the line will be.
- To change the color, click the color box underneath Color. Select your desired color.
- Click OK to save and apply your changes.
- To move the line, double-click and drag it to the desired position.


Advertisement
-
1
Open Microsoft Word on your Windows or Mac computer. Click or double-click the Word app icon, which resembles a white «W» on a dark-blue background.[1]
- If you want to draw a line in an existing Word document, double-click the Word document to open it and skip the next step.
-
2
Click Blank document. It’s in the upper-left side of the page.
-
3
Place your cursor where you want your line to appear. You’ll need to be on a blank line, as this won’t work if there is text before or after your cursor on the same line.
- You’ll be creating a horizontal line that spans from one edge of your page to the other. The line will stop at your set margins.
- If you want to make the line span the whole page, you’ll need to change your document margins.
-
4
Type three dashes in a row. Use your dash key on the number row at the top of your keyboard, or on the numeric pad.
-
5
Press ↵ Enter to convert the dashes into a line. AutoCorrect will automatically create a solid line that will situate itself directly beneath the previous line of text.
- Note that the line does not occupy the space of a line of text, but instead exists between lines of text.
- If you do not have AutoCorrect enabled, do so by clicking File → Options → Proofing → AutoCorrect Options…. This will open a new window.
- Make sure the Border Lines box is checked. This can be found underneath Apply as you type.
- If you want to turn off AutoCorrect, uncheck the boxes.
-
6
Use different characters for different line styles. There are a variety of different lines that you can create by using characters other than the dash:[2]
- Thin line: Three hyphens (-).
- Thick line: Three underscores (_).
- Double line: Three equal signs (=).
- Dotted line: Three asterisk (*).
- Triple line: Three pound signs (#).
- Squiggly line: Three tildes (~).
-
7
Move the line by entering text above it. You can prompt the line to move down by typing text above it and then pressing Enter.
- Deleting text above the line will prompt it to move upward.


Advertisement
-
1
Open a document in the Microsoft Word app. This looks like a blue notebook next to a W.
- Microsoft Word is available for iOS in the App Store and for Android in the Google Play Store.
- Tap Blank document to open a new document or tap a file to open an existing document.
-
2
Tap ••• . This can be found above the keyboard, to the right.
- If you don’t see your keyboard, tap the document to bring it up.
- A new menu will open.
-
3
Tap Home. This will be to the left of the formatting window.
- A drop-down menu will open.
-
4
Tap Insert. You’ll see a list of all objects you can insert.
-
5
Tap Shapes. This is next to the icon of an overlapping circle and square.
-
6
Select a line shape. In the «Lines» heading, tap one of the line templates. You can choose a line, line arrow, double line arrow, and more.
-
7
Draw your line. Tap and drag across the document to create your line.
- Use two fingers to pinch and zoom out to view the entire document.
- If you need to adjust the line’s length and orientation, tap the left or right circle. Drag it left or right to adjust the length, or drag it up and down to adjust the orientation.
- To move the line, tap and drag it to the desired position.


Advertisement
Add New Question
-
Question
How do I view all available symbols in Microsoft Word?

Click «Insert» and then click «Symbols» and you should be shown a box with all of the symbols in it.
-
Question
How do I add a line on the first page, and no lines on the second?
Click «Insert» and then click «Symbols» and you should be shown a box with all of the symbols in it.
-
Question
How do I change the color of the line?
In the paragraph section, open the drop-down menu on the «Borders» button. At the very bottom is a «Borders and Shading» option. In that option, change the color of the bottom border to your specified color. Click the «Borders» button.
See more answers
Ask a Question
200 characters left
Include your email address to get a message when this question is answered.
Submit
Advertisement
-
Looking for money-saving deals on Microsoft Office products? Check out our coupon site for tons of coupons and promo codes on your next subscription.
Thanks for submitting a tip for review!
Advertisement
About This Article
Article SummaryX
1. Click Insert.
2. Click Shapes.
3. Select a line template.
4. Click and drag across your Microsoft Word document to draw the line.
Did this summary help you?
Thanks to all authors for creating a page that has been read 2,043,877 times.
Is this article up to date?
|
Prefix |
Input 1 Line count: 0 |
Delimiter |
Input 2 Line count: 0 |
Suffix |
Fill voids with
Join sets with
Unix
Dos.
Tools provided as-is, without warranty of any kind and used at your own risk. ©2015 TextMechanic.com |
Privacy
In this article, we are going to learn How to Read File Line by Line in C language.We will read each line from the text file in each iteration.
C fscanf function
The fscanf function is available in the C library. This function is used to read formatted input from a stream. The syntax of fscanf function is:
int fscanf(FILE *stream, const char *format, …)
Parameters
- stream − This is the pointer to a FILE object that identifies the stream.
- format − This is the C string that contains one or more of the following items − Whitespace character, Non-whitespace character, and Format specifiers. A format specifier will be as [=%[*][width][modifiers]type=].
1. How to Read File Line by Line in C
Here we are making use of the fscanf function to read the text file.The first thing we are going to do is open the file in reading mode. So using fopen() function and “r” read mode we opened the file.The next step is to find the file stats like what is the size of the data this file contains. so we can allocate exact memory for the buffer that is going to hold the content of this file. We are using the stat() function to find the file size.
- Once we have the size and buffer allocated for this size, we start reading the file by using the fscanf() function.
- We keep reading the file line by line until we reach the end of the file. In fscanf function, we are passing n as the argument so we can read the text until we find a next line character.
- The code will look like this: “fscanf(in_file, “%[^n]”
C program to Read File Line by Line
To run this program, we need one text file with the name Readme.txt in the same folder where we have our code.The content of the file is:
Hello My name is
John
danny
#include <stdio.h>
#include <stdlib.h>
#include <sys/stat.h>

const char* filename = "Readme.txt";

int main(int argc, char *argv[])
{
    FILE *in_file = fopen(filename, "r");
    if (!in_file)
	{
        perror("fopen");
        return 0;
    }

    struct stat sb;
    if (stat(filename, &sb) == -1) {
        perror("stat");
        return 0;
    }

    char *textRead = malloc(sb.st_size);
	int i = 1;

    while (fscanf(in_file, "%[^n] ", textRead) != EOF)
	{
        printf("Line %d is  %sn",i, textRead);
		i++;
    }

    fclose(in_file);
    return 0;
}
Output
Line 1 is  Hello My name is
Line 2 is  John
Line 3 is  danny