
Word for Microsoft 365 Outlook for Microsoft 365 Word 2021 Outlook 2021 Word 2019 Outlook 2019 Word 2016 Outlook 2016 Word 2013 Outlook 2013 Word 2010 Outlook 2010 Word 2007 Outlook 2007 More…Less
You can change the spacing between characters of text for selected text or for particular characters. In addition, you can stretch or compress an entire paragraph to make it fit and look the way that you want it to.
Change the spacing between characters
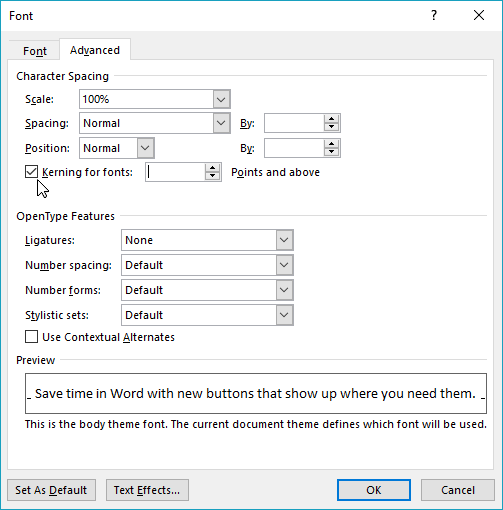
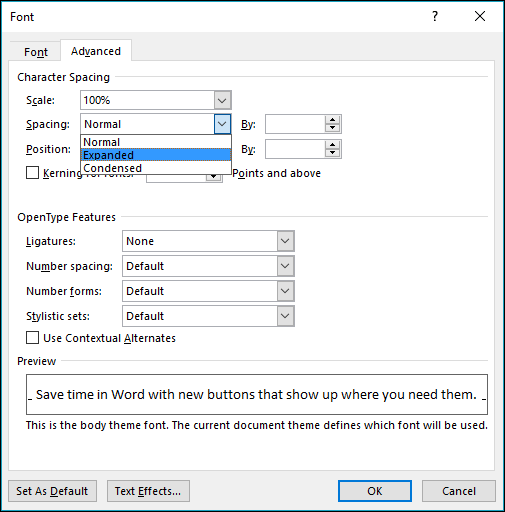
Selecting Expanded or Condensed alters the spacing between all selected letters by the same amount. Kerning alters the spacing between particular pairs of letters — in some cases reducing and in other cases expanding the space depending upon the letters.
Expand or condense the space evenly between all the selected characters
-
Select the text that you want to change.
-
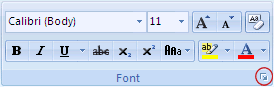
On the Home tab, click the Font Dialog Box Launcher, and then click the Advanced tab.

Note: If you’re using Word 2007 the tab is called Character Spacing.
-
In the Spacing box, click Expanded or Condensed, and then specify how much space you want in the By box.

Kern the characters that are above a particular size
Kerning refers to the way spacing between two specific characters is adjusted. The idea is to give a better looking result by reducing the spacing between characters that fit together nicely (such as «A» and «V») and increasing the spacing between characters that don’t.
-
Select the text that you want to change.
-
On the Home tab, click the Font Dialog Box Launcher, and then click the Advanced tab.
Note: If you’re using Word 2007 the tab is called Character Spacing.
-
Select the Kerning for fonts check box, and then enter the point size in the Points and above box.
Stretch or scale the text horizontally
When you scale the text, you change the shapes of the characters by percentages. You can scale text by stretching it or by compressing it.
-
Select the text that you want to stretch or compress.
-
On the Home tab, click the Font Dialog Box Launcher, and then click the Advanced tab.
Note: If you’re using Word 2007 the tab is called Character Spacing.
-
In the Scale box, enter the percentage that you want.
Percentages above 100 percent stretch the text. Percentages below 100 percent compress the text.
Change the line spacing
To increase or decrease the amount of vertical space between lines of text within a paragraph, the best method is to modify the style the paragraph uses.
-
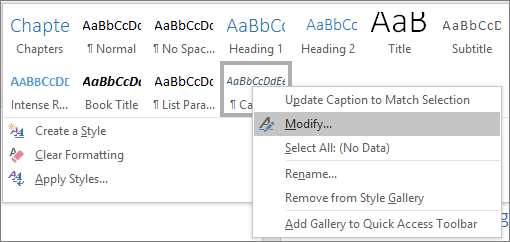
Find the style you’re using in the Styles gallery on the Home tab.
-
Right-click the style you want to change and select Modify.
-
Near the center of the dialog box you’ll find the line spacing buttons that let you select single, 1.5x or double spaced. Choose the spacing you want to apply and click OK.

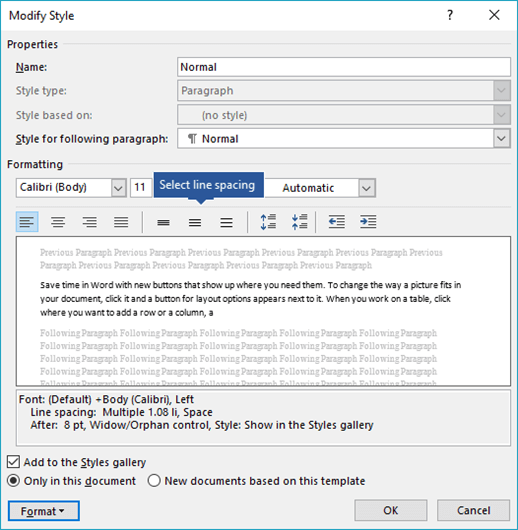
If you’d like to apply more specific line spacing to the style, clickthe Format button at the bottom left corner of the Modify Style dialog box and select Paragraph. The Line spacing drop-down lets you select or set more specific line spacing.
For more information on modifying styles in Word, see: Customize styles in Word.
See also
-
Using Styles in Word — a free, 10-minute video training course.
-
Change the font size
-
Set page margins
-
Align text left or right, center text, or justify text on a page
-
Change the line spacing in Word
Do you have a question about Word that we didn’t answer here?
Post a question in the Word Answers Community.
Help us improve Word
Do you have suggestions about how we can improve Word? Let us know by providing us feedback. See How do I give feedback on Microsoft 365? for more information.
Need more help?
Want more options?
Explore subscription benefits, browse training courses, learn how to secure your device, and more.
Communities help you ask and answer questions, give feedback, and hear from experts with rich knowledge.
When I am trying to Justify text paragraph in MS Word, random space is generating between words. How can I set equal gap between words and how can I change the setting of Justify
![]()
karel
13.3k26 gold badges44 silver badges52 bronze badges
asked Jul 20, 2010 at 10:43
You are probably justifying the text in Center mode, which means that the text must reach both ends of the page, left and right.
If the text-line is not exactly of the width of the printed page, the only way for Word to make both ends meet is by adding space in-between the words. Word in effect distributes the missing width pixels among the white-space in the line.
Word has a nice algorithm for this, and it’s not at all random.
answered Jul 20, 2010 at 10:51
![]()
harrymcharrymc
439k30 gold badges506 silver badges885 bronze badges
Justify is meant to spread the text out over the width of the current container and shouldn’t be used if you want equal widths between your words. To change the width of the space between the words you should change the font settings of the text: You can do this by selecting the text, do a right click and click Font, then go to the advanced tab where you can change the character spacing settings.
answered Jul 20, 2010 at 10:51
![]()
Tamara WijsmanTamara Wijsman
56.9k27 gold badges184 silver badges256 bronze badges
1
Character Spacing in the Font dialog adjusts spacing between letters of the selected text. It barely adjusts the spacing between words. Word does not have a nice algorithm for spacing in my opinion. It is a lame attempt to emulate a publishing layout tool, which it is not. If you want to justify text and control the spacing to the 1/1000th of a em, use a professional layout application like Adobe InDesign. I never justify paragraph text in Word. It creates unsightly rivers (uneven white space between words that flows down the page).
To increase the spacing between words, say in a title that is ALL CAPS, use two spaces. And if that creates too large a gap, reduce the font size of the spaces only. If you’re thinking you could just increase the font size of a single space, then you’ll discover this also affects the vertical line spacing (unless you’ve specified an exact line height).
answered Jun 10, 2014 at 17:15
![]()
Found no way to get rid of that ugly spaces. All I could do is to select the gapped text with some more lines below it, then cut and paste using the option text only. that worked for me.
answered Nov 30, 2020 at 9:26
![]()
1
When the document «Word» is decorated beautifully, then with itand work more pleasantly. Most likely, with such a philosophy no one will argue. Beautiful design in this case is called formatting. This concept includes a lot, but in the article we will only consider the intervals in the «Word». Let’s talk about what it is, where their settings are and how to change them.

Excess paragraph
Before talking about the intervals in the «Word» you want toremember that it is similar to the downed interval settings, but it is not. Many people can find a double paragraph for the high parameter of the interval between paragraphs. Moreover, everyone can make such a mistake, because the visual paragraph does not stand out in any way and you only need to check it yourself.
But you can use some cunning andTo visualize all the paragraphs with the help of the corresponding button. How it looks, you can see in the image below. Look for this button in the «Home» tab.

Once you click it, in your documentdifferent characters will appear. All of them we will not list — there is simply no sense. And the paragraph looks like this — «¶». To get rid of unnecessary paragraphs, view the entire document in the non-printable character display mode and delete the extra «¶» characters.
Set the default intervals
Such a problem, as superfluous paragraphs, is, of course,same, a rarity. Most often, the culprits are incorrectly given intervals in the «Word». Initially, we’ll look at how to change the intervals so that the changes remain forever. And after that we’ll discuss how to make changes locally.

So, to set the default settings, youyou need to open the program. Now, on the toolbar, find the «Paragraph» column (in the «Home» tab). There will be an arrow in the lower right corner — click on it to get to the settings we need. In the «Paragraph» settings, you can also access the other way by clicking on the PCM in any area of the document and selecting the line «Paragraph» from the menu.

In the settings window, make sure that the tab on thewhich you are, was called «Indents and intervals.» In this case, we are only interested in the area in the window called «Interval». It has the ability to change both the line spacing and the spacing between paragraphs. In the first case, you need to interact with the drop-down list on the right side of the window. In the second case, on the left.
Once you have changed the document «Word»line spacing or paragraph spacing, click the «Default» button. This is necessary for the changes to be preserved by the template — in this case you do not have to change these parameters every time.
Change the line spacing in two clicks
How to set intervals in the «Word» by default,we figured it out, but as you can see, this process is quite long, and if you need to frequently change the intervals in different areas of the document, it can take a long time.
Now we’ll talk how to change the line spacing in a few seconds.
This is done very simply. You need to click the «Interval» icon on the «Home» tab. Its location you can see in the picture below.

A drop-down list opens in which you can specify the interval you need. Before this, do not forget to select the area of the text to which you want to make changes.
Change the interval between paragraphs in two clicks
As the line spacing changed, we learned,now let’s talk about how to quickly change the interval between paragraphs. This is done already on the «Design» tab. There, in the column «Formatting the document», find the corresponding icon. It is called «Interval between paragraphs». Interaction with it occurs in a similar way to the previous method. In the drop-down list, select the value you need, before you forget to select the desired text area.
That’s all I would like to talk about in this article. Of course, in the program «Word» the interval between words can also be changed, but this is another topic.
</ p>>
Spruce up the formatting in your Word docs
What to Know
- To fix spacing between words, go to Find and Replace. Enter a space in both fields, then go to More > Format > Font and choose a font size.
- To adjust spacing between characters, go to Home, select Expand (the down-arrow) next to Font, and select the Advanced tab.
- To change spacing between lines, go to Home and select Expand (the down-arrow) next to Paragraph and adjust the Spacing options.
This article explains how to fix spacing in Word 2021, 2019, 2016, and Word for Microsoft 365.
How to Fix Spacing Between Words in Word
Using different fonts or font sizes in your document can lead to inconsistent spacing between words. Follow these steps to adjust the spacing between words without affecting the space between letters:
To show paragraph breaks and spaces, go to the Home tab and select the Show/Hide icon (¶) in the Paragraph group.
-
Highlight the text you want to change and select the Home tab. Press Ctrl+A (Windows) or Cmd+A (Mac) to highlight the entire document.
-
Select Replace in the Editing group.
On Mac, go to Edit > Find > Advanced Find and Replace, then select the Replace tab.
-
Click in the Find what text field and press your spacebar to create a space.
-
Click in the Replace with field and press your spacebar to create a space.
-
Select More to expand the window.
-
Select Format and choose Font.
-
Under Size, choose the font size you use most consistently throughout the document, then select OK.
-
Select Replace All.
-
In a new window, Word will report the number of replacements. Select Yes to apply changes to the entire document, or select No to change only the highlighted text.
The spacing between words should now be consistent. You can now close the Find and Replace window.
Don’t add multiple spaces between words because it makes formatting the entire document more difficult.
You can justify text in Word if you want to expand word spacing so the right margin is always straight (like a newspaper column).
How Do I Fix Spacing Between Characters?
To adjust the spacing between characters (letters, numbers, symbols, etc.), follow these steps:
-
Highlight the text you want to change and select the Home tab.
-
Next to Font, select Expand (the down-arrow).
-
Go to the Advanced tab. To stretch or compress the text, increase or decrease Scaling. For Spacing, choose Expanded or Condensed to adjust the spacing between all characters.
Select Kerning for fonts to enable text kerning. This feature automatically adjusts the spacing between characters to be more aesthetically pleasing. You can choose to kern characters above a certain size.
How to Fix Line Spacing in Word
Follow these steps to change the amount of space between lines within a paragraph:
To adjust the spacing between paragraphs, go to the Design tab, select Paragraph Spacing and choose from the options. For single spacing, choose No Paragraph Space.
-
Highlight the text you want to change and select the Home tab.
-
Next to Paragraph, select Expand (the down-arrow).
-
In the Spacing section, manually set the amount of space before and after line breaks, or choose one of the options under Line spacing. Select the Line and Page Breaks tab for more advanced options like text wrapping and pagination settings.
When you’re done, select OK to save changes.
FAQ
-
How do I change the tab spacing in Word?
The quickest way to set tab stops is to click the ruler where you want a tab. Alternatively, go to the Home tab and select Paragraph Settings in the Paragraph group. Next, select the Tabs button. Finally, set the desired Tab stop position, click Set, and click OK.
-
How do I fix the spacing between bullet points in Word?
To change line spacing between bullets in a list, select the list and then click the Paragraph Dialog Box Launcher. On the Indents and Spacing tab, under Spacing, clear the Don’t add space between paragraphs of the same style check box.
Thanks for letting us know!
Get the Latest Tech News Delivered Every Day
Subscribe

When working in Microsoft Word, you’ve probably seen two different kinds of text with lines through it (commonly called a “strikethrough”). Red text with a red line through it happens when you delete text while the collaborative Track Changes feature is on. Black text with a black line just has special character formatting applied. Here’s how it works.
Why Would You Want to Strike Through Text, Anyway?
It’s a good question. Why cross out words when you can just delete them? When you’re tracking changes in Word so that you can collaborate with other people, keeping that deleted text visible, but struck through, lets them know what has changed. They can even review those changes and accept or deny them.
We have a full guide on keeping track of changes made to a Word document, so we’re not going to cover all that in this article. It’s a good read, though, if you’re collaborating on a document.
Instead, we’re going to focus on how to apply strikethrough character formatting and why you might want to.
So, why bother? Well, you might be collaborating with someone and not want to use the Track Changes feature. Maybe they don’t use Word or Microsoft Office, and you’re sending it to them to view in Google Docs, or as a PDF they can print out.
Either way, you can strike through text as a suggestion that it be deleted, but leave it in place for them to see. This is particularly useful in a situation where, for example, you’re tutoring a student in a subject like a foreign language. It’s much easier for the student to learn if they can go back and see the mistakes along with the corrections.
Some writers also use strikethrough text (and occasionally often overuse it) to show a change of thinking in a document. Or maybe you just want to be annoying funny.
Whatever the reason, we’re here to show you how to do it.
RELATED: How to Apply Strikethrough to Text in Google Docs
How to Apply Strikethrough Formatting to Text
Applying strikethrough formatting is pretty easy. Start by selecting the text you want to strike through. You can do this by clicking and dragging over the text (or just double-clicking a word), but when you do this, Word likes to select the space after the text, as well. If you don’t want that to happen, click to place your insertion point at the beginning of the text, and then Shift-click at the end of the text for a more precise selection.
If you want to get fancy and select multiple words spread out through the document at the same time, you can do that, too. Select the first bit of text the regular way, and then hold down the Ctrl key while selecting additional text in different places. We suggest only doing this a paragraph at a time because it’s frustrating when you accidentally let go of the Ctrl key and have to start over.

When you have your text selected, look on the “Home” tab of Word’s Ribbon. In the “Font” group, click the Strikethrough button (it’s the three letters with a line drawn through them).
Now, any text you had selected should be struck through.
You can also apply strikethrough formatting using the Font window. Select your text, and then press Ctrl+D on Windows or Cmd+d on Mac to open that window up. Here, you can select not only the regular “Strikethrough” option but a “Double Strikethrough” option if you want to go that way, instead. Make your selection, and then click the “OK” button.
Make Things Easier By Creating a Keyboard Shortcut
Microsoft Word has loads of keyboard shortcuts, including a bunch for applying formatting. Unfortunately, there’s no built-in shortcut for applying strikethrough formatting. If it’s something you do a lot, though, you can create your own key combo.
Start by opening that Font window back up. Now, press Ctrl+Alt+Plus on Windows (you might have to use the Plus key on your number pad). Your cursor should very briefly turn into a clover shape. After that happens, click the “Strikethrough” option and a Customize Keyboard window should open.
Here, you can assign your preferred keyboard combo by clicking once in the “Press New Shortcut Key” box and then pressing the keys you want to use. If the combination you choose already has a shortcut function, Word will let you know that it’s currently assigned to something else. You can, of course, still use it even if it’s assigned to something else, but it’s better to try to find a combination that doesn’t have any current functions. We find Ctrl+Alt+- (minus) is pretty easy to remember and doesn’t have any other use in Word.
Press the “Assign” button, and then go back to your Word doc and try it out.
Now you have your customized strikethrough shortcut!
READ NEXT
- › How to Strikethrough in Microsoft Outlook
- › How to Use the Ink Features in Microsoft Office
- › How to Insert a Line in Microsoft Word
- › How to Apply Strikethrough to Text in Google Docs
- › How to Strikethrough in Microsoft Excel
- › Save Hundreds on Elegoo’s New PHECDA Laser Engraver Through Kickstarter
- › The New Winamp Is Here, but It’s Not What You’d Expect
- › Discord Direct Message Won’t Go Away? Here’s the Fix
Change the spacing between charactersSelect the text that you want to change.On the Home tab, click the Font Dialog Box Launcher, and then click the Advanced tab. In the Spacing box, click Expanded or Condensed, and then specify how much space you want in the By box.
How do I stop Word from auto spacing?
Go to Tools | AutoCorrect Options to open the window.Periods and automatic spacing: Word 2010 does not automatically put a space after periods. Automatic capitalization, Automatic replacement of words and symbols: Click on the AutoFormat As You Type tab.Click on AutoFormat tab.
Why does my Word document have weird spacing?
This particular issue is usually a result of copying from external sources, but regardless how it came about, the answer is usually the same. There is spacing set in the before and after paragraph spacing, or the spacing is set to more than single.
How do I change the spacing between lines in Word 2010?
To format line spacing:Select the text you want to format.Click the Line and Paragraph Spacing command in the Paragraph group on the Home tab.Select the desired spacing option from the drop-down menu. From the drop-down menu, you can also select Line Spacing Options to open the Paragraph dialog box.
What is 1.5 spacing word?
The lines in all Word documents are single-spaced by default, which is appropriate for letters and most documents. But you can easily change your document line spacing to double or 1.5 lines to allow extra space between every line. This is useful when you want to make notes on a printed document.
Is 1.5 considered double spacing?
Use the keyboard shortcuts Ctrl + 1 to single space, Ctrl + 2 to double space, or Ctrl + 5 to set the spacing to 1.5 line spacing on any line, paragraph, or all highlighted text.
Is 2.0 spacing the same as double spacing?
A 2.0 value will mean double spacing. Remember that the double spacing will take place from whatever part in the text your cursor is positioned. Place your cursor on the very top of the page if you want the entire document to be double spaced.
Is 1.15 single spacing?
The default line spacing in Word is 1.15. By default, paragraphs are followed by a blank line and headings have a space above them. Go to Home > Line and Paragraph Spacing. Select Line Spacing Options, and then choose the options you want under Spacing.
Is 1.0 single spacing?
About Line Spacing Line spacing is the distance between lines. In earlier versions of Word, the default line spacing distance is “1.0,” or single-spacing, which stacks lines closely together with minimal space between. The amount of that space varies depending on the font used.
What is the space before a paragraph called?
Line spacing is the space between each line in a paragraph. Word allows you to customize the line spacing to be single spaced (one line high), double spaced (two lines high), or any other amount you want.
What is the difference between line spacing and paragraph spacing?
Line spacing determines the amount of vertical space between lines of text in a paragraph. By default, lines are single-spaced, meaning that the spacing accommodates the largest font in that line, plus a small amount of extra space. Paragraph spacing determines the amount of space above or below a paragraph.
How much is single line spacing?
About line spacing Line spacing is the space between each line in a paragraph. Word allows you to customize the line spacing to be single spaced (one line high), double spaced (two lines high), or any other amount you want. The default spacing in Word is 1.08 lines, which is slightly larger than single spaced.
How do I change the spacing between lines in Word?
Change the line spacing in a portion of the documentSelect one or more paragraphs to update. Go to Home > Line and Paragraph Spacing.Select Line Spacing Options and choose an option in the Line spacing box.Adjust the Before and After settings to change spacing between paragraphs.Select OK.
How do I change the spacing between lines in Word 2013?
To format line spacing:Select the text you want to format. Selecting text to format.On the Home tab, click the Line and Paragraph Spacing command. A drop-down menu will appear.Move the mouse over the various options. The line spacing will change in the document.
What is the shortcut key for line spacing?
Changing the line spacing in a Word document is very easy if you remember a few keyboard shortcuts: Pressing Ctrl+5 changes to 1.5 line spacing. Pressing Ctrl+2 changes to double line spacing. Pressing Ctrl+1 will give you single line spacing.
How do I get 0.5 line spacing?
Select the “Paragraph” group on Word’s Home tab to open your paragraph settings.Choose the “Indents and Spacing” tab, then select the drop-down box below the Line Spacing header to reduce your line spacing or to choose a custom line spacing, as per your preference.
How do I reduce line spacing less than 1?
To set less than 1 line space go to Paragraph | Line Spacing and choose ‘Multiple’ – yes ‘Multiple’.
How many PT is 1.5 line spacing?
21.6pt
How do I get rid of double spacing in Word?
Remove double line spacingSelect the paragraph you want to change, or press Ctrl+A to select all text.Go to Home > Line and Paragraph Spacing.Select the line spacing you want. For more exact spacing, select Line Spacing Options, and make changes under Spacing.
What is double spacing in Microsoft Word?
In text formatting, a double space means sentences contain a full blank line (the equivalent of the full height of a line of text) between the rows of words. By default, most programs have single spacing enabled, which is a slight space between each line of text, similar to how this paragraph looks.
What does double spacing mean?
“Double-spaced” simply means that there is one blank line between every line of type. In Microsoft Word 2013, you will need to set line spacing to “Double” and also ensure that no additional spaces are added before or after paragraphs.
Why are essays double spaced?
There are reasons why double-spacing is the standard for the essays you write in high school and college: double-spacing is easier to read quickly because the lines don’t blur together; also, double-spacing gives your reader room to write comments on your personal statement (and yes, some admissions officers do print …
Should you double space an essay?
Your essay should be typed and double-spaced on standard-sized paper (8.5″ x 11″), with 1″ margins on all sides. Include a page header (also known as the “running head”) at the top of every page. For a professional paper, this includes your paper title and the page number.
How do you do double spacing on pages?
Add double spacing. To change the spacing between lines, alter the “Between” option. To insert double spacing, you simply need to click the arrows until you increase to “2.0,” or click the box and type in “2.0.” Caution is not needed when altering lines.
How many handwritten pages is 500 words?
Usually, handwritten 500-word essays are about 2-4 pages long (4 pages if your writing is colossal).
How do I make lines in pages?
Click the line or paragraph (or select multiple paragraphs) where you want to add the border or rule. In the Format sidebar, click the Layout button near the top. Click the pop-up menu next to Borders & Rules, then choose a line type (solid, dashed, or dotted). Set where the line appears: Click a position button.
How do you double space on Microsoft Word for iPad?
Change spacing between linesIn your Word document, select the text you want to change. On your iPad, tap the Home tab, and then tap the Line Spacing icon. Tap the Line Spacing menu and choose the line spacing you want, from 1.0 to 3.0.
How do you double space in pages on iPad?
Set line and paragraph spacing in Pages on iPadTap in a paragraph or select specific text, or tap a text box or a shape with text. You can’t adjust line spacing for text in a table cell. Tap. (then tap Text if you selected a text box or shape).Tap Line Spacing, then tap. next to Spacing to decrease or increase the spacing.
TechRepublic Premium
-
TechRepublic PremiumQuick glossary: Software-defined networks
PURPOSE With the ubiquitous adoption of cloud computing, the Internet of Things, big data and mobile devices, the amount of data flowing through a modern enterprise network has increased substantially. Managing the flow of all this data requires systems that are dynamic, agile and flexible enough to handle the increased load. In many cases, the …
-
TechRepublic PremiumHiring kit: Wireless system engineer
PURPOSE Finding and hiring Wireless System Engineers will require a focused and comprehensive recruitment plan that looks for qualified individuals with the right technical skills and a personality that will best fit your organizational culture. This Hiring Kit from TechRepublic Premium provides an adjustable framework your business can use to find, recruit and ultimately hire …
-
TechRepublic PremiumiCloud Usage Policy
PURPOSE The policy’s purpose is to define proper practices for using Apple iCloud services whenever accessing, connecting to, or otherwise interacting with organization systems, services, data and resources. This policy, from TechRepublic Premium, can be customized as needed to fit the needs of your organization. From the policy: POLICY DETAILS All organization representatives, including all …
-
TechRepublic PremiumIT expense reimbursement policy
PURPOSE The policy’s purpose is to define for employees and authorized representatives the technology-related purchases eligible for reimbursement. The policy also seeks to ensure all expenses are properly reported, processed and reimbursed. This policy, from TechRepublic Premium, can be customized as needed to fit your organization’s needs. From the policy: POLICY DETAILS No technology-related purchases …
-
TechRepublic
-
TechRepublic on Twitter
-
TechRepublic on Facebook
-
TechRepublic on LinkedIn
-
TechRepublic on Flipboard

There are several ways to adjust line spacing in Microsoft Word. Today’s tutorial explains the basic method using the ribbon and a more advanced method using the Paragraph dialog box.
See the Quick Tip at the bottom of this tutorial to learn how to single-space an entire document from the Paragraph dialog box.
This tutorial is available as a YouTube video showing all the steps in real time.
Watch more than 150 other document software tutorials on my YouTube channel.
The images below are from Word for Microsoft 365.The steps are the same in Word 2021, Word 2019, and Word 2016, and similar for Word 2013 and Word 2010. However, your interface may look slightly different in those older versions of the software.
Basic Method: Adjust Line Spacing from the Ribbon
- Select the Home tab in the ribbon.

- (Optional Step) Select the Show/Hide button in the Paragraph group to show paragraph break symbols and other formatting that may affect line spacing.

- Select the text with the line spacing that needs to be changed.

- Select the Line and Paragraph Spacing button in the Paragraph group.

- Select an option from the drop-down menu:
A. Numbers 1.0 through 3.0 add space between lines.
B. Add Space Before Paragraph adds space before paragraphs but not before the lines within them.
C. Remove Space After Paragraph removes space after paragraphs but not after the lines within them.
These three options are based on your current font size with 1.0 being the equivalent of single-spacing.

Your changes will be applied immediately.

Note that you can apply the individual line spacing (the numbers 1.0 through 3.0) and the paragraph spacing to the same text to further customize your results.
- (Optional Step) Select the Show/Hide button again to hide paragraph symbols and other formatting (see figure 2).
Now, let’s move on to an advanced method offering additional spacing options.
Advanced Method: Adjust Line Spacing from the Paragraph Dialog Box
- Select the Home tab in the ribbon (see figure 1).
- (Optional Step) Select the Show/Hide button in the Paragraph group to show paragraph break symbols and other formatting that may affect line spacing (see figure 2).
- Select the text with the line spacing that needs to be changed (see figure 3).
Pro Tip: PC users can press Ctrl + A to select the entire document if all the line spacing needs to be changed. However, this includes items you may not want to alter, including headings, tables, table titles, figure captions, tables of contents, footnotes, endnotes, and reference lists.
- Select the dialog box launcher in the Paragraph group.

- Make changes in the Spacing section of the Paragraph dialog box:
A. The Before and After boxes represent the spaces before and after paragraphs measured in points with one point being 1/72 of an inch tall. Use the increment arrows to choose a whole number or enter a number with a decimal (e.g., 2.75) directly into the box.
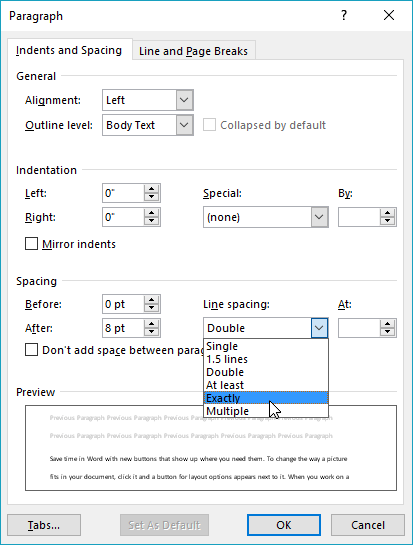
B. The Line spacing drop-down menu offers six options:
1. Single—Creates single-spacing based on your current font size.
2. 1.5 Lines—Creates a space and a half as large as your current font size.
3. Double—Creates double-spacing based on your current font size.
4. At Least—Determines the minimum amount of space between lines based on the number of points entered in the At box.
5. Exactly—Creates space between lines based on the number of points entered in the At box.
6. Multiple—Creates spacing multiplied by the number entered in the At box. For example, if you enter four in the At box, your spacing will be four times as large as your current single-spacing.
C. Don’t add space between paragraphs of the same style—For many users, this will remove spaces between all paragraphs because general documents commonly have only one paragraph style.

Note that the Preview box updates as you make adjustments in the Spacing section.
- Select the OK button to close the Paragraph dialog box.

- (Optional Step) Select the Show/Hide button again to hide paragraph symbols and other formatting (see figure 2).
Quick Tip: Single-Space an Entire Document from the Paragraph Dialog Box
- Select the Home tab in the ribbon (see figure 1).
- Select the entire document. (PC users can press Ctrl + A.)
- Select the dialog box launcher in the Paragraph group (see figure 7).
- Enter 0 in the Before box in the Paragraph dialog box (see figure 8).
- Enter 0 in the After box in the Paragraph dialog box (see figure 8).
- Select Single in the Line spacing drop-down menu (see figure 8).
- Select the OK button (see figure 9).
Related Resources
How to Adjust Letter Spacing in Microsoft Word (PC & Mac)
How to Adjust the Space between Words in Microsoft Word
How to Adjust Page Margins in Microsoft Word
Updated June 25, 2022
Corralling information in a Microsoft Word document isn’t all about headers and paragraph formatting. You may find yourself needing to draw a line in the virtual sand, and with Word, all you need to do is tell it where and how. Word’s Shapes collection lets you make horizontal and vertical lines to separate content on your pages.
Using a Word Separator Symbol
Inserting a symbol between words is a great way to make a heading predominant or to keep words separate for readers who are quickly scanning a document. Instead of using hyphens or asterisks, try using an ASCII or Unicode (hex) symbol as a word divider, available inside Microsoft Word.
To do this, place the cursor where you want the symbol to appear click the «Insert» menu, then select «Symbols» and then «More Symbols.» Select the one you want from the table that appears. You can also filter the list by selecting the Unicode or ASCII options.
MS Word Separator Line
Drawing a horizontal line across the page to separate paragraphs is very straightforward if you’re not too fussy about how the line appears. Just place the cursor in a blank line between sentences and hit the hyphen key several times. When you press Return, the hyphens transform into a single long hyphen.
To draw a custom line in a document to separate words, use the Shapes option. Scroll to the place on the page to place the divider. To add extra space for the divider, press the “Enter” key. Click the “Insert” tab. Click the “Shapes” button on the ribbon and choose the “Line” option, the first one in the Lines subcategory.
Press and hold down the “Ctrl” key, which keeps your divider line straight. Position the cursor near the left margin under the place you want to divide. Press and hold down the left mouse button and drag the cursor to the right, drawing the divider. Release the mouse button and the “Ctrl” key.
Click the divider line once it appears. When the new Tools tab opens, click the “Shape Outline” menu on the ribbon. Here you can format the divider by making it thicker, changing its color and choosing a different line style.
Using Clip Art to Divide Content
Microsoft Word has an extensive collection of clip art you can use to separate content on a page, including bars and scrollwork, which can add a dash of elegance to a page. To find some clip art, select «Online Pictures» from the Insert tab.
Enter a word that describes the art you are looking for. Using words like «divider,» «scrollwork,» «border» or «flowers,» should help you find the perfect artwork to divide your content.
spacing between words in word :Fix error: spaces are missing between some words in Microsoft Word. . Hi all, today i am going to help you fixed the error: spaces are missing between some words when open a Word 2010 document in Word 2007

Change the line spacing in an entire document
-
Go to Design > Paragraph Spacing.
-
Choose an option. To single space your document, select No Paragraph Space.
To return to the original settings later, go to Design > Paragraph Spacing and choose the option under Style Set. This may be Default or the name of style you’re currently using.
Change the line spacing in a portion of the document
-
Select one or more paragraphs to update. Press Ctrl + A to select all.
-
Go to Home > Line and Paragraph Spacing

-
Select Line Spacing Options and choose an option in the Line spacing box.

-
Adjust the Before and After settings to change spacing between paragraphs.
-
Select OK.

This error caused by the adaption between Word 2007 version and 2010 version. We have only method to fix it:

1- If you want continue save as .docx to To resolve this problem, install the 2007 Microsoft Office Suite Service Pack 3 (SP3). To download the service pack, visit the following Microsoft website: https://www.microsoft.com/en-us/download/details.aspx?displaylang=en&id=27838
2 If you want to fix it when you still using word 2007, please save file as .doc for keep the speces between words.
From microsoft forum fix spaces are missing between some words in the document:
I am a Microsoft employee, I lead the Program Management team for Office Sustaining Engineering.
This is a known issue with Word 2007.
The issue has already been addressed in a release that first appeared on September 25, 2008. The “non-security fixes” section of the article describes the behavior. The knowledge base article and solution for the problem are located under the link. For Office 2007 users who will receive your documents, ensure they are current on updates for Office. Specifically, ensure the patch referenced in the link above is installed, or ensure the user of 2007 has installed Office 2007 Service Pack 2.
The easiest way to obtain the fix is to install Office 2007 Service Pack 2.
This is an issue related to opening files that we discovered and fixed before the shipment of Office 2010. It was important enough for us to push the fix through the security update channel. At Microsoft we were able to re-produce the problem on machines which did not have the patch installed for Office 2007, and we are unable to reproduce the problem on machines that have the patch installed.
Yesterday we re-tested this problem based on the information being reported in the forums and on various blogs. There are a few details worth noting:
– If you have already saved the document in an unpatched version of Word and the spaces are missing, unfortunately there is no way to recover them.
– When you send the file to other users from Office 2010, unpatched 2007 users who edit the document may cause the spaces to disappear. It is important to ensure Office 2007 users are patched with this update, and ensuring that can be done by turning on Automatic Updates.
Related to the forum post on this topic:
– In our testing, turning spooling services on and off did not affect the problem.
– Additionally, the presence (or not) of a specific printer driver or any printer driver did not solve or cause the problem.
As has been reported on various blogs, the Open XML standard is not the cause of the issue. This is an issue with Word 2007, and we believe a solution has been available since 2008.
We certainly regret any inconvenience this issue may have caused.
If you patch your 2007 installation to the current update level, and you are authoring documents on patched versions of Word 2007 (or 2010), and you still experience this problem, please don’t hesitate to contact us.
Change the spacing between characters
Selecting Expanded or Condensed alters the spacing between all selected letters by the same amount. Kerning alters the spacing between particular pairs of letters – in some cases reducing and in other cases expanding the space depending upon the letters.
Expand or condense the space evenly between all the selected characters
-
Select the text that you want to change.
-
On the Home tab, click the Font Dialog Box Launcher, and then click the Advanced tab.

Note: If you’re using Word 2007 the tab is called Character Spacing.
-
In the Spacing box, click Expanded or Condensed, and then specify how much space you want in the By box.


Kern the characters that are above a particular size
Kerning refers to the way spacing between two specific characters is adjusted. The idea is to give a better looking result by reducing the spacing between characters that fit together nicely (such as “A” and “V”) and increasing the spacing between characters that don’t.
-
Select the text that you want to change.
-
On the Home tab, click the Font Dialog Box Launcher, and then click the Advanced tab.
Note: If you’re using Word 2007 the tab is called Character Spacing.
-
Select the Kerning for fonts check box, and then enter the point size in the Points and above box.


Stretch or scale the text horizontally
When you scale the text, you change the shapes of the characters by percentages. You can scale text by stretching it or by compressing it.
-
Select the text that you want to stretch or compress.
-
On the Home tab, click the Font Dialog Box Launcher, and then click the Advanced tab.
Note: If you’re using Word 2007 the tab is called Character Spacing.
-
In the Scale box, enter the percentage that you want.
Percentages above 100 percent stretch the text. Percentages below 100 percent compress the text.
Change the line spacing
To increase or decrease the amount of vertical space between lines of text within a paragraph, the best method is to modify the style the paragraph uses.
-
Find the style you’re using in the Styles gallery on the Home tab.
-
Right-click the style you want to change and select Modify.

-
Near the center of the dialog box you’ll find the line spacing buttons that let you select single, 1.5x or double spaced. Choose the spacing you want to apply and click OK.


If you’d like to apply more specific line spacing to the style, clickthe Format button at the bottom left corner of the Modify Style dialog box and select Paragraph. The Line spacing drop-down lets you select or set more specific line spacing.
