
Merging text boxes
- Select the Object tool ( ) from the tool bar.
- Click on each of the text boxes you want joined.
- Once all are selected, choose Text->Text Box->Merge Vertically to join the separate boxes into one.
- Once joined, text will flow as a single column and the results should look better.
Contents
- 1 How do I merge text box shapes?
- 2 How do I group a text box and shape in Word?
- 3 How do you join two objects together in Word?
- 4 How do I link two text boxes together?
- 5 How do I group all objects in Word?
- 6 How do you select multiple text boxes in Word?
- 7 How do I make a multi level list in Word?
- 8 What is dialog box launcher in MS Word?
- 9 Where is dialog box launcher word?
- 10 What is mail merge in Word?
- 11 How do you select all boxes in Word?
- 12 Why can’t I group items in Word?
- 13 How do you select multiple text boxes at once?
- 14 How do I select a text box?
- 15 How do I copy everything in a text box?
- 16 What is a multi level list?
- 17 How do you fix multilevel numbering in Word?
- 18 How do you create a hierarchy in Word?
- 19 Where is dialog box in computer?
- 20 How do I get rid of a dialog box in Word?
How do I merge text box shapes?
Press and hold Ctrl while you click the shapes, pictures, or other objects to group. 2. Then right click and select Group. By doing this, we can group shapes, pictures, or other objects at the same time as though they were a single shape or object.
How do I group a text box and shape in Word?
Group shapes, pictures, or other objects
- Press and hold CTRL while you click the shapes, pictures, or other objects to group. You will need to select more than one shape, picture or object in order to enable the Group button.
- Select the Arrange button and choose Group.
How do you join two objects together in Word?
Select the shapes you want to merge: press and hold the Shift key while you select each shape in turn. (If you don’t select any shapes, then the Merge Shapes button in step 2 will be grayed out.) On the Drawing Tools Format tab, in the Insert Shapes group, select Merge Shapes, and then pick the option you want.
How do I link two text boxes together?
Follow these steps:
- Insert the text boxes that you will link and position them where you want them.
- Under Drawing Tools, on the Format tab, in the Text group, click the Create Link button:
- Click the next text box.
- Choose the second text box, and then repeat the linking process as needed.
How do I group all objects in Word?
Grouping objects
- Hold the Shift (or Ctrl) key and click the objects you want to group.
- Click the Group command on the Format tab, then select Group.
- The selected objects will now be grouped.
How do you select multiple text boxes in Word?
Step 2: Click on the text boxes.
Now, press and hold the CTRL key and click the next one. Repeat the same steps to go over all of the text boxes in your document. There you have it! That’s how you use the CTRL key and your mouse to select multiple text boxes in Word.
How do I make a multi level list in Word?
To create a multilevel list:
- Select the text you want to format as a multilevel list.
- Click the Multilevel List command on the Home tab. The Multilevel List command.
- Click the bullet or numbering style you want to use.
- Position your cursor at the end of a list item, then press the Enter key to add an item to the list.
What is dialog box launcher in MS Word?
A dialog box launcher is a small icon that appears in a group. Users click this icon to open related dialog boxes or task panes that provide more options that relate to the group.
Where is dialog box launcher word?
Click the Home tab. In the Fonts group, click the dialog box launcher button. The button is found in the lower-right corner of the Font group. Use the Dialog box launcher to open the Font dialog box.
What is mail merge in Word?
Mail Merge is a handy feature that incorporates data from both Microsoft Word and Microsoft Excel and allows you to create multiple documents at once, such as letters, saving you the time and effort of retyping the same letter over and over.
How do you select all boxes in Word?
To select one object, click or tap the object. To select multiple shapes in a group, press and hold Shift or Ctrl while you click or tap the shapes.
Why can’t I group items in Word?
The Group button is unavailable
Only one shape or picture is selected. Make sure you have multiple shapes or pictures selected. If your selection includes a table, worksheet, or GIF image, the Group button will not be available.
How do you select multiple text boxes at once?
Just hold the mouse button down (don’t release it). You can hold down the Ctrl key while clicking the edge of each text box.
How do I select a text box?
To select the text box, you need to click the border of the text box, and the insertion point disappears. If you press Tab or Ctrl+Tab while the insertion point is visible in the text box, then you only modify the text in the text box; you don’t select the next object.
How do I copy everything in a text box?
Copy a text box
- Click the border of the text box that you want to copy.
- Press Ctrl+C. Note: Make sure the pointer is on the border of the text box, not inside it. If the pointer is inside, pressing Ctrl+C will copy the text, not the text box.
- Select a location and press Ctrl+V to paste the text box.
What is a multi level list?
Word’s multilevel list feature takes bullets and numbering to the next step. It makes creating sublists or subpoints in a list easy. An example of a multilevel list is an outline where the first level uses a Roman numeral and the next level uses a capital letter.
How do you fix multilevel numbering in Word?
How to fix Multilevel list in Word
- Select the first heading level and then from the Word Main menu, under the tab Home, within the group Paragraph, click the Multilevel List icon.
- From the drop-down list, click option Define New Multilevel List.
How do you create a hierarchy in Word?
Create a hierarchy
- On the Insert tab, in the Illustrations group, click SmartArt.
- In the Choose a SmartArt Graphic gallery, click Hierarchy, and then double-click a hierarchy layout (such as Horizontal Hierarchy).
- To enter your text, do one of the following: Click [Text] in the Text pane, and then type your text.
Where is dialog box in computer?
In Microsoft Windows, when you right-click a file and choose Properties, you are presented with the Properties dialog box. You can press Esc to cancel or close a dialog box.
How do I get rid of a dialog box in Word?
Click the x button from the top right corner of the dialog box that you’d like to close. Clicking this button should close the box and make it vanish. However, this could sometimes make alternate other boxes open up instead. Use a context-Close task from the taskbar listing for the dialog box that appears.

If you want to highlight portions of text in your document, you can insert text boxes. But what you might not know is that you can link these boxes in Microsoft Word and have the text within them flow continuously.
Maybe you have a brochure that uses text boxes to call out features of a product or service. Or maybe you have a document and use text boxes for helpful tips or pull quotes. By linking the text boxes together, you can type in one text box and have the overflow of text move to the next one.
RELATED: How to Add Sideheads and Pull Quotes to Microsoft Word Documents
You can use a preformatted text box or draw and format your own. Head to the Insert tab, click the Text Box drop-down arrow, and choose or draw your first text box. You can start typing your text in the first box or wait until you add and link the second one.

Follow the same steps to insert your second text box. If you choose a preformatted text box, you’ll need to remove the sample text inside. A requirement for linking one text box to another is that the second text box must be empty. Just select all of the text in the preformatted box and press Delete.
Click to select your first text box. Then go to the Shape Format tab and click “Create Link” in the text section of the ribbon.
You’ll see your cursor change to a pitcher. Move your pitcher to the second text box and click inside of it. This creates the link between the two.
Now when you type within the first text box and reach the bottom of the shape, the text will continue inside the second text box automatically.
You can continue to add text boxes and link those as well. So, if you want to add a third, select the second text box and create a link the same way to the third text box.
You can move text boxes to different pages or rotate the boxes without it affecting the linked ones.
RELATED: How to Make Diagonal Text in Word
Resize and Format Linked Text Boxes
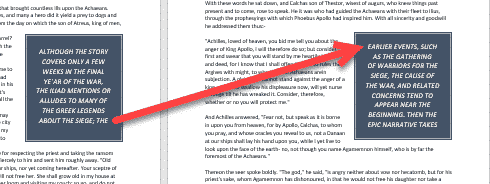
If you resize a text box by dragging a corner or edge, the text inside adjusts between the linked boxes. As you can see in the screenshot below, we made the first text box smaller, so the overflow of text automatically moved to the second text box.
If you format the font inside of a text box, it does not affect the text in the linked text box. This allows you to use italics, bold, or a different font color in the various boxes.
Keep in mind, however: if the size of a text box changes and the text flows into the linked box, it will bring with it the formatting you applied as shown below.
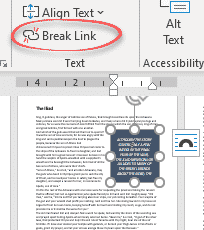
Break a Text Box Link
If you decide later you want to unlink the text boxes, this is easy to do. Select the first text box, go to the Shape Format tab, and click “Break Link” in the Text section of the ribbon. Follow the same process to unlink your remaining text boxes if necessary.
When you break the link, all of the text in the second text box appears in the first. You may need to resize the first text box to see it all.
Linking text boxes in Microsoft Word is a good way to display a continuous short story, list of tips, set of instructions, or something similar without affecting the main part of your content. And to keep those boxes safe from editing, you can lock text boxes in Word as well.
READ NEXT
- › How to Mirror or Flip Text in Microsoft Word
- › The New Winamp Is Here, but It’s Not What You’d Expect
- › Discord Direct Message Won’t Go Away? Here’s the Fix
- › Windows 11 Has a New Photo Gallery in the File Explorer
- › How to Get a Refund on the PlayStation Store
- › Android’s Nearby Share Has (Unofficially) Arrived on Mac
- › Save Hundreds on Elegoo’s New PHECDA Laser Engraver Through Kickstarter
How-To Geek is where you turn when you want experts to explain technology. Since we launched in 2006, our articles have been read billions of times. Want to know more?
Microsoft Word, MS Office, Office 2007, Office 2010, Office 2013, Office 2016, Office 2019, Office 365 /
14 May 2019
Separate text boxes in Microsoft Word can be linked so text in one box can automatically flow into another text box later on the same page or document.
Yet again with Word, there’s some extra tricks available beyond simple linking of boxes.
Linked boxes is a trick that’s a common feature in professional publishing and layout tools that was quietly added to Word.
Create Text Box Link
At its simplest, put two text boxes in a document. Click in the first one, then choose Format | Text | Create Link. The mouse pointer changes into a flowing cup to click into another text box.

Now the unseen text from the first text box appears in the linked box.
All the text will automatically flow between the boxes as needed, for example if you change the text inside the boxes or change the size of the text boxes. No cut/paste or juggling of text required.
Empty the text box
The target or ‘linked to’ text box has to be empty and that includes the placeholder text Microsoft adds to every new text box automatically.
Delete that text before trying to link.
Copy the text box
For consistency, we suggest making and formatting the first text box. Then duplicate (copy and paste) that box to other places in your document.
Text Boxes don’t have styles so changing the look of one box has to be manually copied to any others. If at all possible, format once then clone to other locations.
The text inside a text box can (and usually should) have a style applied to it.
Linking more than two text boxes
Multiple text boxes can be linked to make a chain of three or more. Do that by selecting the last box in the current chain and linking it to the next empty box.
Sadly, there’s no way to link multiple boxes at once.
Text is a single linked block
The text in linked text boxes is treated as a single entity by Word. Click inside a linked text box and press Ctrl + A (Select All) will select all the text in all linked text boxes (and not select text outside the boxes).
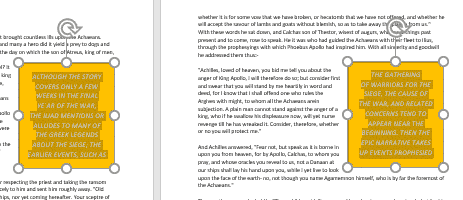
Text inside boxes all selected with a single Ctrl + A shortcut.
That makes it easy to reformat all the text.
But linked text boxes are not linked in other ways
Create Link only applies to text. Nothing else about the text boxes are linked.
A change in the look or size of a text box has no effect on any linked box.
Nor are text boxes grouped in the selection pane
Break the link
To unlink text boxes, click in the first or source text box then Format | Text | Break Link.
In some document layouts (e.g., magazines), you may need to run a series of text boxes that contain a
sequence of text. Word lets you flow text from one text box to another: When the first text box is full,
Word automatically moves to the next text box and fills it. If you add or delete text in a text box, Word
adjusts the text in the subsequent text boxes accordingly.

To make the text flow, you create a link between the text boxes. Follow these steps:
1. Insert the text boxes that you will link and position
them where you want them. Place all the content in the first text box. Most likely, only the first part
of it will appear in the text box.
2. Under Drawing Tools, on the Format tab, in
the Text group, click the Create Link button:

Word changes the mouse pointer to a pouring jug:
— In the first text box: ![]()
— In other text box displays a prompt telling you to move text here:

3. Click the next text box. Word creates the link and flows
the text from the first text box.
4. Choose the second text box, and then repeat the linking
process as needed.

To break a link, select a linked text box, and then under Drawing Tools, on the Format
tab, in the Text group, click the Break Link button:

See also this tip in French:
Flux de texte d’une zone de texte à une autre.
Linking between text boxes is the process of establishing a text flow from one text box to the next.
We can shorten the typing process. The text can be adjusted by resizing the text box. As we all know, manually entering text into a text box takes a lot of time.
Table of Contents
- How to Create a Link Between the Text Boxes:
- How to Flow Text from One Text Box to Another in Word
- Breaking a link Between the Text Boxes
- Video Tutorial
Firstly, go to the Insert tab.
Then click on the Shapes and select the Text Box.
After that, insert the Text Box by drawing into the document, and then automatically the Drawing Tools Format tab will open.

From the Drawing Tools Format Tab, insert as many text boxes as you want.

Otherwise, insert the shapes you want.
Then right-click on them and select Add Text to make any shape as a Text Box.

To create a link between the two Text Boxes, select the first Text Box from which you want to start typing.
Then click on “Create Link” in the Text group on the Format tab.

Automatically the cursor pointer turned into a Mug.
Then click on the 2nd text box to create the link between the first text box and the second one.
If you would like to create a link between the 2nd Text Box and to 3rd one, then select the 2nd Text Box to add a link from it to the next one.
Then click on “Create Link” in the Text group on the Format tab.
And then click on the 3rd Text Box to create the link in between the 2nd and 3rd to link the next 3rd and 4th, 4th and 5th, etc. Text Boxes do the same as explained above.

How to Flow Text from One Text Box to Another in Word
Now start typing in the first text box until all the text boxes are filled.
Breaking a link Between the Text Boxes

Removing a link between the text boxes to stop flowing text from one text box to another is called, Break Link.
to remove the link that was created as previously mentioned between two text boxes. Pick two text boxes that are connected to one another first.
In these linked text boxes, click on the first one to select
On the Drawing Tools Layout tab, select Break Link in Text for the group.
Now, the link is broken in between the 1st and the 2nd Text Box.
Video Tutorial
What is meant by creating a link between the text boxes?
Flowing text from one text box to another by linking text boxes is called creating a link between text boxes.