
Содержание
- Сервисы для создания облака тегов
- Способ 1: Word It Out
- Способ 2: Wordart
- Способ 3: Word Cloud
- Вопросы и ответы
Сделать акцент на важных словах в тексте либо указать на наиболее встречающиеся выражения в тексте поможет облако тегов. Специальные сервисы позволяют красиво визуализировать текстовую информацию. Сегодня мы поговорим о наиболее популярных и функциональных сайтах, на которых облако тегов можно создать всего за несколько щелчков мышкой.
Сервисы для создания облака тегов
Пользоваться такими способами гораздо удобнее, чем специальными программами для компьютера. Во-первых, вам не нужно устанавливать ПО на ПК, во-вторых, работать можно с текстом по указанной ссылке без необходимости вручную вводить нужные слова. В-третьих, на сайтах огромное разнообразие форм, в которые можно вписать теги.
Способ 1: Word It Out
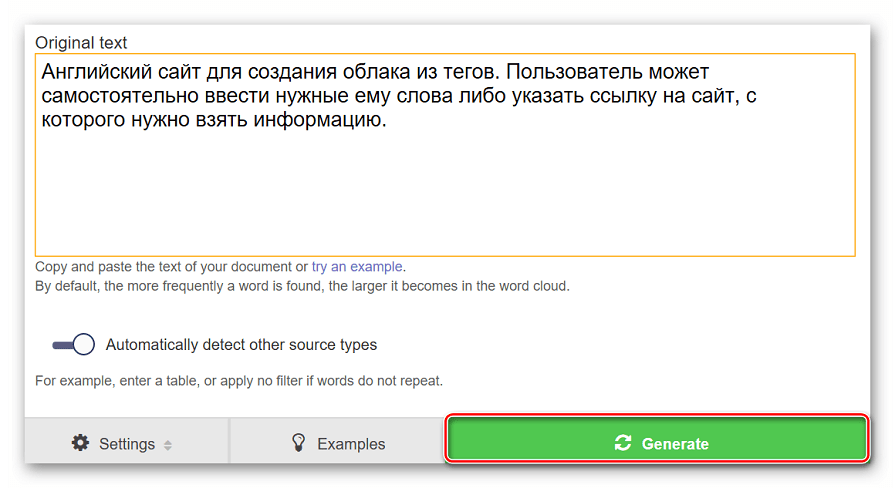
Английский сервис для создания облака из тегов. Пользователь может самостоятельно ввести нужные ему слова или указать адрес, с которого нужно взять информацию. Разобраться в функционале ресурса несложно. В отличие от других сайтов не требует регистрации и авторизации через социальные сети. Еще один большой плюс – правильное отображение кириллических шрифтов.
Перейти на сайт Word It Out
- Заходим на сайт и щелкаем «Create» на верхней панели.

- Вводим в указанном поле ссылку на rss сайта либо пишем нужные сочетания вручную.
- Для начала формирования облака щелкаем на кнопку «Generate».

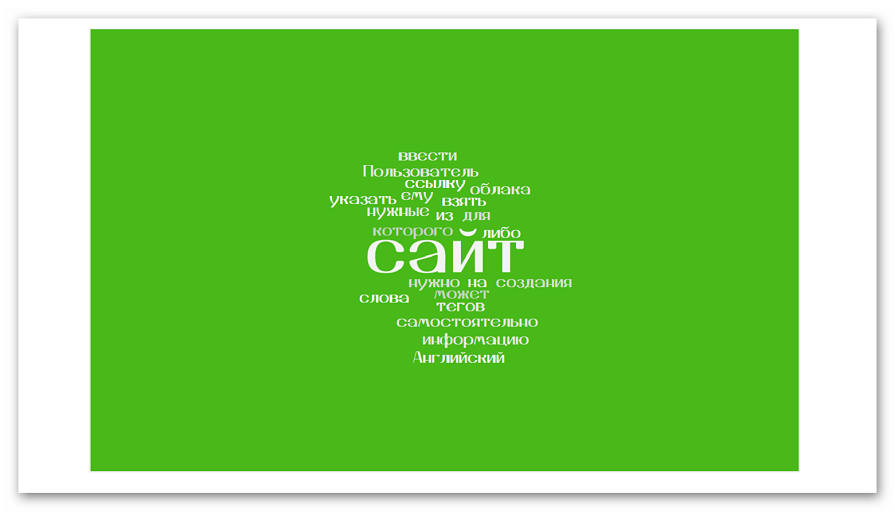
- Появится облако тегов, которое можно сохранить на компьютер. Обратите внимание на то, что каждое новое облако создается рандомно, за счет чего имеет уникальный внешний вид.

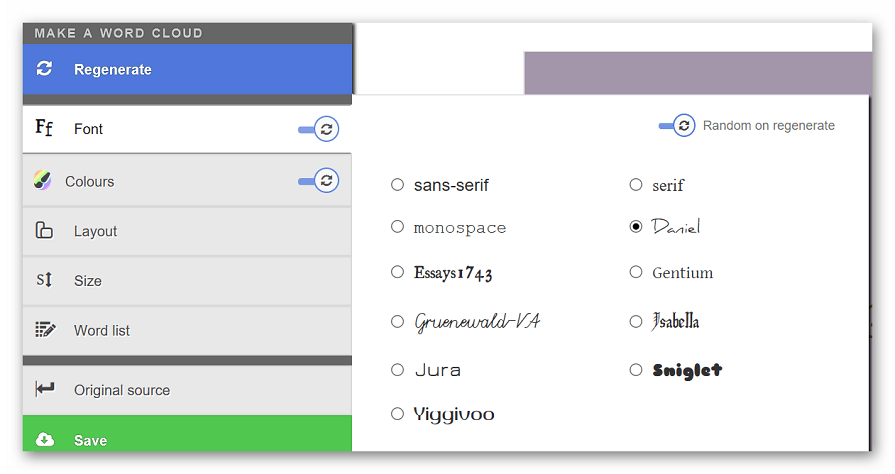
- Настройка определенных параметров облака осуществляется посредством бокового меню. Здесь пользователь может выбрать нужный шрифт, настроить цвет текста и фона, изменить размер и ориентацию готового облака.


Word It Out предлагает пользователям точечные настройки каждого элемента, которые помогают получить в свое распоряжение уникальное облако тегов. Иногда получаются довольно занимательные варианты.
Способ 2: Wordart
Wordart позволяет создать облако тегов определенной формы. Шаблоны можно загрузить из библиотеки. Пользователи могут указать ссылку на сайт, с которого нужно взять важные слова, или ввести желаемый текст вручную.
Доступны настройки шрифта, ориентации слов в пространстве, цветовой схемы и прочие параметры. Итоговое изображение сохраняется в виде картинки, качество пользователь может выбрать самостоятельно. Небольшой недостаток сайта заключается в том, что пользователю необходимо пройти несложную регистрацию.
Перейти на сайт Wordart
- На главной странице сайта щелкаем «Create now».

- Попадаем в окно редактора.

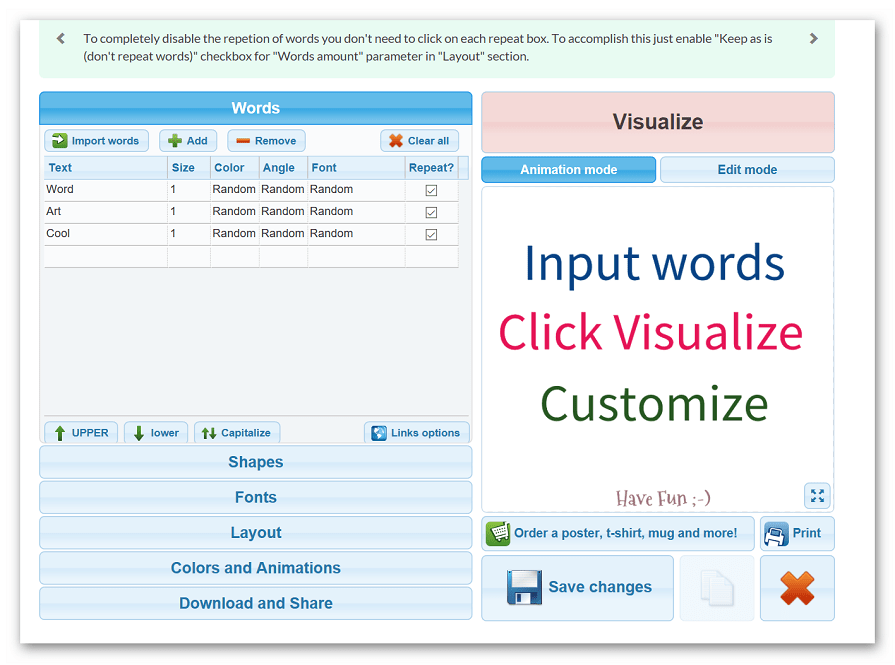
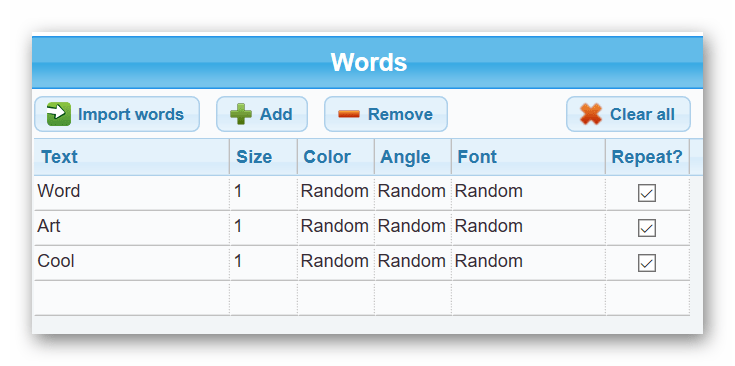
- Для работы со словами в редакторе предусмотрено окно «Words». Для добавления нового слова щелкаем «Add» и вводим его вручную, для удаления нажимаем на кнопку «Remove». Есть возможность добавления текста по указанной ссылке, для этого щелкаем на кнопку «Import words». Для каждого отдельного слова в тексте можно настроить цвет и шрифт, самые необычные облака получаются при рандомных настройках.

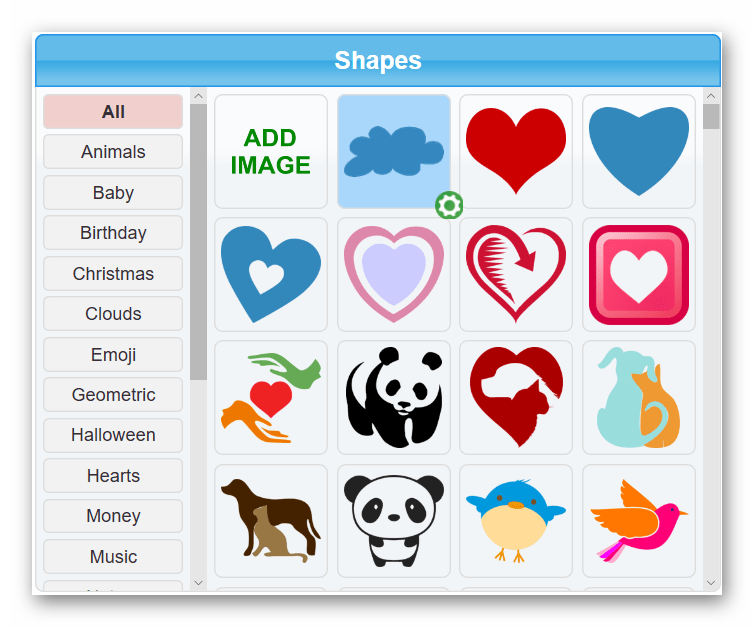
- Во вкладке «Shapes» можно выбрать форму, в которой будут расположены ваши слова.

- Вкладка «Fonts» предлагает огромный выбор шрифтов, многие из них поддерживают кириллический шрифт.

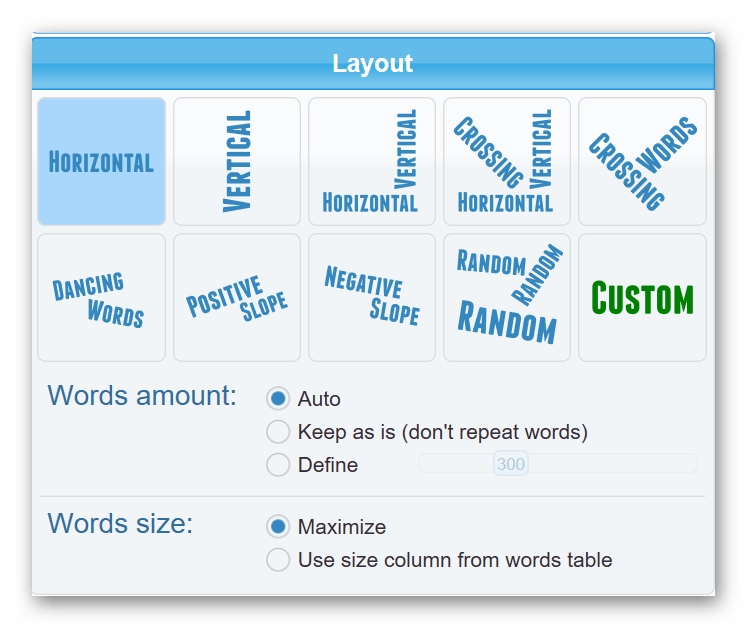
- На вкладке «Layout» можно выбрать нужную ориентацию слов в тексте.

- В отличие от других сервисов, Wordart предлагает пользователям создать анимационное облако. Все настройки анимации происходят в окне «Colors and Animations».
- Как только все настройки будут завершены, щелкаем на кнопку «Visualize».

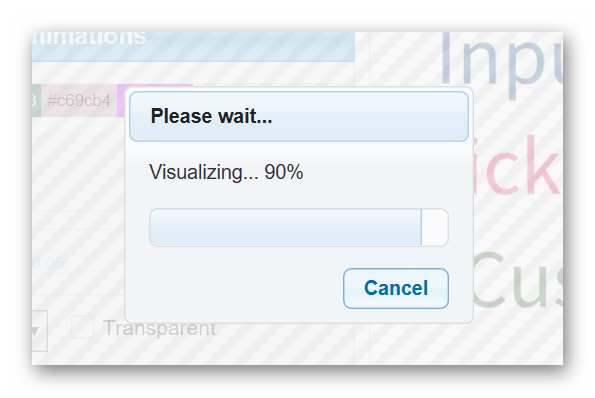
- Начнется процесс визуализации слов.

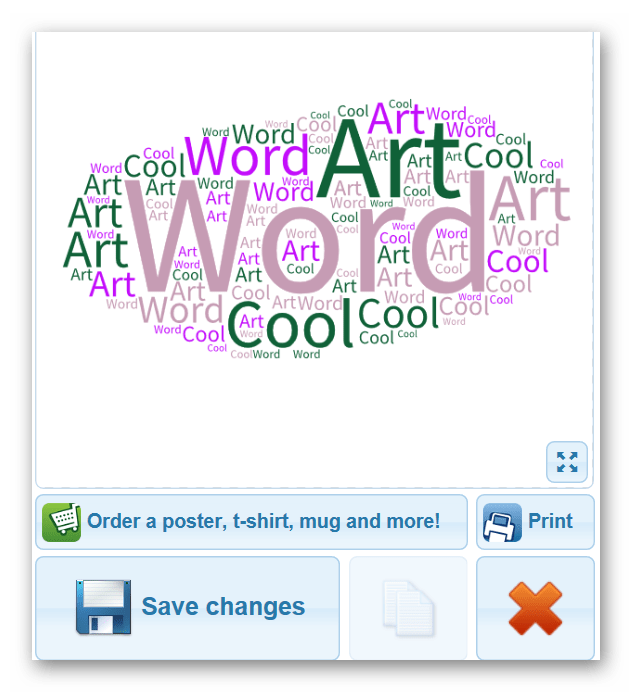
- Готовое облако можно сохранить либо сразу отправить на печать.


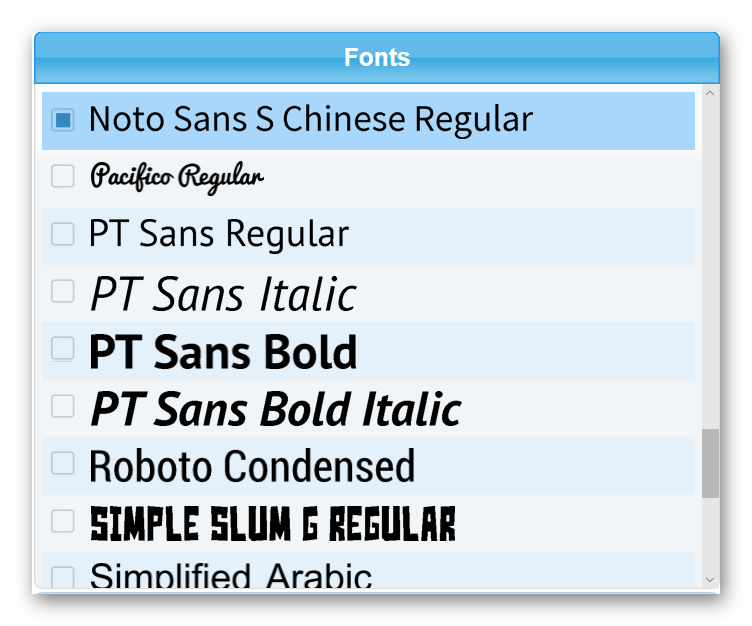

Шрифты, которые поддерживают русские буквы, выделены синим цветом, это поможет правильно определиться с выбором.
Способ 3: Word Cloud
Онлайн-сервис, который позволит за считанные секунды создать необычное облако тегов. Сайт не требует регистрации, итоговое изображение доступно для скачивания в форматах PNG и SVG. Способ ввода текста аналогичен двум предыдущим вариантам – слова можно указать самостоятельно либо вставить в форму ссылку на сайт.
Главный минус ресурса – отсутствие полноценной поддержки русского языка, за счет чего некоторые кириллические шрифты отображаются неправильно.
Перейти на сайт Word Cloud
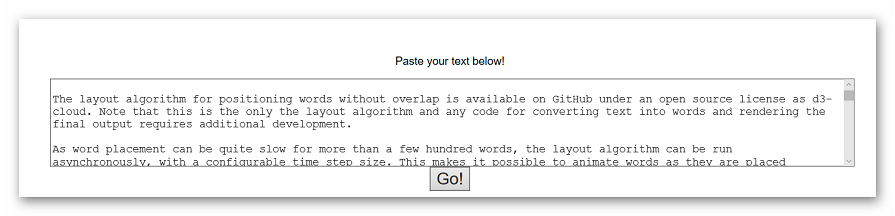
- Вводим текст в указанную область.

- Указываем дополнительные настройки слов в облаке. Можно выбрать шрифт, наклон и поворот слов, ориентацию и другие параметры. Экспериментируйте.

- Для загрузки готового документа щелкаем на «Download».


Сервис отличается простотой и отсутствием сложных для понимания функций. При этом использовать его лучше для создания облака из английских слов.
Мы рассмотрели самые удобные сайты для создания облака тегов онлайн. Все описанные сервисы на английском языке, однако, проблем у пользователей возникнуть не должно – их функции максимально понятны. Если планируете создать необычное облако и максимально настроить его под свои потребности – используйте Wordart.

Еще статьи по данной теме:
Помогла ли Вам статья?
Word It Out — cервис, с помощью которого можно визуализировать текст, как «облако слов».
Визуализация «облако слов» представляет текст в сфокусированном виде. По сути это визуализация частоты слов в тексте. «Облако тегов» часто используют для визуализации политических речей — этим и объясняется популярность использования этого формата в СМИ для анализа речи президентов, губернаторов или акимов.
Сервисов для превращения текстов в «облака» очень много. Worditout, на мой взгляд, самый простой.
Регистрации не требуется. На английском языке. Распознает кириллицу.
В Worditout вы можете настроить облако тегов под дизайн вашего проекта: можно менять цвета слов и фона, размер и вид шрифта.
В настройках можно прописать слова, которые не нужно учитывать в визуализации. Например, предлоги — эти слова стречаются в тексте часто, но не имеют смысловой нагрузки, если их оставить, то в вашем облаке тегов, они могут заполнить половину облака тегов. Также можете можно игнорировать слова, в которых слов меньше 3 букв (так как чаще всего это те же предлоги или союзы).
Часто встречаемые слова будут выделены большим размером. Готовое облако слов можно скачать или распространить по социальным сетям. Для скачивания необходимо ввести свой e-mail.
WordItOut
What is a word cloud? What are word clouds for? Who made this website?
See our home page and our about page.
Using a word cloud
What am I allowed to do with a word cloud on WordItOut?
![]()
Word clouds are licensed under a Creative Commons Licence, specifically an Attribution-Non-Commercial-NoDerivative Works Creative Commons Licence (4.0). That’s quite hard to say out loud.
This means that if it’s just for your own, personal use, then you can do lots of things, such as embedding the word cloud on your own website or blog. If you do this, we only ask that you give credit to WordItOut and include a link to our website or the word cloud. For the full details, see the Creative Commons Licence.
Contact us if you would like to use a word cloud commercially.
Zazzle
I have a question about a word cloud I bought with Zazzle as a T-shirt, mug, …
All questions should go directly to Zazzle, as they manufacture the items, and also deal with returns, shipping and so on. You can contact Zazzle here. WordItOut is only responsible for generating the images that Zazzle uses for printing.
Printing
How do I print a word cloud?
Your web browser (the software you’re using now to access the internet) can print the word clouds, but will probably remove some of the colours. We recommend you to download the word cloud as an image and then print it.
Saving
Can I save the word cloud as an image?
Yes you can! First you need to save the word cloud on WordItOut (no sign-up, only requires your email address -and no spam too!). Then click on the ‘Download’ button just below the word cloud to save your own copy to your computer. However, if you want to put a word cloud on your own website, you don’t need to do this, you can embed the word cloud, which will automatically resize as well. See the following section.
Some languages are not supported, please see this section.
Embedding
How does embedding work?
To embed a word cloud, you need to copy the html code provided and paste it into your own (non-commercial) website. The word cloud will grow or shrink to fit the space you’ve put it in. Don’t forget that you need to mention WordItOut and put a link back to our website (we’ve provided some code as an example, you can customise if you wish).
How can I change the size of my embedded word cloud?
In the code, you will see the following: <div style='width:auto;height:auto;'>. You can simply change the auto (for either the height or width) to a number of pixels or a percentage e.g. 400px or 50%
I’ve embedded the code, where’s the word cloud?
See this section.
Making a word cloud
Text input
Is there a limit to how much text I can put in?
In theory no, but your computer may slow down a little for very large texts, depending on its abilities and the type of web browser you’re using. We recommend Firefox.
Can I make multi-word phrases?
Yes you can! By default, the tilde “~” and underscore “_” are replaced with a non-breaking space which will keep words together. You can also add other characters to do the same thing.
Another option is to modify how a word is displayed on the word list, perhaps adding a space or other characters, and you can remove other words to prevent them from showing twice.
We do not automatically check to see if there are multi-word phrases: this is possible but would really slow down the time to generate a word cloud.
Can I put symbols in a word cloud?
By default, characters and symbols are filtered from the source text. To stop this, click on ‘Settings’ for the source and clear the textbox with the characters to be removed.
Privacy
See our Privacy and Cookie Policy for full details.
Why do you need my email address to save a word cloud?
We need your email address to make sure that you’re a human. We will only send you important links and information on how to share and manage your new word cloud.
Your details will never be given to anybody else or used for anything not related to WordItOut. We hate spam and other nasty things too, so we will never use your email address for these bad things!
By using just an email address, you don’t need to choose a username and remember another password, just use your emails as you always do!
How can I stop my word cloud from being seen by the public?
Easy. When you save your word cloud, choose the ‘Private’ sharing option. This way, we’ll give you an almost impossible to guess link for your word cloud. Then, you can share this word cloud only with the people you choose to give it to. You can even set this option later, or change the private link from your Secret Link that we will email to you.
Is WordItOut secure enough for confidential documents?
As long as you don’t save the word cloud, nothing will leave your computer. If you save one, then only the data necessary to reconstruct the word cloud and some settings are sent but that’s all: the original text isn’t even sent to our servers.
Language support
Which languages does WordItOut work with?
Every language should work, even if the default set up is for English.
When making a word cloud, you are able to remove any common words or characters yourself, either from the original source settings or by directly editing the word list. Word breaks are simply white space, and any alternative word-breaking characters could be added to the list of punctuation to be removed, which will subsequently become white space.
Please note that for certain languages, not all of the fonts will appear correctly.
See this section for more information.
Inappropriate content
Do you filter out rude words?
Word clouds containing common rude English words do not appear in the galleries on the Discover page. When removed, you will have an option to allow such word clouds to appear, as long as you confirm that you are old enough to do so. See our blog post for more information.
JavaScript is required for filtering to work. See this section for more information about JavaScript.
Current filter settings:
I’d like to use your website for educational purposes. How can I prevent the students from finding word clouds with adult content?
As we wrote above, we do filter word clouds by default anyway. However, individuals can decide to view them. If you want a stronger control, please see your IT administrator and ask them to block the pages you don’t want students to see. Most networks have such a function.
How can I report an inappropriate word cloud?
If you find a word cloud that you believe is not allowed according to our Terms of Use, for example with offensive content or disclosing your personal information, please inform us using the form below and include a link to the word cloud.
Developers
Am I allowed to use your code for my own projects?
Do you have an API (Application Programming Interface)?
We are considering opening up the source code to external developers, but we’re very busy at the moment and this is not currently a priority. So for now, no, you are not allowed to use our software (apart from on this Website) and we don’t have an external API.
Ask us a question
1. However, should you think guessing is really your strength and you do enjoy challenging your mind, Word it Out will become your all-time favorite game.
2. Guessing one word after the other brings on elevating challenges with more and more complicated image puzzles.
загрузить и установить Word It Out! на вашем персональном компьютере и Mac
Некоторые приложения, например, те, которые вы ищете, доступны для Windows! Получите это ниже:
| SN | заявка | Скачать | рецензия | Разработчик |
|---|---|---|---|---|
| 1. |  Microsoft Ultimate Word Games Microsoft Ultimate Word Games
|
Скачать | 4/5 2,002 рецензия 4 |
Xbox Game Studios |
| 2. | Word Mobile
|
Скачать
|
4.4/5 1,850 рецензия 4.4 |
Microsoft Corporation |
| 3. | Word Search
|
Скачать | 4.6/5 1,775 рецензия 4.6 |
Steve Nessen |
Или следуйте инструкциям ниже для использования на ПК :
Выберите версию для ПК:
- Windows 7-10
- Windows 11
Если вы хотите установить и использовать Word It Out! на вашем ПК или Mac, вам нужно будет загрузить и установить эмулятор Desktop App для своего компьютера. Мы усердно работали, чтобы помочь вам понять, как использовать app для вашего компьютера в 4 простых шагах ниже:
Шаг 1: Загрузите эмулятор Android для ПК и Mac
Хорошо. Прежде всего. Если вы хотите использовать приложение на своем компьютере, сначала посетите магазин Mac или Windows AppStore и найдите либо приложение Bluestacks, либо Приложение Nox . Большинство учебных пособий в Интернете рекомендуют приложение Bluestacks, и у меня может возникнуть соблазн рекомендовать его, потому что вы с большей вероятностью сможете легко найти решения в Интернете, если у вас возникнут проблемы с использованием приложения Bluestacks на вашем компьютере. Вы можете загрузить программное обеспечение Bluestacks Pc или Mac here .
Шаг 2: установите эмулятор на ПК или Mac
Теперь, когда вы загрузили эмулятор по вашему выбору, перейдите в папку «Загрузка» на вашем компьютере, чтобы найти приложение эмулятора или Bluestacks.
Как только вы его нашли, щелкните его, чтобы установить приложение или exe на компьютер или компьютер Mac.
Теперь нажмите «Далее», чтобы принять лицензионное соглашение.
Чтобы правильно установить приложение, следуйте инструкциям на экране.
Если вы правильно это сделаете, приложение Emulator будет успешно установлено.
Шаг 3: Word It Out! для ПК — Windows 7/8 / 10/ 11
Теперь откройте приложение Emulator, которое вы установили, и найдите его панель поиска. Найдя его, введите Word It Out! в строке поиска и нажмите «Поиск». Нажмите на Word It Out!значок приложения. Окно Word It Out! в Play Маркете или магазине приложений, и он отобразит Store в вашем приложении эмулятора. Теперь нажмите кнопку «Установить» и, например, на устройстве iPhone или Android, ваше приложение начнет загрузку. Теперь мы все закончили.
Вы увидите значок под названием «Все приложения».
Нажмите на нее, и она перенесет вас на страницу, содержащую все установленные вами приложения.
Вы должны увидеть . Нажмите на нее и начните использовать приложение.
Шаг 4: Word It Out! для Mac OS
Привет. Пользователь Mac!
Шаги по использованию Word It Out! для Mac точно такие же, как для ОС Windows выше. Все, что вам нужно сделать, это установить Nox Application Emulator или Bluestack на вашем Macintosh. Вы можете получить Это здесь .
Спасибо за чтение этого урока. Хорошего дня!
Получить совместимый APK для ПК
| Скачать | Разработчик | Рейтинг | Score | Текущая версия | Совместимость |
|---|---|---|---|---|---|
| Проверить APK → | LazyLand LTD | 0 | 1.0.20 | 4+ |
Скачать Android
Как скачать и установить Word It Out! в Windows 11
Чтобы использовать мобильные приложения в Windows 11, необходимо установить Amazon Appstore. Как только он будет настроен, вы сможете просматривать и устанавливать мобильные приложения из кураторского каталога. Если вы хотите запускать приложения Android на своей Windows 11, это руководство для вас..
Шаги по настройке компьютера и загрузке приложения Word It Out! в Windows 11:
- Проверьте, совместим ли ваш компьютер: Вот минимальные требования:
- RAM: 8GB (минимум), 16GB (рекомендованный)
- Хранение: SSD
- Processor:
- Intel Core i3 8th Gen (минимум или выше)
- AMD Ryzen 3000 (минимум или выше)
- Qualcomm Snapdragon 8c (минимум или выше)
- Processor Architecture: x64 or ARM64
- Проверьте, имеет ли Word It Out! собственную версию Windows. Сделай это здесь ». Если собственная версия отсутствует, перейдите к шагу 3.
- Установите Amazon Appstore из Microsoft Store. Сделай это здесь ». При выборе «Получить» начнется установка приложения и автоматически установится подсистема Windows для Android.
- После установки Amazon Appstore и приложение «Настройки подсистемы Windows для Android» появятся в меню «Пуск» и списке приложений. Откройте Amazon Appstore и войдите в свою учетную запись Amazon.
- Перейдите в магазин приложений Amazon и выполните поиск по слову « Word It Out! ». Откройте страницу приложения, щелкнув значок приложения. Нажмите «Установить». После установки нажмите «Открыть», чтобы начать использовать приложение Word It Out!.
Words don’t come easy…
However, should you think guessing is really your strength and you do enjoy challenging your mind, Word it Out will become your all-time favorite game. Guessing one word after the other brings on elevating challenges with more and more complicated image puzzles.
Is it almost in your mind but you cannot spell it out? Is it impossible to guess the hidden word? We know you hate to be stuck! That’s why we offer you amazing power ups to show you the way, in those struggling times!
One common word behind 4 different images. Can you word it out?
Test your ability to find the words!
If you like to challenge your ability to find and compose words from a random letter pattern for every match … Download Word it Out for free: it will keep you glued to your smartphone.
With Word it Out you can:
Play in arcade mode without connection challenging yourself
Play online Zen (1 VS 1) or Classic (4 challengers) challenging your friends or random people connected
Evaluate your growing ability by achieving all goals: Play and prove day by day to be a champion.
How the game works:
Arcade mode: do not let the time run out, find as many words as you can and accumulate precious seconds. Start with 30 seconds of time.
Hint: find the words with the largest possible number of letters to accumulate more seconds.
Mode Zen (1 VS 1): Subtract as many words as possible to your opponent, do not expire the time available to you and win the challenge.
Mode Classic (4 challengers): Find the first 10 words and win the challenge. Demonstrate to your friends that you know how to be the fastest.
N.B. Do you need a little help to beat all your records and/or to win your friends? Thanks to the virtual coins of Word it Out, you can buy a maximum of 5 words per match. You can accumulate your virtual coins just buying them or winning games.
With our guide to the top Microsoft Word tips, you get an insider’s guide to master the app.


I’ve always said that the best apps are easy to get started with but have plenty of features to learn. Microsoft Word fits this bill perfectly: user-friendly, but it includes every feature you might need.
This tutorial shows you the very best tips for using Microsoft Word. Knowing the top tips and tricks of MS Word helps you to reduce the time you spend and move onto the next task on your list. Let’s dive in!
15 Top Microsoft Word Tips & Tricks
If you love learning Word document tricks, you’re in the right place. On Envato Tuts+, we’ve built an incredible learning resource called Learn How to Use Microsoft Word (Beginner Tutorial Guide.) It includes everything you need to master the app.


Now let’s sample 15 of the best tips for using Microsoft Word. Many of these will help you jump to full-length tutorials with even more in-depth tips and tricks of MS Word:
This tutorial was written using a macOS and Office 365. If you’ve got a different operating system or a different version of Word, your steps may be slightly different.
1. Tap Into Custom Fonts and Styles
One of the leading Word tips involves customizing the size and style of your fonts. Word displays text in a default font like Calibri, size 12. But by changing font settings, you can transform the look and feel of your document.
Changing the font size and style works in two ways:
- You can change the settings before typing anything.
- You can change the size and style of existing text.
Either way, the options you need are on Word’s Home tab. You’ll see this in the upper left corner of the screen. On the left side of the Home tab, you’ll see the Font group.
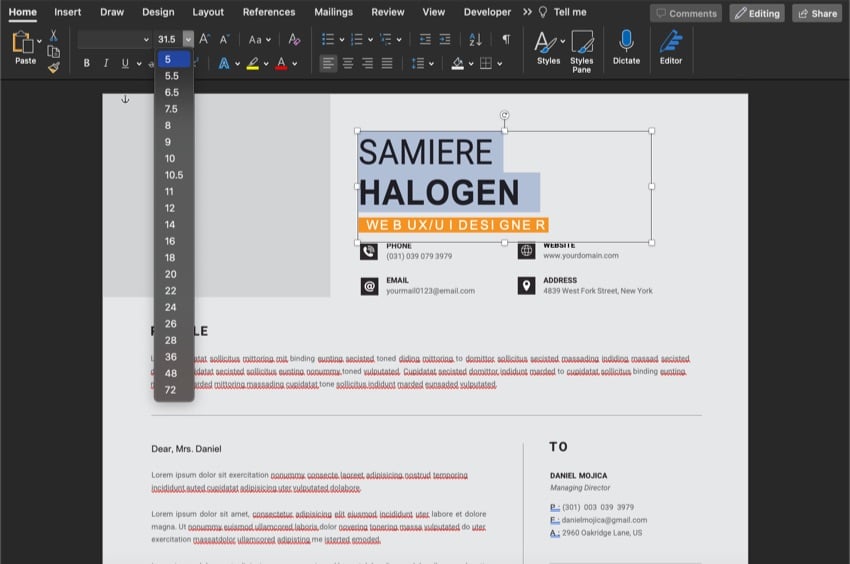


If you’re modifying existing text, click and drag your cursor to select the text that you want to change. Then, you can make changes using the drop-down menus you see in the Font group.
Choose a new font style and adjust the size. You’ll see Word updating your text in real time. That makes this one of the most common Microsoft Word tips — it’s an easy tweak with big results!
Learn to set your custom font selection as the default option with this tutorial:
2. Add a Header and Footer
Headers and footers are the text that you often see at the very top or bottom of a Word document. No list of MS Word tips is complete without them.
Headers and footers take many forms. Word document tricks include adding page numbers, custom text, or names here.
Once again, you’ll need to navigate to the ribbon to add these. In fact, most Microsoft Word tips and tricks involve the ribbon!
This time, click on the Insert tab. Then, from the right side of the menu, you’ll see drop-down arrows for Header, Footer, and Page Number.


Click on any of them to explore your options. Word displays a theme gallery with an array of designs. Click one of the thumbnails and Word adds the header or footer. You’ll be able to type in custom text like you would elsewhere on your document.
For a complete guide on header and footer customization, check out our feature-length tutorial below:
3. Style Text With Headings and Titles
Text style is a common feature in the tips and tricks of MS Word. Tips like this help you make a good impression. Rather than placing title text in the same style as other content, it pays to add headings.


Headings are bold, larger text designs that help key words stand out.
To add headings, return to the Home tab on Word’s ribbon. Right of center, you’ll see a window pane with a variety of heading styles. To add headings, scroll through the options by clicking on the arrow button.
Headings are listed in order of size: Heading 1 is a large heading, Heading 2 is slightly smaller, and so forth. Click on a design, then type in your heading text.
4. Use Updating Timestamps
Need tips for using Microsoft Word with a global team in real time? Try adding the date and time to your document so that it updates automatically. This is a popular example of Word document tricks used by collaborators.


To add the date and time to your Word document, go to the Insert tab. On the right, you’ll see a calendar-and-clock button labeled Insert Date and Time. Click it, and you’ll see an array of options listed.
These show dates and times displayed in many formats. Choose the one you like best by clicking it.
By default, this information is static. To update in real time, check the Update Automatically box, then click OK. These MS Word tips help keep your files current.
5. Change the Color Palette
As you’ve already seen, color and design styling is a hallmark of the best Word document tricks. By changing your Word document color palette, you transform how any file looks.
This time, you’ll want to go to the Design tab on Word’s ribbon. You’ll see a wide window with a selection of style layouts. Just to the right, you’ll see the Colors drop-down menu. Click on it.


The Colors menu appears, with tons of pre-built colors. These are expertly designed to provide stylish, complementary color schemes. Click on any of them, and you’ll see Word update your document with your newly chosen colors.
For examples and inspiration of eye-catching Word color palettes, check out this article with templates below:
6. Adjust the Page Layout With Margins
Margin adjustments are one of the top tips and tricks of MS Word. Margins control how close text comes to the edge of your page. By adjusting them, you can transform how your Word doc looks.
Margins live on the Layout tab. Click Layout, and you’ll see a Margins drop-down menu. Click it.


Normal margins are the default. The Normal setting is 1 inch of spacing on all four sides of your page.
You’ll see some other preset options, like Narrow, Moderate, and more. Create your own custom margins by clicking Custom Margins at the bottom.
On the Document window, you can add your desired settings. Click OK when you’re finished. This is one of the best Word tips and tricks.
To use a border to bracket your Word margins, keep learning with this tutorial:
7. Place Text in Columns
Tips for using Microsoft Word should help you get the most out of the app. That helps you create beautiful, readable documents that look great.
By using column layouts, you can arrange text in a magazine-style layout. Follow these Word document tricks if you need a layout like that.


To add columns, return to the Layout tab on the ribbon. Near the left side, click Columns. You’ll see Word display a series of preset designs. You can add a single column, two columns, three, and so on.
Need more control? Click More Columns. Here, you can customize the number of columns on each page. You can also control the width, spacing, and more. When you’re finished, click OK.
8. Add and Edit Images
Word tips don’t only involve words! Don’t forget to add images to make your documents more compelling. To add photos, go to the Insert tab on the ribbon. Then, click on the Pictures drop-down menu. If you’ve got a photo you want to use, click Picture from File.
Browse to an image file, click it, then choose Insert. Word adds the image to your document, wherever your cursor is positioned.


Then, you can make edits. Click Picture Format on the ribbon, and you’ll see an array of style, size, and layout effects. Plus, you can move the image around by clicking and dragging. Also, the corners can be pulled to resize each photo.
9. Check Spelling and Grammar
All the Microsoft Word tips and tricks in the world won’t help you impress if you’ve got errors in your document. Spelling and grammar mistakes are very off-putting, but they’re also very easy to make. That’s why it’s key to check your spelling and grammar before sharing your files with others.


To begin, go to the Review tab, once again found on the ribbon. On the left side, click Spelling & Grammar. Word will analyze all the text on your document.
If errors are found, you’ll see a window appear. Errors will appear highlighted, and you’ll have options to correct them. You can check suggestions or choose to ignore an identified error if it isn’t valid.
There’s more power inside this feature, so make sure to check out our tutorial on the feature below. It includes more spelling and grammar tips and tricks of MS Word:
10. Save Your Document as a PDF
Let’s face it: Word files are meant for sharing. Word document tricks for sharing help ensure that anyone can view your documents.
Keep in mind, not everyone has Word installed on their computers. It’s a good idea to share Word files in PDF format, which is far more accessible.


To save a Word file as a PDF, go to the File > Save As menu. Give your file a name, then click on the File Format drop-down. From your listed options, click PDF, then click Save.
You now have a PDF copy of your file.
Your PDF copy won’t be editable in Word when you share it. But it’ll be readable on a vast array of devices.
As the perfect complement to this Word tip, let’s explore the opposite step: importing PDF documents into Word. Jump to the tutorial below for MS Word tips on importing and editing a PDF inside of Word:
11. Sign Your Name


A cool Microsoft Word tip is that you can sign your name on your Word Document.
First, click on the Insert tab above the toolbar. Next, in the Lines section, click on the Scribble option.
After you click on Scribble, your cursor turns into a drawing tool. Finally, drag your mouse to sign your name.
12. Protect Your Document With a Password


If you are sending a sensitive Word document, then a helpful Word trick can be to password protect your Word document.
First, click on the Review tab above the toolbar.
Next, you’ll see a Protect button in the toolbar. You can choose how you want to protect your document when you click this button.
A window appears if you click on the Protect Document option. In this window, you can make your password to protect the document.
13. Eliminate Distractions


If you get distracted easily, this Microsoft Word tip could help you. Microsoft Word has a Focus mode. To turn on the Focus mode, click on the View tab. Next, click on the Focus button in the toolbar.
14. Add Filler Text


If you want to check what a font looks like or want filler text, try this Word trick.
First, click on the spot where you want filler text. Next, type =Lorem() and press Enter. In the parenthesis, you need to specify how many paragraphs of filler text you want.
After adding the number in the parenthesis, nonsense words appear and will be structured like normal sentences. You can edit and format this text like any other text to preview what your changes might look like.
15. Dictate to Type


Another Word tip is to use the Dictate button to type. This button is in the toolbar under the Home tab. It looks like a microphone.
After you click on the Dictate button, you can turn your spoken words into text. You may need to go back and edit some of the text for accuracy.
The Best Source for Microsoft Word Templates (With Unlimited Use)
You’ve just looked at our list of 15 Word tips and tricks. But there’s another resource that you should know about.
Much like our selection of MS Word tips, Envato Elements is built to save you time. Thanks to unlimited downloads, you’ve got everything you need to work effectively.
Explore Envato Elements


With a subscription to Envato Elements, you’ll unlock all the following:
- Templates. These give you a major head start in your design work. There are templates for every type of project you might need, like resumes, invoices, and more. Just add your details.
- Graphics. Icons and illustrations perfectly complement a good resume design. You’ll unlock this huge library at no extra cost.
- Stock photos. Much like graphic elements, stock photos are the perfect addition to a Word document.
No matter how much you download, your costs stay flat. These templates and resources make your work so much easier. It’s one of our top Word document tricks because it transforms your work to the simple task of filling in placeholders.
Learn More About Microsoft Word
If you want to learn more about Microsoft Word, read this Guide. Then, to learn even more about Microsoft Word, read these articles:
Start Using These 15 Tips for Using Microsoft Word
With these 15 tips and tricks of MS Word, you’re way more efficient than when you started. Keep these features top of mind so that you always have a solution to your design challenges.
Don’t forget that one of our top tips for using Microsoft Word is to leverage Envato Elements. Sign up, grab templates, and work more efficiently than ever before!
Editorial note: This tutorial was originally published in November of 2021. It’s been completely updated to make it accurate and relevant by Sarah Joy.