
Print/Save as PDF
Computer applications teachers are always looking for new and exciting ways to teach Microsoft Word to their middle and high school students.
Rather than spending hours upon hours creating your own lesson plans, you want something that you can simply integrate into your existing computer applications curriculum.
At AES, we work with thousands of middle and high school teachers who teach Word, Excel, and PowerPoint in their classes.
And while we provide a Microsoft Office curriculum, our solution may not be the right fit for everyone. Because of this, we’ve put together a list of other resources you can use to put together your Microsoft Word lesson plans.
In this post, you’ll discover three popular places to find Microsoft Word lesson plans:
- GCF Global
- Teachers Pay Teachers
- Study.com
We’ll discuss what each resource is, the pros and cons, and what scenario it works best for. After reading this article, you should have a better idea if one would work well in your classroom.
Related Resource: Microsoft Office Lesson Plans Your Students Will Love
1. Microsoft Word Tutorials from GCF Global

What is GCF Global?
GCF Global is a database of teaching resources created by Goodwill Industries. Their Microsoft Office curriculum includes Word, Excel, PowerPoint, and Access lessons for Office 2016, 2019, and 365 editions.
Specifically for Word, you’ll find 35 lessons that range from the basics of opening a document to advanced features like mail merge.
These lessons include video walkthroughs and accompanying text for different aspects of the applications. After working through all of the lessons, students can then take a quiz.
Pros of GCF Global
- The material is free to access for teachers and students.
- GCF hosts their material online, allowing students to complete the work wherever they have internet access.
Cons of GCF
- The video-based modality leaves little room for interactions between you and your students.
- The material only covers the subject matter at a high-level.
- The content is open to anyone, which means it’s not specifically designed for middle or high school students.
- There is no ability to track student progress or grade work outside of the built-in quiz.
Where GCF Global Might Work Best For You
GCF Global is a good way to get started with teaching Microsoft Office if you want to explore resources without investing money. And the ease of access to videos means that students can practice at home to reinforce classroom teaching.
While it won’t serve as a full Microsoft Office curriculum, GCF can easily supplement an existing curriculum for teaching Microsoft Office.
2. Teachers Pay Teachers

What is Teachers Pay Teachers?
Teachers Pay Teachers (TpT) is an online marketplace where educators can share, sell, and buy resources like lesson plans, activities, and posters.
The resources are uploaded to the TpT marketplace by “Teacher-Authors” from around the world and cover a variety of subject areas and grade levels.
For Microsoft Word, you can find hundreds of lesson plans and activity ideas from vendors such as TechCheck Lessons, That Tech Chick, and Computer Teacher Solutions.
Pros of Teachers Pay Teachers
- You can choose from a huge library of Microsoft Word lesson plans and activities, with new items added on a regular basis.
- Many of the TpT materials are pretty affordable, especially if you’re only picking a couple to add to your existing Microsoft Office curriculum.
Cons of Teachers Pay Teachers
- As an open education resource, there isn’t much quality control to confirm the effectiveness or accuracy of the materials.
- Authors aren’t required to update or maintain their materials. That means you may find some extremely outdated or irrelevant resources.
- Grade levels are chosen by the author, who ultimately wants as many people as possible to buy their resource. As a result, a single Microsoft Word resource could be listed as «appropriate» for elementary school, middle school, high school, and higher education.
Where TpT Might Work Best For You
Using the Microsoft Word lessons and activities from Teachers Pay Teachers depends on your needs.
If you’re looking for supplemental resources to fill gaps in your existing curriculum, TpT is a great option.
3. Study.com
![]()
What is Study.com?
Study.com is a subscription-based educational website designed to give teachers resources to teach students in a variety of different fields, including career and technical education.
Study.com offers a lesson plan for Microsoft Word aligned to Common Core State Standards that allows students to learn through a tutorial video and interacting with the application.
Pros of Study.com
- The plan is straightforward and comes with a tutorial video to get students started.
- The lesson is aligned to Common Core standards, making it easy for teachers to see where it fits into their curriculum.
- The lesson plan comes with other Microsoft Office resources available on Study.com.
Cons of Study.com
- Beyond the introductory video, teachers will need to guide students in completing the lesson.
- There is only one hour’s worth of material here, so you might need additional materials on Microsoft Word.
- You’ll need a subscription to Study.com to access this lesson plan and other resources.
Where Study.com Might Work Best For You
Study.com provides a good introductory lesson plan for students new to Microsoft Office.
If you already subscribe to Study.com or are interested in some of the many other CTE resources the site has available, it might be a good choice for you. Consider incorporating this lesson into your classroom as a supplementary resource.
Which Microsoft Office Lesson Plans are Right for Your Classroom?
Overall, GCF, TpT, and Study.com offer excellent supplemental materials to help you better keep students engaged when learning Microsoft Word.
However, if you teach Microsoft Word you likely also teach Excel, PowerPoint, and other technology topics.
If that’s true for you, consider looking into a more robust computer curriculum option, like Business&ITCenter21.
Business&ITCenter21 is a digital curriculum used by thousands of computer teachers like you to teach Microsoft Office, Google Apps, digital literacy skills, coding fundamentals, and more.
With this ready-made curriculum, teachers regularly save 5+ hours per week with planning and grading.
Wondering if Business&ITCenter21 could help you save time while better engaging students in Microsoft Office lessons? Watch your demo video to find out:

Microsoft Word is an effective tool in the classroom. The platform can assist in student learning, organizing, and the development of 21st-century skills. These skills develop critical thinking, collaboration, communication, and creativity. Microsoft Word helps develop and cultivate these skills in a variety of ways.
Students can use Microsoft Word to explore new content or deepen their understanding of the topic. It can also help students take notes or organize their learning throughout the school year.
Use the lessons, activities, and other ideas listed here to help enhance your students’ learning using Microsoft Word.
1. My Life As a Movie

A great beginning of the year lesson is to have students create an autobiography in Microsoft Word. This project gets creative by asking students to create a DVD cover inside of a booklet to share about their life with their peers.
Learn more: Teachers Pay Teachers
2. Name Acrostic

Another great beginning of the year project is an acrostic poem. Students type their name’s vertically, then write adjectives that would describe them horizontally. Students can use bold, italics, colors, and shadows to express their personalities. This is a fun and easy activity to have students complete on the first day of school as you can display them throughout the year!
Learn more: Student Web
3. Annotate Digital Texts

Annotating the text, or highlighting and taking notes in the margin, is a literacy skill middle school students should develop. Students can annotate a text digitally in Microsoft Word using the highlight and comment feature. Students can highlight the text using a variety of colors and make digital comments on each of these highlights. This is an extremely valuable tool as it allows students to annotate a variety of texts, not just print!
Learn more: Groovy Post
4. Peer-Review and Writing Feedback

Microsoft Word is a great tool for peer review. Students can collaborate on their writing with their classmates by sharing the document and then using the track changes feature. This allows one student to provide feedback and changes to another student’s writing while allowing the original owner of the writing to keep the original document and see the writing suggestions.
Learn more: Microsoft
5. Resume Writing

Students can practice writing a resume in Microsoft Word. Since Word offers a variety of basic functions, tools, and templates, students can choose a template that would best represent a future career of their choice. This activity provides students with real-world practice and develops an essential skill they will need in the future.
Learn more: Resume Genius
6. Formal Letter Writing
Another amazing writing skill to practice with students is teaching how to write a formal letter. This lost form of communication is still incredibly important for students to learn. Students can learn how to properly format a letter to include the heading, address, body, and signature. Teachers can easily use the templates provided in Microsoft Word to help students learn the proper writing structure for formal letters.
Learn more: Lisa Doe
7. Write a Newspaper

Microsoft Word also has accessible templates to teach students how to write a newspaper article. Students can practice their expository writing skills by creating a newspaper article. This is a great assignment that teaches students real-world writing skills and is fun! Writing prompts could include both fiction and non-fiction and can be embedded in a variety of units.
Learn more: Microsoft
8. Mini-Book Project

This project takes the idea of a traditional book report to a new level! Students use Word to create a mini-book using colorful templates and tables. This assignment asks students to demonstrate their comprehension of a novel while allowing the students to practice their technology skills as well!
Learn more: Teachers Pay Teachers
9. Create Flashcards
Microsoft Word offers students a ton of amazing critical learning tools to help study and organize their learning. Students can create flashcards using Microsoft Word to help them study. These flashcards can be saved in OneDrive and students can access them at all times.
Learn more: Andrew Who
10. Digital Planner

Another great way to use Microsoft Word to help students organize is by creating a digital planner. Word offers a variety of planner templates to help students keep track of assignments, homework, and other important dates.
Learn more: Template.net
11. Online Notebook

Microsoft OneNote allows students access to a variety of features to create a digital notebook. Students can take notes, add photos, and include audio and video recordings in their notebooks. This is a great resource for students who attend online school. Teachers can also create OneNote notebooks for their students to allow them to all have the same note-taking experience or basic school report.
Learn more: Microsoft OneNote
12. Make a Family Tree

Students can create a genogram in Microsoft Word to learn more about their families. This project allows students to discover more about their ancestors through the formation of a family tree.
Learn more: It Still Works
13. Create a Word Cloud
Word clouds can be a great way to allow students to demonstrate their overall understanding or summary of a topic. Microsoft Word allows users to create a word cloud using one of the add-on features.
Learn more: The Tech Train
14. Create Digital Art
Microsoft Word allows students to practice their writing skills, but it also has a variety of features for creative expression. Students can create digital art using the drawing tools such as shapes, fill, shading, and other features in Word.
Learn more: Lisa Doe
15. Create a Book Cover

This project is another fun deviation away from the traditional book report. Students can use Word to create a book cover connected to the theme of the novel. Using the borders, images, fonts, and colors students can demonstrate their comprehension of a book in a new way!
Learn more: Innovations in Techology
16. Invent an Animal

Students can get creative and invent their own animals. Students can draw the animal using the shapes and images in Microsoft Word. After drawing their own animal, students can use text to describe their animal and make connections to other cross-curricular areas.
Learn more: Innovations in Technology
17. Plan a Vacation

Students can research and budget their own faux vacation. This lesson idea teaches students real-life skills such as organizing and money planning. Students then compile their research in Microsoft Word and create a travel brochure.
Learn more: Teachers Pay Teachers
18. Progress Monitor Student Work
While Microsoft Word offers a variety of ways to expand student learning, it also has many tools to help teachers. One way teachers can use Microsoft Word is to progress monitor student learning. Using the «activity» feature, teachers can view student progress including the date and time of each activity completed.
Learn more: Foetron Academy
19. Create Handouts
/tim-platt-getty-images-56a563c13df78cf772880e12.jpg "tim-platt-getty-images-56a563c13df78cf772880e12.jpg")
Teachers are always doing their best to individualize the learning for all their students. Microsoft Word is a great way to create handouts that best meet their students’ needs no matter the lesson plan.
Learn More: Techwalla
20. Transfer Work Documents to iPad
Many students, teachers, and parents use Apple products, but that does not limit their ability to use Microsoft Word. Documents can be transferred to pages allowing for unlimited access to the resources for any school project.
Learn More: Trusoljahs

MS-WORD
Microsoft Word is a word processor developed by Microsoft. It was first
released in 1983 under the name Multi-Tool Word for Xenix systems. MS
Word is a popular word-processing program used primarily for creating
documents such as letters, brochures, learning activities, tests, quizzes and
students’ homework assignments. There are many simple but useful features
available in Microsoft Word to make it easier for study and work. That‘s why
so many people would prefer to convert the read-only PDF to editable Word
and edit PDF in Word.
PRACTICAL -1
Type the paragraph above as it is using “Calibri font” , font size 12.
Change the font type to “Lucida Calligraphy” and size to 14
Alignment to your paragraph to right margin.
Save this file as ms-word.doc in “my documents” folder using save as option.
Edit some part of your document and save again using save option.
Close the file.
Open this file again using open option from office button.
View the file you have created using print preview option.
Take a print out of this document through print option.
Create a new file using new option.
Select some part of your document of PRACTICAL -1 and copy it to new file created in
bullet 1. Use shortcut keys for copy and paste.
Highlight “Microsoft Word is a word processor developed by Microsoft.”
Search for word “document” using find option.
Replace the word “Microsoft” with “MS”.
MS Word holds a solid position in the Teaching and Learning process, Microsoft word has now become the most commonly used software in education. as It offers many general relative advantages to teachers and students for the teaching and learning process.
With the use of Microsoft Word, teachers can make the learning process very effective.
You as a student will need MS word for lots of reasons but don’t worry. I won’t spoil anything for you. You can read the importance and uses of MS Word in detail down below.
What is MS Word?
Microsoft Word is a top-rated word processing application designed for the use of businesses, workers, educators, students, and personal use. It helps the users to View, Crate, edit, and share documents.
MS Word is used primarily to create documents such as letters, brochures, learning activities, tests, quizzes, and students’ homework assignments. And more.
This Application is available on the major operating system, be it Windows, Mac OS, Android, or IOS.
Microsoft Word is often called MS Word and Word.
Microsoft first developed it in 1983. MS Word is one of the office productivity applications included in the Microsoft Office suite. But it can also be purchased as a stand-alone product.
Read all about the Features and Uses of Microsoft Office in Education and Business
Importance of MS Word in Education
MS WORD is an essential application for educational purposes. In this digital age, it is easier to take notes without using notebooks. We can create notes that include diagrams, graphs, tables, and smart art, among other things. We can organize our work in a more efficient method, and the best thing is that we can freely share the word file.
MS Word can assist teachers and students in developing new and innovative learning and teaching methods. Students can use MS Word and MS Office to transmit educational materials and practice in school and university more quickly and with higher quality.
It is also helpful to higher education students to prepare their research notes on it more efficiently and professionally. It has the exact sources and materials that are required for researching any topic.
MS Word has a grammar and spell check feature that can make your files error-free documents. The research in the typed form will also be more effective than handwritten work. MS Word files are very simple to publish or print; thus, after completing a thesis or research, one can quickly and easily publish their work.
MS Word is designed to be “Instantly Usable” by anyone regardless of whether they have very little or no computer knowledge. In addition to this, it also has so many cool features that are easy to apply – you can open it and start writing!
MS Word is one of the most popular word processing applications. Like other word processing applications, it’s capable of helping teachers to prepare lectures, papers, and notes for their students.
And allow students to write their assignments, thesis, and projects. So, it has affected Education in a good way.
Here are some of the many ways students and teachers can use Microsoft Word to make learning more accessible and more efficient.
1. Time-Saving Tool
MS Word can be used as a teaching tool in schools, colleges by teachers and students. It helps the teachers to modify their teaching materials instead of creating new ones. You can correct your mistakes quickly on MS Word and can adjust the file whenever you want.
2. An Aide for Teachers
A teacher can use MS Word to create orders, notices, updates, and reminders to share information with students.
3. An Aide for Students
MS Word is also a helper for students. They can study through MS Word files. They can also use it to make their presentations, assignments, notes, and many other study-related things.
4. E-Content Generation
A new trend is emerging in which pupils are given customized notes in graphic-text style. MS Word can be used to insert notes, book references, the institution’s name, the course and subject titles, graphics, and charts, and these are all examples of educational E-content. Educator-created e-content is frequently uploaded to websites where anybody can read it.
5. Tool for Preparing Question Papers for Exams
One of the uses of MS Word also includes that it can be used to prepare question papers for exams in schools and colleges.
6. Lesson Plan
Teachers can plan their lessons using MS Word. For example, lesson plans might be weekly, monthly, or annually, depending on the curriculum used in the classroom.
7. Creation of a Good Resume
If you’re seeking work and have an interview, the first question the interviewer will ask is about your resume. Thus it’s a crucial tool in your job hunt. Creating an attractive CV was not an easy task back then, but with the help of MS Word, teachers and students can now quickly make a very attractive and appealing resume on their own.
8. Environmental-Friendly Tool 🙂
One of the essential advantages of MS Word in Education is that it is environmentally friendly because it uses less paper.
MS Word is a paperless content production application that aids in the reduction of paper consumption for rough work. Said, teachers, and students can now utilize as many documents as they want without worrying about the environment or paper consumption. They don’t have to waste paper; they may delete the incorrect material with a single click.
9. Working as a Notebook
Students can use Microsoft Word as a notebook; they can write anything on it and use it as their diary.
10. Documents Can Be Saved for Future Use
Because you never know when or where a particular document will come in handy, storing critical files is a must in one’s life. MS Word can help you with this problem. You can preserve a document for as long as you desire.
As a result, students and teachers can keep documents, notes, and other educational materials. They can obtain those files and data by visiting MS Word files if they require specific files or class notes.
11. Write essay
When it comes to writing essays, many students choose MS Word overwriting on paper. Because rewriting and restructuring are so easy and stress-free.
12. An Effective Tool in Universities
In schools, colleges, and universities, Microsoft Word is a valuable tool. Students are regularly given MS Word assignments, and they must write the assignment on it. It has a positive impact on Education in every aspect.
13. Helps in Making class notes.
Class notes are a perfect vehicle to let your classmates know about the study. With the use of MS word, students can create and edit class notes and help their classmates.
14. Sharing Notes/Notebooks made easy
Traditionally, students took physical notebooks of other students to complete the homework, but with MS Word, students can access others’ notebooks anytime on any device without carrying a physical hard copy.
Conclusion
To put it in a nutshell, MS Word is an essential tool for our day-to-day work if we are doing any professional job or need to take notes, for example. It is similar to what we do when we write in our notebooks.
Microsoft Word has a lot of advantages in Education. Now, teachers can make their lessons more understandable, and students can study more efficiently with the help of MS Word. Technology has affected the lives of teachers and students in a good way and made Education easy.
FAQs about MS Word?
What is the importance of using MS Word in education?
MS WORD can benefits teachers and students to create new innovative methods of learning and teaching. MS WORD is an important application for education purpose. In this digital world, it helps to make notes in spite of notebooks. We can prepares notes with diagrams, graphs, tables and smart art etc.
Why is MS Word so popular?
According to a report, 80% of users use MS word to write paper alone(not in a group- for group paper writing some prefer to use Google Doc),
One of the obvious reasons behind its popularity is its simplicity and availability.
MS Word is designed to be ‘instantly usable’ by anyone. regardless of whether they have very little or no computer knowledge. Plus it has so many cool features and options that are easy to apply.
Almost all Windows users install Microsoft office in their computer system. If not preloaded, It works fine with the Windows system.
What are the main feature of MS Word?
Given below are the basic functions of Microsoft Word:
- Creating text documents.
- Editing and Formatting the existing documents.
- Making a text document interactive with different features and tools.
- Graphical documents, comprising images.
- Used by Authors and Researchers.
- Detect grammatical errors in a text document.
Please Support Us by Reading Just One More [Related Articles]
Importance of MS Office and its Features?
Разыгрываем три iPad Air! Скачайте приложение «Каталог Onlíner»,
чтобы участвовать!
Microsoft представила ИИ-помощник под названием Copilot для офисных приложений из пакета Microsoft 365. Он использует в том числе GPT-4 от OpenAI, сообщается на сайте компании.
Проще говоря, Copilot может помочь создавать документы, электронные письма, презентации и другие файлы пользователям офисного пакета Microsoft. Впрочем, в компании добавляют, что ИИ окажется правым не во всех случаях, но натолкнуть юзера на определенную мысль вполне способен.
Так, в Word ИИ сможет написать текст на основании других файлов, а также отредактировать его или обобщить для выводов. В Excel система проанализирует и систематизирует данные, даже если дать ей команду на «естественном языке» (то есть написать задание словами, а не вводить его кодом). Наконец, презентации в PowerPoint также смогут создаваться в автоматическом режиме — или по крайней мере в полуавтоматическом, с предложениями по плану выступления, сокращениями и готовым макетом. Почтовый сервис Outlook быстро разберет входящие сообщения и предложит подходящие шаблонные варианты ответов.
Важно: сейчас проходит тестирование Copilot только с 20 клиентами. В Microsoft обещают сообщить более подробную информацию, сроки доступности Copilot и цены на его использование в ближайшие месяцы.
Наш канал в Telegram. Присоединяйтесь!
Есть о чем рассказать? Пишите в наш телеграм-бот. Это анонимно и быстро
Word 2016 is designed to help you create professional-quality documents. Word can also help you organize and write documents more efficiently.
When you create a document in Word, you can choose to start from a blank document or let a template do much of the work for you. From then on, the basic steps in creating and sharing documents are the same. And Word’s powerful editing and reviewing tools can help you work with others to make your document great.
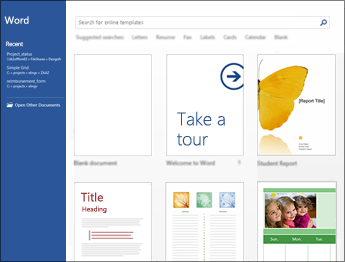
Start a document
It’s often easier to create a new document using a template instead of starting with a blank page. Word templates come ready-to-use with pre-set themes and styles. All you need to do is add your content.
Each time you start Word, you can choose a template from the gallery, click a category to see more templates, or search for more templates online.
For a closer look at any template, click it to open a large preview.
If you’d rather not use a template, click Blank document.
Open a document
Every time you start Word, you’ll see a list of your most recently used documents in the left column. If the document you’re looking for isn’t there, click Open Other Documents.
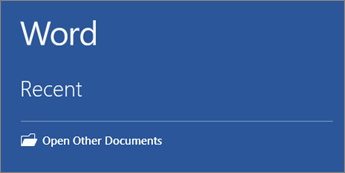
If you’re already in Word, click File > Open and then browse to the file’s location.
When you open a document that was created in earlier versions of Word, you see Compatibility Mode in the title bar of the document window. You can work in compatibility more or you can upgrade the document to use Word 2016.
Save a document
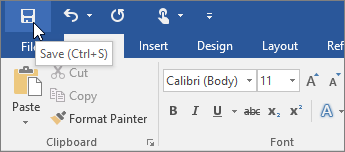
To save a document for the first time, do the following:
-
On the File tab, click Save As.
-
Browse to the location where you’d like to save your document.
Note: To save the document on your computer, choose a folder under This PC or click Browse. To save your document online, choose an online location under Save As or click Add a Place. When your files are online, you can share, give feedback and work together on them in real time.
-
Click Save.
Note: Word automatically saves files in the .docx file format. To save your document in a format other than .docx, click the Save as type list, and then select the file format that you want.
To save your document as you continue to work on it, click Save in the Quick Access Toolbar.
Read documents
Open your document in Read Mode to hide most of the buttons and tools so you can get absorbed in your reading without distractions.
-
Open the document you want to read.
Note: Some documents open in Read Mode automatically, such as protected documents or attachments.
-
Click View > Read Mode.
-
To move from page to page in a document, do one of the following:
-
Click the arrows on the left and right sides of the pages.
-
Press page down and page up or the spacebar and backspace on the keyboard. You can also use the arrow keys or the scroll wheel on your mouse.
-
If you’re on a touch device, swipe left or right with your finger.
Tip: Click View > Edit Document to edit the document again.
-
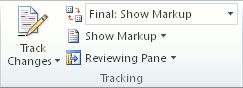
Track changes
When you’re working on a document with other people or editing a document yourself, turn on Track Changes to see every change. Word marks all additions, deletions, moves, and formatting changes.
-
Open the document to be reviewed.
-
Click Review and then on the Track Changes button, select Track Changes.

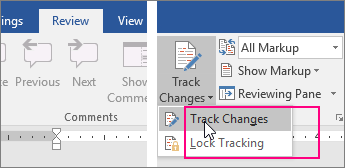
Read Track changes to learn more.
Print your document
All in one place, you can see how your document will look when printed, set your print options, and print the file.
-
On the File tab, click Print.
-
Do the following:
-
Under Print, in the Copies box, enter the number of copies you want.
-
Under Printer, make sure the printer you want is selected.
-
Under Settings, the default print settings for your printer are selected for you. If you want to change a setting, just click the setting you want to change and then select a new setting.
-
-
When you’re satisfied with the settings, click Print.
For details, see Print a document.
Beyond the basics
For more on the fundamentals of using Word, see What’s new in Word 2016.
Top of Page
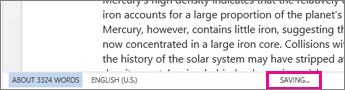
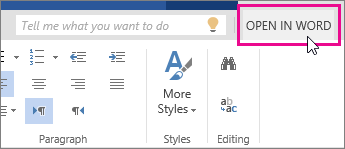
With Word for the web, you use your web browser to create, view, and edit the personal documents that you store on OneDrive. If your organization or college has a Microsoft 365 plan or SharePoint site, start using Word for the web by creating or storing documents in libraries on your site.Save changes
Word saves your changes automatically. Look on the status bar at the bottom left corner of Word for the web. It will either show Saved or Saving.
Share documents online
Because your document is online, you can share it by sending a link instead of an email attachment. People can read it in their web browser or mobile device.
Click File > Share > Share with People.

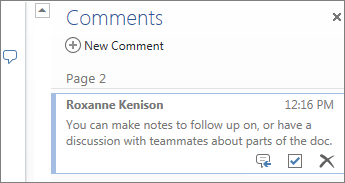
Comment in the browser
A comment balloon shows where comments have been made in the doc.

Reply to comments, and check off items you’ve addressed.
Edit in the browser
If you try to type in the document and nothing happens, you’re probably in Reading view. Switch to Editing view: click Edit Document > Edit in Word for the web.

Type and format text, add pictures, adjust the layout of the page, and more. For more advanced editing, click Open in Word.
Work together on the same doc
To work together in Word for the web, you edit a document as you normally would. If others are also editing it, Word for the web alerts you to their presence. You can see everyone who is currently working in the document by clicking in the ribbon.

Clicking on an author’s name jumps you to where they’re working in the doc. And you’ll see the changes they make as they’re happening. They can be working in Word for the web, Word 2010 or later, or Word for Mac 2011.
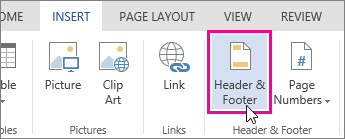
Add a header or footer
Go to Insert > Header & Footer to add headers and footers to your document.
Click Options to choose how you’d like them to appear.

Add page numbers
Click Insert > Page Numbers and then choose from the gallery where you’d like the page numbers to appear.
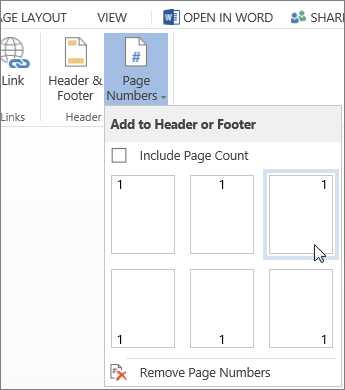
Select Include Page Count to show the current page number along with the total number of pages (page X of Y).
Find and replace text
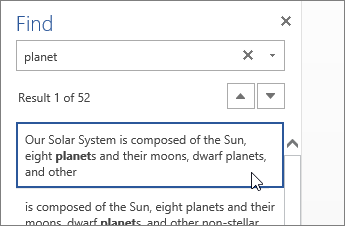
Quickly search for every occurrence of a specific word or phrase in your document by clicking Home > Find (or type Ctrl+F). Results appear next to your document so you can see the term in context. Clicking on a search result jumps you to that occurrence.
Click Replace (or type Ctrl+H) to find and replace text.
Print in Word for the web
Go to File > Print. Word for the web creates a PDF preview of your document that keeps all the layout and formatting of your document. Send the PDF to your printer and it will print the way you expect.
Microsoft Word 2013 is a word-processing program designed to help you create professional-quality documents. Word helps you organize and write your documents more efficiently.
Your first step in creating a document in Word 2013 is to choose whether to start from a blank document or to let a template do much of the work for you. From then on, the basic steps in creating and sharing documents are the same. Powerful editing and reviewing tools help you work with others to make your document perfect.
Choose a template
It’s often easier to create a new document using a template instead of starting with a blank page. Word templates are ready to use with themes and styles. All you need to do is add your content.
Each time you start Word 2013, you can choose a template from the gallery, click a category to see the templates it contains, or search for more templates online. (If you’d rather not use a template, just click the Blank document.)
For a closer look at any template, just click it to open a large preview.
Top of Page
Open a document
Every time you start Word, you’ll see a list of your most recently used documents in the left column. If the document you’re looking for isn’t there, click Open Other Documents.
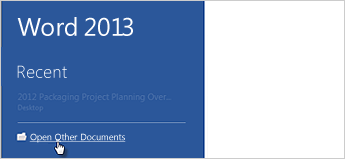
If you’re already in Word, click File > Open and then browse to the file’s location.
When you open a document that was created in earlier versions of Word, you see Compatibility Mode in the title bar of the document window. You can work in compatibility more or you can upgrade the document to use features that are new or enhanced in Word 2013.
Top of Page
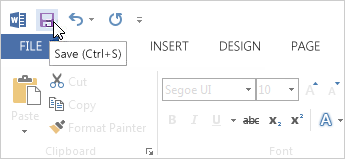
Save a document
To save a document for the first time, do the following:
-
Click the File tab.
-
Click Save As.
-
Browse to the location where you’d like to save your document.
Note: To save the document on your computer, choose a folder under Computer or click Browse. To save your document online, choose a location under Places or Add a Location. When your files are online, you can share, give feedback and work together on them in real time.
-
Click Save.
Note: Word automatically saves files in the .docx file format. To save your document in a format other than .docx, click the Save as type list, and then select the file format that you want.
To save your document as you continue to work on it, click Save in the Quick Access Toolbar.
Top of Page
Read documents
Open your document in Read Mode to hide most of the buttons and tools so you can get absorbed in your reading without distractions.
-
Open the document you want to read.
Note: Some documents open in Read Mode automatically, such as protected documents or attachments.
-
Click View > Read Mode.
-
To move from page to page in a document, do one of the following:
-
Click the arrows on the left and right sides of the pages.
-
Press page down and page up or the spacebar and backspace on the keyboard. You can also use the arrow keys or the scroll wheel on your mouse.
-
If you’re on a touch device, swipe left or right with your finger.
Tip: Click View > Edit Document to edit the document again.
-
Top of Page
Track changes
When you’re working on a document with other people or editing a document yourself, turn on Track Changes to see every change. Word marks all additions, deletions, moves, and formatting changes.
-
Open the document to be reviewed.
-
Click Review and then on the Track Changes button, select Track Changes.

Read Track changes to learn more.
Top of Page
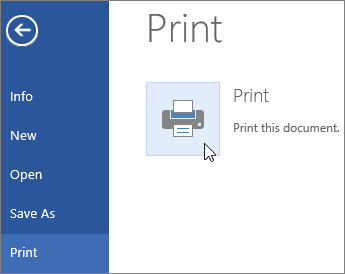
Print your document
All in one place, you can see how your document will look when printed, set your print options, and print the file.
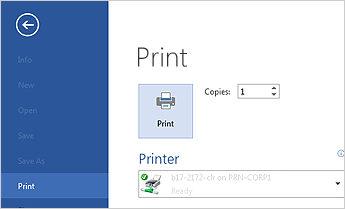
-
Click the File tab and then click Print.
-
Do the following:
-
Under Print, in the Copies box, enter the number of copies you want.
-
Under Printer, make sure the printer you want is selected.
-
Under Settings, the default print settings for your printer are selected for you. If you want to change a setting, just click the setting you want to change and then select a new setting.
-
-
When you’re satisfied with the settings, click Print.
For details, see Print and preview documents.
Beyond the basics
Go beyond the basics with your documents by creating a table of contents or saving a document as a template.
Top of Page
Important:
Office 2010 is no longer supported. Upgrade to Microsoft 365 to work anywhere from any device and continue to receive support.
Upgrade now
In this article
-
What is Word?
-
Find and apply a template
-
Create a new document
-
Open a document
-
Save a document
-
Read documents
-
Track changes and insert comments
-
Print your document
What is Word?
Microsoft Word 2010 is a word-processing program, designed to help you create professional-quality documents. With the finest document-formatting tools, Word helps you organize and write your documents more efficiently. Word also includes powerful editing and revising tools so that you can collaborate with others easily.
Top of Page
Find and apply a template
Word 2010 allows you to apply built-in templates, to apply your own custom templates, and to search from a variety of templates available on the web.
To find and apply a template in Word, do the following:
-
On the File tab, click New.
-
Under Available Templates, do one of the following:
-
To use one of the built-in templates, click Sample Templates, click the template that you want, and then click Create.
-
To reuse a template that you’ve recently used, click Recent Templates, click the template that you want, and then click Create.
-
To use your own template that you previously created, click My Templates, click the template that you want, and then click OK.
-
To find a template on Office.com, under Office.com Templates, click the template category that you want, click the template that you want, and click Download to download the template from Office.com to your computer.
-
Note: You can also search for templates on Office.com from within Word. In the Search Office.com for templates box, type one or more search terms, and then click the arrow button to search.
Top of Page
Create a new document
-
Click the File tab and then click New.
-
Under Available Templates, click Blank Document.
-
Click Create.
For more information about how to create a new document, see Create a document.
Top of Page
Open a document
-
Click the File tab, and then click Open.
-
In the left pane of the Open dialog box, click the drive or folder that contains the document.
-
In the right pane of the Open dialog box, open the folder that contains the drawing that you want.
-
Click the document and then click Open.
Top of Page
Save a document
To save a document in the format used by Word 2010 and Word 2007, do the following:
-
Click the File tab.
-
Click Save As.
-
In the File name box, enter a name for your document.
-
Click Save.
To save a document so that it is compatible with Word 2003 or earlier, do the following:
-
Open the document that you want to be used in Word 2003 or earlier.
-
Click the File tab.
-
Click Save As.
-
In the Save as type list, click Word 97-2003 Document. This changes the file format to .doc.
-
In the File name box, type a name for the document.
-
Click Save.
For more information about how to create a document that is compatible with Word 2003 or earlier versions, see Create a document to be used by previous versions of Word.
Top of Page
Read documents
-
Open the document that you want to read.
-
On the View tab, in the Document Views group, click Full Screen Reading
-
To move from page to page in a document, do one of the following:
-
Click the arrows in the lower corners of the pages.
-
Press PAGE DOWN and PAGE UP or SPACEBAR and BACKSPACE on the keyboard.
-
Click the navigation arrows at the top center of the screen.
Tip: Click View Options, and then click Show Two Pages
to view two pages, or screens, at a time.
-
 to view two pages, or screens, at a time.
For more information about how to view documents, see Read documents in Word.
Top of Page
Track changes and insert comments
-
To turn on change tracking, on the Review tab, in the Tracking group, click Track Changes.
-
To insert a comment, on the Review tab, in the Comments group, click New Comment.
For more information about how to track changes made while revising, see Track changes and insert comments.
Top of Page
Print your document
-
Click the File tab and then click Print.
-
Do the following:
-
Under Print, in the Copies box, enter the number of copies that you want to print.
-
Under Printer, make sure that the printer that you want is selected.
-
Under Settings, the default print settings for your printer are selected for you. If you want to change a setting, click the setting you want to change and then select the setting that you want.
-
-
When you are satisfied with the settings, click Print.
For more information about how to print a file, see Preview and print a file.
Top of Page
Word provides a writing instructor with a wide range of ways to integrate word processing into the classroom. We have included a list of some of the most popular options here, but this list is certainly not exhaustive.
Option 1: Developing Close Reading Skills
Students can work individually or in groups, responding to guided questions about readings, or they can use the formatting and highlighting features of Word to visually ‘mark-up’ a passage. By taking a passage out of context, students can be forced to look much closer at the rhetorical “clues” provided in the text.
Sample Exercise: Close-Reading Textual Fragments
(Cindy Landwehr)
- Read the fragment of the story I’ve given you at least three times and very carefully. Don’t worry that it seems “out of context”—it is, and this may help you notice details that you wouldn’t notice if you were just reading for plot.
- Identify all the details or collections details that seem significant, troubling, important, or intriguing to you. These could be images, objects, specific words or phrases, ideas, relations. Mark on the paper as much as you want to—go ahead and underline words and make notes in the margins.
- Now, type out a list of the actual phrases or sentences that you have identified, and one by one reflect on what interests you about the details you have chosen. What is enlightening or puzzling or interesting about them? What do they reveal about the character(s) involved—judging from the passage that you are interpreting, how would you describe each character’s state of mind, personality, characteristics, and relationship with the other character(s)? What seems to be happening—plot-wise—in the story at this point?
- You will have the rest of the class period to compose your response. When you are finished, make sure to read over for things you may want to change or make clearer or add to, and of course proofread for typos and mechanical errors. You will be printing this out at the end.
INTEGRATED OPTION: Including the passage in the file would allow students to mark up the passage on-line, eliminating the need for retyping phrases.
Option 2: Using Microsoft’s “Insert Picture” Feature to Stimulate Discussion and Teach Verbal/Visual Literacy
Using Word’s “Insert Picture” function is an excellent means to encourage close reading as well as to distinguish variations in student initial responses to literary texts is the interpretive pairing of graphic with verbal imagery.
SAMPLE EXERCISE: JUDGING BOOKS BY THEIR COVERS?
(Laurie George)
In the following example, a simple Google “Image” search for photographs used by Jon Krakauer in his book Into the Wild produced the following self-portrait of the book’s protagonist, Christopher McCandless, a photograph that Krakauer reprinted as the first image (notably graphic, not verbal) inside the book’s cover.
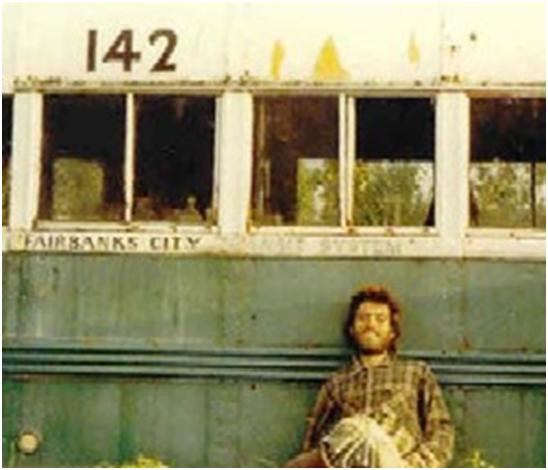
One of his last acts was to take a picture of himself, standing near a bus under the high Alaska sky, one hand holding his final note toward the camera lens, the other raised in a brave, beatific farewell. His face is horribly emaciated, almost skeletal. But if he pitied himself in those first difficult hours—because he was so young, because he was alone, because his body had betrayed him and his will had let him down—it’s not apparent from the photograph. He is smiling in the picture, and there is no mistaking the look in his eyes. Chris McCandless was at peace, serene as a monk gone to God.
(Krakauer, Into the Wild, 1996)
Downloading the image into a Word file and then pairing it with some of Krakauer’s verbal descriptions of the starving McCandless provide excellent pedagogical means of teaching assorted critical approaches to literature—that is, an instructor can pose questions to students that reveal biographical, cultural, and/or formalist reader predispositions toward the interpretation of literature, questions such as these:
-
Why did Krakauer decide to include this picture (rather than the one of McCandless waving at the camera) and how does it complement/contrast with the verbal description he fashions when characterizing McCandless in the final stages of the young man’s life, starving to death in the wilderness that he had so idealized?
-
Does the photographic self-depiction of McCandless mesh with Krakauer’s imagined verbal depiction of the young man’s final days, thoughts, and emotions? What matters about any variance in the two depictions—is one less “true” than the other? What does any difference reveal about Krakauer’s so-called journalistic objectivity?
Such questions provide an excellent means to start a discussion of any text, as students can be asked to “read” the photo in relation to any number of philosophical/theoretical approaches (Naturalism, Realism, or Romanticism, for examples) and contrast these ideals with the verbal textual representations before writing about them.
Undertaking these interpretive exercises in class, students are introduced to core concepts of visual literacy and reader-response theory and must address core questions:
-
Do these graphic depictions enrich readers’ (difficult) pleasure by accompanying verbal text, or simply entertain and reproduce cultural stereotypes?
-
Do graphic additions rob readers’ imaginations, which might otherwise conjure revelatory images of an altogether different kind?
Option 3: Using Microsoft’s Comment Tool to Annotate Texts
As much literature can be found online (Amazon.com publishes lengthy excerpts of even the most recent novels in online advertisements), an excellent means of teaching students to read closely and annotate thoughtfully (not just circle and underline) is to copy and paste a portion of any text (poetry, prose, whatever) into a Microsoft Word read-only document, have students make personal copies of the document in class, annotate the excerpt, and then project students’ annotated texts for discussions of the text, either in the computer classroom or in the seminar room via the laptop.
Sample Exercise: Annotating Text with Microsoft Word
(Laurie George)
Note: The collaborative nature and in-class locale of this exercise is important, as students can easily and readily access databases from the English Library Web page (http://www.lib.washington.edu /subject/English/) to provide biographical, etymological, and socio-historical glosses to a variety of terms and allusions in the text. All enrich class discussion and broaden students’ horizons about critical approaches to literary interpretation.
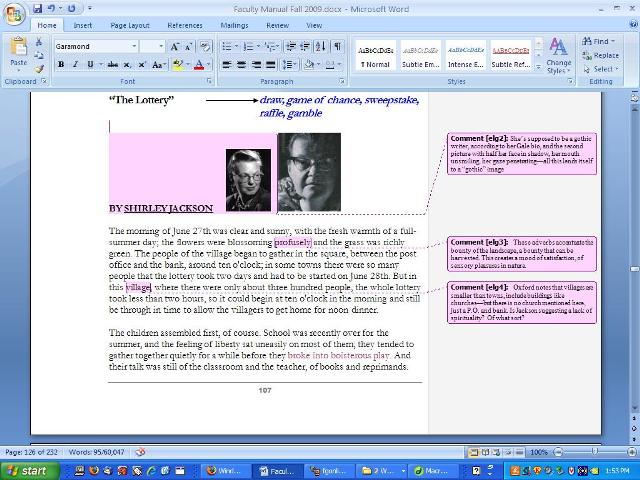
On Thursday we’ll be spending the first half hour of class annotating an excerpt of “The Lottery,” using various databases available to us via the UW Library—specifically, Literature Resource Center (to find biographical information about Jackson), Oxford Reference Online, and English Language Dictionaries.
The goal is not to find critical articles that provide a story interpretation for you, but for you yourself to build an interpretation of Jackson’s story by stopping at any word, phrase, or allusion that she chooses to include. Do this remembering that Jackson started with a blank page and was fastidious about the words she used to craft characterizations, setting, mood, conflict, etc.—always remember that she had choices, that she had designs on you as a reader to think and feel a certain way about the cast of characters and how things play out during the course of the plot. Words are her essential means of gaining your attention, especially through language connotations, denotations, and allusions.
When you find a word, also use the thesaurus feature in Word (in the Tool bar above, select Tools > Language > Thesaurus) to consider how Jackson might have chosen other words that would have attracted/distracted your attention to different character attributes and themes.
So in the first half hour tomorrow, I will have you comb the first part of this text, its exposition, highlighting words and phrases in which to insert your annotations, your commentary.
So in the first half hour tomorrow, I will have you comb the first part of this text, its exposition, highlighting words and phrases in which to insert your annotations, your commentary.
To do this:
-
Highlight the word or phrase in Jackson’s story that you are researching
-
Find the Tool Bar at the top of the page and left click on Insert
-
Drop the cursor down to Comment, selecting it
-
Keyboard your comment into the pop-up box that appears, briefly noting the information you researched and why you find it useful
Example:
Option 4: Using Audio to Facilitate Textual Annotation
(Definition and sample assignment, Laurie George)
Human speech is like a cracked kettle on which we tap crude rhythms for bears to dance to, while we long to make music that will melt the stars.
Gustave Flaubert
Although instructors think most readily of using DVD clips in classrooms, not as frequently do we consider audio without the visual—any number of sites online feature audio clips of poetry, short stories, speeches, and novels read by the authors:
In the following exercise, students are asked in the computer classroom to listen to a writer’s oral rendition of their text as the students read the written rendition onscreen, and then respond in writing to their audiovisual reading of authorial voice.
Some background: because it is important in audio sessions to have students focused on listening rather than distracted by other considerations, students arrive at the listening session (such as the one described below) well versed in the differences between indirect and direct modes of literary address, as well as generic differences between memoirs and fiction.
Students are also well aware of the basic plot line of the selected text featured: in the case below, a 41-year-old man describes his class meetings of Alliance Francaise in Paris, a class he enrolled in willingly to learn French despite his fears that the pedagogical model would be less than collaboratively constructive. His fears are realized; his instructor proves to be extraordinarily abusive towards all the students in the class, whatever their race, gender, or ethnicity: discipline and punish is one way of encapsulating the thematic core of this David Sedaris essay.
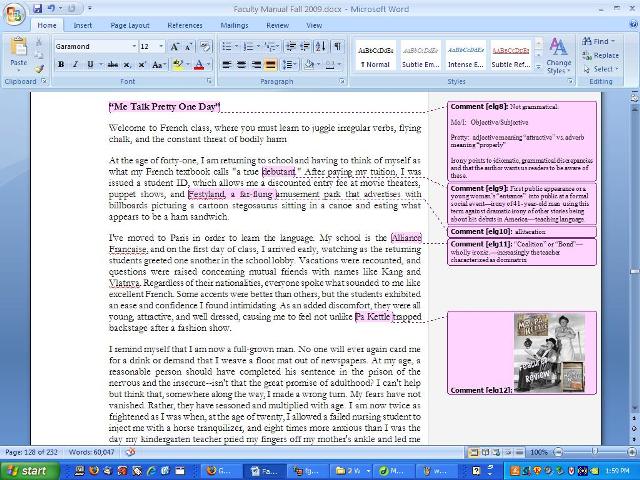
Plot in mind, students are asked to listen to the text in the computer lab as they read the print text from the screens in front of them, and to insert comments (from the Insert column of the shortcut bar on Microsoft Word) as they read and listen. The exercise works best if the clip is replayed at least once, and better twice.
Here is one annotated edition from listening to the Sedaris reading of the first half of his essay “Me Talk Pretty One Day” (from the book on disk):
Option 5: Using Word’s Readability Tool to Evaluate Texts
Microsoft Word also includes a tool for checking a text’s readability, whether that “readability” concerns a student essay, a critical essay, a wall graffiti note, a blog entry, a presidential address, a short story, a novel, etc.
This tool is therefore enormously useful for checking the stylistic profile of any professional- or lay-authored text, including the fictional styles of characters and personae penned from whatever actual or virtual source.
Sample Exercise: Examining Texts with Word’s Readability Tool
(Laurie George)
Any document saved into Microsoft Word can be scanned for certain “readability statistics” by configuring Word in the following ways:
| Word 2003 | Word 2007 |
|
|
Only after a text goes through the keyed-in process of running Spell Check does this program display information about the readability of the document—but it does, finally, and this is what it displays:
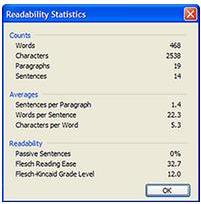
The most useful features of the tool relate to a student’s editing concerns for their own writing or a student’s need to analyze the stylistic features of a professional writer. Both goals apply to the three headings of “Counts,” “Averages,” and “Readability” in the following ways:
- In a student draft, does the text include enough words—or too many—slightly fitted or stuffed into paragraphs that match the writer’s
rhetorical goals for a given reading audience? - In the professional text, does the variance of word averages indicate a kind of authorial style—for example, the minimalism of a Raymond Carver story? Alternatively, does a high count of words in a page of dialogue reveal verbosity in a certain set of characterizations?
How many paragraphs are included in this passage—if there were more or fewer, would the emotional and logical effect on the viewer be different? Would the difference add to credibility in whatever fashion? - If a character in a fictional work is speaking a piece labeled “readable” in this manner, how reliably literate is this character?
- If the character or the author writes in extremely brief or extensively long sentences, what does the simplicity or complexity of the style reveal about the character, or the author’s style or the author’s values?
- What about the character’s or author’s passivity or activity in sentence construction? What does this stylistic attribute reveal about the character or author—is the writer hiding culpability behind passive voice? Is the author implying thematically that a character is unwilling to take agency, the passive voice indicative of that resistance?
- If conventional criteria measure this writing excerpt as “low” in the conventional reading level of “Flesch-Kinkaid” grade levels, then what does this gradation imply about the readers’ values or the evaluators’ values concerning literacy?
Option 6: Brainstorming and Freewriting
Brainstorming and freewriting often work best when they are made a regular part of the class routine. Word makes it easy to do this. Some instructors start off every day in the computer classroom with a ten-to-fifteen minute freewrite or with an electronic journal response. Alternatively, students could be given time in class to brainstorm before a paper is due. Unlike a handwritten freewrite, both the student and the instructor can share the end product. Students can print out a copy or save a copy to disk, and instructors can review the class responses from their offices.
Sample Exercise: Working Toward an Interpretative Thesis
(Laurie George)
During this class period, you will be working toward a strong, interpretive thesis based on the evidence and ideas you’ve already collected about your topic. The following steps are designed to help you get started in the thesis process; feel free to skip or alter them—whatever will help you most. Have the people near you read what you have written and advise you on it; ask questions, and offer suggestions. There’s no need to be silent. Hold the mouse over highlighted text to see instructions on how to do various tasks. Remember to SAVE OFTEN.
I. Topics
Review your journal entry from last night and, in the space below, type in your “proto-thesis,” or a summary of what you think you want to write about. If you need a few sentences, that’s okay; this statement is just a place to get you started.
II. Argument Brainstorm
As we’ve discussed in class, every argument breaks down into a number of sub-arguments—a series of subordinate ideas that are the building blocks of the larger argument. In the space below, begin to think about how your topic could be broken down. Start by looking at your topic statement above and listing off all the ideas that seem related to it. Or, if that doesn’t work, try listing a series of questions that you think you would need to answer in a paper about that topic. List these ideas, sub-topics, and questions in the left-hand column of the chart. In the column to the right, list two or three pieces of evidence that might be useful in developing a paragraph about each sub-topic. Try, whenever possible, to be very specific about your evidence. Don’t worry about whether or not you will use each one of these—at this point you are just generating ideas. If you run out of space, insert more rows in the table.
III. Speculations
Now, think carefully about the lists above. Generate a series of claims related to your topic that could serve as subtopics to organize and to develop your argument. Your goal here is to construct claims; write out complete sentences, as if these were going to be the topic sentences of your paragraphs. Use the top box to brainstorm freely, and come up with as many ideas as possible. Once you generate your list, cut and paste different claims into the bottom boxes, and experiment with organizing your ideas in different ways.
| Brainstorm | |
| Outline 1 | |
| Outline 2 |
IV. Thesis Statements
Now that you have worked though your ideas and listed out both your evidence and possible organizational strategies, try to come up with two or three possible thesis statements. Look carefully at the lists you have made; you may have several more thesis options that you originally thought.
| Thesis 1: | |
| Thesis 2: | |
| Thesis 3: |
V. Peer Commentary
Review the worksheet, especially sections III and IV, and then comment on the thesis statements above. Consider whether or not the thesis seems broader than the ideas expressed in the brainstorming section. Does it seem arguable? How clear is it? Does it oversimplify? Is it too complex? Be sure to write your name in the gray box above your comments.
| First Reviewer: | Second Reviewer: |
If you want to work with these reviews at home, be sure to print a copy of this file or save a copy to disk.
Integrated Option:
Additional instructions for how to add more rows to tables, print and save can be added using the comment function. When students move the mouse to the highlighted text, these instructions appear in a comment window.
Option 7: Peer Reviews and Self Assessments
Word gives you a number of options for peer-reviews and for student self-assessment. Students can read ‘hard-copies’ of each other’s papers, then write a peer review, assessing the strengths and weakness of the argument. Or they can comment on the paper electronically, making a copy of their partner’s file and inserting comments into the document itself. Word provides a number of features to help make their inserted comments stand out. Students can use the Comment feature or the Highlight feature, described below, or simply place all their comments in bold or in capital letters.
Sample Exercise: On-Screen Peer Editing
(Laura Kuske)
Today you are going to workshop your peer’s paper and provide advice on how he or she could strengthen the argument. This time, your review will focus especially on organization, evidence, and paragraph structure. You will be working in pairs and using the prompts below to guide your responses to your partner’s paper. Before you begin, you will need to follow these initial instructions.
Getting Started
Step 1: Exchange file names with your partner, and open his or her document. Double-click on the “Word” icon to open Microsoft Word. Select Open from the File menu, and choose your partner’s file from the directory list.
Step 2: Make a personal copy of your partner’s file. Since you will be making changes to the file, you want to make sure you are working from a COPY, not the original. To do this, Select Save As from the File menu, and rename the file as directed by your instructor.
Step 3: Tell the computer who you are. The person you are reviewing will want to know who said what; you need to tell the computer who you are so it can attribute your comments to you. To do this, select Options from the Tool menu. From the window that pops up, select User Information. Type in your name and initials at the prompt.
Step 4: Begin your review. To insert comments, highlight the text you are commenting on and select Comments from the Insert menu. Type in your suggestions in the window that appears at the bottom of the screen. To add end comments, simply scroll to the end of the document, click the mouse at the bottom of the text, and begin typing. Use the following questions as your guide, and be sure to save your work periodically.
The Peer Review
1. Read the paper over once, fairly quickly. Do not make any comments. You are merely trying to formulate a general impression of the argument as a whole. At the end of the paper, describe your initial response to the argument. Without referring back to the essay, see if you can summarize the main points. What does the paper seem to argue? How persuasive did you find the argument? Thinking back, can you remember the logic of the argument, or is it all a blur? Was there anything about the paper that grabbed your attention? Were there claims that you strongly disagreed with or found insufficiently supported?
2. Reread the paper slowly and carefully, and comment on the introductory paragraph. First, find the thesis, and underline it. Next, insert a comment evaluating its effectiveness; consider both the myths and purposes of a thesis that we discussed in class last week.
3. Next, take a closer look at each body paragraph, and identify two that you feel might benefit from further revision. Considering all the structural issues we discussed today, think carefully about how the paragraph is put together:
Is there a topic sentence near the beginning of the paragraph? If so, highlight it, and comment on how well it fulfils its role. Does it present a concept or a detail from the story? Does it connect to the thesis?
Does it have a clear relationship to the ideas developed in the preceding paragraph? How well does it capture the main idea of the paragraph? If there is no clear topic sentence, comment on what you think the topic of the paragraph might be.
Look at the body of the paragraph. Insert your comment(s). Consider what type and how much evidence is used; is there enough? Is there too much evidence? Are claims being developed over the course of the paragraph? Does the writer do more than merely summarize from the story? Does he or she present you with specific details from the text? Does the writer explain what the evidence proves and WHY?
4. Insert a comment at the end of the paragraph considering the paragraph’s conclusion. Does the paragraph offer one? Does its conclusion offer any new perspective on the evidence and on how it relates to or develops the ideas expressed in both the topic sentence and in the thesis? Does the conclusion seem forced or obvious? Does it seem unrelated to the evidence offered? Do you see how the conclusion can be derived from the evidence offered?
Printing Your Comments
When you and your partner have finished commenting, you can print out a copy of the paper with all the comments. From the File menu, select Print. To select this option, you must use the menu; do not use the print icon. In the window that pops up, click on Options. Make sure that there is a check-mark next to Comments in the list that appears. If the check is not there, simply click the mouse in the box to insert the check-mark. Now, click OK to return to the print menu. Click OK again to send your file to the printer.
Sample Exercise: Self-Assessment of Organization in Film Analysis
(E.L. George)
In this revision of your essay, I’d like you to assess your own draft (before a classmate moves to your workstation to respond):
1. Make a copy of your essay and name it movie#OR
2. In the copy, above the title, use 14 pt. bold faced font to state your thesis (even if it appears again in the introductory paragraph). Then number the paragraphs in boldface in the space following each paragraph (create space as you need to).
3. Reread each paragraph, and in the space you’ve created, type out the main claim of the paragraph (if you use topic sentences in your paragraph, you would rewrite the topic sentence).
Examine the list, and ask yourself the series of questions noted in The St. Martin’s Handbook.
What organizations strategies are used? spatial? chronological? logical? [compare & contrast?]
Are they used effectively and consistently?
Do the main points clearly relate to the thesis and to one another? Are any of them irrelevant [disunifying the essay]?
Can you identify any confusing leaps from point to point?
Do you need to provide additional or stronger transitions?
Can you identify clear links [either through a logical shift of ideas or obvious transitions or repeated words ] between paragraphs and ideas? Do any others need to be added?
Have any important points [about the likenesses and differences of movie x on corporate life vs. movie y] been left out? (63)
Sample Exercise: Self-Assessments Using Auto-Summary
(Laura Kuske)
Author:
Paper Title:
Today, instead of reviewing a partner’s paper, you are going to do an extended assessment of your own writing… with a little help from Microsoft Word. Part of the point of today’s exercise is to expand our discussion of paragraph structure and argumentative logic to include transitions — which means that we are going to begin focusing on how to clearly express the connections BETWEEN ideas and between paragraphs. In order to begin to see why transitions are important, we are going to spend the first part of class today working on creating an abstract of our arguments. Ideally, an abstract can be formed by collecting the main ideas of an argument into a single paragraph. But for an abstract to MAKE SENSE, these ideas have to be expressed in ways that make the relationships between ideas clear, while still accurately reflecting the specific content of the paragraphs. That can be quite a challenge, and the attempt can often reveal quite a bit about the places where the connections are not yet clear enough in the larger argument.
What we do today may seem a little confusing at first, because you are going to move back and forth between two Word files — this worksheet and your own paper— and we are going to try out a few ‘advanced’ Word commands. If you have problems or get lost along the way, just raise your hand and I’ll help get you back on track.
Getting Started
1. Begin by opening the file containing your draft. Do not close this worksheet before opening your paper. You will need to have BOTH files open to do this exercise. To move between the two files, click on the Windows menu and select to file you want to look at.
2. Once your paper file is open, select AutoSummarize from the Tools menu. AutoSummary will review your paper, collect what it takes to be your main ideas, and write an abstract of your paper. From the window that appears, select the option to hide everything but the summary, and set the percentage at 10%. Click OK. Word will create an abstract of your paper. Although the rest of your paper will disappear, it is still there. You may need to delete a few extra paragraph returns to format the summary. It should appear as a single paragraph.
Creating/Critiquing/Revising your Computer Generated Abstract
1. Read carefully through the summary Word created. Does it seem accurate? Does the abstract read smoothly or is it choppy, abrupt or confusing? Pretend, for a moment, that this was not computer generated, but something written by you to be submitted (for instance) on the class Web page. Critique the abstract in the space below. Would you submit this abstract as representative of your paper and your writing? Why or why not? How would you revise it?
Comments:
2. Now, return to your paper, and increase the percentage of the text Word uses to create the AutoSummary to 15%. Reread the summary. Keep playing with the percentage until you have what you consider to be the best ‘raw material’ for an abstract of your paper. You will be editing and revising this, don’t worry if you have to include extra material to get in all the ideas you want to include. Cut and paste the text from your abstract here.
Percentage:
Abstract:
3. You are going to revise this material in a moment, but first, take a look at exactly what parts of your paper the computer selected to create your abstract. To do this, return to your paper file and click OK to clear away the summary and return to the argument itself. Select AutoSummarize again, but this time, select the option to hightlight key points and click OK. Set the percentage control window to the same percentage you used to create your abstract. Scroll through your paper and observe what parts of your paragraphs—and how much of the paragraphs— the computer is using. Do the computer’s selections reflect the topic sentence/conclusion pattern you might expect? How much ‘other’ material did you have to include to get a complete outline of your argument? Did the computer skip over some of your topic sentences and conclusions? Why? Comment on the patterns you notice and reflect on what they might suggest.
Comments/Observations:
Name:
Now cut and paste the raw material above into the box below and revise it into a concise and accurate abstract for your paper. Your abstract should be no more than 12-15 sentences (approximately 1 to 2 sentences per paragraph). It should provide a reader with a quick summary of all your main points, and the ideas should ‘flow’ together smoothly. It should not read like a list. It should read like an overview of an argument.
Revised Abstract:
When you are done, print out a copy of this page (only this page.), and a copy of your paper. You will be giving a copy of your paper and your abstract to a peer partner to review.
Option 8: Writing Workshops
Word offers a range of powerful tools to help workshop writing, especially when used in conjunction with the overhead projector. Word allows you to highlight text in different colors, track editorial changes made to a document, or move text around in order to try out a variety of organizational or stylistic strategies.
Sample Exercise: Group Highlighting
(Kimberlee Gillis-Bridges)
Students participated in the following writing workshop during the class preceding the final draft due date. The essay assignment asked students to analyze a single scene from one of three early horror films, focusing on the narrative and cinematic elements at play in the scene. Before the workshop, I created a document featuring excerpts from students’ papers as well as links to digitized video clips of the scenes. The excerpts represented the three main problems students had with their drafts: their paragraphs tended to be diffuse discussing several technical elements that served different functions; paragraphs often had little discernible connection to the thesis; and formal film terminology was absent or misused.
As they viewed the projected essay excerpts, the class analyzed weaknesses and developed strategies for revision. During the workshop, students asked to view the linked clips to confirm details or to point out cinematic elements the writer had missed. I served as recorder, using Word’s highlighting function to mark passages as directed by the students. Writers whose paragraphs we analyzed could copy their marked passages and paste them into another document; a number of writers did so during the workshop, taking notes on their peers’ comments, then saving the marked passage once the class had completed the review.
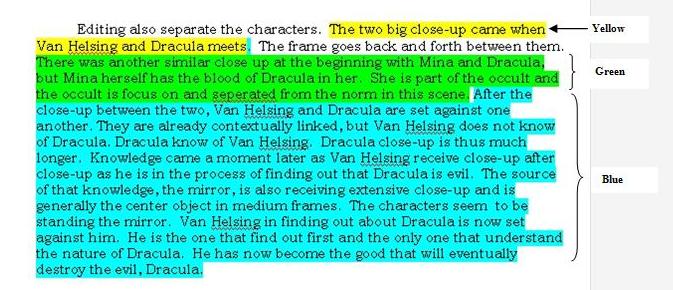
The following example demonstrates how students marked the excerpts:
Scene: Dracula; scene in which Dracula and Van Helsing Meet
Writer’s Thesis: The scene separates Dracula and Van Helsing from the other characters as it pits the two against one another in a struggle between evil and good.
Explanation of Highlighting: The yellow highlighting marks a passage connected with the first part of the thesis—that technical elements of the scene separate Dracula and Van Helsing from the other characters. Although the passage suggests that a pattern of alternating close-ups distinguishes these two characters from other characters in the scene, the class thought that the idea needed further explication, perhaps in another paragraph. The green highlighting indicates an idea that the class thought detracted from the analysis in the rest of the paragraph. The blue highlighting marks a passage the class viewed as connected to the thesis. Students suggested that the writer make this passage the focus of the paragraph. They also suggested that the writer connect the editing of the close-ups and the issue of knowledge. Van Helsing’s growing knowledge is conveyed through editing, and it is this knowledge that pits him against Dracula.
Sample 2: Style Imposters
(Karen Kupka)
Read through the following passages carefully, using Word’s highlighter to note the distinctive features of the writer’s style. After you think you’ve grasped the stylistic differences between the two passages, try impersonating both authors. Pretend that you are Hemingway, and rewrite the excerpt from Carter’s The Bloody Chamber in your own inimitable style. When you’re done with that, transform yourself into Carter and elaborate on A Moveable Feast.
I knew how severe I had been and how bad things had been. The one who is doing his work and getting satisfaction from it is not the one that poverty bothers. I thought of bathtubs and showers and toilets that flushed as things that inferior people to us had or that you enjoyed when you made trips, which we often made. There was always the public bathhouse down at the foot of the street by the river. My wife had never complained once about these things any more than she cried about Chevre d’Or when he fell. She had cried for the horse, I remembered, but not for the money. I had been stupid when she needed a grey lamb jacket and had loved it once she had bought it. I had been stupid about other things too. It was all part of the fight against poverty that you never win except by not spending. Especially if you buy pictures instead of clothes. But then we did not ever think of ourselves as poor. We did not accept it. We thought we were superior people and other people that we looked down on and rightly mistrusted were rich. It had never seemed strange to me to wear sweatshirts for underwear to keep warm. It only seemed odd to the rich. We ate well and cheaply and drank well and cheaply and slept well and warm together and loved each other.
—Ernest Hemingway, A Moveable Feast
Revision:
…for the opera, I wore a sinuous shift of white muslin tied with a silk string under my breasts. And everyone stared at me. And at his wedding gift.
His wedding gift, clasped round my throat. A choker of rubies, two inches wide, like an extraordinarily precious slit throat.
After the Terror, in the early days of the Directory, the aristos who escaped the guillotine had an ironic fad of tying a red ribbon round their necks at just the point where the blade would have sliced it through, a red ribbon like the memory of a wound. And his grandmother, taken with the notion, had her ribbon made up in rubies; such a gesture of luxurious defiance. That night at the opera comes back to me even now…the white dress; the frail child within it; and the flashing crimson jewels round her throat, bright as arterial blood.
I saw him watching me in the gilded mirrors with the assessing eye of a connoisseur inspecting horseflesh, or even of a housewife in the market, inspecting cuts on the slab. I’d never seen, or else had never acknowledged, that regard of his before, the sheer carnal avarice of it; and it was strangely magnified by the monocle lodged in his left eye. When I saw him look at me with lust, I dropped my eyes but, in glancing away from him, I caught sight of myself in the mirror. And I saw myself, suddenly, as he saw me, my pale face, the way the muscles in my neck stuck out like thin wire. I saw how much that cruel necklace became me. And, for the first time in my innocent and confined life, I sensed in myself a potentiality for corruption that took my breath away.
The next day, we were married.
—Angela Carter, The Bloody Chamber
Revision:
Option 9: Reverse Outlines
Word also provides a range of outlining features that allow students to take a paper and convert it into an outline. An outline can help students to see the organizational structure of their papers in a “bare bones” format. Word also allows you to easily break down a student’s paper paragraph by paragraph and create a reverse outline exercise. This type of reverse outline allows students to visualize their paper’s organization as it is—and as they want it to be.
Sample Exercise: Reverse Outline
Step 1: Read the following paper. As you finish each paragraph, type out what you think the most important idea (in other words, the thesis) of the paragraph is. What is the general claim of the paragraph? Be sure to write out the thesis in a single, grammatically correct sentence.
Despite appearances, I believe that Imogene & Marya’s friendship is not the most important thing in Joyce Carol Oates’s story, «Theft.» No character in the story has as important a role as Marya, but her friendship with Imogene does not play the most important role in Marya’s life. Therefore that friendship cannot occupy the most important part of the story. While this friendship concerned Marya a lot, she eventually discovered that other things—her work and especially her writing—played a much more important role in her life. Marya gave up her friendship with Imogene because it took up too much time, time in which she could do more important things like writing. Marya saw writing as the most important thing in her life because writing overcame the destructive effects of time, while friendship just passed the time.
THESIS OF 1st PARAGRAPH:
It’s hard to say exactly why Marya wanted to be Imogene’s friends, but whatever the reason was, it wasn’t the most important thing in Marya’s life. Marya of course didn’t initiate the friendship. Imogene pursued her. Marya never planned to be Imogene’s friend; it happened to her like an accident. But Marya had some curiosity towards Imogene. Before Imogene ever approached her, Marya found herself staring «at the blonde girl in her political science class» who wore «a handsome camel’s hair coat» and «an engagement ring with a large square-cut diamond» (476). This attraction, however, didn’t seem to have any reason, or at least any particular importance. Marya throughout the story stared at a lot of people, but doesn’t end up friends with any of them, except Imogene. Again I would say the friendship depended more on Imogene than Marya.
THESIS OF 2nd PARAGRAPH:
Though her relation with Imogene confused her for a while, Marya came to realize that work held more importance for her. «It occurred to her with a chilling certitude that every moment not consciously devoted to her work was an error, a blunder» (487). Marya worried constantly whether she did enough work. This didn’t mean her work at the library. If anything, she regretted the time her job took from her. What worried her was schoolwork. She wanted to work hard at it. She even enjoyed it. But fear motivated her as well. She thought nothing mattered as much as success, even her own health. She felt that only «one’s personal accomplishment» (493) mattered in life. In the story two kinds of accomplishment mean the most to Marya: school and writing. As I will explain later, because of the problem time created in her life, writing proves more important than anything else.
THESIS OF 3rd PARAGRAPH:
What created this preference from writing over schoolwork was her attitude toward time. The idea of time kind of scared her. In fact, Marya got quite hung up on the idea of time. «Time is the element in which we exist…We are either borne along by it, or drowned in it» (487). Here Marya reveals her fear that time would destroy her. But she thought that time could help her as well, if she did things right & worked hard. She asked herself, «Wasn’t time the precious element that would carry her along to her salvation» (481)? Marya obsessed over the destructive effects of time. Her thoughts about the photographs of the old athletes express her feelings:
Another rowing team. Hopeful young men, standing so straight and tall; their costumes slightly comical; their haircuts bizarre. An air of team spirit, hearty optimism, doom (481).
Marya thinks of doom when she sees this picture because the picture reminds her that those men eventually died. I think Marya expresses this sense of doom in other places in the story as well, like when Phyllis’s mother and sister came to clean out Phyllis’s room: «And then the waters close over your head.—This phrase ran through Marya’s head repeatedly» (491). Marya is thinking her about the doom that overcame Phyllis: doom comes like a flood, then washes you away into oblivion. Marya’s obsession over this phrase is a sign that she considered this more than just Phyllis’s problem. It was a personal problem for Marya too, because the source of the problem was time itself, something Marya couldn’t escape. I believe Marya believes that «doom» was another word for «time.»
THESIS OF 4th PARAGRAPH:
The first problem Marya experiences with the problem of time comes from not having enough of it, so she gets rid of Imogene in order to have more time for work. I think the writing was on the wall from the very beginning of their relationship. In the coffee house with Imogene’s friends, when Marya thought she «should have been elsewhere» (481), that other place was back at her room or in the library working. She always felt that «she hadn’t…time for ‘wasting’ on people» (478). In her journal she writes the following words on the subject of friendship: «She hadn’t time…she hadn’t energy for something so…ephemeral» (483). This last quote points out what really bothered Marya about friendship, that it isn’t permanent. Eventually she thought conversations with anyone, whether Imogene or not, wasted her time.
THESIS OF 5th PARAGRAPH:
This sense of impending doom scares Marya, but she has a game plan. Just after she thinks the thoughts about the rowing team, she decides «she really should leave…she shouldn’t be here» (481), because she feels this same doom closing in on her, and feels that only through work can she escape it. And the work that could save her is writing. Without writing, she’s doomed to destruction like the rowers. But if she could become a writer, she’d have an indestructible existence. We know she believes this when she says «a writer’s authentic self…lay in his writing and not his life; it was the landscape of the imagination that endured, that was really real» (474). By becoming a writer she too could have an «authentic self» that «endured.» People would read her books long after she’d gone. People would know her «authentic self» long after the end of her «life.» So what work she puts into writing is work toward eternity, while what work she puts into friendship is, as she says of sex, «as good a way as any of passing the time» (499). But Marya doesn’t want to just pass the time. Marya’s quotation of Thoreau expressed her need to avoid such frivolity: «How can anyone kill time without injuring Eternity?» (487)
Step 2: Retype each thesis statement below:
1)
2)
3)
4)
5)
What you have here is a reverse outline of the paper. It is called «reverse» because the outline was written after the paper was written. Based on this reverse outline, evaluate the argument of the paper by answering the following questions:
Was there a clear claim for the whole paper stated in the first paragraph?
How did the subsequent subordinate claims support the main claim? In other words, based on your reverse outline, describe how the supporting points that each paragraph brought out supported the main claim for the paper?
Do you get a sense of the progression in the subordinate claims? In other words, can you see how the supporting points follow one from the other?
Step 3: Pick out one paragraph from the paper to examine in further detail.
How has the writer signaled the transition from the previous paragraph to this one?
Evaluate the development & support of the paragraph. How did the details presented support the general claim of this paragraph?
How are the ideas within the paragraph related to each other? In other words, how has the writer tried to make the paragraph cohere, to make it flow together?
Has the writer considered possible objections to the general claim of the paragraph? How?
Option 10: Editing
Although the program has limitations, Word’s grammar and spell-check tools can assist students with the editing process. Moreover, because students can easily change their prose in Word, you can create exercises that allow them to explore a variety of options for word choice, syntax, and source integration.
Sample Exercise: Using Quotations
(Alison Tracy)
Make yourself a copy of this file called “quotex.doc” and be sure you are working in your own file. Go ahead and type your answers right into the prompts below.
The following exercise will give you some further practice in using quotations smoothly, effectively, and correctly in your own writing. Select a quote from the following passage to complete each sentence. First, read through the examples carefully.
I am not merely asserting that “We are not all alike.” Those who aren’t aware of that would not likely read this essay or anything like it. What I am saying is that generalizations from within are every bit as fragmenting as scrutiny from without. From my boyhood I have read and heard all manner of statistical facts and figures about black people. Really, they’ve told me very little about who I am, let alone who we are. We’re too big for that, and as individuals too complex. I’m not so sure we should ever find ourselves in the position of saying this general thing or that general thing about black people, expecting our words to discover the essence of our “true self-consciousness,” for when we do, we will be doing no more than talking about black people, talking around them, never quite getting it right, never pinning us down, never quite turning sound into substance, and never—much like the way sharks course around caged divers—ever able to sink our teeth into flesh.
Reginald McKnight, p. 180
Try to use the quotes in several different ways throughout the exercise:
a) Use a signal phrase followed by a comma:
McKnight says,
McKnight claims,
He states,
b) Use your own complete sentence, then a colon, followed by the quotation (which must also be a complete sentence.) Notice that I’ve also left out a brief phrase by inserting the ellipses.
McKnight thinks that negative messages from his own black community are as bad as racist attitudes among other races: “generalizations from within are . . . as fragmenting as scrutiny from without” (180).
Work the quotation right into your own sentence (and here I’ve used brackets to indicate a slight change in wording in his sentence):
He thinks that people who want to pin down “black people” as one thing or the other are like “sharks cours[ing] around caged divers” (180).
You need to be sure you are using the correct methods to add the quote to your sentence. Each sentence can be complete several ways; be sure that whatever way you choose, you use the correct signals and punctuation. You may add words or alter the prompt slightly.
1. McKnight doesn’t want us to think that he is just restating a cliché; he claims,
2. McKnight wants to show that statements made by other black people can be just as harmful as those made by white people:
3. He claims that all of the “facts and figures” he has heard don’t do much to explain his culture to him
4. McKnight wants us to see “black people” not just as a group, but
5. Trying to pin down “blackness” to a certain set of qualities doesn’t do justice to the complicated natures of black individuals
6. McKnight uses the image of sharks biting to explain how vicious people can be about each other
7. He doesn’t think words can ever explain our true selves
8. He doesn’t want us to continue the mistakes of the past
Option 11: Grading
Students can use Word to develop and modify evaluation rubrics. Creating such rubrics allows students to consider their audience’s expectations, and it gives them an active role in the grading process.
Sample Exercise: Grading Rubric
(Alison Mandaville)
Rationale: In this exercise students use the Insert Table feature of Word to develop a grading rubric for essays which they will then apply to peer essays and, finally, to their own writing. Students work in groups at the computers to develop the rubric and then can either work in groups or alone to use the rubric to grade each other’s work. The nice thing about doing this on the computer is that students can then print out a copy which looks official and which all group members can read. In addition, the rubrics can be used later to project on the overhead for whole class discussion/modification. My students’ rubrics are fairly general, but you may also have students make rubrics that are very specific to a particular assignment/topic.
Spending the time making their own chart, agreeing on definitions and criteria for each score and then applying this rubric to their own work is a great way to both examine closely the elements of a good essay and begin to be able to systematically evaluate their own writing. For 104-5 students in particular, I think this exercise is useful in helpful empower students to evaluate their own work and begin to establish some control over their ability to understand and improve their grades. The group aspect reinforces all those good group skills and makes what could be a fairly dry exercise much more fun. There can be some tension around grading each other, so I retain final authority in assigning grades, but find that their grading gets more and more effective the more they do it until sometimes I have few changes to make.
The Exercise: The easiest way to create a table in Word is to use the “Insert Table” icon on the pictorial toolbar. First place you cursor in your document where you want the table to be. Then Left click on the icon that looks like a mini-table with a blue band at the top—the one without an Excel symbol on it. Hold down the mouse as you draw the size of your chart. When your chart is the size you want, release the mouse button, and the chart will drop in where your cursor was.
Students work together (one student creates the table and types in information OR everyone makes their own after agreeing on criteria) to label the chart (terms to define on one axis and scores on the other) and define the criteria for scoring an essay. The terms you ask them to define will depend on what you’ve been working on—you may ask them only to do one or two to start, adding another criteria with each assignment.
Students work to evaluate a draft of each other’s essays based on their own rubrics.
Large group discussion following the group exercise can help fill out individual groups’ charts and pinpoint areas of fuzziness re: writing criteria.
NOTE: Resist the impulse to create the chart for the students because first, it’s good to know how to make a chart, and second, the terms you ask them to define, and the scale you ask them to use will become much more firmly entrenched if you have them set it all up.
Option 12: Reflection
At the end of an assignment sequence, you can ask create a short reflection exercise that allows students to reflect upon both their essay and the usefulness of activities in the sequence. Students can type their responses into the document and save the file to an evaluation folder.
Sample Exercise: Reflecting on the Writing Process
(Kimberlee Gillis-Bridges)
1. How did the process of writing this essay help you to develop as a cinema studies thinker and writer? Did comparing and contrasting two films give you any insight into patterns and shifts in the horror genre?
2. Which elements of your first draft (thesis paragraph, use of evidence, organization, etc.) did you revise most extensively? How have those revisions made the essay stronger?
3. If you could still revise your essay, what would you revise? Why?
4. Which aspects of the writing process for this essay did you find easy? Which did you find difficult? Why?
5. Please offer a grade for each of your peer reviewers, using the following scale and explaining to what extent each reviewer’s comments helped you to revise.
Plus: An extremely useful evaluation
Check: A mostly useful evaluation
Minus: Not very useful overall (perhaps not complete)
| Reviewer 1: | Reviewer 2: |
| Grade: | Grade: |
| Reasons: | Reasons: |
6. How did the process of reviewing other writers’ work influence your revision process?
7. Was the flexibility of the peer critiquing method (paper, Word) useful? Do you have any suggestions for organizing the peer critique process for Essay #3?
8. Did issues discussed in the conference and my comments on your paper or Web site help you to revise your work? Why or why not?
9. Which activities and homework (responses, brainstorming sheet, discussion of lecture arguments and responses, in-class clip analyses and comparison presentation, essay workshop) did you find most and least helpful in writing your first draft? Why?
10. What types of activities and homework would you like to do in preparation for our next paper, an analytical essay that incorporates research?
Useful Advanced Features
Word is a powerful program with more features than it is possible to cover in a manual of this scope. However, the following table highlights some of the features available through Word 2007that are most useful to a writing classroom. More extensive information on how to use these features can be found in the on-line Word Help menu and in the sample exercises in this manual that make use of these features.
| What It Is | What It Does | Where to Find It |
| Comments | Inserts comments in boxes next to the text. Useful for peer reviews and for on-screen instructor commenting. See sample peer editing exercise for an example. | Select Comment from theReview menu. |
| Auto-Summarize | Automatically generates an abstract of a paper. Allows students to adjust the percentage of text included in abstract. Can be a useful way to demonstrate organizational and structural problems in papers. | Select Auto Summarizefrom the Tools menu. |
| Outline View | Allows students to move sections of an argument to other locations and to visualize the organizational structure of a draft. Useful in pre-writing and revision exercises. | Select Outline from theView menu. |
| Track Changes | Maintains and displays a visual record of recent editorial changes to a document and can even print this record out. Useful for peer editing and writing workshops, especially when used with the projector. | Select Track Changes from the Review menu. |
| Highlight | Allows students and instructor to block text out with a range of different bright colors. Useful in writing workshops with the projector. Instructor can assign different meanings to different colors. | Click the highlighter icon on the Home toolbar, select a color, and highlight selected text. |
| Document Map | Displays a split screen. A brief outline appears on the left, while the text of the paper appears on the right. Useful tool for longer arguments and research papers. | Select Document Mapfrom the View menu, or click on its icon on the tool bar. |
Class Activities with Microsoft Word on BenQ Boards
- BenQ
- 2021-11-16
There’s more to Microsoft Word than just word processing. You can use it to facilitate active learning activities that get your students engaged in the ongoing discussion. Below are a few simple activities that you can easily try out for your classes.
Guided reading with annotation
Reading is a fundamental skill that students should be able to acquire at an early age as it affects how they pick up and process information. Having guided reading activities in class allows you to assess your students’ aptitude and identify areas that can be further improved. You can use this activity to correct mispronunciations, check their comprehension, and explain underlying ideas in the text.
Prior to class, you can prepare reading materials on Microsoft Word. Open the document on the RP series and then ask your students to read aloud. During the activity, you can activate the Duo Windows mode to split the screen and use the EZWrite cloud whiteboard for discussions. You can highlight key passages on Word and then write notes on the whiteboard as you and your students analyse the text.
Sentence pattern exercises
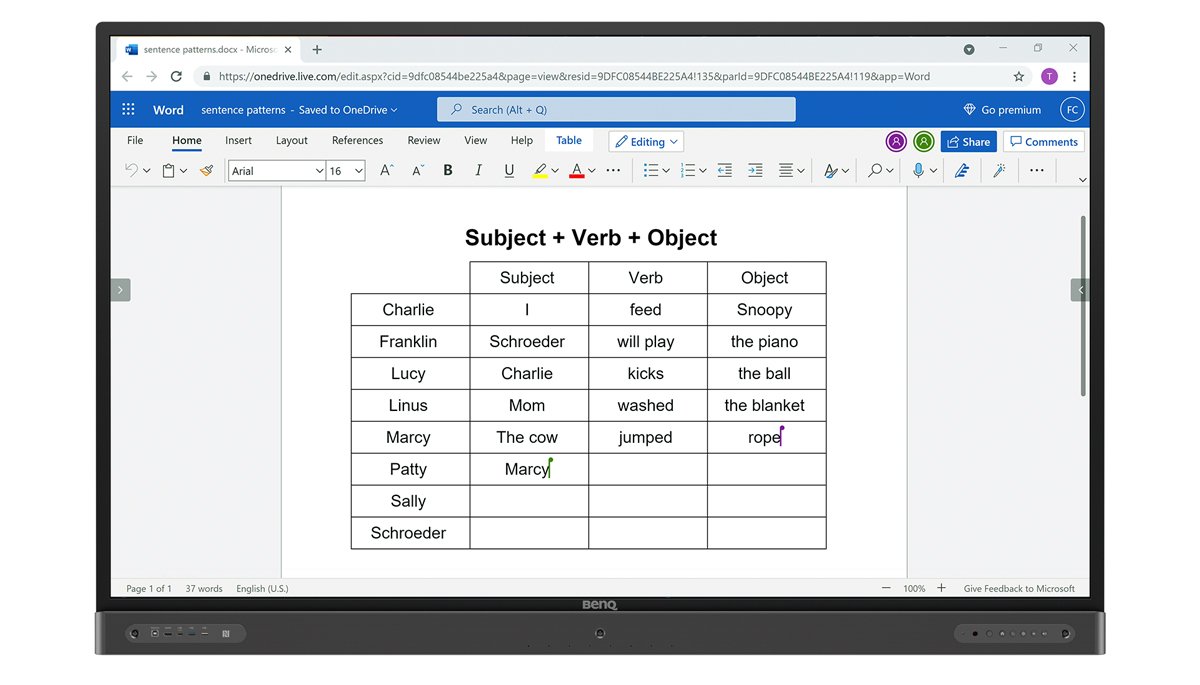
Another activity that is great for early language learners is sentence pattern exercises. Each language follows specific patterns that help speakers and writers construct basic sentences. Normally, you can facilitate this by writing the pattern on a board and having students come over and write their own sentences one by one. But if your school uses cloud-based applications like Microsoft Word on Office 365, you can ask the whole class to simultaneously participate.
Equipped with personal or shared tablets and laptops, students can access a common Word document and fill out a table with their own sentences. Viewed on a large-format interactive display, you can annotate on the screen to make suggestions, correct mistakes, and highlight good examples.
One of the most commonly used features of Microsoft Word is Synonyms. It’s a helpful tool that gives writers alternative options when the right words are hard to come by. Because it’s convenient, many students unfortunately fail to consider the fact that not every synonym can be used the same way. Creating an exercise based on this feature is a good way to not only enrich your students’ vocabulary, but also teach them how to become better writers.
You can load your students’ papers on the display and note sentences that can be improved through word substitution. Use Synonyms to preview alternatives, and then ask your students to rewrite the original sentence using the new word.
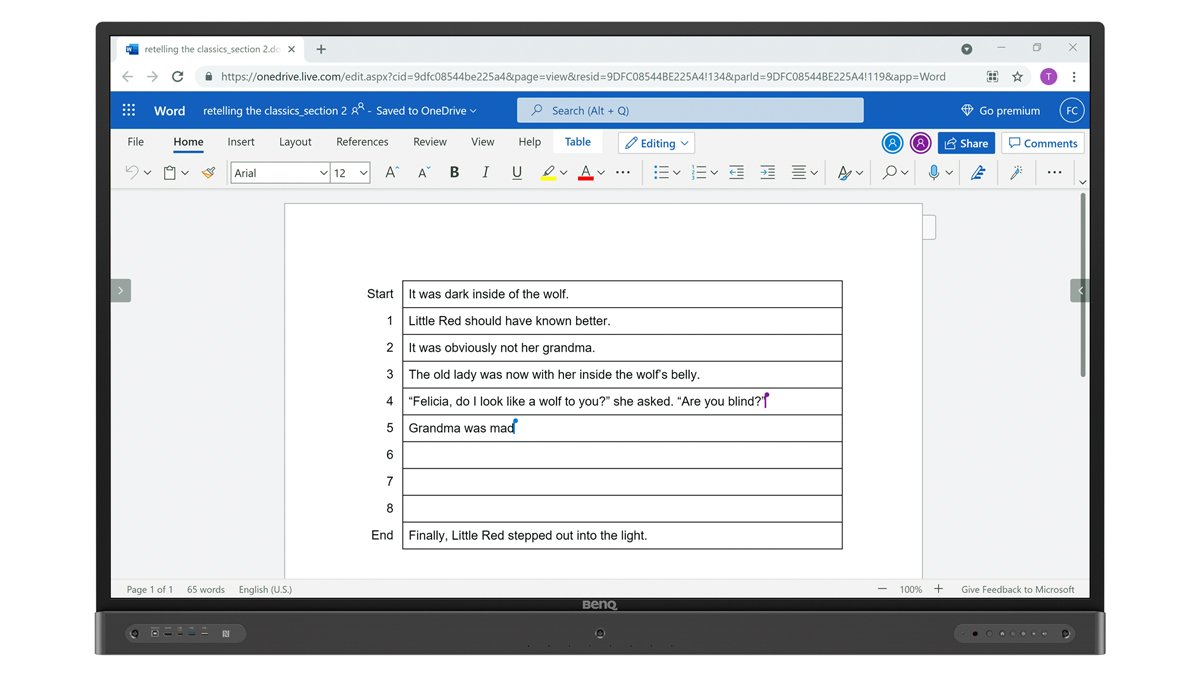
Storytelling is an essential skill that goes beyond literature classes. People who know how to tell great stories are very effective when it comes to sharing their ideas to groups of people, especially in the workplace. This skill can be trained early on through story writing relays.
For younger learners, you can prepare a cloud-hosted Word document that supplies the beginning and the ending of a story. You can then ask students who are typing from their own tablets or laptops to continue the sequence of events until the story is complete. During the writing process, you can coach students who may be struggling with grammar or coming up with ideas. And once the story is done, you can use Word’s comments feature to add suggestions to sentences which you think could be further improved. This type of activity helps students exercise their creativity, show off their vocabulary, and practise their typing skills.
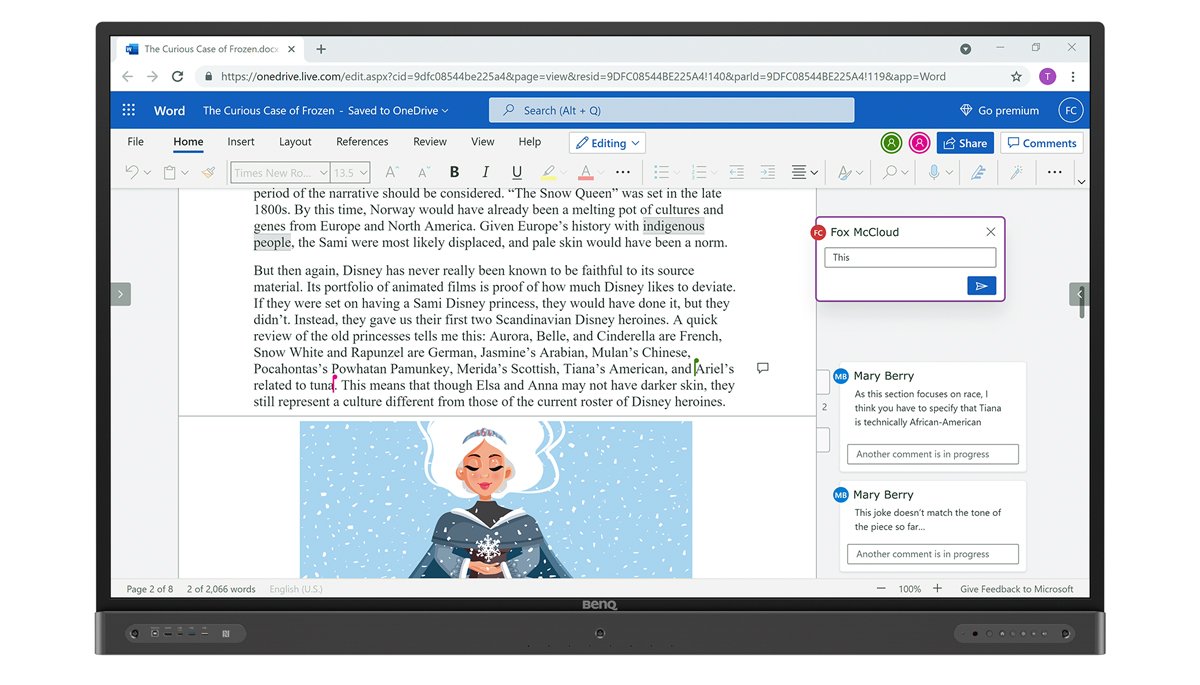
When students send in their essays or papers, you can collect all their output in an online repository and then open each Word document for live peer critique in class. Your students can use the comments feature on Word to leave their suggestions in the text. This is a good way to develop your students’ sensitivity to grammar, sharpen their analytical skills, and also build up their capacity to take criticism.
Students who know how to critique text will develop a critical eye that they can also apply to their own work. This would hopefully lead to more carefully thought out pieces from them in the future. The activity also aims to strengthen their interpersonal skills as it gives them a controlled safe space where they can learn how to give and receive feedback without being too brash or emotional.
Related Products
Welcome to BenQ Europe
BenQ Europe respect your data privacy. We use cookies and similar technologies to ensure you get the best experience when visiting our website. You can either accept these cookies by clicking “Accept Cookies”, or click “Only Required Cookies” to refuse all non-essential technologies. You can customise your cookie settings here at any time. For further information, please visit our Cookie Policy and our Privacy Policy.
How can I change my BenQ cookie settings?
Some essential features on BenQ sites just won’t work without cookies. And having other cookies switched off can seriously affect the way you’ll be able to enjoy our services.
Please check your cookie settings below and turn on any cookies you’re happy with.
“Strictly necessary” cookies can’t be turned off. But Functional and Performance cookies can be turned on or off below. You can learn more about cookies and what they do on our other pages.
If you’ve chosen to block third-party cookies on your browser, your cookie preferences won’t carry over from benq.eu to benq.xx and vice versa. Please make sure to set your cookie preferences in both places.
-
Strictly necessary cookies
These cookies are essential so that you can move around the website and use its features. Without these cookies services you have asked for cannot be provided.
See list of strictly necessary cookies
-
Functional cookies
These cookies allow the website to remember choices you make to give you better functionality and personal features.
See list of functional cookies
-
Performance cookies
These cookies help to improve the performance of BenQ. If you want to opt-out of advertising cookies, you have to turn-off performance cookies.
See list of performance cookies
BenQ Europe respect your data privacy. We use cookies and similar technologies to ensure you get the best experience when visiting our website. You can either accept these cookies by clicking “Accept Cookies”, or click “Only Required Cookies” to refuse all non-essential technologies. You can customise your cookie settings here at any time. For further information, please visit our Cookie Policy and our Privacy Policy.