
Cause: You opened a document that was created in an earlier version of Word.
Solution: Save the document in the .docx file format.
Important: The following procedure changes the file format of the document. If you plan to share the document with people who use an earlier version of Word, you might want to work in compatibility mode and leave the document in its current file format. This is because other people may be unable to edit parts of a document that you create by using new or improved features in Word for Mac 2011 and Word 2016 for Mac.
-
On the File menu, click Save As.
-
On the Format pop-up menu, click Word Document (.docx).
-
If you are using Word for Mac 2011, make sure that the Maintain compatibility with Word 98-2004 check box is clear.
-
Click Save.
Solution: Work in compatibility mode.
Some new features in Word can cause a document to look different when it is viewed by using an earlier version of Word. In some cases, part of a document that is created by using new features can’t be edited in an earlier version of Word. Compatibility mode turns off new features that can cause incompatibility with earlier versions. If you share a document with someone who uses an earlier version of Word, consider using compatibility mode. To use compatibility mode, you can either open a document that has a .doc file name extension or save a document in the Word 97-2004 Document (.doc) format.
Cause: The document was saved in the Word 97-2004 Document (.doc) format.
Solution: Save the document in the .docx file format.
Important: The following procedure changes the file format of the document. If you plan to share the document with people who use an earlier version of Word, you might want to work in compatibility mode and leave the document in its current file format. This is because other people may be unable to edit parts of a document that you create by using new or improved features in Word for Mac 2011 and Word 2016 for Mac.
-
On the File menu, click Save As.
-
On the Format pop-up menu, click Word Document (.docx).
-
If you are using Word for Mac 2011, make sure that the Maintain compatibility with Word 98-2004 check box is clear.
-
Click Save.
Solution: Work in compatibility mode.
Some new features in Word can cause a document to look different when it is viewed by using an earlier version of Word. In some cases, part of a document that is created by using new features can’t be edited in an earlier version of Word. Compatibility mode turns off new features that can cause incompatibility with earlier versions. If you share a document with someone who uses an earlier version of Word, consider using compatibility mode. To use compatibility mode, you can either open a document that has a .doc file name extension or save a document in the Word 97-2004 Document (.doc) format.
Cause: The document was saved with compatibility mode turned on.
Solution: Save the document with compatibility mode turned off.
Important: The following procedure changes the file format of the document. If you plan to share the document with people who use an earlier version of Word, you might want to work in compatibility mode and leave the document in its current file format. This is because other people may be unable to edit parts of a document that you create by using new or improved features in Word for Mac 2011 and Word 2016 for Mac.
-
On the File menu, click Save As.
-
On the Format pop-up menu, click Word Document (.docx).
-
If you are using Word for Mac 2011, make sure that the Maintain compatibility with Word 98-2004 check box is clear.
-
Click Save.
Solution: Work in compatibility mode.
Some new features in Word can cause a document to look different when it is viewed by using an earlier version of Word. In some cases, part of a document that is created by using new features can’t be edited in an earlier version of Word. Compatibility mode turns off new features that can cause incompatibility with earlier versions. If you share a document with someone who uses an earlier version of Word, consider using compatibility mode. To use compatibility mode, you can either open a document that has a .doc file name extension or save a document in the Word 97-2004 Document (.doc) format.
See also
I can’t add a chart or SmartArt graphic
Open a document in a later version of Word
Need more help?
Want more options?
Explore subscription benefits, browse training courses, learn how to secure your device, and more.
Communities help you ask and answer questions, give feedback, and hear from experts with rich knowledge.
When you open a document in Word, you may sometimes see the text [Compatibility Mode] in the Title bar next to the document name. In this article, you will learn about what Compatibility Mode means, how you can find out what Compatibility Mode a document is in, how you can update a document so it is no longer in Compatibility Mode, and more…
This article applies to Word 2007, 2010, 2013, 2016, 2019, and Word for Microsoft 365 (see How to find out what version of Word you have, if needed).
In Word, there are more concepts related to compatibility than Compatibility Mode.
If you want to learn about the compatibility options and layout options listed in the Word Options dialog box, at the bottom of the Advanced category options, see my article Word Layout Options & Compatibility Options.
For details about how to set the compatibility options via VBA (macros), see my article How to Set Word Compatibility Options via VBA.
This article was first published March 5, 2020.
About the Compatibility Mode of a Word document
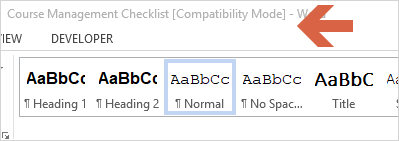
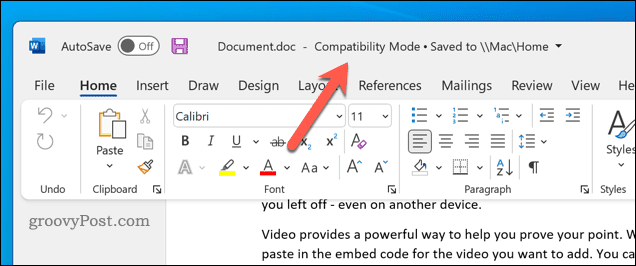
If a Word document shows the text [Compatibility Mode] in the title bar, it means that the document was created or last saved in an earlier version of Word than the version you are using.
Example: You are using Word for Microsoft 365. You open a document that was created in or last saved in Word 2010. The text [Compatibility Mode] will appear after the document name in the Title bar on your computer. On the other hand, if the same document is opened in Word 2010, [Compatibility Mode] will not be shown.
Note that Word 2013, 2016, 2019, and 365 are already compatible. Therefore, you will not see the text [Compatibility Mode] if, for example, you open a document in Word for Microsoft 365 even if the document was created or last saved in Word 2013, 2016, or 2019.
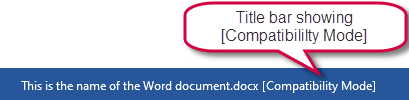
Figure 1. Compatibility Mode shown in the Title bar of Word document means that it was created or last saved in an earlier version of Word than the version you are using.
As long as a document is showing [Compatibility Mode], new or changed Word features that were not included in the earlier version will be disabled. This means that the document can still be edited by people who are using the earlier version of Word. Also, a document in Compatibility Mode preserves the layout of the document from the earlier version.
In many cases, you can just ignore the information about Compatibility Mode. However, if you understand what it means, you can better decide whether you want or need to update the document to get out of Compatibility Mode.
If you open a document that is showing [Compatibility Mode], you can convert it to the format of your current Word version. Note that this may change the layout of the document. Also, people using an earlier version of Word may no longer be able to work with all parts of the document that have been created using newer features.
How to remove Compatibility Mode in Word
See how to update a document to get out of Compatibility Mode below.
How to find out which compatibility mode a Word document is in
The text [Compatibility Mode] in the Title bar tells you that the document was created or last saved in an earlier version of Word. However, the information does not tell you which Word version it originates from.
You can find out which specific mode the document is in. The following steps apply to Word 2010, 2013, 2016, 2019, and 365.
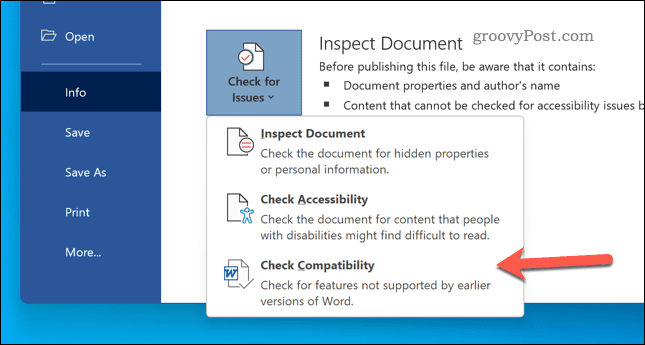
- Select File > Info.
- In the Inspect Document section, click the Check for Issues button > select Check Compatibility. See Figure 2 below.
- In the Microsoft Word Compatibility Checker dialog box that opens, click Select versions to show. A check mark is shown next to the name of the document’s current mode. See Figure 3 below.
- Click OK.
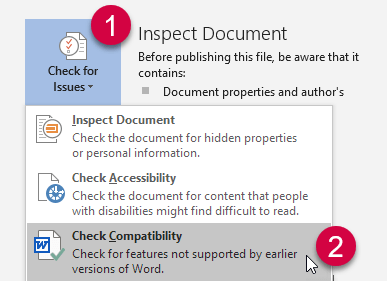
Figure 2. Select File > Info > Check for Issues > Check Compatibility to find the current mode.
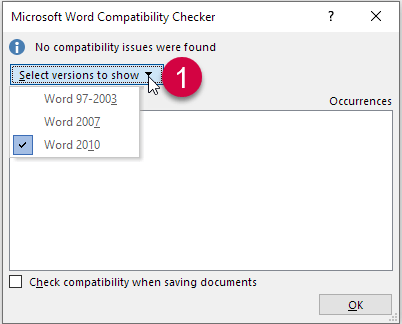
Figure 3. In the Microsoft Word Compatibility Checker dialog box, click Select versions to show. A check mark is shown next to the name of the document’s current mode.
How to find out whether there are compatibility issues
In some situations, content in a Word document may change if the document if opened in an earlier version than the version used when creating or editing the document. This happens, for example, if you have used features for creating content that isn’t supported in earlier versions of Word. If you know that a document is going to be opened by users with an earlier version of Word than the one you are using, it is relevant to check whether there will be compatibility issues.
TIP: If you know for sure that some users with earlier versions of Word need to work with a specific document, it may be most practical to change the Compatibility Mode back to the earliest version in use. This will disable the features in your Word that are not compatible with the earlier version(s). Then you don’t risk using content types that will not work in earlier versions.
You can revert to an earlier Compatibility Mode using a line of VBA macro code. You will find such VBA code in my article How to Set Word Compatibility Options via VBA.
See also the information about special compatibility issues in relation to table later in this article.
Example: You have created a document in Word 2010 or a newer version of Word. You have inserted check box content controls in the document. If the document is to be opened in Word 2007 or an earlier version, Word can’t show check box content controls since they were not implemented until Word 2010. Therefore, Word needs to change the check box content controls to something else, as close to check box content controls as possible.
You can check whether there are such issues in relation to the content in a document. The following steps apply to Word 2010, 2013, 2016, 2019, and 365.
- Select File > Info.
- In the Inspect Document section, click the Check for Issues button > select Check Compatibility. See Figure 2 above.
- In the Microsoft Word Compatibility Checker dialog box that opens, click Select versions to show. Select the Word version you want to check compatibility with and uncheck other Word versions.
- Check the Summary field. Word will describe any issues found and will also show the number of occurrences for each type of issue.
- Repeat step 3 to check more Word versions, if relevant.
- Click OK when finished.
- If needed, make changes to the document to handle the issues found.
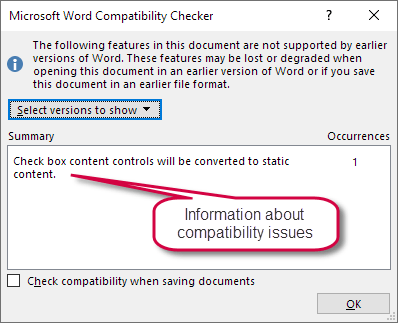
Figure 4. The Microsoft Word Compatibility Checker dialog box can show compatibility issues for different Word versions. In this example, the information tells that Word needs to change check box content controls if the document is opened in Word 2007 (selected in the Select version to show – not visible here).
How to update a document in Compatibility Mode to the current Word version and get out of Compatibility Mode
In the heading above, I have used the term «update» in relation to getting out of Compatibility Mode. You may instead think of it as removing or turning off Compatibility Mode. No matter the term used, you can use the procedures described as METHOD 1 and METHOD 2 below.
METHOD 1 – use Word’s Convert feature to convert a document to the current Word version
IMPORTANT: This method will replace the old version of the document with the new one. If you want to keep a copy of the original version, save a backup copy of it first.
If you are using Word 2007:
- Click the Office button (top-left corner of the window).
- Click Convert in the dialog box that opens.
- If a message opens, showing information about the conversion, click OK.
If you want, you can turn on the check box to prevent that message from appearing again (see Figure 5 below).
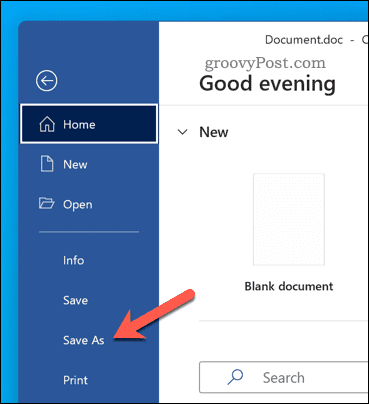
If you are using Word 2010, 2013, 2016, 2019, 365:
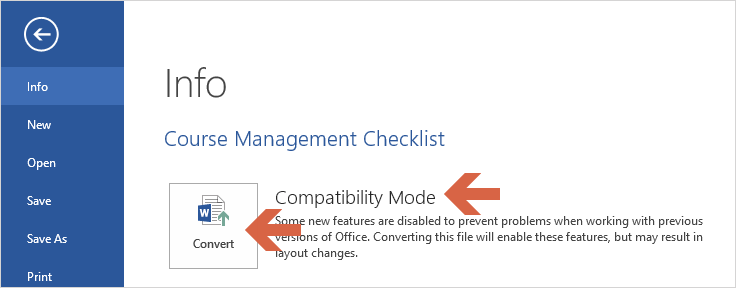
- Select File > Info.
- Click the Convert button (see Figure 5 below).
- If a message opens, showing information about the conversion, click OK.
If you want, you can turn on the check box Do not ask me again about converting documents to prevent that message from appearing again (see Figure 6 below).
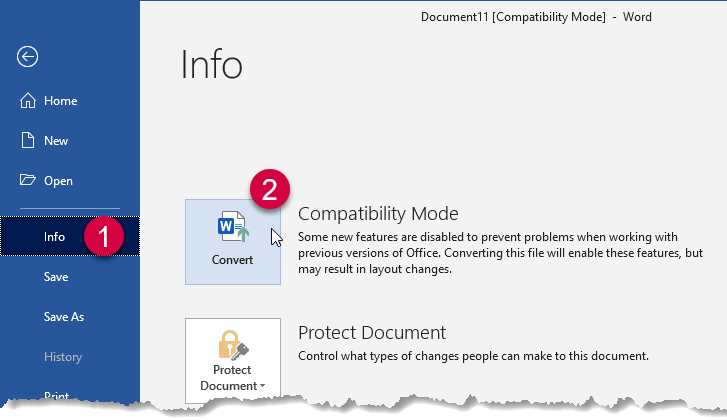
Figure 5. To convert a document to the current version, select File > Info and click Convert.
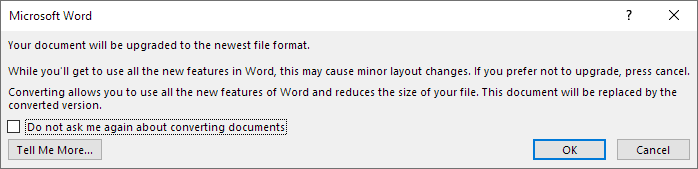
Figure 6. Message about what happens when converting a Word document.
The text [Compatibility Mode] disappears from the Title bar when you click OK in step 3 above. In case the document was in .doc or .dot format (formats from Word 2003 or earlier), the extension will not change to the newer file extension in the Title bar until you save the document (the extensions can be .docx, .dotx, .docm, or .dotm). The old file will be replaced by the converted version.
METHOD 2 – use the Save As dialog box to convert a document to the current Word version
If a document has been set to maintain the compatibility with earlier versions of Word, you can have it converted to the current version of Word as follows:
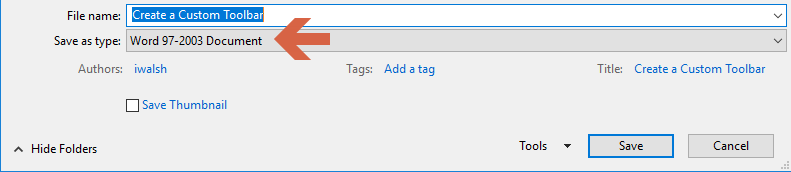
- Open the Save As dialog box (File > Save As or press F12).
- Turn off the check box Maintain compatibility with previous versions of Word. See Figure 7 below.
- If you want to keep the old version too, type a new name in the File name field. If you want to overwrite the old version, keep the same name.
- Click Save.
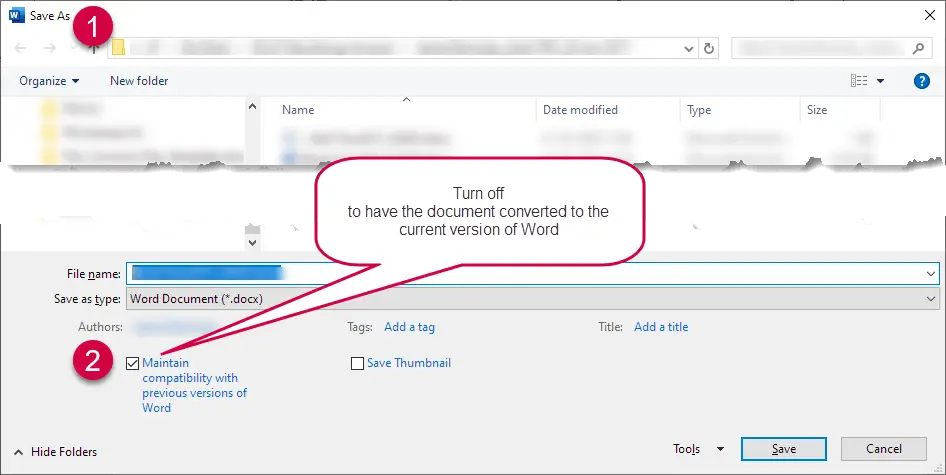
Figure 7. In the Save As dialog box, turn off Maintain compatibility with previous versions of Word and click Save.
How to change a document to Compatibility Mode and why you might want to do that
There may be situations where you want to set a document back to Compatibility Mode. This could be the case if you want to be able to turn on a special compatibility option that was available in an earlier version of Word and that is not available in the current version. You will find a detailed overview of all Word compatibility options in my article Word Layout Options & Compatibility Options.
The situation may also be that you rely on Word add-ins or macros that are not compatible with your version of Word.
You may also want to set a document back to a specific Compatibility Mode if users elsewhere need to work with the document and if those users are using an earlier version of Word.
You can set a document back to a specific Compatibility Mode using a macro. You will find macros for that purpose in my article How to Set Word Compatibility Options via VBA.
What to do if all new documents you create are in Compatibility Mode
As mentioned earlier, you may not need to do anything about documents in Compatibility Mode. However, you can change the situation, if you want.
What to do if new, blank documents you create in Word are in Compatibility Mode
If Word starts with a blank document in Compatibility Mode, it indicates that the template Normal.dotm is in Compatibility mode. To fix that, you need to open the Normal.dotm template and convert it to the version you are using:
- Start Word.
- Select File > Open, browse to the folder where Normal.dotm is found, select it and click Open.
The default location in Windows 10 is:
C:Users[user name]AppDataRoamingMicrosoftTemplatesIf you can’t see the folder AppData, see How to make hidden files and folders visible.
- Convert Normal.dotm. See how to convert a document above.
- Save Normal.dotm and close the file.
New, blank documents you create from now on will no longer be in Compatibility Mode.
What to do if new documents you create using other templates than Normal.dotm are in Compatibility Mode
If you create new Word documents based on other templates than Normal.dotm and if such documents are in Compatibility Mode, it indicates that the template(s) in question are in Compatibility Mode.
To convert a template so it is no longer in Compatibility Mode:
- Start Word.
- Select File > Open, browse to the folder where the template is found, select it and click Open.
The default location for custom templates in Windows 10 is:
C:Users[user name]AppDataRoamingMicrosoftTemplatesIf you can’t see the folder AppData, see How to make hidden files and folders visible.
Note that your template may be saved in another folder. If the active document is attached to template, you can find the template path via Developer tab > Document Template. The path is shown in the topmost field in the Templates and Add-ins dialog box. If needed, see How to show the Developer tab in Word.
- Convert the template. See how to convert a document above.
- Save and close the template.
From now on, new documents you create based on that template will no longer be in Compatibility Mode. Repeat the steps above for all templates that need to be converted.
What to do if new documents change to Compatibility Mode when saving
If all new documents you create change to Compatibility Mode when you save the document, the cause is most likely the setting of a specific Save option in Word. Do as follows:
- In Word, select File > Options.
In case of Word 2007: Office button > Word Options. - Select Save to get access to the save options. See Figure 7 below.
- Click the Save files in this format list and select the first option, Word Document (*.docx). See Figure 7 below.
- Click OK.
- In the next dialog box that opens, click Yes if you want to change the default setting for all Office applications. See Figure 9 below.
From now on, new documents you save will be in .docx format compatible with your current Word version.
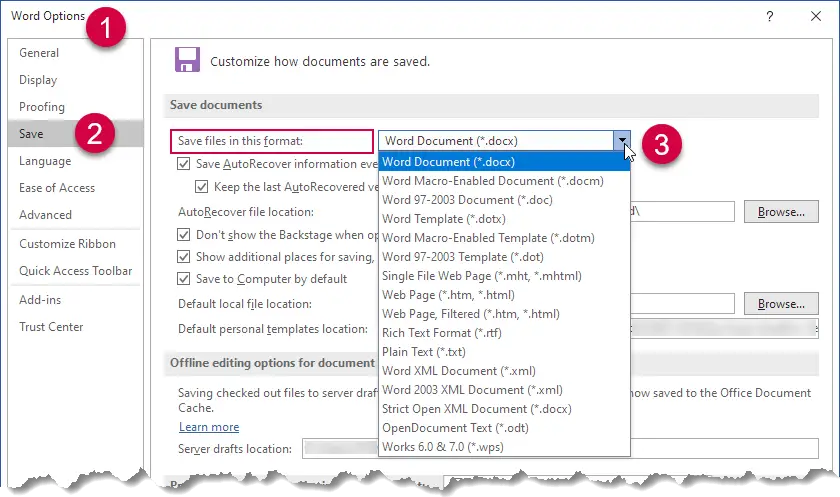
Figure 8. Set Save files in this format to the first option to have all new documents saved in .docx format compatible with your current version of Word.
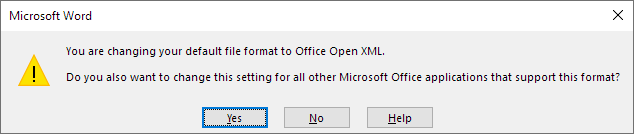
Figure 9. Select whether you want to change the default setting for all Office applications.
Special compatibility issues with tables – before and after Word 2013
Since Word 2013, tables have behaved differently than in Word 2010 and earlier versions. This is due to a Microsoft design change:
- Word 2010 and earlier versions: Left and right cell margins exceed page margins.
- Word 2013 and newer versions: Left and right cell margins do not exceed page margins.
This means that the width of tables with left and right cell margins that were created in Word 2010 or earlier (or created in documents in Word 2010 Compatibility Mode), will be reduced if the document is converted to Word 2013 or newer format. A reduced table width may cause different line breaks in cells and may cause row heights to increase. Such changes may also cause different page breaks. Therefore, you should check documents with tables carefully to correct issues, if needed.
See the illustration below.

Figure 10. Example showing a table with left and right cell margins, before and after converting from Word 2010 format to a newer format. The red lines show where the margins are. For further details, read the text in the tables in the illustration.
What to do if you need to convert to a newer format than Word 2010 and, at the same time, preserve the table widths and left alignment
If you need to convert documents that include a lot of tables created in Word 2010 or earlier, and if you – for any reason – need to preserve the table widths and left alignment unchanged, it requires quite a lot of work.
You will have to reduce the left table indent corresponding to the cell margin of the left-most cell(s). In addition, you must compensate for the reduced column widths. Not all tables may be regular. If there are merged cells, different cell margins, and other irregular layout, it quickly becomes complex. It is possible to write VBA macros to handle the corrections. If all kinds of possible variations are to be taken into account, it isn’t piece of cake. Personally, I have had to handle such changes in very large and complex documents – I know by experience how many variants and details need to be taken into account.
If at all possible, I recommend that you adjust the tables to compensate for too narrow columns, inappropriate line breaks or page breaks and that you don’t try to make the tables look totally as before.
Personally, I find that the document layout looks much cleaner when the tables are aligned to the margins instead of exceeding the margins. Until Word 2010, I always set the cell margins to 0 (zero) and added indentation to the styles I used in tables in order to have the table and margins align.
Related information
See my article Word Layout Options & Compatibility Options for a detailed overview of all compatibility options in Word, including information about which options are found in which versions of Word.
Setting compatibility options via VBA (macros): My article How to Set Word Compatibility Options via VBA includes macros ready for use. The macros let you set all Word compatibility options, change the Compatibility Mode of a document, and more.
For an overview of changes in Word features between versions, see the Microsoft article Compatibility changes between versions.
For information on setting Compatibility Mode via Group Policy, see Manage compatibility mode for Office.
If you try to open an older version of a MS Word document with the .doc file extension, you might get a message that your file is in compatibility mode. What does this mean?
It means your doc was saved in an older version of Word, typically Word 97-2003, and because of that some features in the newer version of Word may not work. There’s nothing wrong with your file. It still works fine but some features will not work unless you update the file.
So, how do you do this?
By the way, converting the file to a new version will usually make the file size much smaller, which is always a good thing.
If MS Word opens your documents in Compatibility Mode instead of as a normal document, follow these steps.
- Open a document in compatibility mode. In Word, it shows Compatibility Mode in the top of the window.

- Click FILE on the ribbon menu.
- Click Convert.
This converts the file to the new format.
The [compatibility mode] message is removed and the file is now a regular Word file with the .docx file extension.
How to Turn Off Compatibility Mode in Word # 2
- Click File tab, Options, Save option, Save files in this format.

- Save as *.DOCX“
How to Turn Off Compatibility Mode in Word #3
If Word 2010 creates all NEW blank documents in Compatibility Mode, this means your Normal.dotm template is in Compatibility Mode.
To fix it, open the Normal.dotm file itself to convert it to Word .docx format.
Use File > Open instead of File > New.
There are two things you must do:
- Make sure the file type dropdown is set to either “All Files (*.*)” or “All Word Documents (*.docx;*.docm;*.dotx;*.dotm;….)” or “All Word Templates (*.dotx;*.dotm)”.
- Find the folder that contains Normal.dotm.
- In Windows 7 that’s usually C:Users<your name>AppDataRoamingMicrosoftTemplates, but it’s different in Windows XP, and could be different if you’ve used the Options >Advanced > File Locations dialog to change the User Templates location.
Also, the AppData folder and everything under it is marked as Hidden by default, so you might not be able to see it if you try to navigate the folders.
- Go to the address bar at the top of the Open dialog and type: %AppData%MicrosoftTemplates
- Click Enter.
- Once you locate Normal.dotm in the Open window.
- Click it and click the Open button.
- If the Word title bar now says “Normal.dotm [Compatibility Mode]”, click File and click the Convert button.
- Save and close the file.
Future new blank documents will no longer be in Compatibility Mode.
How to Turn Off Compatibility Mode in Word # 4
- Delete the template.
- Restart Word 2010
- Word creates a new template.
- Click FILE, Options, Advanced.
- Scroll down to Compatibility options for and select All New Documents
VIDEO – How to Turn Off Compatibility Mode in Word
User Guide Templates (5 x MS Word)
Download these 5 User Guide templates to create user manuals, getting started guides and other technical documents.
Download Now for $9.99 – Buy Here!
 Learn more about these templates
PDF Tutorial
Download the PDF of this tutorial here – How to Turn Off Compatibility Mode in MS Word.
Login
In This Article
- Click the File tab.
- On the Info screen, click the Convert button. A dialog box may appear, explaining the conversion process.
- If prompted, click OK in the dialog box. The document is updated; the text [Compatibility Mode] vanishes from the title bar.
Contents
- 1 How do I enable editing in compatibility mode?
- 2 How do I turn off compatibility mode word?
- 3 Why can’t I edit a Word document in compatibility mode?
- 4 Why can’t I edit a Word document?
- 5 Why is my Word document in compatibility mode?
- 6 How do I save a Word document in compatibility mode?
- 7 Why does .docx open in Compatibility Mode?
- 8 How do I convert a Word document to a newer version?
- 9 How do I open a Word 2007 document in 2019?
- 10 Why can’t I edit Word on my Mac?
- 11 How do I turn off compatibility mode in Word 2013?
- 12 How do I change compatibility mode on Mac?
- 13 What is meant by compatibility mode?
- 14 How do I change compatibility options in Windows 10?
- 15 How do I change compatibility settings in Windows 10?
- 16 How do I open compatibility mode?
- 17 How do I turn off compatibility mode in Windows 10?
- 18 How do I open old Word documents in 2019?
- 19 How do I open an older version of a Word document?
- 20 How do I open a Word 2007 document in Word 2016?
How do I enable editing in compatibility mode?
To do so, open a document that’s in Compatibility Mode and click File > Info > Check for Issues > Check Compatibility. Click the “Select Version to Show” box. The version with a check mark next to it is the Compatibility Mode the document is currently using.
How do I turn off compatibility mode word?
Word
- On the Word menu, click Preferences.
- Under Output and Sharing, click Compatibility .
- Under Compatibility Report, clear the Check documents for compatibility check box. Tip: To check the compatibility of a document after you have turned off the Compatibility Report, on the View menu, click Compatibility Report.
If you try to open an older version of a MS Word document with the . doc file extension, you might get a message that your file is in compatibility mode.It means your doc was saved in an older version of Word, typically Word 97-2003, and because of that some features in the newer version of Word may not work.
Why can’t I edit a Word document?
If you receive or open a document and can’t make any changes, it might be Open for viewing only in Protected View. Follow these steps to edit:Select Protect document. Select Enable Editing.
Why is my Word document in compatibility mode?
If a Word document shows the text [Compatibility Mode] in the title bar, it means that the document was created or last saved in an earlier version of Word than the version you are using. Example: You are using Word for Microsoft 365.
How do I save a Word document in compatibility mode?
My document title says [Compatibility Mode]
- On the File menu, click Save As.
- On the Format pop-up menu, click Word Document (. docx).
- If you are using Word for Mac 2011, make sure that the Maintain compatibility with Word 98-2004 check box is clear.
- Click Save.
Why does .docx open in Compatibility Mode?
docx, and then later open the file in a more recent version of Microsoft Office, you will often still see the [Compatibility Mode] message.This means that any file created in an older version than what you have installed on your computer did not have the latest XML structure updates.
How do I convert a Word document to a newer version?
Click the File tab. Do one of the following: To convert the document without saving a copy, click Info, and then click Convert. To create a new copy of the document in Word 2016 or Word 2013 mode, click Save As, and then choose the location and the folder where you want to save the new copy.
How do I open a Word 2007 document in 2019?
Right-click on the document you want to convert and select Open with followed by Word. This ensures the file opens in the right software. When the document opens, click on the File tab at the top-left corner. Then select the tab that says Info in the left sidebar and click on Convert in the right pane.
Why can’t I edit Word on my Mac?
Sign out of and quit all Microsoft Office applications. In the next window that pops up select the following three files, delete them, and then empty your trash. Restart your Mac, re-launch Word, and sign back in with your [email protected] and password.
How do I turn off compatibility mode in Word 2013?
Step 1: Open your document that you wish to convert in Word 2013. Step 2: Click the File tab at the top-left corner of the window. Step 3: Click the Convert button near the top of the window. Step 4: Click the OK button to convert the document to the Word 2013 format and get it out of compatibility mode.
How do I change compatibility mode on Mac?
Browser Compatibility Mode
- Go to Safari Preferences.
- Click on the Advanced tab.
- Check Show Developer Mode in Menu Bar.
- Once you enable the option for Develop, click on Develop and then User Agent. This will give the option to run Safari in several different modes like Firefox or Chrome.
What is meant by compatibility mode?
A compatibility mode is a software mechanism in which a software either emulates an older version of software, or mimics another operating system in order to allow older or incompatible software or files to remain compatible with the computer’s newer hardware or software.
How do I change compatibility options in Windows 10?
1) Right-click the specific application and click Properties. 2) Go to Compatibility tab, then check the box next to Run this program in compatibility mode for: 3) Select the version of Windows to use for your application in the drop-down box. 4) Click Apply and OK to save the change.
How do I change compatibility settings in Windows 10?
Right-click (or press and hold) the program icon and select Properties from the drop-down menu. Select the Compatibility tab. Under Compatibility mode, check the box next to Run this program in compatibility mode for and select the appropriate version of Windows from the drop-down list.
How do I open compatibility mode?
This is how:
- Right-click on the game and select Properties from the menu.
- Select the Compatibility tab and check the box next to Run this program in compatibility mode for:
- Select the version of Windows to use for your game’s settings from the drop down.
- Click Apply and run the application.
How do I turn off compatibility mode in Windows 10?
I you wanted to turn off the compatibility mode for a program you can try the below steps.
- Right click on the setup files and select properties.
- Click on compatibility tab and uncheck the box Run this program in compatibility for:
- Click on Apply and Ok.
How do I open old Word documents in 2019?
If you need to open a file in an older version of Microsoft Word, Excel, PowerPoint, Access or Publisher, follow these steps:
- Click.
- Choose “All Programs”
- Then select, the “Microsoft Office” folder.
- Now, open your desired Office application.
- Once the application opens, select.
- Click.
How do I open an older version of a Word document?
View previous versions of Office files
- Open the file you want to view.
- Click File > Info > Version history.
- Select a version to open it in a separate window.
- If you want to restore a previous version you’ve opened, select Restore.
How do I open a Word 2007 document in Word 2016?
If you are using Microsoft Office Word 2007 or Word 2010, you can open . docx or . docm files that were created in Word 2016 and 2013.
Documents created in Word 2013, 2016.
| Word 2016 or 2013 document elements | When opened in Word 2007 |
|---|---|
| Alternative text on tables | Removed. |

Compatibility mode allows you to edit documents from older versions of Word. If you need to get out of compatibility mode in Word, follow this guide.
It’s hard to believe, but Microsoft Word has been an office staple since 1983, predating the Windows operating system itself.
It’s come a long way since then. New features are added to each release, making it hard for documents to remain compatible with older versions. Thankfully, Microsoft has a workaround—compatibility mode.
Unfortunately, compatibility mode can cause problems, especially if you’re trying to edit older documents in a newer version of Word. If you’re unsure how, here’s how to get out of compatibility mode in Word.
What is Compatibility Mode in Microsoft Word?
You might open a Microsoft Word document and see compatibility mode appear in Word’s title bar. If you see this, it means your document was likely created in an older version of Word (or using an older Word format). As a failsafe, Word is opening your file in compatibility mode to protect the document.
Each new version of Word brings new features—features that might break the integrity or formatting of your older document. Compatibility mode switches these features off to allow you to view and edit your document as it was intended to be viewed in the version of Word it was initially created in.
For example, if you’re trying to edit a document created in Word 2010, you won’t be able to embed videos into your document, as the feature didn’t exist in 2010.
Word will also switch to compatibility mode if you open a document using the doc file format. This file format was replaced with docx in Office 2007, but older files using the .doc format continue to exist.
How to Check Your Word Document for Compatibility With Older Versions
You can easily check what versions of Word your document is compatible with by using the compatibility checker in Word. This is only available for users running a modern version of Word on Windows.
To check your file compatibility in Word:
- Open your Word document.
- On the ribbon bar, press File.
- In the File menu, press Info > Check for Issues > Check Compatibility.

- Press the Select versions to show drop-down menu.
- In the drop-down, the version with a blue tick is the latest version of Word that the document is fully compatible with.


If you’ve opened a document in compatibility mode in Word, you can switch it off by saving the file in a newer Word format. This will disable compatibility mode and allow you to access all of the available features in your version of Word.
A word of warning, however. Updating the file format will mean that any new features you use could cause your document to appear differently in older versions. This is what compatibility mode is used for—if you switch it off, your document compatibility might be reduced as a result.
The steps below will work for both Windows and Mac users.
To turn off compatibility mode in Word:
- Open your Word document.
- On the ribbon, press File > Save As.

- In the Save As window, select Word Document (.docx) from the drop-down. On older versions, select it from the Format drop-down menu.

- If you want to overwrite the existing file, leave the filename intact and press Save.
- Otherwise, change the filename and press Save to save the new file.


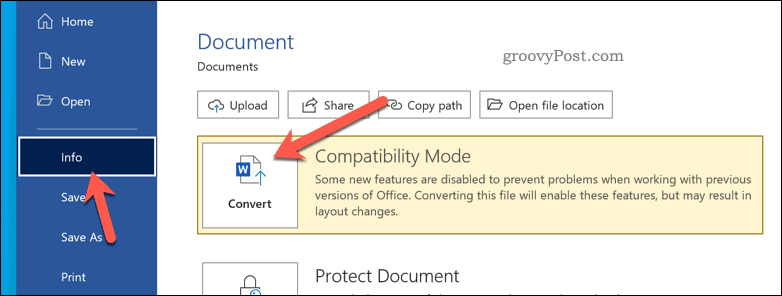
How to Update and Convert Older Word Documents
If you’re running Word on Windows, you can quickly convert a document to leave compatibility mode. This will update an older file (such as a doc file) to the newer format.
To update and convert an older Word document:
- Open your Word document.
- Press File > Info > Convert. Your document will convert to a newer format and enable new features.

- Follow any additional on-screen instructions.
- Press File > Save or Save As to save your changes.
Using Microsoft Word
Using the steps above, you should be able to exit compatibility mode in Word. If you upgrade your document, it should become compatible with the newer version of Office you’re using.
Don’t want to keep upgrading? You can always take out a Microsoft 365 subscription, ensuring you always have the latest version of Word installed. You can also try out Word on an Android device or you can try Office on your iPhone instead.
Want to ditch Windows? Microsoft offers a version of Office for Chromebooks, allowing you to switch from Google Docs to your favorite Office suite instead.
![]()