
| title | description | ms.date | ms.topic | dev_langs | helpviewer_keywords | author | ms.author | manager | ms.technology | ms.workload | ||||
|---|---|---|---|---|---|---|---|---|---|---|---|---|---|---|
|
How to: Programmatically create Word tables |
Learn how to use the Add method of the Tables collection to add a table at the specified range in a Microsoft Word document. |
02/02/2017 |
how-to |
|
|
John-Hart |
johnhart |
jmartens |
office-development |
office |
How to: Programmatically create Word tables
[!INCLUDE Visual Studio]
The xref:Microsoft.Office.Interop.Word.Tables collection is a member of the xref:Microsoft.Office.Interop.Word.Document, xref:Microsoft.Office.Tools.Word.Document, xref:Microsoft.Office.Interop.Word.Selection, and xref:Microsoft.Office.Interop.Word.Range classes, which means that you can create a table in any of those contexts. You use the xref:Microsoft.Office.Interop.Word.Tables.Add%2A method of the xref:Microsoft.Office.Interop.Word.Tables collection to add a table at the specified range.
[!INCLUDEappliesto_wdalldocapp]
Create tables in document-level customizations
To add a table to a document
-
Use the xref:Microsoft.Office.Interop.Word.Tables.Add%2A method to add a table consisting of three rows and four columns at the beginning of the document.
To use the following code example, run it from the
ThisDocumentclass in your project.C#
:::code language=»csharp» source=»../vsto/codesnippet/CSharp/Trin_VstcoreWordAutomationCS/ThisDocument.cs» id=»Snippet86″:::
VB
:::code language=»vb» source=»../vsto/codesnippet/VisualBasic/Trin_VstcoreWordAutomationVB/ThisDocument.vb» id=»Snippet86″:::
When you create a table, it is automatically added to the xref:Microsoft.Office.Interop.Word.Tables collection of the xref:Microsoft.Office.Tools.Word.Document host item. You can then refer to the table by its item number by using the xref:Microsoft.Office.Interop.Word.Tables.Item%2A property, as shown in the following code.
To refer to a table by item number
-
Use the xref:Microsoft.Office.Interop.Word.Tables.Item%2A property and supply the item number of the table that you want to refer to.
To use the following code example, run it from the
ThisDocumentclass in your project.C#
:::code language=»csharp» source=»../vsto/codesnippet/CSharp/Trin_VstcoreWordAutomationCS/ThisDocument.cs» id=»Snippet87″:::
VB
:::code language=»vb» source=»../vsto/codesnippet/VisualBasic/Trin_VstcoreWordAutomationVB/ThisDocument.vb» id=»Snippet87″:::
Each xref:Microsoft.Office.Interop.Word.Table object also has a xref:Microsoft.Office.Interop.Word.Table.Range%2A property that enables you to set formatting attributes.
To apply a style to a table
-
Use the xref:Microsoft.Office.Interop.Word.Table.Style%2A property to apply one of the Word built-in styles to a table.
To use the following code example, run it from the
ThisDocumentclass in your project.C#
:::code language=»csharp» source=»../vsto/codesnippet/CSharp/Trin_VstcoreWordAutomationCS/ThisDocument.cs» id=»Snippet88″:::
VB
:::code language=»vb» source=»../vsto/codesnippet/VisualBasic/Trin_VstcoreWordAutomationVB/ThisDocument.vb» id=»Snippet88″:::
Create tables in VSTO Add-ins
To add a table to a document
-
Use the xref:Microsoft.Office.Interop.Word.Tables.Add%2A method to add a table consisting of three rows and four columns at the beginning of the document.
The following code example adds a table to the active document. To use this example, run it from the
ThisAddInclass in your project.C#
:::code language=»csharp» source=»../vsto/codesnippet/CSharp/Trin_VstcoreWordAutomationAddIn/ThisAddIn.cs» id=»Snippet86″:::
VB
:::code language=»vb» source=»../vsto/codesnippet/VisualBasic/Trin_VstcoreWordAutomationAddIn/ThisAddIn.vb» id=»Snippet86″:::
When you create a table, it is automatically added to the xref:Microsoft.Office.Interop.Word.Tables collection of the xref:Microsoft.Office.Interop.Word.Document. You can then refer to the table by its item number by using the xref:Microsoft.Office.Interop.Word.Tables.Item%2A property, as shown in the following code.
To refer to a table by item number
-
Use the xref:Microsoft.Office.Interop.Word.Tables.Item%2A property and supply the item number of the table that you want to refer to.
The following code example uses the active document. To use this example, run it from the
ThisAddInclass in your project.C#
:::code language=»csharp» source=»../vsto/codesnippet/CSharp/Trin_VstcoreWordAutomationAddIn/ThisAddIn.cs» id=»Snippet87″:::
VB
:::code language=»vb» source=»../vsto/codesnippet/VisualBasic/Trin_VstcoreWordAutomationAddIn/ThisAddIn.vb» id=»Snippet87″:::
Each xref:Microsoft.Office.Interop.Word.Table object also has a xref:Microsoft.Office.Interop.Word.Table.Range%2A property that enables you to set formatting attributes.
To apply a style to a table
-
Use the xref:Microsoft.Office.Interop.Word.Table.Style%2A property to apply one of the Word built-in styles to a table.
The following code example uses the active document. To use this example, run it from the
ThisAddInclass in your project.C#
:::code language=»csharp» source=»../vsto/codesnippet/CSharp/Trin_VstcoreWordAutomationAddIn/ThisAddIn.cs» id=»Snippet88″:::
VB
:::code language=»vb» source=»../vsto/codesnippet/VisualBasic/Trin_VstcoreWordAutomationAddIn/ThisAddIn.vb» id=»Snippet88″:::
See also
- How to: Programmatically add text and formatting to cells in Word tables
- How to: Programmatically add rows and columns to Word tables
- How to: Programmatically populate Word tables with document properties
- Optional parameters in Office solutions
The .NET Framework allows us to do many things with relative ease but the main cost is often the time taken in finding a decent example to learn from. I experienced pain when I wanted to create a Word document programmatically and add a simple table to it. But I got there in the end, and this is how I did it.
I’m not going to describe in full how you need to prepare your Visual Studio project. For that, read this. I wanted to utilise the ConvertToTable() method of the Word.Range object which allows us to create a table using a string delimited by tabs and newlines such as this:
NametAgetLocationnNigelt44tUKnBillt33tUSAnRubent86tNicaraguan
The MSDN page Automating Word Tables for Data Insertion and Extraction had taken me so far, but not all the way, so here’s the useful (read: missing) code to bring it all together:
Word.Application app = new Word.Application();

Word.Document doc = app.Documents.Add(
    ref oMissing, ref oMissing, ref oMissing, ref oMissing
);

Word.Range r = doc.Range(ref oMissing, ref oMissing);
r.Text = "NametAgetLocationnNigelt44tUKnBillt33tUSAnRubent86tNicaraguan";

object tab = Word.WdTableFieldSeparator.wdSeparateByTabs;
Word.Table t  = r.ConvertToTable(
    ref tab,
    ref oMissing, ref oMissing, ref oMissing, ref oMissing,
    ref oMissing, ref oMissing, ref oMissing, ref oMissing,
    ref oMissing, ref oMissing, ref oMissing, ref oMissing,
    ref oMissing, ref oMissing, ref oMissing
);
Please leave a comment if you have any questions on this, or if I’ve done something heinous that is a crime against Word automation 😉
Good luck!
EDIT: If you need to add more than one item to a blank Word document, you might want to take a look at my subsequent post.
Добрый день, подскажите, как можно дописать код? Мне нужно открыть шаблон word-файла, сделать правки и в самом конце добавить таблицу. Первые два пункта сделал, а с добавлением таблицы в конец файла проблемы.
public static void createWord()
{
    wordapp = new Word.Application();
    Object path = @"D:WorkSpaceProjectstestWordtestWordtestWordSh.dot";
    try
    {
        worddocument = wordapp.Documents.Add(ref path, ref missingObj, ref missingObj, ref missingObj);
        worddocument.Bookmarks["Well"].Range.Text = "asdfasdf";
      //Что нужно писать?
    }
    catch (Exception e) {
        worddocument.Close(ref falseObj,ref missingObj,ref missingObj);
        wordapp.Quit(ref missingObj,ref missingObj,ref missingObj);
        worddocument = null;
        wordapp = null;
        //throw new Exception();
    }
    wordapp.Visible = true;
}
![]()
Sublihim
2,2891 золотой знак14 серебряных знаков23 бронзовых знака
задан 9 мар 2017 в 8:29
![]()
3
//Добавляем параграф в конец документа
var Paragraph = wordApp.ActiveDocument.Paragraphs.Add();
//Получаем диапазон
var tableRange = Paragraph.Range;
//Добавляем таблицу 2х2 в указаный диапазон
wordApp.ActiveDocument.Tables.Add(tableRange, 2, 2);

//"Приукрашиваем" таблицу, иначе по-дефолту она будет без линий
var table = wordApp.ActiveDocument.Tables[wordApp.ActiveDocument.Tables.Count];
table.set_Style("Сетка таблицы");
table.ApplyStyleHeadingRows = true;
table.ApplyStyleLastRow = false;
table.ApplyStyleFirstColumn = true;
table.ApplyStyleLastColumn = false;
table.ApplyStyleRowBands = true;
table.ApplyStyleColumnBands = false;
ответ дан 9 мар 2017 в 11:16
![]()
SublihimSublihim
2,2891 золотой знак14 серебряных знаков23 бронзовых знака
//Создание таблицы:
Table tb;  /* Если не получится объявить так, то объяви через: public static Table tb;  */
tb = doc.Tables.Add(doc.Paragraphs[doc.Paragraphs.Count].Range, n + 4, 6); /* В паметрах указывается: 1.Место,где она начинается; 2.Кол-во строк; 3.Кол-во столбцов  */
tb.Borders.Enable = 1;//Делаем границы видимыми
ответ дан 13 янв 2019 в 11:40
![]()
SamsonSamson
576 бронзовых знаков

Большинству операций, выполняемых программным способом, есть эквиваленты в пользовательском интерфейсе (UI), доступные как команды в меню и на панелях инструментов. Также существует нижележащая архитектура, обеспечивающая поддержку команд, выбираемых из UI. Всякий раз, когда вы создаете новый документ Word, он базируется на каком-либо шаблоне; расширение файлов шаблонов «.dot», а файлы документов – «.doc». Шаблон Word может содержать текст, код, стили, панели инструментов, элементы автотекста, комбинации клавиш для быстрого доступа к командам. Новый документ связывается с шаблоном и получает полный доступ к его элементам. Если вы не указываете конкретный шаблон, новый документ создается на основе стандартного шаблона «Normal.dot», который устанавливается при установке Word).
Шаблон Normal.dot является глобальным, он доступен любому документу, который вы создаете. Вы могли бы при желании поместить весь свой код в Normal.dot и создавать все документы в своей среде на основе собственного шаблона Normal (Обычный). Но тогда его файл мог бы стать чрезмерно большим, поэтому более эффективное решение для многих разработчиков — создание собственных шаблонов для конкретных приложений. В документах, создаваемых на основе вашего шаблона, код из стандартного шаблона Normal по-прежнему будет доступен. При необходимости можно связывать документ с несколькими шаблонами в дополнение к шаблону Normal.
Для работы с приложением Microsoft Word в .NET, используется объект Application, который является предком всех остальных объектов. Получив на него ссылку, вы можете работать с его методами и свойствами. Этот объект предоставляет большой набор методов и свойств, позволяющих программным путем управлять Microsoft Word. Код инициализации нового объекта Application, представлен ниже.
Microsoft.Office.Interop.Word.Application winword =
  new Microsoft.Office.Interop.Word.Application();
Чтобы открыть существующий документ или создать новый, необходимо создать новый объект Document.
object missing = System.Reflection.Missing.Value;
Microsoft.Office.Interop.Word.Document document =
     winword.Documents.Add(ref missing, ref missing, ref missing, ref missing);
Выполняя какую-либо операцию в пользовательском интерфейсе Word (например, добавляя верхний колонтитул), вы выделяете соответствующую секцию, используя объект «Selection», определяющий текущую позицию «невидимого» курсора и применяете к ней новый параметр форматирования с использованием объекта «Range». Данный объект представляет область в документе и может включать в себя все что угодно — от пары символов, до таблиц, закладок и много другого. Вы не ограничены одним объектом «Range» — в одном документе можно определить сразу несколько таких объектов.
//Добавление верхнего колонтитула
foreach (Microsoft.Office.Interop.Word.Section section in document.Sections)
{
    Microsoft.Office.Interop.Word.Range headerRange =
    section.Headers[Microsoft.Office.Interop.Word.WdHeaderFooterIndex.wdHeaderFooterPrimary].Range;
    headerRange.Fields.Add(headerRange, Microsoft.Office.Interop.Word.WdFieldType.wdFieldPage);
    headerRange.ParagraphFormat.Alignment =
    Microsoft.Office.Interop.Word.WdParagraphAlignment.wdAlignParagraphCenter;
    headerRange.Font.ColorIndex = Microsoft.Office.Interop.Word.WdColorIndex.wdBlue;
    headerRange.Font.Size = 10;
    headerRange.Text = "Верхний колонтитул" + Environment.NewLine + "www.CSharpCoderR.com";
}

//Добавление нижнего колонтитула
foreach (Microsoft.Office.Interop.Word.Section wordSection in document.Sections)
{
    Microsoft.Office.Interop.Word.Range footerRange =
   wordSection.Footers[Microsoft.Office.Interop.Word.WdHeaderFooterIndex.wdHeaderFooterPrimary].Range;

    footerRange.Font.ColorIndex = Microsoft.Office.Interop.Word.WdColorIndex.wdDarkRed;
    footerRange.Font.Size = 10;
    footerRange.ParagraphFormat.Alignment =
    Microsoft.Office.Interop.Word.WdParagraphAlignment.wdAlignParagraphCenter;
    footerRange.Text = "Нижний колонтитул" + Environment.NewLine + "www.CSharpCoderR.com";
}
Чтобы добавить текст в документ, необходимо указать позицию для вставки и сам текст.
//Добавление текста в документ
document.Content.SetRange(0, 0);
document.Content.Text = "www.CSharpCoderR.com" + Environment.NewLine;
Так же вы можете применить к тексту определенный стиль.
//Добавление текста со стилем Заголовок 1
Microsoft.Office.Interop.Word.Paragraph para1 = document.Content.Paragraphs.Add(ref missing);
object styleHeading1 = "Заголовок 1";
para1.Range.set_Style(styleHeading1);
para1.Range.Text = "Исходники по языку программирования CSharp";
para1.Range.InsertParagraphAfter();
В классе Microsoft.Office.Interop.Word.Document, присутствует коллекция «Tables», которая позволяет добавить таблицу в документ с использованием метода Add.
//Создание таблицы 5х5
Table firstTable = document.Tables.Add(para1.Range, 5, 5, ref missing, ref missing);

firstTable.Borders.Enable = 1;
foreach (Row row in firstTable.Rows)
{
    foreach (Cell cell in row.Cells)
    {
        //Заголовок таблицы
        if (cell.RowIndex == 1)
        {
            cell.Range.Text = "Колонка " + cell.ColumnIndex.ToString();
            cell.Range.Font.Bold = 1;
            //Задаем шрифт и размер текста
            cell.Range.Font.Name = "verdana";
            cell.Range.Font.Size = 10;
            cell.Shading.BackgroundPatternColor = WdColor.wdColorGray25;
            //Выравнивание текста в заголовках столбцов по центру
            cell.VerticalAlignment =
                 WdCellVerticalAlignment.wdCellAlignVerticalCenter;
            cell.Range.ParagraphFormat.Alignment =
                 WdParagraphAlignment.wdAlignParagraphCenter;
        }
        //Значения ячеек
        else
        {
            cell.Range.Text = (cell.RowIndex - 2 + cell.ColumnIndex).ToString();
        }
    }
}
Для функционирования описанного выше кода, необходимо добавить к текущему проекту объектную библиотеку MS Word. Перейдите в меню «Проект» и выберете команду «Добавить ссылку» или в обозревателе решений, найдите пункт «Ссылки» и сделайте клик правой клавишей мыши по нему, из появившегося контекстного меню выберете соответствующий пункт.

В открывшемся окне «Добавить ссылку», перейдите на вкладку «COM» и выберете «Microsoft Word 14.0 Object Library» из предложенного списка библиотек.
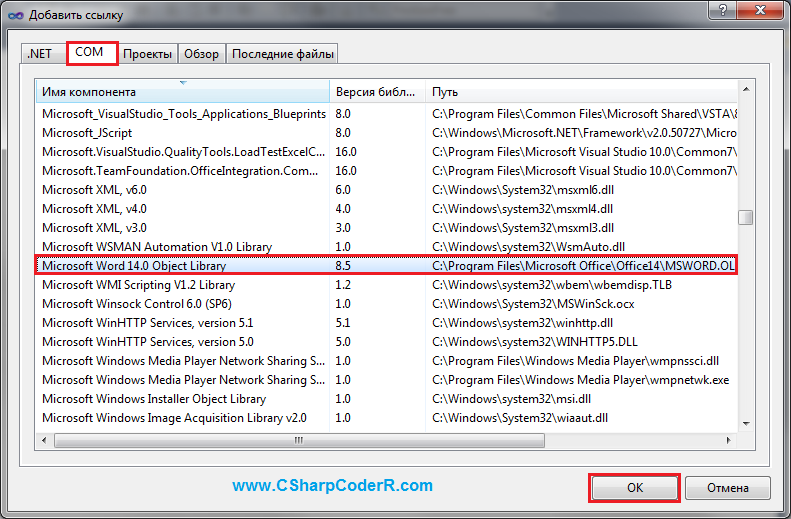
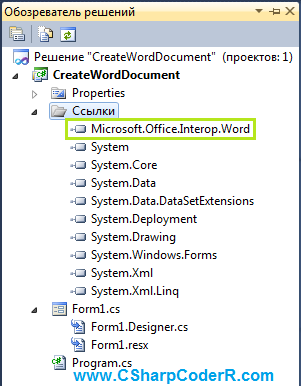
В обозревателе решений у вас появится ссылка на данную библиотеку.
Перейдите в конструктор главной формы и добавьте из панели элементов, командную кнопку «Button». Данный элемент необходим для запуска процесса создания документа и вызов MS Word для отображения.

Сделайте двойной клик левой клавишей мыши по элементу «Button» и вы перейдете в автоматически созданный метод события «button1_Click». Добавьте в него приведенный ниже код.
try
{
    Microsoft.Office.Interop.Word.Application winword =
        new Microsoft.Office.Interop.Word.Application();

    winword.Visible = false;

    //Заголовок документа
    winword.Documents.Application.Caption = "www.CSharpCoderR.com";

    object missing = System.Reflection.Missing.Value;

    //Создание нового документа
    Microsoft.Office.Interop.Word.Document document =
        winword.Documents.Add(ref missing, ref missing, ref missing, ref missing);

    //добавление новой страницы
    //winword.Selection.InsertNewPage();

    //Добавление верхнего колонтитула
    foreach (Microsoft.Office.Interop.Word.Section section in document.Sections)
    {
        Microsoft.Office.Interop.Word.Range headerRange = section.Headers[
        Microsoft.Office.Interop.Word.WdHeaderFooterIndex.wdHeaderFooterPrimary].Range;
        headerRange.Fields.Add(
       headerRange, Microsoft.Office.Interop.Word.WdFieldType.wdFieldPage);
        headerRange.ParagraphFormat.Alignment =
       Microsoft.Office.Interop.Word.WdParagraphAlignment.wdAlignParagraphCenter;
        headerRange.Font.ColorIndex =
       Microsoft.Office.Interop.Word.WdColorIndex.wdBlue;
        headerRange.Font.Size = 10;
        headerRange.Text = "Верхний колонтитул" + Environment.NewLine + "www.CSharpCoderR.com";
    }

    //Добавление нижнего колонтитула
    foreach (Microsoft.Office.Interop.Word.Section wordSection in document.Sections)
    {
        //
        Microsoft.Office.Interop.Word.Range footerRange =
wordSection.Footers[Microsoft.Office.Interop.Word.WdHeaderFooterIndex.wdHeaderFooterPrimary].Range;
        //Установка цвета текста
        footerRange.Font.ColorIndex = Microsoft.Office.Interop.Word.WdColorIndex.wdDarkRed;
        //Размер
        footerRange.Font.Size = 10;
        //Установка расположения по центру
        footerRange.ParagraphFormat.Alignment =
            Microsoft.Office.Interop.Word.WdParagraphAlignment.wdAlignParagraphCenter;
        //Установка текста для вывода в нижнем колонтитуле
        footerRange.Text = "Нижний колонтитул" + Environment.NewLine + "www.CSharpCoderR.com";
    }

    //Добавление текста в документ
    document.Content.SetRange(0, 0);
    document.Content.Text = "www.CSharpCoderR.com" + Environment.NewLine;

    //Добавление текста со стилем Заголовок 1
    Microsoft.Office.Interop.Word.Paragraph para1 = document.Content.Paragraphs.Add(ref missing);
    object styleHeading1 = "Заголовок 1";
    para1.Range.set_Style(styleHeading1);
    para1.Range.Text = "Исходники по языку программирования CSharp";
    para1.Range.InsertParagraphAfter();

    //Создание таблицы 5х5
    Table firstTable = document.Tables.Add(para1.Range, 5, 5, ref missing, ref missing);

    firstTable.Borders.Enable = 1;
    foreach (Row row in firstTable.Rows)
    {
        foreach (Cell cell in row.Cells)
        {
            //Заголовок таблицы
            if (cell.RowIndex == 1)
            {
                cell.Range.Text = "Колонка " + cell.ColumnIndex.ToString();
                cell.Range.Font.Bold = 1;
                //Задаем шрифт и размер текста
                cell.Range.Font.Name = "verdana";
                cell.Range.Font.Size = 10;
                cell.Shading.BackgroundPatternColor = WdColor.wdColorGray25;
                //Выравнивание текста в заголовках столбцов по центру
                cell.VerticalAlignment =
                WdCellVerticalAlignment.wdCellAlignVerticalCenter;
                cell.Range.ParagraphFormat.Alignment =
                WdParagraphAlignment.wdAlignParagraphCenter;
            }
            //Значения ячеек
            else
            {
                cell.Range.Text = (cell.RowIndex - 2 + cell.ColumnIndex).ToString();
            }
        }
    }
    winword.Visible = true;
}
catch (Exception ex)
{
    MessageBox.Show(ex.Message);
}
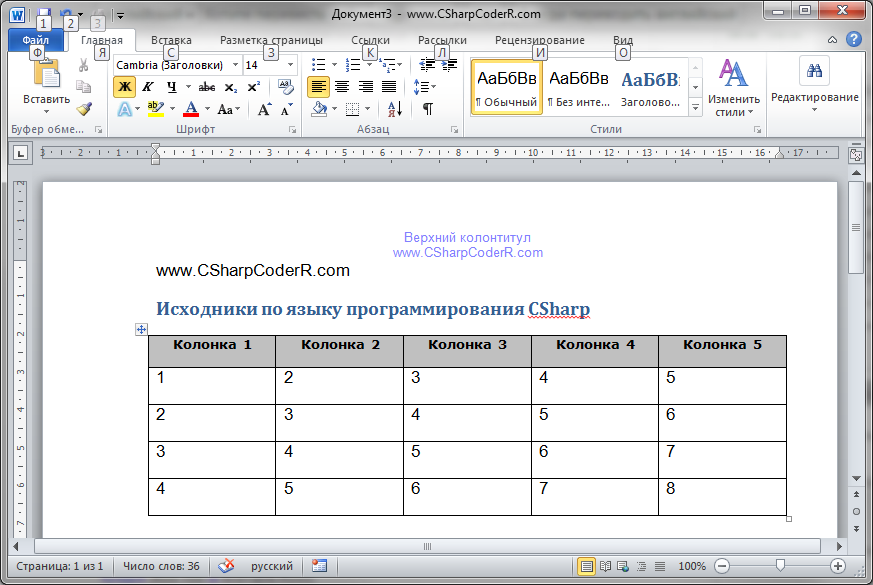
Запустите ваш проект, нажав на клавиатуре, клавишу «F5». Нажмите на единственную кнопку, расположенную на главной форме вашего проекта. У вас автоматически откроется документ Microsoft Word с заполненным верхним и нижним колонтитулом, обычным и с применением стиля текстом, а так же заполненной таблицей.
Для сохранения документа в определенной директории, добавьте приведенный ниже код, после строки «winword.Visible = true;».
//Сохранение документа
object filename = @"d:temp1.docx";
document.SaveAs(ref filename);
//Закрытие текущего документа
document.Close(ref missing, ref missing, ref missing);
document = null;
//Закрытие приложения Word
winword.Quit(ref missing, ref missing, ref missing);
winword = null;
При работе с приложением Word в памяти компьютера создается отдельный процесс, если его не закрыть или не вывести созданный документ на экран, то он будет работать до выключения компьютера. Так же при постоянной работе с такими документами, их процессы будут накапливаться незаметно для пользователя, что может привести к зависанию компьютера или другим последствиям.
|
1 / 1 / 0 Регистрация: 27.05.2019 Сообщений: 108 |
|
|
1 |
|
|
17.12.2021, 21:46. Показов 1786. Ответов 3
Добрый день! Помогите решить задачу используя именно Interop.Word На вход подается две DataTable и мне требуется объединить их в одну, при этом сделать шапку для каждой из таблиц.
Разделение будет в виде объединенных 3-х ячеек и жирным текстом внутри «Первый блок» и «Второй блок» жирным текстом.
0 |

|
sfumatori 147 / 91 / 56 Регистрация: 03.02.2021 Сообщений: 274 |
||||
|
23.12.2021, 10:16 |
2 |
|||
|
Как-то так:
}
1 |
|
8927 / 4839 / 1885 Регистрация: 11.02.2013 Сообщений: 10,246 |
|
|
23.12.2021, 15:19 |
3 |
|
Как-то так: Зачем же использовать ActiveDocument, когда ссылка на документ уже находится в объекте doc?
0 |

|
147 / 91 / 56 Регистрация: 03.02.2021 Сообщений: 274 |
|
|
24.12.2021, 11:45 |
4 |
|
Это вы верно отметили, я начало кода дернул из проекта, который писал предыдущий программист
0 |
Выбрать уже существующую таблицу внутри документа можно по ее порядковому номеру (начиная с 1 и начала документа) можно через интерфейс Tables. При этом мы получим объект типа Table
Word.Table _table = _document.Tables[tableNumber];
Новая вставляется методом Tables.Add (предполагается что мы уже получили диапазон _currentRange того места в документе, куда будем ее вставлять):
_table = _document.Tables.Add(_currentRange, numRows, numColumns, ref _missingObj, ref _missingObj);
и добавить к ней строки
_table.Rows.Add(ref _missingObj);
Тип границ для таблицы можно задать так:
_table.Borders.OutsideLineStyle = Word.WdLineStyle.wdLineStyleDouble;
_table.Borders.InsideLineStyle = Word.WdLineStyle.wdLineStyleDouble;
Имея таблицу мы можем получить диапазон для конкретной ячейки по номеру строки/колонки через интерфейс Cell и делать с ним все описанное в предыдущих статьях:
_currentRange = _table.Cell(rowIndex, columnIndex).Range;
В том числе задать вертикальное выравнивание через перечисление WdCellVerticalAlignment
_table.Cell(rowIndex, columnIndex).VerticalAlignment = Word.WdCellVerticalAlignment.wdCellAlignVerticalTop;
Слить несколько ячеек в одну
_table.Rows[cellOneRowIndex].Cells[cellOneColIndex]. Merge(_table.Rows[cellTwoRowIndex].Cells[cellTwoColIndex]);
Или объединить все ячейки для строки
Word.Row row = _table.Rows[rowNum];
Word.Cell firstCell =row.Cells[1];
foreach(Word.Cell  currCell in row.Cells)
{
    if(currCell.ColumnIndex !=  firstCell.ColumnIndex)
    {
        firstCell.Merge(currCell);
    }
}
- Работаем с MS Word из C#, часть 0, класс и тестовый проект-пример WinForms
- Работаем с MS Word из C#, часть 1. Открываем шаблон, ищем текст внутри документа
- Работаем с MS Word из C#, часть 2. Вставляем текст на закладку и форматируем
- Работаем с MS Word из C#, часть 3. Работа с таблицами
- Работаем с MS Word из C#, часть 4. Обьединяем несколько файлов в один, считаем количество страниц
- Microsoft.Office.Interop.Word Namespace
- Range Interface
- Rows Interface
- Download source code — 52.9 KB
- Download demo — 365.7 KB
Introduction
Many times in real world scenario, we need to create our reports in Word file, need to export ‘things‘ to Word file. In such cases, we need to create and write Word file programmatically and to accomplish the task COM winword interop library will play a role for you.
Using the Code
Our Aim: Create a Word file programmatically and create a table in it
Things we need: C#, Word interop object


Here are the code steps we follow to get to our destination:
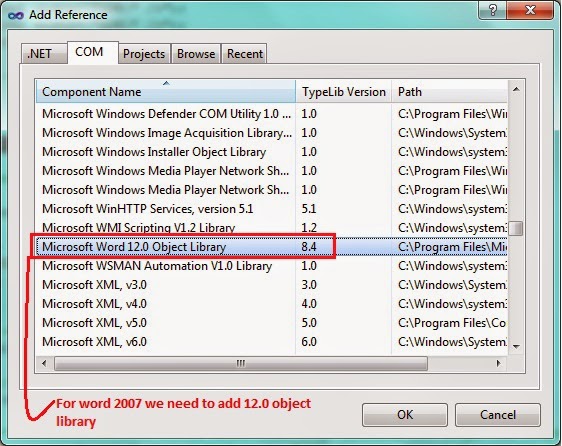
- Create a simple Windows/web/WPF application (You may use console application or class library too, here I have used Windows application in C# with Visual Studio 2010 and Microsoft Word 2007)
- Now just right click on solution explorer, click on Add reference and select COM tab
- Select Word com library (If you have Word 2007 installed, you will see 12.0 object library, if you have Word 2010 installed, you will see 14.0 object library and for Word 2013 you will see 16.0 object library)
See the image below.
- Add reference. Now in reference folder of solution explorer, you will see ‘
Microsoft.Office.Interop.word‘ library added. - Now we are ready to code, first we need to create a new Word document using C#.
- Import Word namespace and create Word object.
See below snippet:Word._Application objApp; Word._Document objDoc; objApp = new Word.Application(); objApp.Visible = true; objDoc = objApp.Documents.Add(ref oMissing, ref oMissing, ref oMissing, ref oMissing);
With the help of the above code, we will be able to create a new Word file. (Note: Do not ever create
newobject of Word document.).Visibleproperty will open a new Word file. - Now to add a new table in Word document, we need to define bookmark first (which is the range of Word document from which we need to start writing the things)
See the below snippet to define default bookmark of Word document:object objMiss = System.Reflection.Missing.Value; object objEndOfDocFlag = "\endofdoc";
- Yes, we have successfully defined ‘end of doc’ flag, now we can first add some caption to table with the help of
Paragraphobject (Paragraphobject is a object which is used to write some text in Word document)
See the below snippet:Word.Paragraph objPara1; object oRng = objDoc.Bookmarks.get_Item(ref objEndOfDocFlag).Range; objPara1 = objDoc.Content.Paragraphs.Add(ref oRng); objPara1.Range.Text = "Test Table Caption"; objPara1.Format.SpaceAfter = 10; objPara1.Range.InsertParagraphAfter();
Here, we have defined a paragraph and insert that paragraph to the end of the document.
- Now, we need to define rows and columns for table that we need to draw. Here, I have drawn a table with 2 rows and 2 columns.
In code, simply go to the end of the document and create 2X2 table, see the below snippet:Word.Table objTab1; Word.Range objWordRng = objDoc.Bookmarks.get_Item(ref objEndOfDocFlag).Range; objTab1 = objDoc.Tables.Add(objWordRng, 2, 2, ref objMiss, ref objMiss); objTab1.Range.ParagraphFormat.SpaceAfter = 6; int iRow, iCols; string strText; for (iRow = 1; iRow <= 2; iRow++) for (iCols = 1; iCols <= 2; iCols++) { strText = "r" + iRow + "c" + iCols; objTab1.Cell(iRow, iCols).Range.Text = strText; } objTab1.Rows[1].Range.Font.Bold = 1; objTab1.Rows[1].Range.Font.Italic = 1;
Here, we have created a ‘
word.table‘ object and added some text with the help ofRangeobject.objWordRng = objDoc.Bookmarks.get_Item(ref objEndOfDocFlag).Range; objWordRng.InsertParagraphAfter(); objWordRng.InsertAfter("THE END.");
We are done with the task. Let’s checkout the final code.
object objMiss = System.Reflection.Missing.Value; object objEndOfDocFlag = "\endofdoc"; Word._Application objApp; Word._Document objDoc; objApp = new Word.Application(); objApp.Visible = true; objDoc = objApp.Documents.Add(ref objMiss, ref objMiss, ref objMiss, ref objMiss); Word.Paragraph objPara2; object oRng = objDoc.Bookmarks.get_Item (ref objEndOfDocFlag).Range; objPara2 = objDoc.Content.Paragraphs.Add (ref oRng); objPara2.Range.Text = "Test Table Caption"; objPara2.Format.SpaceAfter = 10; objPara2.Range.InsertParagraphAfter(); Word.Table objTab1; Word.Range objWordRng = objDoc.Bookmarks.get_Item (ref objEndOfDocFlag).Range; objTab1 = objDoc.Tables.Add(objWordRng, 2, 2, ref objMiss, ref objMiss); objTab1.Range.ParagraphFormat.SpaceAfter = 6; int iRow, iCols; string strText; for (iRow = 1; iRow <= 2; iRow++) for (iCols = 1; iCols <= 2; iCols++) { strText = "row:" + iRow + "col:" + iCols; objTab1.Cell(iRow, iCols).Range.Text = strText; } objTab1.Rows[1].Range.Font.Bold = 1; objTab1.Columns[1].Width = objApp.InchesToPoints(3); objWordRng = objDoc.Bookmarks.get_Item(ref objEndOfDocFlag).Range; objWordRng.InsertParagraphAfter(); objWordRng.InsertAfter("THIS IS THE SIMPLE WORD DEMO : THANKS YOU."); object szPath = "test.docx"; objDoc.SaveAs(ref szPath);
Summing Up
So, we have seen with the help of a little bit of code, we can develop a nice Word table application.
If you want to download the source code, then you may do so from the link at the top of the post.
Finally
COM interop is not a single cup of tea. There are thousands of things we need to discuss, we can cover them one by one in later articles.
Suggestions and doubts are welcome.
Thank you for reading.
License

Written By
Technical Lead
![]() India
India
Hi there, I am Prasad. Author, Blogger, contributor and passionate about Microsoft .NET technologies. I like to write an articles/blogs on different .NET aspects and like to help Developers, to resolve their issues and boost them on Microsoft Technologies.
Certifications: Microsoft Certified professional (MCP), Microsoft Certified technology specialist (MCTS), Agile-Scrum Master.
Awards: Microsoft Re-connect MVP (GSC Member), Most valuable member at dotnetspider, Most popular curator, Most active curator, featured curator at Microsoft Curah, Editor at dotnetspider.
Microsoft MVP 2014 [ASP.NET/IIS]
Click here for more .NET Tips
-After all Knowledge is an endless entity
Use Ctrl+Left/Right to switch messages, Ctrl+Up/Down to switch threads, Ctrl+Shift+Left/Right to switch pages.
- Remove From My Forums
-
Question
-
I have an existing word document that is used to quote equipment.
This document has a table that is used to list items being quoted.
I have created software (C#) that creates the descriptions and prices automatically (salesmen prefer not to have to do this manually so….).
My intention is to transfer the info from the winform to the word doc.
I have found several ways of accomplishing this. The preferred method is to create the table however the question then becomes how do I locate the table were it needs to be?
below is the quote templete to be used, any help or perhaps other solution would be appreciated.
Tac
tac
-
Moved by
Thursday, October 11, 2018 3:24 AM
Office related
-
Moved by
This article describes how to create a new Word document and insert a table using c#, it also shows how to format tables, and populate the tables with data.
follow these steps:
1. Start a new Windows application in C# language.
2. Add a reference to the Microsoft Word Object Library
3. Add a button to Form1 from Toolbox.
4. Create a Button1 click event.
5. Put this code on the click event of button1:
 private void button1_Click(object sender, EventArgs e)
        {
            CreateTableInWordDocument();
        }
 private void CreateTableInWordDocument()
        {
            object oMissing = System.Reflection.Missing.Value;
            object oEndOfDoc = "\endofdoc";
            Microsoft.Office.Interop.Word._Application objWord;
            Microsoft.Office.Interop.Word._Document objDoc;
            objWord = new Microsoft.Office.Interop.Word.Application();
            objWord.Visible = true;
            objDoc = objWord.Documents.Add(ref oMissing, ref oMissing,
                ref oMissing, ref oMissing);

            int i = 0;
            int j = 0;
            Microsoft.Office.Interop.Word.Table objTable;
            Microsoft.Office.Interop.Word.Range wrdRng = objDoc.Bookmarks.get_Item(ref oEndOfDoc).Range;
            objTable = objDoc.Tables.Add(wrdRng, 3, 4, ref oMissing, ref oMissing);
            objTable.Range.ParagraphFormat.SpaceAfter = 7;

            string strText;
            for (i = 1; i <= 3; i++)
                for (j = 1; j <= 4; j++)
                {
                    strText = "Row" + i + " Coulmn" + j;
                    objTable.Cell(i, j).Range.Text = strText;
                }
            objTable.Rows[1].Range.Font.Bold = 1;
            objTable.Rows[1].Range.Font.Italic = 1;
            objTable.Borders.Shadow = true;
            this.Close();
        }