
Word for Microsoft 365 Outlook for Microsoft 365 Word 2021 Outlook 2021 Word 2019 Outlook 2019 Word 2016 Outlook 2016 Word 2013 Outlook 2013 Word 2010 Outlook 2010 Word 2007 Outlook 2007 More…Less
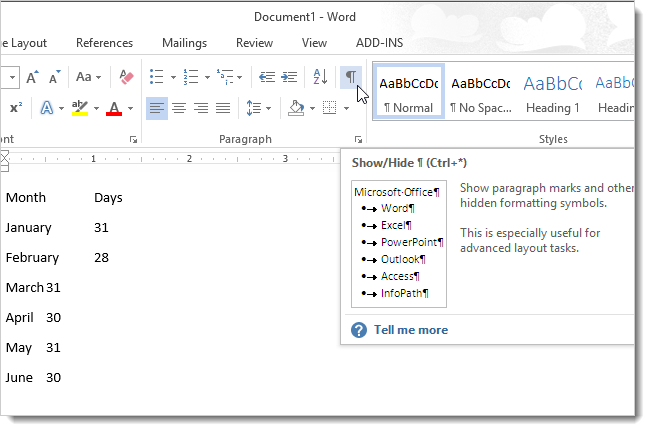
To convert text to a table or a table to text, start by clicking the  Show/Hide paragraph mark on the Home tab. This lets you see how text is separated in your document.

Convert text to a table
-
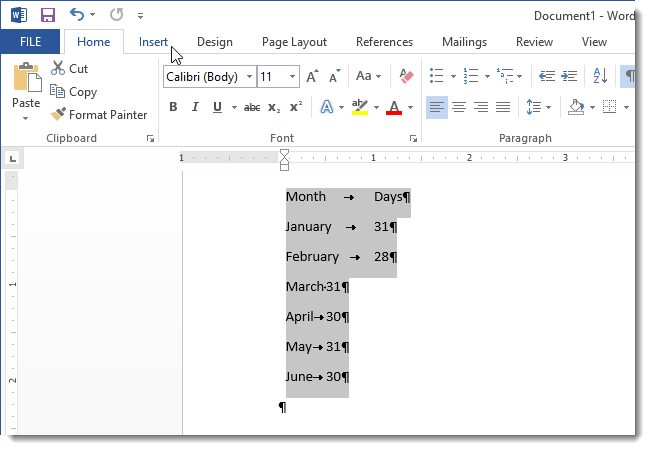
Insert separator characters—such as commas or tabs—to indicate where to divide the text into table columns.
Note: If you have commas in your text, use tabs for your separator characters.
-
Use paragraph marks to indicate where you want to begin a new table row.
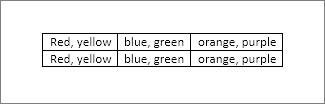
In this example, the tabs and paragraph marks will produce a table with 3 columns and 2 rows:

-
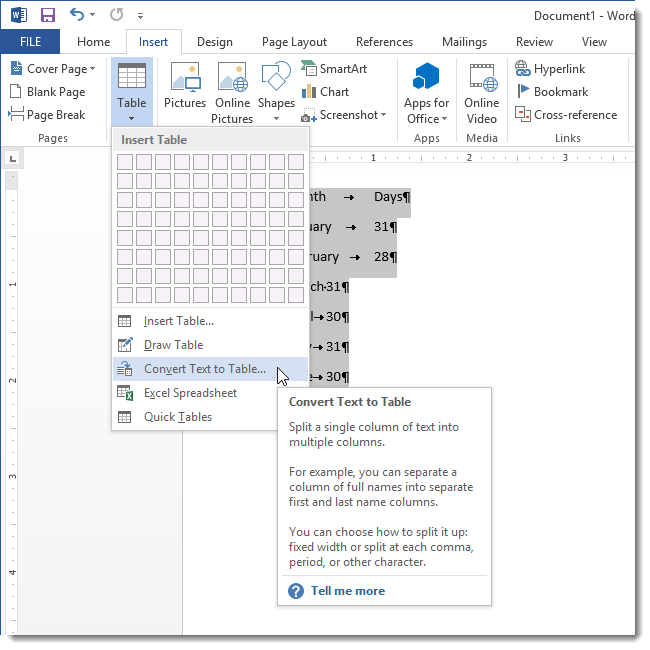
Select the text that you want to convert, and then click Insert > Table > Convert Text to Table.
-
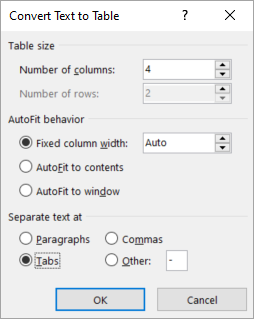
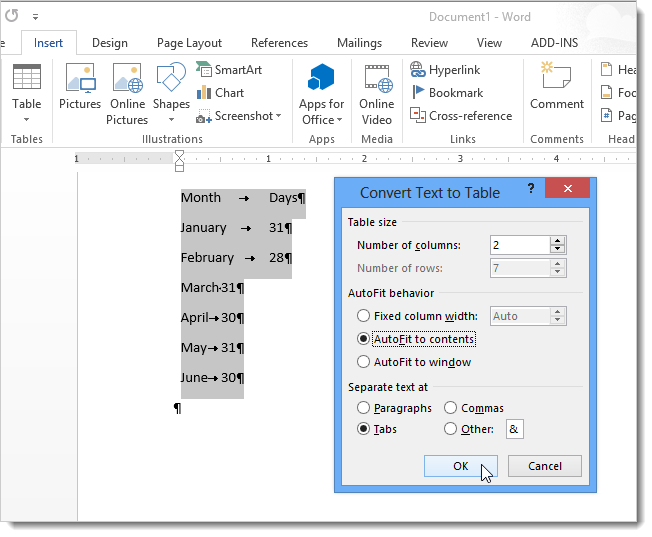
In the Convert Text to Table box, choose the options you want.
Under Table size, make sure the numbers match the numbers of columns and rows you want.
Under AutoFit behavior, choose how you want your table to look. Word automatically chooses a width for the table columns. If you want a different column width, choose one of these options:
To do this
Choose this option
Specify a width for all the columns
In the Fixed column width box, type or select a value.
Resize the columns to fit the width of the text in each column
AutoFit to contents
Resize the table automatically in case the width of the available space changes (for example, web layout or landscape orientation)
AutoFit to window
Under Separate text at, choose the separator character you used in the text.
-
Click OK. The text converted to a table should look something like this:


Convert a table to text
-
Select the rows or table you want to convert to text.
-
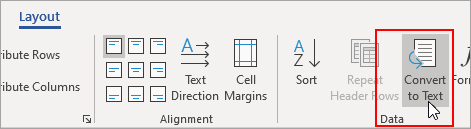
On the Layout tab, in the Data section, click Convert to Text.
-
In the Convert to Text box, under Separate text with, click the separator character you want to use in place of the column boundaries. Rows will be separated by paragraph marks.
-
Click OK.
Need more help?
Many documents present some data in the form of figures or tables. Creating tables is often more efficient than describing the data in the paragraph text, especially when the data is numerical or large. The tabular data presentation makes it easier to read and understand.
A table is a collection of information or data, usually represented by horizontal rows and vertical columns. Each column and each row can have a header. Some tables have only column headings or only row headings. The box at the junction of each column and row is a cell that contains data such as text, numeric information, or images. Some cells can be merged or split (see more about formatting tables). E.g.:

Microsoft Word has many features that make working with tables simple and convenient.
Create a table
There are several ways how to insert or create a table:
- Create a blank table of up to 10 columns and 8 rows,
- Create a blank table with more than 10 columns or more than 8 rows,
- Create a blank table manually (Draw a table),
- Create a table using predefined templates (Quick Tables),
- Create a table from the existing data (Convert Text to Table),
- Insert a Microsoft Excel spreadsheet.
To create a blank table in a Word document, do the following:
1. Place your cursor where you want to insert the table.
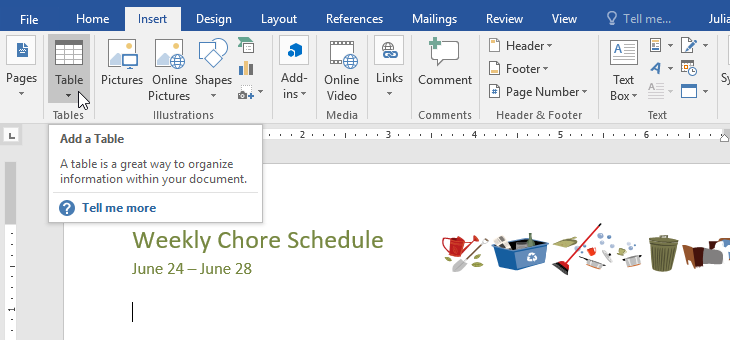
2. On the Insert tab, in the Tables group, click the Table button:

3. Do one of the following:
Create a blank table of up to 10 columns and 8 rows
- To create a table of up to 10 columns and 8 rows, move the cursor right (to select columns) and down (to select rows) the grid to select as many cells as you need. E.g., the table of 5 columns and 3 rows (selected cells will turn orange):

Click on a cell in the grid with the expected number of rows and columns (or press Enter) to insert an empty table to fit the width of the text (paragraph).
The table has the specified number of single-line text rows in the current paragraph and equal-width columns. E.g., the table of 3 rows and 5 columns:


Create a blank table with more than 10 columns or more than 8 rows
- To create a table with more than 10 columns or more than 8 rows, do one of the following:
- Create a table with exactly 10 columns or 8 rows, then add as many columns or rows as you need (see below how to customize table).
- Click the Insert Table… option:
In the Insert Table dialog box:

- In the Table size group, specify the number of columns and rows,
- In the AutoFit behavior group, specify the width of the table and its columns:
- Select the Fixed column width option to customize width in the appropriate field: select Auto (used by default) or specify width. E.g., 0.75″:

- Select the AutoFit contents option to adjust cell sizes to the document content. E.g.:

- Select the AutoFit to window option to adjust the table’s width to the document content width. E.g.:

- Select the Remember dimension for new tables check box if you want to create tables with the same options later. Word will remember your customization.


Create a blank table manually
- To manually create an empty table, click the Draw Table option:
After clicking that option, the cursor changes to the pencil
 that allows drawing cells directly in the Word document to create a table:
Click anywhere in a document but the table itself by the pencil to stop drawing a table.
Notes:
- To draw additional lines, select a table, then on the Table Layout tab, in the Draw group, click the Draw Table button:

- If you draw a line in the wrong position, click the Eraser button in the Draw group of the Table Layout tab:
- We recommend displaying the rulers or gridlines to help you place the lines correctly.
- To draw additional lines, select a table, then on the Table Layout tab, in the Draw group, click the Draw Table button:


Create a table using predefined templates
To create a table using predefined Word templates of tables and calendars, do the following:
1. Place your cursor where you want to insert the table.
2. On the Insert tab, in the Tables group, click the Table dropdown list, then select Quick Tables list:

3. From the Quick Tables gallery, select the template you prefer.
For example:

Create a table from the existing data
To create a table from the existing data in a document data (either as regular text or as a tabbed list), do the following:
1. Select the document data you want to shape into a new table.
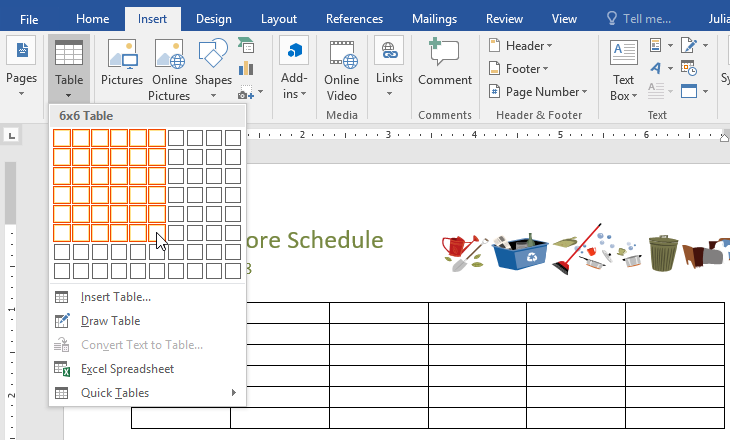
2. On the Insert tab, in the Tables group, click the Table dropdown list, then select Convert Text to Table…:

3. In the Convert Text to Table dialog box:

- In the Table size group, specify the number of columns,
- In the AutoFit behavior group, specify whether the width of the columns should be fixed (see details above),
- In the Separate text at group, select the character that separates text into columns in the selected text: paragraph marks, commas, tabs, or some other character.
E.g.:

Insert a Microsoft Excel spreadsheet
Note: It is possible to insert a Microsoft Excel spreadsheet in a document. To do so, on the Insert tab, in the Tables group, click the Table dropdown list, then select Excel Spreadsheet:

Word opens the Excel spreadsheet where you can enter the data. You can use Excel features such as functions and formulas to create or manipulate the data. Note that it is not a Word table.
Add rows and columns
To add a row and a column to a table, do the following:
1. Position the cursor:
- to a cell in a row above or below which you need to insert a row,
- to a cell in a column left or right which you need to insert a column.
2. Do one of the following:
- Click the Insert dropdown list in the Mini toolbar:

- On the Table Layout tab, in the Rows & Columns group:

- Click the Insert Above button to insert a row above the row with the cursor,
- Click the Insert Below button to insert a row below the row with the cursor,
- Click the Insert Left button to insert a column left to the column with the cursor,
- Click the Insert Right button to insert a column right to the column with the cursor.
- Right-click and select the Insert list:


Notes:
- To insert rows or columns, move the mouse over the table or left of the table until you see the Insertion indicator, then click the icon:
 and
and
- You can choose the option Insert -> Insert Cells… from the popup menu; Word opens the Insert Cells dialog box:

After selecting the option and clicking the OK button, Word adds an entire row or column, not a cell. Word just moves cells according to the selection.
 and
and 

Delete a table element
To delete a table element, do the following:
1. Select the cell, multiple cells, the entire column or multiple columns, the entire row, or multiple rows.
2. Do one of the following:
- Click the Delete dropdown list in the Mini toolbar:

- On the Table Layout tab, in the Rows & Columns group, click the Delete dropdown list, then select one of the options:


3. Select one of the proposed options:
- Delete Cells… opens the Delete Cells dialog box, in which select the option you need:
- Delete Columns
- Delete Rows
- Delete Table

Note: You can select the element you want to delete, right-click on the selection and select the appropriate item in the popup menu. For example, if the entire table is selected or the column is selected:
 and
and

Convert a table into text
To convert a table into text in Word, follow the next steps:
1. Click anywhere in the table.
2. On the Layout tab, in the Format group, click the Convert to Text button:

3. In the Convert Table to Text dialog box, select the charter to separate cells data in the text:

4. Click OK.
Допустим, вы напечатали какой-либо текст, разделили его на столбцы при помощи табуляции и теперь хотите преобразовать его в таблицу. В редакторе Word есть полезная функция, которая позволяет быстро конвертировать текст в таблицу и наоборот.
Вы можете преобразовать текст, разделенный особыми знаками (например, табуляцией) в таблицу. Мы покажем, как это можно сделать, а затем покажем, как преобразовать таблицу обратно в текст.
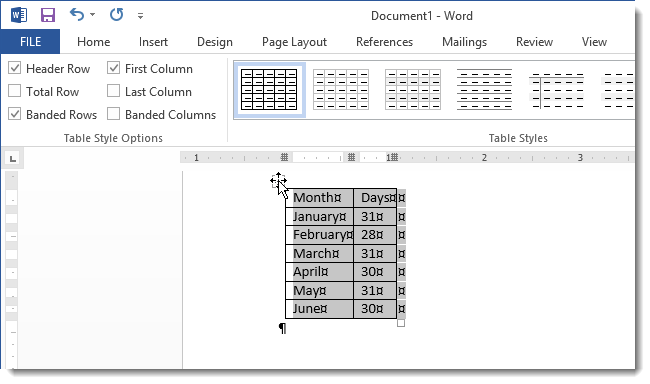
К примеру, у вас есть некий список месяцев и соответствующее каждому из них количество дней. Прежде чем начать преобразовывать текст в таблицу, нужно отобразить знаки форматирования и абзаца, чтобы точно знать, как отформатирован текст. Чтобы это сделать, кликните кнопку в виде знака абзаца на вкладке Home (Главная) раздела Paragraph (Абзац).
Появятся скрытые знаки абзаца и символы табуляции. Если вы преобразовываете текст в таблицу из двух столбцов, убедитесь, что данные в каждой линии разделяет только один символ табуляции. Выделите строки, которые нужно конвертировать в таблицу.
Откройте вкладку Insert (Вставка) и выберите Table (Таблица) в разделе Table (Таблицы). В выпадающем меню выберите пункт Convert Text to Table (Преобразовать в таблицу).
Если между пунктами каждой строки у вас стоит только один символ табуляции, установите значение Number of columns (Число столбцов) в диалоговом окне Convert Text to Table (Преобразовать в таблицу) равное 2. Number of rows (Число строк) определяется автоматически.
Уточните ширину столбцов, выбрав опцию в разделе AutoFit behavior (Автоподбор ширины столбцов). Мы решили сделать столбцы достаточно широким, поэтому выбрали AutoFit to contents (Автоподбор по содержимому).
В разделе Separate text at (Разделитель) укажите символ, который вы использовали для разделения текста в каждой строке. В примере мы выбрали Tabs (Знак табуляции). Вы можете выбрать и другие символы, например, точку с запятой или знак абзаца. Можно даже указать символ, которого нет в списке. Просто выберите Other (Другой) и укажите нужный символ в поле ввода.
Теперь, когда текст преобразован в таблицу, её можно снова конвертировать в текст. Выделите всю таблицу, для этого наведите указатель мыши на маркер перемещения таблицы (расположен в левом верхнем углу таблицы) и кликните по нему. Так выделится вся таблица.
Примечание: Если количество разделяющих символов в каждой строке текста неодинаково, может получится больше строк и столбцов, чем ожидалось. К тому же текст может расположиться некорректно.
Появится группа вкладок Table Tools (Работа с таблицами). Нажмите на вкладку Layout (Макет).
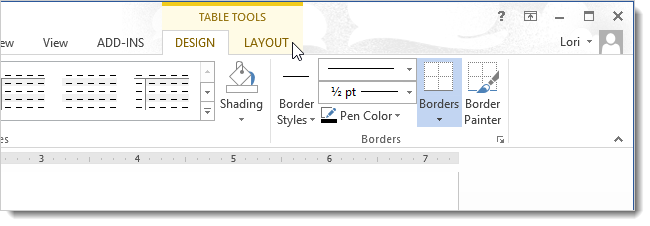
Кликните по кнопке Convert to Text (Преобразовать в текст) из группы команд Data (Данные).
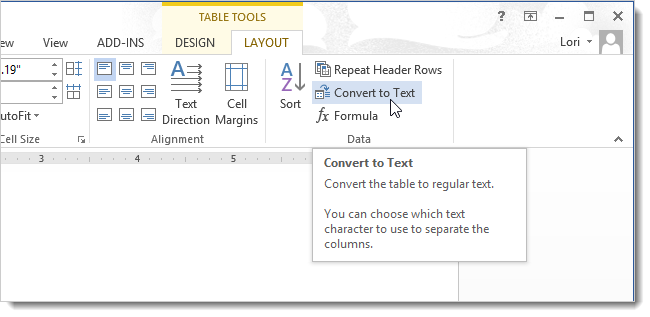
В диалоговом окне Convert Table to text (Преобразование в текст) определите символ, который будет разделять столбцы текста. В примере мы выбрали Tabs (Знак табуляции). Нажмите ОК.

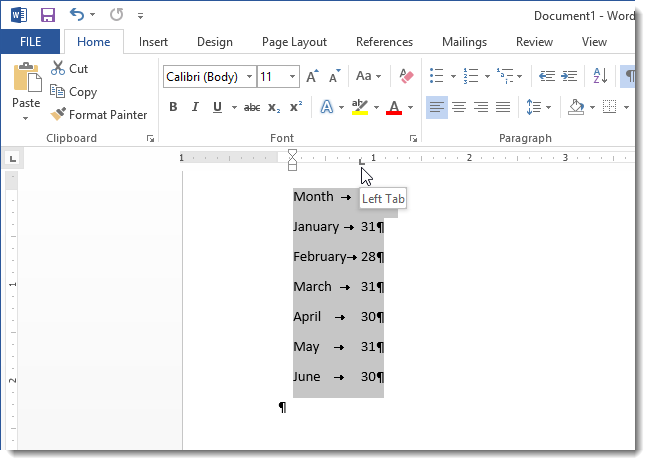
Каждая строка таблицы станет строкой текста, где элементы столбцов разделены знаками табуляции. Word автоматически помещает на линейку маркер табуляции, чтобы выровнять элементы столбцов.
Эта функция очень полезна, если вы используете текст из другого документа, который изначально не был организован в виде таблицы. Просто проверьте, что знаки разделения каждой строки проставлены корректно, а затем преобразуйте текст в таблицу.
Оцените качество статьи. Нам важно ваше мнение:
 Please Note:
This article is written for users of the following Microsoft Word versions: 2007, 2010, 2013, 2016, and 2019. If you are using an earlier version (Word 2003 or earlier), this tip may not work for you. For a version of this tip written specifically for earlier versions of Word, click here: Converting Text Into a Table.
![]()
Written by Allen Wyatt (last updated November 2, 2019)
This tip applies to Word 2007, 2010, 2013, 2016, and 2019
There are two major ways you can create tables in Word. One way is to create a blank table by any of the various methods provided by Word (such as drawing the table or using the Insert Table tool). The other method is to convert existing text into a table. To convert text into a table, follow these steps:
- Make sure the text that is to be converted into the table contains only a single tab character between each column.
- Select the text you want converted into a table.
- Display the Insert tab of the ribbon.
- Click the Table tool and then click Convert Text to Table. Word displays the Convert Text to Table dialog box. (See Figure 1.)
- Make sure all the table settings in the dialog box are correct.
- Click OK.
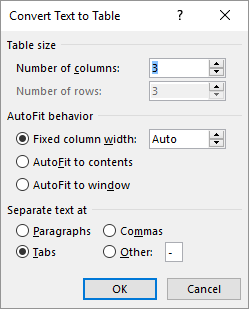
Figure 1. The Convert Text to Table dialog box.
The selected text is immediately converted into a table. In some instances, the width of columns in the resulting table may need to be adjusted. You will know if this is the case because the table will look very strange. Sometimes you can get files from programs such as a spreadsheet that use commas to separate columns. Word will also convert this comma-separated text to a table.
WordTips is your source for cost-effective Microsoft Word training.
(Microsoft Word is the most popular word processing software in the world.)
This tip (7725) applies to Microsoft Word 2007, 2010, 2013, 2016, and 2019. You can find a version of this tip for the older menu interface of Word here: Converting Text Into a Table.
Author Bio
With more than 50 non-fiction books and numerous magazine articles to his credit, Allen Wyatt is an internationally recognized author. He is president of Sharon Parq Associates, a computer and publishing services company. Learn more about Allen…
MORE FROM ALLEN
Inserting Foreign Characters
It is not unusual to need to insert foreign characters (often called diacritical marks) as part of your typing. Word …
Discover More
Protecting Worksheets from Deletion
If you share a workbook with others in your office, you will probably want to make sure that some of the worksheets don’t …
Discover More
Word Count for Headers and Footers
Getting a word count for an entire document is rather easy. If you want a word count for a special part of a document …
Discover More
More WordTips (ribbon)
Cannot Set Heading Rows in a Table
Word allows you to specify which rows in a table should be considered headings. What if setting the headings doesn’t work …
Discover More
Blank Lines Before Tables
Adding a blank line before your table is easy, but Word’s behavior as you attempt to make the insert can depend on where …
Discover More
Borders Disappear on Shaded Table Rows
When creating a table, it is possible that adding row or cell shading can affect how cell borders are displayed. This …
Discover More

Have you ever started adding text to your document only to discover it would be better suited in a table? After all, a table provides a solid structure and appearance. In Word, you can simply convert text to table.
Whether you have text separated by tabs or commas or a list in a numbered or bulleted format, converting it to table is easy enough. Plus, it takes less time than creating a table and manually moving all that text into the cells.
You can choose the type of delimiter you’re using to properly convert the text. For instance, you may separate words with commas or phrases with tabs. If you aren’t sure, you can display the paragraph marks by going to the Home tab and selecting the Show/Hide paragraph button.

This is good to know if you’re using tabs because you don’t see them in ordinary text, only when you show the paragraph marks.
RELATED: How to Display Non-Printing Characters in Word
Select the text that you want to convert to a table. Then, go to the Insert tab and click the Table drop-down arrow. Choose “Convert Text to Table.”
In the pop-up window, pick the number of columns you want. By default, the text you select separates into columns. If you prefer to use rows, decrease the number of columns so that the number of rows correlates to the number of items you select.
Optionally, select the AutoFit Behavior. You can pick a specific width for the columns or AutoFit the table to the contents or window.
Finally, choose the delimiter you’re using. In our example, we have a list of names separated by tabs.
Select “OK” when you finish. You’ll see your text pop into a table. You can then add rows, resize the table, or center the text.
Convert a List to a Table in Word
Converting a list to a table is a little different than text because the list is already separated by numbers or bullets. This places each item in a separate row instead of a column, but you can change this if you like.
RELATED: How to Automatically Resize a Table in Microsoft Word
Select the list that you want to convert to a table. If you want to include the numbers or bullets in the table, move on to the next step. But if you don’t want those in the table, deselect the list type in the Paragraph section of the Home tab.
This removes the numbers or bullets so that you list items display on separate lines without leaders.
With your list items selected, go to Insert > Table and select “Convert Text to Table.” You’ll see the same pop-up as above. By default, your items display in rows. If you prefer them in columns, enter the same number of columns as your number of list items. Then, optionally choose the AutoFit settings.
By default, the delimiter should be set to Paragraph because the list items are on separate lines. Click “OK” and you’ll see your items in a table. You can then insert columns, resize the table, or move it.
Convert a Table to Text
If you change your mind after converting to a table or have a table that you prefer to remove and leave the text on its own, you can do the reverse of the above. Yes, you can convert a table to text too.
Select the table and go to the Layout tab that displays. Click “Convert to Text” in the Data section of the ribbon.
Choose how you want to separate the text once it’s converted. You can pick paragraph marks, tabs, commas, or a custom option you enter. Click “OK.”
You’ll then see your table data as ordinary text in your document.
Converting your text to a table in Word is a true time-saver compared to creating the table and moving the text into it. For more, take a look at how to nest a table or how to add formulas to tables in Word.
READ NEXT
- › How to Get a Refund on the PlayStation Store
- › Windows 11 Has a New Photo Gallery in the File Explorer
- › Android’s Nearby Share Has (Unofficially) Arrived on Mac
- › The New Winamp Is Here, but It’s Not What You’d Expect
- › Discord Direct Message Won’t Go Away? Here’s the Fix
- › Save Hundreds on Elegoo’s New PHECDA Laser Engraver Through Kickstarter
Lesson 23: Tables
/en/word/aligning-ordering-and-grouping-objects/content/
Introduction
A table is a grid of cells arranged in rows and columns. Tables can be used to organize any type of content, whether you’re working with text or numerical data. In Word, you can quickly insert a blank table or convert existing text to a table. You can also customize your table using different styles and layouts.
Optional: Download our practice document.
Watch the video below to learn more about creating tables.
To insert a blank table:
- Place the insertion point where you want the table to appear.
- Navigate to the Insert tab, then click the Table command.
- This will open a drop-down menu that contains a grid. Hover over the grid to select the number of columns and rows you want.
- Click the grid to confirm your selection, and a table will appear.
- To enter text, place the insertion point in any cell, then begin typing.
To navigate between cells, use the Tab key or arrow keys on your keyboard. If the insertion point is in the last cell, pressing the Tab key will automatically create a new row.
To convert existing text to a table:
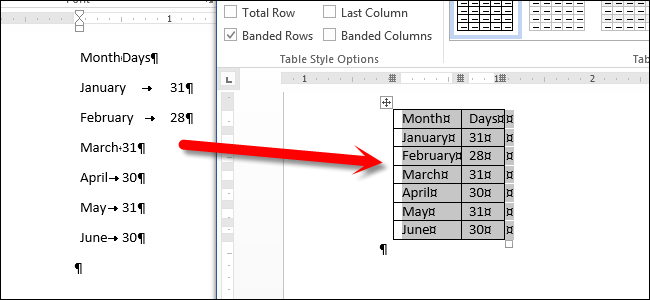
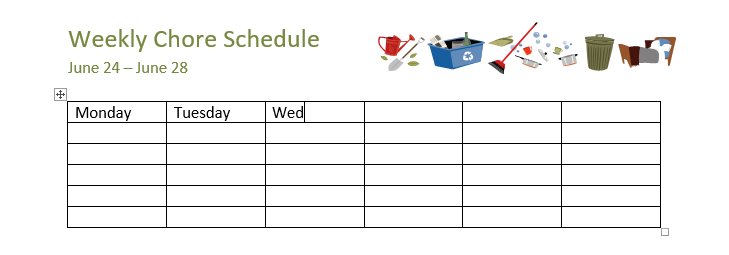
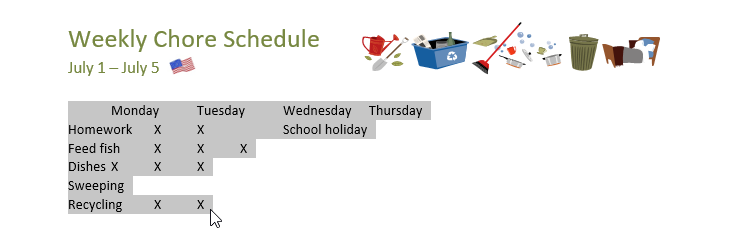
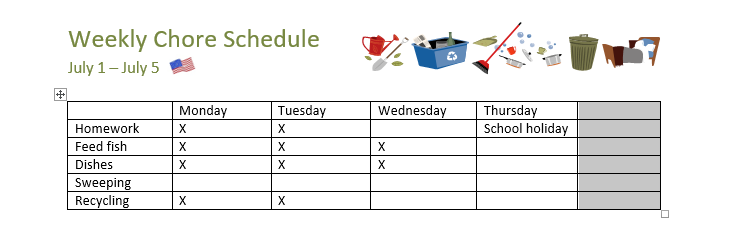
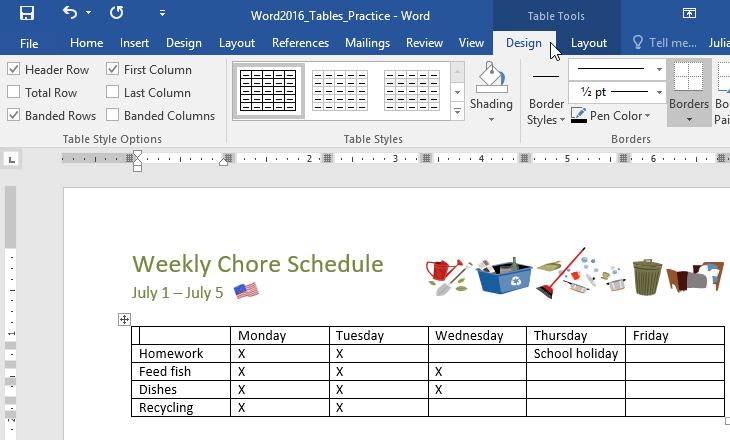
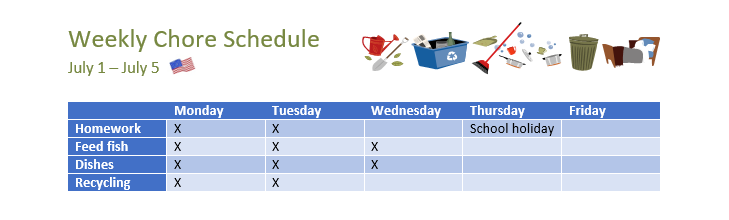
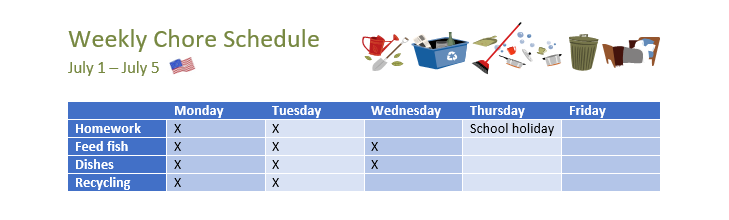
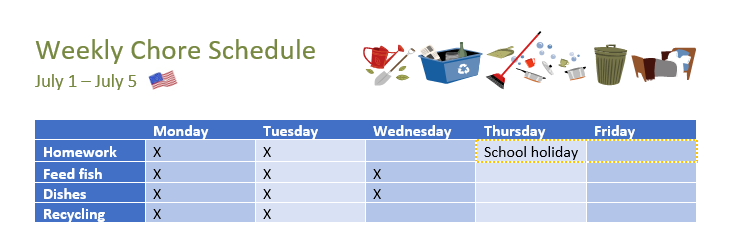
In the example below, each line of text contains part of a checklist, including chores and days of the week. The items are separated by tabs. Word can convert this information into a table, using the tabs to separate the data into columns.
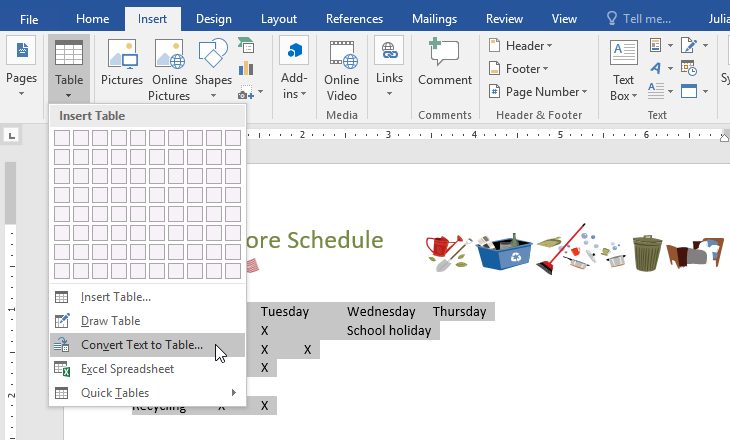
- Select the text you want to convert to a table. If you’re using our practice file, you can find this text on page 2 of the document.
- Go to the Insert tab, then click the Table command.
- Select Convert Text to Table from the drop-down menu.
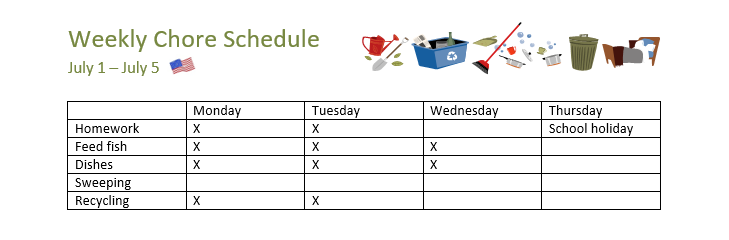
- A dialog box will appear. Choose one of the options under Separate text at. This is how Word knows what to put into each column.
- Click OK. The text will appear in a table.

Modifying tables
You can easily change the appearance of your table once you’ve added one to your document. There are several options for customization, including adding rows or columns and changing the table style.
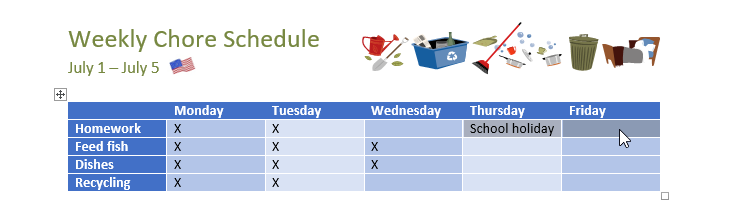
To add a row or column:
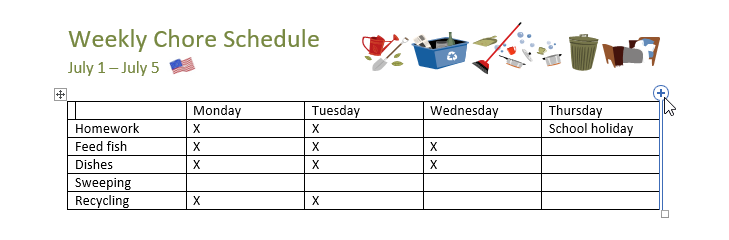
- Hover outside the table where you want to add a row or column. Click the plus sign that appears.
- A new row or column will be added to the table.
You can also right-click the table, then hover over Insert to see various row and column options.
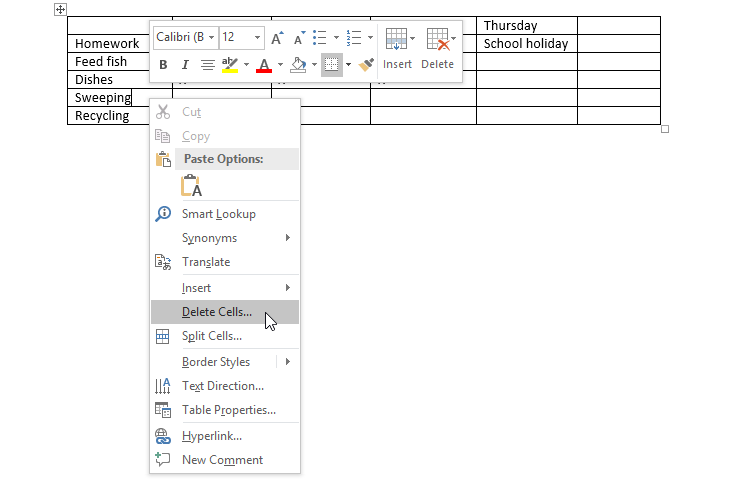
To delete a row or column:
- Place the insertion point in the row or column you want to delete.
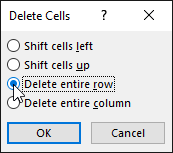
- Right-click, then select Delete Cells from the menu.
- A dialog box will appear. Choose Delete entire row or Delete entire column, then click OK.
- The row or column will be deleted.
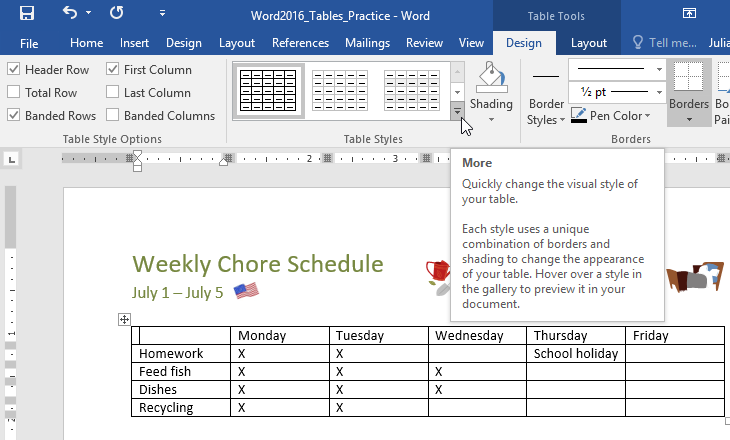
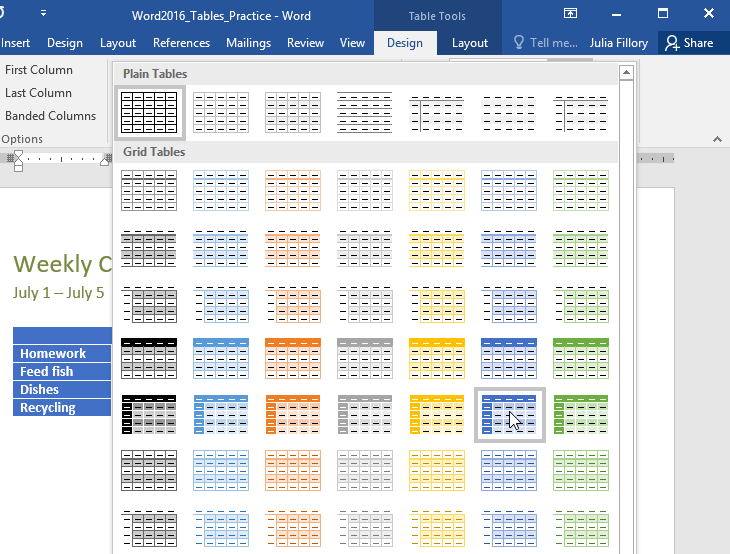
To apply a table style:
Table styles let you change the look and feel of your table instantly. They control several design elements, including color, borders, and fonts.
- Click anywhere in your table to select it, then click the Design tab on the far right of the Ribbon.
- Locate the Table Styles group, then click the More drop-down arrow to see the full list of styles.
- Select the table style you want.
- The table style will appear.
To modify table style options:
Once you’ve chosen a table style, you can turn various options on or off to change its appearance. There are six options: Header Row, Total Row, Banded Rows, First Column, Last Column, and Banded Columns.
- Click anywhere in your table, then navigate to the Design tab.
- Locate the Table Style Options group, then check or uncheck the desired options.
- The table style will be modified.
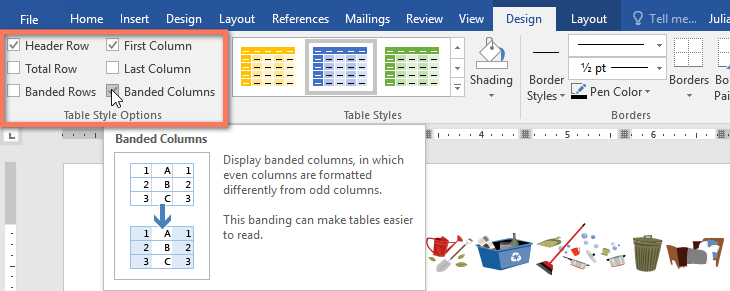
Depending on the Table Style you’ve chosen, certain Table Style Options may have a different effect. You might need to experiment to get the look you want.
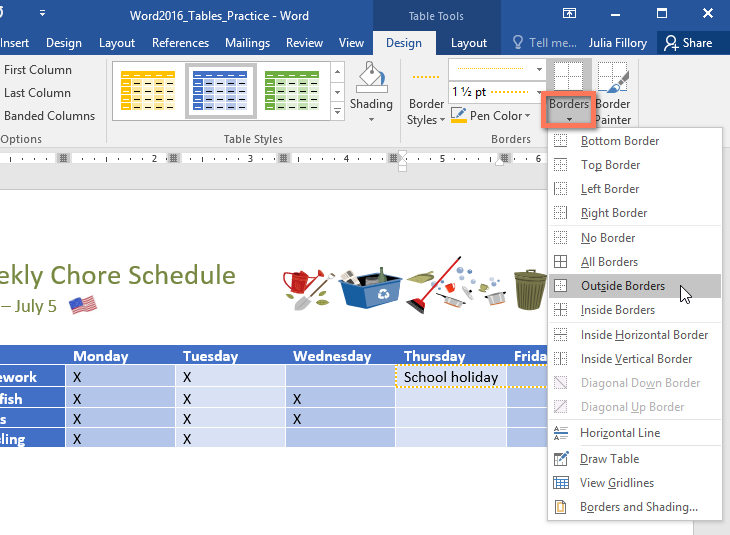
To apply borders to a table:
- Select the cells you want to apply a border to.
- Use the commands on the Design tab to choose the desired Line Style, Line Weight, and Pen Color.
- Click the drop-down arrow below the Borders command.
- Choose a border type from the menu.
- The border will be applied to the selected cells.

Modifying a table using the Layout tab
In Word, the Layout tab appears whenever you select your table. You can use the options on this tab to make a variety of modifications.
Click the buttons in the interactive below to learn more about Word’s table layout controls.
Challenge!
- Open our practice document.
- Scroll to page 3 and select all of the text below the dates July 8 — July 12.
- Use the Convert Text to Table to insert the text into a 6-column table. Make sure to Separate text at Tabs.
- Delete the Saturday column.
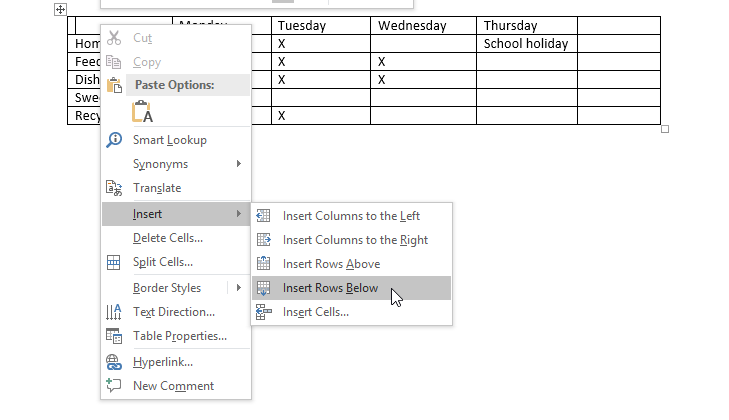
- Insert a column to the left of the Friday column and type Thursday in the top cell.
- Change the table style to any style that begins with Grid Table 5. Hint: Style names appear when you hover over them.
- In the Table Style Options menu, uncheck Banded Rows and check Banded Columns.
- Select the entire table. In the Borders drop-down menu, choose All Borders.
- With the table still selected, increase the table row height to 0.3″ (0.8 cm).
- Select the first row and change the cell alignment to Align Center.
- When you’re finished, your table should look something like this:


/en/word/charts/content/
Trouble viewing the screencast at work? Try signing up for new posts on our home page with your personal email address and watch the screencast from home.
You may have had to transfer text in paragraph form into a table. This manual process can be automated with the help of Microsoft Word’s Convert text to table feature.
How the Convert Tool Works
The convert tool will transform each line break of your text into a row of the new table. Each row will further be split into columns based on the concept of a delimiter. A delimiter is a character or section of the document that marks a specific part of the text. In this particular case, the delimiter would mark the start of a new column. Common delimiters are new paragraphs, commas, tabs, or spaces.
When the convert tool is started, it will prompt you to specify your delimiter character. For example, in the following paragraph I have chosen a blank space to be my delimiter. Therefore, the paragraph would be split into two rows and three columns as shown below. It is split into two rows because of the line break after «Jersey». It will be split into four columns because of the single spaces between each of the four words on each line.
navitend Byram New Jersey
GREENER GRASS THIS WAY
| navitend | Byram | New | Jersey |
| GREENER | GRASS | THIS | WAY |
The line in your text that contains the most delimiters will determine how many columns are in your table. Any lines that contain less delimiters will not completely fill their particular row. For example, the following text would result in the table below:
navitend
GREENER GRASS THIS WAY
| navitend | |||
| GREENER | GRASS | THIS | WAY |
How To Use the Convert Tool
Follow along with these steps to learn how to use the feature.
1. Open Microsoft Word and highlight the text you wish to convert into a table.

2. Select the Insert tab and choose Convert Text to Table… from the Table dropdown.

3. The following window will appear. Is is okay to leave the Table size and AutoFit behavior options at their default values. Make sure you choose the appropriate delimiter character from the Separate text at options. In this case, I separated by columns with a blank space, so I’ve chosen Other and typed a blank space into the box.

4. Click OK to complete the process.
If you have an unanswered technical question that you would like to see addressed in an upcoming issue, feel free to email it to social@navitend.com.
Contact us at 973.448.0070
How to Convert Text into Table in MS-Word
Some time you forget to insert table into your document and start writing without table in this case MS-Word have one feature to convert your text into table.
Steps to Convert Text into Table in MS-Word
- Select that you want to convert the text
- Select the Insert tab
- In Tables group click the Table command
- Select the ‘Convert Text to Table’ option;
- It displays a dialog box
- In ‘Separate text at’ section select the desired option
- Click OK, the text will convert to a table
Buy This Ad Space @$20 per Month, Ad Size 600X200 Contact on: hitesh.xc@gmail.com or 9999595223
Magenet is best Adsense Alternative here we earn $2 for single link, Here we get links ads. Magenet
Таблицу можно создать на основе уже существующих данных. В качестве примера возьмем текст следующего вида: Название разделителей: знак абзаца, знак табуляции, знак точки с запятой Действия: нажатие клавиши Enter, нажатие клавиши Tab, нажатие клавиши с изображением.
Обозначим границы будущих столбцов и строк с помощью разделителей. Начало и конец каждой строки обозначим с помощью знака абзаца, а для границ столбцов выберем знак запятой: Название разделителей,Действия,знак абзаца,нажатие клавиши Enter, знак табуляции,нажатие клавиши Tab,знак точки с запятой, нажатие клавиши с изображением;
[box color=primechanie]Разделителями могут служить знак абзаца, табуляции, знак точки с запятой или любой выбранный вами символ.[/box]
Затем выделим данный текст и выберем команду Вставка ⇒ Таблица ⇒ Преобразовать в таблицу (Insert ⇒ Table ⇒ Convert Text to Table). В открывшемся диалоговом окне Преобразовать в таблицу (Convert Text to Table) в группе Размер таблицы (Table Size) установим Число столбцов (Number of columns), равное двум, в группе Автоподбор ширины столбцов (AutoFit behavior) установим переключатель в положение По ширине окна (AutoFit to window), в группе Разделитель (Separate Text at) установим переключатель в положение другой (Other) и укажем запятую. У нас получится таблица вида, представленного на рис. 6.6.

Рис. 6.6. Текст, преобразованный в таблицу
Как в Word 2010 преобразовать таблицу в текст
Процесс преобразования таблицы в текст производится в обратном для вышеприведенного порядке.
- Выделите таблицу.
- На контекстной вкладке Макет (Layout) в группе Данные (Data) выберите команду меню Преобразовать в текст (Convert Table to Text).
- В открывшемся диалоговом окне Преобразование в текст (Convert Table to Text) выберите вид разделителя, который будет отделять строки друг от друга после преобразования.
[box color=primechanie]Лучше всего на роль разделителя подходит абзац. Если вы выберете это значение, то каждая строка будет начинаться с абзаца. В том случае, когда текст должен состоять только из одного абзаца, выберите в качестве разделителя знак табуляции.[/box]