

If you create documents in Word with complex layouts, tables are a useful method of arranging your content. You can use the cells in a table to structure your text, images, and even other tables. And yes, you can even nest tables in Word and we’ll show you how.
Using nested tables in Word can make a document more readable by adding more white space to line up text and images. As an example, we’ll create a nested table for part of a procedure from our article about printing a worksheet with comments in Excel.
First, we insert the main table that will contain the steps of the procedure. We write the first step and press “Enter”. We’re going to insert a nested table that describes the situations in which you would choose each option. Before inserting the nested table, we make sure the cursor is placed where we want to insert it.

You can simply insert a table at the cursor; however, you may notice that the top and bottom borders are very close to the surrounding cell. In our example, we have text above the nested table, but the bottom border of the nested table is too close to the bottom border of the containing cell. We need to expand the margins within the cell.
If you inserted a nested table this way, you can press Ctrl+Z to undo the insertion and remove the nested table. We will insert the nested table again after expanding the margins within the cell.
RELATED: How to Select All or Part of a Table in Word
To expand the margins in the cell so the borders of the nested table and the cell are not too close, make sure the cursor is in the cell of the main table where you want to insert the nested table.
NOTE: If you know that you are going to need to expand the margins the same way in other cells of the main table as well, you can select multiple cells in the table. For this example, however, we’re only going to change the margins for one cell.
Click the “Layout” tab.
In the Table section, click “Properties”.
On the Table Properties dialog box, click the “Cell” tab, if it’s not already active.
Click “Options” at the bottom of the Cell tab.
In the Cell margins section on the Cell Options dialog box, click on the “Same as the whole table” check box so there is NO check mark in the box. This activates the Top, Bottom, Left, and Right edit boxes, which contain the values for the four margins in the selected cell. By default (in Word 2016), the Top and Bottom margins are “0” and the Left and Right are “0.08”. These values might differ in earlier versions of Word. Enter new values for the margins, especially the Top and Bottom margins. We used “0.1” for all the margins in our cell. Click “OK”.
You are returned to the Table Properties dialog box. Click “OK” to close it.
Now, you can insert a table in that cell and enter your content. The nested table sits nicely in the cell in your main table.
To further enhance your table layout, you can add borders to all or parts of cells, add shading in different colors, merge and split cells, and even freeze the size of some or all of the cells in a table. You can also have multiple layers of nested tables, but be careful. Too many layers of nested tables can make for a confusing layout.
READ NEXT
- › How to Quickly Add Rows and Columns to a Table in Microsoft Word
- › How to Make Your Word Document More Accessible to Everyone
- › How to Draw a Custom Table in Microsoft Word
- › How to Convert Text to a Table in Microsoft Word
- › Discord Direct Message Won’t Go Away? Here’s the Fix
- › Windows 11 Has a New Photo Gallery in the File Explorer
- › The New Winamp Is Here, but It’s Not What You’d Expect
- › Android’s Nearby Share Has (Unofficially) Arrived on Mac
How-To Geek is where you turn when you want experts to explain technology. Since we launched in 2006, our articles have been read billions of times. Want to know more?
 Please Note:
This article is written for users of the following Microsoft Word versions: 2000, 2002, and 2003. If you are using a later version (Word 2007 or later), this tip may not work for you. For a version of this tip written specifically for later versions of Word, click here: Tables within Tables.
![]()
Written by Allen Wyatt (last updated June 12, 2021)
This tip applies to Word 2000, 2002, and 2003
Word allows you to place one table within another table, which can be handy for some complex document layouts. (This ability was added in Word 2000; it is not available in Word 97.) To place a table within a table, follow these steps:
- Place your major table, as desired. Make sure that it has the number of rows and columns that you desire, and that you merge any cells that you want merged.
- Put the insertion point in the cell that you want to contain the secondary table.
- Insert your secondary table using any of the regular table insertion tools provided by Word.
That’s it; the secondary table should be completely within the cell in which the insertion point was located. You may notice that the top and bottom borders of the secondary table you inserted are very close to the top and bottom borders of the cell in which the table was placed. If you want more separation between the cell and table borders, modify your creation steps just slightly:
- Place your major table, as desired. Make sure that it has the number of rows and columns that you desire, and that you merge any cells that you want merged.
- Put the insertion point in the cell that you want to contain the secondary table.
- Choose Table Properties from the Table menu. Word displays the Table Properties dialog box.
- Make sure the Cell tab is displayed.
- Click the Options button. Word displays the Cell Options dialog box. (See Figure 1.)
- Clear the Same As the Whole Table check box.
- Using the controls just under the check box, specify the margins you want used within the cell.
- Click OK twice to dismiss both dialog boxes. The insertion point should still be in the cell where you want to place the secondary table.
- Insert your secondary table using any of the regular table insertion tools provided by Word.
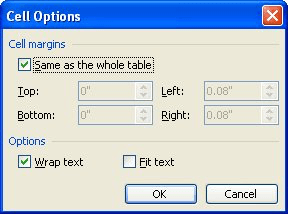
Figure 1. The Cell Options dialog box.
WordTips is your source for cost-effective Microsoft Word training.
(Microsoft Word is the most popular word processing software in the world.)
This tip (146) applies to Microsoft Word 2000, 2002, and 2003. You can find a version of this tip for the ribbon interface of Word (Word 2007 and later) here: Tables within Tables.
Author Bio
With more than 50 non-fiction books and numerous magazine articles to his credit, Allen Wyatt is an internationally recognized author. He is president of Sharon Parq Associates, a computer and publishing services company. Learn more about Allen…
MORE FROM ALLEN
Renaming a Toolbar
Word allows you to create custom toolbars that can speed how you work with various tools and macros. When you first …
Discover More
Changing the Size of a Graphic
Adding a graphic to a worksheet is easy. Getting that graphic to just the right size may take a little bit of trial and …
Discover More
Preserving Bookmarks During Replace Operations
When you do a search and replace operation in Word, it is possible that you could inadvertently wipe out a bookmark or …
Discover More
More WordTips (menu)
Creating Tables with Specific Column Widths
Create a table and Word figures out column widths by dividing the horizontal space by the number of columns you want in …
Discover More
Rounded Table Edges
Tables can be a great addition to many documents, as they allow you to arrange and present information in a clear and …
Discover More
Quickly Inserting Tables that Don’t Go From Margin to Margin
Adding a table to your document is easy. Adding one that doesn’t extend from margin to margin may seem a bit harder. …
Discover More
According to your comments, I’ve updated my solution so it’s only using PInvoke
I’ve also added some new Get/SetProperty constructors
 class Program
{
    public static object GetProperty(object obj, string memberName, object[] objParam)
    {
        return InvokeMember(obj, memberName, BindingFlags.GetProperty, objParam);
    }
    public static object SetProperty(object obj, string memberName, object[] objParam)
    {
        return InvokeMember(obj, memberName, BindingFlags.SetProperty, objParam);
    }

    public static void SetProperty(object obj, string sProperty, object oValue)
    {
        object[] oParam = new object[1];
        oParam[0] = oValue;
       obj.GetType().InvokeMember(sProperty, BindingFlags.SetProperty, null, obj, oParam);
    }

    public static object InvokeMethod(object obj, string memberName, object[] objParam)
    {
        return InvokeMember(obj, memberName, BindingFlags.InvokeMethod, objParam);
    }

    public static object InvokeMember(object obj, string memberName, BindingFlags flag, object[] objParam)
    {
        try
        {
            return obj.GetType().InvokeMember(memberName, flag, null, obj, objParam);
        }
        catch (Exception ex)
        {
            throw ex;
        }
    }
    public static  object InvokeMethod(object obj, string sProperty, object oValue)
    {
        object[] oParam = new object[1];
        oParam[0] = oValue;
        return obj.GetType().InvokeMember
        (sProperty, BindingFlags.InvokeMethod, null, obj, oParam);
    }
    public static  object GetProperty(object obj, string sProperty, object oValue)
    {
        object[] oParam = new object[1];
        oParam[0] = oValue;
        return obj.GetType().InvokeMember
            (sProperty, BindingFlags.GetProperty, null, obj, oParam);
    }
    public static object GetProperty(object obj, string sProperty)
    {
        return obj.GetType().InvokeMember
        (sProperty, BindingFlags.GetProperty, null, obj, null);
    }
    static void Main(string[] args)
    {

        Application oWord = new Application();
        try
        {
            Document oDoc;

            oWord.Visible = true;
            object oMissing = System.Reflection.Missing.Value;
            object oEndOfDoc = "\endofdoc"; /* endofdoc is a predefined bookmark */

            oDoc = oWord.Documents.Add(ref oMissing, ref oMissing,
               ref oMissing, ref oMissing);
            Range wrdRng = oDoc.Bookmarks.get_Item(ref oEndOfDoc).Range;
            object outerTables = GetProperty(wrdRng, "Tables");
            object oTable = InvokeMethod(outerTables, "Add", new object[] { wrdRng, 3, 3, oMissing, oMissing });

            var outerBorders = GetProperty(oTable, "Borders");

            SetProperty(outerBorders, "OutsideLineStyle", 1);//WdLineStyle.wdLineStyleSingle = 1
            SetProperty(outerBorders, "OutsideColor", 0); //WdColor.wdColorBlack = 0
            SetProperty(oTable, "TableDirection",1 );//WdTableDirection.wdTableDirectionLtr=1
            SetProperty(outerBorders, "InsideLineStyle", 1);//WdLineStyle.wdLineStyleSingle=1
            SetProperty(outerBorders, "InsideColor", 0);//WdColor.wdColorBlack = 0
            object oDocTables = oDoc.Tables;
            object oOuterTable = InvokeMethod(oDocTables, "Add", new object[] { wrdRng, 3, 3, oMissing, oMissing });

            object objCell = InvokeMethod(oTable, "Cell", new object[] { 2, 2 });
            object objTR = GetProperty(objCell, "Range", null);

            object Start = GetProperty(objTR, "Start", null);
           InvokeMethod(wrdRng, "SetRange", new object[] { Start, Start });
            object innerTables = GetProperty(oOuterTable, "Tables", null);


            object iTable = InvokeMethod(innerTables, "Add", new object[] { wrdRng, 2, 2, oMissing, oMissing });
            var  innerBorders = GetProperty(iTable, "Borders");

           SetProperty(innerBorders, "OutsideLineStyle", 1);
            SetProperty(innerBorders, "OutsideColor", 0);
            SetProperty(iTable, "TableDirection", 1);
            SetProperty(innerBorders, "InsideLineStyle", 1);
            SetProperty(innerBorders, "InsideColor", 0);


        }
        catch (Exception ex)
        {

            throw ex;
        }
        finally
        {
           // oWord.Quit();
        }
    }

}
which results in :

Many documents present some data in the form of figures or tables. Creating tables is often more efficient than describing the data in the paragraph text, especially when the data is numerical or large. The tabular data presentation makes it easier to read and understand.
A table is a collection of information or data, usually represented by horizontal rows and vertical columns. Each column and each row can have a header. Some tables have only column headings or only row headings. The box at the junction of each column and row is a cell that contains data such as text, numeric information, or images. Some cells can be merged or split (see more about formatting tables). E.g.:

Microsoft Word has many features that make working with tables simple and convenient.
Create a table
There are several ways how to insert or create a table:
- Create a blank table of up to 10 columns and 8 rows,
- Create a blank table with more than 10 columns or more than 8 rows,
- Create a blank table manually (Draw a table),
- Create a table using predefined templates (Quick Tables),
- Create a table from the existing data (Convert Text to Table),
- Insert a Microsoft Excel spreadsheet.
To create a blank table in a Word document, do the following:
1. Place your cursor where you want to insert the table.
2. On the Insert tab, in the Tables group, click the Table button:

3. Do one of the following:
Create a blank table of up to 10 columns and 8 rows
- To create a table of up to 10 columns and 8 rows, move the cursor right (to select columns) and down (to select rows) the grid to select as many cells as you need. E.g., the table of 5 columns and 3 rows (selected cells will turn orange):

Click on a cell in the grid with the expected number of rows and columns (or press Enter) to insert an empty table to fit the width of the text (paragraph).
The table has the specified number of single-line text rows in the current paragraph and equal-width columns. E.g., the table of 3 rows and 5 columns:


Create a blank table with more than 10 columns or more than 8 rows
- To create a table with more than 10 columns or more than 8 rows, do one of the following:
- Create a table with exactly 10 columns or 8 rows, then add as many columns or rows as you need (see below how to customize table).
- Click the Insert Table… option:
In the Insert Table dialog box:

- In the Table size group, specify the number of columns and rows,
- In the AutoFit behavior group, specify the width of the table and its columns:
- Select the Fixed column width option to customize width in the appropriate field: select Auto (used by default) or specify width. E.g., 0.75″:

- Select the AutoFit contents option to adjust cell sizes to the document content. E.g.:

- Select the AutoFit to window option to adjust the table’s width to the document content width. E.g.:

- Select the Remember dimension for new tables check box if you want to create tables with the same options later. Word will remember your customization.


Create a blank table manually
- To manually create an empty table, click the Draw Table option:
After clicking that option, the cursor changes to the pencil
 that allows drawing cells directly in the Word document to create a table:
Click anywhere in a document but the table itself by the pencil to stop drawing a table.
Notes:
- To draw additional lines, select a table, then on the Table Layout tab, in the Draw group, click the Draw Table button:

- If you draw a line in the wrong position, click the Eraser button in the Draw group of the Table Layout tab:
- We recommend displaying the rulers or gridlines to help you place the lines correctly.
- To draw additional lines, select a table, then on the Table Layout tab, in the Draw group, click the Draw Table button:


Create a table using predefined templates
To create a table using predefined Word templates of tables and calendars, do the following:
1. Place your cursor where you want to insert the table.
2. On the Insert tab, in the Tables group, click the Table dropdown list, then select Quick Tables list:

3. From the Quick Tables gallery, select the template you prefer.
For example:

Create a table from the existing data
To create a table from the existing data in a document data (either as regular text or as a tabbed list), do the following:
1. Select the document data you want to shape into a new table.
2. On the Insert tab, in the Tables group, click the Table dropdown list, then select Convert Text to Table…:

3. In the Convert Text to Table dialog box:

- In the Table size group, specify the number of columns,
- In the AutoFit behavior group, specify whether the width of the columns should be fixed (see details above),
- In the Separate text at group, select the character that separates text into columns in the selected text: paragraph marks, commas, tabs, or some other character.
E.g.:

Insert a Microsoft Excel spreadsheet
Note: It is possible to insert a Microsoft Excel spreadsheet in a document. To do so, on the Insert tab, in the Tables group, click the Table dropdown list, then select Excel Spreadsheet:

Word opens the Excel spreadsheet where you can enter the data. You can use Excel features such as functions and formulas to create or manipulate the data. Note that it is not a Word table.
Add rows and columns
To add a row and a column to a table, do the following:
1. Position the cursor:
- to a cell in a row above or below which you need to insert a row,
- to a cell in a column left or right which you need to insert a column.
2. Do one of the following:
- Click the Insert dropdown list in the Mini toolbar:

- On the Table Layout tab, in the Rows & Columns group:

- Click the Insert Above button to insert a row above the row with the cursor,
- Click the Insert Below button to insert a row below the row with the cursor,
- Click the Insert Left button to insert a column left to the column with the cursor,
- Click the Insert Right button to insert a column right to the column with the cursor.
- Right-click and select the Insert list:


Notes:
- To insert rows or columns, move the mouse over the table or left of the table until you see the Insertion indicator, then click the icon:
 and
and
- You can choose the option Insert -> Insert Cells… from the popup menu; Word opens the Insert Cells dialog box:

After selecting the option and clicking the OK button, Word adds an entire row or column, not a cell. Word just moves cells according to the selection.
 and
and 

Delete a table element
To delete a table element, do the following:
1. Select the cell, multiple cells, the entire column or multiple columns, the entire row, or multiple rows.
2. Do one of the following:
- Click the Delete dropdown list in the Mini toolbar:

- On the Table Layout tab, in the Rows & Columns group, click the Delete dropdown list, then select one of the options:


3. Select one of the proposed options:
- Delete Cells… opens the Delete Cells dialog box, in which select the option you need:
- Delete Columns
- Delete Rows
- Delete Table

Note: You can select the element you want to delete, right-click on the selection and select the appropriate item in the popup menu. For example, if the entire table is selected or the column is selected:
 and
and

Convert a table into text
To convert a table into text in Word, follow the next steps:
1. Click anywhere in the table.
2. On the Layout tab, in the Format group, click the Convert to Text button:

3. In the Convert Table to Text dialog box, select the charter to separate cells data in the text:

4. Click OK.
I would like to merge 2 tables together in Microsoft Word. I have attempted to do the usual drag and drop, but I’m out of luck!
I don’t know if my mouse is the problem, but even if I use the touch pad I can reproduce this issue.
![]()
asked Feb 3, 2011 at 15:12
![]()
Wern AnchetaWern Ancheta
6,44226 gold badges105 silver badges147 bronze badges
From allexperts.com:
There are a few things you can check
on:
Make sure that the second table doesn’t have any rows marked as
heading rows.Make sure that neither table is wrapped (wrapping should be set to
None on the Table tab of Table
Properties).Make sure that neither table (even if they appear identical) is nested in
one large cell of a containing table
(this sometimes happens with material
pasted from the Web).That said, I can tell you that I once
had two tables—which I had created
myself, so I know there was nothing
unusual about them—that just refused
to merge, for no apparent reason. It’s
possible that the table structures
were somehow damaged, and if I’d been
doing this in Word 2003, perhaps using
Open and Repair would have fixed the
problem. As it was, it wasn’t vital
that the tables be actually part of
the same table, so I shrugged and
moved on.If you encounter such a situation, you
have really only two recourses (if
Open and Repair doesn’t help):
Add rows to the first table and copy/paste the content of the second
table into them.Convert both tables to text, then convert all the text back to a single
table.Sorry I can’t be more definitive, but
this is a mystery to me, too!Suzanne S. Barnhill
Microsoft MVP (Word) 1998-2006
answered Feb 3, 2011 at 15:25
![]()
3
Quite often you’ll find that you have two tables in a Word document and you want to join the two together to make just one table. The solution is simple but way from obvious.
To do this, first select over all the cells in one of the two tables. If the table is underneath the one you want to join it up to, then press Alt + Shift + ↑ to move the table up the document so that it joins the bottom of the table before it. Keep pressing the key until the top row that you have selected joins the bottom border of the one above.
If you have selected the topmost table, then press Alt + Shift + ↓ until the top table locks onto the table below.
You can also drag one table up or down until it joins but this method is very slick. It also works on a single row so you can take one row from one table and move only it to join up with another table or to become a table all of its own. Experiment with this key combination – I’m sure you will love it.
Once you’ve done this, the tables will be joined to make one single table. If desired, you can then adjust the positioning of the columns so that the columns match between the two tables – this isn’t required but you may want to do it if the columns are supposed to be the same throughout.
![]()
James Mertz
26.1k41 gold badges109 silver badges163 bronze badges
answered Jul 13, 2012 at 9:46
![]()
2
Similar situation I had was resolved by adding a blank row to the bottom of the upper table and a blank row to top of the lower table. Neither of these two new rows should have columns and both tables should be the identical width. Then, by removing any returns (blank lines) between the two tables, they should automatically join. Afterward, you can remove any unwanted rows.
answered May 9, 2012 at 16:05
![]()
John BJohn B
511 silver badge1 bronze badge
I just had a situation where my table was breaking with the cells before the bottom of the page and leaving a blank spot at the bottom of ONE PAGE in just ONE SECTION of a 30-PAGE TABLE. I did all of the checking/unchecking that is mentioned here and at other advice boards, but to no avail.
After about an hour of beating my head against a wall I calmed down and just methodically went though every option available relating to the table and noticed that in the cell that should have been broken into the bottom of one page and the top of the next (but was instead getting moved to the next page in its entirety) had a specified height (Table Properties/Row tab). I removed it and instantly the table started breaking with the page as I had been after.
So, all that is to say — another option you should check if you’re encountering a situation where one cell of an otherwise-compliant table won’t break where it is supposed to — see if there’s a specified height to the cell in the Row tab under Table Properties.
Good luck!
answered Nov 2, 2012 at 10:43
![]()
Check the row height.
For Windows 10
- Under Tables — Layout
- Go to Cell Sizes
- Click on Row
- Uncheck Specify Height and in «Row Height is …» put at least
- Under Options, check «Allow row to break across pages».
![]()
random♦
14.5k9 gold badges53 silver badges58 bronze badges
answered Dec 23, 2012 at 17:02
![]()
I found if I individually converted all the tables to text, separated by tabs using:
Table Tools / Layout/ Convert
to text then selected all the text and converted to tables using:
Insert / Table ↓ / Convert Text to table
that it worked for me.
![]()
James Mertz
26.1k41 gold badges109 silver badges163 bronze badges
answered Jul 19, 2012 at 13:38
![]()
When nothing else works, try the following solution (works in Word 2010):
- Reveal hidden formatting characters (try
Ctrl-Shift-8orAlt,H,8). - Select the lower table’s contents (try
Alt,J,L,K,T). - Click the selected text; drag it up beneath the upper table’s final, external paragraph mark; and release the mouse button.
answered Jan 23, 2014 at 20:19
![]()
nikodaemusnikodaemus
2,7033 gold badges22 silver badges23 bronze badges
If you have two or more tables that you need to merge in MS Word, simply put the cursor in the blank space between them and press the Delete Key until the lower table comes up and it’ll merge with the one on top. It worked for me with two identical tables.
answered Feb 27, 2014 at 16:24
![]()
1
Press Ctrl + Shift + 8. This will show all the non-printing characters in the word document. Delete the paragraph symbol ¶ between the two tables which you want to combine. The two tables will be combined.
answered May 12, 2015 at 9:53
![]()
I’ve been fighting with table styles all day then came across this problem. I had to clear formatting of both tables, then I deleted the paragraph between the tables and they merged perfectly.
answered Mar 28, 2017 at 19:07
![]()
-
Click on the cross-in-square at the left upper corner of the top table.
If both tables are highlighted, it is likely that the lower table is nested in the upper table.
- Click on the same square for the lower table.
- If only the lower table is highlighted, cut it (Ctrl—X) and paste it in the non-table space below the upper table.
- Then proceed with the table merge strategies described by others.
- Once they are merged, click and drag column boundaries of one table to match the other.
![]()
answered May 15, 2017 at 20:03
![]()
0
Click the button with a symbol ¶ (mirrored black P) which shows all non-printing characters (result of various formatting). Little blue marks will appear in the text.
Find one between two tables that prevents them from joining. Put your cursor next to it and press Delete. It will go away, and the tables would stick together.
![]()
answered Jun 25, 2013 at 20:46
![]()
1
As was suggested by a proficient user whose advice I found, I used the search and find using the caret p or ^p (and the caret is shift 6) to find the paragraph break between the sections.
Well, first I had to figure out how to show the search and find pane, which was under view, search. THen I had to figure out how to make the caret symbol, and finally figured that out.
Then I figured out you have to keep hitting «next» until it highlights the offending paragraph symbol.
Then, after trying a thousand other things that did not work, on the thousand and first try, I went to the edit menu again, and hit «cut»
and paragraph symbol that i did not want (that was giving me the blank space) was gone! Just like that!!!!!
answered Sep 7, 2013 at 23:10
![]()
It’s quite simple: insert empty row bellow first table, cut second table, right mouse click on added row then select paste option «merge tables»
answered Sep 18, 2015 at 9:15
![]()
If all the other suggestions have failed try this :
If you remove everything between the two tables that you want to merge you will likely find that you can move your cursor between the tables and it appears that there is a blank line in between them.
I’m sure you’ve tried hitting backspace expecting the lower table to move up and join the one above, but it seems that the blank line just will not let itself be removed.
Instead — try the DELETE key ! This has worked for me a number of times. The blank line in between dissapears and the tables sit next to each other and appear as one.
answered Aug 18, 2016 at 16:53
![]()
I went to hell and back with this problem.
I tried everything listed here above, and on many other forums and sites, but nothing worked.
I was trying to combine two IDENTICAL tables, each copied from a separate documents, to no avail. The tables look merged, but there is always a thicker line between them and each table would still be separate.
How I fixed it in the end was quite amusing yet incredibly unsatisfying:
- Make sure you try everything mentioned before (wrapping, style, size…).
- Leave the two tables apart.
- Save the document.
- Exit the document.
- Open the document.
- Delete the space between the two tables.
- The tables merged.
Whatever was messed up with Word needed only a restart of the document to get fixed.
![]()
karel
13.3k26 gold badges44 silver badges52 bronze badges
answered Apr 5, 2017 at 6:32
![]()
In Office 2007, select the space just below or above table depending on where the other table to be inserted and right click. You should find an option «Paste by Appending Table». Just click on it ….voila !!
answered Jul 30, 2017 at 7:05
![]()
After trying all of these I finally had a brainwave. Added, I am working on office for mac, so it might be a bit different, but try this (I love how simple this ended up being!):
Drag Select the last row of the first table you want to merge together with the first row of the table underneath, go to the Edit tab and select Merge table.
hahaha… so easy, but not really intuitive. Should this be under the table tab, Microsoft? (maybe I’m missing something?).
answered Sep 3, 2017 at 9:09
![]()
The merging of table can be done using text wrapping properties.
- For that, select first table.
- Go to properties—> In table properties, select text wrapping as none and then click OK.
- Now select second table. do the same thing as mentioned in point No.2
- If there is any gap between the 2 tables, place the cursor in the gap and press delete button or if you cannot place the cursor in between, place the cursor in the last row/ cell in the first table and press delete button.
And now the 2 tables become combined.
answered Nov 13, 2017 at 5:14
![]()
select last row of upper table and first row of below table, then go to layout option nd click on distribute rows
answered Mar 10, 2018 at 8:01
![]()
Save the document as an older version of Word, i.e. Word 97-2003. This will allow you to merge the two tables simply by deleting the ^p (paragraph/return) symbol.
This worked for me after trying everything above without success.
You can convert the document back to your current version of Word by ‘Save As’.
answered Jun 13, 2018 at 17:38
![]()
I have been using tables for many years, and this has been comparatively trouble-free.
However, just recently I discovered that one of my files could not be put into alphabetical order. At first I was puzzled and, thinking that I had made some kind of mistake, tried several times to fix the problem, but to no avail.
Then I tried selecting the table and, upon scrolling down, I discovered that the whole table had not been selected. The shading stopped at a line which was thicker than the boundaries between the other rows, as mentioned before on this list.
In this way I discovered that what I thought was one table consisted in fact of three tables, each with its little box with the cross marking the beginning of that table, but with no space between them.
I then noticed that the 2nd table had only two rows!
This apparent anomaly attracted my attention. Could these two rows have been imported from another file, perhaps a file composed in a different version of Word?
With this in mind, I went to the last row of the 1st table and inserted two new rows below it (by pressing ‘return’ and then F4 to repeat the action).
I then selected the two rows of the 2nd table, picked them up using Ctrl + x, and then selecting the two new empty rows, dropped what I had picked up into them.
This left two empty rows which I then deleted.
By using ‘select table’ I found that I now had one table, which I could now put int alphabetical order!
answered Jul 8, 2018 at 15:33
![]()
Inert a blank row at the bottom of the upper table. Define all cells of the bottom table. Place your cursor at the top-left corner of the upper-left defined cell of the bottom table. Press the left mouse button and, holding it down, slide it up into the left inserted cell at the bottom of the upper table. Boom.
answered Sep 27, 2018 at 21:37
![]()
For me (using Word for Mac),
Whilst in Print Layout View (either checked in View Menu equivalent icon in View Ribbon icon selected)
I used the following icon first
(Found on the Home ribbon)

For me I was then able to delete a page break:

But still had a symbol like the menu bar icon in the text between the two tables.

I just drag-clicked over the control character to select it, then used the Cut keyboard shortcut Cmd-X.
Voila!
answered Nov 17, 2019 at 19:41
![]()
JGFMKJGFMK
1215 bronze badges
When using Microsoft Word for small business purposes, you may have need to insert tables into your Word document. If you have two or more tables in the same document, Word lets you move the tables around and merge them into one larger table. After merging the tables, you can also merge specific cells within the table. This turns previously separated cells into one larger cell. Word lets you choose between using your cursor to merge tables or using a keyboard shortcut.
-
Hover the mouse over the table you’re moving. Highlight the entire table by clicking the small box with the cross in it, located in the upper-left corner of the table.
-
Using your cursor, drag the highlighted table to the table you’re merging it with. Alternately, you can use the cursor keys; press «Alt-Shift-Up» at the same time to move the highlighted table up. Use «Alt-Shift-Down» instead to move the table down on the page.
-
Navigate to the «Layout» tab under «Table Tools.» Drag your cursor over a selection of cells you want to merge. Click the «Merge Cells» button in the ribbon.
In Microsoft Word, you can insert a table in your document in three ways:
* Choose from a gallery of pre-formatted table templates.
* Use the Table menu to specify the number of rows and columns that you want.
* Use the Insert Table dialog box.
or you can insert one table into another table to create a more complex table
You can use table templates to insert a table into your document that is based on a gallery of preformatted tables. The templates contain samples to help you choose what the table will look like.
Click where you want to insert a table in your document.
1. On the Insert tab, in the Tables group, click Table, point to Quick Tables and then click the template that you want.

2. Replace the data in the template with the data that you want.
USING THE TABLE MENU
1. Click where you want to insert a table.
2. On the Insert tab, in the Tables group, click Table, then, under Insert Table, drag to select the number of rows and columns that you want.

HOW TO USE THE INSERT TABLE COMMAND
You can use the Insert Table command to choose the table dimensions and format before you insert the table into a document.
1. Click where you want to insert a table.
2. On the Insert tab, in the Tables group, click Table, and then click Insert Table.
3. Under Table size, enter the number of columns and rows.
4. Under AutoFit behaviour, choose options to adjust the table size.

Table of Contents
- 1 How do I insert a table into a table in Word?
- 2 How do I format a table to AutoFit in Word?
- 3 How do I make a good looking table?
- 4 How do you make a visually appealing table?
- 5 What can I put in my dining room instead of a table?
- 6 How can I paint my dining room table without sanding?
- 7 Can I paint over varnished wood without sanding?
How do I insert a table into a table in Word?
For a basic table, click Insert > Table and move the cursor over the grid until you highlight the number of columns and rows you want. For a larger table, or to customize a table, select Insert > Table > Insert Table.
How do I format a table to AutoFit in Word?
In “Table Tools” click the [Layout] tab > locate the “Cell Size” group and choose from of the following options:
- To fit the columns to the text (or page margins if cells are empty), click [AutoFit] > select “AutoFit Contents.”
- To fit the table to the text, click [AutoFit] > select “AutoFit Window.”
Can you format numbers in a Word table?
Those who are familiar with the rich formatting features of Excel may long for a way to format numbers in a Word table just as easily. Unfortunately, Word does not allow you to do this type of formatting directly. There is a work-around, however. You can use a field to insert any number you want in any format you want.
Why can’t I adjust table in Word?
Make sure your cursor is inside the table so you can see the Table Tools tab on the ribbon. Click the Layout tab and select the AutoFit icon from the Cell Size group. Select AutoFit Window from the drop down menu. Your table will fit on the page between the left and right margins.
How do I make a good looking table?
- 4 Steps for Good-looking Tables in a Presentation.
- Replace the grid of your standard presentation table.
- Add shapes to table columns and rows headers.
- Illustrate with icons.
- Highlight the key table cell content.
How do you make a visually appealing table?
How To Make Your Data Visually Appealing
- Step 1: Add a table style. Adding a table style is a quick and easy way to make your data stand out.
- Step 2: Add visualization to your data with in cell data bars. Now that the table is styled, let’s add some visualization.
- Step 3: Add spark line graphs. To add an extra special touch let’s add some spark line graphs.
How can I make my dining table look nice?
7 Simple Ways To Make Your Dining Room Look Expensive
- Eschew The Expected.
- Make At Least One Bold Choice.
- Show Off Your Favorite Serving Pieces.
- Add a Statement Chandelier.
- Emulate Your Favorite Restaurant.
- Create an Artistic Focal Point.
- Find the Perfect Rug.
How can I make a cheap dining room table look expensive?
To get you started, here are eight fantastic budget-sensitive tips for helping your dining room to look its very best.
- 01 of 08. Get a High End Look for Less.
- 02 of 08. Floral Arrangements.
- 03 of 08. Gold Flatware.
- 04 of 08. Add a Rug.
- 05 of 08. Wallpaper the Room.
- 06 of 08. Creative Lighting.
- 07 of 08. Ghost Chairs.
- 08 of 08. Artwork.
What can I put in my dining room instead of a table?
6 Dining Room Alternatives
- 1.) LOUNGE – FOR THE ENTERTAINER.
- 2.) LIBRARY – FOR THE BOOK WORM.
- 3.) PLAYROOM – FOR THE KIDS.
- 4.) OFFICE – FOR THE WORKER BEE.
- 5.) GUEST BEDROOM – FOR THE HOST WITH THE MOST.
- 6.) EXERCISE ROOM – FOR THE FIT.
How can I paint my dining room table without sanding?
Here are 5 Ways To Paint Furniture Without Sanding:
- USE A MINERAL PAINT. Mineral paint is very similar to chalk style paints in that no prep or prime is required.
- USE MILK PAINT + BONDING AGENT. As I already mentioned, the antique desk in this post was not prep-sanded.
- USE A BONDING PRIMER.
- USE A LIQUID SANDER/DEGLOSSER.
What happens if you don’t sand before painting?
When You Can Skip Sanding, Deglossing and Priming If the finish on your furniture isn’t damaged or chipping, it’s flat not shiny and you aren’t painting it a drastically different color, then you may be able to just go ahead and start painting. Before painting though, do make sure the piece is clean.
Can you Restain wood without stripping?
Minwax® PolyShades® is an easy way to change the color of your currently stained or polyurethane finished wood. There’s no stripping or heavy sanding necessary to remove the old finish!
Can I paint over varnished wood without sanding?
Can you paint over varnished wood without sanding? Yes. The oil based primer will stick to varnished or sealed wood. And then you can paint over it with latex paint.
Are you struggling to get your message across? When your Microsoft Word project contains information, try presenting it in the form of a Word table. Learn how to make tables in Word quickly with a template.


A table is a kind of chart that organizes and presents data in rows and columns. It makes information easier to grasp, understand, and analyze at a glance, compared to explaining the same data through plain text.
Microsoft Word gives you various ways to insert or create a table. And you’ve got granular control over the formatting, layout, and appearance of Microsoft Word tables. Table charts are useful in different types of Word projects, whether for personal, educational, or business use.
This article will show you how to make a table in Word using a template. Then edit and format it to change its appearance.
(Note: The screenshots and instructions that follow are made using Microsoft Word for Mac version 16.4. If you’re using a different version of Word, then the interface and steps may be different.)
How to Make & Edit MS Word Tables (Video)
In this video, you’ll learn how to quickly make tables in Mircosoft Word. Find out how to start with a premium template. Quickly customize it to make an attractive, professional MS Word table you can use and reuse.
To learn even more about MS Word tables and about templates than can be used for tables, study the step-by-step tutorial below:
How to Make Basic Tables in Word
Let’s start by learning how to make a basic table in Microsoft Word:
1. Insert a Table
You can create a basic Microsoft Word table in one of two ways:
Method 1. The Insert Tab
Click on the Insert tab, then click the Table button on the ribbon.


The Insert Table panel appears. Drag the cursor over the squares to specify the number of columns and rows you want to create. Click to apply.


Method 2. The Insert Menu
Go to Insert > Table….


The Insert Table panel opens. Specify the number of columns and rows you need. (You can always add or remove columns and rows later.)


Also select the Autofit Behavior you want the table to have. You’ve got several options:
- Initial column width. The default setting is Auto, which divides the entire width of your page window across the number of columns in the table. Or, you can specify a different column width.
- AutoFit to contents. Resizes the column width based on the width of the content inside the column.
- AutoFit to window. Distributes the columns equally across the entire width of the page window.
- Set as default for new tables. Check this option if you want the settings to be applied globally to all new tables you create.
When you’re happy with the options you’ve selected, click OK.


2. Draw a Table
Or, you can draw a table in MS Word. This is a useful feature if you want to create an irregular or more complicated table with columns and/or rows of varying widths.
To draw a table, click Insert > Table > Draw Table.


With your mouse or trackpad, click and drag the cursor to start drawing your table. You can begin by drawing the outermost boundary of the table first.


Then, click and drag the cursor to create columns and rows inside the table. When you’re done, click anywhere outside the table.


Here’s an example of an “irregular” table you can draw using this feature.


If you make a mistake, click Layout > Eraser to erase a line from the table.


Click and drag the eraser along the line you wish to erase. The line that’ll be erased appears as a thick, red line. Release the mouse or trackpad to erase.


Click outside the table when you’re done.
3. Convert Text to Tables and Vice Versa
Another way to create a table is by converting text into a table. This means you can take non-tabular data from a CSV or plain TXT file and convert them into a table.
First, copy and paste the non-tabular data into your Word document.


With the text selected, go to Insert > Table > Convert Text to Table….


The Convert Text to Table panel opens. Specify the settings you wish to use. Click OK.


The text is then converted into a table.


You can also do the opposite, which is to convert a table into text.
Select the cells or entire table you want to convert. Next, click on the Layout tab then click the Convert Table to Text icon.


The Convert Table to Text panel opens. This is where you’ll decide how you want to separate text that’s currently in different columns. When you’ve made a selection, click OK.


For this example, I chose to separate text with commas. This is what the converted table looks like.


4. Advanced: How to Insert a Table from Excel
If you’ve already created a table in Excel, you can embed it into your Word document.
Open the Excel file. Click and drag the mouse to select the table.


Go back to your Word document. Go to Edit > Paste Special ….


In the Paste Special panel, select Microsoft Excel Binary Worksheet Object, then click OK.


This embeds the Excel table into Word. It’s still an Excel table, which means you can’t edit or format the table in MS Word. You’ve got to do so in Excel.


Double-click anywhere in the table to launch the source file in Excel. When you make any changes to the table in Excel, the table embedded in your Word project automatically updates to reflect those changes.
Now you know how to make a table in MS Word using various options.
How to Edit Tables
At any time after creating your table, you can edit and customize it to look the way you want it to. Here are some steps for editing tables in Microsoft Word:
1. Add a Column or Row
To add a row or column, click inside a table cell. Right-click on the mouse, then click Insert.


Select one of the following:
- Columns to the Left. Adds a column to the left of the current column
- Columns to the Right. Adds a column to the right of the current column
- Rows Above. Adds a row above the current row
- Rows Below. Adds a row below the current row
- Cells … Inserts a cell and shifts the rest of the cells either to the right or down from where the cursor is
- Table … Inserts a table inside the current cell
Or, with the cursor in one of the cells, you can click on the Layout tab.


Then choose of the following buttons on the ribbon:
- Insert Above. Inserts a row above the current cell
- Insert Below. Inserts a row below the current cell
- Insert Columns to the Left. Inserts a column to the left of the current cell
- Insert Columns to the Right. Inserts a column to the right of the current cell
Finally, you can add a new row when you’ve reached the last cell in the last row of your table. Simply press tab and a new row appears.
2. Delete a Column or Row
To delete a cell, column, row, or table, click on the Layout tab > Delete.


Select one of the options that appear:
- Delete Cells …
- Delete Columns
- Delete Rows
- Delete Table
You can use the same steps to edit a table you’ve drawn. Or, you can use the Layout tab to add or delete rows and columns.


Merge Cells
Sometimes you may want to merge cells to present information more clearly. To merge cells, click and drag the cursor to select the cells you wish to merge.


On the Layout tab, click on the Merge Cells button.


Or, after selecting the cells to be merged, right-click on your mouse, then click Merge Cells.


Now the cells have been merged into one.


Split Cells
After merging cells, you can always split them again into separate cells.
Place the cursor in the merged cell, then click Layout > Split Cells.


Or, right-click on your mouse, then click Split Cells….


Either way, the Split Cells panel pops up. Specify the number of columns and rows you want to split the cell into. Click OK.


Split Table
You may decide that it makes more sense to split up a table into two separate tables. Microsoft Word lets you do that easily, too.
In this example, I want to split the table right above the Accessories cell. And so, I’ll place the cursor in that cell. Next, click on the Layout tab, then click the Split Table button.


Now, we’ve got two separate tables.


Table Formatting
When you first create a table, it looks plain and boring. But Microsoft Word has many features so you can format tables to look exactly the way you want them. Here are some common ways to format tables:
1. Table Styles
The easiest way to format a table is by using one of the pre-formatted table styles. Put the cursor in any cell in the table. Click on the Table Design tab. Next, click on the arrow to expand the Table Styles group.


Click on a style you want to use and it’s applied immediately.


You can change any style you’ve selected. Again, click on Table Design, expand the Table Style group, then click Modify Style.


The Modify Style panel opens. Make the selections you want, then click OK.


2. Use Your Own Formatting
The Table Design tab gives you control over the appearance of every aspect of your table. Click on the Table Design tab and any of the appropriate buttons on the ribbon.


Resize a Table
You can also resize your table. Click on any cell to select the table, then click and drag one of the corners to resize it.


Or, you can use the Layout tab to resize individual cells, specific rows or columns, or the entire table. Select the columns or rows you wish to resize. Specify the height and/or width you wish to apply.


You can also adjust column width by hand by using the Table Ruler. Click inside a column you want to change. Then, drag the sliders in the Table Ruler to set to desired width.


Text Wrapping
If you want text to flow around the table, you can do so by changing its text wrapping.
Click in any cell to select the table. Click Table > Table Properties….


In the Table Properties panel and under Text Wrapping, click Around > OK.


Now the text flows around the table.


Take note that the Table Properties panel allows you to format other qualities of the table, including:
- Size
- Alignment
- Positioning
- Borders and Shading
On the other tabs, you can change:
- Column, Row, and Cell Size
- Allow row to break across pages
- Repeat as header row at the top of each page
- Cell Vertical Alignment
- Alt Text (Title and Description) — more information about the table, to help people with vision or cognitive impairment who may not see the table
Find Great Styles for Microsoft Word
You don’t have to start from scratch to create an impressive and effective Word document — even if you don’t have design skills. You can find great styles by using a template for Word.


One great source for great Microsoft Word templates and professional graphics is Envato Elements. For one low monthly subscription, you get unlimited downloads of templates, graphics, fonts, and other creative tools you need for your project. It’s a terrific option if you create plenty of materials.
For single projects, GraphicRiver is an outstanding source for templates for Word. This marketplace gives you access to thousands of creative elements on a pay-per-use basis.
Learn More
Microsoft Word has many robust features to help you realize the vision you’ve got for your document. But with power comes complexity. That’s why it’s a good idea to learn how to use Microsoft Word.
These articles will help you get started:
Visualize Your Data with Microsoft Word Tables
Make your information clearer and easier to understand by learning how to make a table in Microsoft Word. Tables organize data into rows and columns, which makes them easier to grasp at a glance. Follow the steps in this article to create, format, and customize tables in Word.
You can also use a premium Word template to get a premium design created by designers. Get Word templates from Envato Elements, if you want unlimited downloads of templates, graphics, and other creative tools you need — all for one flat monthly fee.
Or, get premium templates for Word from GraphicRiver if you prefer to pay for each use of an item. Both sources give you access to thousands of design elements created by professionals, so you can save time, energy, and effort while creating an outstanding Word document.
Did you find this post useful?

Marketing & Communications Professional and Lifelong Learner/Canada
Lexi Rodrigo is a marketing and communications professional, copywriter, and course creator who helps remarkable brands and people get seen, heard, and known. Writing for the web since 2008, she has over 100+ blog posts published on Envato Tuts, Acadium, Mirasee, Vero, Copyblogger, FreelanceFolder, Business2Community, and others.
Lexi has supported multimillion-dollar companies and nonprofits in various marketing and communication roles. She has driven results like tripling the organic search traffic of a blog in three months and generating over $65 million in revenues, donations, and sponsorships.
She has a Bachelor of Arts degree in communications. She is also the co-author of «Blog Post Ideas: 21 Proven Ways to Create Compelling Content and Kiss Writer’s Block Goodbye.» When she’s not reading or writing, Lexi bakes bread, grows food, and takes long walks.