
Using document info
For common information, such as Author name, File name, date, or file path, follow these steps:
-
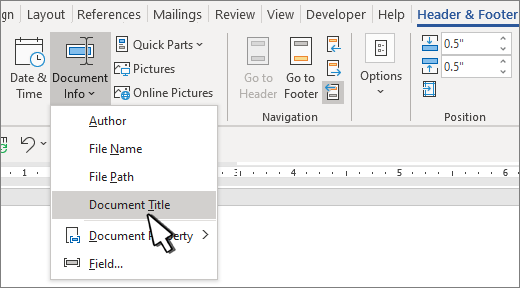
Double-click the header or footer .
-
Select Document Info, and choose the information you want.

Note: Select Document Property to select additional information, such as Title, Company, or Subject.
-
Select Close Header and Footer or press Esc to exit.
Using field codes
If you don’t find the info you want, such as file size or who it was last saved by, you can use field codes to add a variety of document properties.
Note: If you already added a header or footer from the gallery, this procedure may replace or change the formatting of the current header or footer.
-
Go to Insert > Header or Footer.
-
Select Edit Header or Edit Footer.
-
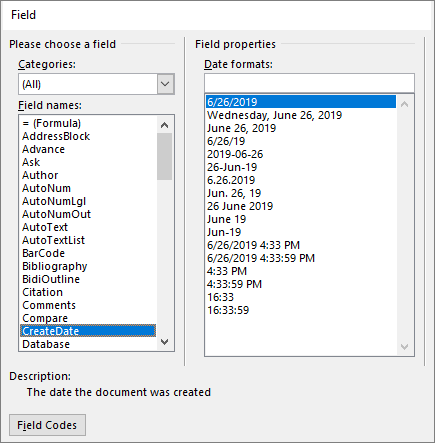
Select Quick Parts, and select Field.
-
In the Field names list, choose the field you want (such as FileName, Date, Author, or Title), choose the format you want in the Field properties section.
-
If a field property has addition options, choose any you like in the Field options section.
-
Select OK.
-
Select Close Header and Footer or press Esc to exit.

Word for the web doesn’t support adding file names and other document properties to a header or footer.
Select Open in Word to open your document in the desktop version of Word if you have it and follow the steps here on the Windows tab.

Insert a Word Document’s File Name and Path using Fields
by Avantix Learning Team | Updated October 14, 2022
Applies to: Microsoft® Word® 2010, 2013, 2016, 2019, 2021 or 365 (Windows)
In Microsoft Word, you can insert a document’s file name and path using fields. The path can be displayed in the body of the document or in the header or footer. You can also customize the Quick Access Toolbar and display the file path.
Recommended article: How to View Word Count in Microsoft Word (4 Ways)
Do you want to learn more about Microsoft Word? Check out our virtual classroom or in-person classroom Word courses >
Insert a document file name and path in a Word document using the FileName field
To insert the FileName field and display the current document’s file name and path:
- Position the cursor where you want to display the file name and path. You can insert the field in the document or in a header or footer.
- Click the Insert tab in the Ribbon and click Quick Parts in the Text group. A drop-down menu appears.
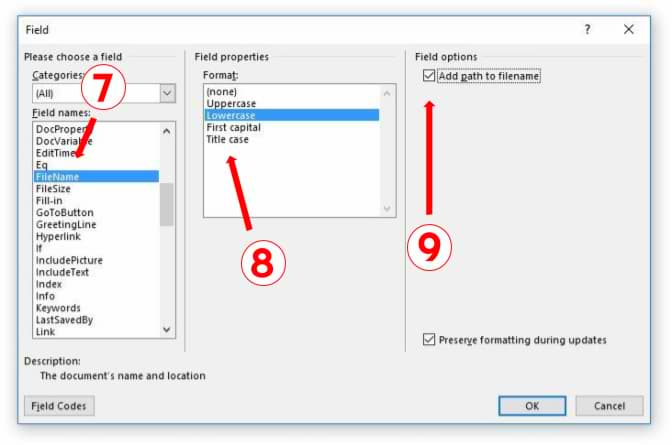
- Select Field. A dialog box appears.
- Select FileName in the Field Names list. Options appear for the field.
- Select a format in the Format list.
- To display the full path, check or select the Add Path to filename check box.
- Click OK.
Below is the Field dialog box:

Hide Field Codes
A file name would normally appear similar to the following example:
C:UsersDavidDesktopABCCompanyProjectsARCProject.docx
If field codes appear instead, you can hide the field codes by pressing Alt + F9.
Update the FileName field
If the document’s name or path has changed, you’ll need to update the field.
To update the field, right-click the field and select Update or click the field and press F9. You can also press Ctrl + A and then press F9 to update all fields in your document.
Add a File Path button to the Quick Access Toolbar
You can also add a button in the Quick Access Toolbar to display the file path.
To customize the Quick Access Toolbar to display the file path:
- Click the arrow to the right of the Quick Access Toolbar (which is normally above the Ribbon by default) and choose More Commands. In the dialog box that appears, Quick Access Toolbar should be selected on the left.
- Click the arrow below Choose commands from and then select All Commands.
- Select Document Location in the list of commands.
- Click Add.
- Click OK. A document location or file path will now display in the Quick Access Toolbar.
Below is the Options dialog box where you can add buttons to the Quick Access Toolbar:

You may want to display the Quick Access Toolbar below the Ribbon by clicking the arrow to the right of the Quick Access Toolbar and selecting Show Below the Ribbon.
This article was first published on October 4, 2017 and has been updated for clarity and content.
Subscribe to get more articles like this one
Did you find this article helpful? If you would like to receive new articles, JOIN our email list.
More resources
How to Insert a Check Mark in Word (5 Ways)
How to View Word Count in Microsoft Word (4 Ways)
How to Superscipt or Subscript in Word (with Shortcuts)
How to Insert or Type an Em Dash in Word (4 Ways with Shortcuts)
10+ Great Microsoft Word Navigation Shortcuts for Moving Around Quickly in Your Documents
Related courses
Microsoft Word: Intermediate / Advanced
Microsoft Excel: Intermediate / Advanced
Microsoft PowerPoint: Intermediate / Advanced
Microsoft Access: Introduction
VIEW MORE COURSES >
Our instructor-led courses are delivered in virtual classroom format or at our downtown Toronto location at 18 King Street East, Suite 1400, Toronto, Ontario, Canada (some in-person classroom courses may also be delivered at an alternate downtown Toronto location). Contact us at info@avantixlearning.ca if you’d like to arrange custom instructor-led virtual classroom or onsite training on a date that’s convenient for you.
Copyright 2023 Avantix® Learning
Microsoft, the Microsoft logo, Microsoft Office and related Microsoft applications and logos are registered trademarks of Microsoft Corporation in Canada, US and other countries. All other trademarks are the property of the registered owners.
Avantix Learning |18 King Street East, Suite 1400, Toronto, Ontario, Canada M5C 1C4 | Contact us at info@avantixlearning.ca
How to Automatically Insert the Document Filename in Word
- Click the “Insert” tab on the Word ribbon.
- Click “Quick Parts” in the Text group.
- Click “Field” to open the Field dialog box.
- Click “FileName” from the “Field Names” list.
- Click a capitalization format in the “Format” list.
Contents
- 1 How do I insert FileName into a Word document?
- 2 How do I insert FileName and path in Word?
- 3 How do I insert watermark in Word?
- 4 How do I insert FileName in Word without extension?
- 5 Where is the document name displayed?
- 6 How do you automatically update File names in Word?
- 7 How do you create a file path?
- 8 What is document name in MS Word?
- 9 How do you display the file location?
- 10 How do you put a watermark in front of a Word document?
- 11 What is watermark in MS Word?
- 12 Why is my watermark not showing up in Word?
- 13 How do I insert filename in Excel without extension?
- 14 How do I save a document without an extension?
- 15 How do I get rid of extensions in Word?
- 16 When a File is saved in Word The file name is displayed in the?
- 17 How do you automate a file name?
- 18 What does a file path look like?
- 19 What is path example?
- 20 Does file path include filename?
How do I insert FileName into a Word document?
Insert File Name of the Document
Under Header & Footer Tools, on the Design tab, in the Insert group, click Quick Parts, and then click Field. In the Field names list, click FileName select the Format you want. In Field options put a check in the Add path to filename check box. Click OK.
How do I insert FileName and path in Word?
From the “Text” group, click [Quick Parts] > Select “Field…” Under “Field names,” select “FileName.” In the “Field properties” section, select a format. In the “Field options” section, check “Add path to filename.” The file name will now appear in the header or footer.
How do I insert watermark in Word?
On the Design tab, select Watermark.
- In the Insert Watermark dialog, select Text and either type your own watermark text or select one, like DRAFT, from the list. Then, customize the watermark by setting the font, layout, size, colors, and orientation.
- Select OK.
How do I insert FileName in Word without extension?
Insert the custom document property, FileBaseName , in your document:
- MS Word menu > Insert [tab] > Text [group] > Quick Parts > Field
- From “Field Names” choose “DocProperty”.
- From “Field Properties” > “Property”: Choose “FileBaseName” > OK.
Where is the document name displayed?
The title bar displays the document name, followed by the program name.
How do you automatically update File names in Word?
To enable this option follow the steps below:
- Click on the ‘Office’ button.
- Click on Word Options.
- Select the Advanced tab on the left-hand side.
- Check the option ‘update automatic links on open’ under the General section on the right-hand side.
- Click on Ok. Replies (2) Question Info.
How do you create a file path?
Hold down Shift on your keyboard and right-click on the file, folder, or library for which you want a link. Then, select “Copy as path” in the contextual menu. If you’re using Windows 10, you can also select the item (file, folder, library) and click or tap on the “Copy as path” button from File Explorer’s Home tab.
What is document name in MS Word?
docx – Word document. . docm – Word macro-enabled document; same as docx, but may contain macros and scripts. .
How do you display the file location?
To view the full path of an individual file:
- Click the Start button and then click Computer, click to open the location of the desired file, hold down the Shift key and right-click the file.
- On the menu, there are two options to choose from that will allow you to either copy or view the entire file path:
How do you put a watermark in front of a Word document?
You’ll need to open the header to select the watermark.
- Double-click near the top of the page to open the header.
- Click the watermark to select it. (Try moving the cursor over the watermark until the cursor displays a four-headed arrow.)
- Drag the watermark where you want it on the page.
What is watermark in MS Word?
A watermark is an image or text that appears behind the main text of the document. It is usually a lighter shade than the text, so you can read the document easily. Text Watermarks are often used to categorize or to show the purpose of a document with words such as DRAFT.
Why is my watermark not showing up in Word?
However, sometimes a watermark may not be displayed. The most common reason for this is that by default watermarks are displayed in the background, behind the document’s content.The solution is to change the z-order of the watermark to a positive value to make sure it is displayed in front of the content.
How do I insert filename in Excel without extension?
Insert filename in cell without extension by Excel formula
Select a blank cell, and enter the formula =TRIM(LEFT(SUBSTITUTE(MID(CELL(“filename”,A1),FIND(“[“,CELL(“filename”,A1))+1,255),”. xl”,REPT(” “,255)),255)) into it, and press the Enter key.
How do I save a document without an extension?
To create a file without an extension with Notepad, use quotation marks. The quotation marks ensure the integrity of the file name chosen without an extension. The file is saved with a name and a file type of “file” which has no extension.
How do I get rid of extensions in Word?
To disable or remove an add-in follow these steps:
- Click File > Options > Add-ins.
- Towards the bottom of the window, where it says Manage, click the Go button.
- In the dialog box, select the add-ins you want to disable or remove.
- To disable the add-in, just uncheck the box in front of its name.
When a File is saved in Word The file name is displayed in the?
When you open a Word document, Word displays its name in the title bar.
How do you automate a file name?
Rename multiple files one at a time
- Open File Explorer.
- Browse to the folder with the files to rename.
- Click the View tab.
- Select the Details view.
- Select the first file in the folder.
- Click the Home tab.
- Click the Rename button.
- Rename the file.
What does a file path look like?
A path is either relative or absolute. An absolute path always contains the root element and the complete directory list required to locate the file. For example, /home/sally/statusReport is an absolute path.For example, joe/foo is a relative path.
What is path example?
The definition of a path is a trail, route, course or a line of movement. An example of a path is what deer follow through the forest. An example of a path is what hikers follow up a mountain. An example of a path is the direction taken by a tornado. An example of path is the vapor left behind a plane in the sky.
Does file path include filename?
Paths include the root, the filename, or both. That is, paths can be formed by adding either the root, filename, or both, to a directory.

On Monday, I showed you how to add a Chapter Heading to your Microsoft Word documents. The nice thing about this is that it shows the reader where they are in the document at any give time.
That is very effective in long technical and financial documents, such as Business Plans, where the reader may have hundreds of pages to read through.
Why Format the Headers and Footers?
If you write for a living, you’ll want your documents to look at professional as possible. I use the Header and Footer section to include content that makes the document look more professional, have more use to the reader, and ultimately makes my material look better than other writers.
One way I do this is to add the Document Name into the Footer. This reminds the reader what they are reading, especially when the scroll to the end of the document or when the document is printed out and, for example, the cover sheet is missing.
Without this information in the footer, the document looks unfinished.
We don’t want that, do we?
What if you only want to show the document title in the footer? What’s the fastest way to do this? In Microsoft Word, there are usually a few ways to do the same thing. Which is good and bad 🙂
Here’s one way to add the document title to the header or footer.
- Open Word.
- Go to File, Properties. This is where you can add metadata about the file, such as the document name, owner, date and keywords.

- Enter the document name in the Title Field (i.e. first field)Close this and return to the Word document as usual.
- On the View menu, click Header and Footer.
- From the Insert drop-down menu, select Filename.

- This adds the Filename to the Footer.
If you have other questions about Microsoft Word, let me know in the comments below.
Word 2003 v 2007
As the menu is different in both versions, I have included the steps for 2003 first. To do this with 2007, click the Start button and then look for the Options.
How do I?
You can also add the date, page numbers, and other information this way. It’s the simplest way to keep your Microsoft Word documents organized.
If you have other questions about Microsoft Word, drop me a line.
As most readers use Microsoft Word 2003, these steps will apply to this version of Word. If there is any confusion, please let me know.
Word: Insert File/Path Name into Document Footer or Header
Inserting your Word document’s file/path name into the footer or header will help you know where your document is located.
- Open Microsoft Word.
- Click the «Insert» tab.
- From the «Header & Footer» group, click [Header] or [Footer].
- From the drop-down menu, choose a Header or Footer style.
- Return to the «Insert» tab.
- From the «Text» group, click [Quick Parts] > Select «Field…»
- Under «Field names,» select «FileName.»
- In the «Field properties» section, select a format.
- In the «Field options» section, check «Add path to filename.» The file name will now appear in the header or footer.
Note:
If your saved document has moved locations, you can manually update the file/path name by clicking inside the field and pressing F9. If you want Microsoft to automatically update the field, see section «Method 2: Create a Macro
to Automatically Update the Field» of the Microsoft help page.
Keywords: header, filename, filenames, file names, path, pathname, pathnames, path names, add
Share This Post
-
Facebook
-
Twitter
-
LinkedIn