Word for Microsoft 365 Word 2021 Word 2019 Word 2016 Word 2013 Word 2010 Word 2007 More…Less
An index lists the terms and topics that are discussed in a document, along with the pages that they appear on. To create an index, you mark the index entries by providing the name of the main entry and the cross-reference in your document, and then you build the index.
You can create an index entry for an individual word, phrase, or symbol, for a topic that spans a range of pages, or that refers to another entry, such as «Transportation. See Bicycles.» When you select text and mark it as an index entry, Word adds a special XE (Index Entry) field that includes the marked main entry and any cross-reference information that you choose to include.

After you mark all the index entries, you choose an index design and build the finished index. Word collects the index entries, sorts them alphabetically, references their page numbers, finds and removes duplicate entries from the same page, and displays the index in the document.
Mark the entries
These steps show you how to mark words or phrases for your index, but you can also Mark index entries for text that spans a range of pages.
-
Select the text you’d like to use as an index entry, or just click where you want to insert the entry.
-
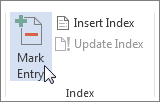
On the References tab, in the Index group, click Mark Entry.
-
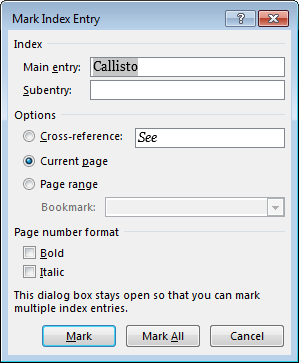
You can edit the text in the Mark Index Entry dialog box.
-
You can add a second-level in the Subentry box. If you need a third level, follow the subentry text with a colon.
-
To create a cross-reference to another entry, click Cross-reference under Options, and then type the text for the other entry in the box.
-
To format the page numbers that will appear in the index, select the Bold check box or Italic check box below Page number format.
-
-
Click Mark to mark the index entry. To mark this text everywhere it shows up in the document, click Mark All.
-
To mark additional index entries, select the text, click in the Mark Index Entry dialog box, and then repeat steps 3 and 4.
Create the index
After you mark the entries, you’re ready to insert the index into your document.
-
Click where you want to add the index.
-
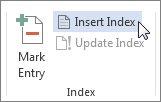
On the References tab, in the Index group, click Insert Index.
-
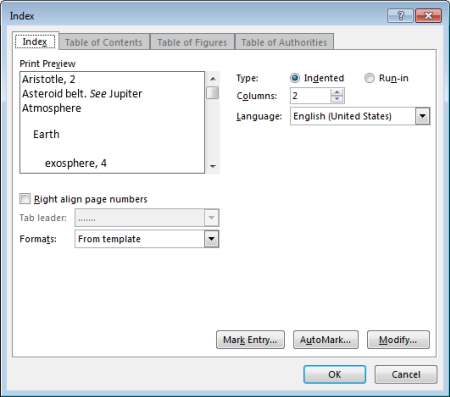
In the Index dialog box, you can choose the format for text entries, page numbers, tabs, and leader characters.
-
You can change the overall look of the index by choosing from the Formats dropdown menu. A preview is displayed in the window to the top left.
-
Click OK.
Edit or format an index entry and update the index
If you mark more entries after creating your index, you’ll need to update the index to see them.
-
If you don’t see the XE fields, click Show/Hide
in the Paragraph group on the Home tab.
-
Find the XE field for the entry that you want to change, for example, { XE «Callisto» t «See Moons» }.
-
To edit or format an index entry, change the text inside the quotation marks.
-
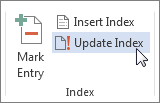
To update the index, click the index, and then press F9. Or click Update Index in the Index group on the References tab.
If you find an error in the index, locate the index entry that you want to change, make the change, and then update the index.
Delete an index entry and update the index
-
Select the entire index entry field, including the braces ({}), and then press DELETE.
If you don’t see the XE fields, click Show/Hide
in the Paragraph group on the Home tab.
-
To update the index, click the index, and then press F9. Or click Update Index in the Index group on the References tab.
Need more help?
Want more options?
Explore subscription benefits, browse training courses, learn how to secure your device, and more.
Communities help you ask and answer questions, give feedback, and hear from experts with rich knowledge.
The analytical index makes it possible to provide readers of a book, or in any case of a very long text, with quick references on the pages in which certain topics are dealt with. In other words, it is an index that — usually positioned at the end of a text — contains references to key words and phrases with the numbers of the pages where they can be found.
Word, the word processor included in Microsoft’s Office suite, includes a feature that allows you to create it quickly and easily. For this reason, in today’s guide, I will take care to illustrate you in detail how to create Word index through procedures that you can put into practice regardless of the version of the software and the computer you use (I will therefore mainly refer to the classic version of Word for Windows and macOS and not to Word Online or the Word apps for smartphones and tablets).
So if you want to find out how to succeed in creating an index in your documents, let’s not waste any more time and let’s take action. Come on, sit down comfortably, pay close attention to the tips that I will show you and try to put them into practice. Having said that, I just have to wish you a good reading and, above all, a good job!
Index
- How to create an index on Word
- Insert entries into the index
- Create the index
- Update the index
- How to create a table index in Word
- How to create Word Auto Index
How to create an index on Word
If you want to know how to create an index on Word, in the next chapters I will explain, step by step, everything you need to do to be able to achieve this goal using Microsoft Word desktop software for Windows or macOS.
Insert entries into the index
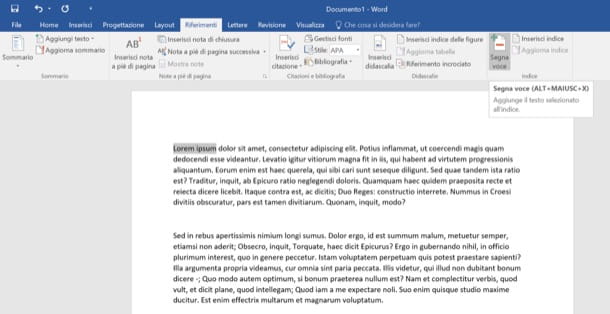
If you want create an index in Word, the first step you have to take is to select with the mouse a phrase or a word that you want to insert in it. After selecting the text, go to the tab References Word and click on the button Mark entry which is located at the top right.
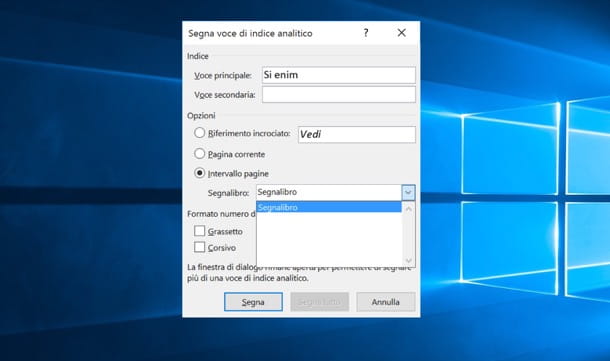
In the window that opens, make sure that in the field Main item the phrase or word you have just selected is set and choose whether to index only the selected occurrence by clicking on the button Mark, or whether to bring back in the index all the pages of the document in which to buy the chosen phrase / word, by pressing on Mark all.
If you want to change the formatting of the page numbers, use the boxes Bold e italic located in the lower part of the window (so that the page numbers appear in the index in italics or in bold).
You can also create bookmarks and limit the search for occurrences to a custom page span. To create a bookmark in your document, select with the mouse the content of the pages to which you want to limit the search, then go to the tab Inserisci and click on the button Bookmark. In the window that opens, then type a name for the bookmark and press on Add but I will complete the operation.
Once the bookmark is created, to limit the indexing of a term or phrase to a specific range of pages, call the function Mark entry Word, put the check mark next to the item Page range, select the desired bookmark from the appropriate drop-down menu and click on Mark.
You want to insert a secondary entry in your index so that a primary entry, rather than the number of pages, matches the wording «See [sub item name]»? Nothing easier.
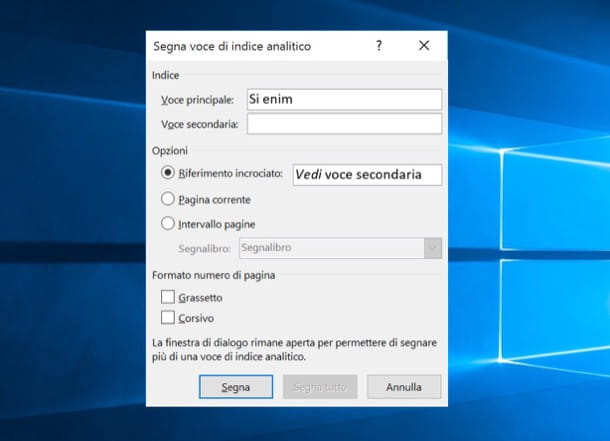
After calling the function Mark entry Microsoft Word, put the check mark on Cross reference and type in the adjacent text field the name of the sub-item you want to appear in the index.
Create the index
After you have correctly configured all the items you want to appear in the document index, for create Word index you have to move to the last page of the file (at the bottom) and insert a new one page breakby selecting the appropriate item from the menu Inserisci.
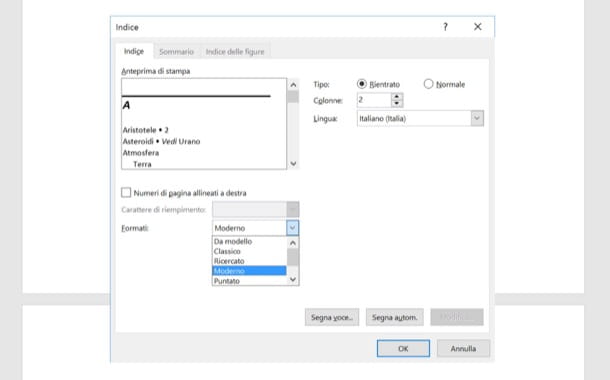
At this point, go back to the tab References and click on the button Insert index located at the top right. In the window that opens, then put the check mark next to the item Page numbers aligned to the right, if you want to right-align the index numbers, and select one of the styles available in the drop-down menu Formats.
Then choose how many column you want to arrange the index, using the appropriate text field located at the top right, choose a fill character from the menu at the bottom left (the fill character is the one used to fill the space between each index entry and its page number) and click on OK to insert the index into your document.
Update the index
Forgot to make a major change to your document after you’ve already indexed it? Do not fear. Word includes a handy feature of index update which completely automatically changes the contents of the index, correcting incorrect page numbers.
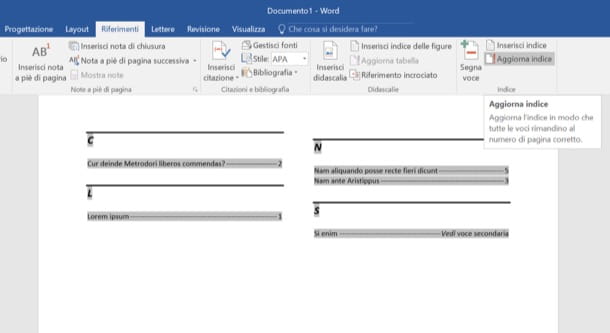
To correct the analytical index in your document, click on the index, go to the tab References of the toolbar and presses the button Update index located at the top right.
In addition to being able to add new items, you can change the index of your document by acting on the titles already present in it. To change one of the titles in the index, search for its reference in the document and change the text in brackets.
For example, if you want to change the title Lorem Ipsum to turn it into Lorem Ipsum 2 you have to search for the text Home {XE «Home» } in the document and turn it into Thank him {XE «Home 2»}. When the operation is completed, select the index, click on the button Update index located on the tab References Word and that’s it.
If, on the other hand, you want to delete an entry from the index, look for references to it in the document and remove the text in brackets. For example, if you want to remove Lorem Ipsum from the index, you need to search for the text Home {XE «Home» } in the document and turn it into Lorem Ipsum. When the operation is completed, select the index and update it by clicking on the appropriate button.
The procedure, as mentioned at the beginning of the post, applies to both Windows and macOS. Unfortunately it is not feasible on smartphones and tablets, nor in Word Online, as these versions of Word do not yet include a function for creating indexes.
How to create a table index in Word
Indexes can also be created for tables and images present in Word. How? In a similar way to that already seen in the previous chapter, always working from the panel References Microsoft Word for computers.
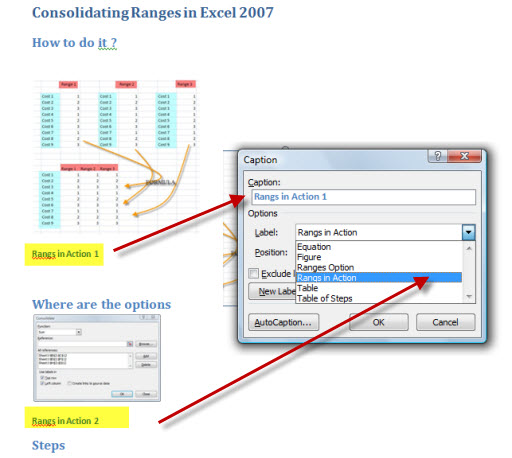
The first step is to create one caption for images and tables in the document. Therefore, click on one of these elements to highlight it: for tables, place the mouse on the grid and then click on thecross icon present in the upper left corner.
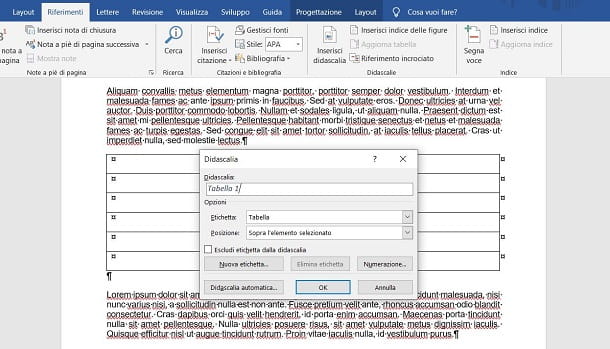
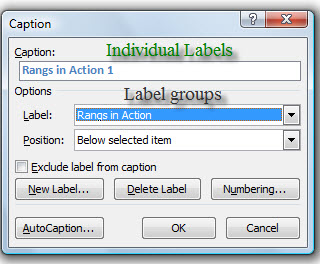
Now that you’ve selected the table or image, go to the tab References, at the top, find the section Didascalia and premium tasto Insert caption. In the screen that is shown to you, fill in the data required to add the caption.
You can leave the present data unchanged, but make sure that the position of the caption is correct (via the drop-down menu Location) and that the label is correct. Regarding the latter option, via the drop-down menu Label you can choose if the content to add the caption is a table, a figure or anequation.
Therefore, make sure that the correct value is set, which in this case will be Table, for a table; or figure, in the case of an image. Then you just have to press the button OK to confirm the insertion of the caption.
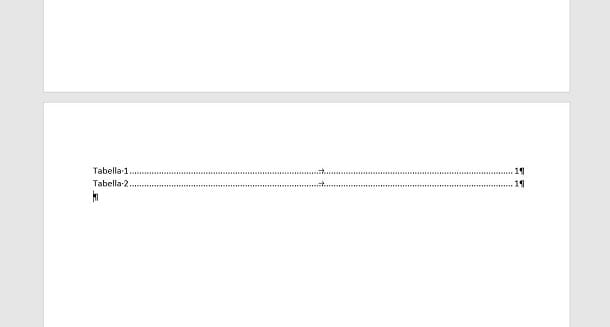
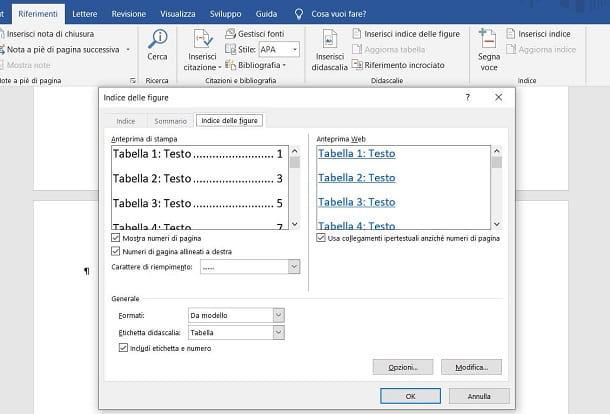
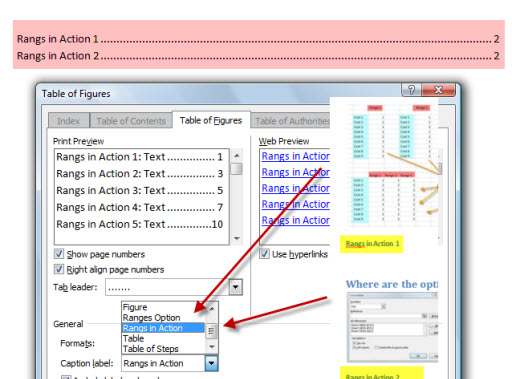
Now that you have labeled all the images and tables in the document, let’s see how to insert the index. Reach, therefore, the last page and insert a ‘page break, using the appropriate button on the card Inserisci. Once this is done, go back to the tab References and fai clic sul tasto Insert index of figures.
In the screen that is shown to you, you can customize the way the index of tables and images will be displayed, deciding if show page numbersis align the latter to the right and which fill character it will have to be between the index label and the page number, just to give you some examples.
Finally, make sure in the section General the correct type of elements you want to show in the index is set, using the drop-down menu Caption label: Choose Table if you want to bring the table index of the document or figure, for images. Then press on OK to confirm the entry.
In case you have added new tables or images, you can update the index by selecting it and clicking the button Update table, which you find in the card References. To remove an entry from the index, however, all you have to do is delete the caption you added to the table or image, simply by removing the text.
How to create Word Auto Index
On the desktop client of Microsoft Word or on Word Online, the Web version of the famous Microsoft word processing software, it is also possible to manage automatic indexes, also defined summaries. Unlike, however, the index, which I told you extensively in the previous chapters, the summary automatically generates an index based on the chapters.
This means that the index will only be generated based on the presence of text set for example as 1 title, 2 title o 3 title. The indexes on specific words or phrases or on tables and figures must instead be generated manually, as I have already explained to you previously.
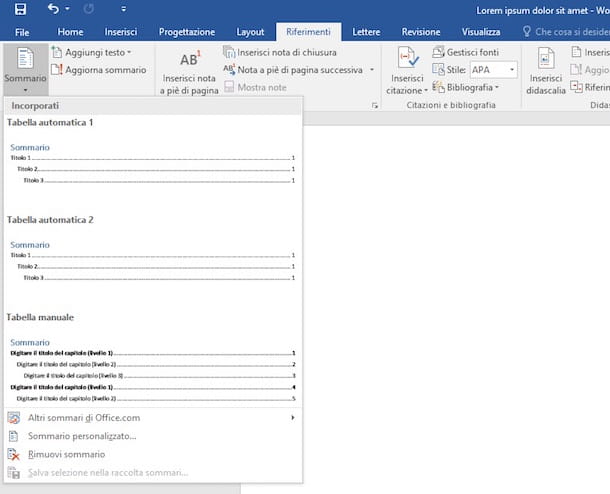
In any case, the functionality of inserting the table of contents on Microsoft Word can be found in the tab Referencesby pressing the key Contents and choosing one of the models present in the panel on the screen. The index can be updated simply by adding or removing chapters and pressing the button Update summary, in the tab References.
In Word Onlineinstead, you cannot directly create a table of contents but, if you have imported or saved the document on OneDrive, you can update the table by clicking on it and reaching the items Table of Contents> Update Table of Contents in the tab References up.
In case you want to deepen the topic related to Word summaries, I suggest you consult my guide dedicated to the topic, in which you will find useful information to be able to quickly create an index for the chapters of your document.
Name
Insert → Index and Tables
Synopsis
While it is possible to create a
table of contents or an index manually, it’s often much easier
to let Word do it. In addition, Word provides greater accuracy and
can more efficiently update the table or index as a document changes
over time.
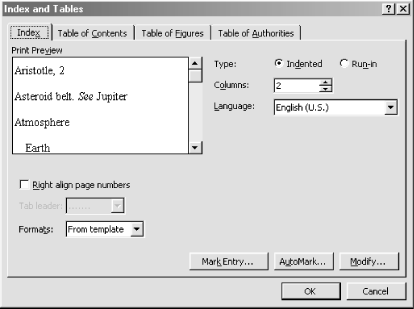
The Index and Tables dialog box provides four
tabs relating to the types of tables/indices: Index, Table of
Contents, Table of Figures, and Table of Authorities.
Index
The Index tab
(Figure 7-21) controls the layout of an index. It
also provides tools for marking index entries within your document.
The preview window shows a sample index that changes to reflect your
format settings.
Figure 7-21. Creating an Index
To create an index for a document, you first have to mark the entries
(words or phrases) that should go into the document. There are two
options for doing this. Mark entries in a document manually using the
Mark Entry button on the Index and Tables dialog. Alternately, supply
an AutoMark file (a separate Word document that lists words to
index).
Clicking the Mark Entry button opens the Mark Index Entry dialog box
(Figure 7-22). Alt-Shift-X also opens this dialog directly from within a document. The dialog stays open so you can quickly add more entries as you work. To mark an entry, select the word or phrase in the document and click the Mark button. Clicking Mark All marks all occurrences of the …
Table of Content is the most know and the firs thing you see for any book or even a well formatted word document but have you wondered of creating a index for all the tables, figures or images and labels you use in the book or word document ?
I asked a couple of people online and even some technical writer but they said why do we need to create index of it when TOC is there. However this is not the case if you have lot of images or tables which are important it becomes as necessary as TOC to list them at one place. This helps lot of people to find it quickly instead of scanning the whole book for it.This is what exactly is table of Figures
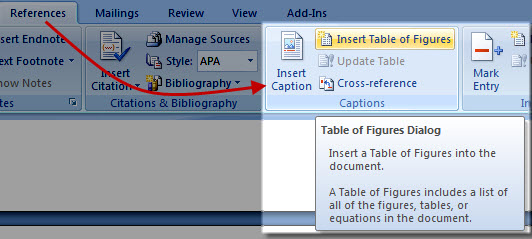
Microsoft Office word ( I am using 2007 ) provides you with an option to create an index like this. Find the menu under References.
How to create Table of Figures ?
The main trick is to group all your figures under different labels. The labels are created by when you give caption for the images or tables. Labels make sure you can group related figures together. Right click any image or table and select insert caption. Make sure to create a new label for the first time or use the already created labels further.
Now next step is to select an area where you want to add this list. Click on Insert Table of Figures and then select the label for which you want to create the index and press OK. This will create the list of all the figures with that label and page numbers
That’s all. Now you can select whichever figure you would feel is important and put it into this index. The only problem I found here was you need to create index for every figure on by one. It doesn’t work like creating TOC but I think this is not met to create a index to include every figure. Just the once which are important.
Updated :
How to create table of content ?
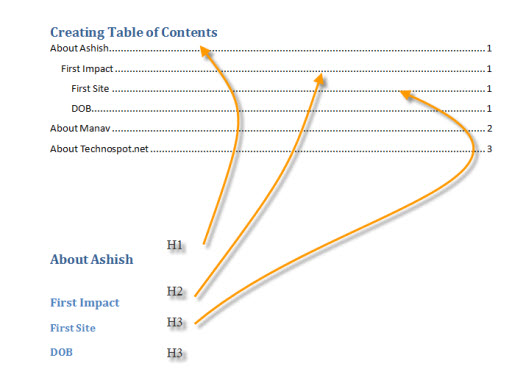
Creating table of content is very easy. The only thing you need to do is to keep your word document organized properly. Word takes this hierarchy
H1 > H2 > H3 > H4
So when it creates TOC H1 becomes the topic, H2 will become sub topic under h1 and so on. Here is an example
Table of content menu is avaible at the same place where table of figures. Just remember to out it under right heading tabs,]
In this post, I’ll share how to build a dynamic Microsoft Word index (i.e. one you can update automatically without having to rebuild it) using 2 methods — the Mark and Index method and using a concordance file.
A Word Index (example shown below) provides a very useful reference for the reader.
Unlike a structured table of contents where the reader scans a general list of topics until they find a one of interest), a Word index allows the reader to search for a specific word or phrase, normally in alphabetical order and go straight to the relevant page (or pages).
How to create a table of contents in Word that updates itself
How to set up multilevel numbering that works perfectly first time
1. Creating a Word Index using Mark & Index
There are two steps for generating an index. Firstly, you must work through your document and ‘mark’ anything that you would like to include in the index. Then, you compile the index, using the marked entries.
Each time you mark an entry, an XE field code is inserted into the document, like this:
{ XE “index entry text” }
XE stands for Index Entry.
Word switches hidden formatting on as soon as you mark an entry so it doesn’t take long before your document starts to look messy. But don’t worry — when you print your document, field codes are not printed.
But don’t worry — when you print your document, the field codes are not printed.
As your Word index grows, It can sometimes be quite hard to locate and isolate a particular index entry to modify or remove it.
For this reason, many editors use a concordance file, which is a table in a separate document that lists everything to be indexed. This file can then be used to compile the index, leaving the original file squeaky clean and making maintenance easy.
(a) Marking a main entry
To mark an entry:
1. Highlight the text that should appear in the index.
2. In Word, select the References tab.
3. Click the Mark Entry icon in the Index group
The Mark Index Entry dialog box is displayed. The text that you highlighted is displayed in the Main Entry box. This is the text that will appear in the index. You can modify it if you wish.
It’s worth learning the keyboard shortcut for marking entries, as you will probably use it a lot when working with large documents. To display the Mark Index Entry dialog box, press
ALT + SHIFT + X
4. Click the Mark button to mark only this occurrence of the word or phrase
Click the Mark All button to flag every occurrence of the word or phrase within the document.
5. Rinse and repeat for each word or phrase you want to include in the index. To save time, you can leave the Mark Index Entry dialog box open – you don’t need to close it for every entry you select a new entry.
An XE field code is inserted into the document
{ XE “index entry text” }
The text within the quotation marks is what appears in the index. It does not have to be the same as the text in the document so you can edit it if you wish.
* Guidelines for marking index entries in Word *
- Spell out abbreviations, e.g. CPU (Central Processing Unit).
- Simplify words or phrases, e.g. change ‘legalities’ to ‘law’.
- Avoid multiple entries of the same keyword, e.g. installing, installations, install procedures. Instead, use one entry – “Install” and list the others as sub-entries (discussed shortly).
- Avoid starting an entry with a vague or ambiguous word, e.g. ‘using’ or ‘to’ or an adjective, e.g. use ‘contact’ rather than ‘multiple contacts’.
- Indexing is case sensitive
(b) Marking a subentry
Subentries are a powerful way of grouping similar items in an index. Let’s say we wanted to index various sub-entries around the main word Console:
- 3DS console
- Switch console
- Game Boy console
If the reader searches the index for Console, they can be redirected to the page(s) for the specific console they are interested in.
In this example, the Main Entry is Console and the 3 subentries are 3DS, Switch and Game Boy.
1. Find the word 3DS in the text and select it.
2. Press Alt+ Shift + X
3. Enter ‘Console‘ into the Main Entry and ‘3DS‘ into the Subentry. Entries will appear in the index exactly as you type them so take care not to misspell anything and be consistent with upper case and lower case.
4. Click the Mark or Mark
All buttons.
(c) Cross-referencing another indexed item
Cross-references are used to direct someone who is searching for one thing to another. For example, if someone searches for Music, the index could say See Audio, or if someone searches for Food, the index could point them towards Nutrition.
Index cross-references should not be confused with the standard Word cross-reference feature which can be found on the Insert menu.
To create an index cross-reference:
1. Select the text to be marked.
2. Press ALT + SHIFT + X
3. Confirm the text in the Main Entry box.
4. Select the Cross-Reference radio button.
5. After “See” type the synonymous text item.
(d) Compile the Word Index
Now that all the entries have been marked it is time to create the index itself.
1. Select the References tab.
2. Click the Insert Index icon in the Index group. The Index dialog is displayed.
3. Choose a Format from the drop-down list. Be aware that different formats select, deselect or change some of the other options in the dialog. The safest approach is to start at the bottom left and work upwards, then to the right.
4. Ensure that Right-align page numbers is selected.
5. Select a tab leader (the tab leader fills the gap between the end of the item and the page number — dots work best).
6. Choose whether to use Run-In or Indent (watch the preview).
7. Choose how many columns to display in the index.
8. Click OK
(e) Update the index (whenever needed)
1. MIn the document, mark any new text you wish to include in the index and remove any existing XE field codes that you no longer require.
2. Click anywhere on the index to show grey shading.
3. Press F9 to refresh the index.
Alternatively, right-click and choose Update Field from the context menu or click the Update Index button on the References ribbon).
How to create a table of contents in Word that updates itself
2. How to remove all field codes from a document
Ideally, a document should be finished before creating an index, but if significant changes have occurred you may want to clear any XE field codes throughout the document and start from scratch. Here’s a simple process to get that job done.
1. Press CTRL H to display the Replace dialog. Alternatively, click the Find & Select icon on the far-right side of the Home ribbon, then choose Replace.
2. In the Find box, type ^d (press SHIFT 6 to get ^).
3. Leave the Replace box empty.
4. Click Replace All (or Find then Replace to process one by one).
Using ^d will remove every field in the document, not just the XE field codes. It is a special character that finds braces (curly brackets) that enclose field codes.
To remove just the XE field codes, use ^d XE.
3. How to create a Word index using a concordance file
Many editors use a concordance file to generate an index for a document. A concordance file is a two-column table that is created in a separate document.
- The left column contains the entries to be marked in the document.
- The right column defines what appears in the index.
- If a text item is separated with a colon then the first part is the main entry and the second part is a sub entry (as pictured in the blue section below).
- Concordance entries are case sensitive, so if a word appears capitalised and not capitalised at various points through the document, create two entries, one for each case variation in the left-hand column, and a common variation in the right-hand column (as pictured in the yellow section below).
- The concordance also provides a good opportunity to handle singles, duplicates and other word variations. Place all the variations in the left column and a common entry for each in the right column (as pictured in the grey section below).
(a) Mark entries within a Word document using the pre-prepared concordance file
1. Select the References tab.
2. Click the Insert Index icon in the Index group.
3. Click the AutoMark.. button.
4. Locate and select the concordance file and click OK . All entries are now marked.
(b) Create the index
1. Select References | Insert Index again.
2. Set your index preferences as discussed in Step 2: Compiling the index (above).
3. Click OK.
(c) Update the concordance and/or index
1. Open the concordance file, make your changes and save the file.
2. Clear the current XE codes in the main document (as described previously).
3. Select References | Insert Index | Automark.
4. Click on the existing index to display the grey shading.
5. Press F9 to refresh the index.
Alternatively, right-click and choose Update Field from the context menu or click the Update Index button on the References ribbon).
4. Key Takeaways
- To create a back-of-book index, text entries should first be marked. The index is then built from the list of marked entries. The index tools are located in the Index group on the References ribbon.
- Entries may be marked once or every time they appear in the document.
- Marked entries have a field code, e.g. { XE «Text to appear in index» } inserted directly after them.
- Field codes are only visible while displaying hidden formatting. They are not printed.
- Press Alt + Shift + X to display the Mark Index Entry dialog box.
- The Mark Index Entry dialog can be left open allowing you to switch between it and the document to mark multiple entries.
- A main index entry may have a number of sub entries.
- An index entry may cross-reference another index entry, if it is a similar item.
- An index may also be created using a concordance file, which is accessed by clicking the AutoMark… button in the Mark Index Entry dialog box.
And that, my friend, is how you build an index page in Word.
How to set up multilevel numbering that works perfectly first time
I hope you found plenty of value in this post. I’d love to hear your biggest takeaway in the comments below together with any questions you may have.
Have a fantastic day.
About the author
Jason Morrell
Jason loves to simplify the hard stuff, cut the fluff and share what actually works. Things that make a difference. Things that slash hours from your daily work tasks. He runs a software training business in Queensland, Australia, lives on the Gold Coast with his wife and 4 kids and often talks about himself in the third person!
SHARE

 in the Paragraph group on the Home tab.