
 При открытии файлов документов или таблиц в Microsoft Word и Excel вы можете увидеть уведомление: «Защищенный просмотр» с пояснением, например: «Будьте осторожны: файлы из Интернета могут содержать вирусы. Если вам не нужно изменять этот документ, лучше работать с ним в режиме защищенного просмотра» или «Изменение файлов этого типа запрещено параметрами политики». Иногда редактировать документ всё-таки требуется, в этом случае может потребоваться выйти из режима защищенного просмотра.
В этой инструкции подробно о том, почему включается этот режим и о том, как убрать защищенный просмотр в Word и Excel.
Назначение защищенного просмотра
Защищенный просмотр для документов Word и Excel по умолчанию включается для:
- Файлов, скачанных из Интернета или полученных через Outlook
- Файлов из небезопасных расположений (например, папок с временными файлами)
- Файлов старых версий Word и Excel
Также, в зависимости от настроек безопасности, защищенный просмотр может включаться для определенных типов документов или документов из сетевых расположений.
Назначение защищенного просмотра — заблокировать действия, которые может выполнить документ на вашем компьютере (а документы могут содержать в себе не только текст, но и исполняемые макросы), что может повысить безопасность в случаях, когда источник документа неизвестен.
Как убрать защищенный просмотр
В зависимости от конкретного сценария открытия документа Word и Excel в режиме защищенного просмотра, возможны следующие действия, чтобы его отключить.
Простое отключение защищенного просмотра
Два простых варианта (при условии, что вам действительно требуется редактирование документа и простой просмотр не подходит), которые сработают для файлов из Интернета при сообщении «Будьте осторожны: файлы из Интернета могут содержать вирусы»:
- Нажать кнопку «Разрешить редактирование» в уведомлении о защищенном просмотре.

- Для файлов, скачанных из Интернета — нажать правой кнопкой мыши по файлу, выбрать пункт «Свойства», отметить пункт «Разблокировать» в свойствах файла, применить настройки и уже после этого открывать его в соответствующем приложении Microsoft Office.


Параметры защищенного просмотра и безопасности в Word и Excel
Если требуется настроить включение защищенного просмотра в определенных условиях, сделать это можно в настройках Word и Excel. Настройки почти одинаковы в обеих программах, привожу пример для Excel:
- Откройте меню Файл — Параметры. Если вы не видите пункт «Параметры», нажмите «Другие…», а затем — этот пункт.
- Откройте пункт «Центр управления безопасностью».
- Нажмите кнопку «Параметры центра управления безопасностью». Параметры защищенного просмотра настраиваются в далее приведенных разделах.

- Защищенный просмотр — здесь задаются параметры, при которых защищенный просмотр будет включен автоматически: для файлов из Интернета и других ненадежных файлов. Отметки можно снять и применить настройки. Список параметров отличается для Word и Excel.
- Параметры блокировки файлов — в этом разделе вы увидите список типов файлов. Те из них, для которых установлена отметка в столбце «Открыть» по умолчанию открываются в режиме защищенного просмотра (что указано ниже списка). Вы можете снять отметки и применить настройки, чтобы файлы открывались в обычном режиме. Этот раздел настроек поможет отключить защищенный просмотр в случае, если «Изменение файлов этого типа запрещено параметрами политики».
- Надежные расположения — список папок (можно добавить свои, в том числе расположения в сети), документы из которых считаются надежными и не открываются в режиме защищенного просмотра.
- Надежные документы — позволяет включить «надежность» для документов из локальной сети или отключить её. Также, если ранее какие-либо документы были отмечены как надежные (вы разрешили их редактирование), здесь можно очистить список таких документов и при последующем открытии они снова откроются в режиме защищенного просмотра.


Видео
Если у вас остаются вопросы, касающиеся режима защищенного просмотра в Microsoft Office, задавайте их в комментариях — решение должно найтись.
Files from the Internet and from other potentially unsafe locations can contain viruses, worms, or other kinds of malware that can harm your computer. To help protect your computer, files from these potentially unsafe locations are opened as read only or in Protected View. By using Protected View, you can read a file, see its contents and enable editing while reducing the risks.
Note: If your machine has Application Guard for Microsoft 365 enabled, documents that previously opened in Protected View will now open in Application Guard for Microsoft 365.
Included in this article
Why is my file opening in Protected View?
How do I exit Protected View so that I can edit, save, or print?
Why can’t I exit Protected View?
A problem was detected with my file
I want to change my Protected View settings
I want to revoke trust from a document/documents that I’ve previously trusted to not open in Protected View
Protected View Trust Center settings explained
What happens to add-ins in Protected View?
What happens to cloud fonts in Protected View?
How do I use Protected View with a screen reader?
Why is my file opening in Protected View?
Protected View is a read-only mode where most editing functions are disabled. There are several reasons why a file opens in Protected View:
-
The file was opened from an Internet location — When you see the message in Protected View that says «Be careful — files from the Internet can contain viruses. Unless you need to edit, it’s safer to stay in Protected View.», the file is being opened from the Internet. Files from the Internet can have viruses and other harmful content embedded in them. We recommend you only edit the document if you trust its contents.

-
The file was received as an Outlook attachment and your computer policy has defined the sender as unsafe — When you see the message in Protected View that says «Be careful — email attachments can contain viruses. Unless you need to edit, it’s safer to stay in Protected View.», the file was received from a potentially unsafe sender. We recommend you only edit the document if you trust its contents.
-
The file was opened from an unsafe location — When you see the message in Protected View that says «This file was opened from a potentially unsafe location. Click for more details.», the file was opened from a folder that is unsafe. An example of an unsafe location is your Temporary Internet Files folder. We recommend you only edit the document if you trust its contents.
-
The file is blocked by File Block — The following images are examples. Learn more about File Block
Editing isn’t allowed.
Editing is allowed, but not recommended unless you completely trust its contents.
-
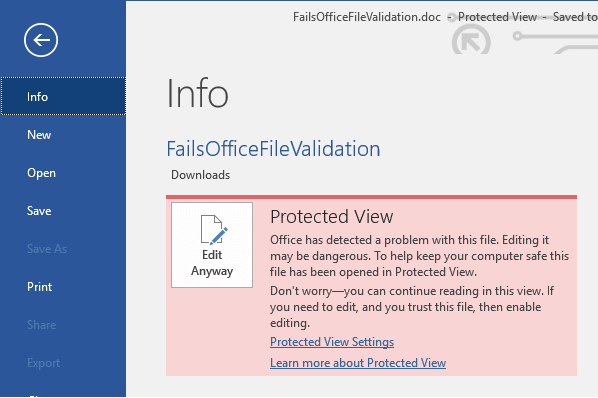
File validation failure — When you see a message in Protected View that says «Microsoft 365 has detected a problem with this file. Editing it may harm your computer. Click for more details.», the file didn’t pass file validation. File validation scans file for security problems that can result from changes in the file structure.
-
The file was opened in Protected View by using the Open in Protected View option — When you see the message in Protected View that says «This file was opened in Protected View. Click for more details.«, you chose to open the file in Protected View. This can be done by using the Open in Protected View option:
1. Click File > Open.
2. On the Open dialog box, click the arrow next to the Open button.
3. From the list, click Open in Protected View.
-
The file was opened from someone else’s OneDrive storage— When you see the message in Protected View that says «Be careful — This file is from someone else’s OneDrive. Unless you trust this person and want to continue collaborating with them, it is safer to stay in Protected View.», you opened a document from a OneDrive folder other than your own, for example, when someone has shared a file in OneDrive with you. Such files may be untrusted and could beused to cause harm to your computer. We recommend you trust documents only if you trust the person to whom this OneDrive location belongs.
Notes:
-
This functionality is currently only available in Microsoft 365 clients.
-
Once you click «Trust Documents From This Person» all subsequent documents shared from this OneDrive location will no longer open in Protected View.
-


Important: Administrators can customize the list of potentially unsafe locations to include additional folders they also consider unsafe.
How do I exit Protected View so that I can edit, save, or print?
If you must read the file, and don’t have to edit it, you can remain in Protected View. If you know the file is from a trustworthy source, and you want to edit, save, or print the file, you can exit Protected View. After you leave Protected View, you’ve effectively remove read only, and the file becomes a trusted document.
Exit Protected View and edit when the yellow Message Bar appears
-
On the Message Bar, click Enable Editing.
Exit Protected View and edit when the red Message Bar appears
-
Click File > Edit Anyway.
Caution: We recommend you only do this if the file’s source and content are trusted by you.
Why can’t I exit Protected View?
If you can’t exit Protected View, it’s possible that your systems administrator has rules established that prevent leaving Protected View. Speak to your administrator to determine whether such rules have been made.
A problem was detected with my file
Microsoft 365 found a problem with your file and it might be a security risk. Opening the file in Protected View helps protect your computer and we recommend that you edit the file only if you trust the person who sent it to you, and if the file doesn’t look suspicious.
Why do I see this message?
This message can appear for a malicious file, which was created by a hacker to infect your computer with a virus or steal important information. This message means that editing the file could be dangerous. Sometimes the message appears for files that are damaged, for example:
-
The disk where the file is stored could be worn out or broken.
-
The file was created or edited with a program that has a problem.
-
An unexpected error occurred while copying the file to your computer, which can be caused by a problem with your Internet connection.
-
There could be a problem with how Microsoft 365 looks for problems in files. We work to make it better, but it’s not perfect.
Can I edit the file?
If the file is from someone you know and trust, you can choose to edit it. But we recommend that you avoid editing a file that seems suspicious. For example:
-
The file came from someone you don’t know or trust.
-
You weren’t expecting to receive the file or it doesn’t seem like the kind of file that person would send you.
-
The content of the file seems unusual, for example, it appears to be a bill for something you never bought, or it’s causing your computer to display errors.
If the file seems suspicious, close the file and delete it from your computer. We recommend you don’t edit it. To ease suspicion, you can call or email the person who sent you the file to confirm.
The following image is an example of the Edit Anyway button in the Microsoft 365 Backstage view.

What type of files cause file-validation errors?
-
Word 97-2003 files (.doc, .dot)
-
Excel 97-2003 files (.xls, .xla, .xlt, .xlm, .xlb, .xlt)
-
PowerPoint 97-2003 files (.ppt, .pot., pps, .ppa)
I want to change my Protected View settings
We advise speaking with your administrator before you make changes to your Protected View settings.
-
Click File > Options.
-
Click Trust Center > Trust Center Settings > Protected View.
-
Make selections that you want.
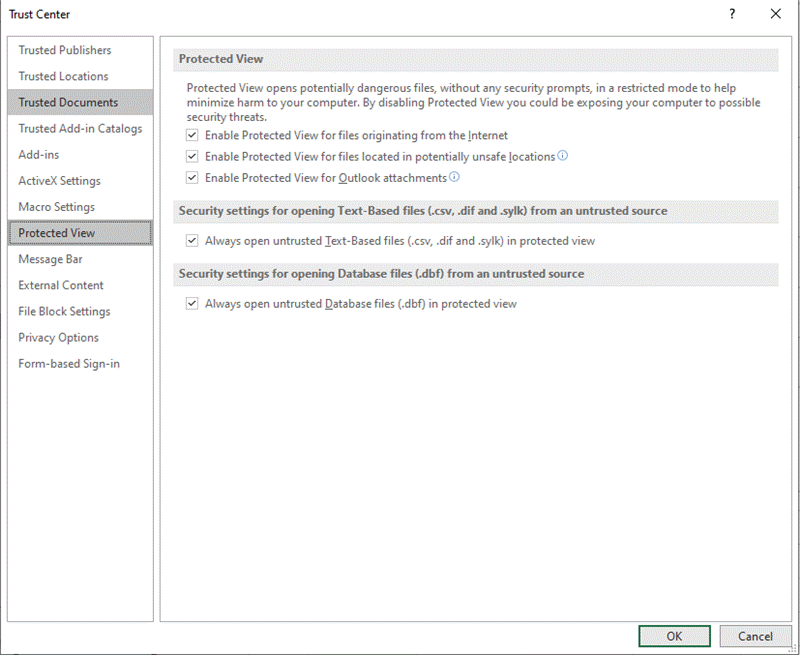
Protected View Trust Center settings explained
-
Enable Protected View for files originating from the Internet The Internet is considered an unsafe location because of its many opportunities for malicious intent.
-
Enable Protected View for files that are located in potentially unsafe locations This refers to folders on your computer or network that are considered unsafe, such as the Temporary Internet folder or other folders assigned by your administrator.
-
Enable Protected View for Outlook attachments Attachments in emails can come from unreliable or unknown sources.
-
Always open untrusted Text-Based files
(.csv, .dif and .sylk)
in protected view If this Excel-specific setting is enabled, text-based files opened from an untrusted location are always opened in Protected View. If you disable or don’t configure this setting, text-based files opened from an untrusted location are not opened in Protected View.This setting can also be configured by an administrator as a policy via Group Policy or the Microsoft 365 cloud policy service.
Note: This policy setting only applies to Microsoft 365 products.
-
Always open untrusted Database files (.dbf) in protected view If this Excel-specific setting is enabled, database files opened from an untrusted location are always opened in Protected View. If you disable or don’t configure this setting, database files opened from an untrusted location are not opened in Protected View.
This setting can also be configured by an administrator as a policy via Group Policy or the Microsoft 365 cloud policy service.
Note: This policy setting only applies to Microsoft 365 products.
I want to revoke trust from a document/documents that I’ve previously trusted to not open in Protected View
If you previously trusted a document or documents to open outside of Protected View by either (1) clicking «Enable Editing» or «Trust Documents From This Person» in the message bar or (2) clicking on «Edit Anyway» when the file fails validation, please refer to guidance under Trusted documents for removing this trust decision and making such documents re-open in Protected View.
What happens to add-ins in Protected View?
Add-ins may run when a file opens in Protected View, but may not function as expected. If your add-ins aren’t running correctly, contact the add-in’s author. An updated version, which is compatible with Protected View, may be needed.
What happens to cloud fonts in Protected View?
It’s possible the person who sent you the document used a cloud font, which is a font that doesn’t ship with Windows or Microsoft 365 but which must be downloaded from the Internet the first time it’s used. If so, and it’s a font you don’t already have installed, that font won’t download while you’re in Protected View. Word will try to substitute another font that will hopefully look okay. If you’re confident that the document is safe, and want to see it the way the author intended, you’ll need to enable editing so that Word can download and install the correct font.
Note: If Word is unable to find any compatible fonts to substitute you might see black boxes where the text should be. Enabling editing so the correct font can download should fix the problem.
How do I use Protected View with a screen reader?
When you are in protected view, editing is locked, so you can’t cursor around the document as expected. However, if you need to navigate through a document in Protected View with a screen reader, you can press F7 to turn on caret browsing. This action should allow you to navigate through the text without being in edit mode.
See Also
Open a document after a file corruption error
Check file compatibility with earlier versions
Add or remove protection in your document, workbook, or presentation
Microsoft Word, Excel, and PowerPoint open the file in the Protected View mode when you open a file from an online location, such as a cloud storage location, email message, or another insecure location. In the Protected View mode, most editing functions are disabled. Microsoft apps do this to prevent malicious code from accessing your computer.
When the file is opened in Protected View, Word, Excel, or PowerPoint displays:
- Protected View label in the title bar to the right of the file name,
- a yellow banner at the top of the content pane explains why the file was opened in Protected View.
For example:


Read-only the file opened in Protected View
If you are not going to change the file content, you can hide the banner by clicking the Close button (the X) at its right end.
Open a file in Protected View
To open a file in the Protected View mode, in the Open dialog box (see how to open this dialog box in Word, in Excel), in the Open list, click the arrow on the right side of the Open button, then select Open in Protected View from the drop-down list.
For example, in Word:

Note: You may face a situation when some types of files, regardless of the location, don’t open, and a warning message is displayed. For example:

See File Block settings below to configure which files can be opened and saved or denied opening or saving.
Modify, edit the file opened in Protected View
If you are sure that the file was received/uploaded from a safe location or the trusted sender and want to edit the file content, click the Enable Editing or Edit Anyway button.
Note: Microsoft Word, Excel, and PowerPoint remember files you have edited even in suspicious locations. The next time you open this file, it may open without the Protected View mode warning. See how to stop remembering such files below (in the Trusted Documents).
Open files from a location without a Protected View
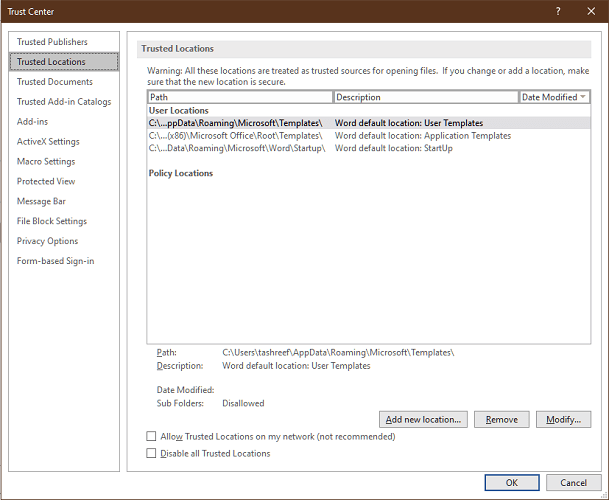
To open a file from a specific online storage folder without switching into the Protected view mode, you need to add it (and its subfolders if needed) to the Trusted Locations list. Do the following:
1. On the File tab, click the Options button:

2. In the *** Options dialog box, on the Trust Center tab, click the Trust Center Settings… button.
For example, in Word:

3. In the Trust Center dialog box, on the Trusted Locations tab, the User Locations list shows the folders from which you can open files without Protected View.
For example, in Word:

You can add a new location to this list, remove and modify the existing locations.
Change settings to open files without Protected View
In Microsoft Word, PowerPoint, and Excel, there are three core settings selected by default:

- Enable Protected View for files originating from the Internet controls files opened from a website. To open any file from the Internet without the Protected View mode, unselect this check box.
- Enable Protected View for files located in potentially unsafe locations controls files opened from certain folders considered unsafe, such as Temporary internet files. Unselect this check box if you want to open all files without Protected View.
- Enable Protected View for Outlook attachments controls attachments that you try to open from an email message in Microsoft Outlook. To open any files from the Outlook attachments, unselect this check box.
Excel adds two more settings, both of which are unselected by default:

- Always open untrusted Text-Based files (.csv, .dif and .sylk) in Protected View
- Always open untrusted Database files (.dbf) in Protected View
These two additional options control how to open specified files in Excel. If you prefer to open these files in the Protected View mode, select the appropriate check box.
File Block settings
The Block Files list in Word, Excel, and PowerPoint contains file types prohibited from opening or saving in Word, Excel, and PowerPoint, respectively. You can change the list of Block Files by selecting or deselecting the file types that the app opens in Protected View. To make changes, do the following:
1. On the File tab, click the Options button.
2. In the *** Options dialog box, on the Trust Center tab, click the Trust Center Settings… button.
3. In the Trust Center dialog box, on the File Block Settings tab, in the File Type list, select or deselect the Open check box and the Save check box to prohibit the file type from opening and saving.
For example, in Word:

Note: Unfortunately, when writing this tip, options of the Open behavior for selecting file types group work incorrectly. The selected Open check box prohibits from opening the file type even if the Open selected file types in Protected View and allow editing check box is selected. The same problem occurs for the selected Save check box.
Trusted documents
By default, Word, Excel, and PowerPoint remember which files were marked as safe by the user (saved without Protected View). The next time you open such a file, Word, Excel, and PowerPoint will not open it in Protected View, even if the file has been modified.
To stop remembering such files, do the following:
1. On the File tab, click the Options button.
2. In the *** Options dialog box, on the Trust Center tab, click the Trust Center Settings… button.
3. In the Trust Center dialog box, on the Trusted Documents tab, unselect the Allow documents on a network to be trusted check box:

To clear the files already remembered in Word, Excel, or PowerPoint, click the Clear button. In the Microsoft message, click Yes:

Here’s how to get rid of Protected View in Word via Trust Center or Registry. Caution advised ❗
by Tashreef Shareef
Tashreef Shareef is a software developer turned tech writer. He discovered his interest in technology after reading a tech magazine accidentally. Now he writes about everything tech from… read more
Updated on January 12, 2023
Reviewed by
Alex Serban

After moving away from the corporate work-style, Alex has found rewards in a lifestyle of constant analysis, team coordination and pestering his colleagues. Holding an MCSA Windows Server… read more
- When opening a file downloaded from the internet in Word, you may have noticed it is opening in Protected View.
- While the feature reduces risks, it can also disable macros and other useful content.
- We will show you how to turn off Protected View in Word without a password and work with it at your convenience.

XINSTALL BY CLICKING THE DOWNLOAD FILE
This software will repair common computer errors, protect you from file loss, malware, hardware failure and optimize your PC for maximum performance. Fix PC issues and remove viruses now in 3 easy steps:
- Download Restoro PC Repair Tool that comes with Patented Technologies (patent available here).
- Click Start Scan to find Windows issues that could be causing PC problems.
- Click Repair All to fix issues affecting your computer’s security and performance
- Restoro has been downloaded by 0 readers this month.
First things first – what is a Protected View? Protected View is a read-only mode enabled for Microsoft office documents downloaded from the internet and other potentially unsafe sources.
For instance, when you open the document with an embedded tracker, Protected View will display a message showing the document to be unsafe. The document in View-Only mode will not load or download any images to reduce risk.
Should you choose to enable editing and let the image load from the sender’s server the tracker will leak the following information from your PC: your IP address, browser, as well as OS and MS Office version.
Aside from the Web tracker method, there are also SMB Injection attacks. This time, the attacker will use UNC File path specification instead of HTTP file reference to reduce suspicion.
When Word tries to authenticate the connection, the responder on the attacker’s server will steal your credentials.
Why is my Word document opening in Protected View?
- The file was opened from an internet location – Your file will open in Protected View if Microsoft Office determines the file to be opened from an internet location.
- The file was opened from an unsafe location – Even if you have opened a file from a local folder, the file may still open in Protected View if Office determines there is a problem with this file.
- Outlook file from an unsafe sender – Microsoft Outlook will open an Outlook attachment in Protected View if your computer policy has defined the sender as unsafe.
Files from the Internet and other potentially unsafe sources can contain viruses or malware that can harm your computer or compromise sensitive data.
To reduce the risk of malware attacks from Internet files, Word opens the document in Protected View. This way you can view the document while reducing the risk.
So, unless you made the necessary modifications, MS Word will (and should) open unsafe documents in Protected View by default.
However, the feature can be bothering. Some users even complained that occasionally, Word gets stuck when opening in Protected View.
Some PC issues are hard to tackle, especially when it comes to corrupted repositories or missing Windows files. If you are having troubles fixing an error, your system may be partially broken.
We recommend installing Restoro, a tool that will scan your machine and identify what the fault is.
Click here to download and start repairing.
Don’t worry, we will show you how to turn off Protected View in Word 2007, 2016, 2019, or 365, without any password.
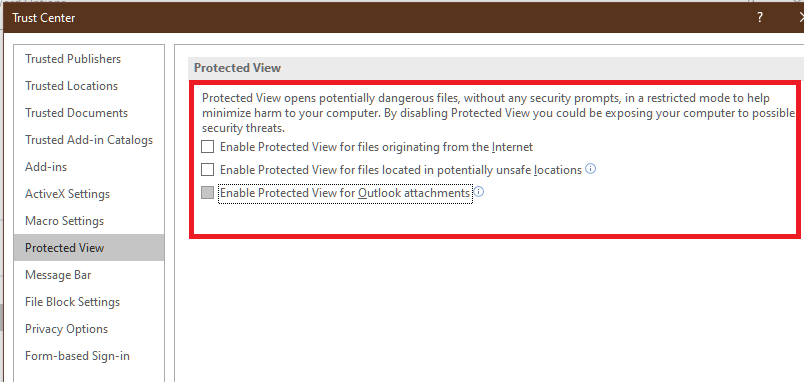
How do I turn off Protected Mode in Word?
- Open Word and click on the File menu.
- Next, choose Options and select Trust Center.
- Open the Trust Center options and select Protected View.
- Uncheck all three options listed to disable Protected View.

- Finally, click OK to save the changes.
Next time you open any Word document, Protected View will not screen the document for security issues. However, only disable Protected View if you trust the document and the source.
Alternatively, you can also disable Protected View in Office via the Registry. The process is fairly similar for all the Office apps, Word, Excel, PowerPoint, and so on.
- To do that, simply open the Registry Editor and navigate to this path:
ComputerHKEY_CURRENT_USERSoftwareMicrosoftOfficeWordSecurityProtectedView - In the right pane of the editor, you should see 3 values: DisableAttachementsInPV, DisableInternetFilesInPV, and DisableUnsafeLocationsInPV.
- Set each value to 1 to disable Protected View in Word.
⚙️ How to work with Protected View in Microsoft Office
Protected View for Microsoft Office apps offers three core settings as listed below:
- Enable Protected View for Files Originating from the Internet
- Enable Protected View for Files Located in Potentially Unsafe Location
- Next, enable Protected View for Outlook Attachments
You can click on Enable Editing to make changes and load other content of the document like images from the Internet.
1. Reenable Protected View for Trusted Files
- Open File > Options.
- Trusted Center > Trusted Center Settings.
- Open Trusted Documents.
- Click on the Clear button to Clear all Trusted Documents so that they are no longer trusted.
- Now all the files that you had enabled editing for will open in read-only mode.
If you want to reenable Protected View for the document that you may have bypassed earlier by enabling editing, follow the above steps.
- The File Couldn’t Open in Protected View [Excel, Word]
- Can’t Edit Word Document: 7 Ways to Fix it on Windows 10
- Unable to edit Word 2016 documents [SIMPLE GUIDE]
- FIX: This workbook was opened in read-only mode [Office 365]
- FIX: SharePoint Documents won’t Open in Application Solved
2. Add Trusted Locations for trusted files
- Open File > Options.
- Go to Trusted Center > Trusted Center Settings.
- Open Trusted Locations.

- Here you can add or remove the path to folders that you want to be included in the Trusted Location.
Files and folders from Trusted Location will open without bumping into the Protected View mode.
Protected View in Microsoft Word is a security feature that protects you from accidentally opening potentially harmful files that come embedded with malware or even trackers.
This is how to turn off Protected View in Word. However, make sure that you reenable it once you are done working with the documents.
![]()
Newsletter
All 1.2 billion Microsoft Office users have probably benefited from Word’s Protected View format. When you download documents or format them to Word from the Internet, especially from cloud services (like OneDrive, Google Drive, Dropbox, and Box) or as email attachments, you’ll get the document in “Protected View.”
Protected View is Microsoft’s way of protecting your computer from harm while giving you access to the document you downloaded. Giving reasons for setting documents to Protected View, Microsoft’s website reads:
Files from the Internet and from other potentially unsafe locations can contain viruses, worms, or other kinds of malware that can harm your computer. To help protect your computer, files from these potentially unsafe locations are opened in Protected View. By using Protected View, you can read a file and see its contents while reducing the risks.
However, Word isn’t locked to the Protected View format. Switching from Protected View to editing mode takes only a few clicks. You’ll notice a yellow Message Bar. Click “Enable Editing” as you’d see on the Message Bar. Next, click File and then Edit Anyway. You can also skip Protect View altogether and go straight to editing mode whenever you download Word-formatted documents from the Internet.
The obvious first step is to open your Microsoft Word to see the display as shown in the image below. Unless you’re using older versions of Word, this is what you should see when you open the software.

Now, choose a blank document. This should be the blank document on the top-left side of your desktop as seen in the red box and arrow below.

Next, click on the ‘File’ tab. You’ll see this tab on your blank file just as indicated by the red arrow below.

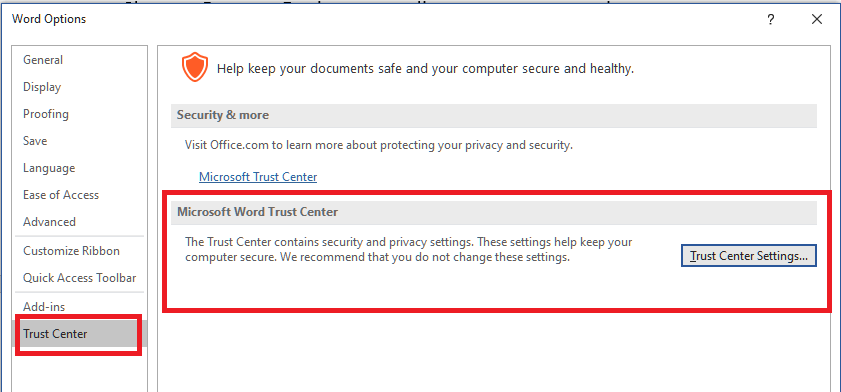
Click on Options. This is the last link to the bottom-left side of your screen as indicated by the arrow below.

Once you click on Options (from the step before this one), you’re taken to Word Options where you can access the Trust Center. The last link on the bottom-left side of your screen is labeled “Trust Center” as indicated by the arrow below.

Now, look at the bottom-right side of Trust Center to find a button labeled “Trust Center Settings.” Click on that button as indicated by the arrow below.

Next, select “Protected view” which is the fifth link from the bottom on the left side of your screen.

Depending on your preferences, you may choose one of three types of Protected Views or a combination of them. Protected View may be set for:
- Files with origins from the Internet (like your cloud storage, downloads from websites and others). This is basically all your files.
- Files that are located in places that might be unsafe, a public domain or an online public repository.
- Your desktop email client, e.g. Outlook.

Conclusion
With your Protected View disabled, you can easily download and instantly start editing documents from the Internet, emails, cloud, and others. Just as Microsoft indicates on their website, Protect View is a security feature to protect you from harm’s way. Unless you’re always sure that the documents you download are safe, it’s best to leave your Word’s Protected View on.

Nicholas Godwin
Nicholas Godwin is a technology researcher who helps businesses tell profitable brand stories that their audiences love. He’s worked on projects for Fortune 500 companies, global tech corporations and top consulting firms, from Bloomberg Beta, Accenture, PwC, and Deloitte to HP, Shell, and AT&T. You may follow his work on Twitter or simply say hello. His website is Tech Write Researcher.
Subscribe to our newsletter!
Our latest tutorials delivered straight to your inbox
Protected View in Microsoft Word opens files in an uneditable mode that restricts certain elements, such as linked images and cloud fonts, that may be infected with viruses or malware. Protected View is stricter than Read-Only mode.
Unless you have changed your security settings, Word should automatically open potentially unsafe files in Protected View. Potentially unsafe files include those that originate from the internet, email attachments, or someone else’s cloud storage. Although this process is typically automatic, you can manually open files in Protected View, as shown in this tutorial.
 Protected View does not provide complete protection from infected files. Any time you open a file from an unknown source, you are risking corruption or infection.
This tutorial is available as a YouTube video showing all the steps in real time.
Watch more than 200 other writing-related software tutorials on my YouTube channel.
The images below are from Word for Microsoft 365. These steps also apply to Word 2021, Word 2019, Word 2016, and Word 2013. Protected View is not currently available in Word for Mac.
If you are using Word through an enterprise license, you may have a feature called Application Guard instead of Protected View. Please contact your organization’s network administrator for information about Application Guard.
- Launch your Word software.
- Select the Open button in the Home screen.

Alternatively, if you have another document open already, select the File tab in the ribbon followed by the Open tab in the Backstage view.

- Select the Browse button.

- Locate and select the file in the Open dialog box.
Important Note: Don’t double-click the file! Double-clicking will open the file as a trusted document (i.e., in the normal mode).

- Select the Open menu arrow. (Be careful not to select the Open button itself.)
![]()
- Select Open in Protected View from the drop-down menu.

The file should open with a yellow warning bar at the top of the screen. If you see a red warning bar, that means Microsoft has detected a threat within the file.

- Select the Enable Editing button if you want to exit Protected View.

Important Note: When you manually open a file in Protected View and then close the file, it won’t automatically reopen in Protected View.
Related Resources
How to Password Protect Files in Microsoft Word
How to Restrict Editing in Microsoft Word
How to Restrict Style Changes in Microsoft Word

on
May 8, 2019, 11:43 PM PDT
How to work with Protected View in Microsoft Office
Microsoft’s Protected View feature tries to protect you against potentially malicious files and documents. Here’s how to use it.
We may be compensated by vendors who appear on this page through methods such as affiliate links or sponsored partnerships. This may influence how and where their products appear on our site, but vendors cannot pay to influence the content of our reviews. For more info, visit our Terms of Use page.

Opening Microsoft Office documents from unknown sources can present a security risk because such files can carry viruses. To protect yourself and your computer from malware and other threats, Microsoft offers a feature called Protected View.
When enabled, Protected View opens Office documents in read-only mode with macros and other content disabled. You can easily bypass Protected View if you need to edit a certain document or other file, but you should also know where and how to manage Protected View. Among the core Microsoft Office applications, Word, Excel, and PowerPoint all include the Protected View feature. Let’s see how this works.
LEARN MORE: Office 365 Consumer pricing and features
First, you’ll want to review the settings for Protected View.
- Open Word, Excel, or PowerPoint.
- Go to File and then Options.
- From the Options window, click the entry for Trust Center.
- At the Trust Center window, click the button for Trust Center Settings.
- Click the entry for Protected View.
Microsoft Word, PowerPoint, and Excel offer three core settings, all of which are checked by default (Figure A):
- Enable Protected View For Files Originating From The Internet. This setting controls documents opened from a website.
- Enable Protected View For Files Located In Potentially Unsafe Locations. This setting controls files opened from certain folders considered unsafe, such as Temporary Internet Files.
- Enable Protected View For Outlook Attachments. This setting controls attachments that you try to open from an email message in Microsoft Outlook.
Figure A

Excel adds two more settings, both of which are unchecked by default (Figure B):
- Always Open Untrusted Text-Based Files (.csv, .dif and .sylk) In Protected View
- Always Open Untrusted Database Files (.dbf) In Protected View
Figure B

When done viewing the Protected View settings, click OK or Cancel to close the various options windows.
SEE: 30 things you should never do in Microsoft Office (free PDF) (TechRepublic)
Specific types of files also can cause a red flag with Protected View. Documents from older and outdated versions of Office, files that fail to pass validation, and files opened from someone else’s OneDrive storage might open in Protected View.
If you try to open a file from a location controlled by Protected View, the file opens in Read-Only Mode. You’ll see a message telling you that the file was opened from a potentially unsafe location. If you simply need to read or print the file, you can remain in Protected View. If you need to edit it, you can easily enough click on the button to Enable Editing (Figure C).
Figure C

If you’re expecting the file and you know and trust the source, then you may be fine bypassing Protected View. If not, you’ll want to exercise the usual caution. If you bypass Protected View to edit a file and then save that file, it will open in edit mode any time you try to reopen it.
Let’s say you’re working with several files and locations one after the other and you keep running into Protected View. You can always return to the Protected View settings and uncheck the specific restriction. After you’re done, you should reenable the setting you disabled (Figure D).
Figure D

At the Trust Center window, you’ll want to check out other settings related to Protected View. Click on the entry for Trusted Documents. One setting allows documents on a network to be trusted. You typically want to keep this setting checked so that you can easily open documents on your local network without running into Protected View (Figure E).
Figure E

Next, maybe you’ve bypassed Protected View for certain files and documents so you can edit them, but now you want them to once again open in Protected View by default. To do this, click the Clear button next to Clear All Trusted Documents So That They Are No Longer Trusted. Click Yes to confirm (Figure F).
Figure F

Now any document for which you bypassed Protected View in the past will once again open with Protected View enabled.
Next, click the entry for Trusted Locations. This window shows the trusted user folders from which you can open documents without bumping into Trusted View. You can remove or modify the existing locations and add any new folders to be trusted (Figure G).
Figure G

You can manage Protected View and related settings for your entire organization through Group Policy. Download and set up the necessary Microsoft Office administrative templates for your version of Office. In Group Policy, navigate to the following setting: User Configuration | Administrative Templates. Navigate to the folder for the Office application you want to manage, such as Microsoft Word. Then move to the following setting: Word Options | Security | Trust Center. Here you’ll find settings for Protected View, Trusted Locations, and File Block Settings, any of which you can configure (Figure H).
Figure H

Also See
-
How to become a cloud engineer: A cheat sheet
(TechRepublic) -
How to add a drop-down list to an Excel cell
(TechRepublic) -
Cost comparison calculator: G Suite vs. Office 365
(Tech Pro Research) -
Windows 10 security: A guide for business leaders
(Tech Pro Research) -
Microsoft Office has changed, how you use it should too
(ZDNet) -
Best cloud services for small businesses
(CNET) -
Best to-do list apps for managing tasks on any platform
(Download.com) -
Microsoft: More must-read coverage
(TechRepublic on Flipboard)
-
Microsoft
-
Security
-
Software
If you want to open old Word documents in Protected View in the new Microsoft Word, here is how you can do that. It is possible to open old Word documents such as Word 2003, Word 2007, Word 97, etc., documents in the latest version of Word in the Protected View. You can enable or disable this setting using the in-built settings panel, Local Group Policy Editor, and the Registry Editor.
To open old Word documents in Protected View, follow these steps:
- Open Word on your PC.
- Click on Options.
- Switch to the Trust Center tab.
- Click on the Trust Center Settings button.
- Go to the File Block Settings tab.
- Check all old Word checkboxes in the Open column.
- Click the OK button.
To learn more about these steps, continue reading.
First, you need to open Microsoft Word and click on the Options menu to open the Word Options panel. Then, navigate to Trust Center > Trust Center Settings > File Block Settings.
Here you need to ensure that the Open selected file types in Protected View option is selected. Then, tick all the Open checkboxes of old Word versions.
For example, you can check these checkboxes:
- Word 2007 and later Documents and Templates
- Word 2007 and later Binary Documents and Templates
- Word 2003 and Plain XML Documents
- Word 2000 Binary Documents and Templates
And more.

Finally, click the OK button to save the change.
How to open old Word documents in Protected View using Registry
To open old Word documents in Protected View using Registry, follow these steps:
- Search for regedit in the Taskbar search box.
- Click on the individual search result.
- Click the Yes button.
- Go to Microsoftoffice16.0wordin HKCU.
- Right-click on word > New >Key and name it as security.
- Do the same to create another kay named fileblock.
- Right-click on fileblock > New > DWORD (32-bit) Value.
- Name it as word2000files.
- Double-click on it to set the Value data as 4.
- Click the OK button.
Let’s learn more about these steps.
First, you need to open the Registry Editor on your computer. To do that, search for regedit in the Taskbar search box, click on the individual search result and click the Yes button.
Then, navigate to this path:
HKEY_CURRENT_USERSoftwarePoliciesMicrosoftoffice16.0word
Right-click on word > New > Key and name it as security.
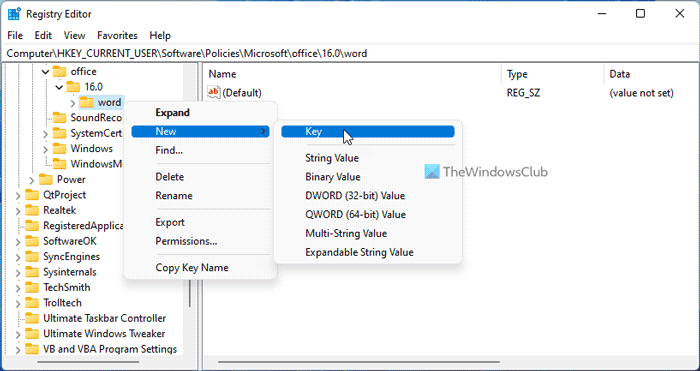
Then, repeat the same steps to create another sub-key under security and call it fileblock. Following that, you need to create a REG_DWORD value. To do that, right-click on fileblock > New > DWORD (32-bit) Value and set the name as word2000files.
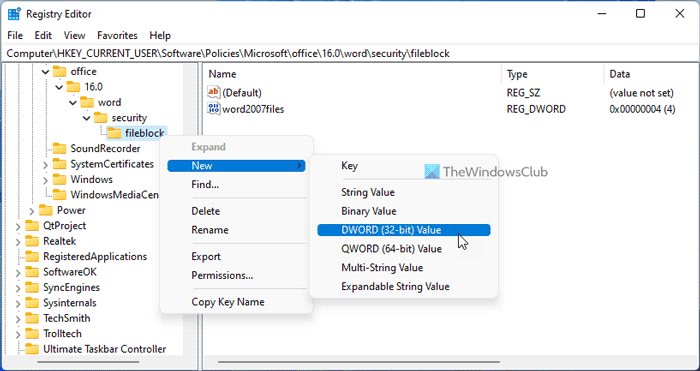
However, if you want to block other files, you have to create more REG_DWORD values and name them as follows:
- openxmlfiles
- word2003files
- word2007files
- word95files
- word97files
- wordxmlfiles
Then, double-click on it and set the Value data as 4.
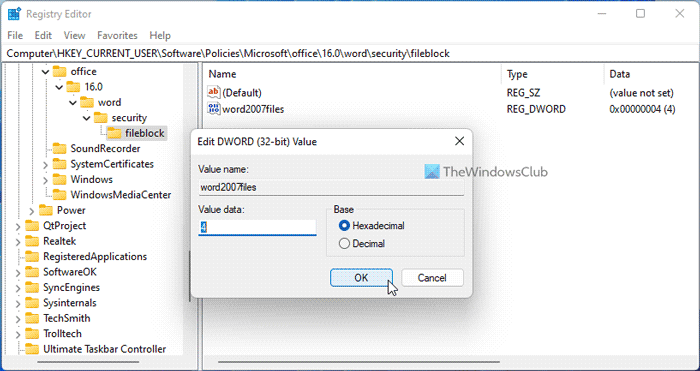
Finally, click the OK button and restart your computer.
Read: How to open OLD Excel spreadsheets in Protected View
How to open old Word documents in Protected View using Group Policy
To open old Word documents in Protected View using Group Policy, follow these steps:
- Press Win+R > type gpedit.msc > press the OK button.
- Go to File Block Settings in User Configuration.
- Double-click on the Word 2000 binary documents and templates setting.
- Choose the Enabled option.
- Select the Open in Protected View option.
- Click the OK button.
- Repeat these steps for other settings.
To know more about these steps, keep reading.
To get started, press Win+R to open the Run prompt, type gpedit.msc, and press the OK button to open the Group Policy on your PC. Then, go to this path:
User Configuration > Administrative Templates > Microsoft Word 2016 > Word Options > Security > Trust Center > File Block Settings
Here you can find these settings:
- Word 2000 binary documents and templates
- Word 2003 binary documents and templates
- Word 2003 and later binary documents and templates
- Word 2007 and later binary documents and templates
- Word 2007 and later documents and templates
- Word 95 binary documents and templates
- Word 97 binary documents and templates
- Word 2003 and plain XML documents
Double-click on each of these settings and choose the Enabled option.
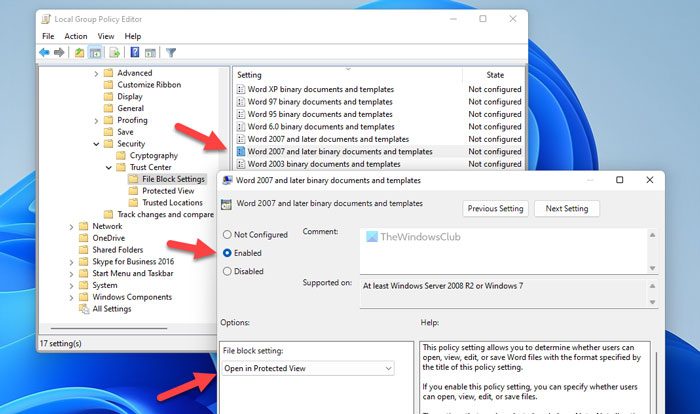
Then, select the Open in Protected View option from the drop-down list. Finally, click the OK button.
Read: How to ALWAYS open OLD PowerPoint presentations in Protected View
How do I unlock a Word document that is protected?
There are two ways to unlock a protected Word document. First, you can right-click on the file and tick the Unlock checkbox. Second, you can open the file and click on the Enabled editing option. Both do the same thing, and you can opt for any one of them.
Read: How to open always open PDF files in Protected View in Word
Why can’t I open an old Word document?
If you are unable to open an old Word document in the latest version of Microsoft Word, you can check the aforementioned settings. If the Protected View option is selected, you won’t be able to open the file properly. Instead, it opens the file in Protected View.
That’s all! Hope this guide helped.
Read: How to disable Text Drag and Drop feature in Word and PowerPoint.
I want to change my Protected View settings
- Click File > Options.
- Click Trust Center > Trust Center Settings > Protected View.
- Make selections that you want.
Contents
- 1 How do I enable editing in protected view?
- 2 How do I unprotect a Word document 2019?
- 3 Why is my Microsoft Word document displaying a strange unreadable text?
- 4 How do I change the default view for one page in Word?
- 5 Why can’t I edit a Word document on my Mac?
- 6 How do I turn off read only in Word?
- 7 How do I remove Protected View in Word without password?
- 8 How do I remove document protection?
- 9 How do I fix unreadable content in Word?
- 10 Why does my Microsoft Word document have weird symbols?
- 11 How do I fix unreadable text in Word?
- 12 What is the default view mode in Word?
- 13 Why is my Word account view only?
- 14 Why is my office account view only?
- 15 Where is editor in Word on Mac?
- 16 How do I stop Word from opening in read only mode on Mac?
- 17 Why are all my documents read only?
- 18 How do I fix the layout of a Word document?
- 19 How do I fix corrupted files?
- 20 How do you fix the file is corrupted and Cannot be opened Word?
How do I enable editing in protected view?
If you receive or open a document and can’t make any changes, it might be Open for viewing only in Protected View.
Follow these steps to edit:
- Go to File > Info.
- Select Protect document.
- Select Enable Editing.
How do I unprotect a Word document 2019?
Click the “Stop Protection” button at the bottom of the Restrict Formatting and Editing window. Type the password in the Unprotect Document pop-up window and click “OK.” Save the document, which is no longer protected and can be edited by anyone.
Why is my Microsoft Word document displaying a strange unreadable text?
If the Word document contains a font that is not installed or not compatible on the system, or if the Word document is corrupted, or if the Word documents being transferred over internet being have been edited on multiple platforms/systems, the Word file may open with weird symbols or gibberish.
How do I change the default view for one page in Word?
Try this:
- Go to Layout tab and click on Margins, select Custom Margins.
- Select Normal on Multiple pages and click Set As Default and OK.
Why can’t I edit a Word document on my Mac?
Why can’t I edit Word documents on my Mac and how do I fix it? Sign out of and quit all Microsoft Office applications. In the next window that pops up select the following three files, delete them, and then empty your trash. Restart your Mac, re-launch Word, and sign back in with your [email protected] and password.
How do I turn off read only in Word?
Remove read only
- Click the Microsoft Office Button. , and then click Save or Save As if you have previously saved the document.
- Click Tools.
- Click General Options.
- Clear the Read-only recommended check box.
- Click OK.
- Save the document. You might need to save it as another file name if you have already named the document.
How do I remove Protected View in Word without password?
Press Alt+F11 again to close the VBA editor, click on the protected text to open the Restrict Editing menu. Click Stop Protection. It will stop protection without the password.
How do I remove document protection?
Remove protection from your file
In the file, click File > Info > Protect Document > Restrict Editing and click Stop Protection at the bottom of the Restrict Editing pane. To remove or change restricted access, open the file, and then click Change Permission in the yellow bar at the top of the document.
How do I fix unreadable content in Word?
Now Open Microsoft word and follow the steps.
- Navigate to File tab > Click Open on the left panel > Click Browse on the right panel.
- On the Microsoft Open window, select the unreadable word files.
- Choose Recover Text from Any File from the drop-down menu.
- Click Open and wait.
Why does my Microsoft Word document have weird symbols?
In Word, these markers indicate the ends of paragraphs, and are created when you press RETURN at the end of a line. If you do not want to see these markers, click on the Show/Hide icon in the Paragraph group on the Home tab.
How do I fix unreadable text in Word?
In Word, select the File Menu, and then select Open. In the Files of type box, select Recover Text from Any File(.). Select the document from which you want to recover the text. Select Open.
What is the default view mode in Word?
Although Microsoft Word has several different ways you can view or edit your documents, the Print Layout view is the default. If you want to make quick edits using the Draft view, however, you have to change views manually every time you open your documents.
Why is my Word account view only?
Open an Office app > Click your account in the upper left corner > Sign out your account > Go back to Office app, and sign in your account. Please try to clear credential caches and reactivate Office for Mac. Right-click each of the folders below if present, and then click move to trash.
Why is my office account view only?
View Only: Your Account Doesn’t Allow Editing on a Mac – Office 365 Error. First, verify that you are using the proper account: Click “Use Another Account” and sign in with your email address and Microsoft password. Alternately, click the “Activate” button and sign in with credentials.
Where is editor in Word on Mac?
1. On the Home tab, click the Editor button. 2. In the Editor pane click a category, such as Spelling or Grammar, to review the suggestions for that area and take action based on the provided guidance.
How do I stop Word from opening in read only mode on Mac?
Right-click its icon, and select “Get Info” to enter the file’s Info window. 2. Check if the selection “Locked” in General is enabled. If so, disable it and the files will quit Read-only mode.
Why are all my documents read only?
You may find that when you are opening files, they open as read-only. In some cases, this is for added security, such as when you are opening files from the internet, and other times, it can be due to a setting that can be changed.
How do I fix the layout of a Word document?
Change the default layout
- Open the template or a document based on the template whose default settings you want to change.
- On the Format menu, click Document, and then click the Layout tab.
- Make any changes that you want, and then click Default.
How do I fix corrupted files?
Open Windows File Explorer and then right click on the drive and select ‘Properties’. From here, select ‘Tools’ and then click ‘Check’. This will scan and attempt to fix glitches or bugs on the hard drive and recover corrupt files.
How do you fix the file is corrupted and Cannot be opened Word?
How to Resolve ‘The file is corrupted and cannot be opened’ Error of MS Word
- Open your MS Word application.
- Click ‘File >> Options’.
- Select the ‘Trust Center’ and press button under ‘Trust Center Settings’.
- Click ‘Protected View’.
- Uncheck all the options available under ‘Protected View’ and click ‘OK’ to confirm.