
off2pdx
-
#1
I have set Word Options -> Advanced -> Cut, copy, and paste -> Isert/paste
picture as: In line with text.
However, everytime I paste in a graphic, the active text wrapping is «In
Front of Text», forcing me to manually select «In line with text».
What do I need to do so that the default setting works?
Advertisements
Suzanne S. Barnhill
-
#2
Are you by any chance using Paste Special? I find that it doesn’t conform to
the insert/paste default settings.
—
Suzanne S. Barnhill
Microsoft MVP (Word)
Words into Type
Fairhope, Alabama USA
http://word.mvps.org
Want to reply to this thread or ask your own question?
You’ll need to choose a username for the site, which only take a couple of moments. After that, you can post your question and our members will help you out.
Ask a Question
Download PC Repair Tool to quickly find & fix Windows errors automatically
Have you tried to type over a line in Microsoft Word, but the text is not staying on the line but keeps on moving and creating space, and you are wondering how can I get the text on the line without the line moving and creating space? In this tutorial, we will discuss some techniques to write over the line.
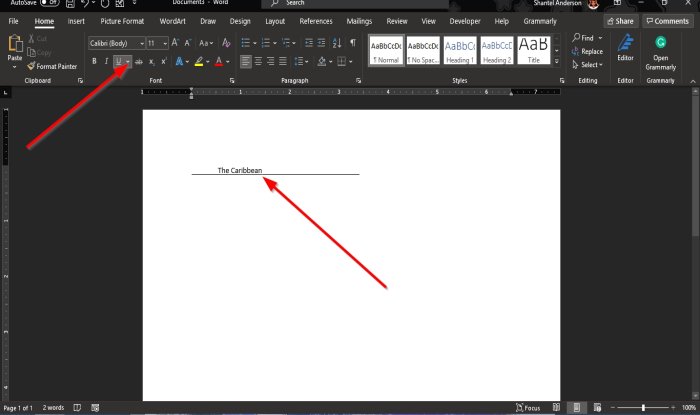
Open Microsoft Word.
Draw a line in your document.
The first technique we will use is to write on the line; notice, when you are typing on the line the text, is not staying on the line, and the line keeps on moving.
Highlight the text and click the Underline button on the Home tab in the Font group, and you will notice that the text will be on the line.
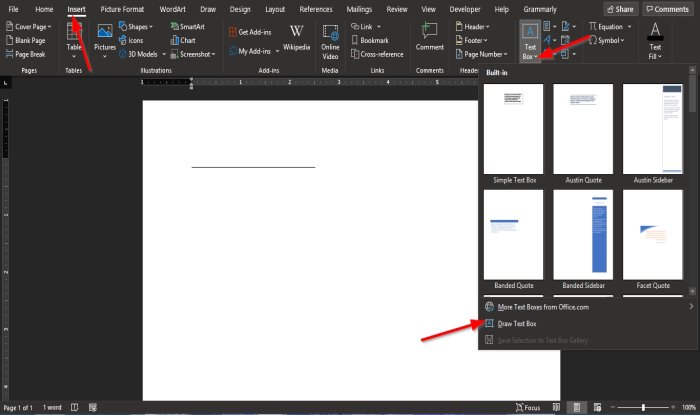
The second technique is to click the Insert tab and click the Text box button in the Text group.
In the drop-down list, select Draw Text Box.
A text box will appear in the document.
Move the text box over the line; ensure that the bottom of the text box matches the line.
We do not want the text box to have an outline; we will click the Shape Format tab.
The Shape Format tab appears whenever the shape is selected, including the text box.

On the Shape Format tab in the Shape Styles group, click the Shape Outline button, and in the drop-down list, select No Outline.
Notice that the text box lines become invisible.
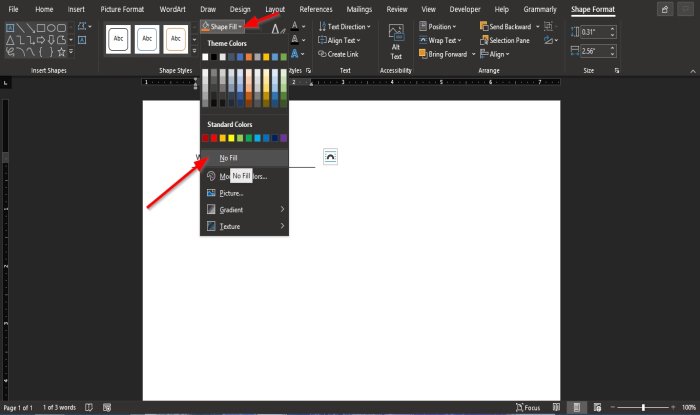
Then click the Shape Fill button, and in the drop-down list, click No Fill.
Drag the text box closer to the line.
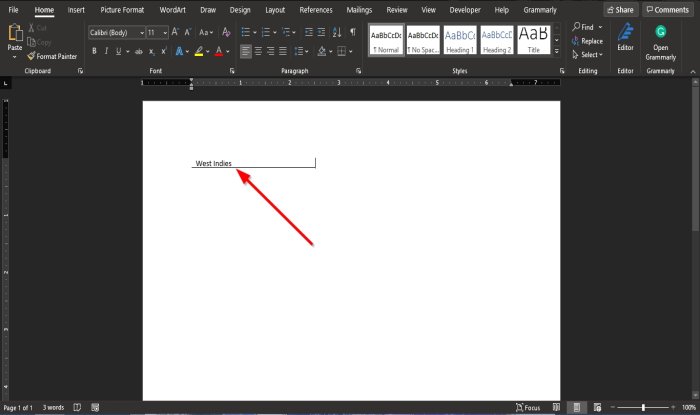
Now, we have the text on the line.
We hope this tutorial helps you understand how to type over lines in Microsoft Word.
Read next: How to add Citations & References in Word.

Shantel has studied Data Operations, Records Management, and Computer Information Systems. She is quite proficient in using Office software. Her goal is to become a Database Administrator or a System Administrator.
Word’s Position and Wrap Text features help arrange images and text on the page. Position features automatically place the object at the location of your choice on the page (see how to position figures in Word for more details). Text Wrap features determine how text wraps around an image or other objects on the page, depending on the chosen option.
Wrap Text features work for figures in a Word document (see text wrapping for tables). Figures in Word mean any visual objects except tables and equations. So, using the same Wrap Text features can be used for images, ClipArt objects, charts, text boxes, diagrams, and SmartArt objects.
Change text wrapping
By default, Word inserts (see examples below):
- Pictures (images and photos), charts in line with the text.
- Text boxes, shapes in front of the text.
- WordArt objects behind the text.
To change the way how text should wrap the object, select it, then do one of the following:
- On the Picture Format (Shape Format, Graphics Format) tab, in the Arrange group, click the Wrap Text button:

- Right-click on the object, then choose Wrap Text in the popup menu:

or

- Click the Layout Options button that appears next to the selected figure:


From the Wrap Text list, choose the option you prefer:
- In Line with Text places an object in a paragraph on the same line as the surrounding text. The text does not wrap around it.

- Square wraps the text around the picture or shape on all sides at right angles (a square pattern) as if it is rectangular. The text fills the remaining rectangular region.
This option is the most common form of text wrapping.

- Tight wraps the text around the edges of the figure. The text follows the shape.
This option is most useful for larger images covering most of the page width.

- Through wraps the text around the picture or shape edges, including any white gaps. If there is no white space in the image or shape, text wrapping works the same as Tight.
This option is an advanced setting because you pull or drag image and shape points in and out of their original borders:
See how to edit hyphenation points.
- Top and Bottom wraps the text above and below the figure to keep the image on its line. There is no text on either side of it.
- Behind Text places the figure behind, or underneath, any existing text. The text does not wrap around it.
The picture looks like a watermark or background image.
Note: Use the Selection pane when working with objects behind the text.
- In Front of Text places the object on top of the text. The text is not wrapped, so some of it may be blocked depending on the figure’s transparency.


Note: Figures that use the Square, Tight, Through, Top and Bottom, Behind Text, or In Front of Text wrapping style are all considered floating.
Position a figure to a paragraph or page
Also, Word offers two options for all wrapping styles except In line with Text (for floating figures):

or

- Move with Text moves the figure along with the surrounding text.
If a figure is positioned inside the paragraph, and you delete or add any content before the paragraph, the figure moves with the paragraph. See more about Positioning a picture, text box, or shape on the page.
- Fix Position on Page keeps the figure at the same place on the page when text is added or removed.
If the paragraph where the figure is located (that paragraph contains anchor) moves to the next page, the figure moves and keeps its position relative to the page.
Note: The same options you can find in the Layout dialog box, on the Position tab, in the Options section:

Checking the Move object with text check box is equivalent to the Move with Text option from the Wrap Text dropdown list. Unchecking the Move object with text check box is equivalent to the Fix Position on Page option.
Wrap text on both sides, or one side only
To change additional options, choose More Layout Options… from the Wrap Text dropdown list or the See more… link in the Layout Options menu.
In the Layout dialog box, on the Text Wrapping tab:

- In the Wrapping style group, choose any style exact In line with text (see above).
- In the Wrap text group (available for the Square, Tight, and Thought wrapping styles), choose any of the additional options:
- Both sides wraps text around either side of the image or shape:
- Left only wraps text around only the left side of the image or shape:
- Right only wraps text around only the right side of the image or shape:
- Largest only wraps text on the side of the image or shape with the larger distance from the margin.
- Both sides wraps text around either side of the image or shape:


Change the distance between text and object
To change the distance between text and the visual object, open the Layout dialog box by one of the following methods:
- On the Picture Format (Shape Format, Graphics Format) tab, in the Arrange group, click the Wrap Text button, then select More Layout Options…
- Right-click on the object, click the Wrap Text list, then select More Layout Options… in the popup menu.
- Click the See more… link in the Layout Options menu.
In the Layout dialog box, on the Text Wrapping tab, in the Distance from text section, enter custom values for the distance between the text and the picture independently for:
- Top and Bottom (available for the Square, Tight, Thought, and Top and Bottom wrapping styles),
- Left and Right (available for the Square, Tight, and Thought wrapping styles).
For example, with the 0.3-inch distance on all sides:

Edit hyphenation points
To use the Tight or Through options effectively, you may need to adjust the wrapping points for the image or shape. To edit wrap points, select the object, then activate the Edit Wrap Points view by one of the following methods:
- Picture Format (Shape Format, Graphics Format) tab, in the Arrange group, click the Wrap Text button. Then choose Edit Wrap Points from the Wrap Text dropdown list:

- Right-click on the object and select Wrap Text -> Edit Wrap Points in the popup menu:


In the Edit Wrap Points view, drag the red lines to adjust where the text wraps:

Note: There is no way to add points. You can move existing wrap points however you want.
Be careful! After changing a text wrapping option or copy-pasting the picture, Word lost the changes of Wrap Points.
Asked by: Marques Kris
Score: 5/5
(41 votes)
Change default text wrap setting for images
- Go to File > Options >Advanced.
- In the Cut, copy, and paste section, change the setting under Insert/paste pictures as: to the text wrapping style you want.
- Select OK.
Why can’t I change the text wrapping in Word?
To change the word wrapping of a specific image, right-click on it, click or hover your mouse over “Wrap Text” in the drop-down menu, then select your preferred word wrapping option for that image. … To configure the word wrapping settings, right-click an image, select “Wrap Text”, then select a wrapping option.
How do you change an image text wrapping in Word?
Configure text wrapping around a picture or drawing object
- Select the picture or object.
- Go to Picture Format or Shape Format and select Arrange > Wrap Text. If the window is wide enough, Word displays Wrap Text directly on the Picture Format tab.
- Choose the wrapping options that you want to apply.
How do you unlock text wrapping in Word?
Enable or disable text wrapping for a text box, rich text box, or expression box
- Right-click the control for which you want to enable or disable text wrapping, and then click Control Properties on the shortcut menu.
- Click the Display tab.
- Select or clear the Wrap text check box.
Why wont word let me wrap an image?
In the list to the left, select Layout. Click on the Advanced button. Make sure the Position tab at the top is selected. Place a checkmark in «Wrap text within text boxes for overlay objects.»
35 related questions found
Why is wrap text not working?
If manual or automatic wrapping doesn’t work in Excel, it may be because the selected cell is a merged cell. If you want to wrap text in this cell in Excel you must first unmerge the cells. If you want to keep the merged cell, you can still use the word wrap by manually adjusting the row height and column width.
What is text wrapping in MS Word?
In other words, Word treats the image like it would treat any word or letter of text. You can change this by applying a text wrap. Text wrap causes all of the text to wrap around the image so that the image does not interfere with line spacing.
What is AutoFormat as you type word?
The AutoFormat As You Type tab provides options for formatting that occurs automatically based on what you type. Using this feature can minimize the need to apply changes from the Ribbon.
How do I remove text from a picture in Word?
Drag the mouse until you select all wrapped text, except the first word, and release the left mouse button. If you attempt to select the first word, you can accidentally select the image and delete it.
How do I edit text in a picture in Word 2016?
On the Insert tab, in the Text group, click Text Box, click anywhere near the picture, and then type your text. To change the font or style of the text, highlight the text, right-click it, and then select the text formatting you want on the shortcut menu.
What is the default text wrapping for a picture in MS Word?
By default, Word sets text wrapping to In line with text when you insert or paste a new picture into a document.
What is the text wrapping?
Text wrap is a feature supported by many word processors that enables you to surround a picture or diagram with text. The text wraps around the graphic. … Text wrap is also called text flow.
Can we edit text in image?
Edit text in an image
Edit the style and content of any Type layer. To edit text on a type layer, select the type layer in the Layers panel and select the Horizontal or Vertical Type tool in the Tools panel. Make a change to any of the settings in the options bar, such as font or text color.
How do I change text wrapping settings?
To wrap text around an image:
- Select the image you want to wrap text around. The Format tab will appear on the right side of the Ribbon.
- On the Format tab, click the Wrap Text command in the Arrange group. Then select the desired text wrapping option. …
- The text will wrap around the image.
How do I change the default picture layout in Word?
To change the default picture location in Word, open an existing or a new document and click the “File” tab. On the backstage screen, click “Options” in the list of items on the left. On the Word Options dialog box, click “Advanced” in the list of items on the left.
How do I change the default picture location in Word?
To set the default folder for the Insert Picture dialog, do the following in Word:
- Click File > Options > Advanced.
- Scroll to the bottom of the dialog and click the File Locations button.
- Click the Images item in the list and then click the Modify button.
- In the next dialog, navigate to the desired folder and click OK.
How can I edit a picture in Word?
How to Add Text to Photo?
- Open your collage, design, or photo in Fotor.
- Using the «Text» button, select and drag a text box to the desired location.
- Modify the text, change the font, color, size, background or transparency.
- Preview and save your work, choosing the size and format you wish.
How do I cut part of a picture in Word?
Crop a picture
- Select the picture you want to crop.
- On the Ribbon, select the Picture tab.
- Select the downward pointing arrow next to the Crop option. …
- With your mouse, point at a crop handle, then click and drag inward to trim the margin of the image.
How do I black out part of a picture in Word?
Use Insert > Shape to draw a shape over the area you want to blur. On the Format tab, select Shape Fill > Eyedropper. With the Eyedropper, click a part of the picture whose color approximates the color you want the blurred shape to be. On the Format tab, select Shape Effects > Soft Edges.
How do I automatically format a Word document?
Here’s how to AutoFormat your document:
- Load the document you want to format.
- Choose AutoFormat from the Format menu. Word displays the AutoFormat dialog box. (See Figure 1.)
- Use the radio buttons to indicate if you want AutoFormat to work without stopping for your input, or not.
- Click on OK.
How do I stop Word from changing formatting?
How do you stop formatting changes in Word?
- Make sure the Review tab of the ribbon is displayed.
- Click the down-arrow under the Track Changes tool (in the Tracking group) and then click Change Tracking Options. Word displays the Track Changes Options dialog box. …
- Clear the Track Formatting check box.
- Click OK.
What are the five types of alignment in Word?
side, middle, top, bottom, and graphing.
What is the use of wrap text list any three text wrapping options available in MS word?
Any three-word wrapping options available in a word processing software are tight, square and through. Word processing software helps the writers to create documents, edit and print them as per requirement. Word wrapping is often required to fit the texts in the desired space so that the layout remains in control.
How do I wrap text around a picture in word 2010?
To wrap text around an image:
- Select the image. The Format tab will appear.
- Click the Format tab.
- Click the Wrap Text command in the Arrange group.
- Select the desired menu option. The text will adjust based on the option you have selected. …
- Move the image around to see how the text wraps for each setting.
What is the utility of a text wrapping in a document?
Text wrapping refers to how images are positioned in relation to text in a document, which ensures that pictures and charts are presented neatly. … Top and Bottom – Text wraps above and below the image so that the image is on its own line. This is most useful for larger images that occupy most of the width of a page.
|
01-05-2010, 03:28 PM |
|||
|
|||
|
Image Disappearing With «In Line With Text» Option Hello —
Here’s my problem. Whenever I insert a graphic into Word (via copy/paste, or the insert graphic button), about 95% of the image is hidden behind the text above when the «In Line With Text» option is selected for Text Wrapping. When I change the text wrapping to any other option (e.g., square, tight, top/bottom), it reappears. I desperately need help with getting these images into «In Line With Text.» Whenever I create a new document, the images and «In Line With Text» works fine. So it probably has something to do with the document. Here’s a link from my DropBox to two files: (2) The actual document PLEASE HELP!!! Thanks in advance.
|


|
03-05-2010, 08:42 AM |
|||
|
|||
|
Did you get help with this? I’m experiencing the same issue. Did you find an anser? Thanks in advance.
|
|
03-08-2010, 06:43 PM |
|||
|
|||
|
This link suggested by JudieRaman:
|
|
12-22-2011, 03:33 AM |
|||
|
|||
|
Paragraph settings Not sure whether still somebody is looking for an «easy» solution. Here’s what I came up with (for Word 2010, though): Check the paragraph settings, particularly the line spacing: don’t set an exact value! Insert the figure as a separate paragraph (best assign a style to the figure). With elastic paragraph spacing («Auto») and single line spacing the figures magically reappeared.
|
|
09-26-2012, 02:06 AM |
|||
|
|||
|
I also encounter this problem for many times, but i can not fix it. This problem result from the line spacing when you copy the graph into word document. Please do the following: 1. Select the text and the graph and then right click and chose «Paragraph» Hope this instruction would be a help.
|
|
08-21-2014, 08:49 AM |
|||
|
|||
|
Image Disappearing With «In Line With Text» Option In Word 2010, try left clicking on the image and then, in the Home tab in the Ribbon across the top, in the Styles section, click «Normal». You may have to click «Normal» twice. That worked for me when NOTHING else did.
|