
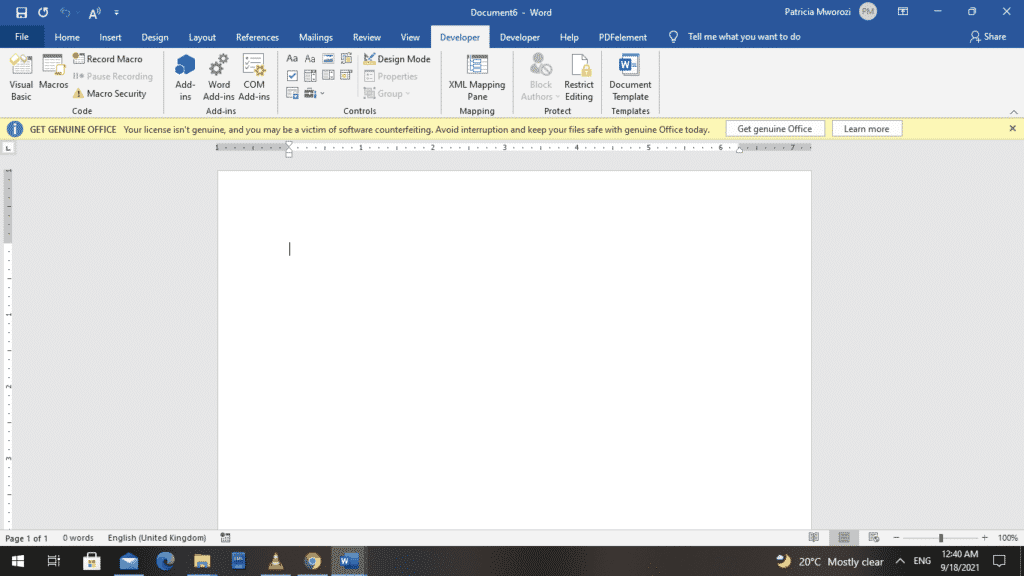
In MS Word, there are only two ways to box your content: textboxes and frames.
You might not have ever heard of frames. This is because they preceded textboxes. Newer versions of Word now use text boxes. Although, one can activate and use frames.
Both frames and text boxes have their attributes. However, the capabilities of textboxes exceed those of frames.
Why may textboxes be preferred?
- They look more organized because you can create links allowing text to flow from one textbox to another.
- They have an extensive selection of text-wrapping options
- You can change the alignment and orientation of text in a textbox.
Why may frames be preferred?
Frames can be part of a paragraph-style definition. In addition, they accommodate comments, automatic numbering, endnotes and footnotes.
Similarities
- Both hold text.
- Both can have a border (you can add color to it)
- Both can contain images and other graphical features.
- Both can have a background fill.
- Both can be placed within a page margin.
MS Word does not show the Frame feature on the ribbon by design. Therefore, you must first add the Frame functionality to the ribbon to integrate frames into a document. This article will teach you how to activate the Frame feature and insert frames into your document.
- Open the document where you want to insert the frame.
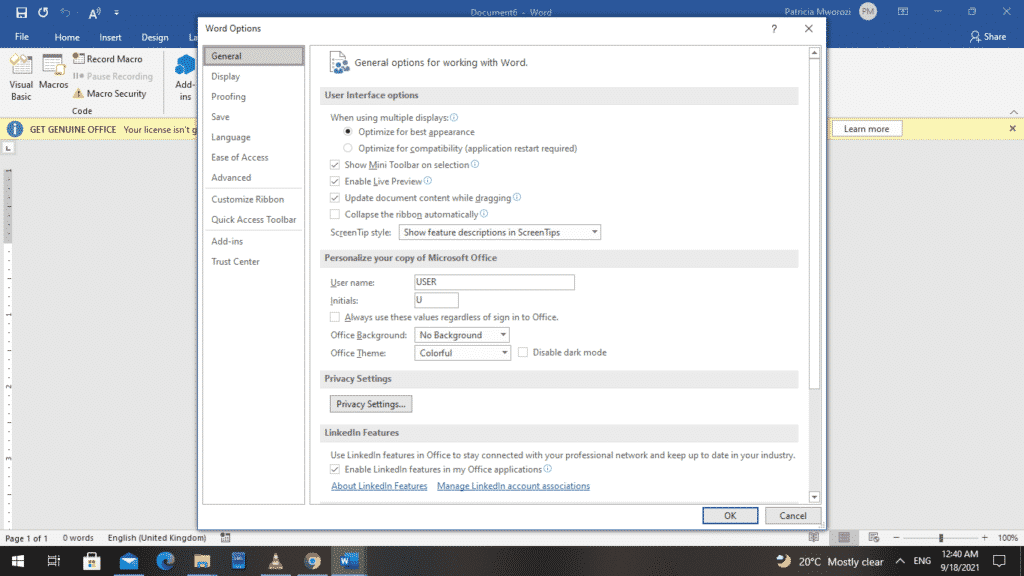
- Go to the ‘File’ tab on the ribbon.
- From the backstage view, select ‘Options.’
- Word displays a ‘Word Options’ dialog box.
- From the left pane, choose ‘Customize Ribbon.’

- Another dialog box opens up when you do this: ‘Customize the Ribbon and keyboard shortcuts.’
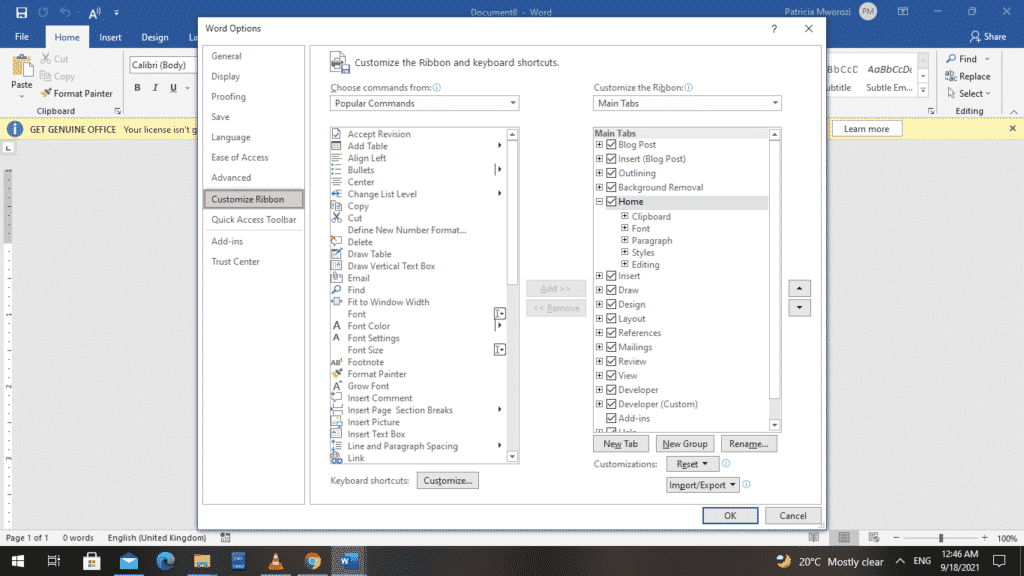
- On your left, under the ‘Main Tabs’ section, check ‘Developer.’ If it is already selected, leave it.
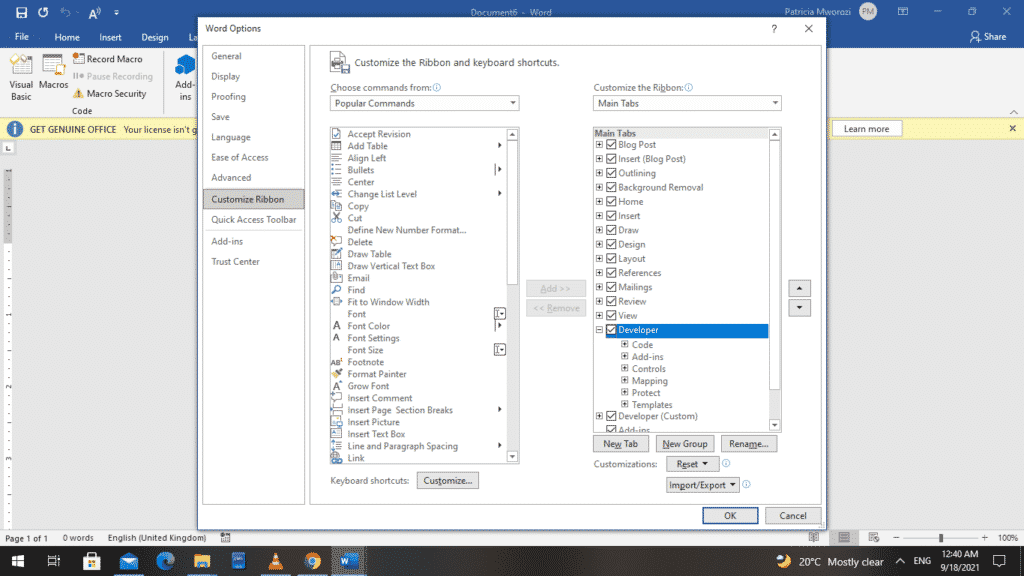
- Click OK.
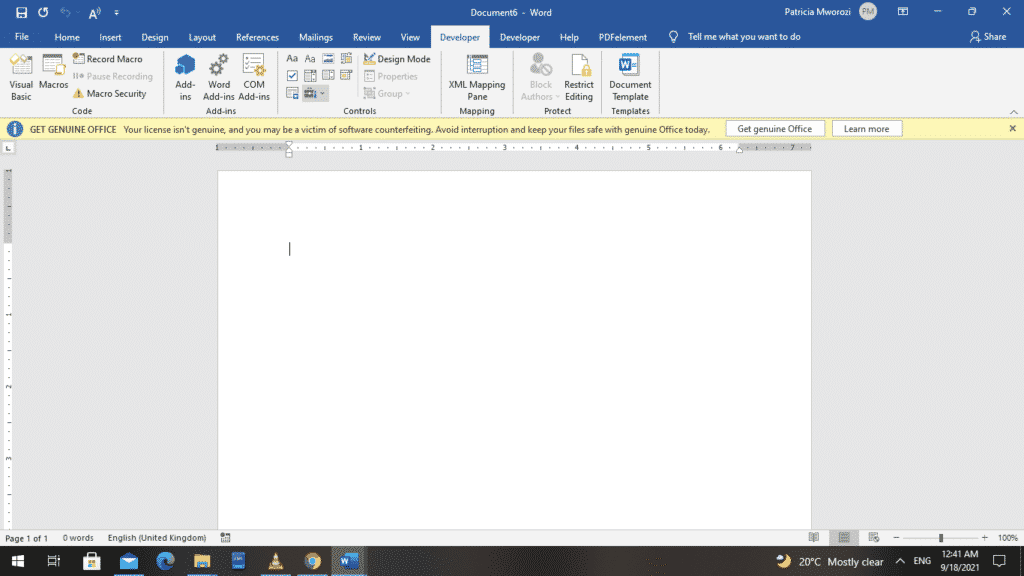
- Go back to the ribbon and select the ‘Developer’ tab.

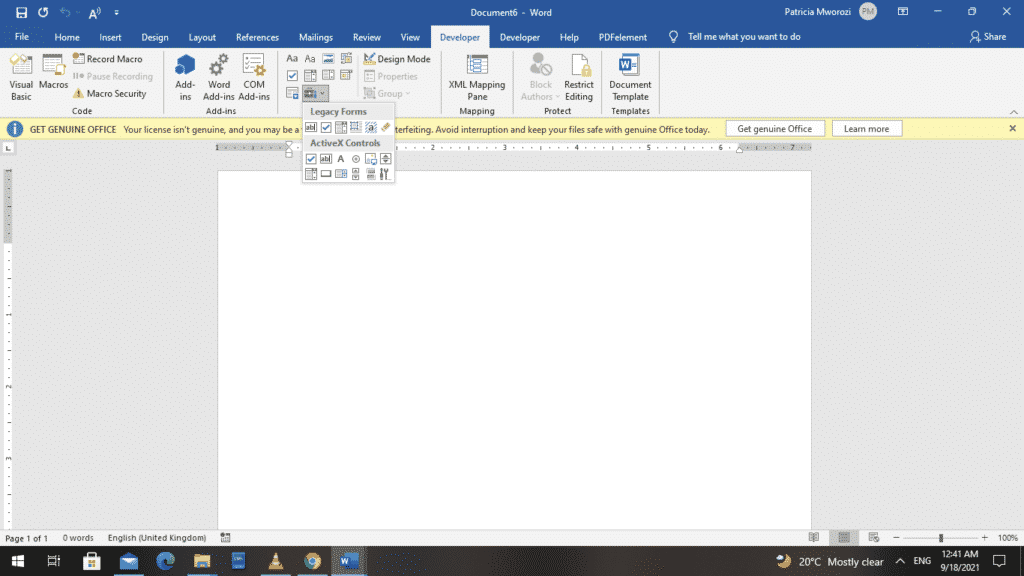
- Under the ‘Controls’ section, choose ‘Legacy Forms.’ The option itself is not written words if you think your Word version does not have this function. Instead, a small briefcase represents it.
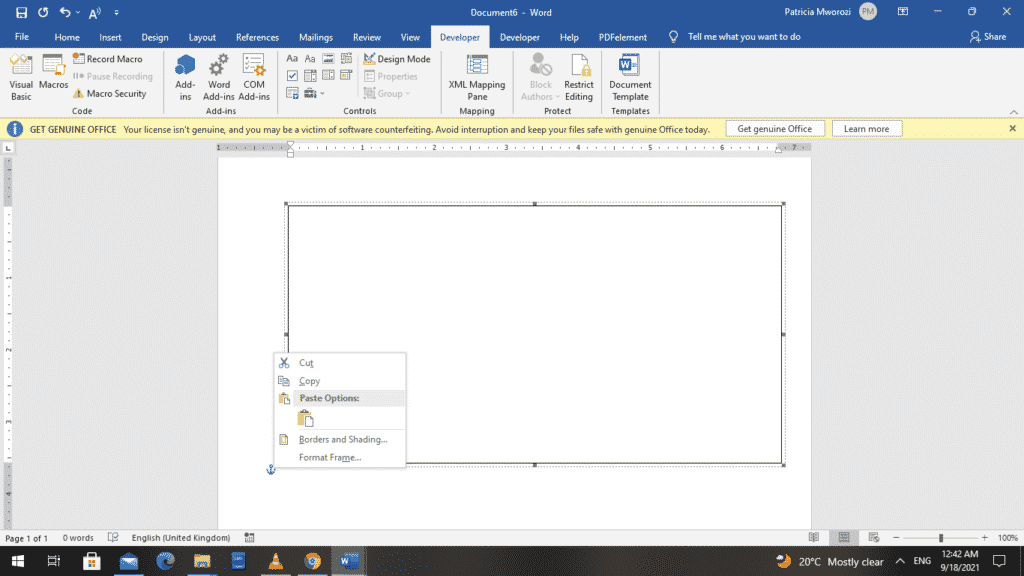
- When you choose ‘Legacy Forms,’ another box appears on your screen. From it, select ‘Insert Frame.’ It is the fourth symbol from your left.
- You will notice that your pointer now appears as a cross. This is to allow you to draw the frame and adjust it to your preferred size.
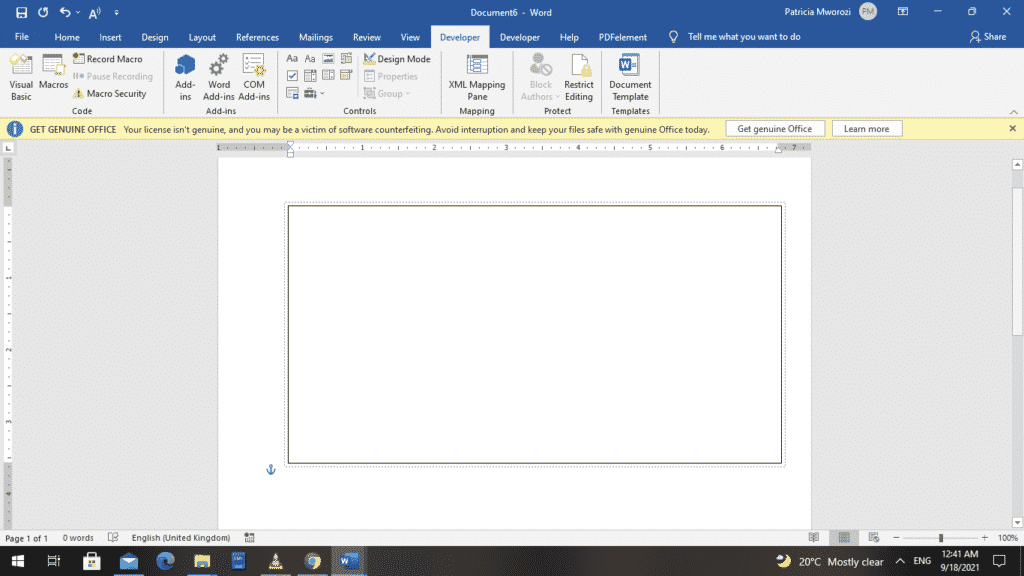
- By design, the frame has a border and is filled. You can adjust the appearance of your frame by right-clicking it and making changes from the contextual menu.
Do you ever have to work on written projects with colleagues but cannot find an organised and structured way to do it?
Group projects are already hectic, but we cannot run away from them. They are either mandatory for work or school.
You do not know who should write the first draft, who should edit or how long it will take, which word processor to use. Besides, many things always go wrong because of the many people involved.
Fortunately for you, Simul Docs can solve all these problems.
Download Simul Docs and get started. After writing your first draft in Microsoft Word, upload it to Simul Docs. This will automatically make it the first version. Now, another colleague can open it and make their edits. This will create another version different from the first. Every time another person opens a version and makes edits, a new version is created, with the latest changes. The best part is, even if you forget to turn on tracked changes, they are automatically documented!
Since it is a collaboration, a bonus feature is the ability to add comments to the document. If you want a colleague to review the changes by a specific time, or any other instructions, you can let them know in the comment section.
Let us say another co-worker is supposed to include their input, but they do not have Simul Docs. All you have to do is download the document or forward it by email. Alternatively, you can upload it to any storage software like one drive, and once their changes have been made, they can forward it to you once again, and you can open it in Simul Docs.
Once all the necessary edits have been made, you can save the final version containing all the modifications with one click.
Simul is the most convenient collaborative tool yet. Centralising your written project avoids mishaps like losing your work or losing its original format.
Visit simuldocs.com and simplify group edits today.

Программа MS Office Word обладает богатым функционалом. Не каждый пользователь знает о полном списке возможностей текстового редактора. Более того, часто мы забываем о простейших опциях, к примеру, о том, как вставить рамку в Ворде. Особенно актуально это при редактировании творческих работ. Именно об этом мы сейчас и поговорим.

Пользуемся Word 2003
Сделать оформление в Ворде 2003 довольно просто:
- выделяете страничку обычным щелчком по ней;
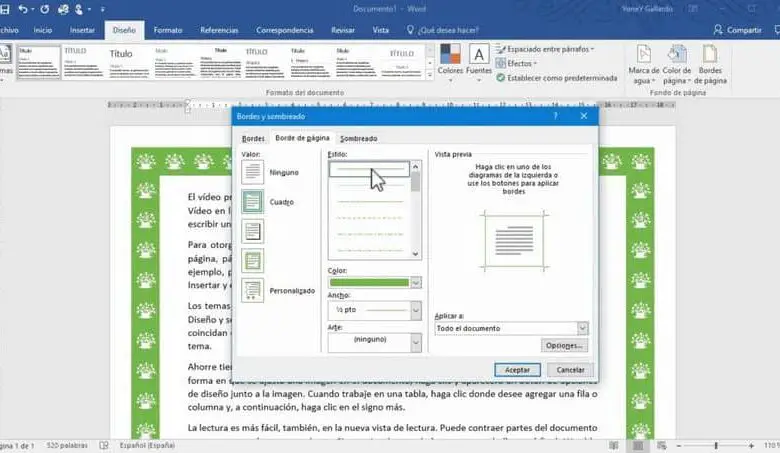
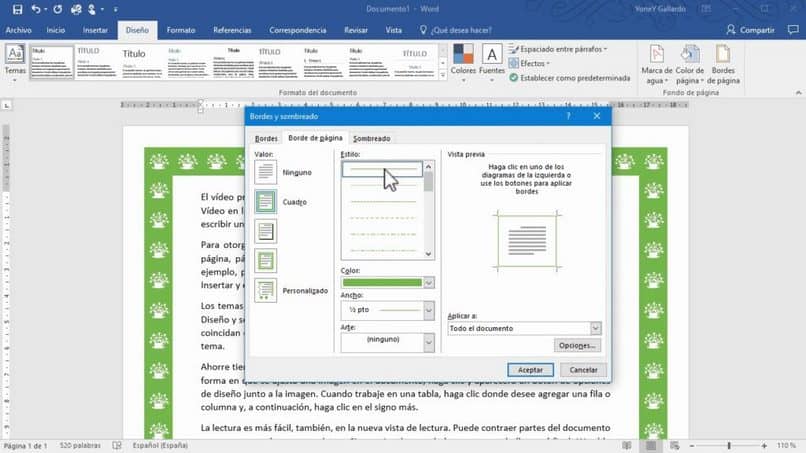
- выбираете раздел Формат сверху на панели инструментов;
- из появившегося списка выбираете подпункт Границы и заливка. Откроется одноименное окно;
- переходите на вторую вкладку Страница, выбирая необходимые параметры для рамочки.

Можно менять цвет, толщину линий. С правой стороны кнопки отмечают стороны, на которых будет обрамление. В пункте «Тип» можно подбирать формы линий – пунктиром, двойную, сплошную. Пункт «Рисунок» поможет выбрать вариант обрамления. Если необходимо подвинуть рамочку по краям листа, следует тапнуть по клавише «Параметры» в правой нижней стороне.

Как вставить рамку в Ворде 2007, 2010, 2013
В 2007 выпуске программный интерфейс преобразился. Здесь алгоритм действий будет такой:
- во-первых, ищите сверху раздел «Разметка страницы»;
- во-вторых, жмете «Границы страницы».

Начиная с 2013 версии, эту кнопку вы найдете в разделе «Дизайн».

Открывшееся окошко аналогично предыдущим версиям. Там есть все необходимые параметры: цвет, тип, ширина линий, возможность выбора оформления с дубликатом рисунка, а также сторон, на которых будут рамочки.

Пользуемся картинкой
Оформить документ вы можете не только специальными шаблонами, но и изображениями. Это позволит сделать оформление более выразительным и интересным. Для этого просто загружаете понравившийся элемент нужного формата.
Чем больше размер объекта, тем лучше он будет отображен на печати. После чего вставляете загруженную картинку на лист. Для этого используется меню «Вставка», пункт «Рисунок» или можно просто перетащить файл в программное окно.

Далее выделяете щелчком изображение, сделав по ней правый клик мышкой, выбрав «Размер и положение» из контекстного меню.
В открывшемся окне переходите в подраздел «Обтекание текстом» и выбираете пункт «за текстом». Так изображение не перекроет набранный текст, а встанет на задний план. Кроме того, он не привязан к краям странички, можно его перемещать к самому краю. Если оно не подходит по размеру, его можно растягивать за «уголки», они будут активны. Точечки по углам меняют размеры, сохраняя пропорции, а по сторонам – тянут горизонтально и вертикально.
Рамка в Ворде вокруг отдельного текста
Вставить оформление возле определенного участка довольно просто. Действия практически аналогичны вышеописанным:
- заходите в раздел «Дизайн»;
- тапаете «Границы страниц»;
- в открывшемся меню переходите в раздел «Граница»;

- жмете по кнопочке «Рамка», «ОК».
Если хотите установить рамочку на другой абзац, просто выделите его перед выполнением инструкции, описанной выше.
Не стоит забывать, что можно менять тип, размерность, внешний вид, рисунок, расположение обрамления, все зависит от ваших пожеланий. Принцип установки данного элемента аналогичен для всех выпусков Word, отличие только в расположении элементов. При желании вы легко с этим справитесь, для этого нужно просто следовать вышеописанной инструкции.
Теперь вы знаете, как вставить рамку в Ворде. В статье вы найдете варианты для всех версий редактора. Удачи!
Представляет текстовый фрейм в объекте Shape . Represents the text frame in a Shape object. Объект TextFrame содержит текст в текстовом фрейме и свойства, управляющие полями и ориентацией текстового фрейма. The TextFrame object contains the text in the text frame and the properties that control the margins and orientation of the text frame.
Используйте свойство TextFrame , чтобы возвратить объект TextFrame для фигуры. Use the TextFrame property to return the TextFrame object for a shape. Свойство TextRange возвращает объект Range , представляющий диапазон текста в заданном текстовом фрейме. The TextRange property returns a Range object that represents the range of text inside the specified text frame. В приведенном ниже примере текст добавляется в текстовый фрейм фигуры один в активном документе. The following example adds text to the text frame of shape one in the active document.
Некоторые фигуры не поддерживают присоединенный текст (например, линии, полилинии, изображения и объекты OLE). Some shapes do not support attached text (lines, freeforms, pictures, and OLE objects, for example). Если вы попытаетесь вернуть или задать свойства, которые управляют текстом в текстовом фрейме для этих объектов, возникает ошибка. If you attempt to return or set properties that control text in a text frame for those objects, an error occurs.
Используйте свойство хастекст , чтобы определить, содержит ли текстовый фрейм текст, как показано в следующем примере. Use the HasText property to determine whether the text frame contains text, as shown in the following example.
Текстовые фреймы можно связывать друг с другом, чтобы текст перетекать из текстового фрейма одной фигуры в текстовую рамку другой фигуры. Text frames can be linked together so that the text flows from the text frame of one shape into the text frame of another shape. Используйте свойства Next и Previous для связывания текстовых фреймов. Use the Next and Previous properties to link text frames. В примере ниже показано, как создать текстовое поле (прямоугольник с текстовым фреймом) и добавить в него текст. The following example creates a text box (a rectangle with a text frame) and adds some text to it. Затем он создает еще одно текстовое поле и связывает два текстовых фрейма, чтобы текст переходил из первой текстовой рамки в вторую. It then creates another text box and links the two text frames together so that the text flows from the first text frame into the second one.
Используйте свойство контаинингранже для возврата объекта Range , представляющего всю статью, которая проходит между связанными текстовыми рамками. Use the ContainingRange property to return a Range object that represents the entire story that flows between linked text frames. В следующем примере проверяется орфография текста в TextBox 3 и любого другого текста, связанного с TextBox 3. The following example checks the spelling of the text in TextBox 3 and of any other text that is linked to TextBox 3.
Методы Methods
| Имя Name |
|---|
| BreakForwardLink BreakForwardLink |
| DeleteText DeleteText |
| ValidLinkTarget ValidLinkTarget |
Свойства Properties
| Имя Name |
|---|
| Application Application |
| AutoSize AutoSize |
| Column Column |
| ContainingRange ContainingRange |
| Creator Creator |
| HasText HasText |
| HorizontalAnchor HorizontalAnchor |
| MarginBottom MarginBottom |
| MarginLeft MarginLeft |
| MarginRight MarginRight |
| MarginTop MarginTop |
| Next Next |
| NoTextRotation NoTextRotation |
| Orientation Orientation |
| Overflowing Overflowing |
| Parent Parent |
| PathFormat PathFormat |
| Previous Previous |
| TextRange TextRange |
| ThreeD ThreeD |
| VerticalAnchor VerticalAnchor |
| WarpFormat WarpFormat |
| WordWrap WordWrap |
См. также See also
Поддержка и обратная связь Support and feedback
Есть вопросы или отзывы, касающиеся Office VBA или этой статьи? Have questions or feedback about Office VBA or this documentation? Руководство по другим способам получения поддержки и отправки отзывов см. в статье Поддержка Office VBA и обратная связь. Please see Office VBA support and feedback for guidance about the ways you can receive support and provide feedback.
Для создания фреймов используются кнопки Новая рамка слева (New Frame Left), Новая рамка справа (New Frame Right), Новая рамка сверху (New Frame Above) и «Новая рамка снизу (New Frame Below), расположенные на панели инструментов Рамки (Frames). Чтобы создать фрейм, следует поместить курсор в пределах фрейма, относительно которого будет размещен вновь создаваемый фрейм (то есть сделать этот фрейм активным), и щелкнуть на одной из этих кнопок. Если активный документ не входит в состав открытого в Word набора фреймов, при щелчке на одной из этих кнопок также будет создан набор фреймов, в который включается активный документ.
Создание фрейма с оглавлением
Word позволяет автоматизировать процесс создания оглавления Web-страницы, которое может быть использовано для навигации по Web-сайту или в качестве отправной точки при создании панели навигации.
Для создания фрейма оглавления используется кнопка Оглавление в рамке (Table Of Contents In Frame) на панели инструментов Рамки (Frames). Если на момент вызова функции создания оглавления активный документ не был сохранен, Word предложит выполнить сохранение и, получив положительный ответ, отобразит окно диалога Сохранение документа (Save As). Непосредственно после сохранения документа будет создан набор из двух вертикально ориентированных фреймов. Активный документ будет размещен в правом фрейме, а созданное оглавление — в левом. На рис. 2 показан пример фрейма, содержащего оглавление документа, созданного на основе шаблона Простая Web-страница (Simple Layout).
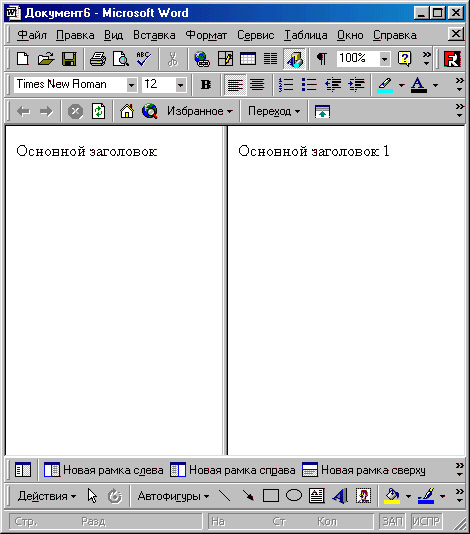
Рис. 2. Пример фрейма оглавления, созданного с использованием кнопки Оглавление в рамке
Следует отметить, что в оглавление, создаваемое с использованием кнопки Оглавление в рамке (Table Of Contents In Frame), будут включены только заголовки, оформленные стандартными стилями заголовков Word.
Не нашли то, что искали? Воспользуйтесь поиском:
Лучшие изречения: Да какие ж вы математики, если запаролиться нормально не можете. 8443 –  | 7337 –
  или читать все.
78.85.5.224 © studopedia.ru Не является автором материалов, которые размещены. Но предоставляет возможность бесплатного использования. Есть нарушение авторского права? Напишите нам | Обратная связь.
Отключите adBlock!
и обновите страницу (F5)
очень нужно
Dividing a Microsoft Word page into quarters allows you to separate important elements in your document and can be used to produce copies of the same item on a single sheet of paper. The simplest way to quarter your page is to insert a table, with each of the cell frames containing its own text, pictures and other elements. If you want to create a more irregular layout with frames that don’t line up in a table, use Word’s text box feature instead.
Create Frames With a Table
-
Launch Word and open a new document. If you plan to adjust the page margins, do it now so you can adjust the table to the correct size.
-
Select the «Insert» tab, and then click «Table» to open the Insert Table submenu.
-
Drag your cursor across the four squares in the upper left corner of the submenu, and then release your mouse button. Word inserts a four-cell table into your document.
-
Grab the small square on the bottom right corner of the table and drag it down until the table covers the entire page. The printable area of your page should now be divided into four equal frames.
-
Select the «Table Tools Layout» tab, and then click the «Properties» to open the Table Properties dialog box.
-
Click the «Options» button, and then clear the check box next to «Automatically Resize to Fit Contents.» This prevents Word from changing the size of the table cells. Click «OK» to return to the Table Properties dialog box.
-
Click the «Borders and Shading» button if you want to remove the cell borders. Select «None» and click «OK.»
-
Click «OK» to close the dialog box and return to your document. The printable area of your page should now be divided into four equal quadrants.
Create Frames Using Text Boxes
-
Launch Word and open a new document. If you plan to adjust the page margins, do it now so you can adjust the text boxes to the correct size.
-
Select the «Insert» tab, then click «Text Box,» and then select «Simple Text Box.»
-
Click the border of the text box to select it, and then press «Ctrl-C» to copy it.
-
Press «Ctrl-V» three times to create three copies of the text box. The text boxes are copied on top of each other, so you can’t see the copies right now.
-
Drag each copy to a part of the page where you want to create a frame, and then drag the handles on the box to resize it to the desired dimensions.
-
Right-click a text box and select «Borders and Shading» if you want to remove the border. Select «None» and click «OK.»
Фреймы в Microsoft Word
Введение
Пожалуй, данная страница относится к одной из самых сложных тем, но не благодаря сути, а из-за бездумья программистов.
Слово «frame», изначально использовавшееся в программе, переводится как кадр или рамка.
Оно активно использовалось в разнообразном ПО 1990-х для определения того, что такой объект получает определенную самостоятельность внутри программы.
Он может перемещаться вопреки общим правилам и обладает набором собственных свойств.
Дальнейшее развитие дало ему еще одно определение — контейнер, но оно не прижилось в области текстовых редакторов.
Термин фактически прекратил свое существование, вы не найдете этот бывший пункт меню ни в программе, ни в Справке.
Ещё одним синонимом из полиграфии будет «врезка» — вспомогательный текст, заверстанный отдельным блоком, часто с использованием другой гарнитуры и размещаемый на плашке (фоне).
Но суть сущности от бездумья программистов и руководителей соответствующих проектов никак не изменилась.
«Слова нет, а суть осталась».
Множество объектов в Word помещаются во фрейм и обретают дополнительные свойства, во многом абсолютно идентичные.
Рисование в программе, так активно используемое, в том числе оправданное, также невозможно без понимания.
Именно из-за этого и стоит обсудить обозначенную тему.
Итак, любой объект, не являющийся элементом последовательного текста, включая колонтитулы, заключается во фрейм.
Следует сразу сказать, что такая модель по определению чужеродна для текстового редактора.
Зато она является основой работы издательских систем, где, условно, является апогеем их развития.
Одновременно, проникновение подобных технологий «на чужую территорию» прекрасно иллюстрирует пересечение функций программ разных классов и назначения.
Текстовый редактор без фреймов откатится на десятилетия назад.
Попробуем перечислить такие объекты.
Доступ к этим материалам предоставляется только зарегистрированным пользователям!
Общие свойства объекта во фрейме.
Доступ к этим материалам предоставляется только зарегистрированным пользователям!
….
Создание фреймов
Фрейм может быть сформирован автоматически (вне воли пользователя) или по прямому указанию.
Ручное создание фрейма стандартно предполагает некую цель, обычно упирающуюся в единственный вариант: свободное перемещение фрейма с обтеканием его текстом.
Первичным и универсальным вариантом будет создание текстового блока, куда можно поместить всё, что угодно.
Получается своего рода документ в документе.
Но даже здесь есть свои особенности.
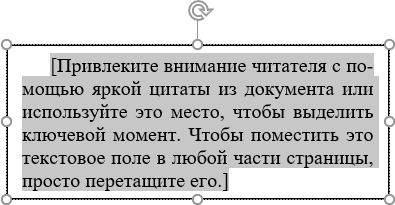
Так, использование кнопки ленты Вставка⇒Текстовое поле приведет к появлению блока с выделенным поясняющим текстом, обтеканием вокруг него и черной рамкой, толщиной 0,75 пт.
Доступ к этим материалам предоставляется только зарегистрированным пользователям!
Автоматическое создание будет описано позже….
Присвоение объекту обтекания также создаст для него фрейм.
….
Обтекание (Flow)
В подавляющем большинстве случаев использование обтекания объектов текстом характерно при работе с многостраничными документами.
Для одной страницы правила размещения объектов гораздо разумнее формировать с помощью таблиц, хотя и это неоднозначно.
Парадигма развития текстовых редакторов потребовала появления возможностей, присущим более профессиональным программам для верстки.
Именно обсуждаемая функция стала наиболее востребованной у рядовых пользователей.
С некоторых точек зрения она получила больший функционал, так как для большинства случаев текст мог активно редактироваться, а на вёрстку он обычно поступает в окончательной редакции.
Варианты обтекания
Прежде чем говорить о способах управления, стоит разобраться с теоретической частью смысла и назначения различных вариантов.
Для упрощения будем считать, что в качестве объекта рассматривается рисунок.
Доступ к этим материалам предоставляется только зарегистрированным пользователям!
Способы задания параметра обтекания
На протяжении всего моего взаимодействия с Word и его пользователями, я постоянно сталкиваюсь с позицией, что данное действие примитивно и «все это знают и умеют».
Попробуем разобраться, так ли это на самом деле.
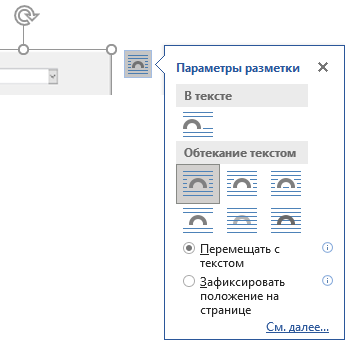
Исходное состояние: в текст вставлен графический объект без указания обтекания (в тексте).
Доступ к этим материалам предоставляется только зарегистрированным пользователям!
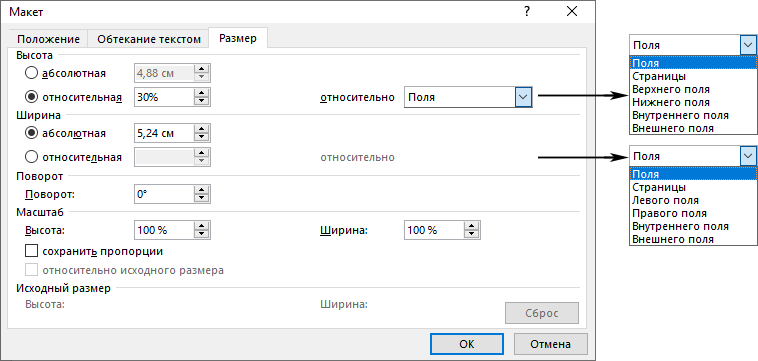
Положение объекта
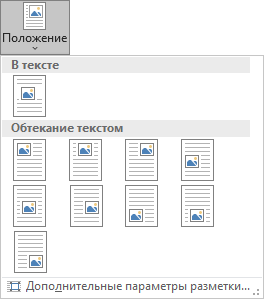
С точки зрения логики, положение можно присвоить только объекту, которому назначено обтекание, что наглядно подтверждается содержанием кнопки ленты Макет⇒Положение (Position).
Однако, внимательное рассмотрение позволит увидеть принципиальные отличия.
На самом деле задается обтекание вокруг рамки с одновременным присвоением положения, показанного на пиктограмме.
Разберем их по порядку.
Доступ к этим материалам предоставляется только зарегистрированным пользователям!
Размер объекта
Чрезвычайно важная вкладка диалога «Макет».
Она позволяет не только создать удобную автоматизацию и тонкие настройки, но и изрядно «напортачить».
Доступ к этим материалам предоставляется только зарегистрированным пользователям!
Закрепление объектов
Чрезвычайно важная настройка с точки зрения последствий при редактировании.
Фрейм либо всегда стоит на месте, либо двигается с относящимся к нему описанием.
Доступ к этим материалам предоставляется только зарегистрированным пользователям!
Практическое применение
С чисто прагматической точки зрения можно выделить две типовых ситуации, служащие экономии места на странице и повышению аккуратности документа.
Обе они активно применяются при профессиональной верстке.
Доступ к этим материалам предоставляется только зарегистрированным пользователям!
….
In this post, we are going to show 4 fast ways for you to remove undesired frames in your Word document.
To some degree, frames are very must the same like text boxes, both used to holding texts in a document. But frames have some advantages over text boxes. For example, it can contain some fields and you can start footnotes or endnotes inside, either of which works in text boxes. 
Despite this, we can’t ignore the need to remove frames you just don’t want anymore. Therefore, we offer you 4 easy but quick ways as below:
Method 1: Remove Frames Manually
- Firstly, right click on a frame border.
- Then choose “Format Frame” on the contextual menu.
- Next in the “Frame” box open, click the “Remove Frame” tab.


Method 2: Remove All Frames in a Selection
As you see, it’s tedious to remove multiple frames one by one with steps in method 1. To save your time, a quicker approach would be to use the VBA codes.
- First of all, make a selection over a range of texts containing frames.
- Secondly, press “Alt+ F11” to open VBA editor.
- Next click “Normal” project and then click “Insert”.
- On the drop-down menu, select “Module”.

- Open the module by double click and paste following codes there:

Sub RemoveAllFramesInSelection()
  Dim objFrame As frame
  Dim nFrame As Long

  Application.ScreenUpdating = False

  nFrame = Selection.Frames.Count

  For Each objFrame In Selection.Frames
    objFrame.Delete
  Next objFrame
  MsgBox ("All " & nFrame & " frames in this selection have been removed!")

  Application.ScreenUpdating = True
End Sub
- Finally, click “Run” button or hit “F5” to execute codes.


You will receive a message box, indicating you the result, such as below:
Method 3: Remove All Frames in Current Document
Still, we will need a macro to do the batch processing.
- Install and run a macro with steps in method 2.
- Then replace that macro with this one:
Sub RemoveAllFramesInDoc()
  Dim objFrame As frame
  Dim nFrame As Long

  Application.ScreenUpdating = False

  nFrame = ActiveDocument.Frames.Count

  For Each objFrame In ActiveDocument.Frames
    objFrame.Delete
  Next objFrame
  MsgBox ("All " & nFrame & " frames in this document have been removed!")

  Application.ScreenUpdating = True
End Sub
Similarly, you will be notified with a message box once the process is over.
Method 4: Remove All Frames in Multiple Documents from a Folder
In case you have a batch of documents all including frames, we also provide a macro to do the task.
- Paste and run these codes in VBA module:
Sub RemoveAllFramesInAllDocsInFolder()
  Dim objDoc As Document
  Dim dlgFile As FileDialog
  Dim nFile As Integer
  Dim objFrame As frame
  Dim nFrame As Long

  Set dlgFile = Application.FileDialog(msoFileDialogFilePicker)

  With dlgFile
    dlgFile.AllowMultiSelect = True
    If .Show = -1 Then
      For nFile = 1 To dlgFile.SelectedItems.Count
        Documents.Open dlgFile.SelectedItems(nFile)
        Set objDoc = ActiveDocument

        nFrame = ActiveDocument.Frames.Count
        For Each objFrame In ActiveDocument.Frames
          objFrame.Delete
        Next objFrame
        objDoc.Save
        objDoc.Close
      Next nFile
    Else
      MsgBox "No file is selected! Please select a target file."
      Exit Sub
    End If
  End With
End Sub
- Now you will trigger the “Browse” window. Select target documents and click “Open”. Then in seconds, you will have all frames in selected documents removed.
Overcome Data Disaster
Needless to say, data disaster is by no means horrible. It can even be a career threat to some extent. So to safeguard data and know the right action to take after data loss happens is of vital importance. One of the advisable measures is to get hold of a docx fix tool in advance.
Author Introduction:
Vera Chen is a data recovery expert in DataNumen, Inc., which is the world leader in data recovery technologies, including xlsx fix and pdf repair software products. For more information visit www.datanumen.com
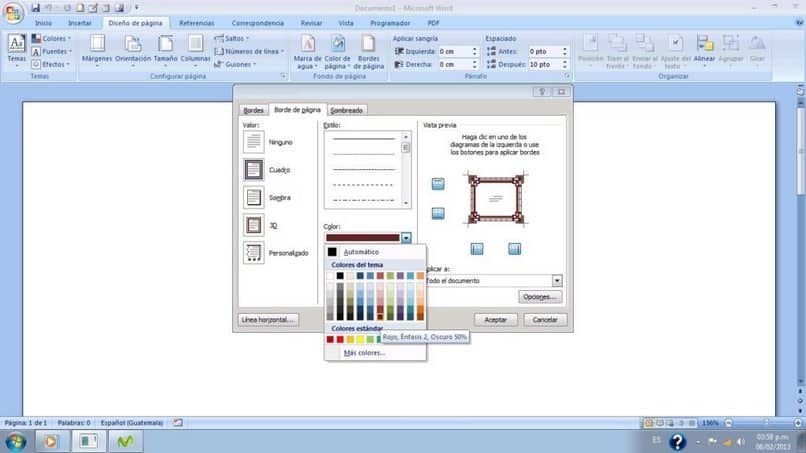
In this article we will find one more step for Word, where you will learn put frames in Word or add borders to Word pages very quickly and easily. We invite you to continue reading to learn all these functions that are necessary in office automation.
Fullerenes frames in Word are used to give a different detail to your text documents in Word, for example; Decorating a personal letter is important to achieve a different look, you can vary the decorations and they are very useful. Making presentations with frame details in your project would be ideal with a custom frame. If you also want to give your document a personal touch, you may be able to write with Chinese letters or characters in your Word document.
How to place a frame in Word?
- We open a new text document in the Microsoft Word program . If you haven’t installed it, you can download Word from its official website.
- Inside we have to start with the option «Design» and inside of it we will look for the option « Borders page».
- A new window will appear in which we will configure the frames we want to add to our project.
- Different design options will appear from dashed lines to more elaborate borders with design and all we have to do is select the one you like so that when you click accept the frame is placed on our page.

Can I choose colors and sizes for Word frames?
If you can choose colors and change the sizes as many times as you want in your text sheet in Word.
- We enter «Page Borders» .
- We select the border design that is of our preference for the project.
- Below are the colors and by default it determines «Automatic colors» this way he will take the color we use in text , in this case, black.
- Clicking here will bring up the window where we will see the variety of colors we can choose for the frame.
- The size of the frames can be determined just below the color option, we can change from the thinnest to the thickest size of all, it will depend on your project.
- With these changes, just press «Accept» and the modification will be in our text sheet.
How do we put art in our frame in Word?
- We can just place characters in our frame like «Art» and the appearance will change, depending on your project, it can be a more fun option.
- In the option «Page Borders» , we will see that after the colors and sizes of the borders, the option «Art» is present and when we click on it a new selection of frames is displayed, in this case it will be figures, stars, fruits, food, doodles and more.
- We select the one we like and click OK.
- Important: Our art will be affected by the color we set previously, i.e. if we previously selected a frame in blue, our art will also be affected in the background with a blue color.
- If you want this color not affect the art, we can put the color back on «Automatic» and then we will only see the art without color modifications.
- The size of our art can also be changed from the option «Width» where as we go forward we can preview the changes in the same window.
How to frame only text in Word?
- We write the words we want to include in a new text document.
- When we are done, we click on the tab «Design» then on the option «Page Borders» .
- Inside we will find «Borders» and inside other borders linked to the text of our project, in which we can generate borders of different styles but we no longer have the option «Art» .
- Clicking on «OK», we can see the changes in the text sheet.
If you don’t have a computer handy and need to edit a Word file, you can make changes to your Word documents from your android cell phone.
You can read more step by step on how to set background color for table cells in Word on our website. Look no further for guides, this is the most comprehensive on how to put frames in Word, add borders to Word page !.

Button back to top
1
Add space for underlines
This option adds extra space for underlines.
2
Adjust line height to grid height in the table
When this option is turned on, the table row height snaps to the document grid. Used in East Asian text.
3
Align table rows independently
When this option is not selected, center-aligned or right-aligned non-wrapped tables are aligned as a whole without changing the relative positions of the rows.
When this option is selected, the rows of a center-aligned or right-aligned non-wrapped table are center-aligned or right-aligned independently. For example, the right edges of the rows of a right-aligned non-wrapped table line up evenly if the right edges do not line up when the table is left-aligned.
4
Allow hyphenation between pages or columns
5
Allow space between paragraphs of the same style in a table
6
Allow table rows to lay out apart
This option determines the behavior of a non-wrapped table that is laid out on the right side of a wrapped object and extends below the wrapped object.
When this option is not selected, the remainder of the table is positioned out to the right with the first part of the table.
When the option is selected, the remainder of the table is allowed to slide back to the left.
7
Allow tables to extend into margins
This option was new in Word 2003.
This option will retain the settings of a table that is extended past the margins of a document instead of using autofit to make the table fit within the margins.
This was enabled automatically under Tools > Options > Compatibility for Word 2000 and Word 2002. In Word 2003 and newer versions, the option is built in.
8
Auto space the way Word 95 does
(Word 2003: Auto space like Word 95)
This option determines how lines of text break (word wrap) in an East Asian Word 95 document.
9
Balance SBCS characters and DBCS characters
Not used in U.S. English Word.
10
Combine table borders the way Word 5.x for the Macintosh does
If a table contains two contiguous cells whose border is formatted differently, the left-most cell is displayed with the border width of the right-most cell.
11
Convert backslash characters into yen signs
Not used in U.S. English Word.
12
Disable OpenType Font Formatting Features
13
Do full justification the way WordPerfect 6.x for Windows does
To achieve full justification, WordPerfect compresses the spaces between words while Word expands them. This often results in different line breaks and leads to different page breaks.
Turn on this option to implement the WordPerfect justification method.
14
Don’t add automatic tab stop for hanging indent
This option ignores the automatic tab stop that Word 6.0 uses when creating a hanging indent.
15
Don’t add extra space for raised/lowered characters
This option prevents Word from inserting additional space between lines to accommodate raised or lowered characters.
16
Don’t add leading (extra space) between rows of text
This option displays text without leading between the lines. This is the same functionality that exists in Word versions 5.x for the Macintosh.
17
Don’t allow hanging punctuation with character grid
This option prevents the use of punctuation marks in East Asian text when the character grid is enabled. This option was new in Word 2002.
18
Don’t autofit tables next to wrapped objects
19
Don’t balance columns at the start of Continuous sections
This option prevents Word from balancing columns at the end of a section or document.
20
Don’t blank the area behind metafile pictures
This option prevents Word from obscuring any text or graphics surrounding an inserted metafile. Selecting this option decreases editing speed.
21
Don’t break constrained tables forced onto the page
22
Don’t break wrapped tables across pages
This option was new in Word 2002. This option prevents a wrapped table from breaking across a page break.
Note: The Allow row to break across pages option has no effect in a wrapped table.
23
Don’t center «exact line height» lines
This option changes the vertical position of text between the top of the line space and the bottom of the line space.
With this option turned off, any extra space is split between the ascender and descender. With the option turned on, all the extra space goes to the descender.
24
Don’t expand character spaces on a line that ends with SHIFT+RETURN
When a «justified» line of text ends with SHIFT+ENTER, Word prevents extra spacing between words and makes the line appear as «Align Left».
25
Don’t snap text to grid inside table with inline objects
This option was new in Word 2002. This option prevents Word from allowing East Asian text in a table cell to snap to the character grid when an «inline with text» object is inserted in the table cell.
26
Don’t use Asian rules for line breaks with character grid
This option was new in Word 2002. This option allows East Asian text to line-break the same as in earlier versions of Word when the character grid is turned on.
27
Don’t use hanging indent as tab stop for bullets and numbering
28
Don’t use HTML paragraph auto spacing
This option has two functions:
- If you have Auto set for Paragraph Spacing Before/After, and you turn this option on, Word adjusts Paragraph Spacing Before/After to 5 pt.
- With this option turned off (default setting), Word sets the spacing between paragraphs to the larger of Paragraph Spacing Before/After.
With this option turned on, Word uses both values of Paragraph Spacing Before/After between paragraphs. This is the same functionality as in earlier versions of Word.
29
Don’t use proportional width for Korean characters
30
Don’t vertically align inside of textboxes
31
Don’t vertically align table cells containing shapes
32
Draw underline on trailing spaces
Not used in U.S. English Word.
33
Expand/condense by whole number of points
This option rounds the measurement of the spacing for characters with condensed or expanded spacing to the nearest whole number.
34
Forget last tab alignment
This option forces tab settings at the end of lines to behave the same as in Word 97.
35
Lay out AutoShapes the way Word 97 does
When an AutoShape with Top & Bottom wrapping style applied appears at the bottom of a page, Word forces the AutoShape behind the text.
36
Lay out footnotes the way Word 6.x/95/97 does
This option positions footnotes as they were in earlier versions of Word.
37
Lay out tables with raw width
This option allows Word to determine the width of a table (table width + table indent) and prevents a table from being laid out in an area that is too small.
This option prevents the table from being clipped (cut off on the sides) or pushed off the page when it is aligned next to a floating object.
38
Print body text before header/footer
This option prints the main text layer before the Header/Footer layer, which allows for the process of PostScript codes in the text layer, the same way that Word 5.x for the Macintosh does. (This functionality is the reverse of the default order.)
39
Print colors as black on noncolor printers
This option prints all colors as black, instead of using grayscale (different shades of gray) when you use a printer that does not print color.
40
Select entire field with first or last character
This option was new in Word 2002. This option allows you to select the entire field when you select either the first or last character of the field result. This option does not work when the field code is displayed.
41
Set the width of a space like WordPerfect 5.x
WordPerfect calculates the width of a space in a proportional font differently from Word. In the WordPerfect interface, this default word spacing is named WordPerfect Optimal. The Word 97 text converters can use the WordPerfect formula for spacing.
42
Show hard page or column breaks in frames
If a frame contains a manual, or hard, page break or column break, Word displays it.
43
Split apart page break and paragraph mark
44
Substitute fonts based on font size
This option is used by the WordPerfect 6.x converter to make a font request based on font size first and, if a match is not found, to actually map the font.
45
Suppress extra line spacing at bottom of page
WordPerfect suppresses any extra line spacing from the last line on a page. For example, if line spacing is set to double, the final line on the page does not display white space below it.
Turn on this option to implement the line-spacing feature.
46
Suppress extra line spacing at top of page
This option prevents Word from adding extra line spacing at the top of a page. If the line spacing for the line at the top of a page is set for more than single spacing, Word ignores the extra spacing, so that the top margin does not increase.
47
Suppress extra line spacing at top of page the way Word 5.x for the Macintosh does
(Word 2003: Suppress extra line spacing at top of page like Word 5.x for the Mac)
This option prevents Word from adding extra line spacing at the top of a page. If the line spacing for the line at the top of a page is set for more than single line spacing, Word ignores the extra spacing, so that the top margin does not increase.
48
Suppress extra line spacing the way WordPerfect 5.x does
(Word 2003: Suppress extra line spacing like WordPerfect 5.x)
This option ensures that the layout of a converted WordPerfect document that is formatted with Automatic line height closely matches that of the original document.
49
Suppress Space Before after a hard page or column break
This option suppresses the space in a paragraph formatted with the Space Before option that follows a hard page break or column break.
50
Swap inside and outside mirror indents and relative positioning
51
Swap left and right borders on odd facing pages
If a paragraph has a left border (not a box) and the Different Odd/Even Headers check box or Mirror Margins check box is selected, Word prints the border on the right, on odd numbered pages.
52
Treat * as ** in mail merge data sources
In a data source, this option converts a delimiter composed of a backslash and quotation mark («) to two quotation marks (» «), so that Word can recognize quotation marks.
53
Truncate font height
This option rounds the font size up or down, as in WordPerfect 6.x for Windows.
54
Underline tab character in numbered lists
55
Use cached paragraph information for column balancing
56
Use larger small caps the way Word 5.x for the Macintosh does
This option applies small caps formatting in Word version 6.0 for the Macintosh the same way as in Word version 5.x for the Macintosh, which produces slightly larger small capital letters.
57
Use line-breaking rules
This option was new in Word 2002. This option controls line breaks in a Thai language document.
58
Use Normal style for bulleted and numbered lists
59
Use printer metrics to lay out document
If this option is selected, Word uses the information from the printer driver that is installed, as in some earlier versions of Word.
If this option is turned off (default), Word use built-in metrics to lay out the document. This means your document looks the same, no matter what printer driver is installed.
60
Use Word 2002 table style rules
This option was new in Word 2003. This option will preserve layout compatibility of tables styles used in Word 2002.
61
Use Word 2002-2007 style evaluation rules for font size and paragraph justification in tables
62
Use Word 2003 hanging-punctuation rules
63
Use Word 2003 indent rules for text next to wrapped objects
64
Use Word 2003 kerning pair rules
65
Use Word 2013 rules for hyphenation between pages and columns
66
Use Word 2003 table autofit rules
67
Use Word 6.x/95 border rules
This option suppresses paragraph borders when a paragraph is intersected by frames or wrapped drawing objects.
68
Use Word 97 line-breaking rules for Asian text
This option uses Word 97 line-breaking rules for Asian text.
69
Wrap lines the way Word 6.0 does
(Word 2003: Lines wrap like Word 6.0)
Not used in U.S. English Word.
70
Wrap trailing spaces to next line
This option automatically moves any spaces that trail into the margin after a word at the end of a line to the beginning of the next line.