
Download PC Repair Tool to quickly find & fix Windows errors automatically
Tables are used to organize data, but did you know that you can insert Images into your Word table? By default, a cell in the table will adjust to the size of an inserted picture, so you can insert as many pictures into your table as you want. In this tutorial, we will explain how to insert images into a table in Microsoft Word.
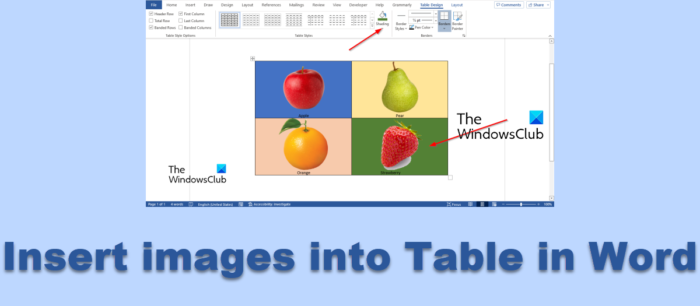
Want to fit an image in a Table cell in Word? Follow the steps below to insert images into a table in Microsoft Word:
- Launch Microsoft Word.
- Click the Orientation button in the Page Setup group and select Landscape.
- Click the Margin button and change the margins to Narrow.
- Insert a table into the document.
- Click the double arrow to select all the tables.
- Change the height and width of the table.
- Then click the Align bottom center button.
- Click the AutoFit button and select Fixed Column Width.
- Now insert pictures into each table cell.
- Click on the picture, then click the Picture Format tab.
- Change all the picture’s heights to 1.8.
- Click the Table Design tab, select the Shading button and choose a color.
Launch Microsoft Word.
Before you insert a table into the Word document, click the Layout tab, click the Orientation button in the Page Setup group, and select Landscape.

Then click the Margin button and change the margins to Narrow.
Now Insert a table into the Word document.
You can input data into the table if desired.
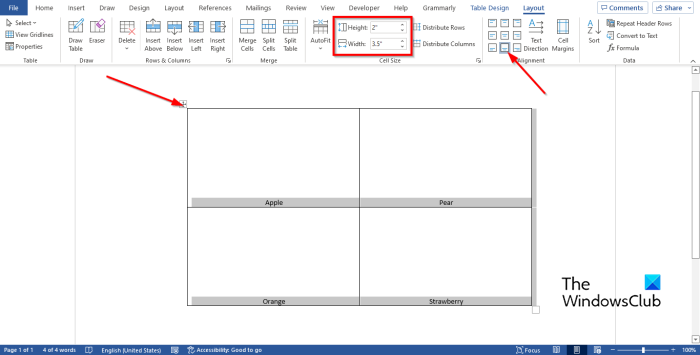
Click the double arrow to select all the tables.
Now change the height and width of the table in the Cell size group. In this tutorial, we have to change the Height to 2” and the Width to 3.5”.
Then click the Align bottom center button in the Alignment group.
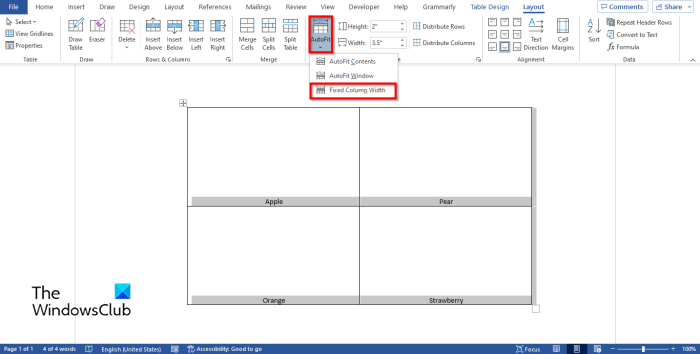
On the Layout tab, click the AutoFit button in the Cell Size group and select the Fixed Column Width option from the menu.
Now insert pictures into each table cell.
You will notice that the pictures are too huge for the table, so they will not hold onto one document. To fix this issue.
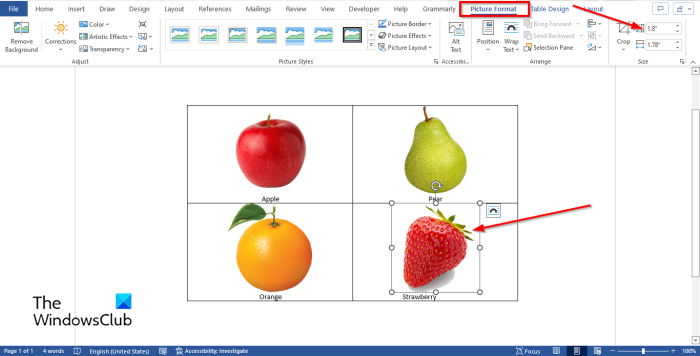
Click on the picture, then click the Picture Format tab.
Change the height of the picture to 1.8. Change all the pictures in the table to that height.
You can also change the cell of the table by clicking on a cell, then clicking the Table Design tab.
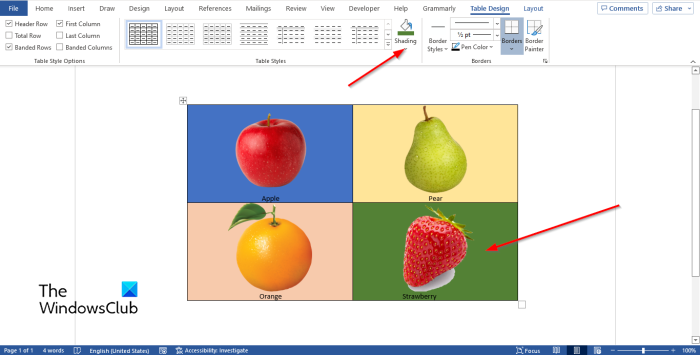
Then click the Shading button and choose a color.
Now we have successfully inserted pictures into a table.
How do I insert multiple Pictures into a table in Word?
If an individual wants to select multiple pictures in Microsoft Word, follow the steps below.
- Click on the first picture to select it
- Press and hold the Ctrl button on your keyboard.
- Click on the rest of the pictures.
READ: How to convert Table to Picture in Word
Can you insert Pictures into a table in Word?
Yes, you can insert a picture in a table in Microsoft Word, but you must know the technique so that the picture you have inserted into the cell will not be unorganized. In this tutorial, we have explained how to insert images into a table in Microsoft Word.
READ: How to insert a Picture into a Shape in Microsoft Word
We hope you understand how to insert images into a table in Microsoft Word.
Shantel has studied Data Operations, Records Management, and Computer Information Systems. She is quite proficient in using Office software. Her goal is to become a Database Administrator or a System Administrator.

Вставляем изображение в документ Microsoft Word

Довольно часто работа с документами в MS Word не ограничивается одним только текстом. Так, если вы печатаете реферат, методичку, брошюру, какой-нибудь отчет, курсовую, научную или дипломную работу, вам вполне может понадобиться вставить в то или иное место изображение.
Вставить рисунок или фото в документ Word можно двумя способами — простым (не самым правильным) и чуточку посложнее, зато правильным и более удобным для работы. Первый метод заключается в банальном копирование/вставке или перетаскивание графического файла в документ, второй — в использование встроенных инструментов программы от Microsoft. В этой статье мы расскажем о том, как правильно в Ворде вставить картинку или фотографию в текст.
1. Откройте текстовый документ, в который требуется добавить изображение и кликните в том месте страницы, где оно должно находиться.

2. Перейдите ко вкладке “Вставка” и нажмите на кнопку “Рисунки”, которая расположена в группе “Иллюстрации”.

3. Откроется окно проводника Windows и стандартная папка “Изображения”. откройте с помощью этого окна папку, в которой содержится необходимый графический файл, и кликните по нему.

4. Выбрав файл (картинку или фото), нажмите кнопку “Вставить”.

5. Файл будет добавлен в документ, после чего сразу откроется вкладка “Формат”, содержащая в себе инструменты для работы с изображениями.

Основные инструменты для работы с графическими файлами
Удаление фона: если это необходимо, вы можете удалить фон картинки, точнее, убрать нежелательные элементы.

Коррекция, изменение цвета, художественные эффекты: с помощью этих инструментов вы можете изменить цветовую гамму изображения. В число параметров, которые можно изменить, входят яркость, контраст, насыщенность, оттенок, другие варианты цвета и многое другое.

Стили рисунков: используя инструменты “Экспресс-стили”, вы можете изменить внешний вид добавленного в документ изображения, в том числе и форму отображения графического объекта.

Положение: данный инструмент позволяет изменить положение изображения на странице, “вклинив” его в текстовое содержимое.

Обтекание текстом: этот инструмент позволяет не только грамотно расположить картинку на листе, но и вписать ее непосредственно в текст.

Размер: это группа инструментов, в которой вы можете обрезать изображение, а также задать точные параметры для поля, внутри которого находится картинка или фото.

Примечание: Область, внутри которой находится изображение, всегда имеет прямоугольную форму, даже если сам объект имеет другую форму.
Изменение размера: если вы хотите задать точный размер для картинки или фото, используйте инструмент “Размер”. Если же ваша задача — растянуть картинку произвольно, просто возьмите за один из кружков, обрамляющих изображение, и потяните за него.

Перемещение: для того, чтобы переместить добавленное изображение, кликните по нему левой кнопкой мышки и перетяните в необходимое место документа. Для копирования/вырезки/вставки используйте горячие комбинации клавиш — Ctrl+C/Ctrl+X/Ctrl+V, соответственно.

Поворот: чтобы повернуть изображение, кликните по стрелке, расположенной в верхней части области, в которой находится графический файл, и поверните его в необходимом направлении.
- Совет: Чтобы выйти из режима работы с изображением, просто кликните левой кнопкой мышки за пределами обрамляющей его области.

Собственно, на этом все, теперь вы знаете, как в Ворде вставить фото или картинку, а также знаете о том, как ее можно изменить. И все же, стоит понимать, что данная программа является не графическим, а текстовым редактором. Желаем вам успехов в ее дальнейшем освоении.
Мы рады, что смогли помочь Вам в решении проблемы.
Помимо этой статьи, на сайте еще 11902 инструкций.
Добавьте сайт Lumpics.ru в закладки (CTRL+D) и мы точно еще пригодимся вам.
Отблагодарите автора, поделитесь статьей в социальных сетях.
Опишите, что у вас не получилось. Наши специалисты постараются ответить максимально быстро.
Как вставить картинку в Ворде (Word), варианты вставки
О том, как вставить картинку в Ворде, не всегда знают новички, при работе с программой Microsoft Word. Часто статьи не ограничивается, только текстом, иногда приходиться добавлять изображение. Из этой статьи Вы узнаете, как правильно это сделать.
Как вставить картинку в Ворде рядом с текстом

Здравствуйте друзья! Как известно для начинающего пользователя, текстовый редактор Ворд кажется сложной программой с различными функциями, в которых можно запутаться. Но на самом деле это не так, просто нужно знать, как этой программой пользоваться.
Итак, как вставить картинку в Ворде? Если Вам нужно добавить изображение в текст, откройте инструмент и напишите предложение. Далее ставите курсор мыши рядом с текстом и нажимаете на кнопку вставка. После чего выбираете картинки, которые находятся на Вашем компьютере. Впоследствии фото отобразится рядом с текстом. (Рисунок 1)

Существует ещё один способ, который помогает за несколько минут добавить фотографию. Для этого, в той же панели управления нажмите на слово картинка. Перед Вами с правой стороны появиться средство поиска, который может находить рисунки прямо из самой программы. Нажмите на кнопку начать и выбирайте любую и из них. Потом жмёте на неё левой кнопкой мыши. Далее, Вы заметите, что она появилась в том месте, где была сделана заметка.
Как вставить фото и картинку в Ворде на весь лист
Вставка картинки в Ворде на основной лист текстового документа, осуществляется следующим образом. Откройте чистый раздел главного листа в данной программе. Добавляйте изображение тем же методом, который был указан выше. После чего, нажимайте правой кнопкой мыши на картинку и выбирайте такие пункты из меню как обтекание текстом и за текстом.
Такие функции позволяют манипулировать картинкой, и тем самым фото удлиняется во всю ширину. Но, чтобы это произошло, необходимо удерживать углы мышкой и растягивать картинку до тех пор, пока она не захватит всю область.
Как вставить фото и картинку в Ворде в таблицу
Установка картинки в программе Ворд, происходит следующим образом. Выбирайте нужное Вам место в таблице и просто загружайте файл. После, того когда загрузка завершиться, появляется полное изображение. (Рисунок 2).

В дальнейшем, его придётся немного отредактировать, чтобы размер рисунка был приемлемым для нормального просмотра. Это сделать просто, достаточно лишь передвинуть углы фото, в различные стороны.
Как вставить надпись на картинку в Ворде
Итак, после того когда Вы узнали, как вставить картинку в Ворде, её можно так же красиво оформлять в виде, специальной надписи. Как известно, в данном текстовом редакторе этот вариант проделать вполне возможно.
Далее мы с Вами рассмотрим эффективный метод, который поможет создать фигуру из текста на картинке. Для этого нужно открыть вкладку Вставка и выбрать пункт WordArt. Впоследствии, Вы увидите окно, из которого следует подобрать стили для текстового поля. Потом добавляйте её на страницу и напишите что-нибудь.
Для того чтобы этот текст отобразился на картинке, необходимо добавить любое фото и потом перенести надпись на само изображение. Делается это так. Вы нажимаете на вкладку Вставка, добавляйте рисунок. Когда он будет добавлен, удерживайте левой кнопкой мыши, созданный текст, и переносите его на фотографию.
Когда всё будет готово, можете добавлять картинки и соединять их с надписью, которая получилась.
Заключение
Из статьи Вы узнали, как вставить картинку в Ворде. Данная программа, позволяет не только работать с текстом, но и улучшать его с помощью различных инструментов. Например, для Вас откроются новые возможности при работе с картинками, и тем самым написанный материал, будет радовать Ваших читателей.
Пользуйтесь способами, которые были рассмотрены выше и тогда сможете написать качественную статью или книгу. Не всегда хочется писать, но Вы можете надиктовывать текст. Прочитайте информацию о том, как набирать слова с помощью голосового набора. Всего Вам лучшего и высоких заработков через Интернет.
Вставка рисунка по размерам
Помощь в написании контрольных, курсовых и дипломных работ здесь.
Команда Изменить рисунок открывает диалоговое окно Вставка рисунка
Здравствуйте. Word 2016, выделяю рисунок на листе, контекстное меню Изменить рисунок — вместо того.
Вставка рисунка в JLabel
Прошу вас помочь вставить рисунок в поле Jlabel, так чтобы он отображался на всех компьютерах.
Вставка рисунка в форму
Здравсмтвуйте. Не подскажете как в форме создать поле, которое ссылается на рисунок *.bmp.
Вставка рисунка в Qt Designer
Здравствуйте! Кто может подсказать как в форму добавить рисунок таким образом, чтобы он отображался.
Microsoft 365, Microsoft Office, Microsoft Word, Office 2016, Office 2019, Office 2021 / Office LTSC, Office 365 /
23 July 2022
When it comes to inserting a background image into the Microsoft Word table, it’s possible with a little trickery. It’s not ideal but quite easy.
We’ll show you how to insert a picture background into a Word table. You’ll need to be aware that it can likely go wrong when the document formatting changes, unfortunately Word hasn’t exactly made inserting background images in tables an easy thing.
Word Table with Picture Background
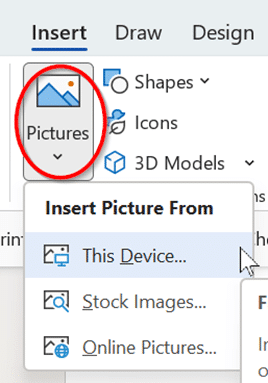
Insert your image into the Word document at Insert | Illustrations | Pictures (choose between your device, stock images or online pictures…)
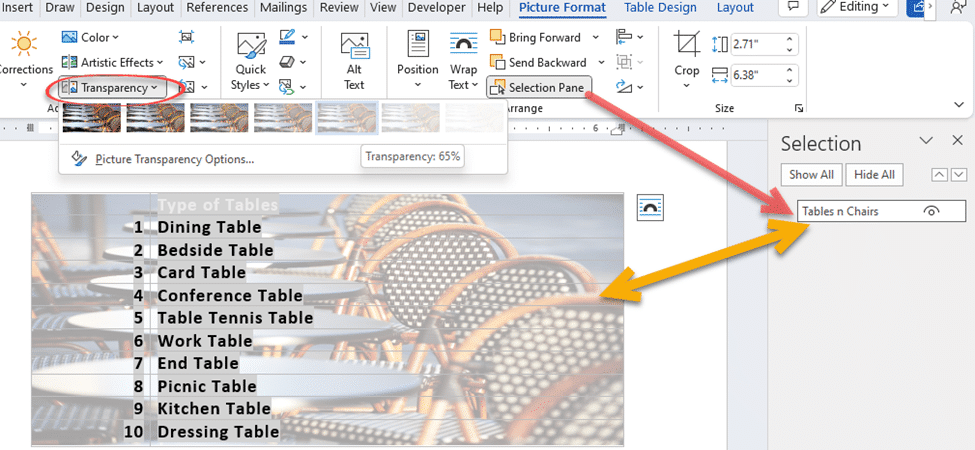
Next, select your image and select the Layout Options icon on the top right corner and under ‘With Text Wrapping’ to Behind Text.

Now move (drag) the image until its ‘under’ the table and resize the image and table as required. You might need to fix up the text in the table too so that it’s easy to read / see. In this example the text has all but disappeared!

Changing the table text formatting. All black or white text, depending on the image. Larger font size might help or a clearer sans-serif font.
Select the image only
You won’t be able to physically group the image together with the table, and once it’s behind the table it’ll be pretty hard to select.
All you need to do is go to Layout | Arrange | Selection Pane and select the image.

Once the picture is selected you can change the image, edit it or delete it.
Make the picture less intrusive
Often the picture is too dark or busy obscuring the text over it. The Office Picture Tools can fix that, in particular Picture | Format | Adjust | Transparency.
Select the image under the table (using the Selection Pane mentioned above). That makes the Picture Format tab appear, try Transparency or some other option to find a text/image balance.
Blank spaces in Word navigation pane
When Word ‘Headings’ aren’t really headings
Word Designer: the quick way to better looking documents
Sometimes you want to insert several images at a time in your MS word file. Microsoft Word can not select multiple images at a time by default. Don’t worry. Here we share the two most straightforward ways to select multiple images. There are three different ways to select and insert multiple images in word.
- Select and insert multiple images on one page in MS word.
- Select and insert multiple images into a table.
How to Select and Insert multiple Images on one page in Ms word?
Now we insert images using tables. First, we go to the Insert menu and select the picture option.
Here we show a dialog box. Now open the folder and select the images and click the insert button.

Now we show all those images in the word file.

If you want to move any image then select the image, and right click. Now select the Wrap text and Font of text. Now you can easily move the image.
How to select and Insert multiple Images into a table in Ms word
There at first we customize our word page size and layout. So, go to the menu bar and select the page layout option. Next select orientation and then landscape.

Now you can customize the pages margins. Here we select the top and bottom margins 0.3 inches. And click ok.

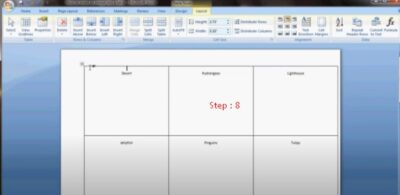
Next go to the insert option and select your table. Your table looks like the image below. In every cell we insert images.

You can resize all the cells.
Here we set the cell high 2.73 inches and width 3.33 inches. Now your table looks like this-
Now go to the picture option to select your images and click insert. Here you can resize your image height and weight. Just go to format and choose the size of the image.

Finally show your image as like

Now fill the every cell with your images as the same process. And all images look like-

![]()
Written by Allen Wyatt (last updated June 5, 2021)
This tip applies to Word 2007, 2010, 2013, 2016, 2019, and Word in Microsoft 365
Michael wonders how he can center a picture or graphic in a table cell, both vertically and horizontally, and have it stay centered if the cell changes size. He has tried several methods proposed by various websites and forums, but they have all either not worked or been too cumbersome to use.
Before figuring out how to center your image in a table cell, you must understand that there are two ways that graphics can be inserted in a Word document: floating or inline. The format used by Word depends on what you are inserting. If you insert a graphic, it is inline by default. If you insert a shape, it is floating by default. When putting a graphic in a table cell, you’ll never be able to really get it right (and keep it right) if the graphic is floating. You need to make sure it is inline. An inline graphic is pulled off of the graphic «layer» and placed in line with the text that surrounds it. It is, essentially, treated like any other textual character.
So, to put your graphic in the table cell, you need to click within that table cell. I find it very helpful to turn on the display of non-printing characters while doing this. (Click the Show/Hide tool in the Paragraph group on the Home tab of the ribbon.) With non-printing characters displayed, you can easily tell if there are any extraneous characters in the table cell. The only thing you want in the cell is the end-of-cell marker, which looks like a small circle with four little «tails» attached to it. If you have other text in the cell (in addition to graphic you want there), it will throw off your centering efforts.
Make sure the insertion point is just in front of the end-of-cell marker, and then insert the picture. You can make sure the graphic is inline (instead of floating) by right-clicking the just-inserted graphic to display a Context menu. Choose, from the menu, the Wrap Text option and then In Line with Text.
Now do a bit of resizing. Both your graphic and your table cell need to be sized so that the graphic fits fully inside the cell.
Now take care of your alignment by displaying the Layout tab of the ribbon. (This tab is visible when you are working inside of a table.) With the graphic selected or the insertion point otherwise located within the cell that contains the graphic, click the Align Center tool, which is in the Alignment group.
If you hover the mouse pointer over the Align Center tool, you see a ToolTip appear that explains that the tool centers text both horizontally and vertically within the cell. The graphic is centered because you made it inline, which means it is treated as your text is treated. The graphic should now remain centered—both horizontally and vertically—even if you resize the graphic or the cell containing the graphic.
There are a few caveats to this, and they have to do with how Word formats paragraphs. When you click the Align Center tool, Word automatically changes the paragraph alignment for the cell. (You can verify this by looking at the Home tab of the ribbon, where you’ll see that the alignment indicated in the Paragraph group is changed to Center.) What it doesn’t change, however, are other formatting settings such as indentation and spacing.
To correct this, display the Paragraph dialog box. With the insertion point still in the cell containing the graphic, display the Home tab of the ribbon and click the small icon at the lower-right corner of the Paragraph group. (See Figure 1.)
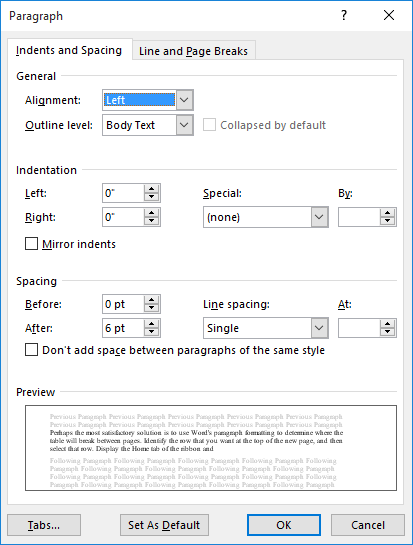
Figure 1. The Paragraph dialog box.
Set the Left, Right, Before, and After controls to 0. Set the Special drop-down list to None and the Line Spacing drop-down list to Single. Click on OK to apply the settings.
In addition, the table settings can affect how a graphic is centered in the cell. Again, display the Layout tab of the ribbon and click the Cell Margins tool (in the Alignment group). Word displays the Table Options dialog box. (See Figure 2.)
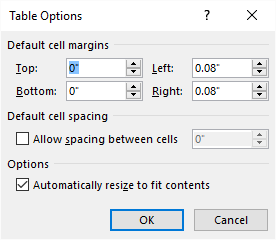
Figure 2. The Table Options dialog box.
Set the Top, Bottom, Left, and Right controls to 0 and feel free to clear the Automatically Resize to Fit Contents check box. Click OK, and these formatting settings are applied. Your graphic should now be exactly centered in the cell.
Finally, you should understand that the nature of your graphic itself can affect how centered it appears in your table cell. Some graphics have a transparency characteristic, which means that you can «see through» a portion of the graphic. If yours does, it may appear off-center when it really isn’t. If you click once on your graphic, Word displays a thin-lined box around the graphic. It is this box, which is actually centered, as it represents the boundaries of the graphic as understood by Word.
WordTips is your source for cost-effective Microsoft Word training.
(Microsoft Word is the most popular word processing software in the world.)
This tip (13114) applies to Microsoft Word 2007, 2010, 2013, 2016, 2019, and Word in Microsoft 365.
Author Bio
With more than 50 non-fiction books and numerous magazine articles to his credit, Allen Wyatt is an internationally recognized author. He is president of Sharon Parq Associates, a computer and publishing services company. Learn more about Allen…
MORE FROM ALLEN
Copying Rows and Columns with the Mouse
Word allows you to do quite a few editing tasks using the mouse. If you want to copy rows or columns in a table, you can …
Discover More
Creating a Hierarchy Map of Your Hard Drive
Want to see how the directories and subdirectories in your hard drive are organized? It’s easy to do using the directions …
Discover More
Making Save As Display the Save As Dialog Box
Sometimes you just want to get to the Save As dialog box as quickly as possible. Word seems to make this increasingly …
Discover More
- Remove From My Forums
-
Question
-
I’ve created a table with 5 columns and 100 rows. I would like to insert 100 picture files into a column at one time. I’ve set-up the table to resize the pictures to fit within the individual cell format that I’ve created. The best I
can do is get the 100 picture files to insert into 1 cell within the table. They are all placed on top of one another. Does anyone know how to do this?
Answers
-
Hi,
Please try the following VBA method:
1. Hold down the ALT + F11 keys, and it opens the
Microsoft Visual Basic for Applications window.2. Click Insert > Module, and paste the following macro in the Module Window.
Sub InsertMultipleImagesFixed()
 Dim fd As FileDialog
 Dim oTable As Table
 Dim iRow As Integer
 Dim iCol As Integer
 Dim oCell As Range
 Dim i As Long
 Dim sNoDoc As String
 Dim picName As String
 Dim scaleFactor As Long
 Dim max_height As Single
 'define resize constraints
 max_height = 275

 'add a 1 row 2 column table to take the images
 Set oTable = Selection.Tables.Add(Selection.Range, 1, 1)
 '+++++++++++++++++++++++++++++++++++++++++++++
 'oTable.AutoFitBehavior (wdAutoFitFixed)
 oTable.Rows.Height = CentimetersToPoints(4)
 oTable.Range.Cells.VerticalAlignment = wdCellAlignVerticalCenter
 '++++++++++++++++++++++++++++++++++++++++++++++

 Set fd = Application.FileDialog(msoFileDialogFilePicker)
 With fd
 .Title = "Select image files and click OK"
 .Filters.Add "Images", "*.gif; *.jpg; *.jpeg; *.bmp; *.tif; *.png; *.wmf"
 .FilterIndex = 2
 If .Show = -1 Then

 For i = 1 To .SelectedItems.Count

 iCol = 1
 iRow = i
 'get filename
 picName = Right(.SelectedItems(i), Len(.SelectedItems(i)) - InStrRev(.SelectedItems(i), ""))
 'remove extension from filename ****
 picName = Left(picName, InStrRev(picName, ".") - 1)

 'select cell
 Set oCell = ActiveDocument.Tables(1).Cell(iRow, iCol).Range

 'insert image
 oCell.InlineShapes.AddPicture FileName:= _
 .SelectedItems(i), LinkToFile:=False, _
 SaveWithDocument:=True, Range:=oCell

 'resize image
 If oCell.InlineShapes(1).Height > max_height Then
 scale_factor = oCell.InlineShapes(1).ScaleHeight * (max_height / oCell.InlineShapes(1).Height)
 oCell.InlineShapes(1).ScaleHeight = scale_factor
 oCell.InlineShapes(1).ScaleWidth = scale_factor
 End If

 'center content
 oCell.ParagraphFormat.Alignment = wdAlignParagraphCenter

 'insert caption below image
 oCell.InlineShapes(1).Range.InsertCaption Label:="Figure", TitleAutoText:="", _
 Title:=": " & picName,
 If i < .SelectedItems.Count And i Mod 2 = 0 Then 'add another row, more to go
 oTable.Rows.Add
 End If
 Next i
 End If
 End With

 Set fd = Nothing
 End Sub
3. Then press the F5 key to run this code, and select the folder which contains the pictures that you want to insert. Then press
Ctrl + A to select all the pictures. And click Open button.If you had further issue about the coding/programs, please post your question to MSDN forum:
http://social.msdn.microsoft.com/Forums/en-US/home?forum=worddev&filter=alllanguages
Regards,
George Zhao
TechNet Community Support
-
Marked as answer by
Friday, February 7, 2014 1:23 AM
-
Marked as answer by