
Обновлено 05.06.2018
![]()
Добрый день! Уважаемые читатели, лучшего IT блога России :), pyatilistnik.org. Так уж повелось, что в последнее время я очень часто пишу про проблемы на сервере терминалов, благо пользователи и компания Microsoft, трудятся над созданием различных, интересных ситуаций. Не так давно поступила ко мне заявка, в которой описывалась такая проблема, на одном из узлов RDS фермы, а именно, пропали значки на офисных документах Microsoft Office (Exel, Word, Visio, Outlook). Самое забавное, что все документы открывались и работали, но согласитесь, это очень не удобно, когда нет возможности быстро ориентироваться в формате файла. Давайте я покажу, каким образом можно восстановить отображение значков Microsoft Office. Думаю, не далек тот день, когда и вы с этим столкнетесь.
Почему исчезают значки
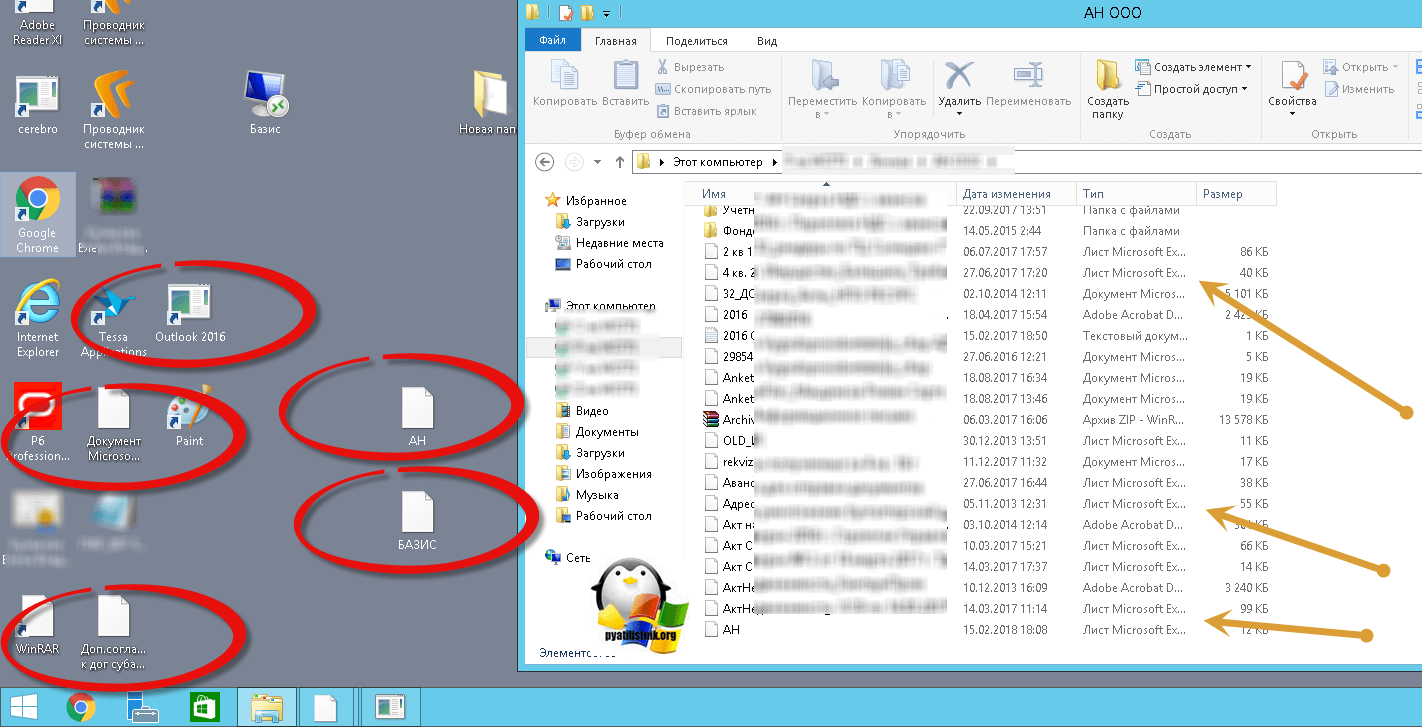
Давайте вначале мы разберемся, почему могут исчезать значки Microsoft Office как с рабочего стола, так с документов. Как я и писал выше, данная проблема у меня появилась на терминальном сервере и выглядит она вот таким образом. Ярлыки на рабочем столе и документы в папке, все потеряли свои значки приложений Microsoft Office. Стрелками я отметил, что тип файлов exel таблицы, или значок Outlook 2016.
Сама проблема не нова с пропажей значков, не так давно мы с вами решали проблему, когда пропал значок громкости windows 10. Давайте рассмотрим по каким причинам исчезают значки с программ и файлов.
Основные причины пропажи
- У вас слетели ассоциации файлов, это когда определенные форматы файлов, например, docx открываются не той программой или вообще операционная система Windows не знает, чем его открывать.
- Проблемы с реестром Windows. Очень частая проблема, забегу вперед у меня все решилось с ней.
- Поврежден офисный продукт
- Требуется чистка кэша значков в операционной системе
Теперь когда мы выяснили почему исчезают значки, нам нужно это поправить, чтобы вам или пользователям было комфортно работать. Благо терминальные фермы редко состоят из одного сервера, поэтому можно закрыть новые подключения к этому хосту , дождаться когда все сеансы с него выйдут и можно вводить его в режим обслуживания.
Что делать если исчез значок на офисном приложении
Теперь переходим непосредственно к практике:
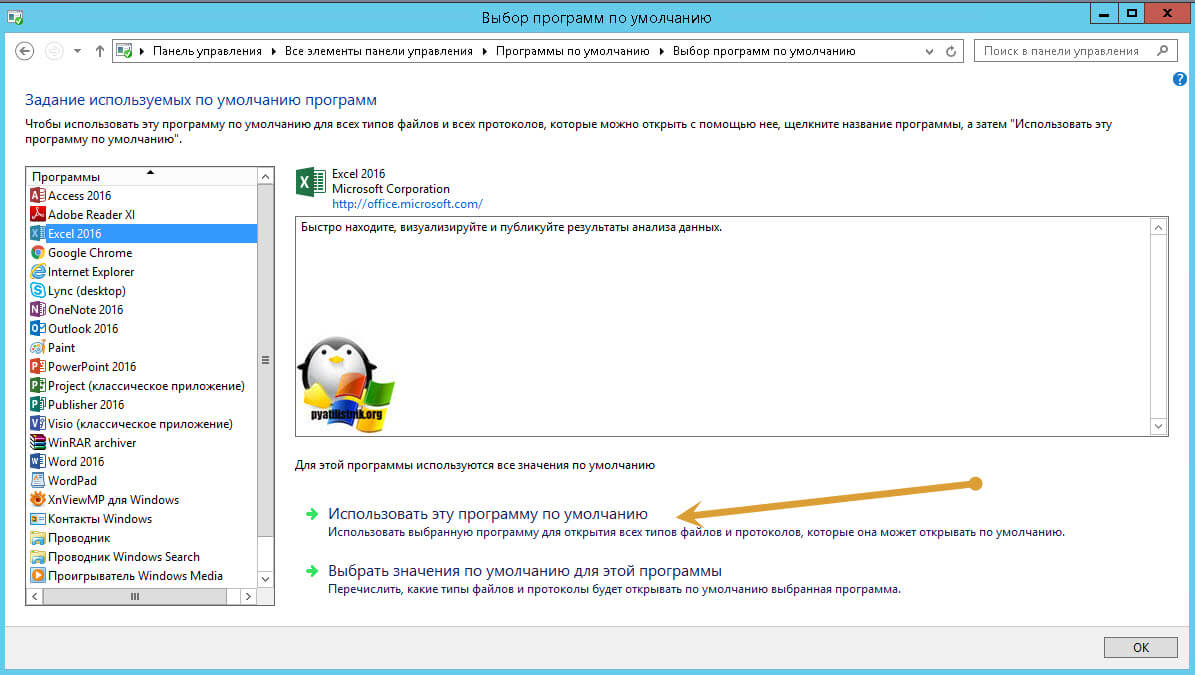
- Заходим на нужного участника фермы, если выскочит ошибка, что «Если вы хотите подключиться к определенному участнику фермы для управления», то по ссылке есть инструкция. Если у вас ваши документы, вообще не открываются, то первым делом проверьте ассоциации файлов, я об этом подробно рассказывал, советую посмотреть, там смысл в том, что вы явным образом указываете каким приложением открывать нужный тип файлов. Для примера, выбираете Exel и задаете, что его нужно использовать по умолчанию.
Либо через правый клик по нужному файлу, выбрать «Открыть с помощью’
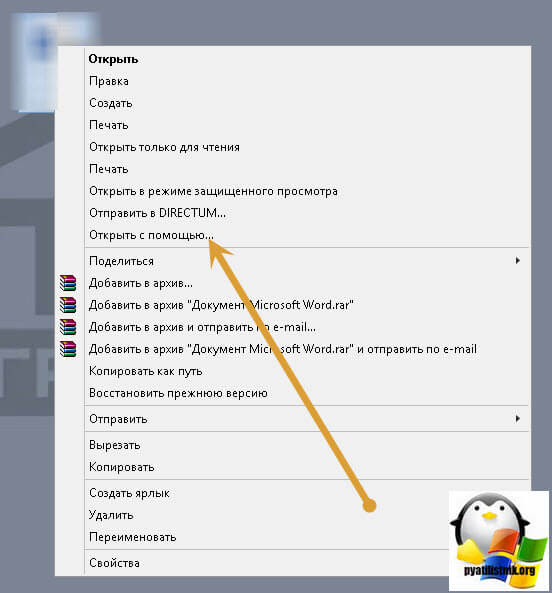
Указываем нужную программу, в примере я открыл файл .docx для него соответствует Word 2016.

- Если вам это не помогло, и исчезнувшие значки Microsoft Office у вас не появились, но файлы открываются нужными приложениями, то вам должен в 90% случаев помочь метод связанный с реестром Windows.
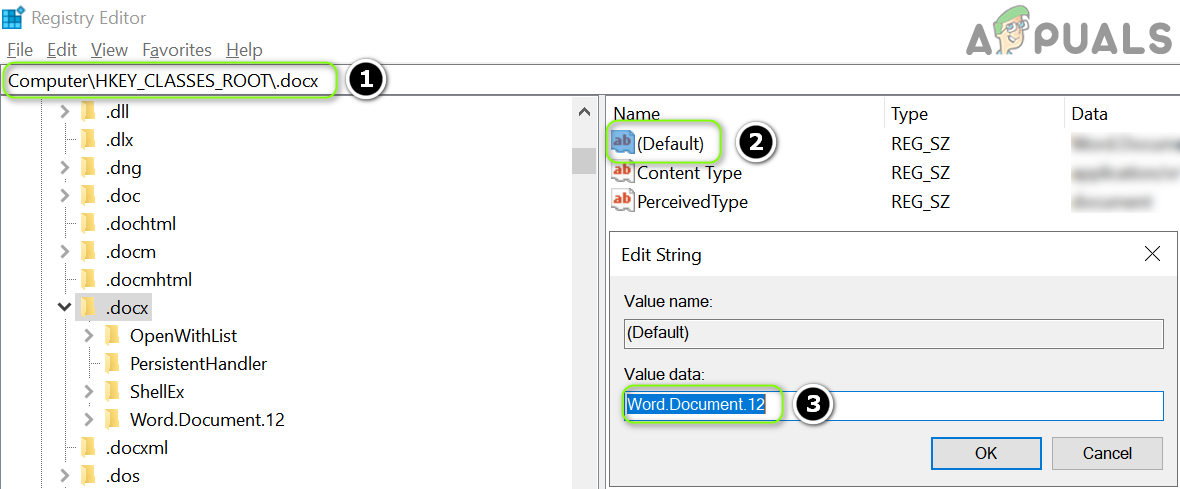
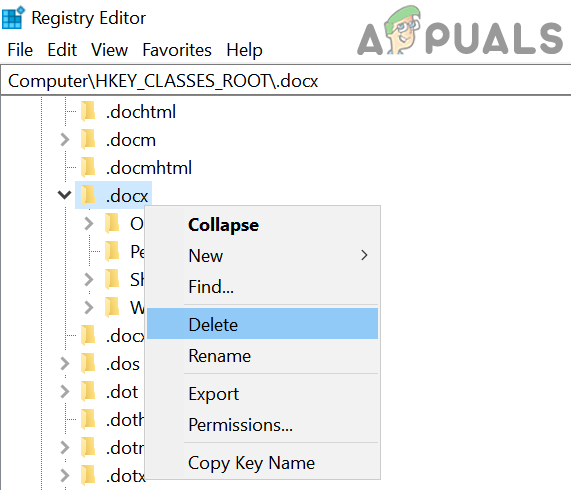
Запускаем реестр Windows и переходим в ветку:
Эта ветка отвечает за ассоциации файлов с конкретными программами, а так же за отображаемые значки. Я в своем примере выбираю файлы формата .docx, у вас в правой части окна редактора реестра, будет такой параметр «По умолчанию», в нормальной ситуации там будет значение Word.Document.12 для 2013 или 2016 Microsoft Office, для 2010 Word.Document.8. Если будет значение docx_auto_file, то для правильного отображения и восстановления значка поставьте значение Word.Document.12 или Word.Document.8.

Теперь когда вы выяснили какое значение у вас для нужного расширения, у меня напомню это Word.Document.12, то ниже оставаясь в ветке реестра HKEY_CLASSES_ROOT, находим папку с данным именем (Word.Document.12).
Далее в Word.Document.12, вы находите папку DefaultIcon (она отвечает за стандартный значок). У вас в правой частb будет значение «По умолчанию» и вот значение у него должно быть в виде пути до файла с иконкой. По умолчанию это C:Program FilesMicrosoft Officeрелиз офиса файлы xlicon.exe, ppiicon.exe, wordicon.exe.
Посмотрите какой у вас путь, у меня это был C:Windowsinstaller{90140000-0011-0000-0000-0000000FF1CE}wordicon.exe,1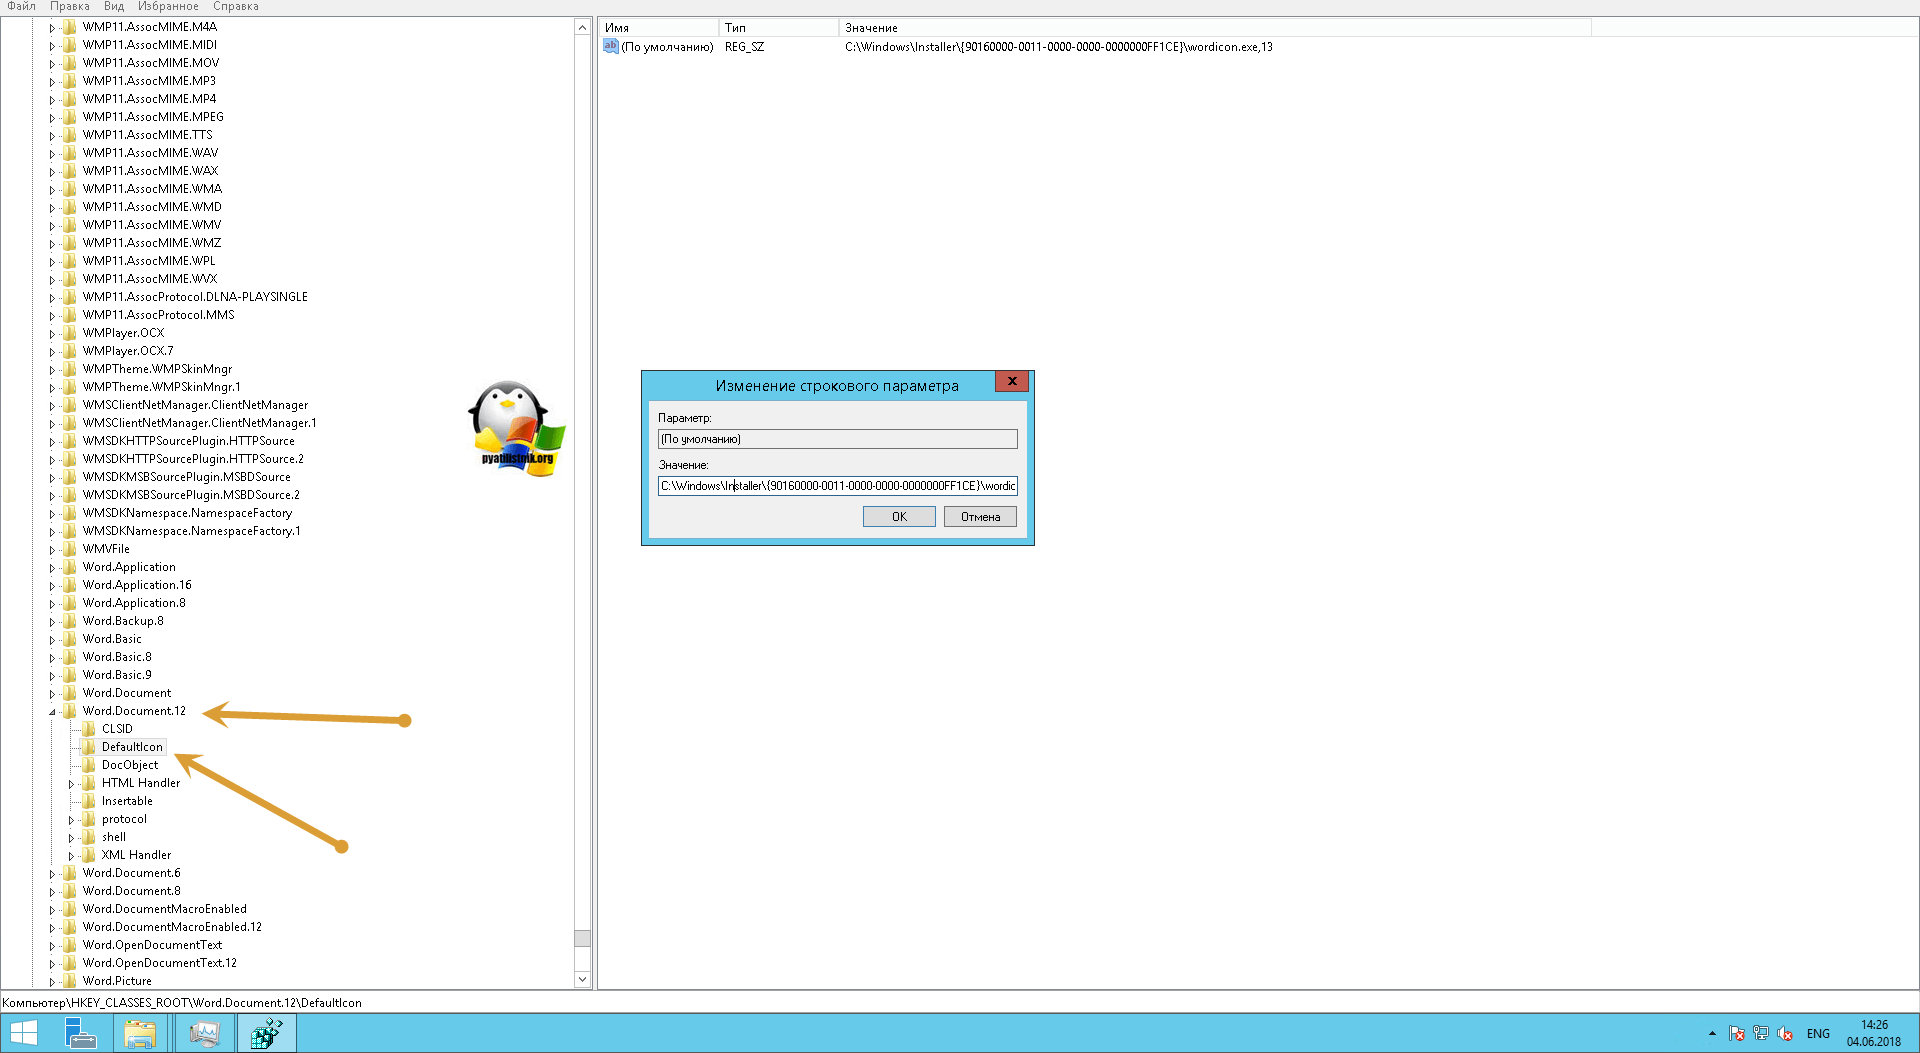
Делаем вот, что пробуем пройти по пути C:Windowsinstaller{90140000-0011-0000-0000-0000000FF1CE} у меня этой папки не существовало, а была только папка installer. Создаем в ней папку со значением в скобках. Далее в этой папке должен быть файл Wordicon.exe. Если его у вас нет, то тут для того, чтобы восстановить исчезнувшие значки Microsoft Office, нужно либо через поиск на диск C: его найти, либо скачать его с другого компьютера с таким же офисным пакетом.
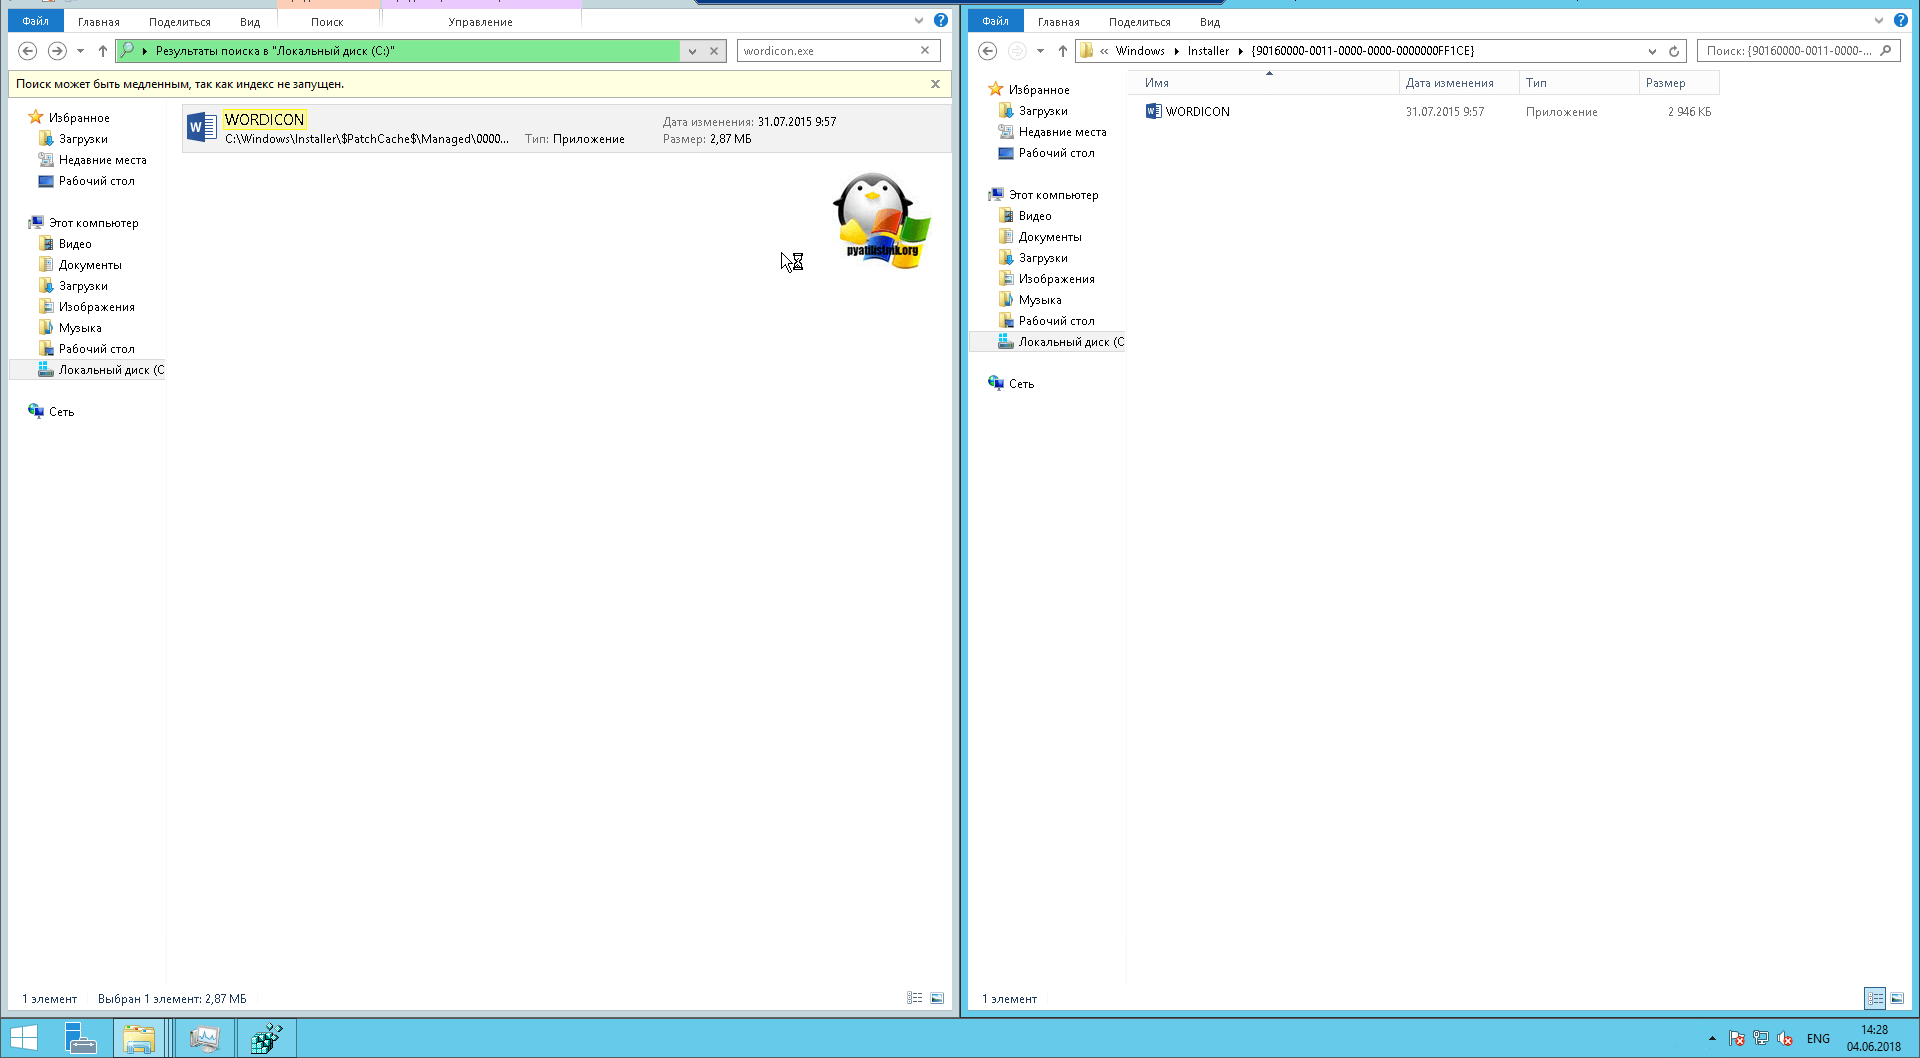
В итоге моя папка {90140000-0011-0000-0000-0000000FF1CE} стала выглядеть вот так и после перезагрузки либо сервера, либо службы «Проводник» все исчезнувшие значки у меня появились. Аналогично этому метод, вы можете восстановить любой значок у любого приложения, главное понять, что ассоциируется в HKEY_CLASSES_ROOT с нужным расширением.

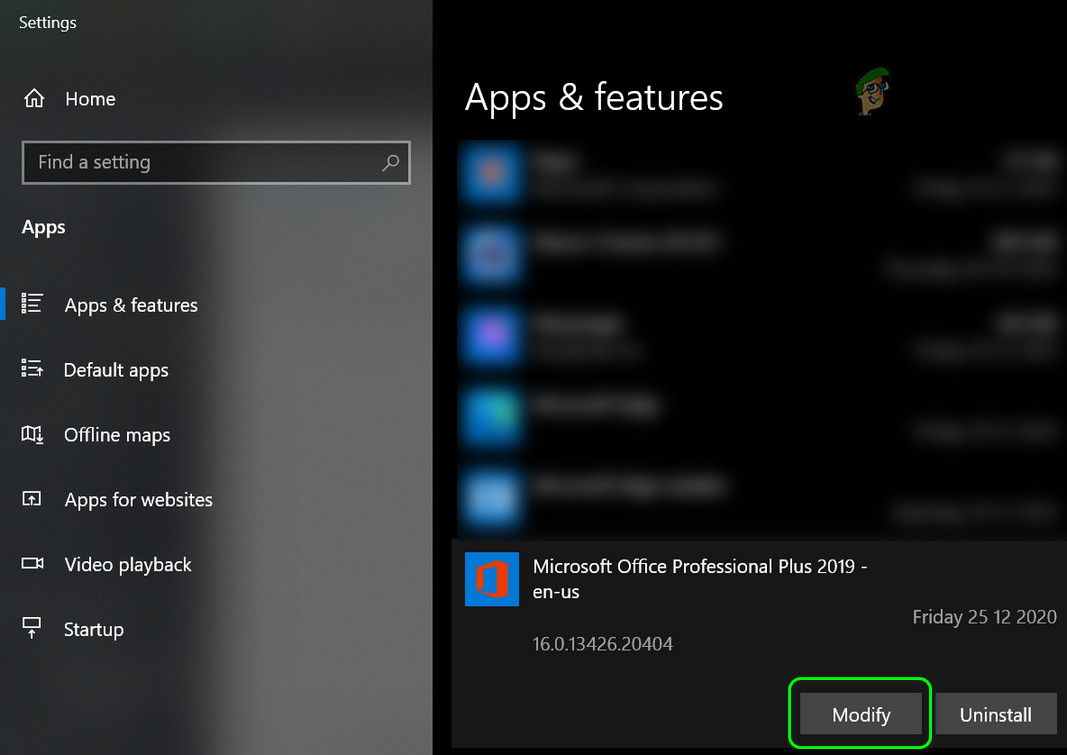
- Как я и писал выше, данные методы помогают в 95% случаев, но если вам это не помогло, то вы можете решить проблему с пропавшими значками на файлах Microsoft Office, путем попытки восстановить офисный пакет, для этого откройте панель управления, перейдите в пункт «Программы и компоненты». Выбираем ваш пакет и в самов верху нажмите кнопку «Изменить»
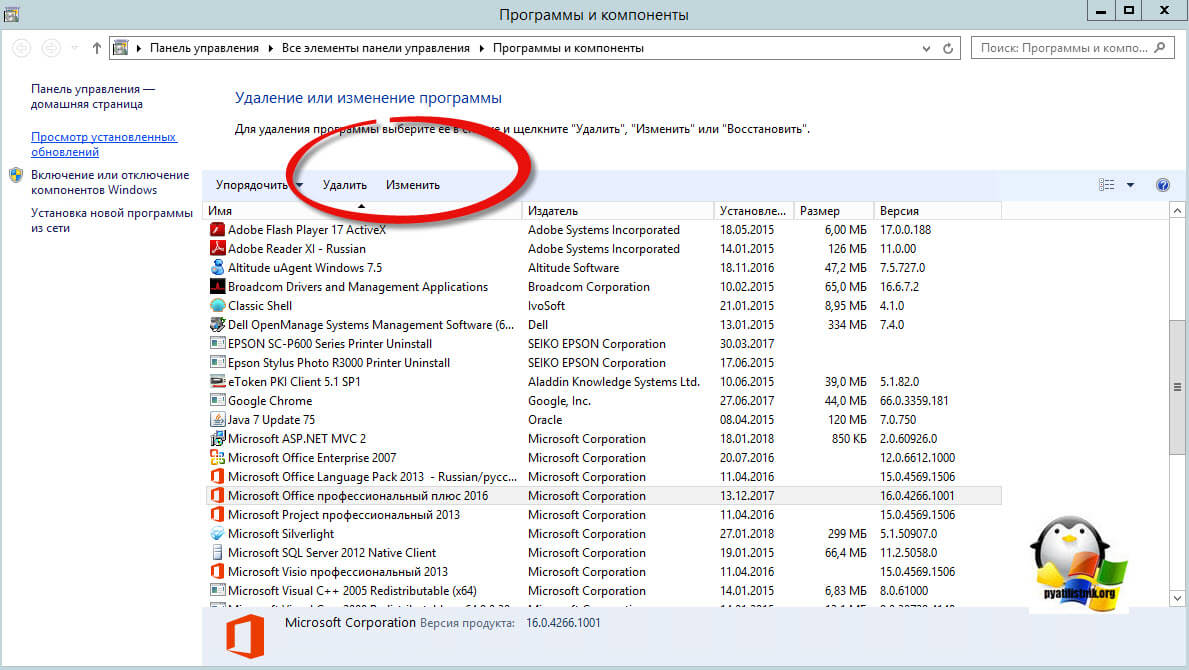
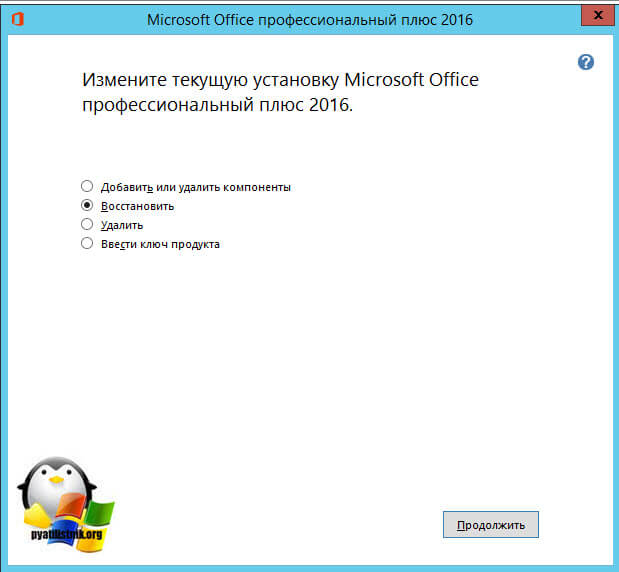
У вас появится возможность восстановить Microsoft Office, данная процедура проверяет целостность всех файлов и их ассоциаций с нужными форматами, в итоге если у вас исчез значок с файлов, данный метод может помочь. Сама процедура занимает несколько минут. перезагрузитесь после процедуры.
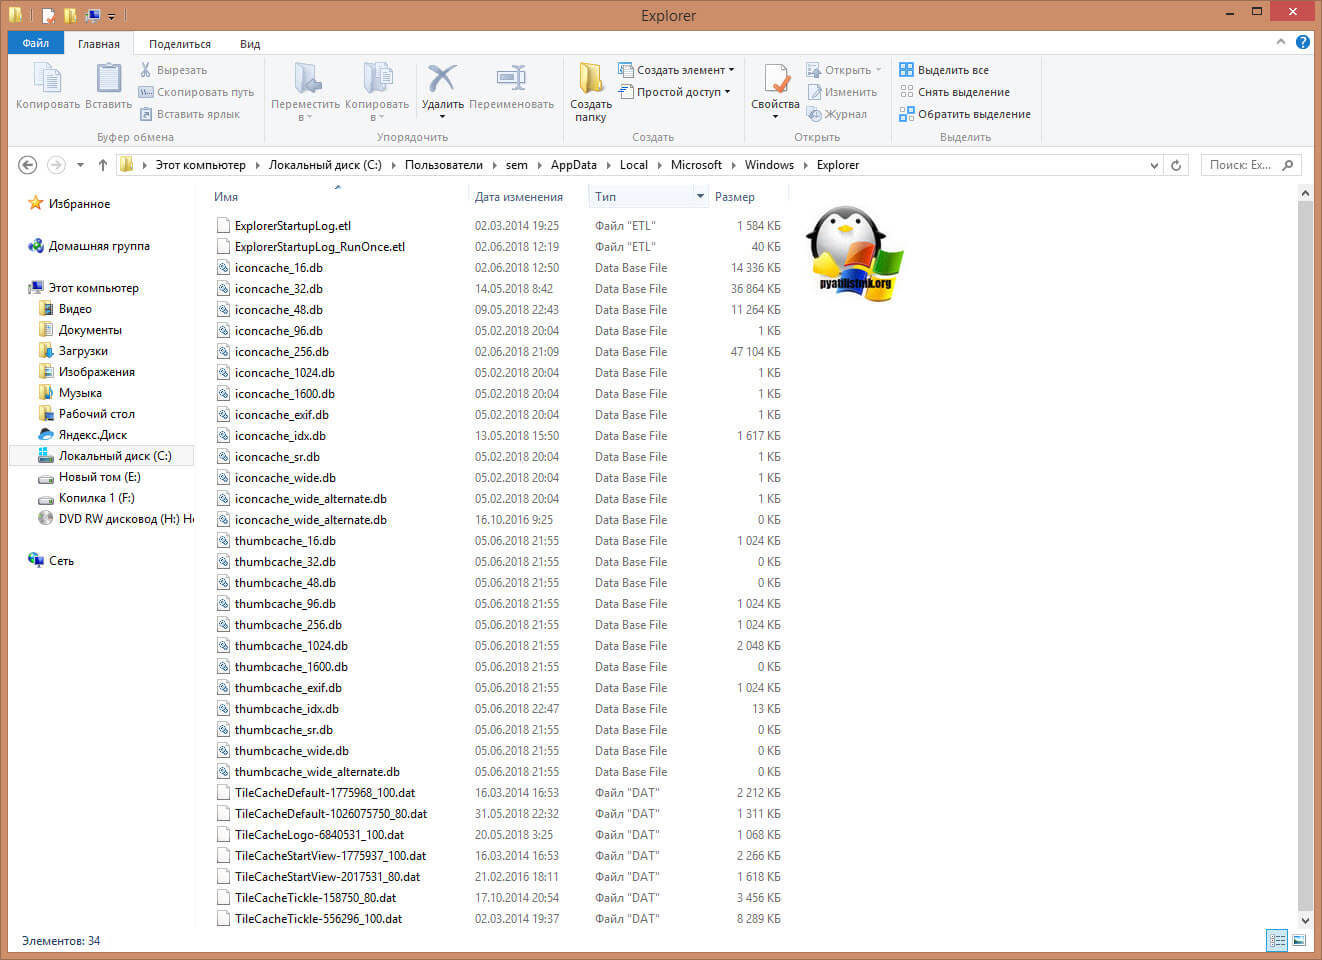
- Еще одним дополнительным методом будет очистка кэша значков в Windows, про это я уже писал подробно, тут лишь напомню команды для очистки. Открываете командную строку от имени администратора, это обязательно или Power shell и вводите по очереди данные команды:
Для Windows 7 и Windows Server 2008 R2
taskkill /im explorer.exe /f
cd %userprofile%appdatalocal
attrib -h IconCache.db
del IconCache.db
explorer
Для Windows 8.1 и Windows Server 2012 R2, 2016
taskkill /im explorer.exe /f
cd /d %userprofile%AppDataLocalMicrosoftWindowsExplorer
del /f /a s IconCache*
explorer
Вот так вот выглядят скрытые фалы:
- iconcache_1280.db
- iconcache_16.db
- iconcache_1920.db
- iconcache_256.db
- iconcache_2560.db
- iconcache_32.db
- iconcache_48.db
- iconcache_768.db
- iconcache_96.db
- iconcache_custom_stream.db
- iconcache_exif.db
- iconcache_idx.db
- iconcache_sr.db
- iconcache_wide.db
- iconcache_wide_alternate.db
Первая строка отключает процесс «Проводник Windows», вторая команда переходит в папку appdatalocal. Далее идет удаление файла IconCache.db и затем запускается процесс проводника. Далее вам нужно перезагрузить ваш сервер, после чего пропавшие значки будут восстановлены.

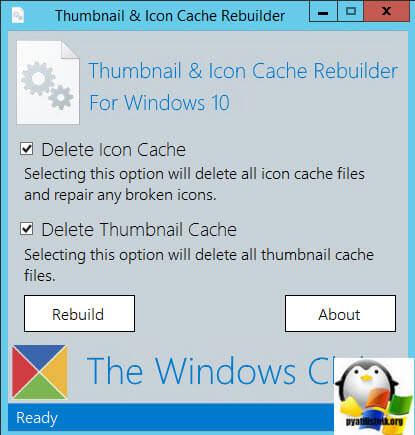
Для любителей графического интерфейса есть бесплатная утилита «Thumbnail & Icon Cache Rebuilder». Скачать ее можно по ссылке. Запускаете ее от имени администратора, через правы клик. Устанавливаете для восстановления пропавших ярлыков галки:
- Delete Icon Cache — удалить кэш иконок
- Delete Thumbnail Cache — удалить файлы эскизы
После чего нажимаете Rebuild, после чего перезагружаетесь и проверяете работу утилиты.
Надеюсь я смог вам ответить, почему не отображаются значки Office, если у вас есть альтернативные методы решения, то было бы здорово если бы вы о них написали в комментариях, нужно делиться знаниями, а с вами был IT блог pyatilisnik.org, скоро будет еще много интересного.
Updated April 2023: Stop getting error messages and slow down your system with our optimization tool. Get it now at this link
- Download and install the repair tool here.
- Let it scan your computer.
- The tool will then repair your computer.
![]()
It is very easy to identify the type of file by looking at its icon. This feature helps users quickly identify the right file type from a stack of different file types. If the Word icon does not appear for .doc or .docx files on your computer, this is very problematic for you. To solve the problem, follow these step-by-step solutions and you will see a normal Word icon on .doc and .docx file types.
Why do .docx files not display the Word icon?

This type of problem is usually caused by a conflict with the default program settings in Windows, so you do not see the Microsoft Word icon on .docx files. So, if you suddenly find that the Microsoft Word icon is empty or missing and not displaying properly on Office .doc and .docx document files on your Windows 10 computer, you can try the possible solutions listed below.
How to restore Word icons not displaying properly in .docx files?
April 2023 Update:
You can now prevent PC problems by using this tool, such as protecting you against file loss and malware. Additionally it is a great way to optimize your computer for maximum performance.
The program fixes common errors that might occur on Windows systems with ease — no need for hours of troubleshooting when you have the perfect solution at your fingertips:
- Step 1 : Download PC Repair & Optimizer Tool (Windows 10, 8, 7, XP, Vista – Microsoft Gold Certified).
- Step 2 : Click “Start Scan” to find Windows registry issues that could be causing PC problems.
- Step 3 : Click “Repair All” to fix all issues.


Fixing Office with apps and features
- Right-click Start, then select Applications and Features.
- Select Microsoft Office from the list and click Edit
- For .msi Office installations, select Repair.
- For clickable Office installations, select Quick Restore, then click Restore.
This will restore the Office/Word icons for both standalone Office and Office 365 installations.
Link the .docx and .doc files to Word
- Open the command line for administrators and run the following command:
assoc .docx=Word.Document.12 - Close the command prompt window.
- Right-click the .docx file and choose Properties.
- Click the Edit button.
- Select Word from the list and click OK.
- Repeat the procedure for .doc files if the .doc icons appear as a plain white rectangle.
- Log out and log back in if the icons or file association changes have not been updated.
Temporarily change the default application for .doc and .docx applications?
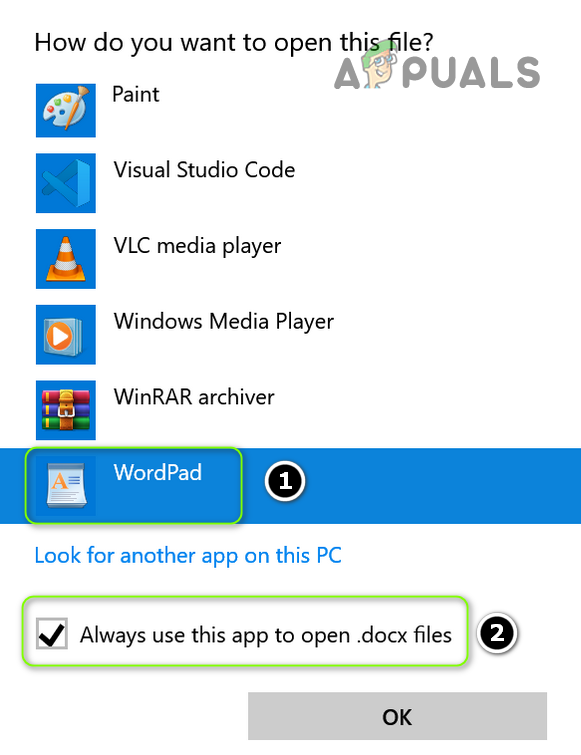
- Right-click on the final .docx file and choose Open with ….. from the context menu.
- In the How do you want to open this file dialog box, click Other Applications.
- Scroll down, select WordPad, and check the “Always use this application to open .docx files” box.
- Then click OK to open the file in WordPad. Do not make any changes to this file or save it, as the formatting may be lost if you save the changes.
- Close WordPad.
- Now right-click again on the .docx document whose attributes you have changed, and select Open with ……..
- Select Word in the list and check the “Always use this application to open .docx files” box.
- Finally, click OK.
Close the Word application and check that the DOCX files are displayed with the correct Word icon in Explorer. This should fix the error on your machine.
Expert Tip: This repair tool scans the repositories and replaces corrupt or missing files if none of these methods have worked. It works well in most cases where the problem is due to system corruption. This tool will also optimize your system to maximize performance. It can be downloaded by Clicking Here
Frequently Asked Questions
Docx files may not display Word icons if the links in the docx file are misconfigured or corrupted. In addition, an outdated or corrupt Office installation can also cause the above error.
Word icon problem can be solved by restoring Office applications. Simply open Settings -> Applications. In the list of apps, find Microsoft Office desktop apps, select them, then click on advanced options and click Restore. Then wait for the process to complete and restart your computer.
Go to the Tools menu and click on Folder Options. Under Folder Options, click the View tab, select Show hidden files, folders, and drives, and click OK. Return to your desktop, click on Local Hard Drive (C), and follow the map. When prompted, select Yes and reboot your system.
If the Office icons are blank after installing Office from the Microsoft Store, go to Settings -> Applications. Find Microsoft Office Desktop Apps in the list of applications, select it and click More Options. Click Restore. Then wait for the process to complete and restart your computer.
Post Views: 1,178
.docx file might not show Word icons if the Docx file associations are misconfigured or corrupt. Moreover, outdated or corrupt Office installation may also cause the error under discussion.
The issue arises when the icons of the .docx files change to blank/shield icons (not the default MS Word icons). The files can be normally opened & edited, but Word icons are not displayed (which work perfectly for the .doc files).
![]()
Before moving on to fix the Docx icon, check if uninstalling any other outdated document application (like Adobe Acrobat Reader) sorts out the icons’ problem.
Solution 1: Update the Windows and MS Office of Your PC to Their Latest Builds
The MS Word icons issue may arise if the Windows or MS Office installation are outdated as it may create incompatibility between the both. In this case, updating the Windows & MS Office to the latest builds may solve the problem.
- Manually update Windows to the latest release & check if the file icons issue is resolved.
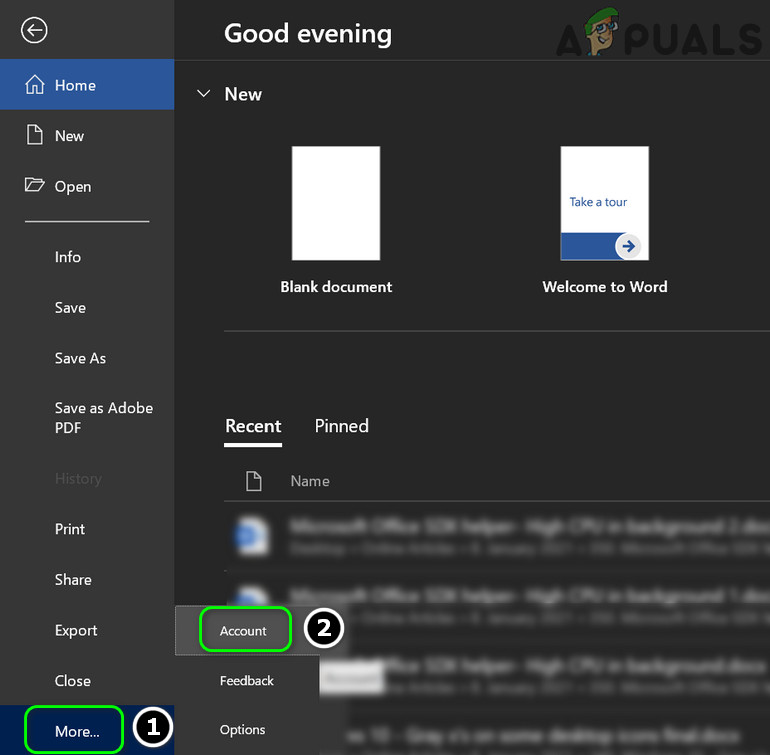
- If not, launch an Office application (e.g., MS Word) & steer to its File menu.
- Now expand More & select Account.

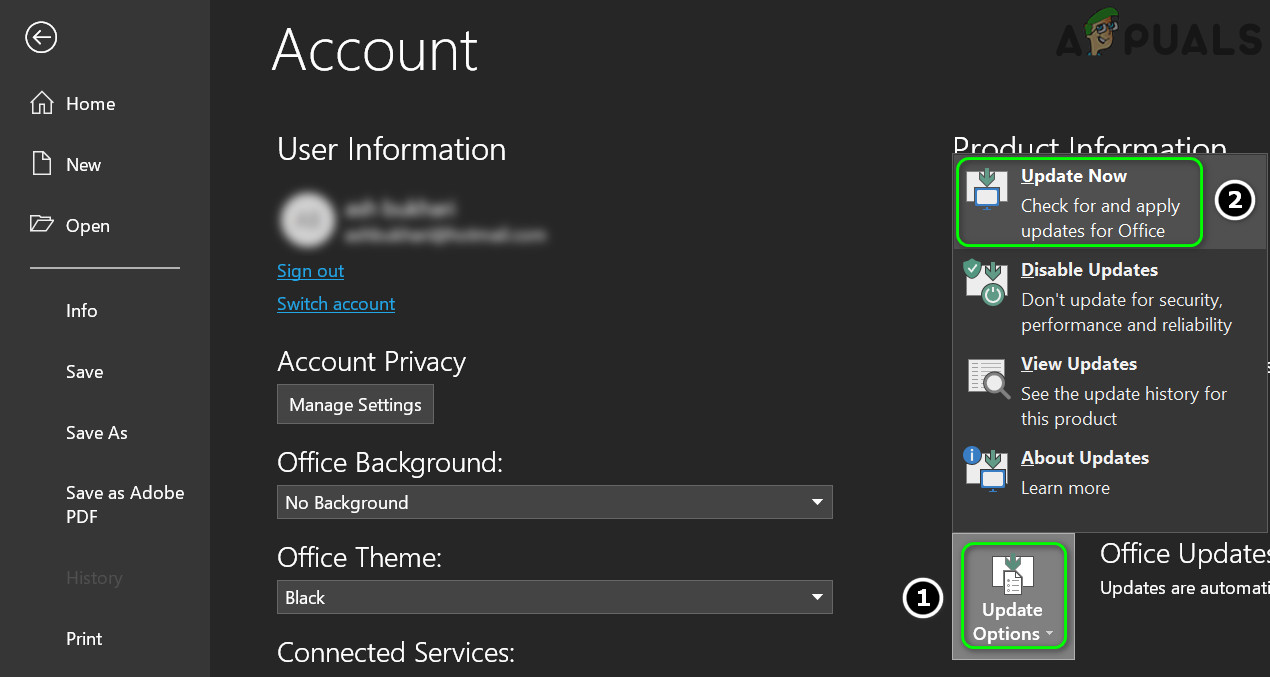
Open Account in the File Menu of MS Word - Then click on Update Options & in the menu shown, click Update Now.

Update Office Application - Now let the Office update process complete & check if the Word file icons issue is resolved.
Solution 2: Revert the File Association to MS Word and Reset the Defaults
The icon issue may arise if the .docx file association is not set to MS Word or corrupt. In this scenario, reverting the .docx file association to MS Word & resetting the default apps to MS defaults may solve the problem.
Set the MS Word as the Default Application for the .docx File Type
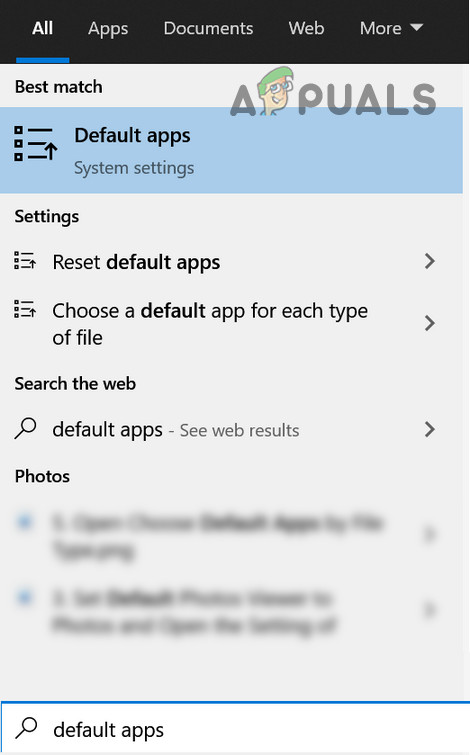
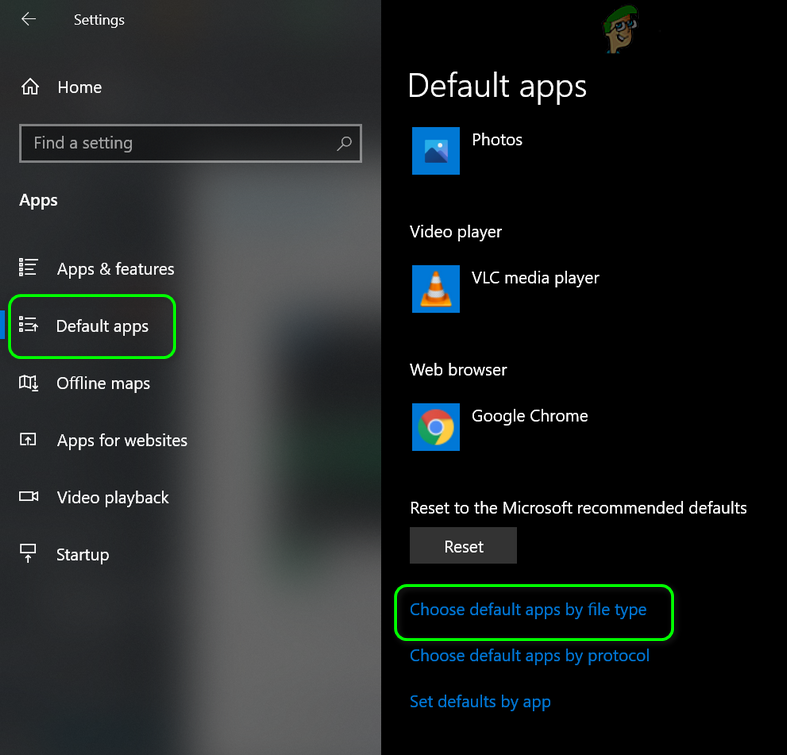
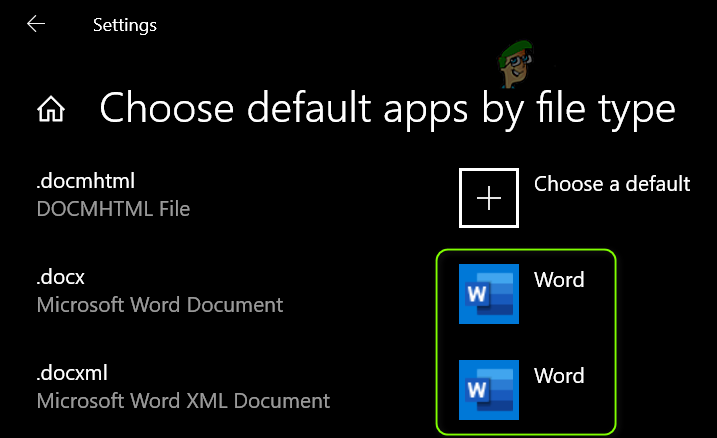
- Press the Windows key & in the search, type: Default Apps. Then open Default Apps.

Open Default Apps - Now open Choose Default Apps by File Types & expand the option in front of the .docx.

Open Choose Default Apps by File Type - Then choose Word & repeat the same to .docxml. If the option is also set to Word, select another app as the default app for .docx & revert the setting to MS Word.

Set MS Word as the Default App for Docx File Type - Now reboot your PC & check if the icon issue is resolved.
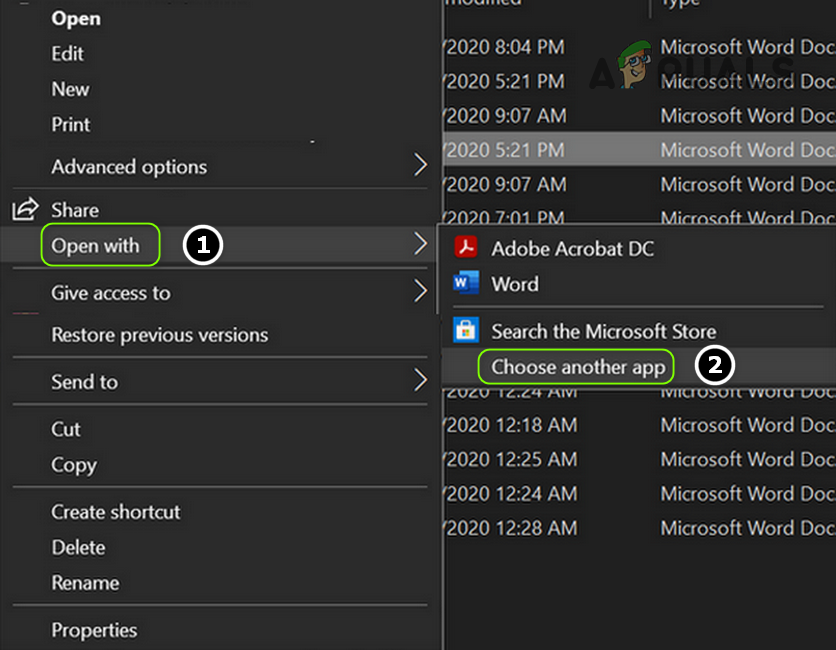
Use the Right-Click Context Menu
- Right-click on an MS Word file & select Open With > Choose Another App.

Open Choose Another App - Now click on More Apps and choose Wordpad.

Open More Apps - Then checkmark Always Use This to Open .docx Files and click on the OK button.

Set Wordpad as the Default App for Docx Files - Then repeat the above steps but set MS Word as the default app and check if the icons have reverted to the Word defaults.
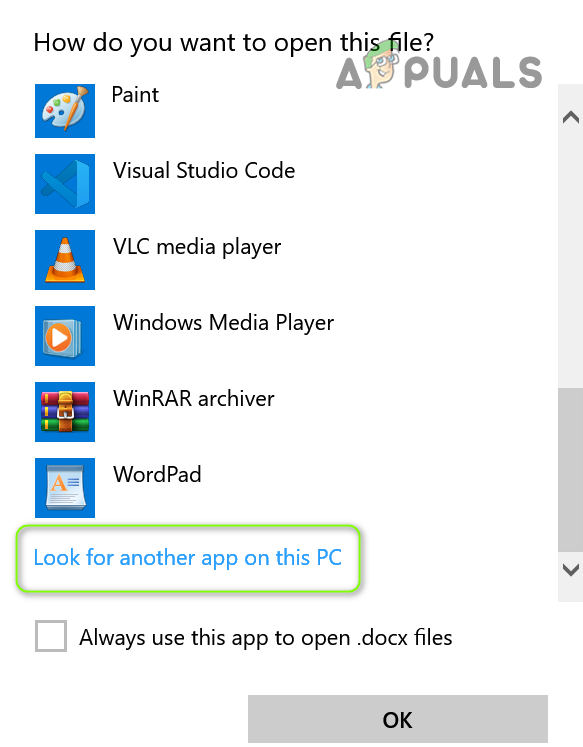
- If the issue persists, revert the default Docx app to Wordpad (by following steps 1 to 3) and right-click on a Word File.
- Now hover your mouse over Open With and open Choose Another App.
- Then expand More Apps and click on Look for Another App on This PC.

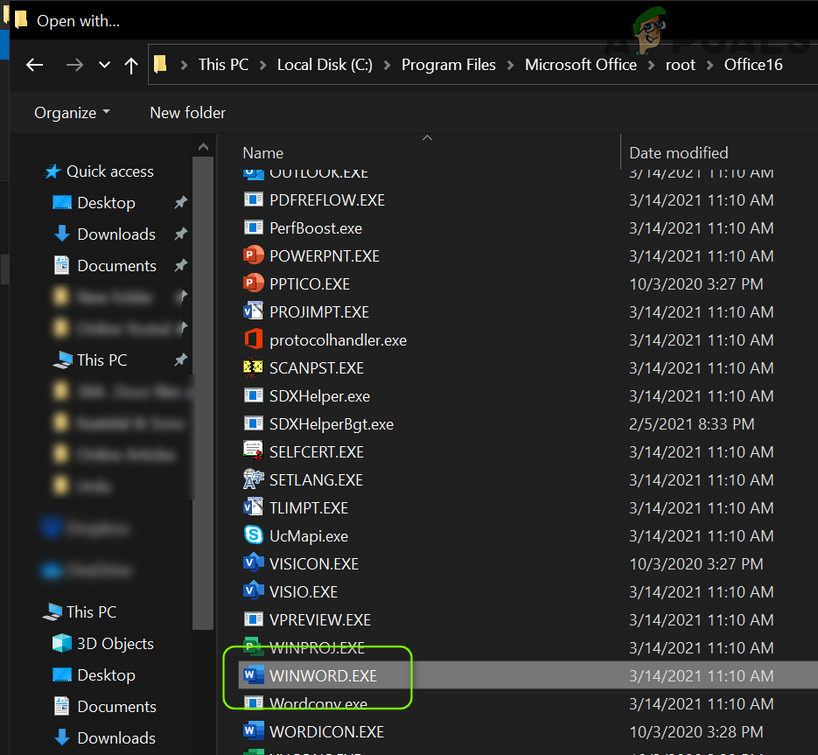
Look for Another App on This PC - Now steer to the MS Word installation directory (you can use the method discussed in solution 5).
- Then double-click on WINWORD.exe (make sure to checkmark the Always Use This option) and check if the icons’ issue is resolved.

Select WinWord.exe
Reset the Default Apps to the Microsoft Recommended
- Open Default Apps (discussed above) and scroll down till the end.
- Now, under Reset to the Microsoft Recommended Defaults, click on the Reset button and check if the MS Word icons issue is resolved.

Reset to the Microsoft Recommended Defaults

Solution 3: Rebuild the Icon Cache Database
The Docx icon issue could be a result of a corrupt Icon Cache Database. In this case, rebuilding the Icon Cache Database may solve the problem.
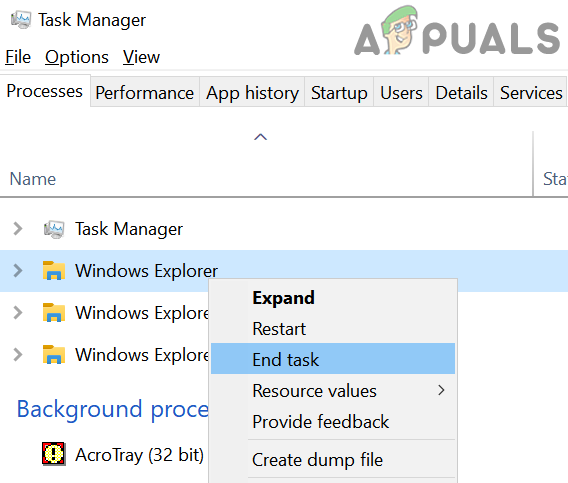
- Close all the applications/folders on the system and right-click on the Windows button.
- Then choose Task Manager and right-click on the process of Explorer.exe (or Windows Explorer).
- Now select End Task and confirm to end the process.

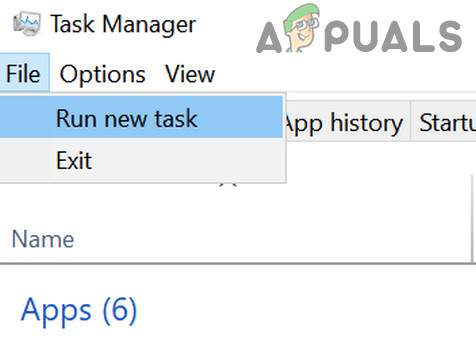
End Task of Windows Explorer - Then expand the File menu and choose Run New Task.

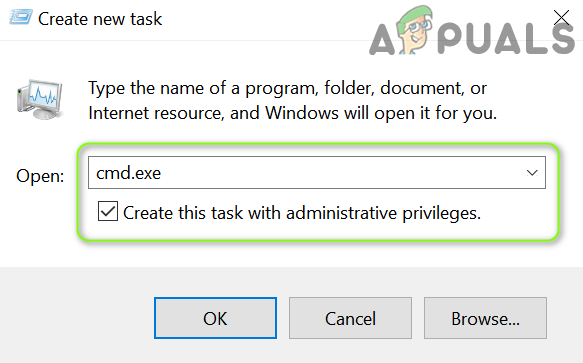
Run a New Task in the Task Manager - Now checkmark the option of Create This Task with Administrator Privileges and in the Open box, type: CMD.exe.

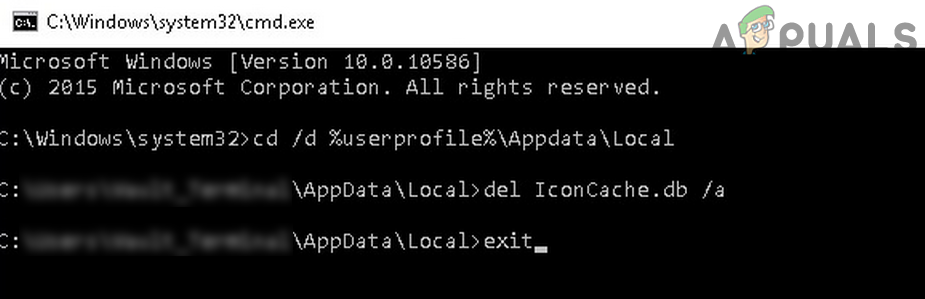
Run CMD.exe Task - Then click the OK button and in the Command Prompt window, execute the following one by one:
CD /d %userprofile%AppDataLocal

DEL IconCache.db /a

EXIT

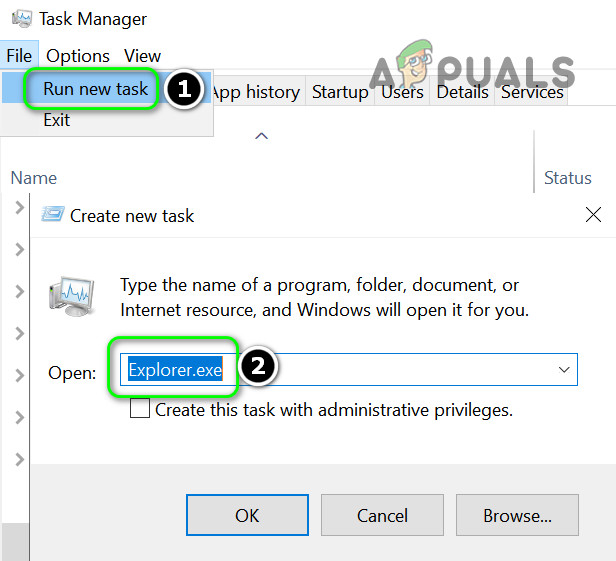
Delete Iconcache Database - Now, in the Task Manager, open the File menu and choose Run New Task.
- Then type Explorer.exe and click on the OK button.

Run a New Task of Explorer.exe in the Task Manager - Now check if the Word icon issue is resolved. If not, reboot your system and check if the icons are restored.
Solution 4: Repair the MS Office Installation
The corrupt MS Office installation may cause the missing Word icon issue. In this context, repairing the MS Office installation may solve the problem.
- Press the Windows key and open Settings.
- Now select Apps and expand the MS Office installation.

Open Apps in the Windows Settings - Then click on the Modify button and click Yes (if UAC prompt received).

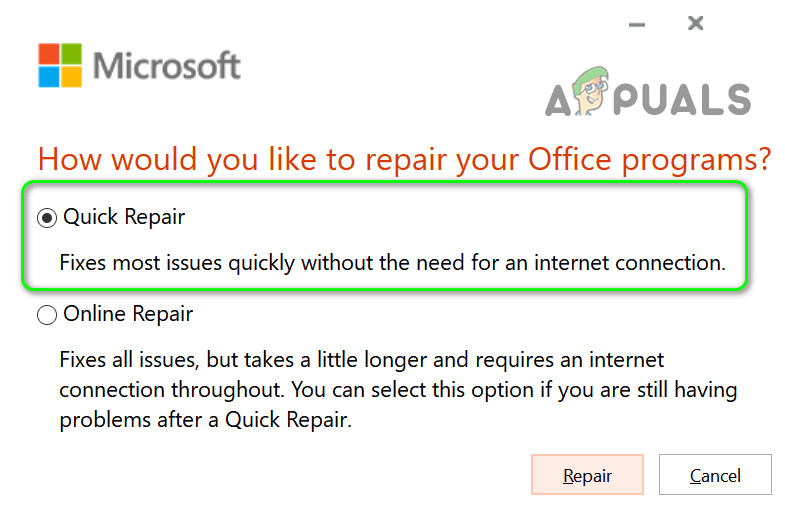
Modify the Office Installation - Now choose the Quick Repair option and click on the Repair button.

Quick Repair Office - Then let the process complete and reboot your PC to check if the Word icon has restored to normal.
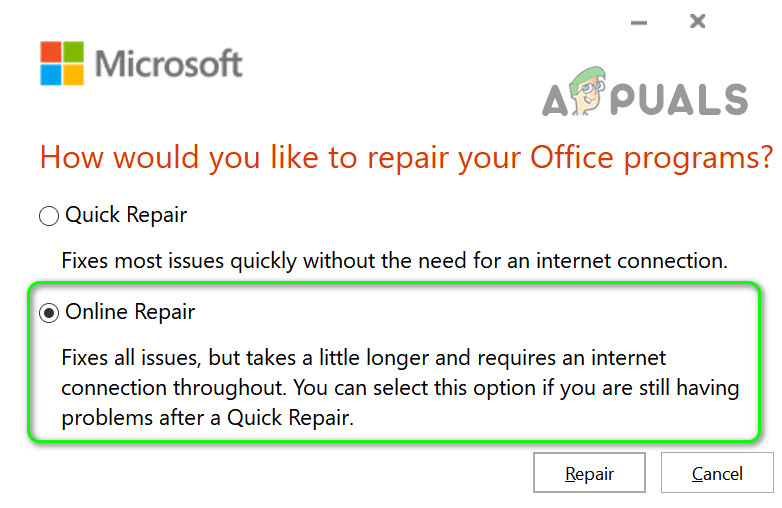
- If not, repeat the above steps but at step 4, choose Online Repair.

Online Repair Office - Once the Online repair is complete, check if the icon’s issue is resolved.
Solution 5: Reregister the MS Word
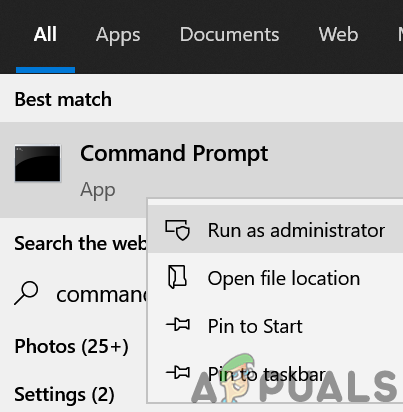
The icons’ issue may arise if the MS Word application fails to claim the .docx file association (despite the user set it to be) in Windows. In this case, reregistering the MS Word application (which may reclaim the association) may solve the problem. Before proceeding, make sure to close any running processes related to MS Office in the Task Manager.
Re-Register the MS Word Application
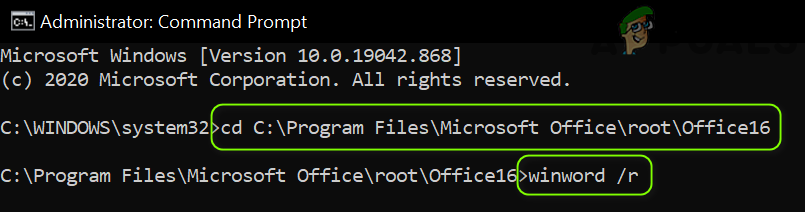
- Press the Windows key and in the search box, type: CMD. Now, in the results list, right-click on the Command Prompt, and in the mini-menu, choose Run as Administrator.

Open Command Prompt as Administrator - Then, execute the following (copy-paste the command):
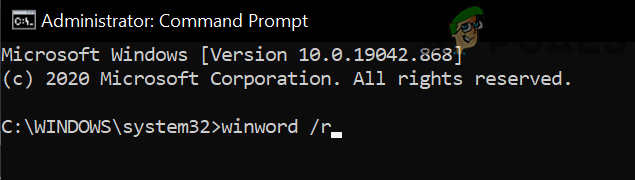
winword /r

Execute Winword /r in the Command Prompt - Keep in mind that nothing will be shown in the Command Prompt window but the Word application will register itself in Windows. Once the cursor is shown in the Command Prompt, check if the icons issue is resolved.
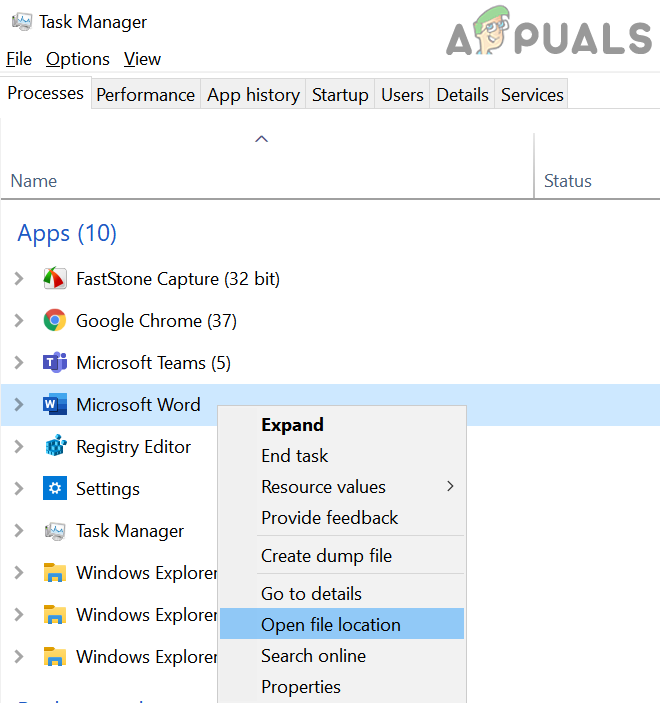
- If not, launch the MS Word and right-click on the Taskbar. Now open Task Manager.

Open the Task Manager of Your System from the Taskbar - Now, right-click on the process of MS Word and choose Open File Location.

Open File Location of MS Word - Then copy the address from the address bar, e.g.,
C:Program FilesMicrosoft OfficerootOffice16)

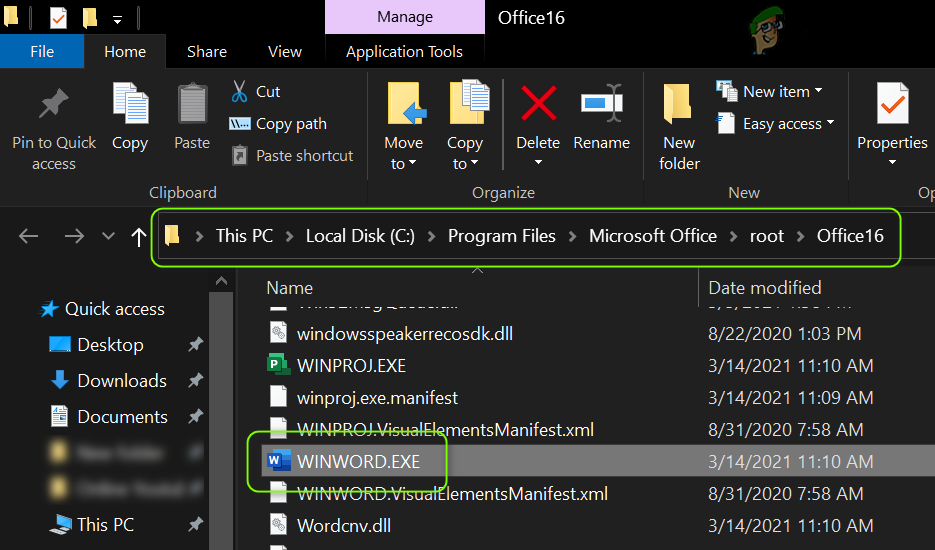
Find the Installation Directory of the MS Word - Then launch an elevated Command Prompt (step 1) and execute the following to steer to the installation directory of MS Word.
cd C:Program FilesMicrosoft OfficerootOffice16
(you may paste the path noted at step 6)
- Now, execute the following and check if the icons are restored:
winword /r

Run the Winword /r from the MS Word Installation Directory - If the issue persists, and you have more than one Office suite installed, check if repeating step 8 from the installation directory of the other Office suite resolves the issue.

Re-Register the MS Word Application
- Launch an elevated Command Prompt (as discussed above in step 1) and execute the following (with inverted commas):
"C:Program FilesMicrosoft OfficerootOffice16winword.exe" /unregserver
The path in inverted commas is the same path noted in step 6 (discussed above).

Unregister Winword - Once the execution is complete, execute the following in the Command Prompt window:
"C:Program FilesMicrosoft OfficerootOffice16winword.exe" /regserver
- Once the execution is complete, check if the Word files icons have reverted to defaults.

Solution 6: Edit the System’s Registry and Reinstall the Office Suite
The icons’ issue may arise if the MS Word application’s registry keys are not properly configured or corrupt. In this case, editing the registry keys relevant to MS Word may solve the problem.
Warning: Advance at your own risk and with extreme care as editing the system’s registry is a proficient task and if not done properly, you may cause everlasting damage to your OS/data/system.
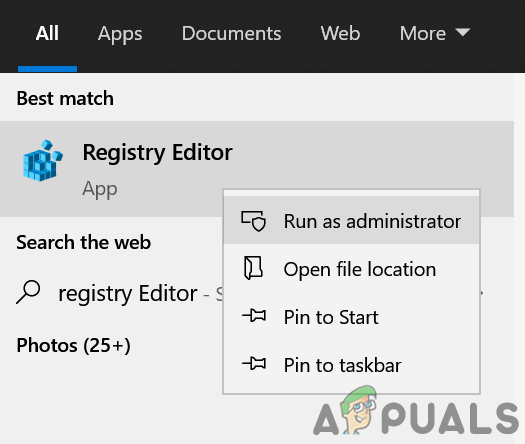
Before proceeding, make sure to perform a backup of your system’s registry. Press the Windows key and search for: Registry Editor. Now, in the list of results, right-click on the Registry Editor, and in the mini-menu, choose Run as Administrator.
You may try the following edits to check if resolves the icons issue (keep in mind some of these keys may not be available to some users).
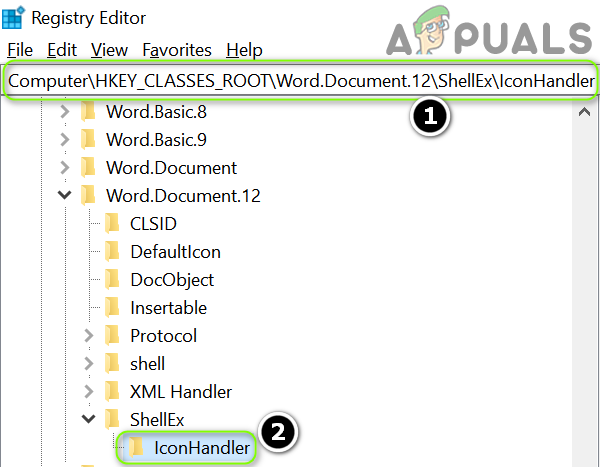
Delete the IconHandler Key
- Navigate to the following path:
ComputerHKEY_CLASSES_ROOTWord.Document.12ShellEx
- Now, in the right pane, delete the IconHandler key and reboot your PC.

Delete the IconHandler Key - Upon reboot, set the Word as the default application for .docx files (as discussed in solution 2) and check if the word icons issue is resolved.
Change the Default Key Path
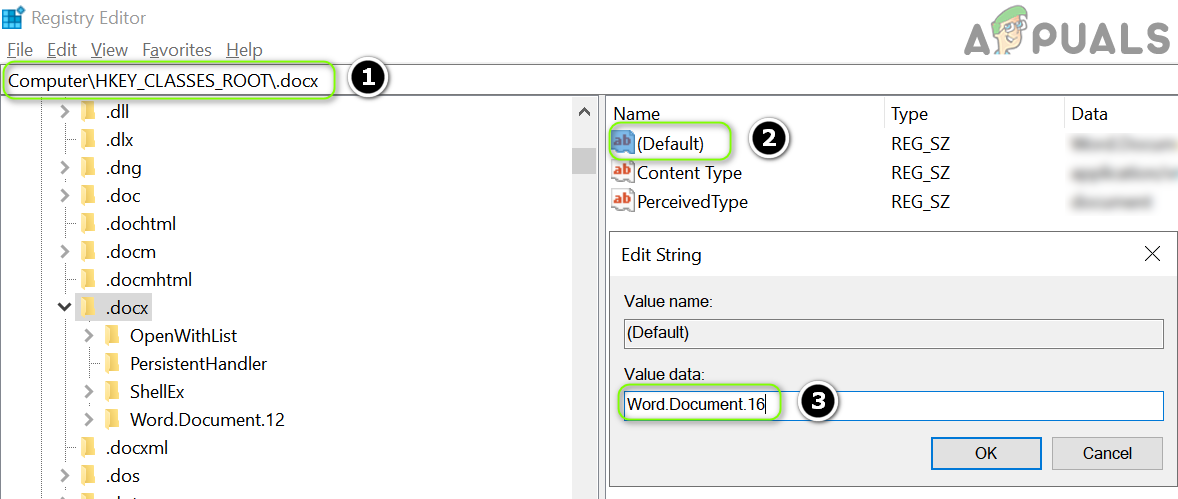
- Navigate to the following path:
ComputerHKEY_CLASSES_ROOT.docx
- Now, in the right pane, double-click on Default and set its value to Word.Document.16.

Set the Default Value to Word.Document.16 - Then repeat solution 2 to set MS Word as the default app and check if the proper icons are shown.
- If not, repeat the above solution but at step 2, set the value of Default to Word.Document.12 and check if it resolves the icons issue.

Set the Default Value to Word.Document.12
Import the .docx Registry Key
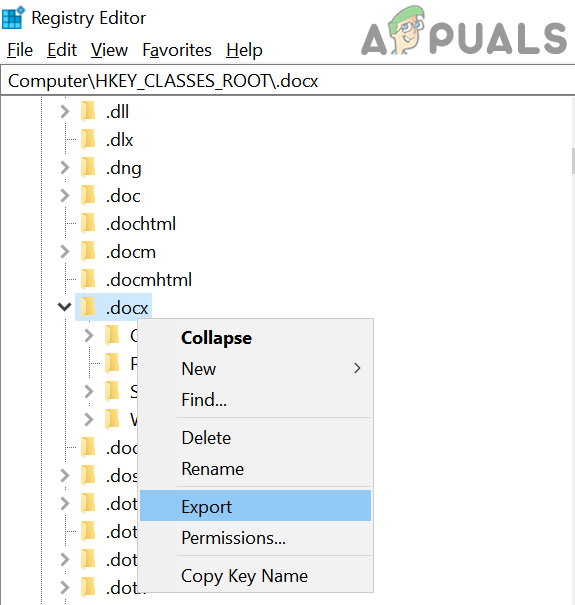
- On a working and trusted computer, navigate to the following path:
ComputerHKEY_CLASSES_ROOT.docx
- Now, in the left pane, right-click on the .docx key and select Export.

Export the .Docx Registry Key - Then save the file to someplace (e.g., the desktop) and transfer it to the affected computer.
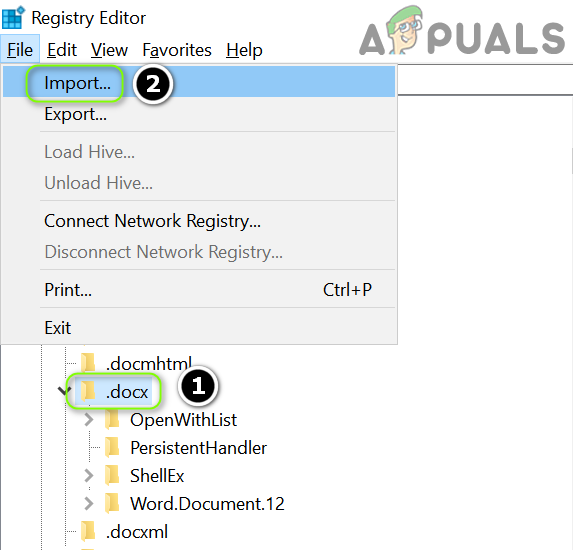
- Now, on the affected computer, launch the Registry Editor and navigate to the following path:
ComputerHKEY_CLASSES_ROOT.docx
- Then, in the left pane, select the .docx key and expand the File menu.
- Now select Import and after completion of the import process, reboot your PC.

Import the .Docx Registry Key - Then repeat solution 2 to check if the icons issue is resolved.
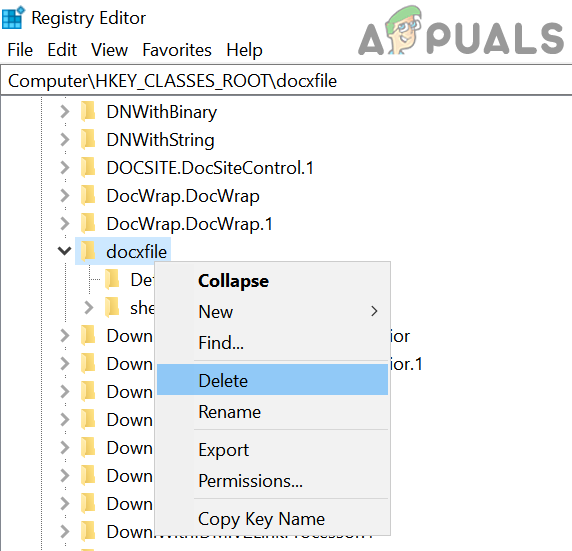
Delete the Docx File
- Navigate to the following path:
ComputerHKEY_CLASSES_ROOTdocxfile
(for some users, the key will be Docx file auto)
- Then, in the left pane, right-click on the docxfile key and select Delete.

Delete the docxfile Registry Key - Now confirm to delete the docxfile key and exit the editor.
- Then, reboot your PC and launch a word file (if asked to, choose MS Word as the default application) to check if the icons’ issue is resolved.
Delete the .docx Keys and Reinstall the Office Suite
- Uninstall the Office suite and in the Registry Editor, navigate to the following path:
ComputerHKEY_CLASSES_ROOT.docx
- Now, in the left pane, right-click on the .docx key and choose Delete. Then confirm to delete the .docx key

Delete the .Docx Registry Key - Now repeat the same to delete the .docx key from the following path and exit the editor:
ComputerHKey_Classes_RootSystemFileAssociations.docx

Delete the .Docx Registry Key - Now reboot your PC and reinstall the Office suite to check if the icons issue is resolved.

Solution 7: Create a New Windows User Account
If none of the solutions has done the trick of you, the issue may be caused by a corrupt user profile. In this context, creating a new Windows user account may solve the problem.
- Create a new Windows user account (it will be better to create a local administrator account) and log out of your current user.
- Then log-in using the newly created Windows account and check if the Word file icons have reverted to defaults. If so, you may transfer all the old account data (a tedious task).
If the issue persists, you may use 3rd party utilities (like IconsExtract & FileTypesMan) to sort out the issue. If the issue is still there, you may edit the security permissions (it may have its repercussions) of the Local folder to allow Everyone (in the Advanced and Group/User names) in the following location:
%userprofile%AppData

Kevin Arrows
Kevin Arrows is a highly experienced and knowledgeable technology specialist with over a decade of industry experience. He holds a Microsoft Certified Technology Specialist (MCTS) certification and has a deep passion for staying up-to-date on the latest tech developments. Kevin has written extensively on a wide range of tech-related topics, showcasing his expertise and knowledge in areas such as software development, cybersecurity, and cloud computing. His contributions to the tech field have been widely recognized and respected by his peers, and he is highly regarded for his ability to explain complex technical concepts in a clear and concise manner.
Recently, a number of users reported seeing plain white icons on their “.docx” files instead of the Word icon. This kind of issue is mostly caused by a conflict with the default program settings in Windows which is why you may not see any Microsoft Word icon on your .docx files. So if you suddenly find that the Microsoft Word icon is either blank or missing and does not show properly on .doc and .docx document files of Office on your Windows 10 computer, then you can check out the potential solutions outlined below.
Before you proceed, you can try to restart your computer as there are instances when a simple system restart can resolve some issues like this one. However, if it does not help, create a System Restore point first. This is to ensure that you can always undo the changes you are about to make in case something goes wrong. Once you have that covered, proceed to the following options.
Option 1 – Try to configure .docx files to open with “winword.exe”
You can try configuring the .docx files to open with the winword.exe in order to fix the problem.
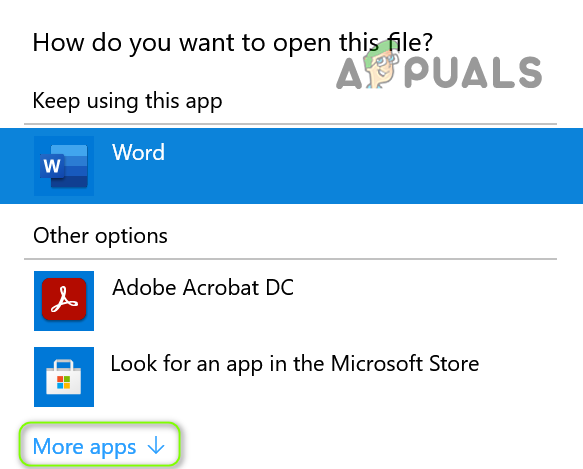
- Right-click on a .docx file and select the “Open with…” option.
- After that, if a prompt appears with a message saying, “How do you want to open this file”, select the “More apps” option to proceed.
- Next, scroll down and check the checkbox that says, “Always use this app to open .docx files” option.
- Then click on the “Look for another app on this PC” link and choose the WINWORD.exe application from one of the following paths based on the installed Office version in your computer and click Open:
- Word 2016 (64-bit): C:/Program Files/Microsoft Office/root/Office16
- Word 2016 (32-bit): C:/Program Files (x86)/Microsoft Office/root/Office16
- Now check if you can now see the Word icon on the .doc or .docx files.
Option 2 – Try changing the default Word icon via Registry Editor
- Tap the Win + R keys to open the Run utility.
- Then type “Regedit” in the field and hit Enter to open the Registry Editor.
- Next, navigate to this path located in the left pane: HKEY_CLASSES_ROOTWord.Document.12DefaultIcon
- From there, double click on the default value at the right pane and based on the Word version you are using as well as the architecture (32 bit or 64 bit) and then copy-paste the corresponding value in the Value data box:
- For Word 2016 (64-bit) keep it as C:/Program Files/Microsoft Office/root/Office16/wordicon.exe,13
- For Word 2016 (32-bit) Keep it as C:/Program Files (x86)/Microsoft Office/root/Office16/wordicon.exe,13
- Once you’re done, tap Enter and then close the Registry Editor.
- Restart your computer and see if the problem’s fixed.
Option 3 – Try to rebuild the Icon cache
You may want to rebuild the Icon cache as it could also help fix the issue.
- Tap Win + E to open File Explorer and then click Folder Options and click Views to show Hidden System Files.
- After that, go to C:Users%username%AppDataLocal folder and look for a file named Iconcache.db and delete it.
- Next, go to C:Users%username%AppDataLocalMicrosoftWindowsExplorer.
- From there, look for the following files and delete them.
- iconcache_32.db
- iconcache_48.db
- iconcache_96.db
- iconcache_256.db
- iconcache_1024.db
- iconcache_1280.db
- iconcache_1600.db
- iconcache_1920.db
- iconcache_2560.db
- iconcache_exif.db
- iconcache_idx.db
- iconcache_sr.db
- iconcache_wide.dd
- iconcache_wide_alternate.db
- Restart your computer. This will purge and rebuild the icon cache.
Option 4 – Try fixing Office apps
Fixing the Office apps can help you resolve the Word icon issue. All you have to do is open Settings > Apps. From the app list, look for the Microsoft Office Desktop apps and select it and then click on the Advanced options and click Fix. After that, wait until the process is completed and restart your PC. However, if the problem still persists, repeat the steps again but this time, click on Reset instead of Fix.
Option 5 – Try to repair Office Installation
If the options given above didn’t work, you can try to repair the Office installation and see if it can fix the problem.
- Open Control Panel and click on Programs and Features.
- Next, right-click on the Office program that you want to repair which in this case is, Word.
- Select Change and click Repair > Continue. After that, Office will start to repair Microsoft Word.
- Wait until the process is done and then reboot your computer.
Do You Need Help with Your Device?
Our Team of Experts May Help

Troubleshoot.Tech Experts are There for You!
GET HELP
Troubleshoot.Tech experts work with all versions of Microsoft Windows including Windows 11, with Android, Mac, and more.
Share this article:
You might also like
The Google Chrome browser checks the SSL Security Certificate of the website that you are trying to open. However, if Chrome is not able to check the certificate then you might encounter an error related to the SSL Certificates which you might face when browsing the web. This particular error is the ERR BAD SSL CLIENT AUTH CERT error which is caused by many factors such as the computer’s Time, Cached Data is corrupt, Date is out of sync, as well as third party software installed in your computer is the one that’s blocking the site and many more.
The ERR_BAD_SSL_CLIENT_AUTH_CERT error might also be coming from the website’s end. It could be that the server is rejecting the certificate the client website is sending. The certificate might have already expired or the server may not trust its issuer – whichever the case may be, here are some options you can check out to fix the error.
Option 1 – Sync Date and Time
The first thing you can try is to sync the Date and Time of your computer as the wrong Date and Time settings are one of the most common causes of connection problems like the ERR_BAD_SSL_CLIENT_AUTH_CERT error. This is because of the incompatibility between the SSL Certificate validation date and the System Clock. Thus, you have to sync your System Clock. Refer to the steps below to do so.
- Right-click on the Taskbar and click on the Adjust Date and Time option.
- Next, click on the Sync Now button to synchronize the Date and Time with the Microsoft Servers.
- Now make sure that the Time Zone that’s set on the same page is correct.
Option 2 – Try clearing the browser data
There are times when some data in the browser is conflicting with the loading of the website and triggers errors like ERR_BAD_SSL_CLIENT_AUTH_CERT. And so you can try to clear your browser’s data. This might be a very basic solution but oftentimes it works in fixing this kind of error in Google Chrome. Follow the steps below to clear the data in your browser.
- Open your Google Chrome browser.
- After that, tap the Ctrl + H keys. Doing so will open a new panel that allows you to delete the browsing history and other data in your browser.
- Now select every checkbox that you see and click on the Clear browsing data button.
- Then restart your Chrome browser and check if you can now open any website or not.
Option 3 – Try to check and fix any possible conflicts with third-party programs
Third-party programs like internet protection software could be interrupting the connection and causing the error. For some unknown reason, your antivirus program or firewall might be detecting the webpage you are trying to open as malicious or with less credibility which is why it is blocking the browser from opening the website. To fix that, if you have third-party programs installed like VPN, security software, or any add-on, or firewall, you can disable them temporarily and see if it fixes the problem and you’re able to pull up the website. After a while, you have to enable them back and configure their settings so that the website won’t get blocked again.
Option 4 – Try enabling SSL 3 / TLS and disable QUIC Protocol
If you were using Google Chrome when you got the ERR_BAD_SSL_CLIENT_AUTH_CERT error, then you need to follow the protocol fixes for SSL3/TLS and QUIC which are usually some of the reasons that cause the SSL version / Cipher Mismatch. It also has a few fixes for Windows 10 computer where you can clear the certificates and make sure that your computer date and time is in sync with your time zone and so on.
If you were using Edge or Internet Explorer when you got the error, then you have to follow the steps below.
- Type “Internet” in the search box of your browser. After that, you should see the Internet Options from the search results.
- Next, open the Internet Properties window and switch to the Advanced tab and then scroll down to the Security section.
- From there, check the “Use TLS 1.1” checkbox as well as the “Use TLS 1.2” checkbox and then click OK to save the changes made.
- Restart the browser.
On the other hand, if you were using Firefox when you go the error, here’s what you have to do.
- Open Firefox and in the address bar, type “about:config” and hit Enter.
- If a warning appears, just click on the “I accept the risk!” button to proceed.
- Next, type in “TLS” in the search field and hit Enter.
- Then look for “security.tls.version.min” and double click on it and set its integer value to 3 to force the protocol of TLS 1.3.
- Now click OK and restart Firefox and do the same thing with SSL.
Option 5 – Try to update Google Chrome
You might also want to try updating your browser to its latest version and have it installed in your computer. After you install the update, check if you can now open the website you were trying to open earlier.
Option 6 – Get rid of any conflicting browser extensions
- Open Chrome and press Alt + F keys.
- Go to More tools and click Extensions to look for any suspicious browser extensions or toolbars.
- Click the Recycle bin and select Remove.
- Restart Chrome and press Alt + F keys again.
- Proceed to On Startup and mark Open a specific page or set of pages.
- To check if the browser hijacker is still active, click Set pages, if it is active, overwrite the URL.
Note: If removing the browser extensions or toolbars didn’t work, you can also try to reset your Google Chrome browser.
- Open Google Chrome, then tap the Alt + F keys.
- After that, click on Settings.
- Next, scroll down until you see the Advanced option, once you see it, click on it.
- After clicking the Advanced option, go to the “Restore and clean up option and click on the “Restore settings to their original defaults” option to reset Google Chrome.
- Now restart Google Chrome.
Read More
If you encounter the “We couldn’t install some updates because the PC was turned off” while trying to run Windows Update on your Windows 10 computer, then read on as this post will give you a couple of suggestions you can use as a reference to fix this error. Make sure to follow the options given below carefully.
Option 1 – Perform basic computer troubleshooting
If you get the “We couldn’t install some updates because the PC was turned off” error on your laptop, then it’s recommended that you connect your laptop to a power source and then try clicking the Update button again. In addition, you also have to make sure that your computer stays awake until the Windows Update process is completed. This will ensure that your computer does not go into an idle state and interfere with the process.
Option 2 – Try deleting the files from the SoftwareDistribution folder and resetting the Catroot2 folder
The downloaded Windows Updates are placed in a folder called “SoftwareDistribution”. The files downloaded in this folder are automatically deleted once the installation is completed. However, if the files are not clean up or if the installation is still pending, you can delete all the files in this folder after you pause the Windows Update service. For complete instructions, refer to the steps below.
- Open the WinX Menu.
- From there, open Command Prompt as admin.
- Then type in the following command – don’t forget to hit Enter right after typing each one of them.
net stop wuauserv
net start cryptSvc
net start bits
net start msiserver
- After entering these commands, it will stop the Windows Update Service, Background Intelligent Transfer Service (BITS), Cryptographic and the MSI Installer
- Next, go to the C:/Windows/SoftwareDistribution folder and get rid of all the folders and files thereby tapping the Ctrl + A keys to select them all and then click on Delete. Note that if the files are in use, you won’t be able to delete them.
After resetting the SoftwareDistribution folder, you need to reset the Catroot2 folder to restart the services you just stopped. To do that, follow these steps:
- Type each one of the following commands.
net start wuauserv
net start cryptSvc
net start bits
net start msiserver
- After that, exit Command Prompt and restart your computer and then try to run Windows Update once more.
Option 3 – Try restarting the Windows Update Services
- Open the Services Manager.
- From there, make sure that you set the following services and Startup types:
- Background Intelligent Transfer Service: Manual
- Cryptographic Service: Automatic
- Windows Update Service: Manual (Triggered)
Option 4 – Try to run the Windows Update Troubleshooter
Running the built-in Windows Update troubleshooter could also help you resolve the “We couldn’t install some updates because the PC was turned off” error. To run it, go to Settings and then select Troubleshoot from the options. From there, click on Windows Update and then click the “Run the troubleshooter” button. After that, follow the next on-screen instructions and you should be good to go.
Option 5 – Try to install the Windows Updates manually
As mentioned, the error might be because Windows missed installing a particular update which is why you are not able to proceed with the current update. So to resolve the issue, you need to install the update that wasn’t installed by downloading it from the Microsoft Update Catalog website. You also have to make sure that you didn’t turn off the Windows update or have it delayed.
Option 6 – Run Microsoft’s online troubleshooter
Running Microsoft’s online troubleshooter might also help you fix the Windows update error. This online troubleshooter is known to help in fixing Windows Update errors, it scans your computer for issues that might be causing the problem and then fixes them automatically.
Read More
If you encountered an error message that says, “Unhandled exception has occurred in your application”, when you start your Windows 10 computer, read on as this post will guide you on how you can fix it. This kind of error usually appears in a Microsoft .NET Framework window and it mostly pops up as soon as you turn on your computer. Here’s the complete context of the error message:
“Unhandled exception has occurred in your application. If you click Continue, the application will ignore this error and attempt to continue. If you click Quit, the application will close immediately.”
When this error occurs, your computer may freeze or display other suspicious behavior at times. Either way, there are several options you can check out in this post to resolve this issue, so read on.
This kind of error could be caused by several factors. It could be due to your antivirus program or other third-party programs installed on your computer. It is also possible that the installation of the Microsoft .NET framework id corrupted or some of its installation files are corrupted. Thus, to fix the error, there are a few suggestions you need to follow such as:
Option 1 – Try to temporarily disable your anti-virus program
As mentioned, the error could be due to the antivirus program or the Windows Defender Firewall installed on your computer. Thus, disabling them or any security software installed in your computer is always a good idea you can try when you’re not able to access the shared drive in your computer. There are times when you encounter problems like the “Unhandled exception has occurred in your application” error due to interference of antivirus or security programs. Thus, you have to disable both your antivirus program in the meantime and check if it fixes the error or not.
Option 2 – Put your computer in a Clean Boot State
As pointed out, it is possible that some third-party program or service is the one that’s behind the problem. To isolate this possibility and to identify the culprit, you have to put your computer into a Clean Boot State. To do so, follow the steps below.
- Log onto your PC as an administrator.
- Type in MSConfig in the Start Search to open the System Configuration utility.
- From there, go to the General tab and click “Selective startup”.
- Clear the “Load Startup items” check box and make sure that the “Load System Services” and “Use Original boot configuration” options are checked.
- Next, click the Services tab and select the “Hide All Microsoft Services” check box.
- Click Disable all.
- Click on Apply/OK and restart your PC. (This will put your PC into a Clean Boot State. And configure Windows to use the usual startup, just simply undo the changes.)
- Once your computer has restarted, check if the error is now gone. If it is, then the culprit is some third-party program. Thus, you have to enable the third-party programs one by one to find out which one of them is causing the the “Unhandled exception has occurred in your application” error.
Option 3 – Try to run a System File Checker scan
System File Checker or SFC is a built-in command utility that helps in restoring corrupted files as well as missing files. It replaces bad and corrupted system files with good system files that might be the cause why you’re getting the “Unhandled exception has occurred in your application” error. To run the SFC command, follow the steps given below.
- Type “cmd” in the Start search and then right-click on the appropriate search result.
- Next, select “Run as administrator” to open Command Prompt with admin privileges.
- After opening Command Prompt, type in sfc /scannow
The command will start a system scan which will take a few whiles before it finishes. Once it’s done, you could get the following results:
- Windows Resource Protection did not find any integrity violations.
- Windows Resource Protection found corrupt files and successfully repaired them.
- Windows Resource Protection found corrupt files but was unable to fix some of them.
- Now restart your computer and see if the problem is fixed or not.
Option 4 – Install and update Dependencies
There are times when programs and applications need to have drivers and supporting software installed for them to properly work. Although the installation usually takes care of it, it’s time for you to do some manual check especially if you are getting this issue of abnormal program termination.
- Install some qualified drivers – A number of high-end games and applications need to have correct and valid drivers for them to work. They just don’t work with general drivers though. Microsoft has this Windows Hardware Quality Labs testing also known as WHQL testing which makes sure that drivers meet the correct experience and pass through the proper testing before certification. Thus, when installing drivers, you need to ensure that they are qualified drivers for your Windows 10 PC.
- Download and install or Update DirectX – As you know, Microsoft DirectX is a suite of technologies developed by Microsoft to provide hardware acceleration for heavy multimedia applications like HD videos and 3D games. Since you are using Windows 10, you have the DirectX 12 version while the earlier Windows versions use the DirectX 11 version.
- Install the Microsoft DirectX End-user runtime – The Microsoft DirectX end-user runtime gives updates to version 9.0c as well as previous versions of DirectX. To install it, click on this link and download it.
- Update or install the .NET framework – The .NET framework is used by games and applications during development which means that without the runtime files that are installed in your computer, it definitely won’t work. Thus, you need to install or update this framework. You can also use the .NET setup verification tool to verify it.
Read More
 Microsoft wants to escalate the situation from Australia to the EU, what a surprise.
Hello all and welcome to another news article, this time we are focusing on Microsoft pushing the EU to accept law proposition from Australia.
For all of you who are not familiar with the given situation let me quickly explain. The feud began when the Australian government proposed a new law that targeted Facebook and Google specifically. The government said that it believed that both of the tech giants were using content from news outlets without paying.
Have you ever seen the little news snippets that Google or Facebook sometimes show its users to keep them up to date? These are lifted directly from news websites, and the Australian government claimed that this practice meant that people didn’t bother visiting the news website. This then staved news websites of revenue.
As such, the government put forward a new law that would mean Google and Facebook would have to pay the source website for every time they displayed a news snippet. Facebook responded by removing its Australian news coverage in light of the law.
Google, however, put up a fight. It argued that its snippets encouraged people to click on it to read more, thus driving more traffic to the news website. It also said that such a law would be too expensive to maintain in the long run.
As such, Google threatened to remove itself from Australia if the law passed. This was likely a scare tactic, as 95 percent of Australian web users use Google; however, it actually opened the door for its rival, Microsoft.
Microsoft saw how it could push its own search engine BING to replace google. It of course went and reached the Australian government to assure them that BING is more than capable to fulfill its needs and fully abide by the proposed law.
Now Microsoft knows that if this law passes it could see a similar situation happening in Europe and it is pushing it. US News reported on how Microsoft plans to encourage EU countries to adopt this new law too. The company has teamed up with the European Publishers Council and News Media Europe to make the following statement:
Publishers might not have the economic strength to negotiate fair and balanced agreements with these gatekeeper tech companies, who might otherwise threaten to walk away from negotiations or exit markets entirely
Read More
Error Code 0x80070570 — What is it?
Error Code 0x80070570 is a common Windows 10 error code that generally is seen by users who are attempting to install a new version of the operating system. While it is most often associated with Windows 10, variations on this same error code have been present in previous versions of the operating system, going all the way back to Windows 7.
Common symptoms include:
- Inability to run through the installation process to completion when attempting to install a new version of the operating system
- Error message regarding corrupt or missing files
While it is frustrating to encounter an error like Error Code 0x80070570 as you try to install a new operating system version on your device, there are several methods that can be used to try to resolve the issue. If you do not feel like you have the skill or knowledge necessary to successfully apply the steps below, be sure to get in touch with a trusted computer repair technician that is competent in the repair of Windows 10 errors.
Solution
 Error Causes
 Error Causes
In some cases, Error Code 0x80070570 arises erroneously when the system isn’t able to find a particular file that it needs. Other times, it happens when there is a conflict with the antivirus software that you are running and the installation software. Finally, there may be a faulty source of RAM in your computer that needs to be removed before the installation can be completed.
Regardless of what you believe to be the cause behind the error code, there are at least two different methods that you can use to try to resolve Error Code 0x80070570 on your device. The first is fairly simple and easy to follow, while the second requires a little bit more knowledge of your hardware in order to complete it successfully.
Further Information and Manual Repair
There are two common ways that users can attempt to get around Error Code 0x80070570 on their devices. Each requires a little more skill and technical knowledge than the last. If you don’t feel like you have the skill, time, or ability to invest in the methods below, be sure to get in touch with a Windows repair technician who can help you to complete the necessary steps in the right ways.
Here are the best ways to attempt to resolve Error Code 0x80070570 on your Windows device:
Method One: Reattempt Installation
In some cases, when Error Code 0x80070570 appears on your computer, you can simply click on the OK button and then go back to the screen immediately proceeding where your installation has left off, choosing to restart the process of installation. For some users, repeating this method at least four times has allowed them to bypass the error without undertaking more serious and time-consuming methods to resolve the issue at hand.
Method Two: Check Your Various Sources of RAM
If you have more than one source of RAM in your computer, first remove one of the sources, then re-attempt installation. If you are still encountering Error Code 0x80070570 after removing one of the sources, continue to remove each until you are down to a single source, then trade that last source for one of the ones that have been pulled.
If you have a bad source of RAM, this can help you to figure out which input is causing the error to appear and to address the problem appropriately. Once you have determined which specific source is causing the problem, you can reboot your computer and attempt to run the installation process one more time.
If your RAM sources are not specifically causing the issue, you may still need to run diagnostics tests on your hardware to identify the source of the problem at hand.
Method Three: Use An Automated Tool
If you wish to always have at your disposal a utility tool to fix these Windows 10 and other related issues when they do arise, download and install a powerful automated tool.
Read More
The new razer modular table looks like something that came out from Star Trek. Project Sophia is a desk but, it is a special kind of desk. It comes with modules that attach themselves underneath the table itself for customization purposes so each user can somewhat create a layout on the table itself as he or she desires. The table itself comes packed with intel CPU and Nvidia GPU but it is said that this component and PC parts will overall be easily upgraded to different ones as users desires.
 The table itself looks very basic and it comes with a very large OLED screen between two different sizes depending on your table choice. You can choose between 65” or 77” screen sizes and OLED is mounted on the table itself so you cannot move it or adjust the angle of it that I somewhat find annoying but that comes from th4e fact I am used to adjusting my screens, but for this large screen maybe you do not need to adjust its rotation in order to get best viewing angle.
Modules themselves will offer some on-the-fly information and quick settings for the PC itself while being modular in a sense they could be mounted in different positions on the table itself providing some customization and order to suit users needs. Modules, for now, are: THX Spatial Surround Sound Controls, system monitoring, programmable hotkey module, Thunderbolt™ Powered eGPU, RAID Controller, Network Performance Module, 15W Wireless Charger, Thunderbolt™ 4 Hub, Media Controls.
Of course table, itself will have Razer chroma RGB on its surface and Razer says it will have a total of 13 different modules available on launch for a true level of personalization.
Conclusion
Is this Razer table something that you really need or just another expensive toy? Personally, I would not mind this table at all but I would choose modules for work, not gaming. Having some things like media controls or RAID controllers all the time at your fingertips is a great time saver and productivity asset. Razer also advertises some modules and setup already for streamers, creators, or team members and has some according modules like touch screen digitizer with stylus and similar.
Read More
Blizzard is one of the most beloved game company which brought some of the most and greatest titles in PC gaming. Blizzard has released its own launcher in which you can launch games, sadly sometimes launcher does not want to work and fails to connect.
If this happens to you be sure to:
-
Reset your network devices to make sure your router hasn’t become flooded with data.
Power cycling your modem and router allows them to reset and re-establish a connection to your ISP. Follow these steps to completely power cycle the devices in your network connection:Note: If your modem has a battery backup, you will need to take the battery out or use the reset button on the modem.
- Shut down all computers connected to the modem/router.
- Power down and unplug the modem and the router if you’re using one.
- Allow to sit for 60 seconds unplugged.
- Plug in and turn on the modem and router, and allow them to completely boot up until the front panel connection lights on the modem show a steady connection.
- Start the computer and allow it to completely boot up.
-
If you’re using a wireless connection, optimize your internet connection to rule out a connection issue.
If you’re experiencing issues with your low-speed or wireless internet connection, follow the steps below to troubleshoot the problem.
-
Try plugging your computer directly into your modem.
- Shut down other programs that access the internet, such as other games or download programs.
- Satellite, mobile phone, and WiMax internet connections are not stable connections and may cause further connection issues when playing Blizzard games. If possible, consider switching to a more stable connection.
-
-
Update your drivers and operating system to resolve any compatibility issues.
Out-of-date drivers and operating systems can cause a variety of issues and are one of the first things to check when a game is having problems. The instructions below will help you check and update your drivers.
- Even new computers can have out-of-date drivers and operating systems because updates are released routinely.
- Some games and programs might run fine on a system with old drivers, but outdated drivers can still create technical issues with specific games or programs.
- Check our supported video cards articles to make sure your hardware is compatible:
- World of Warcraft
- Hearthstone
- StarCraft II
- Diablo III
- Heroes of the Storm
- Overwatch
Refer to the steps below to update drivers and software for your operating system.
-
Release and renew your IP and flush your DNS to resolve any network conflicts.
- While on the desktop, press Windows Key and type CMD.
- Right-click Command Prompt and select Run as administrator.
- Type ipconfig /release in the command prompt.
- Wait a few seconds for a reply that the IP address has been released.
- Type ipconfig /renew in the command prompt.
- Wait a few seconds for a reply that the IP address has been re-established.
- Type ipconfig /flushdns in the command prompt.
- Close the command prompt and attempt to make a connection.
-
Close all other applications to resolve software conflicts and free up resources.
Before trying the steps below, close unnecessary programs and restart your computer.
Identify Problematic Startup Items
- Press Ctrl+Shift+Esc to open the Task Manager.
- Click More Details.
- Select the Startup tab.
- Right-click on each item and select Disable.
- Restart the computer.
If this resolves the issue, enable the startup application one at a time to determine which one is causing the problem. You will need to restart between each application you enable.
Note: To re-enable startup applications, follow steps 1-4 and select Enable.
-
Delete the Battle.net Tools folder to automatically rebuild outdated or corrupt files.
- Close Blizzard processes.
- Press Ctrl + Shift + Esc to bring up the Task Manager.
- Click the Processes tab.
- Select all Agent, Blizzard Battle.net desktop app, and game processes, and click End Process.
- Navigate to the folder containing the Battle.net directory:
- Press Windows Key + R to open the Run dialogue.
- Type C:ProgramData into the Open field and press Enter.
- Delete the Battle.net folder.
- Run Battle.net and update the game to see if the issue persists.
If the error persists after you try these steps, another program may be causing the problem. Restart your computer and delete the Battle.net folder one more time.
Note: The above steps may cause the Blizzard Battle.net desktop app to forget game install locations. If your games can’t be found, you will see Install on the Blizzard Battle.net desktop app game tab instead of Play. To find your installation, click Locate this game or run the game launcher.
- Close Blizzard processes.
Read More
As you know, storage devices are an important part of the computer system for porting, saving, and extracting data files. And for you to differentiate between storage devices on your computer system, each one of the storage devices is labeled with a unique number referred to as Disk Signature for identification.
The unique disk identifier is stored as a part of the MBR or Master Boot Record. Disk signature is used by operating systems in order to identify and set apart different data storage devices and hard disk drives in the computer for data access.
These days, Disk cloning has become a regular practice in upgrading to larger hard disk drives. Drives are cloned in order to produce a similar copy to use both the original drive and cloned copy together. Moreover, lots of virtualization tools are being used to virtualize the physical hard disk drives to create virtual hard disk drives and several virtual machine clones that are created with the existing virtual hard disk drives. And since these are identical copies, chances these copies may have identical disk signatures. As a result, when you use both disks that have identical signatures at the same time you run into the Disk Signature Collision problem. This kind of problem does not often occur as the Windows system does not really allow two disks to function simultaneously when they have the same disk signature.
When you encounter a Disk Collision problem in your Windows 10 computer, you may see the following error messages:
- The boot selection failed because a required device is inaccessible
- The disk is offline because it has a signature collision
- This disk is offline because it has a signature collision with another disk that is online
You can fix the disk collision problem by changing the disk signature which you can achieve using the command line utility diskpart in Windows PowerShell or Command Prompt or using Windows Disk Management utility.
To fix the disk collision problem, you can make use of the command-line utility called diskpart in Windows PowerShell or Command Prompt to view and change the signature, or can make use of Master Boot record in the Windows Registry. You can also make use of Windows Disk Management Utility to change the signature. Simply follow the given options below to change the disk signature either way.
Option 1 – Change Disk Signature via Diskpart
- Type “command prompt” in the Windows Search bar and then right-click on the related search result and select the “Run as administrator” option.
- After that, type the “diskpart” command and hit Enter to open Diskpart.
- Next, type the “list disk” command to display all the disks available in the system.
- Next, take note of the problematic disk number with the status Offline from the list and then type the “Select disk x” command where x is the offline disk to select the offline disk. For instance, if you type “select disk 1”, it will display the “Disk 1 is now the selected disk” message.
- Now type the “Uniqueid disk” command to display the disk signature and to change the disk’s signature and set the disk online, type the “unique disk ID= (New signature)” where (New signature) is the new ID in hexadecimal. For instance, you can set the new id as “unique disk ID= 1456ACBD”.
Note: If you have given the wrong format ID, the command prompt will display the following error:
“The specified identifier is not in the correct format. Type the identifier in the correct format: in hexadecimal form for an MBR disk or as a GUID for a GPT disk.”
- After you’re done, the disk will be online, and then restart your computer.
Option 2 – Change Disk Signature via Disk Management Utility
- Tap the Win + R keys to open the Run dialog box and then type “diskmgmt.msc” and hit Enter or click OK to open Disk Management.
- Next, right-click on the disk that is marked as Missing or Offline.
- After that, select the Online command from the drop-down menu.
- Then from the selecting option Online, Windows will generate a new disk signature.
Read More
Linkey is a potentially unwanted web browser search extension for the top browsers, designed to modify the user’s search and home pages in order to direct advertising. This extension changes your default search provider, redirects new tabs, and distributes information & statistics to the server. This extension will display unwanted ads, redirect you through unwanted search engines, and send your browsing information (potentially private information) back to its ad network.
From the publisher: Linkey is compatible with all the latest versions of Internet Explorer, Chrome, and Firefox. Linkey is a simple browser extension that allows you to get the best sites in one click in visualized & friendly interface.
About Browser Hijackers
Browser hijacking is actually a type of unwanted software, often a browser add-on or extension, which causes modifications in the browser’s settings. Browser hijackers could do many different things on your PC. Usually, hijackers will force hits to websites of their preference either to increase traffic producing higher advertisement revenue, or to obtain a commission for each and every user visiting there. Nonetheless, it’s not that harmless. Your online safety is compromised and it is also extremely annoying. Browser hijackers could also allow other malicious programs without your knowledge to further damage your computer.
How to know whether the web browser is hijacked?
The typical symptoms that suggest having this malicious software on your PC are:
1. your homepage has been reset to some unfamiliar site
2. your browser is constantly being redirected to adult sites
3. the essential web browser settings are modified and undesirable or insecure resources are put into the trusted sites listing
4. unsolicited new toolbars are added to your browser
5. you may notice endless pop-up ads on your screen
6. your web browser starts running sluggishly or exhibits frequent errors
7. You simply can’t access particular sites, particularly anti-malware websites.
How it infects your computer
Browser hijackers attack computers through malicious e-mail attachments, downloaded infected computer files, or by checking out infected internet sites. They could be included with toolbars, BHO, add-ons, plug-ins, or browser extensions. Also, certain freeware and shareware can put the hijacker in your PC through the “bundling” technique. Examples of well-known browser hijackers are Fireball, GoSave, Ask Toolbar, CoolWebSearch, Babylon Toolbar, and RocketTab.
Browser hijackers could interrupt the user’s browsing experience severely, keep track of the websites visited by users and steal financial information, cause problems in connecting to the internet, and ultimately create stability issues, making applications and computers crash.
How you can get rid of a browser hijacker
Some hijackers can be simply removed by deleting the free software they came with or by removing any extension you have recently added to your computer. Unluckily, the majority of the software products used to hijack a browser are deliberately built to be difficult to eliminate or detect. Moreover, manual removals demand in-depth system knowledge and therefore can be an extremely difficult job for novices.
What To Do When You Cannot Download Safebytes Anti-Malware?
All malware is bad and the magnitude of the damage may vary greatly in accordance with the type of infection. Certain malware variants modify internet browser settings by including a proxy server or modify the computer’s DNS configurations. When this happens, you will be unable to visit some or all of the websites, and therefore unable to download or install the necessary security software to remove the malware. If you’re reading this, you may have infected by a virus that prevents you from downloading computer security software like Safebytes Anti-Malware. There are a few options you can attempt to get around with this obstacle.
Install in Safe Mode
The Windows-based PC has a special mode called “Safe Mode” in which just the bare minimum required programs and services are loaded. If the malware is blocking internet access and affecting your PC, running it in Safe Mode will let you download antivirus and run a diagnostic scan while limiting potential damage. In order to get into Safe Mode or Safe Mode with Networking, press F8 while the system is starting up or run MSConfig and look for the “Safe Boot” options under the “Boot” tab. After you restart into Safe Mode with Networking, you could download, install, as well as update anti-malware software from there. After installation, run the malware scanner to remove most standard infections.
Use an alternate browser to download an antivirus application
Certain viruses might target vulnerabilities of a specific web browser that obstruct the downloading process. If you appear to have a virus attached to Internet Explorer, then switch over to an alternate internet browser with built-in safety features, such as Chrome or Firefox, to download your favorite antivirus program – Safebytes.
Install security software on a thumb drive
Here’s another solution which is creating a portable USB anti-malware software that can check your system for malicious software without needing installation. Do these simple actions to clean up your affected PC using portable anti-malware.
1) Download the anti-malware program on a virus-free computer.
2) Plug the Flash drive into the clean computer.
3) Double-click on the downloaded file to open the installation wizard.
4) Choose the USB flash drive as the destination for saving the software file. Follow the on-screen instructions to finish the installation.
5) Unplug the USB drive. You may now utilize this portable anti-malware on the infected computer system.
6) Double click the Safebytes Anti-malware icon on the flash drive to run the software.
7) Click on “Scan Now” to run a complete scan on the infected computer for malware.
A Look at the Best AntiMalware Program
Want to download the very best anti-malware software for your laptop? There are several applications in the market that come in paid and free versions for Microsoft Windows systems. Some of them are excellent, some are ok types, while some will destroy your PC themselves! When searching for an anti-malware tool, choose one which provides dependable, efficient, and complete protection against all known computer viruses and malware. On the list of highly recommended software programs is SafeBytes AntiMalware. SafeBytes carries a good track record of top-quality service, and customers are very happy with it.
Safebytes is one of the well-established computer solutions companies, which offer this all-inclusive anti-malware software. Using its cutting-edge technology, this application will allow you to eradicate multiples types of malware such as computer viruses, trojans, PUPs, worms, ransomware, adware, and browser hijackers.
SafeBytes has got a variety of wonderful features that can help you protect your PC from malware attacks and damage. Below are some typical features present in this tool:
Live Protection: SafeBytes offers a totally hands-free active protection that is set to observe, prevent and remove all threats at its very first encounter. This utility will always monitor your computer for any suspicious activity and updates itself regularly to keep current with the newest threats.
Most Reliable AntiMalware Protection: This deep-cleaning anti-malware software program goes much deeper than most antivirus tools to clean your computer system. Its critically acclaimed virus engine finds and disables hard-to-remove malware that conceals deep inside your PC.
Internet Security: Through its unique safety rating, SafeBytes notifies you whether a site is safe or not to access it. This will make sure that you’re always certain of your safety when browsing the net.
Lightweight Utility: The program is lightweight and can run silently in the background, and that does not have an effect on your PC efficiency.
24/7 Live Professional Support: SafeBytes provides 24/7 technical support, automatic maintenance, and upgrades for the best user experience.
Technical Details and Manual Removal (Advanced Users)
If you wish to manually remove Linkey without the use of an automated tool, it may be possible to do so by removing the program from the Windows Add/Remove Programs menu, or in cases of browser extensions, going to the browsers AddOn/Extension manager and removing it. You will likely also want to reset your browser.
To ensure the complete removal, manually check your hard drive and registry for all of the following and remove or reset the values accordingly. Please note that this is for advanced users only and may be difficult, with incorrect file removal causing additional PC errors. In addition, some malware is capable of replicating or preventing deletion. Doing this in Safe Mode is advised.
The following files, folders, and registry entries are created or modified by Linkey
Files:
C:Users%USER%AppDataLocalTempis33084504mysearchdial.dll
C:Users%USER$AppDataLocalTempis357113909833170_stpsetup.exe
c:Users%USER$AppDataLocalTempMega Browsemegabrowse_setup.exe
C:Program Files (x86)Linkeylog.log
C:Program Files (x86)LinkeyHelper.dll
C:Program Files (x86)LinkeyChromeExtensionChromeExtension.crx
C:Program Files (x86)Linkey
C:Program Files (x86)LinkeyChromeExtension
C:Program Files (x86)LinkeyIEExtension
C:Users%USER$AppDataRoamingDigitalSitesUpdateProc
Registry:
HKLMSOFTWARECLASSESAPPID6A7CD9EC-D8BD-4340-BCD0-77C09A282921
HKLMSOFTWAREWOW6432NODECLASSESAPPID6A7CD9EC-D8BD-4340-BCD0-77C09A282921
HKLMSOFTWARECLASSESCLSID181F2C09-56DD-4F98-86D7-59BA2BC59B5A
HKLMSOFTWARECLASSESCLSID4D9101D6-5BA0-4048-BDDE-7E2DF54C8C47
HKLMSOFTWAREMICROSOFTWINDOWSCURRENTVERSIONEXPLORERBROWSER HELPER OBJECTS
HKLMSOFTWARELINKEY
HKLMSOFTWAREWOW6432NODELINKEY
HKLMSOFTWAREWOW6432NODESYSTEMKGeneral
HKUS-1-5-18-ED1FC765-E35E-4C3D-BF15-2C2B11260CE4-0SOFTWARECONDUITValueApps
HKLMSOFTWAREWOW6432NODEMICROSOFTWINDOWSCURRENTVERSIONEXPLORERBROWSER HELPER OBJECTSEF5625A3-37AB-4BDB-9875-2A3D91CD0DFD
HKLMSOFTWARELINKEY|ie_jsurl, http://app.linkeyproject.com/popup/IE/background.js
HKLMSOFTWAREWOW6432NODELINKEY|ie_jsurl, http://app.linkeyproject.com/popup/IE/background.js
Read More
 Lately, Microsoft has trying to fix Print Nightmare with various methods and patches. The last patch has seemingly fixed Print Nightmare but it has broken the Alt-tab key combination.
It has been reported that the latest patch has broken famous key combinations for quickly switching from window to window. It seems that combination is not working or it is switching to desktop, even going to blank screen if switching from the full-screen game.
Fixing the issue
Luckily this issue is easily fixable.
The first and easier fix for this issue is surprising to turn off the news and info widget, right-click on it and choose News and interests and then click on turn off.
The second solution would be to uninstall the update. Go to Settings, then to Update & Security, and from there view Update History and remove the update.
Read More
![]()
Copyright © 2022, ErrorTools. All Rights Reserved
Trademarks: Microsoft Windows logos are registered trademarks of Microsoft. Disclaimer: ErrorTools.com is not affiliated with Microsoft, nor claim direct affiliation.
The information on this page is provided for information purposes only.
![]()
Repair your PC with one click
Please be aware that our software needs to be installed on a PC system with Windows on it, Open this website on a desktop PC and download the software for easy and quick elimination of your issues.
Skip to content
- Some users reported seeing white icons on their “Office.docx” files instead of the Word icon.
- This type of problem is usually caused by a conflict with the default program settings in Windows.
- If you suddenly notice that the Microsoft Word icon is empty or missing and not displaying properly on your Windows 10 computer, you can check the possible solutions listed below.
In some cases, users may not see the Microsoft Word icon in their “.docx” files because a conflict would occur with the default Windows settings.
Microsoft Office Icons
In the Microsoft 365 architecture icon set, you can find templates and icons for your architecture
Check the solutions listed below if, suddenly, the Microsoft Word icon on your Windows 10 computer disappears or is not displaying properly on Office .doc and .docx documents.
Why doesn’t the Word icon appear in .docx files?
![]()
- Microsoft Office and Windows can be incompatible if they are outdated, causing the MS Word icon to malfunction.
- A corrupted or a missing .docx file association may result in an icon problem.
- In some cases, a corrupt icon cache database may explain the docx icon issue.
- In some cases, MS Office installations can become corrupted, leading to the missing Word icon.
- Having installed MS Word, it can still fail to claim the links to .docx files in Windows.
- An icon problem can occur if the MS Word application’s registry keys are misconfigured or corrupted.
How to restore .docx files that do not display the Word icon?
Microsoft Office Icon
Open Microsoft Office Picture Manager by choosing Office Tools. This will fix the icons in Microsoft Office.
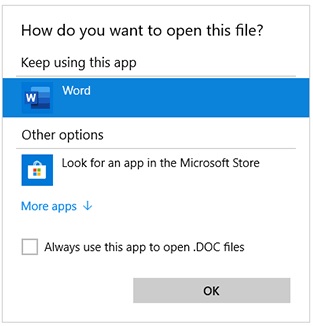
Open a .docx file using Winword.exe
- File Explorer should be opened first.
- Click “Open with…” from the right-click menu.
- Click “Other applications” in the field “How would you like to open this file?”.
- Check the box “Use this application whenever I open a .docx file” in the same window.
- To find another program on the computer, click the “Find another program” button.
- Navigate to the site where the “Winword” application is located in the “Open” window.
- Click “Open” after selecting “winword”.
Remove the icon cache from the local folder
- The “Run” window can be opened by pressing Windows + R.
- By typing “%temp%” in the “Run” window, you will be able to open the program.
- In the address bar, click “Local”.
- Select “View” from the menu.
- Again, click “Options”.
- There will be a new option under the “View” tab in the “Folder Options” window.
- If you want to see hidden files, folders, and drives, select the radio button next to it.
- Once you have clicked “Apply”, click on “OK”.
- The “Iconcache” file can be found by searching.
- Click “Delete” on the “Iconcache” file when you find it.
- Restart your computer after closing File Explorer.
Changing the DefaultIcon value
- You can find the search bar by clicking the Windows icon and entering “Regedit”.
- Press “Enter” after that.
- Navigate here:
Word.Document.12/DefaultIcon in HKEY_CLASSES_ROOT. - You can change it by double-clicking the “(Default)” key.
- In “Value Data:”, paste the following.
The Word icon will be located in C:/ProgramsMicrosoft Office/root/Office16/wordicon.exe,13 if you are using Word 2016 (64-bit).
It should be located at C:/Program Files (x86)/Microsoft Office/root/Office16/wordicon.exe,13 for Word 2016 (32 bit). - Your changes will be saved when you click “OK.”.
- Restart your computer after closing Registry Editor.
Frequently Asked Questions
If the Office icons are blank after installing Office from the Microsoft Store, open Settings -> Apps. Find Microsoft Office Desktop Apps in the list of applications, select it, and click Advanced Options. Click Restore. Then wait for the process to complete and restart your computer.
- Right-click on your desktop and select Properties.
- Click the Desktop tab.
- Click Customize Desktop.
- Click the General tab, then click the icons you want on your desktop.
- Click OK.
- Open Microsoft Word and click File.
- Click Open and select the .docx file where the problem occurred.
- Click the down arrow next to the Open button and select Open and restore.
- Press the Windows key and type: Standard apps in the search function.
- Now open Select default applications by file type and expand the option before .docx.
- Then select Word and repeat the same for .docxml.
- Now restart your computer and see if the icon problem has been resolved.
With WPS Office Suite, you can easily manage documents across Windows, macOS, Linux, Android, and iOS devices, making it a viable alternative to Microsoft Office .
Post Views: 89

Mark Ginter
Mark Ginter is a tech blogger with a passion for all things gadgets and gizmos. A self-proclaimed «geek», Mark has been blogging about technology for over 15 years. His blog, techquack.com, covers a wide range of topics including new product releases, industry news, and tips and tricks for getting the most out of your devices. If you’re looking for someone who can keep you up-to-date with all the latest tech news and developments, then be sure to follow him over at Microsoft.
- Remove From My Forums
-
Question
-
All Word files do not show the icon in folders and on desktop. Using Office 2016, and Windows 10. The icons for excel files and powerpoint files are visible.
Answers
-
Hi,
So Word 2016 icon doesn’t show on associated (.docx) files.
Try to right click on any of the files, select «Open with…» from the context menu, then choose Word 2016 as the default application to open this type of files. Make sure to tick the checkbox of «Use this app for all .docx files.»
If this doesn’t correct the issue, then I would suggest you repair Office installation from Control Panel, and see if issue persists. This will re-register all the Office applications as the default application for Office files.
Hope this helps.
Regards,
Ethan Hua
Please remember to mark the replies as answers if they help, and unmark the answers if they provide no help. If you have feedback for TechNet Support, contact
tnmff@microsoft.com-
Proposed as answer by
Tuesday, April 5, 2016 8:32 AM
-
Marked as answer by
Ethan HuaMicrosoft contingent staff
Wednesday, April 6, 2016 8:16 AM
-
Proposed as answer by
Download PC Repair Tool to quickly find & fix Windows errors automatically
It has been observed that conflicts with the default program settings in Windows can cause plain white icons to be displayed on your ‘.docx‘ files. As such, you may not see any Microsoft Word icon. If Microsoft Word icon is blank or missing, & not showing correctly or properly on .doc & .docx document files of Office on Windows 11/10, then you can try the solutions outlined below in the post.
![]()
In most cases, a simple computer restart or a refresh of the folder can resolve the problem. Press F5 and see. You should also check and ensure that the file extension of such files is either .doc or .docx. If that doesn’t help, then read further.
1] Configure .docx files to open with ‘winword.exe’

Right-click on a DOCX file and select ‘Open with…’ option.
Next, when prompted with ‘How do you want to open this file’ message, choose ‘More apps’ option.
Now, scroll down and check the box marked against the ‘Always use this app to open .docx files’ option.
Click on the ‘Look for another app on this PC’ link and select the WINWORD.exe application, from one of the following paths, according to the installed Office version and click Open:
- Word 2016 (64-bit): C:Program FilesMicrosoft OfficerootOffice16
- Word 2016 (32-bit): C:Program Files (x86)Microsoft OfficerootOffice16
This should help.
3] Change Default Word icon in Registry
Before you begin, do create a system restore point first.
Now type ‘regedit’ in search box and press Enter to open Registry Editor.
Navigate to the following path in the left pane:
HKEY_CLASSES_ROOTWord.Document.12DefaultIcon
Double-click at Default value at the right pane and according to your Word version and architecture (32 or 64 bit), copy-paste the corresponding value in the value data box:
- For Word 2016 (64-bit) keep it as C:Program FilesMicrosoft OfficerootOffice16wordicon.exe,13
- For Word 2016 (32-bit) Keep it as C:Program Files (x86)Microsoft OfficerootOffice16wordicon.exe,13
![]()
The path will depend on your Office version.
When done, hit the Enter key. After that, close Registry Editor and restart your computer.
The problem should be resolved.
3] Rebuild the Icon cache
At times, icons of various files may not appear due to the cache problem. Therefore, you could rebuild the icon cache to fix this issue on your computer. Rebuild the Icon cache and see if it helps. You may use our Thumbnail and Icon Cache Rebuilder to do so with a click.
4] Fix Office apps
If the Office icons are blank after installing Office from the Microsoft Store, then Open Settings > Apps. Find Microsoft Office Desktop Apps in the app list, select it and click on Advanced options. Click Fix. Then wait till the process is over and then restart your computer. If the problem persists, repeat these steps but click Reset instead of Fix.
5] Repair Office Installation
If none of the aforementioned solutions is working for you, you may need to consider repairing your Office installation on your computer.
How do I get my Microsoft Word icon back?
To get your Microsoft Word icons back in Windows 11/10, you need to rebuild the icon cache, change the default Word icon in Registry, etc. At last, you may try repairing your Office installation on your computer using the official tool.
Why is docx icon not showing?
At times, Microsoft Word may not show the icon of files on your Windows 11/10 computer. It mainly happens when there are some internal conflicts in your system files. However, you may be able to fix the issue by following the guides mentioned above.
All the best!

Anand Khanse is the Admin of TheWindowsClub.com, a 10-year Microsoft MVP (2006-16) & a Windows Insider MVP (2016-2022). Please read the entire post & the comments first, create a System Restore Point before making any changes to your system & be careful about any 3rd-party offers while installing freeware.
Файл .docx может не отображать значки Word, если ассоциации файлов Docx неправильно настроены или повреждены. Более того, устаревшая или поврежденная установка Office также может вызвать обсуждаемую ошибку.
Проблема возникает, когда значки файлов .docx меняются на значки пустых / щитовых (а не на значки MS Word по умолчанию). Файлы можно открывать и редактировать в обычном режиме, но значки Word не отображаются (что идеально подходит для файлов .doc).
В файлах .Docx не отображается значок Word
Прежде чем перейти к исправлению значка Docx, проверьте, решает ли удаление какого-либо другого устаревшего приложения для работы с документами (например, Adobe Acrobat Reader) проблему значков.
Решение 1. Обновите Windows и MS Office на своем ПК до последних сборок.
Проблема с иконками MS Word может возникнуть, если установка Windows или MS Office устарела, поскольку это может создать несовместимость между ними. В этом случае обновление Windows и MS Office до последних сборок может решить проблему.
- Вручную обновите Windows до последней версии и проверьте, решена ли проблема с иконками файлов.
- Если нет, запустите приложение Office (например, MS Word) и перейдите в его меню «Файл».
- Теперь разверните Еще и выберите Аккаунт.
Открыть учетную запись в меню файлов MS Word
- Затем нажмите «Параметры обновления» и в появившемся меню нажмите «Обновить сейчас».
Обновить приложение Office
- Теперь позвольте процессу обновления Office завершиться и проверьте, решена ли проблема значков файлов Word.
Решение 2. Верните ассоциацию файлов к MS Word и сбросьте значения по умолчанию.
Проблема со значком может возникнуть, если для ассоциации файлов .docx не задано значение MS Word или они повреждены. В этом сценарии восстановление ассоциации файлов .docx с MS Word и сброс приложений по умолчанию на значения по умолчанию для MS может решить проблему.
Установите MS Word в качестве приложения по умолчанию для типа файла .docx
- Нажмите клавишу Windows и введите в поиске: Приложения по умолчанию. Затем откройте приложения по умолчанию.
Открыть приложения по умолчанию
- Теперь откройте «Выбрать приложения по умолчанию по типам файлов» и разверните параметр перед .docx.
Открыть Выбрать приложения по умолчанию по типу файла
- Затем выберите Word и повторите то же самое с .docxml. Если параметр также установлен на Word, выберите другое приложение в качестве приложения по умолчанию для .docx и верните настройку на MS Word.
Установите MS Word в качестве приложения по умолчанию для типа файла Docx
- Теперь перезагрузите компьютер и проверьте, решена ли проблема со значком.
Используйте контекстное меню, вызываемое правой кнопкой мыши
- Щелкните правой кнопкой мыши файл MS Word и выберите «Открыть с помощью»> «Выбрать другое приложение».
Открыть Выбрать другое приложение
- Теперь нажмите «Другие приложения» и выберите Wordpad.
Открыть больше приложений
- Затем установите флажок «Всегда использовать это для открытия файлов .docx» и нажмите кнопку «ОК».
Установите Wordpad в качестве приложения по умолчанию для файлов Docx
- Затем повторите описанные выше шаги, но установите MS Word в качестве приложения по умолчанию и проверьте, вернулись ли значки к значениям по умолчанию для Word.
- Если проблема не исчезнет, верните приложение Docx по умолчанию к Wordpad (выполнив шаги с 1 по 3) и щелкните правой кнопкой мыши файл Word.
- Теперь наведите указатель мыши на «Открыть с помощью» и откройте «Выбрать другое приложение».
- Затем разверните «Другие приложения» и нажмите «Найти другое приложение на этом компьютере».
Найдите другое приложение на этом ПК
- Теперь перейдите в каталог установки MS Word (вы можете использовать метод, описанный в решении 5).
- Затем дважды щелкните файл WINWORD.exe (убедитесь, что установлен флажок «Всегда использовать это») и проверьте, решена ли проблема со значками.
Выберите WinWord.exe
Сбросьте приложения по умолчанию на рекомендованные Microsoft
- Откройте приложения по умолчанию (обсуждаемые выше) и прокрутите вниз до конца.
- Теперь в разделе «Восстановить рекомендуемые Microsoft значения по умолчанию» нажмите кнопку «Сброс» и проверьте, решена ли проблема значков MS Word.
Сброс до рекомендованных Microsoft значений по умолчанию
Решение 3. Восстановите базу данных Icon Cache
Проблема со значком Docx может быть результатом поврежденной базы данных Icon Cache. В этом случае восстановление базы данных Icon Cache может решить проблему.
- Закройте все приложения / папки в системе и щелкните правой кнопкой мыши кнопку Windows.
- Затем выберите «Диспетчер задач» и щелкните правой кнопкой мыши процесс Explorer.exe (или проводника Windows).
- Теперь выберите Завершить задачу и подтвердите, чтобы завершить процесс.
Завершить задачу проводника Windows
- Затем разверните меню «Файл» и выберите «Выполнить новую задачу».
Запустить новую задачу в диспетчере задач
- Теперь отметьте опцию «Создать эту задачу с правами администратора» и в поле «Открыть» введите: CMD.exe.
Запустить задачу CMD.exe
- Затем нажмите кнопку ОК и в окне командной строки последовательно выполните следующие действия: CD / d% userprofile% AppData Local DEL IconCache.db / a EXIT
Удалить базу данных Iconcache
- Теперь в диспетчере задач откройте меню «Файл» и выберите «Запустить новую задачу».
- Затем введите Explorer.exe и нажмите кнопку ОК.
Запустите новую задачу Explorer.exe в диспетчере задач
- Теперь проверьте, решена ли проблема со значком Word. Если нет, перезагрузите систему и проверьте, восстановлены ли значки.
Решение 4. Восстановите установку MS Office
Поврежденная установка MS Office может вызвать проблему с отсутствующим значком Word. В этом контексте восстановление установки MS Office может решить проблему.
- Нажмите клавишу Windows и откройте Настройки.
- Теперь выберите Приложения и разверните установку MS Office.
Откройте приложения в настройках Windows.
- Затем нажмите кнопку «Изменить» и нажмите «Да» (если получено приглашение UAC).
Изменить установку Office
- Теперь выберите опцию «Быстрое восстановление» и нажмите кнопку «Восстановить».
Офис быстрого ремонта
- Затем дайте процессу завершиться и перезагрузите компьютер, чтобы проверить, восстановился ли значок Word до нормального состояния.
- Если нет, повторите описанные выше шаги, но на шаге 4 выберите Online Repair.
Офис онлайн-ремонта
- После завершения онлайн-ремонта проверьте, решена ли проблема со значком.
Решение 5. Повторно зарегистрируйте MS Word
Проблема со значками может возникнуть, если приложению MS Word не удается запросить ассоциацию файла .docx (несмотря на то, что пользователь установил ее так) в Windows. В этом случае перерегистрация приложения MS Word (которое может восстановить связь) может решить проблему. Прежде чем продолжить, обязательно закройте все запущенные процессы, связанные с MS Office, в диспетчере задач.
Повторно зарегистрируйте приложение MS Word
- Нажмите клавишу Windows и в поле поиска введите: CMD. Теперь в списке результатов щелкните правой кнопкой мыши командную строку и в мини-меню выберите «Запуск от имени администратора».
Откройте командную строку от имени администратора
- Затем выполните следующее (скопируйте и вставьте команду): winword / r
Выполните Winword / r в командной строке
- Имейте в виду, что в окне командной строки ничего не будет отображаться, но приложение Word зарегистрируется в Windows. Как только курсор появится в командной строке, проверьте, решена ли проблема с иконками.
- Если нет, запустите MS Word и щелкните правой кнопкой мыши на панели задач. Теперь откройте диспетчер задач.
Откройте диспетчер задач вашей системы на панели задач.
- Теперь щелкните правой кнопкой мыши процесс MS Word и выберите «Открыть расположение файла».
Расположение открытого файла в MS Word
- Затем скопируйте адрес из адресной строки, например, C: Program Files Microsoft Office root Office16)
Найдите каталог установки MS Word
- Затем запустите командную строку с повышенными привилегиями (шаг 1) и выполните следующее, чтобы перейти в каталог установки MS Word.cd C: Program Files Microsoft Office root Office16
(вы можете вставить путь, указанный на шаге 6)
- Теперь выполните следующее и проверьте, восстановлены ли значки: winword / r
Запустите Winword / r из каталога установки MS Word.
- Если проблема сохраняется и у вас установлено несколько пакетов Office, проверьте, решает ли проблему повторение шага 8 из каталога установки другого пакета Office.
Повторно зарегистрируйте приложение MS Word
- Запустите командную строку с повышенными привилегиями (как описано выше в шаге 1) и выполните следующее (с кавычками): «C: Program Files Microsoft Office root Office16 winword.exe» / unregserver
Путь в кавычках соответствует пути, указанному на шаге 6 (обсужденном выше).
Отменить регистрацию Winword
- После завершения выполнения в окне командной строки выполните следующее: «C: Program Files Microsoft Office root Office16 winword.exe» / regserver
- После завершения выполнения проверьте, не вернулись ли значки файлов Word к значениям по умолчанию.
Решение 6. Отредактируйте системный реестр и переустановите Office Suite.
Проблема со значками может возникнуть, если ключи реестра приложения MS Word неправильно настроены или повреждены. В этом случае редактирование ключей реестра, относящихся к MS Word, может решить проблему.
Предупреждение: продвигайтесь вперед на свой страх и риск и с особой осторожностью, так как редактирование системного реестра — это сложная задача, и если ее не сделать должным образом, вы можете нанести непоправимый ущерб вашей ОС / данным / системе.
Прежде чем продолжить, обязательно сделайте резервную копию системного реестра. Нажмите клавишу Windows и выполните поиск: Редактор реестра. Теперь в списке результатов щелкните правой кнопкой мыши Редактор реестра и в мини-меню выберите «Запуск от имени администратора».
Откройте редактор реестра от имени администратора.
Вы можете попробовать следующие изменения, чтобы проверить, решает ли проблема с иконками (имейте в виду, что некоторые из этих клавиш могут быть недоступны для некоторых пользователей).
Удалить ключ IconHandler
- Перейдите по следующему пути: Computer HKEY_CLASSES_ROOT Word.Document.12 ShellEx
- Теперь на правой панели удалите ключ IconHandler и перезагрузите компьютер.
Удалить ключ IconHandler
- После перезагрузки установите Word в качестве приложения по умолчанию для файлов .docx (как описано в решении 2) и проверьте, решена ли проблема значков слов.
Изменить путь ключа по умолчанию
- Перейдите по следующему пути: Computer HKEY_CLASSES_ROOT .docx
- Теперь на правой панели дважды щелкните Default и установите для него значение Word.Document.16.
Задайте значение по умолчанию Word.Document.16.
- Затем повторите решение 2, чтобы установить MS Word в качестве приложения по умолчанию, и проверьте, отображаются ли правильные значки.
- Если нет, повторите описанное выше решение, но на шаге 2 установите для параметра «По умолчанию» значение Word.Document.12 и проверьте, решает ли он проблему значков.
Установите значение по умолчанию в Word.Document.12.
Импортируйте ключ реестра .docx
- На рабочем и доверенном компьютере перейдите по следующему пути: Computer HKEY_CLASSES_ROOT .docx
- Теперь на левой панели щелкните правой кнопкой мыши ключ .docx и выберите «Экспорт».
Экспорт ключа реестра .Docx
- Затем сохраните файл где-нибудь (например, на рабочем столе) и перенесите его на зараженный компьютер.
- Теперь на зараженном компьютере запустите редактор реестра и перейдите по следующему пути: Computer HKEY_CLASSES_ROOT .docx
- Затем на левой панели выберите ключ .docx и разверните меню «Файл».
- Теперь выберите «Импорт» и после завершения процесса импорта перезагрузите компьютер.
Импортируйте ключ реестра .Docx
- Затем повторите решение 2, чтобы проверить, решена ли проблема с иконками.
Удалить файл Docx
- Перейдите по следующему пути: Computer HKEY_CLASSES_ROOT docxfile
(для некоторых пользователей ключом будет Docx file auto)
- Затем на левой панели щелкните правой кнопкой мыши раздел docxfile и выберите Удалить.
Удалите ключ реестра docxfile
- Теперь подтвердите удаление ключа docxfile и выйдите из редактора.
- Затем перезагрузите компьютер и запустите файл Word (если потребуется, выберите MS Word в качестве приложения по умолчанию), чтобы проверить, решена ли проблема значков.
Удалите ключи .docx и переустановите Office Suite
- Удалите пакет Office и в редакторе реестра перейдите по следующему пути: Computer HKEY_CLASSES_ROOT .docx
- Теперь на левой панели щелкните правой кнопкой мыши раздел .docx и выберите «Удалить». Затем подтвердите удаление ключа .docx
Удалите ключ реестра .Docx
- Теперь повторите то же самое, чтобы удалить ключ .docx по следующему пути и выйти из редактора: Computer HKey_Classes_Root SystemFileAssociations .docx
Удалите ключ реестра .Docx
- Теперь перезагрузите компьютер и переустановите пакет Office, чтобы проверить, решена ли проблема с иконками.
Решение 7. Создайте новую учетную запись пользователя Windows
Если ни одно из решений не помогло вам, проблема может быть вызвана повреждением профиля пользователя. В этом контексте создание новой учетной записи пользователя Windows может решить проблему.
- Создайте новую учетную запись пользователя Windows (лучше создать учетную запись локального администратора) и выйдите из системы текущего пользователя.
- Затем войдите в систему, используя только что созданную учетную запись Windows, и проверьте, вернулись ли значки файлов Word к значениям по умолчанию. В таком случае вы можете перенести все данные старого аккаунта (утомительная задача).
Если проблема не исчезнет, вы можете использовать сторонние утилиты (например, IconsExtract и FileTypesMan) для решения проблемы. Если проблема все еще существует, вы можете отредактировать разрешения безопасности (это может иметь свои последствия) для локальной папки, чтобы разрешить всем (в расширенных именах и именах групп / пользователей) в следующем месте:
% userprofile% AppData
Иконки word не отображаются
Сообщения: 50750
Благодарности: 14522
| Конфигурация компьютера | |
| Материнская плата: ASUS P8Z77-V LE PLUS | |
| HDD: Samsung SSD 850 PRO 256 Гб, WD Green WD20EZRX 2 Тб | |
| Звук: Realtek ALC889 HD Audio | |
| CD/DVD: ASUS DRW-24B5ST | |
| ОС: Windows 8.1 Pro x64 | |
| Прочее: корпус: Fractal Design Define R4 |
там только соответствие расширения файла с программой.
Именно там, с какой?
Попробуйте сбросить кеш иконок с помощью Tweak UI -> Repair -> Rebuild Icons -> Repair Now.
Еще проверьте, как отображается под другой учетной записью.
Сообщения: 13
Благодарности:
Попробуйте сбросить кеш иконок с помощью Tweak UI
Не помогло
Еще проверьте, как отображается под другой учетной записью
Другой записи не было, создал новую, — тоже самое
Еще пробовал вручную назначить файлу значок из WinWord.EXE , там в екзешнике есть все иконки, выбираешь любую, — назначается. Но естественно только этому одному файлу.
Что касается реестра
То там так
[HKEY_CURRENT_USERSoftwareMicrosoftWindowsCurrentVersionExplorerFileExts.docOpenWithList]
«a»=»WINWORD.EXE»
«MRUList»=»acb»
«b»=»avant.exe»
«c»=»WORDPAD.EXE»
[HKEY_CURRENT_USERSoftwareMicrosoftWindowsCurrentVersionExplorerFileExts.docOpenWithProgids]
«WordPad.Document.1″=hex(0):
«Word.Document.8″=hex(0):
Другая ветвь, HKEY_CURRENT_USERSoftwareClasses
Там ничего нет за программы офиса, только Ява и Медиаплеер

Пропали значки Microsoft Office, но файлы открываются
Пропали значки Microsoft Office, но файлы открываются
Добрый день! Уважаемые читатели, лучшего IT блога России :), pyatilistnik.org. Так уж повелось, что в последнее время я очень часто пишу про проблемы на сервере терминалов, благо пользователи и компания Microsoft, трудятся над созданием различных, интересных ситуаций. Не так давно поступила ко мне заявка, в которой описывалась такая проблема, на одном из узлов RDS фермы, а именно, пропали значки на офисных документах Microsoft Office (Exel, Word, Visio, Outlook). Самое забавное, что все документы открывались и работали, но согласитесь, это очень не удобно, когда нет возможности быстро ориентироваться в формате файла. Давайте я покажу, каким образом можно восстановить отображение значков Microsoft Office. Думаю, не далек тот день, когда и вы с этим столкнетесь.
Почему исчезают значки
Давайте вначале мы разберемся, почему могут исчезать значки Microsoft Office как с рабочего стола, так с документов. Как я и писал выше, данная проблема у меня появилась на терминальном сервере и выглядит она вот таким образом. Ярлыки на рабочем столе и документы в папке, все потеряли свои значки приложений Microsoft Office. Стрелками я отметил, что тип файлов exel таблицы, или значок Outlook 2016.
Сама проблема не нова с пропажей значков, не так давно мы с вами решали проблему, когда пропал значок громкости windows 10. Давайте рассмотрим по каким причинам исчезают значки с программ и файлов.

Основные причины пропажи
- У вас слетели ассоциации файлов, это когда определенные форматы файлов, например, docx открываются не той программой или вообще операционная система Windows не знает, чем его открывать.
- Проблемы с реестром Windows. Очень частая проблема, забегу вперед у меня все решилось с ней.
- Поврежден офисный продукт
- Требуется чистка кэша значков в операционной системе
Теперь когда мы выяснили почему исчезают значки, нам нужно это поправить, чтобы вам или пользователям было комфортно работать. Благо терминальные фермы редко состоят из одного сервера, поэтому можно закрыть новые подключения к этому хосту , дождаться когда все сеансы с него выйдут и можно вводить его в режим обслуживания.
Что делать если исчез значок на офисном приложении
Теперь переходим непосредственно к практике:
- Заходим на нужного участника фермы, если выскочит ошибка, что «Если вы хотите подключиться к определенному участнику фермы для управления», то по ссылке есть инструкция. Если у вас ваши документы, вообще не открываются, то первым делом проверьте ассоциации файлов, я об этом подробно рассказывал, советую посмотреть, там смысл в том, что вы явным образом указываете каким приложением открывать нужный тип файлов. Для примера, выбираете Exel и задаете, что его нужно использовать по умолчанию.

Либо через правый клик по нужному файлу, выбрать «Открыть с помощью’

Указываем нужную программу, в примере я открыл файл .docx для него соответствует Word 2016.
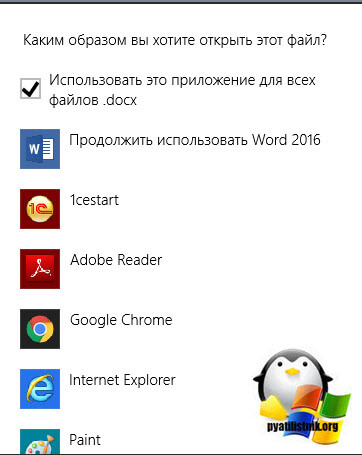
- Если вам это не помогло, и исчезнувшие значки Microsoft Office у вас не появились, но файлы открываются нужными приложениями, то вам должен в 90% случаев помочь метод связанный с реестром Windows.
Эта ветка отвечает за ассоциации файлов с конкретными программами, а так же за отображаемые значки. Я в своем примере выбираю файлы формата .docx, у вас в правой части окна редактора реестра, будет такой параметр «По умолчанию», в нормальной ситуации там будет значение Word.Document.12 для 2013 или 2016 Microsoft Office, для 2010 Word.Document.8. Если будет значение docx_auto_file, то для правильного отображения и восстановления значка поставьте значение Word.Document.12 или Word.Document.8.
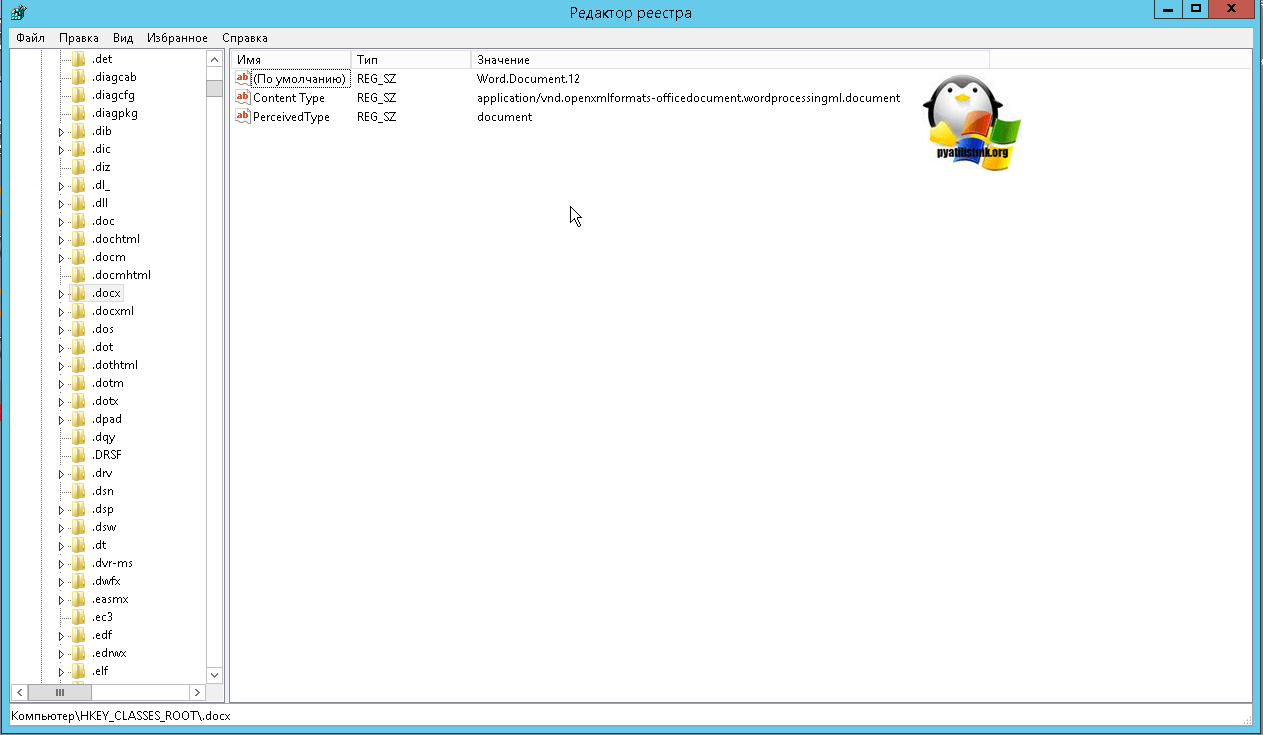
Теперь когда вы выяснили какое значение у вас для нужного расширения, у меня напомню это Word.Document.12, то ниже оставаясь в ветке реестра HKEY_CLASSES_ROOT, находим папку с данным именем (Word.Document.12).
Далее в Word.Document.12, вы находите папку DefaultIcon (она отвечает за стандартный значок). У вас в правой частb будет значение «По умолчанию» и вот значение у него должно быть в виде пути до файла с иконкой. По умолчанию это C:Program FilesMicrosoft Officeрелиз офиса файлы xlicon.exe, ppiicon.exe, wordicon.exe.
Посмотрите какой у вас путь, у меня это был C:Windowsinstaller<90140000-0011-0000-0000-0000000FF1CE>wordicon.exe,1 
Делаем вот, что пробуем пройти по пути C:Windowsinstaller<90140000-0011-0000-0000-0000000FF1CE> у меня этой папки не существовало, а была только папка installer. Создаем в ней папку со значением в скобках. Далее в этой папке должен быть файл Wordicon.exe. Если его у вас нет, то тут для того, чтобы восстановить исчезнувшие значки Microsoft Office, нужно либо через поиск на диск C: его найти, либо скачать его с другого компьютера с таким же офисным пакетом.

В итоге моя папка <90140000-0011-0000-0000-0000000FF1CE>стала выглядеть вот так и после перезагрузки либо сервера, либо службы «Проводник» все исчезнувшие значки у меня появились. Аналогично этому метод, вы можете восстановить любой значок у любого приложения, главное понять, что ассоциируется в HKEY_CLASSES_ROOT с нужным расширением.

- Как я и писал выше, данные методы помогают в 95% случаев, но если вам это не помогло, то вы можете решить проблему с пропавшими значками на файлах Microsoft Office, путем попытки восстановить офисный пакет, для этого откройте панель управления, перейдите в пункт «Программы и компоненты». Выбираем ваш пакет и в самов верху нажмите кнопку «Изменить»

У вас появится возможность восстановить Microsoft Office, данная процедура проверяет целостность всех файлов и их ассоциаций с нужными форматами, в итоге если у вас исчез значок с файлов, данный метод может помочь. Сама процедура занимает несколько минут. перезагрузитесь после процедуры.

- Еще одним дополнительным методом будет очистка кэша значков в Windows, про это я уже писал подробно, тут лишь напомню команды для очистки. Открываете командную строку от имени администратора, это обязательно или Power shell и вводите по очереди данные команды:
Иконки word не отображаются
Вопрос
Такая проблемка образовалась. И в проводнике, и на рабочем столе все документы офиса (и, кстати, pdf-файлы) отображаются «белым листом», мелочь, но клиенту хочется, чтоб красиво. Подскажите как вылечить. Спасибо.
Moderator not found. Begin flame war ([Y]/[N])?
Ответы
Moderator not found. Begin flame war ([Y]/[N])?
Я разобрался в чем проблема, мне помогло следующие решение:
Отображение ярлыков задается параметрами реестра в ветке HKEY_ >
Не ищи Бога, не в камне, не в храме — ищи Бога внутри себя. Ищущий, да обрящет.
- Помечено в качестве ответа Александр Зайцев 22 ноября 2012 г. 5:23
Попробуйте удалить кэш иконок.
1. Запустите cmd от имени администратора
2. Завершите процесс проводника:
или в cmd командой
или
в меню пуск на пустом месте (возле кнопки завершения работы например) удерживая Ctrl и Shift нажмите правую кнопку мыши и выберите Выход из Проводника
3. Поочередно выполните следующие команды:
Не ищи Бога, не в камне, не в храме — ищи Бога внутри себя. Ищущий, да обрящет.
- Помечено в качестве ответа Александр Зайцев 25 декабря 2012 г. 4:52
Все ответы
Мнения, высказанные здесь, являются отражением моих личных взглядов, а не позиции корпорации Microsoft. Вся информация предоставляется «как есть» без каких-либо гарантий
Мнения, высказанные здесь, являются отражением моих личных взглядов, а не позиции корпорации Microsoft. Вся информация предоставляется «как есть» без каких-либо гарантий
Moderator not found. Begin flame war ([Y]/[N])?
Moderator not found. Begin flame war ([Y]/[N])?
Я разобрался в чем проблема, мне помогло следующие решение:
Отображение ярлыков задается параметрами реестра в ветке HKEY_ >
Не ищи Бога, не в камне, не в храме — ищи Бога внутри себя. Ищущий, да обрящет.
- Помечено в качестве ответа Александр Зайцев 22 ноября 2012 г. 5:23
Попробуйте удалить кэш иконок.
1. Запустите cmd от имени администратора
2. Завершите процесс проводника:
или в cmd командой
или
в меню пуск на пустом месте (возле кнопки завершения работы например) удерживая Ctrl и Shift нажмите правую кнопку мыши и выберите Выход из Проводника
3. Поочередно выполните следующие команды:
Не ищи Бога, не в камне, не в храме — ищи Бога внутри себя. Ищущий, да обрящет.
- Помечено в качестве ответа Александр Зайцев 25 декабря 2012 г. 4:52
Moderator not found. Begin flame war ([Y]/[N])?
Когда пропали иконки документов Microsoft Office
Продолжаем постигать тонкости внутреннего устройства операционных систем семейства Windows.
Иногда после установки Microsoft Office в Windows, начиная с версии Vista, могут пропасть иконки (значки) файлов. Подобную неприятность можно устроить себе и самостоятельно. В том числе и со значками других программ. Выглядит это следующим образом:
Как видите, здесь у нас пропали значки файлов MS Office и Adobe Acrobat (Adobe Reader). При это сами приложения успешно работают.
Интернет пестрит советами по чистке кэша иконок, однако нам требуется совсем не то. Причина кроется в том, что в современных ОС Windows иконки лежат не в самом исполняемом файле приложения, а в специальной папке %WINDIR%Installer (где %WINDIR% — каталог, в котором установлена Windows).
Таким образом, чаще всего значки файлов лежат по адресу C:WindowsInstaller.
Стоит добавить, что папка эта скрыта, поэтому нам нужно включить в настройках системы отображение скрытых файлов и папок. Делается это в Панели управления через Параметры папок.
Включаем отображение скрытых файлов
На вкладке Вид снимаем галочку возле пункта «Скрывать защищенные системные файлы» и отмечаем пункт «Показывать скрытые файлы, папки и диски».
Теперь будьте осторожны, дабы не удалить лишнего!
Итак, содержимое этой папки выглядит примерно так:
Именно в эти каталоги Windows складывает необходимые ей файлы при установке программ. Удалять их я крайне не рекомендую.
Скорее всего, раз у нас не отображаются значки некоторых файлов, то нужный нам каталог отсутствует. Попробуем понять о каком каталоге идет речь в случае с Microsoft Office.
Для этого откроем редактор реестра.
Для начала найдем расширение, для которого не отображается иконка. Все они лежат HKEY_CLASSES_ROOT. Возьмем, к примеру расширение .doc. Нас интересуется параметр по умолчанию и его значение. В данном случае Word.Document.8.
Теперь мы знаем, что искать дальше. Параметр Word.Document.8 лежит по тому же адресу HKEY_CLASSES_ROOT. Находим его там и смотрим, что лежит в DefaultIcon.
Как видите, значение явно указывает нам на папку Installer. Папка с длинным именем в фигурных скобках и есть искомый каталог. Если он у вас отсутствует, то его можно перенести с любого компьютера с той же версий Microsoft Office. Каталог для Office 2010 я сразу выложу здесь. Имя каталога зависит от версии Office. Например, для MS Office 2010 оно может быть:
В любом случае, подкорректируйте название каталога в соответствии с параметром реестра.
После перезагрузки иконки файлов должны вернуться. Аналогичным путём можно вернуть значки файлов любых других приложений: смотрим нужное расширение файла в реестре → находим нужный параметр → смотрим, в каком каталоге должны лежать значки.