
Word 2016 Word 2016 for Mac Word 2013 Word 2010 Word for Mac 2011 More…Less
You can have Word hyphenate your text automatically as you type your text, or later, in one pass. You can also use manual hyphenation to have Word make hyphenation suggestions. Automatic hyphenation is quicker and easier, although manual hyphenation provides more control.
Do any of the following:.
-
Click where you want to insert a nonbreaking hyphen.
-
Press Ctrl+Shift+Hyphen .
-
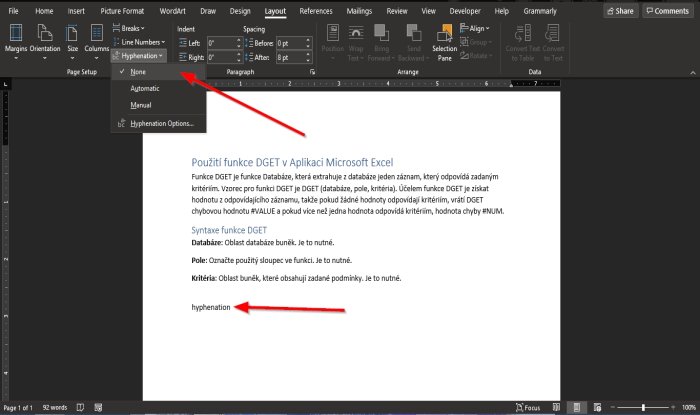
On the Layout tab, click the arrow next to Hyphenation .
-
Select Automatic.
-
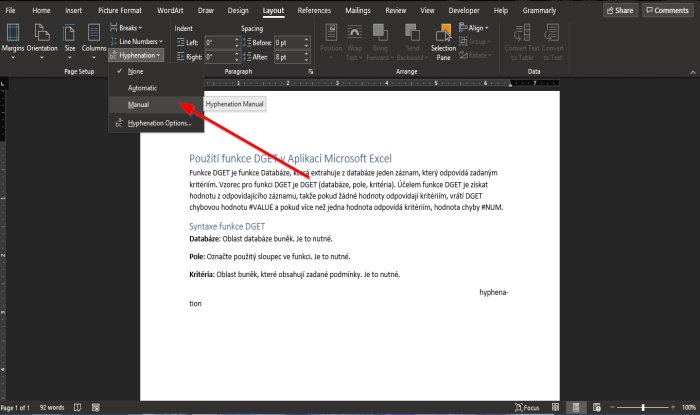
On the Layout tab, click the arrow next to Hyphenation .
-
Select Manual.
Word identifies each hyphenation possibility in turn.
-
In the Manual Hyphenation dialog box, click the hyphenation location that you want, and then click Yes.
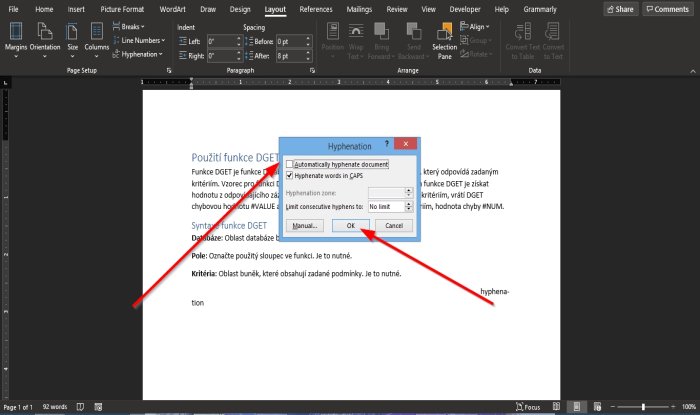
You can limit the number of consecutive hyphens.
-
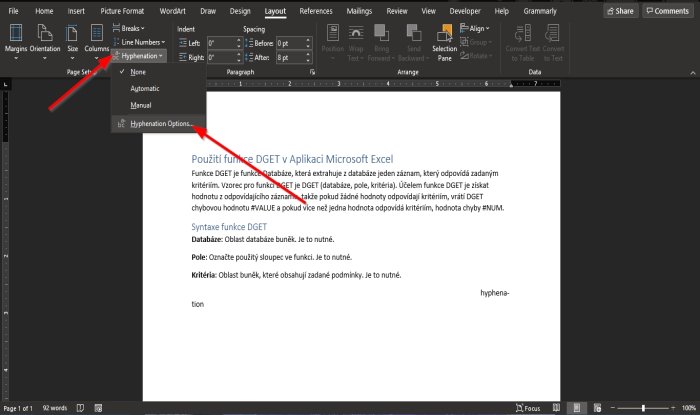
On the Layout tab, click the arrow next to Hyphenation .
-
Select Hyphenation Options.
-
In the Limit consecutive hyphens box, type the maximum number, and then click OK.
-
Select the text.
-
On the Home tab, expand the Paragraph group.
-
In the Paragraph dialog box, select the Line and Page Breaks tab.
-
Under Formatting exceptions, select the Don’t hyphenate check box.
You can control the number of hyphens in your document by adjusting the margin width.
-
On the Layout tab, click Margins .
-
Choose one of the preset margin widths, or choose Custom Margins and then enter Top, Bottom, Left, and Right margin widths.
-
Click OK.
See also
Change the line spacing in Word
Set page margins in Word
Keyboard shortcuts in Word
-
Click where you want to insert a nonbreaking hyphen.
-
Press Command+Shift+Hyphen .
Tips:
-
To insert an en dash (–), press Option+Hyphen .
-
To insert an em dash (—) instead of double-hyphens, press Shift+Option+Hyphen .
-
-
On the Tools menu, click Hyphenation.
-
Select the Automatically hyphenate document check box.
-
In the Hyphenation zone box, enter the amount of space to leave between the end of the last word in a line and the right margin.
-
In the Limit consecutive hyphens to box, enter the number of consecutive lines that can be hyphenated.
Tips:
-
To reduce the number of hyphens, make the hyphenation zone wider.
-
To reduce the raggedness of the right margin, make the hyphenation zone narrower.
-
-
Select the text that you want to hyphenate.
-
On the Tools menu, click Hyphenation.
-
Click Manual.
Word identifies each hyphenation possibility in turn.
-
In the Hyphenate at box, click the hyphenation location that you want.
-
Make sure that no text is selected.
-
On the Tools menu, click Hyphenation.
-
Click Manual.
Word identifies each hyphenation possibility in turn.
-
In the Hyphenate at box, click the hyphenation location that you want.
See also
Change the line spacing in Word
Keyboard shortcuts in Word
Need more help?
Want more options?
Explore subscription benefits, browse training courses, learn how to secure your device, and more.
Communities help you ask and answer questions, give feedback, and hear from experts with rich knowledge.
In this post, we’ll look at how (and when) to use the hyphenation options in Microsoft Word. These can be very useful for making text look neat on the page, especially if you’re having trouble with the regular formatting options and justified text. Read on below to find out how this works.
What Is Hyphenation?
When we refer to “hyphenation in Microsoft Word,” we mean something more than just using hyphenated words correctly in your writing. In this case, hyphenation is about how text looks on the page.
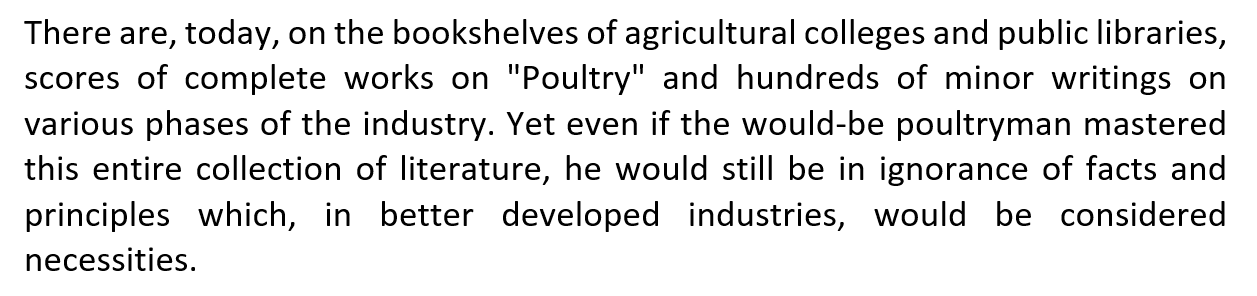
In particular, it helps you ensure that text is presented in neat, regular blocks. You would usually use justified text to achieve this. Sometimes, though, justifying text leaves you with too much space between words, especially when the final line is short, such as in the image below:
One way around this would be to edit the text. But if you don’t want to change what you’ve written, you can switch on the hyphenation in Microsoft Word. This will add hyphens between syllables in longer words at the end of lines, fixing the problem caused by justifying the text:

If you need to do this in a document, check out our guide below.
Hyphenation Options in Microsoft Word for Windows
On a Windows machine, to switch on automatic hyphenation:
- Go to the Layout tab on the main ribbon.
- In the Page Setup section, click Hyphenation.
- Select Automatic from the dropdown menu.
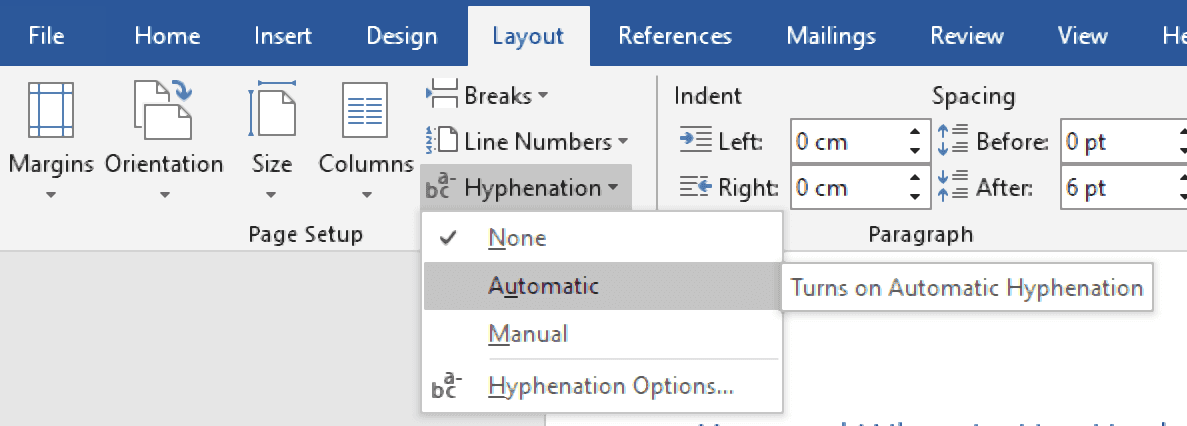
This will automatically apply hyphenation throughout the document.
Find this useful?
Subscribe to our newsletter and get writing tips from our editors straight to your inbox.
For more control over what is hyphenated, select Manual from the menu. Word will then scan the document for problem words. If it finds one, a new window will pop up, letting you select where to hyphenate it.
You can also select Hyphenation Options, where you can:
- Select whether to hyphenate words written in ALL CAPS.
- Limit the number of consecutive lines that end with a hyphen.
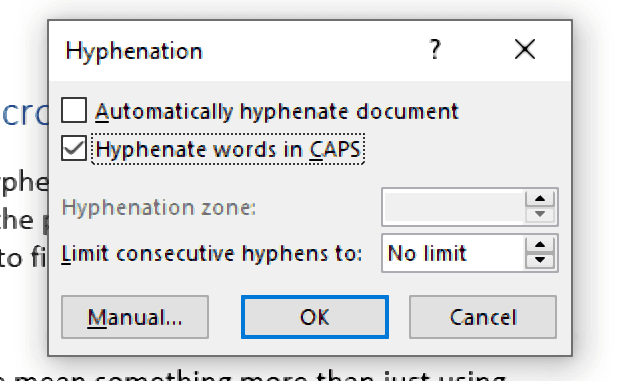
The Hyphenation zone option here sets the space between the last word on a line and the right margin. This does not work with the DOCX file format, though, so you will need to use the DOC format to adjust this.
Hyphenation Options in Microsoft Word for Mac
If you’re using Microsoft Word for Mac, you’ll need to:
- Go to the Tools menu.
- Select the Automatically hyphenate document check box.
- Under Hyphenation zone, enter the space to leave between the last word and right margin (a larger hyphenation zone will mean fewer hyphens).
- For the Limit consecutive hyphens to option, enter the maximum number of lines in a row to hyphenate.
Once you’ve done this, you should have a neatly formatted document. And as with Word for Windows, you can also select Manual if you want to apply hyphenation manually, checking each problem word in turn.
If Hyphenation Doesn’t Work…
If nothing changes when you turn on hyphenation in a document, you may have to change the settings in the Paragraph dialog box. To do this:
- Select the text you want to hyphenate.
- Open the Paragraph dialog box (e.g., by clicking the small arrow in the bottom right of the Paragraph section of the Home tab).
- Go to the Lines and Breaks tab.
- Under Formatting exceptions, find Don’t hyphenate. This stops text from being hyphenated. To make the hyphenation work, then, deselect it.
- Click OK to save your settings.

Once this setting it turned off, the hyphenation previously selected should be applied. Of course, you can also use the Don’t hyphenate option to stop text in a document from being hyphenated if preferred.
Expert Proofreading Services
If you’d like any extra help making sure your writing is always clear, our proofreading services might be just what you need! Upload a sample document for free today to find out more.
You’ve reached the end of a line but are still halfway through typing a word. This can lead to a large gap at the end of the line in a Word document. Or if your text is formatted as justified, large gaps can appear between the words if syllables are not separated at the end of the lines.
Hyphenation in Word is a handy way to separate words at the end of lines in a linguistically correct manner, and to avoid such problems. It can be turned on and off as desired. When deactivated, words are not separated, but a new line is started for words which are too long. With automatic hyphenation enabled in Word, words at the end of lines are broken in grammatically correct places. We’ll show you how to use this feature, what individual settings are available, and which advantages hyphenation provides you with in Word.
Contents
- Hyphenation in Word for Windows: How to activate and customize the feature
- Enable automatic hyphenation in Word
- Exclude word hyphenation in certain paragraphs
- Individually adjust word hyphenation
- Insert protected hyphen by shortcut
- Hyphenation in Word for Mac
- Turn on and adjust manual hyphenation in Word for Mac
- Individually separate text and syllables in Word for Mac
$1 Domain Names
Register great TLDs for less than $1 for the first year.
Why wait? Grab your favorite domain name today!
![]() Matching email
Matching email
![]() SSL certificate
SSL certificate
![]() 24/7/365 support
24/7/365 support
Hyphenation in Word for Windows: How to activate and customize the feature
If hyphenation is available in a Word document, you have the option to use the function for the whole document or to exclude the separation in certain paragraphs. You can even define specificationsmanually.
Enable automatic hyphenation in Word
In Word versions from 2007, hyphenation is disabled in the default settings. You can activate it by doing the following:
- Click on Layout or Page Layout, depending on your version of Word.
- In the Page Setup area, select“Hyphenation”.
- Set a check mark next to “Automatic”.
Automatic hyphenation is now enabled for the entire document.
Exclude word hyphenation in certain paragraphs
If you want to exclude word hyphenation in certain paragraphs, you can do so as follows:
- Select the paragraph in which you want to exclude hyphenation.
- Click on the right mouse button to open a drop-down menu.
- Click on the menu item “Paragraph”.
- Go to the tab “Line and Page Breaks”.
- Put a check mark in the field “Don’t hyphenate” and confirm with OK.
Alternative procedure in some Word versions:
- Select the text.
- Open the “Start” tab and then click on the small icon at the bottom right near “Paragraph”.
- Select the “Lines and Page Breaks” tab.
- Activate the box “Don’t hyphenate” under “Format Exceptions” (or “Formatting Exceptions”).
Individually adjust word hyphenation
In addition to this approach, there are other ways to customize hyphenation in Word:
- Click on the arrow next to “Hyphenation” in the “Layout” tab.
- Select “Manual”. All possible hyphenation options will be recognized.
- In the “Manual hyphenation” dialog box you can set individual breakpoints and finally confirm them with “OK”.
There is an alternative procedure in older versions of Word:
- First, proceed as with automatic hyphenation by going to the “Layout” tab, and clicking on “Hyphenation” under “Page setup”.
- Now, however, select “Hyphenation Options”.
- In the newly opened window, you can set the maximum number of hyphens that may follow each other. To do this, go via “Layout” and “Hyphenation” to “Hyphen Options”. There you can specify the desired maximum number of consecutive hyphens in the field “Limit consecutive hyphens to”.
- In addition, you can also use this menu to see all the words in your document that have been separated so far and reject hyphenation.
Insert protected hyphen by shortcut
In connection with hyphens, you have the additional option to set protected hyphens. You can do this by highlighting a passage in the text and then pressing the key combination [Ctrl] + [Shift] + [hyphen].
Hyphenation in Word for Mac
As in Word for PCs, automatic hyphenation has been disabled in Word for Mac since 2007. On the Mac, turn it back on by clicking “Layout” and then in the tab “Text Layout” select the point“Hyphenation”. Finally, check “Automatic Hyphenation” and confirm with OK.
Turn on and adjust manual hyphenation in Word for Mac
Hyphenation in Word can also be set up manually on Apple computers. When doing this, there must not be any text area highlighted throughout the whole document. In the menu “Extras”, click on “Hyphenation” and select “Manual”. Word now recognizes all possible hyphenation scenarios, and you can select the desired positions in the “Separation Proposal” field.
If you just want to manually set up hyphenation for an area in the document, simply highlight the appropriate text section before performing the above steps.
Individually separate text and syllables in Word for Mac
To separate text and syllables in Word for Mac using individual settings, follow these steps:
- From the “Layout” menu, select “HyphenationOptions”.
- Check the box next to “Automatically hyphenate document”.
- Now you can define the distance you want between the last word ending and the right line edge in the field “Hyphenation zone”.
- You can also go to “Limit consecutive hyphens to” and specify how many consecutive lines can end with hyphens.
HiDrive Cloud Storage with IONOS!
Based in Europe, HiDrive secures your data in the cloud so you can easily access it from any device!
![]() Highly secure
Highly secure
![]() Shared access
Shared access
![]() Available anywhere
Available anywhere

Word documents: how to save as a PDF file
If you want to send a Word document or prepare it for printing, it’s recommended you know how to save it as a PDF file. This way, you can be sure that the formatting of your document won’t change and that others will not be able to edit it without permission. For simple conversion tasks, the save function in Word is often sufficient. However, there are some dedicated tools which offer a wider…
Word documents: how to save as a PDF file

How to create a table of contents in Word
Microsoft Word makes it easy to create smart text documents with its diverse template styles. This includes pre-formatted table of contents templates. With our illustrated, step-by-step guide, we’ll show you how to find the templates and how to customize the design.
How to create a table of contents in Word

How to create a bibliography in Word
Anyone writing a paper for college or school will need to use citations—and they shouldn’t forget the bibliography either. In principle, creating a bibliography in Microsoft Word is not too difficult. If you make a database with all your references, you’ll only need a few clicks to generate references and a bibliography.
How to create a bibliography in Word
Hyphenation in MS Word is used to break the last word of any line beyond the edge of the document and correct it by distributing equally to the current line and its bottom line.
Doing so will give clear and uniform spacing for the text of the document beautifully. There is no need to justify the text if it is in the format.
Table of Contents
- 2 Ways to Hyphenate Text in Word
- 1. Automatic
- 2. Manually Hyphenating Text
- Options:
- Automatically Hyphenate Document:
- Words in CAPS:
- Hyphenation Zone:
- Limit Consecutive Hyphens to:
2 Ways to Hyphenate Text in Word
There are two methods 1. Automatic 2. Manual.
1. Automatic
Make sure there is some text in your document.
Go to the “Layout” tab, then click “Hyphenation” in the “Page Setup” group, and then select automatically from the options.

2. Manually Hyphenating Text
Make sure there is some text in your document.
Go to the “Layout” tab, then click “Hyphenation” in the “Page Setup” group, and then select “Manual”.
As soon as you click manual, a prompt popup box will open
In the dialogue box, you are prompted to select whether the text should be hypnotized by the “Yes” or “No” options from the beginning.

If you select “Yes” the text will be hyphenated.
If you select “No” the text will not be hyphenated and moves forward to suggest the next.
After completion of it, a done prompt dialogue will open as in the picture below.
Options:
Before hyphenating document text, you can adjust zones, and “Limit” or “No limit” are the consecutive hyphens and you may or may not hyphenate words in capital letters based on your requirement.

Automatically Hyphenate Document:
Select this option to automatically hyphenate text in your document after choosing all the options in the dialogue box.

Words in CAPS:
If “Hyphenate Words in CAPS” is selected in the dialogue box, all the CAPITAL words are to be hyphenated. If you don’t want just uncheck this option.

Hyphenation Zone:
It means the distance between the right margin of a page and the last word in a sentence. It measures space in inches. A close word is to be adjusted to the right margin before being hyphenated.

Limit Consecutive Hyphens to:

You can “Limit” or “No limit” in the hyphenation in a paragraph. If you don’t want the limit, then leave the default option “No limit”. Or you can change numbers for limitation by selecting the up or down arrow.
What are the Hyphenated words meaning?
It means to break the last word of any line beyond the edge of the document and correct it by distributing the word to the current line edge and the bottom line edge. Doing so will give clear and uniform spacing for the text of the document beautifully. There is no need to justify the text if it is hyphenated.
What is Automatic Hyphenation?
If you choose this option, the content in your document will be automatically hyphenated.
How to Capitalize hyphenated words?
Double-click the hyphenated word to select it, then press and hold down the “Shift key” and press “F3” two times (Shift + F3).
How do to date hyphens?
Simply, select an automatic hyphen to update all in a document.
How to find 50, 100, or 500 hyphenated words
There is no such tool or command in a word document.
How to Hyphen Multiple words
An automatic hyphen is used to hyphen multiple words.
How do hyphen after a specific letter?
There is no such tool or command in a word document.
Download PC Repair Tool to quickly find & fix Windows errors automatically
There is a feature in Word that can make your text looks neat on your page, especially if you have challenges justifying your text. Hyphenation is needed when Word wants space, so it runs down to the next line. When Hyphenation is turn on Word, hyphenate it instead, the Hyphenation feature allows Word to insert line breaks and hyphens within words to attain a more consistent line length.
Word breaks lines between words and after punctuation when the Automatic Hyphenation feature is turned off.
Hyphenation is a feature in Microsoft Word that creates consistent spacing and saves space in your document. The Hyphenation feature offers options such as Automatic, which allows Word to hyphenate the text while you type and is quicker; Manual allows Word to make Hyphenation suggestion and provide more control and The Hyphenation Options change the behavior of the selected text.
In this tutorial, we will explain how to:
-
- How to turn on Automatic Hyphenation to break lines and hyphenate words.
- How to turn off the Automatic Hyphenation.
- How to use Manual to select hyphenate words in a document.
- How to control the Hyphenation settings.
1] Turn on Automatic Hyphenation to break lines and hyphenate words in Word
Open Microsoft Word.

On the Layout tab in the Page Setup group, click the Hyphenation button.
In the drop-down list, click Automatic.
Read: How to Change Background Color and Add Drop Caps in Word.
2] Turn off the Automatic Hyphenation in Word
On the Layout tab in the Page Setup group, click the Hyphenation button.
In the drop-down list, click None.
Read: How to configure Grammar and Style Settings in Word.
3] Use Manual to select hyphenate words in a Word document
On the Layout tab in the Page Setup group, click the Hyphenation button.
In the drop-down list, click Manual.
A Manual Hyphenation dialog box will appear.
For each of the Hyphenation suggested, click Yes or No.
Read: How to save Table Templates in Microsoft Word.
4] How to control the Hyphenation settings in Word
On the Layout tab in the Page Setup group, click the Hyphenation button.
In the drop-down list, click Hyphenation Option.
A Hyphenation dialog box will pop up.
Inside the dialog box, you can choose to Hyphenate document Automatically, Hyphenate words in CAPS,
The Hyphenation zone is the maximum distance of a hyphen from a document margin, and then choose an option from the Limit consecutive hyphens to the list box.
Then OK.
We hope this tutorial helps you understand how to control the Hyphenation feature in Word.
Read next: How to wrap Text around a Picture in a text box in Word.

Shantel has studied Data Operations, Records Management, and Computer Information Systems. She is quite proficient in using Office software. Her goal is to become a Database Administrator or a System Administrator.