
Find and replace text

-
Go to Home > Replace.
-
Enter the word or phrase you want to replace in Find what.
-
Enter your new text in Replace with.
-
Choose Replace All to change all occurrences of the word or phrase. Or, select Find Next until you find the one you want to update, and then choose Replace.
-
To specify only upper or lowercase in your search, select More > Match case. There are several other ways to search in this menu.
For other options, see Find and replace text
Find and replace basic text
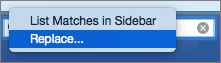
In the upper-right corner of the document, in the search box  , type the word or phrase that you want to find, and Word will highlight all instances of the word or phrase throughout the document.
To replace found text:
-
Select the magnifying glass, and then select Replace.

-
In the Replace With box, type the replacement text.
-
Select Replace All or Replace.
Tips:
-
You can also open the basic Find and Replace pane with the keyboard shortcut CONTROL + H.
-
When you replace text, it’s a good idea to select Replace instead of Replace All. That way you can review each item before replacing it.
-
You can find text with special formatting, such as bold or highlight, by using the Format menu.
-
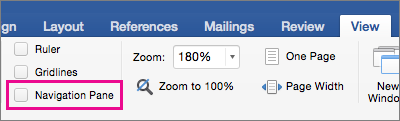
Select View > Navigation Pane.
-
In the Navigation Pane, select the magnifying glass.
-
Select Settings
, and then select Advanced Find & Replace.
Notes:
-
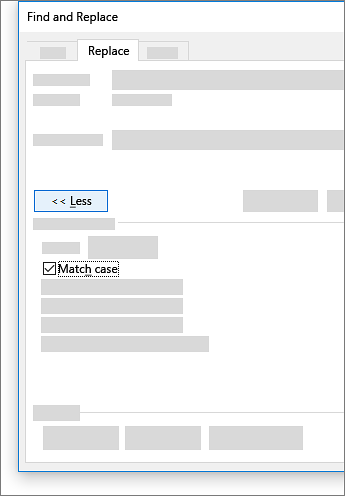
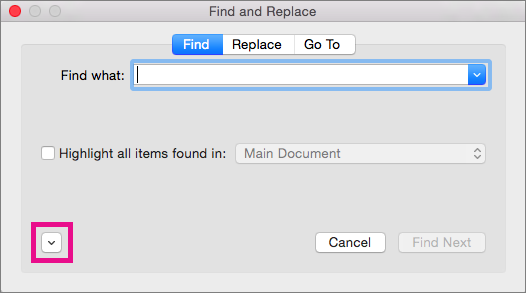
Select the arrow at the bottom of the Find and Replace dialog box to show all options.
-
-
-
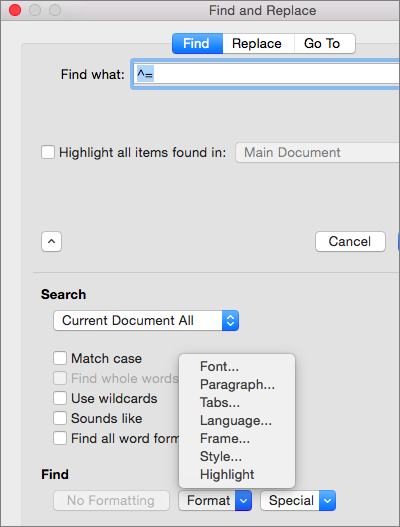
On the Format menu, select the option that you want.
If a second dialog box opens, select the options that you want, and then select OK.
-
In the Find and Replace dialog box, select Find Next or Find All.
 , and then select Advanced Find & Replace.
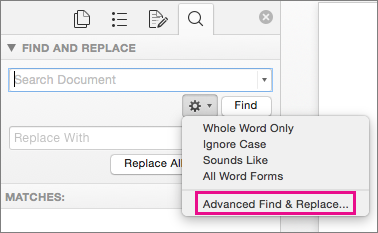
You can find and replace text with special formatting, such as bold or highlight, by using the Format menu.
-
Select View > Navigation Pane.
-
In the Navigation Pane, select the magnifying glass.
-
Select Settings
, and then select Advanced Find & Replace.
-
At the top of the dialog box, select Replace.
Notes:
-
Select the arrow at the bottom of the Find and Replace dialog box to show all options.
-
-
-
On the Find what box, type the text that you want to find.
-
On the Format menu, select the formatting that you want to find.
If a second dialog box opens, select the options that you want, and then select OK.
-
Select in the box next to Replace with.
-
On the Format menu, select the replacement formatting. If a second dialog box appears, select the formats that you want, and then select OK.
-
Select Replace, Replace All, or Find Next.
-
Select View > Navigation Pane.
-
In the Navigation Pane, select the magnifying glass.
-
Select Settings
, and then select Advanced Find & Replace.
Notes:
-
Select the arrow at the bottom of the Find and Replace dialog box to show all options.
-
-
-
On the Special menu, select the special character that you want to find.
-
Select Find Next.

-
Select View > Navigation Pane.
-
In the Navigation Pane, select the magnifying glass.
-
Select Settings
, and then select Advanced Find & Replace.
Notes:
-
Select the arrow at the bottom of the Find and Replace dialog box to show all options.
-
-
-
At the top of the Find and Replace dialog box, select Replace and then select in the Find What box, but don’t type anything there. Later, when you select a special character, Word will automatically put the character code in the box for you.
Note: Select the arrow at the bottom of the Find and Replace dialog box to show all options.
-
On the Special menu, select the special character that you want to find.
-
Select in the Replace with box.
-
On the Special menu, select the special character that you want to use as a replacement.
-
Select Replace or Find Next.
-
Select View > Navigation Pane.
-
In the Navigation Pane, select the magnifying glass.
-
Select Settings
, and then select Advanced Find & Replace.
-
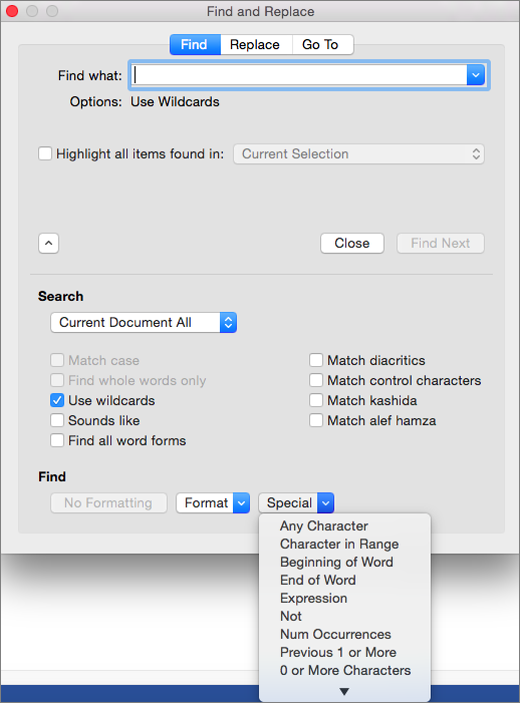
Select the Use wildcards check box.
If you don’t see the Use wildcards check box, select
. -
Select the Special menu, select a wildcard character, and then type any additional text in the Find what box.
-
Select Find Next.
Tips:
-
To cancel a search in progress, press
+ PERIOD. -
You can also enter a wildcard character directly in the Find what box instead of selecting an item from the Special pop-up menu.
-
To search for a character that’s defined as a wildcard character, type a backslash () before the character. For example, type ? to find a question mark.
-
You can use parentheses to group the wildcard characters and text and to indicate the order of evaluation. For example, search for <(pre)*(ed)> to find «presorted» and «prevented.»
-
You can search for an expression and use the n wildcard character to replace the search string with the rearranged expression. For example, type (Newman) (Belinda) in the Find what box and 2 1 in the Replace with box. Word will find «Newman Belinda» and replace it with «Belinda Newman.»
-
-
To replace found text:
-
Select the Replace tab, and then select the Replace with box.
-
Select Special, select a wildcard character, and then type any additional text in the Replace with box.
-
Select Replace All, Replace, or Find Next.
Tip: When you replace text, it’s a good idea to select Replace instead of Replace All. That way you can confirm each replacement to make sure that it’s correct.
-
 .
.
 + PERIOD.
You can refine a search by using any of the following wildcard characters.
|
To find |
Use this |
For example |
|---|---|---|
|
Any single character |
? |
s?t finds «sat» and «set.» |
|
Any string of characters |
* |
s*d finds «sad» and «started.» |
|
One of the specified characters |
[ ] |
w[io]n finds «win» and «won.» |
|
Any single character in this range |
[-] |
[r-t]ight finds «right» and «sight» and «tight.» Ranges must be in ascending order. |
|
Any single character except the characters inside the brackets |
[!] |
m[!a]st finds «mist» and «most» but not «mast.» |
|
Any single character except characters in the range inside the brackets |
[!x-z] |
t[!a-m]ck finds «tock» and «tuck» but not «tack» or «tick.» Ranges must be in ascending order. |
|
Exactly n occurrences of a character or expression |
{ n} |
fe{2}d finds «feed» but not «fed.» |
|
At least n occurrences of a character or expression |
{ n,} |
fe{1,}d finds «fed» and «feed.» |
|
A range of occurrences of a character or expression |
{ n, n} |
10{1,3} finds «10,» «100,» and «1000.» |
|
One or more occurrences of a character or expression |
@ |
lo@t finds «lot» and «loot.» |
|
The beginning of a word |
< |
<(inter) finds «interesting» and «intercept» but not «splintered.» |
|
The end of a word |
> |
(in)> finds «in» and «within,» but not «interesting.» |
Word for the web lets you find and replace basic text. You can match case or fine whole words only. For more varied options, open your document in Word for the desktop.
Need more help?
To Replace the Highlight; Open the Find and Replace dialog (Ctrl H) and click the More button. Click the Replace All button and Word will replace all your highlighting.
Contents
- 1 Can you select all highlighted text in Word?
- 2 How do I change the color of multiple words in Word?
- 3 How do I find and replace in highlighted text?
- 4 What is the shortcut to change the highlight in Word?
- 5 How do I select all text without dragging?
- 6 How do I copy a lot of text at once?
- 7 How do you select all text color in Word?
- 8 How do I highlight a recurring Word in Word?
- 9 How do I change the opacity of highlights in Word?
- 10 How do I change the default highlight color in Word?
- 11 Why can’t I remove highlighting in Word?
- 12 How do you Ctrl highlight?
- 13 What is the Ctrl B?
- 14 What is Ctrl cut?
- 15 How do I move highlighted text in Word without dragging?
- 16 How do you select multiple words at once?
- 17 How do I stop Word from selecting everything?
- 18 How do you have multiple clipboards?
- 19 Can you copy and paste multiple things at once?
- 20 How do you copy all words?
Can you select all highlighted text in Word?
You can select all highlighted text at once using the Find and Replace tool in Word. Press Ctrl + H.
How do I change the color of multiple words in Word?
Click the Font Color drop-down list and choose More Colors. Word displays the Colors dialog box. Make sure the Custom tab is displayed. Using the Red, Green, and Blue controls, specify the RGB values of the text you want to change.
How do I find and replace in highlighted text?
Highlighting Found Text
- Press Ctrl+H.
- Click the More button, if it is available.
- In the Find What box, enter the text you want to find and highlight.
- In the Replace With box, enter ^&.
- With the insertion point still in the Replace With box, click the Format button.
- Click the Highlight option.
What is the shortcut to change the highlight in Word?
Adding highlighting: Select the text you want to highlight, then press Ctrl+Alt+H. Removing highlighting: Select the highlighted text, then press Ctrl+Alt+H.
How do I select all text without dragging?
Click the “Select” drop-down menu in the Editing group on the ribbon and choose “Select All.” All of the body text on the pages will be highlighted. You can now format it, cut, copy, align the text and more. The keyboard shortcut “Ctrl-A” will accomplish the same result.
How do I copy a lot of text at once?
How to Copy and Paste Text from Multiple Locations in Microsoft…
- Select the block of text you want to copy.
- Press Ctrl+F3.
- Repeat the two steps above for each additional block of text to copy.
- Go to the document or location where you want to paste all of the text.
- Press Ctrl+Shift+F3.
How do you select all text color in Word?
MICROSOFT WORD
- Highlight some text with the formatting you want to change.
- Go to the Editing group and click on Select.
- From the dropdown list choose Select all text with similar formatting.
- Then you can change all the selected text as you wish.
How do I highlight a recurring Word in Word?
Click Find in the Editing group or press Ctrl+F to open the Navigation pane. From the text dropdown, choose Options and then check the Highlight All setting (Figure B), and click OK. In the text control, enter video and press Enter. Word will automatically highlight all instances (Figure C).
How do I change the opacity of highlights in Word?
On the Picture Format ribbon, open the Format Picture pane and set the transparency to 45% (you can experiment with the percentage). Drag the picture to the desired location and size.
How do I change the default highlight color in Word?
The default color for highlighting is yellow, but you can change the color if you click the down-arrow to the right of the Highlight tool on the Formatting toolbar. Word allows you to pick any of fifteen different colors. The colors used for highlighting cannot be changed beyond what is offered in the fifteen colors.
Why can’t I remove highlighting in Word?
What appears to be highlighted text might actually be character shading.As such, try removing the highlighting by selecting the text and clicking the Clear Formatting option on the Home tab. Users can also select the text and press Ctrl + Space to remove its formatting.
How do you Ctrl highlight?
If you want to highlight one word at a time, press Ctrl while holding down Shift , and then press the Left arrow or Right arrow . If you want to highlight a whole line of text, move your cursor to the start of the line, hold the Shift key, and then press the Down arrow .
What is the Ctrl B?
Alternatively referred to as Control B and C-b, Ctrl+B is a shortcut key most often used to bold and un-bold text. Tip. On Apple computers, the shortcut to bold is the Command key+B or Command key+Shift+B keys.
What is Ctrl cut?
Keyboard Command: Control (Ctrl) + X. Remember “X” as. The Cut command is used to remove text or images from the screen you are currently working on. “CUT” moves the information to your virtual clipboard, where it is stored until it is overwritten by the next “cut” or “copy” command.
How do I move highlighted text in Word without dragging?
Hold down the Ctrl key and right-click where you want the selected text moved.
How do you select multiple words at once?
To select items that are not next to each other, follow these steps:
- Select the first item that you want. For example, select some text.
- Press and hold CTRL.
- Select the next item that you want. Important Be sure to press and hold CTRL while you select the next item that you want to include in the selection.
How do I stop Word from selecting everything?
Go to File, Options, then Advanced. Look for the option When selecting, automatically select entire word (it is enabled by default). You can disable the ‘feature’ by deselecting it (checkbox).
How do you have multiple clipboards?
How it works: If you’re on the latest Insider build, you can activate the new clipboard by going to Settings > System > Clipboard, and then tap on ‘Save multiple items. ‘ once that’s done, you can press Win+V to access the clipboard, which shows up as a small pop up window.
Can you copy and paste multiple things at once?
Copy and paste multiple items using the Office Clipboard
Open the file that you want to copy items from. Select the first item that you want to copy, and press CTRL+C. Continue copying items from the same or other files until you have collected all of the items that you want.
How do you copy all words?
Press Ctrl + A on your keyboard to highlight all text in your document. Tip: You can also highlight your entire document by placing your mouse cursor in the left margin and then quickly clicking the left mouse button three times in a row. Press Ctrl + C to copy the entire highlighted selection.
How highlight in Word works
Learn how to highlight in Word, how to remove highlight / unhighlight in Word, find and replace highlight, etc.
In Word, you can highlight text on the screen much like you can highlight text on paper using a highlighter. In this article, you will find general information about how highlight in Word works. The basic information about highlight applies to both the built-in highlight functionality and the functionality of the DocTools HighlightManager add-in.
There is no difference between highlight added using the DocTools HighlightManager add-in and using the built-in highlight functionality in Word. The difference is that DocTools HighlightManager add-in makes the work much faster and more flexible.
15 available highlight colors
Word offers 15 highlight colors. For years, Word users have asked for more colors or the option to customize highlight colors, but so far with no luck.

Figure 1. Word highlight colors and their names.
Many of the 15 highlight colors available are too dark to use in most cases – for example, you can’t read black text on any of the darkest highlight colors.
Personally, I use yellow, bright green, turquoise and, in a few cases, red. The colors are rather glaring but I find they are the only ones that work.
Even if the Gray 25% is light enough to read the text, I don’t use it since it is impossible to distinguish it from selected text and from fields with field shading turned on.
In addition to the 15 highlight colors, there is a No Color which removes highlight.
Back to Table of Contents
How to show or hide highlight on screen and in print
- Highlight is neither font formatting nor paragraph formatting
- Highlight in Word documents is placed in its own layer that you can either show or hide
Even if it may look so, highlight in Word is not applied as font formatting or paragraph formatting like e.g. color shading. If you check the formatting of highlighted text, you will not see the highlight listed anywhere.
The display of highlight is managed via an option in Word:
- To show highlight both on the screen and in print, turn ON File > Options > Display > Show highlighter marks. See Figure 2 below.
- To hide highlight both on the screen and in print, turn OFF File > Options > Display > Show highlighter marks. See Figure 2 below.
Note that the Show highlighter marks setting is a global Word setting. It applies to all documents.
When you turn off Show highlighter marks, any highlight in documents will only be hidden, not removed. As soon as you turn on the setting, the highlight will appear again, if any. The highlight will also be visible if the document is opened on another computer with the setting turned on.
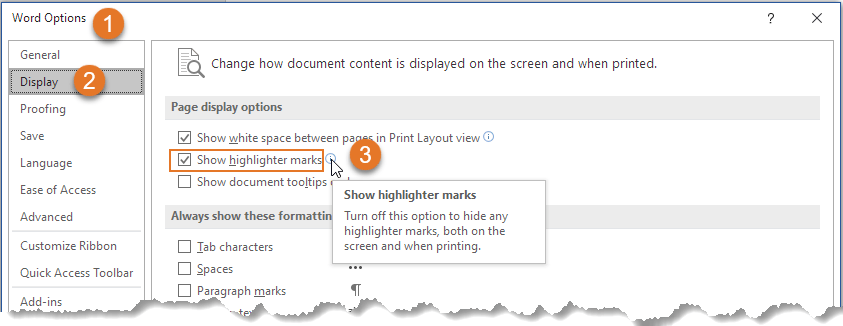
Figure 2. To show highlight on the screen and in print, turn on Show highlighter marks.
When you select a highlight color using the built-in functionality of Word, that color will be set as the default highlight color, i.e. the same color will be applied the next time you click the Text Highlight Color icon in the Home tab of the Ribbon or in the Mini Toolbar.
As opposed to the built-in functionality, the selection of a specific highlight color using the Apply Highlight command in the DocTools HighlightManager add-in will not affect your next highlight operation. The add-in lets you apply any highlight color with a click.
How to print without highlight
As explained above, you can turn highlight on and off, without removing the highlight from the document.
To print without highlight but keep the highlight in the document:
- Turn off display of highlight as explained above (see Figure 2).
- Print.
- Turn highlight on again, if you want.
In the DocTools HighlightManager add-in, you will find a command for quickly turning on and off the display of highlight instead of digging deep into the Word Options dialog box.
Highlight and track changes
Changing highlight in a document is not registered by track changes. Even if track changes is on, Word will not regard a highlight change as a revision.
The difference between highlight color and shading color
You should be aware of the difference between highlight and shading.
As mentioned above, the number of highlight colors is limited. On the other hand, you can apply any color of your choice via the Shading tools in Word. This may make users want to use shading instead of highlight in order to get access to more colors. However, the two types of coloring work in totally different ways.
As explained above, highlight in Word is neither font formatting nor paragraph formatting. The highlight lives in its own layer in Word and can be turned on or off for all content. The same is not possible with shading.
If you apply a shading color to content using a color from one of the Shading tools in Word or via the Borders and Shading dialog box, that color is applied as formatting of text, paragraphs, table cells or entire tables.
This means that the shading is applied as a characteristic or an attribute of the text, paragraph, table cell or table itself.
You can’t turn on and off shading for an entire document as you can with highlight. You can easily select all and set the shading to No Color. However, once you have removed the shading, you can’t easily apply it again if spread across the entire document. This means that it may not necessarily be a good idea to use shading as a substitute for highlight.
Highlight is often used as a temporary marking of content, e.g. during the editing process. Shading may more often be used as permanent formatting that is meant to remain in the finished document.
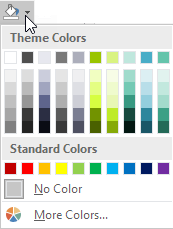
Figure 3. A color selected from a Shading palette is either font, paragraph, or table formatting.
A shading color you apply via a Shading palette or via the Borders and Shading dialog box is applied as one of the following types of formatting depending on the conditions and what you select:
- Font formatting applied to text
- Paragraph formatting applied to entire paragraph(s)
- Table cell formatting applied to entire table cell(s)
- Table formatting applied to entire table(s)
Back to Table of Contents
How to highlight in Word using the built-in functionality
You can apply highlight in different ways using the built-in functionality in Word. See METHODs 1-4 below. When you apply highlight to selected text in Word using the built-in methods described below, Word doesn’t retain the selection but collapses the selection so the insertion point is placed after the selection afterwards. Since you may often want to apply e.g. formatting to the same selection immediately after applying highlight, this is not always practical.
The DocTools HighlightManager add-in lets you decide whether or not to keep the selection after highlighting text. It can help you save time.
METHOD 1 – How to highlight selected text via the Ribbon
- Select the text to be highlighted.
- Select Home tab > click the arrow in Text Highlight Color icon and click the desired highlight color. The currently selected color works as the default highlight color and is shown in the icon. If you want to apply that color, you can just click the icon. (To remove highlight, select No Color).

Figure 4. The Text Highlight Color options in the Home tab in the Ribbon.
Back to Table of Contents
What is the default highlight color in Word?
The default highlight color in Word is the highlight color currently shown in the Text Highlight Color icon.
When you click one of the 15 colors or No Color, that color becomes the default highlight color.
The default highlight color will automatically be used by Word for the next highlight unless you select another color.
The DocTools HighlightManager add-in lets you use any highlight color without changing the default highlight color.
METHOD 2 – How to highlight selected text via the Mini Toolbar
If you have the Mini Toolbar enabled, you can also apply highlight via that toolbar:
- Select the text to be highlighted.
- In the Mini Toolbar that appears when you have selected text, click the arrow in the Text Highlight Color icon and click the desired highlight color. The currently selected color works as the default highlight color and is shown in the icon. If you want to apply that color, you can just click the icon. (To remove highlight, select No Color).
The highlight tools in the Mini Toolbar are identical to the ones on the Home tab in the Ribbon.
The Mini Toolbar only appears when you have selected text and if, at the same time, the option File > Options > General > Show Mini Toolbar on selection is turned on. See Figure 5 below.
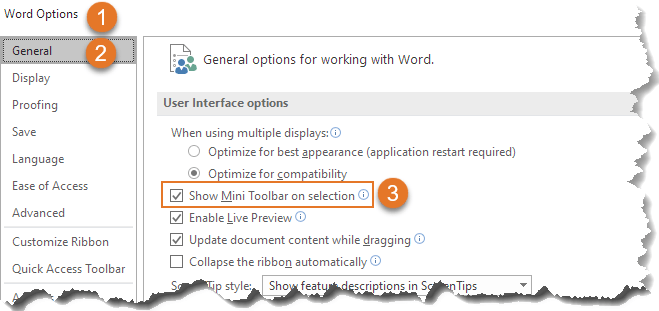
Figure 5 The Mini Toolbar is only shown if the Show Mini Toolbar on selection option is turned on.
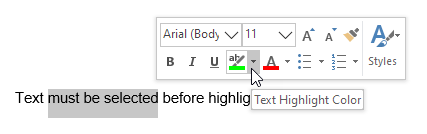
Figure 6. The Text Highlight Color options in the Mini Toolbar are the same as in the Home tab of the Ribbon.
METHOD 3 – How to highlight using a shortcut
Word has a default shortcut assigned to highlight:
- Alt+Ctrl+H
You can both apply highlight and remove highlight using the Alt-Ctrl-H shortcut. Note that this shortcut only works with the currently selected default highlight color so you still have to first make sure the desired color has been selected, either via the Home tab or the Mini Toolbar.
As opposed to how the Alt-Ctrl+H shortcut works, the DocTools HighlightManager add-in lets you assign shortcuts to each individual highlight color – customizable shortcuts have been assigned to the most useful highlight colors beforehand so they are ready for use at once. This means that the add-in makes it possible to apply any highlight color simply by pressing a keyboard shortcut without first switching color.
How the Alt+Ctrl+H shortcut works
You must select text before pressing the Alt+Ctrl+H shortcut. What happens when you press the shortcut depends on the situation. See the examples below:

Figure 7. No highlight applied to the selection beforehand.
EXAMPLE 1
If the selected text is not highlighted beforehand, Alt+Ctrl+H applies the highlight color that is currently selected as the default highlight color in Home tab > Text Highlight Color.
NOTE: If the currently selected default color is No Color, no highlight will be applied even if you press the shortcut.

Figure 8. Entire selection highlighted beforehand.
EXAMPLE 2
If the entire selected text is already highlighted (same color or mixed colors), Alt+Ctrl+H removes the highlight. This means that it works as a toggle: It adds or removes highlight depending of the selection.

Figure 9. The selected text is partly highlighted beforehand.
EXAMPLE 3
If the selected text is partly highlighted, i.e. some of the text is highlighted and other is not, Alt+Ctrl+H applies the highlight color that is currently selected as the default highlight color in Home tab > Text Highlight Color.
NOTE: If the currently selected default color is No Color, Alt+Ctrl+H removes highlight from the selection.
Back to Table of Contents
METHOD 4 – How to highlight without first selecting text
If you click the Text Highlight Color icon on the Home tab or in the Mini Toolbar without first selecting text, the cursor changes to the icon shown below (enlarged here). You can then highlight text by dragging across the text that is to be highlighted.
NOTE: If you drag across text that is already highlighted, the highlight will be removed.

Figure 10. Highlighter icon
To exit the highlighter mode, do one of the following:
Press the Escape key OR
Click the Text Highlight Color icon on the Home tab or in the Mini Toolbar OR
Select Stop Highlighting from the Text Highlight Color tools on the Home tab or in the Mini Toolbar.
Note that the DocTools HighlightManager add-in lets you apply any highlight color to a paragraph without first selecting the entire paragraph – you only need to press a shortcut.
How to unhighlight in Word
Unhighlight is the same as removing highlight. See below.
How to stop highlighting in Word
If you click inside text that is highlighted and start typing, the new text you type will inherit the highlighting from the existing text. If you want to stop highlighting text when you type the new text, you can for example do as follows – all carried out via the keyboard:
- Type the first new character, then press and hold the Shift key and press the Left Arrow key to select the typed character.
- Press Alt+Ctrl+H to unhighlight the selected character you just typed.
- Press the Right Arrow key once to move after the typed character (or you can just delete the character when finished typing in step 3).
- Then continue to type the new text.
Getting rid of highlight may be referred to as either removing highlight or unhighlight. You may also think of it as how to remove highlighted text in word even if you want to keep the text and only make the highlighting go away.
To get rid of highlight in Word – or unhighlight – you can follow the steps described for applying highlight using METHOD 1, METHOD 2, METHOD 3 or METHOD 4 above but with the difference, that you select No Color instead of one of the 15 colors.
The DocTools HighlightManager add-in provides tools that let you quickly remove highlight either from the selection or from all paragraph(s) that are fully or partly included in the selection. This means that you don’t need to spend time on first selecting the entire paragraphs to remove highlight.
How to remove highlight from a paragraph number or bullet
If you are working with Word documents with automatic numbering, you may have struggled with how to unhighlight a number in Word. The same may be true for bullets in bulleted paragraphs.
Paragraph marks and trailing spaces (spaces at the end of a paragraph) never show highlight. However, they may be highlighted – but you can’t see it.
If only the number or bullet of a paragraph is highlighted, it is because the paragraph mark of that paragraph is highlighted.
To remove highlight from a number or from a bullet, select the paragraph mark and remove the highlight. You can also select the entire paragraph or the last part of the paragraph as long as you make sure the paragraph mark is included in the selection. Then the highlight will disappear from the number/bullet. See the illustration below.
TIP: Turn on formatting marks (Ctrl+Shift+8) so you can see the paragraph marks and other non-printing characters. Paragraph marks look like this: 

Figure 11. To remove highlight from a number or bullet, select the paragraph mark and unhighlight it.
The DocTools HighlightManager add-in provides a tool that lets you quickly remove highlight from numbered or bulleted paragraphs. You only need to click a button to remove highlight from any bullet or number in the selection or in the entire document.
Back to Table of Contents
How to remove light yellow highlight that does not disappear when selecting No Color
You may experience that you open a document in which some areas are highlighted with a light or pale yellow color (see figure 12 below). The color differs from the bright yellow color in the highlight color palette. If you try to remove the light, yellow highlight by selecting No Color from the highlight palette, nothing happens.
Such pale, yellow highlight is most likely a result of the document being protected. The yellow color is used to show which areas of the document you can edit. You can turn off the highlight but it will be turned on again if you close and reopen the document. As opposed to normal highlight colors, the light, yellow color does not print. It is shown on the screen only.
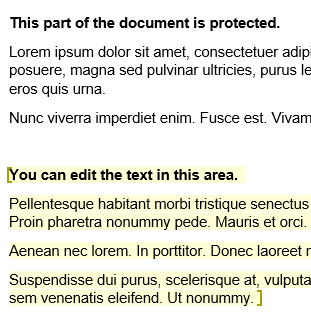
Figure 12. Example of light, yellow highlight that shows which areas you can edit in a protected document.
To remove the light yellow highlight:
- In the Ribbon, select Review tab > Restrict Editing.
- In the Restrict Editing pane that opens, turn off Highlight the regions I can edit. See figure 13 below.
You can also open the Restrict Editing pane from the Developer tab > Restrict Editing.

Figure 13. To remove the light, yellow highlight, turn off Highlight the regions I can edit.
Back to Table of Contents
How to replace highlight colors in a document
You can use Find in Word to search for highlight. You can also use Find and Replace to e.g. search for highlight and remove it or to apply highlight to a search string – or to replace one highlight color with another. See the examples below about how you can use Find and Find and Replace in relation to highlight.
How to find highlight
As you will learn below, the built-in functionality of Word does not let you search for a specific highlight color. As opposed to that, the DocTools HighlightManager add-in lets you find any specific highlight color.
Word does not let you search for specific highlight colors.
If two or more paragraphs in succession are highlighted, Word will not find them as one instance of highlight. Word interprets each paragraph as one instance of highlighting. This means that Word finds highlight in one paragraph at a time.
To find highlight in Word using the Find and Replace dialog box:
- Press Ctrl+H to open the Find and Replace dialog box. If you only want to find highlight, you can use the Find tab in the dialog box. If you want to replace highlight, make sure the Replace tab is selected.
- To find highlight, make sure the insertion point is in the Find what field.
- To expand the dialog box so all options are shown, click the More button.
- Select Format (bottom of dialog box) > Highlight. The word «Highlight» will now be shown below the Find what field. See Figure 15 below.
- If you want to find highlight no matter the text, leave the Find what field empty, otherwise enter the relevant text.
- Add other search criteria as needed and use the buttons in the dialog box to find and/or replace.
TIP: You can find both Highlight and Not highlight
If you select Highlight from the Format menu in the Find and Replace dialog box twice, the text below the Find what or Replace with field changes from Highlight to Not highlight. See Figure 15 below.
This means that you can search for and replace with both highlight and no highlight.
If you select Format > Highlight a third time, Not highlight is cleared.
To clear all Format criteria from the Find what or Replace with field, click in the relevant field, then click the No Formatting button. Alternatively, press Ctrl+Spacebar to clear the formatting.
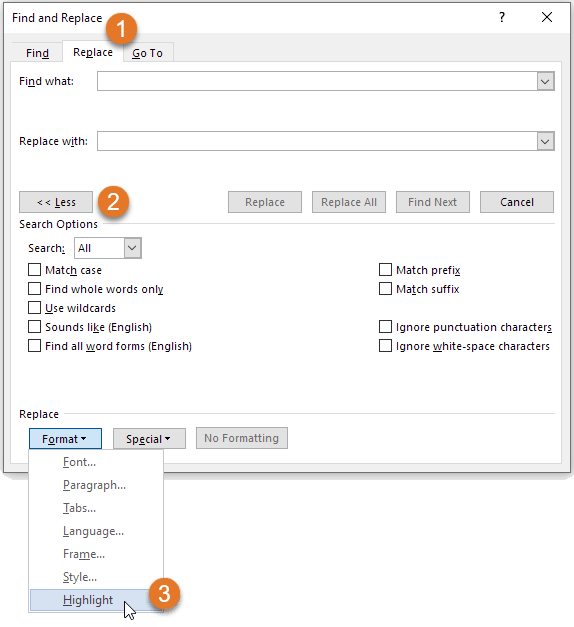
Figure 14. The Find and Replace dialog box lets you search for or replace with Highlight.

Figure 15. Example: You can search for Highlight and replace with Not Highlight.
How to replace one highlight color with another
You may sometimes want to change highlight color in Word.
You can use the Find and Replace command to replace one highlight color with another. To do this:
- Select the new highlight color you want as the default highlight color (via the Text Highlight Color in the Home tab or the Mini Toolbar).
- Press Ctrl+H to open the Find and Replace dialog box.
- In both Find what and Replace with, add Highlight (see How to find highlight above for help. Leave the text fields empty unless you want to search for specific text and/or replace with other text.
- If you want to replace any highlight, no matter the color, with the new color, click Replace All. If you only want to replace a specific color, use the Find Next button and click Replace only if relevant – repeat Find Next.
As opposed to the built-in functionality in Word, the DocTools HighlightManager add-in lets you find any specific highlight color and replace it with any other highlight color, leaving all other colors unchanged.
The DocTools HighlightManager add-in also has a Find command that finds the next highlight in the document without you needing to set up the search in the Find or Find and Replace dialog box.
Back to Table of Contents
How to copy only the highlighted text to another document
The built-in functionality of Word does not have a special feature for copying only highlighted text.
You could save a copy of the document and use Find and Replace to delete all text that is not highlighted. To do that:
- Press Ctrl+H to open the Find and Replace dialog box.
- Click in the Find what field and select Format > Highlight twice until the text Not highlight is shown below the field. Leave the field empty.
- In the Replace with field, type ^p in the field.
The ^p replaces the found non-highlighted text with a paragraph mark. This will split the remaining highlighted text in paragraphs. Otherwise, the result could be that many highlighted instances end in one paragraph. - Click Replace All.
The result may not always be useful since all the highlighted text remains with context.
The DocTools HighlightManager add-in includes a command for extracting highlight to a new document. Using that command, you can quickly create a document that includes the highlight, incl. metadata about each found instance.
Troubleshooting highlight
PROBLEM 1 – Highlight it is not visible on the screen
If you apply a highlight color to selected text and no color appears, the problem is likely to be one of the following:
- You have selected No Color instead of a color.
- The selection if of a type that can’t be highlighted.
- The Show highlighter marks setting is turned OFF. See how to turn on highlight marks.
PROBLEM 2 – Why can’t I remove highlighting in Word?
If you try to remove highlight using the methods described above and if that doesn’t remove the color, the reason may be that the color is not applied using highlight.
See PROBLEM 4 below for further details about how to get rid of other types of colors than highlight.
PROBLEM 3 – How to remove yellow highlight in Word?
A yellow background color on text in Word may not always be highlight. If you try to remove highlight using the methods described above and if that doesn’t remove the yellow color, the reason may be that the color is not applied using highlight.
See PROBLEM 4 below for further details about how to get rid of other types of colors than highlight.
PROBLEM 4 – The color doesn’t disappear when I attempt to remove highlight
What to do if you can’t remove highlighting in word? The reason may be that what looks like highlighting isn’t highlighting at all but another type of coloring.
If you select text that seems to be highlighted and try to remove the highlight and if this does not make the color go away, the reason may be that it is not highlight but one of the following:
- The color is a warm yellow highlight color added by the Find feature
- The color is color shading
- The color is light yellow and is showing which areas you can edit in a protected document
- The color is light gray field shading making it possible to distinguish fields from normal text
- The color is light gray Form Field shading making it possible to see where to fill in fields
See below for help on how to remove the five types of color.
How to remove yellow highlight added by the Find feature
If you use the Find feature in the Navigation Pane, Word highlights all occurrences that match your search criteria. You can, for example, remove the highlight by pressing the Escape key once.
How to remove color shading
- Selected the text from which you want to remove the color shading.
- Select Home tab > Paragraph group > Shading menu > No Color.
Note that shading can be applied to part of a paragraph, entire paragraphs, table cells, or entire tables. However, selecting No Color from the Paragraph group can remove shading from any of the types.
How to remove the light yellow color from a protected document
See how you remove light yellow highlight from a protected document above.
How to remove gray field shading
In documents with fields, I recommend having field shading set to always be displayed. The shading is visible on the screen only and does not print (more information about field shading). However, you can turn off field shading or set it to be displayed only on field(s) that are selected:
- Select File > Options > Advanced.
- In the Show document content group, select Field shading > Never or When selected.
- Click OK.

Figure 16. Example of a field with fields shading.
I strongly recommend having field shading shown always. If you can’t distinguish fields from other content, you risk making manual changes inside fields. The result will be that such changes are gone when you update fields.
How to remove gray Form Field shading
Word documents that are created as forms that are to be filled in by users may be created using a special type of fields: Form Fields. In newer versions of Word, forms that use Form Fields are referred to as Legacy Forms since Word now also lets you create forms using content controls.
If you see gray shading that can’t be removed using any of the methods above, Form Fields may be in use. You can quickly find out by pressing Alt+F9 to show field codes. If the areas with the gray shading now appear as { FORMTEXT }, { FORMCHECKBOX }, or { FORMDROPDOWN }, Form Fields are in use.

Figure 17. Example of Form Field without and with Form Field shading and example of Form Field showing field code.
It is practical to have Form Field shading turned on since it makes it easy to see where to fill in data. However, you can turn the Form Field shading off:
- On the Developer tab > Controls group, click Legacy Tools.
- Click the Form Field Shading icon to turn off the shading of Form Fields.
If you can’t see the Developer tab, see How to show the Developer tab in Word.
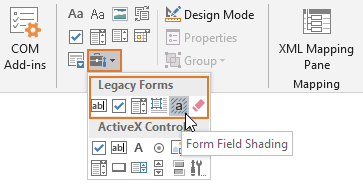
Figure 18. Form Field shading can be turned on and off via Developer tab > Controls group > Legacy Tools.
Back to Table of Contents
PROBLEM 5 – No highlight is applied when I press Alt+Ctrl+H
As explained above, Alt+Ctrl+H is the default shortcut assigned to highlight. If you press Alt+Ctrl+H and nothing happens, the problem is likely to be one of the following:
- You have not selected any text or the selection if of a type that can’t be highlighted.
- The currently selected highlight color in Home tab > Text Highlight Color is No Color,
Back to Table of Contents
PROBLEM 6 – How to customize highlight color in Word?
The quick answer is: You can’t create custom highlight colors in Word. The colors are restricted to the 15 colors shown in Figure 4 above.
You might use color shading instead of highlight. When it comes to color shading, you can define any color you want. However, highlighting and color shading are very different as explained above.
Back to Table of Contents
How to apply or remove highlight via macros (VBA)
Below, you will find small examples of macro code related to highlight. If you record a macro in Word to find out what code to use for highlighting, the result is macro code that also changes the default highlight color to the color you apply. As you will see in the code samples below, you can apply or remove highlight via VBA without changing the default color.
EXAMPLE 1: Apply yellow highlight to the selection without changing the default highlight color that is shown in the Text Highlight Color icon:
Selection.Range.HighlightColorIndex = wdYellow
EXAMPLE 2: Remove highlight from the selection without changing the default highlight color that is shown in the Text Highlight Color icon:
Selection.Range.HighlightColorIndex = wdNoHighlight
EXAMPLE 3: Select bright green as the default highlight color that will be shown in the Text Highlight Color icon:
Options.DefaultHighlightColorIndex = wdBrightGreen
Back to Table of Contents

Generate complete documents in seconds from re-usable text or graphics
Manage comments in Word fast and easy – review comments, extract comments to Word or Excel, etc.
Simplify and speed up the management of cross-references even in your most complex documents
Manage and repeat data in Word fast and easy with custom document properties and DocProperty fields
Extract insertions, deletions and comments from any Word document, incl. context and headings
Apply any highlight color or remove highlight in Word with a single click – customizable shortcuts
Browse pages, sections, headings, tables, graphics, etc. and find text in Word with a single click
Check safety-critical procedure documents for human factor issues in minutes – improve quality and help prevent errors
Create screen tips in Word fast and easy – with up to 2040 characters
Highlight can be useful in many Word documents, not least during the editing process. This article has explained how highlight in Word works. You have learnt how to highlight, how to remove highlight / unhighlight, how to solve different problems with highlight, etc. I hope this article helps you work more efficiently with highlight in Word.
![]()
Written by Allen Wyatt (last updated September 10, 2022)
This tip applies to Word 2007, 2010, 2013, 2016, 2019, Word in Microsoft 365, and 2021
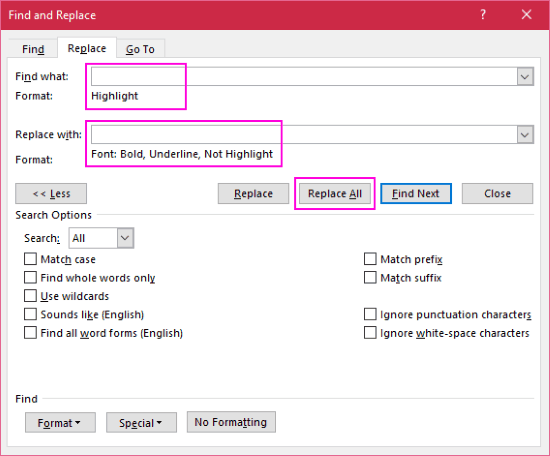
David has a number of Word documents where the essential words have been highlighted using the yellow «text highlight color.» What he needs to do is replace all the highlighted words with an underlined version of the same word with a font size change and also remove the highlight color, all at the same time. David wonders if there is a way to accomplish this task.
Yes, the Find and Replace feature in Word is powerful enough to do this all in a single pass. Before doing so, however, you may want to save your document just in case something goes wrong during the replacing operation. Once that is done, here are the steps you need to follow:
- Press Ctrl+H to display the Replace tab of the Find and Replace dialog box.
- Click the More button, if it is available.
- The insertion point should be blinking in the Find What box, which should be empty. (See Figure 1.)
- Click the No Formatting button, if it is available.
- Click the Format button and choose Highlight. The word «Highlight» appears under the Find What box.
- Click in the Replace With box and make sure it is empty.
- Click the Format button and choose Highlight. The word «Highlight» appears under the Replace With box.
- Click the Format button and choose Highlight a second time. The word «Highlight» changes to «Not Highlight.»
- Click the Format button and choose Font. Word displays the Font tab of the Replace Font dialog box.
- Use the controls in the dialog box to choose the desired font size and underline.
- Click OK to close the Replace Font dialog box.
- Click Replace All.
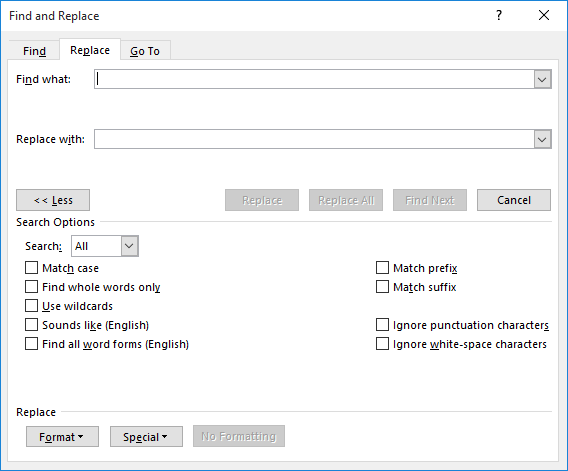
Figure 1. The Replace tab of the expanded Find and Replace dialog box.
There is a variation on the above steps that you can also use, if desired:
- If you are using Word 2007, press Ctrl+F. Word displays the Find tab of the Find and Replace dialog box. If you are using a later version of Word, press Ctrl+H to display the Find and Replace dialog box, then click the Find tab.
- Click the More button, if it is available.
- Make sure the Find What box is empty.
- Click the No Formatting button, if it is available.
- Click the Format button and choose Highlight. The word «Highlight» appears under the Find What box.
- Click the Find In drop-down list and choose Main Document. Word selects all instances of highlighted text in the document.
- Click Close. Everything that is highlighted should still be selected in the document.
- Use the tools on the Home tab of the ribbon to select a font, font size, and underline. All of the selected words are formatted according to your choices.
- Using the Highlight tool on the Home tab of the ribbon, clear the highlighting.
Note that it is important to do step 9 last, as clearing the highlighting «unselects» all the words that were selected in step 6. Interestingly, doing the other formatting changes (step  doesn’t unselect the words.
WordTips is your source for cost-effective Microsoft Word training.
(Microsoft Word is the most popular word processing software in the world.)
This tip (13411) applies to Microsoft Word 2007, 2010, 2013, 2016, 2019, Word in Microsoft 365, and 2021.
Author Bio
With more than 50 non-fiction books and numerous magazine articles to his credit, Allen Wyatt is an internationally recognized author. He is president of Sharon Parq Associates, a computer and publishing services company. Learn more about Allen…
MORE FROM ALLEN
How Word Treats Normal.dot
Templates are at the core of how Word creates and formats documents. From the earliest days of Word, the most basic of …
Discover More
Formatting Text in Custom Document Properties
Word allows you to create custom document properties that stay with a document and can be inserted through the use of …
Discover More
Identifying Digit-Only Part Numbers Excluding Special Characters
When working with data in Excel, you often need to determine if that data meets criteria that you specify. This tip …
Discover More
More WordTips (ribbon)
Getting Rid of Trailing Spaces in Footnotes and Endnotes
The Find and Replace tool can get rid of trailing spaces in paragraphs quite nicely. If those spaces are at the end of …
Discover More
Removing HTML Tags from Text
HTML tags are great when you want to display information on a web page. They are not so great when you have them in a …
Discover More
Replacing a Colon in a Sequence
Sometimes you’ll run across the need to replace a very specific sequence of characters in your document. It is for these …
Discover More
How do you highlight and replace text in Word?
To Replace the Highlight;
- First choose the new Text Highlight Colour that you want to change to.
- Open the Find and Replace dialog (Ctrl H) and click the More button.
- Click in the Find What box.
- Click the Format button (If you can’t see it, click on the More button)
- Select Highlight.
- Click inside the Replace With box.
What to do if you want to highlight a word?
Highlighting Found Text
- Press Ctrl+H.
- Click the More button, if it is available.
- In the Find What box, enter the text you want to find and highlight.
- In the Replace With box, enter ^&.
- With the insertion point still in the Replace With box, click the Format button.
- Click the Highlight option.
- Click the Replace All button.
Can you find and highlight in Word?
You can use Find to highlight all the occurrences of a specific word or phrase as follows: Choose Find from the Edit menu or press [Ctrl]+F. In Word 2007, Find is in the Editing group on the Home tab. In Word 2007, choose Highlight All from the Reading Highlight drop-down list.
How do you highlight all words in Word?
Click Find in the Editing group or press Ctrl+F to open the Navigation pane. From the text dropdown, choose Options and then check the Highlight All setting (Figure B), and click OK. In the text control, enter video and press Enter. Word will automatically highlight all instances (Figure C).
What is the shortcut to highlight in Word?
How to highlight text on an Android smartphone and tablet. Press and hold down on any text with your finger, drag your finger over the text you’d like to highlight, and then let go.
Where is the highlight tool in Word?
Word includes a tool that allows you to highlight your text, much the same way that you can use a highlighter pen or marker on printed material. You can highlight text in your document by clicking on the Highlight tool, located in the Font group on the Home tab of the ribbon.
Why can’t I remove highlight in Word?
As such, try removing the highlighting by selecting the text and clicking the Clear Formatting option on the Home tab. Users can also select the text and press Ctrl + Space to remove its formatting.
How do you highlight text that Cannot be highlighted?
Go to Home, select the arrow next to Text Highlight Color, then finally choose No Color.
How do you highlight notes?
Highlighting tips
- Only highlight after you’ve reached the end of a paragraph or a section.
- Limit yourself to highlighting one sentence or phrase per paragraph.
- Highlight key words and phrases instead of full sentences.
- Consider color-coding: choose one color for definitions and key points and another color for examples.
How do you highlight text in yellow on Iphone?
Enter a word, select it, and from the button adjacent to font color, select your highlight color. You now have yellow (my choice) highlighted text. At the far left of the TextEdit toolbar is the paragraph style button.
How do you copy text without highlighting?
If you don’t want to keep the highlighting on the pasted text, you can paste only the text without the formatting. Instead of pressing Ctrl + V to paste the copied text, click the down arrow on the Paste button in the Clipboard section of the Home tab. Then, click Keep Text Only.
How do you highlight and copy text?
How do I copy and paste text on Android?
- Long-tap a word to select it on a web page.
- Drag the set of bounding handles to include the amount of text you want to copy.
- When you’ve highlighted your desired text, tap on the copy icon on the toolbar at the top of the screen:
- Tap on the field where you want to paste the text.
- Tap the paste icon on the toolbar.
How do you copy part of a text?
Copy, cut, format, delete parts of the text in different areas of the document:
- Hold Ctrl while making the selection in the usual way.
- Release all keys.
- Place cursor at the beginning of the next desired selection.
- Hold Ctrl while making the selection in the usual way.
- Release all keys.
How do you select part of a text?
More Information
- Select the first item that you want. For example, select some text.
- Press and hold CTRL.
- Select the next item that you want. Important Be sure to press and hold CTRL while you select the next item that you want to include in the selection.
What command do you use to cut information from a document?
Use the key shortcut Ctrl + X to cut or use Ctrl + C to copy.
What sequence of functions is used to duplicate text from one program to another?
Answer. Copy and paste function is used to duplicate text from one program to another. Explanation: One of the most basic functions anyone will probably use is to move text from one computer program to another.
What is the short cut of copy?
Copy: Ctrl+C. Cut: Ctrl+X. Paste: Ctrl+V.
What is the function of F6 key?
The F6 key is a function key found at the top of almost all computer keyboards. The key is most often used to move the text cursor to the address bar in an Internet browser.
What are the special keys?
A special key or media key, or multimedia key is a keyboard key that performs a special function not included with the traditional 104-key keyboard. These four buttons, or keys, are considered special keys. Tip. Special keys are found on keyboards often referred to as multimedia keyboards.
How do you highlight all occurrences in Word?
You can use Find to highlight all the occurrences of a specific word or phrase as follows:
- Choose Find from the Edit menu or press [Ctrl]+F.
- On the Find tab, enter the word or phrase into the Find What control.
- Check the Highlight All Items Found In option (shown below).
- Click Find All and click Close.
How do you highlight multiple words in Word?
Hold ctrl and left-click to the left (in the left margin) of a sentence to highlight the entire line. If you continue to hold ctrl, then you can left-click on multiple lines to highlight them. Use (2) to highlight them with a highlighter function. Ctrl+a to highlight all text at once.
Using the highlighting shortcut key
- Adding highlighting: Select the text you want to highlight, then press Ctrl+Alt+H.
- Removing highlighting: Select the highlighted text, then press Ctrl+Alt+H.
Which of the following is not used to highlight some text in a document?
Answer. Answer: If you want to highlight all text, press the shortcut key Ctrl + A . If you are not working with text that can be edited (e.g., this paragraph), you cannot highlight text using these methods.
How do you highlight words on a PC?
If you want to highlight one word at a time, press Ctrl while holding down Shift , and then press the Left arrow or Right arrow . If you want to highlight a whole line of text, move your cursor to the start of the line, hold the Shift key, and then press the Down arrow .
How do you highlight text quickly?
Select all of the text in your document or on your screen by holding down the “Ctrl” key and pressing the letter “A”. 18 Tech Support Reps Are Online! Microsoft Answers Today: 65. Remember the “Select All” shortcut (“Ctrl+A”) by associating the letter “A” with the word “All”.
What is the use of highlight color tool?
Highlighting Tool makes it very easy to use color highlighting to simplify editing work. With its help, you can apply color highlighting to any text that matches reusable lists of search expressions, clear color highlighting, or navigate between text highlighted with specific colors.
What is the difference between highlight and text color?
Answer: Font colour is the actual color in which text will appear on your screen. Highlighting colour Is the shade of a colour over your text.
What is text highlight color in MS Word?
With Microsoft Word and other text programs, text can be highlighted in a different color for quick reference. For example, “This text is highlighted in yellow” and is easily seen while skimming this page.
How do I change the highlight color in Word 2016?
Expanding Colors Available for Highlighting
- Select the text you want to highlight.
- Choose Borders and Shading from the Format menu. Word displays the Borders and Shading dialog box.
- Make sure the Shading tab is displayed. (See Figure 1.)
- From the colors displayed, select the one you want to use.
- Click OK.
How do you write in color text?
Change the font color
- Select the text that you want to change.
- On the Home tab, in the Font group, choose the arrow next to Font Color, and then select a color. You can also use the formatting options on the Mini toolbar to quickly format text. The Mini toolbar appears automatically when you select text.
How do you make your text a different color?
Choose “Settings,” and select the “Advanced” tab. Touch “Appearance Settings,” and then select “Conversation Customization” from the conversation section.
What does blue text mean?
The difference between SMS and iMessage, explained All mobile phones — Android, iPhone, and otherwise — use SMS in some way. However, iPhones also use iMessage, which was built to send messages over the internet, specifically between Apple devices. Messages in green are SMS, while messages in blue are iMessages.
What do the different colors on text messages mean Samsung?
If a message appears in a green bubble, it was sent via Advanced Messaging. A yellow bubble indicates a message sent via SMS or MMS. For Samsung Galaxy S9/9+ If a message appears in a blue bubble, it means the message was sent via Advanced Messaging. A teal bubble indicates a message sent via SMS or MMS.
When a text says delivered does that mean read?
Two gray check marks mean your message was successfully delivered to the recipient’s phone. Two blue check marks mean the recipient has read your message (press and hold on the message to reveal the time it was read).
How can you tell if someone has read your text without read receipt?
If you want to check whether or not one of your friends has turned read receipts off, the easiest way to do so is to simply send a message, wait for a reply, and see whether or not you get a ‘Seen’ notification.
This tutorial explains how to replace highlighted words in MS Word.
It can be done with the help of native Find and Replace dialog box of MS Word. You can replace the text, font type, font color, and set underline and underline color of all the highlighted words. You can also make highlighted words italic or bold. So from replacing the text to adjusting the formatting of highlighted words, everything can be done.
I have tested this feature on MS Word 2007 and 2013 and it worked perfectly. If you also have the need to replace highlighted words in MS Word, this tutorial will help you for sure.

In the screenshot above, you can see before and after comparison. I have replaced highlighted word with bold and underline formatting.
You may also check:
- How to Hide Text, Print Hidden Text, Delete Hidden Text in MS Word.
- Free Markdown Plugin For Microsoft Word: Writage.
- How To Access Google Drive from Microsoft Office.
How to Replace Highlighted Words in MS Word using Find and Replace dialog box?
Step 1: Open MS Word and a document that contains highlight words.
Step 2: Press Ctrl+H hotkey to open Find and Replace box. Now access Replace tab → place mouse cursor on ‘Find what’ box → Click More>> → Format → and select Highlight option. This simply means that you have selected highlighted words for find command.

Step 3: Now you have to place the mouse cursor in Replace with box. After that, click More >> → Format → and Choose Font option. It will open the Font window. Now you can set font type, style, size, color, underline style, and underline color.

When you have set everything press OK button and you will come back to Replace tab.
Step 4: Now while your cursor is still in the Replace with box, select Format and click Highlight again. Finally, you can click Replace All button.
This will replace all the highlighted colors with new changes applied by you.
In case you want to replace highlighted words with a specific text, repeat step 1 and 2. After that, add any word(s) in “Replace with” box and select Replace All button. After applying the changes, the highlighted text will be replaced with the text entered by you.
Final Words:
The MS Word is a feature-rich word processor and has a huge list of important features. Find and Replace feature is one of them. Apart from finding and replacing the words, this feature is also beneficial to easily replace highlight words with some other word and formatting. Go ahead and try it.
When you copy text from a website and paste it into your Word document, the text’s background can have a gray color or highlight. You can quickly remove highlights from the pasted text in Microsoft Word. If you also want to get rid of this gray background from copied text, find out how to remove highlight text in Word. It is possible to remove background shading in Word in a few steps. Luckily for you, this article explains how to remove highlighted text in Word.
Table of contents
- Difference between highlight and shading
- How to remove highlighted text in Word
- Remove highlighted text by using a shortcut
- Remove highlighted text by using the Find and Replace function
- How to remove background shading in Word document
- Remove gray background from a pasted text in Word
- Format background shading by using a different style in Word
- Format gray background by using a shortcut
- Conclusion
Difference between highlight and shading
Highlighting and shading are not the same, but they color a text background in Word to make it more visible. The differences between them are listed underneath.
Highlight:
- Highlighting can only be applied to a text
- A highlight is not a part of a style
- A small number of color options, with only 15 colors
- Find highlighted words by using the Find and Replace function
Shading:
- Shading is applied to text, paragraphs, and tables
- Shading is part of a style
- Many color options, more than 60 colors
- The Find and Replace function does not work on the shaded text

If a part of your text is highlighted, you can easily remove this in Word. It can easily be fixed by following the steps below.
- Select the highlighted text in your paper
- Then go to the Home tab
- Click on the arrow next to the Text Highlight Color icon
- In the highlight gallery, click on No Color

If you select the entire text in your document, then the No Color in the highlight gallery appears gray.
The highlight gallery looks different if you select the entire text in your document because the No Color is already selected in Word. You still have to use the No Color option again to remove Text Highlight Color from the selected text.

Remove highlighted text by using a shortcut
You can remove highlighted text in Word by using this shortcut.
- Select the highlighted text or the entire document by pressing CTRL + Alt on your keyboard
- Now press CTRL + Alt + H on your keyboard to remove the highlighted text in Word
This shortcut is the easiest way to remove all highlighted text in Word.
Remove highlighted text by using the Find and Replace function
You can also use the Find and Replace function in Word to remove all highlighted text. This can be done by following the steps below:
- Click on the Home tab in your Word document
- Click on Replace in the ribbon
- Now a new box called Find and Replace opens in your document. Make sure you are in the Replace tab on the top
- Now click on More to open the box further
If you look at the picture below, you can see that you have to put your mouse cursor on the Find what line after finishing these four steps.

There are a few more steps to follow to complete this method.
- First, you must click on Format in the left-down corner of the box to open more options
- Now, select Highlight
- Under the line, Find what, you will see Format: Highlight

- Now place the mouse cursor at the line next to Replace with
- Click on Format and select Highlight
- It writes Highlight under the line, as shown in the picture below

- If you click on Format and select Highlight again, it will write Not Highlight, as shown in the below picture
So if you want to get Not Highlight under the line, you must repeat the same step twice.

Lastly, click on Replace All.

How to remove background shading in Word document
It is easy to remove the background shading of text in a Word document. To clear the background shading, you should follow the steps below.
- Select the shaded text, paragraph, or table cell
- Go to the Home tab
- Select the arrow next to the Shading icon
- Click on the No color in the shading fill box

If you select the entire text in your document, then the No Color looks gray in the shading fill box.
Even though the preview appears gray in the No Color option in the shading fill box, it will be white on your Word document once you select it. You must choose No Color again, even if it already appears in the selected dropdown box.

Remove gray background from a pasted text in Word
Some have a problem copying citations or text from a website into Word. We have pasted the same text in a Word document to see the difference between a gray highlight or gray shading background text. Then we want to remove highlights from the pasted text in Microsoft Word.
In the below example, you can see that Text 1 has a gray shading. Text 2 has a gray background, which is a gray highlight. The same text is written, and it contains a hyperlink, line and paragraph spacing, bullet points, and bold and italic font styles. We will show you how to remove the gray background and format the text.

Format background shading by using a different style in Word
If you want to format background shading, you can change the style in Word.
- First, you have to select the entire text in your document by pressing CTRL + Alt on your keyboard
- Then go to Styles group under the Home tab
- Select Normal style to remove the gray shading, bullet points, bold font, and change the font size and line spacing to normal text
- You can also select No Spacing, which will remove the shading, bullet point, bold font, and all spacing
Remember that this will not remove highlight text in Word.

Format gray background by using a shortcut
You can also use a shortcut to format background shading in Word.
- Select the gray text or press CTRL + Alt to select the entire document
- Then press CTRL + Q to remove line spacing, numbering, and shading
As you can see, this will also not remove highlights from the pasted text in Microsoft Word. Text 2 still has a gray background because you have to remove highlights by selecting the text and choosing No Color under Text Highlight Color.
- Or use the shortcut CTRL + Alt + H to remove all highlighted text in Word

If you want to remove hyperlinks or font styles, use another shortcut.
- Select the gray text or press CTRL + Alt to select the entire document
- Then press CTRL + Space Bar to format the text
As you can see, this shortcut removes hyperlinks, bold and italic styles. It also formats the text to normal font size text, but it will not remove any gray background text.

Read more: How to delete a row from a table in Word »
Conclusion
Understanding the difference between shaded or highlighted text in a Word document is important. There are different ways to remove highlight text or shading in Word. You can use a shortcut to remove the shaded gray background from copied text. Or you can resolve this problem by changing the style of your Word document. The last option is to make changes in the ribbon by selecting No Color under the Text Highlight Color icon.
I create new documents from source material that others send me, and use Word’s built-in gray highlighting to indicate text in the source file that’s been dealt with in the new document (equivalent to «crossing it off»).
Onscreen, I can still easily read the text; the highlighting does not interfere with legibility. However, when printed, the highlighting is so dark that it interferes with legibility.
Going forward, I will use shading (not highlighting) to get a lighter gray background. In the meantime, I have several documents to be printed. Using find/replace is the obvious solution, but my experiments with it are failing.
In Word 2010 you cannot replace highlighting with shading; you can only replace highlighting with highlighting. The obvious solution to that barrier is to create a new style with shaded text.
But that solution does not work because the new style replaces all of the text formatting (indents, etc.), not just the highlighting.
I’ve tried variations of creating a new style with shading based on normal, based on no style, and (for example) a new style based on the custom «Text» style that is sometimes used.
Can what I want to do—replace highlighting with shading while leaving all else «as is»—be accomplished with find/replace in just one to a few steps? I.e., if it takes a few passes of find/replace, that’s ok.
If this problem is beyond a find/replace capability, then how else can I accomplish it?
Note: Replacing the gray highlighting with another highlighting color is not a solution. Nor is changing the text color.
How to highlight, everyone knows. If you want to highlight repeatedly, double click on the highlight button. Now selecting any text automatically applies the highlight. How to search for highlighted areas is already covered. Now let us learn how to Remove all Highlights – in one stroke – requires just 30 seconds to do it. Learn the magic now!
Quick Fix
- Ctrl A
- Open the highlight dropdown from the Home tab
- Choose No color
Why Remove all Highlights from a document?
If you have taken the trouble to add highlights, why would you like to remove them? Well, there could be many reasons.
Simplest reason is that you received a document highlighted by someone else and you don’t want those anymore. You may have copy pasted some text from a document which already had highlighted areas…
You may want to forward a non-highlighted copy to someone.
Or you may want to enable track changes to get inputs from others. In this situation, highlights will visually interfere with track changes (although, both features can work together).
Remove all Highlights from a Word Document
Here is the sample document containing highlights. You can use your own, but make sure you make a copy of any document and work on the copy. That way, if something goes wrong, your original file is not disturbed.

Removing all Highlights is performed very easily using Find Replace. Press CTRL H (not CTRL F). In the Find what textbox – what do we type? We just want any highlighted text to be found. Therefore, keep the textbox empty. Click on the More button. Don’t resist.
Remember: More means “More Benefits” not “More Trouble”.
There are lot of options shown. Don’t get confused. Apply our simple method of elimination. Read each option and think – is this one likely to help me remove highlights formatting? If no – move to the next option. Till you find something useful.
You will soon realize that the Formatting button seems to be the only available choice. Open that dropdown and click Highlight


Now the Find what area shows Format: Highlight. So far so good. Now how to remove the highlight? At this stage if you choose Replace All, the entire text which has highlights will be removed. Dangerous. Press Ctrl Z to Undo this immediately.
There is one more step which is not very intuitive. We have to inform Word that we are searching for formatting and we want to replace only the formatting- without disturbing the text itself. Right now, the Replace with has no formatting specified.
Click inside the Replace with checkbox and again open the Formatting dropdown to choose Highlight.

Unfortunately, this also does not work. Replace All will work but nothing will changed. Why? Because we searched for highlights and applied Highlights again. Therefore, there is no change visually.
What went wrong? We want to Remove all Highlights. Did we tell that to Word? No. We told Word to Replace with Highlight. That is NOT what we want.
We want to remove the highlight formatting. The solution is not obvious at this stage.
Click inside the Replace with textbox, click on Formatting again and choose Highlight again. Now the Replace with area shows No Highlight. This is what we want. In effect it will Remove all Formatting.
Now choose Replace All and your job is done!


This method works even if highlights of different colors are used. I do not know any method by which we can remove highlights of a particular color across the document (without programming). If you know the method, please share here as a comments post.
Simpler Method
Sorry. There is a simpler method. Ctrl A to select the entire document. Open the Highlight dropdown and choose No Color.
My friend Kamal Karnatak noticed this and commented about it. He is absolutely right. It is a very fast way to handle this problem.
Question is, if there was such a simple method, why did I write a long and complex way?
Because I wanted you to learn the power of the humble Find – Replace dialog. Now that you know how to handle highlights, you can apply this method to any combination of formatting options.
Cheers.
5 Responses
-
Another way, which I use. Give your comment.
CTRL + A, On the Home tab, in the Font group, click the arrow next to Text Highlight Color and select no color.
-
Yes Sir. You are absolutely right. I showed the lengthy way to educate people about the way to use Find with formatting. It also has a double selection option which makes it No Highlight.
This is a very quirky way to implement the feature. In Find, where there is a dialog, it shows both options, e.g., Bold/ Not Bold.
But because the Highlight option is a dropdown item, there is now way to show the reverse setting.
That is why this non-intuitive method is used as a workaround by Microsoft.
I have already updated the article.
-
-
Also, people generally use highlighter as a reminder to something to be taken care of afterwards. Replacing all might not help at such times as it doesn’t ensure that every highlighted item has served it’s purpose while your way will enable finding every highlighted item & review them respectively.
Thanks for this super tip 🙂
-
Great tutorial n’ all, but….this is worded very oddly. Instead of writing out the part where you’re like, “This is not what we want, we want this..”, maybe be a lot more succinct.
Most of us just want a quick solution that’s straightforward and to the point. All the extra narratives and sidebars are unnecessary. It took far longer for me to read through this and follow each of the steps than it did to actually execute those steps.
I dunno. The whole thing comes across as if it was written by an alien.
-
ha ha… well said. The Alien has noted your point and acted upon it. Added a simple Quick Fix in the beginning. Cheers. Doc.
-
Queries | Comments | Suggestions | Wish list
Have you ever wanted to change all of the highlighting in a document to a different colour? Normally you would need to individually select each highlighted text and re-do the colour, however you can do it with the Find and Replace command.
To Replace the Highlight;
- First choose the new Text Highlight Colour that you want to change to
(Home ribbon / Font group / Text Highlight Colour) - Open the Find and Replace dialog (Ctrl H) and click the More button.
- Click in the Find What box
- Click the Format button (If you can’t see it, click on the More button)
- Select Highlight
- Click inside the Replace With box
- Click the Format button
- Select Highlight again
- Click the Replace All button and Word will replace all your highlighting.
To Remove the Highlight;
Do one of the following;
Using Find & Replace;
- Follow the steps above, but after point 6 click the select No Formatting button.
Not using Find & Replace;
- Use Select All on the document (Ctrl A)
- Click the arrow next to the Text Highlight Colour
- Select No Colour.