
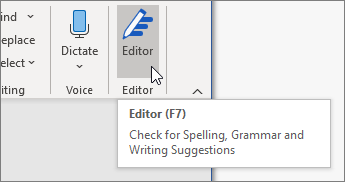
Microsoft Editor runs in Word for Microsoft 365 to analyze your document and offer suggestions for spelling, grammar, and stylistic issues, like making sentences more concise, choosing simpler words, or writing with more formality.
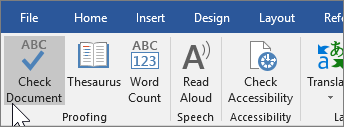
To use Editor, on the Home tab choose Editor.
Reviewing suggestions
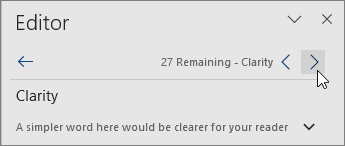
To focus on the issues you care most about, choose a correction or refinement type, like Grammar or Clarity. Then, use the arrows near the top of the pane to step through each of that type of issue.
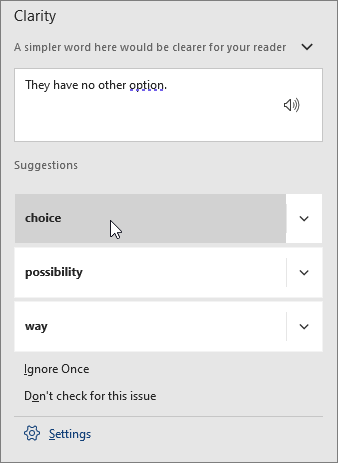
Choose a suggestion to incorporate it into your document. If you don’t like the suggestion, choose Ignore Once. Or, if you never want this type of suggestion, choose Don’t check for this issue.

Note: If you change your mind about an issue you ignored, close and reopen the document, and go back to Editor. Editor will find the issue again.
Tailor what Editor checks for
By default, Editor checks for several categories of issues, and the suggestions may or may not suit your writing style. To finely tune Editor for suggestions you want, do the following:
-
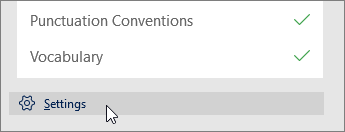
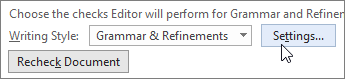
In the Editor pane, choose Settings.

-
In the Word Options dialog box, next to Grammar & Refinements, choose Settings.
-
Scroll through the list of options. Select issues you want Editor to check, and clear the issues you want Editor to ignore.
Note: Choosing Reset All returns to the default settings.
-
Choose OK.
Tip: Editor is designed to empower you to bring out the best in your writing. We are continually making updates to its suggestions and experimenting to learn which suggestions are most welcome. If you have feedback for us, choose Help Improve Office? at the top of the Word window to open the Feedback pane.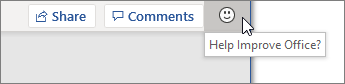
You might notice Editor’s red, blue, and purple underlines in your document even when the Editor pane is closed. That’s because Editor is always running in the background, checking for spelling, grammar, and some style issues.
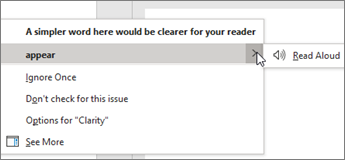
Right-click the underlined text to see the suggestion. Use context menu to:
-
Listen to the suggestion by clicking the arrow next to the suggestion and then choosing Read Aloud.
-
Skip this instance of the issue by choosing Ignore Once.
-
Tell Editor to stop checking for this issue by choosing Don’t check for this issue.
-
Fine tune the settings for this type of issue by choosing the Options link.
-
Get more information about the issue by choosing See More.
Your document might be written in more than one language, or you might want to switch to another language for Editor to check. If you are set up to use multiple authoring languages (File > Options > Language), Word detects the language you’re writing in, and Editor will check for issues in that language.
However, you might be writing in a language that Word doesn’t detect automatically. In that case, you can get Editor to check text in that language by selecting the text and going to Review > Language > Set Proofing Language, and then choose your language.

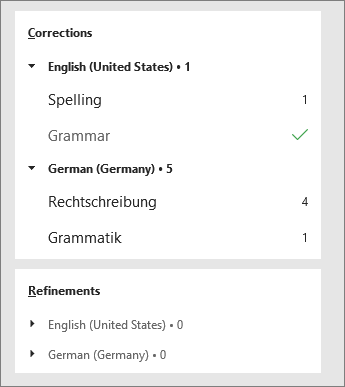
When Editor is checking more than one language, the Editor pane lists corrections and refinements for each language in the document.
For information about the issues that Editor checks in various languages, see Editor’s spelling, grammar, and refinement availability by language.
When you work on documents in Word on the web, Editor provides a rich set of features that are coming soon to Word for Windows. Even when you’re not using Word, the Editor browser extension helps you with writing on websites like LinkedIn, Twitter, Facebook, and Gmail.
Word marks spelling, grammar, and stylistic issues with an underline. Right-click the underlined word, and then choose the suggestion you want, or learn more about the error and how to correct it.
Or, open the Editor pane to address issues by category.
-
On the Review tab, select Check Document.
-
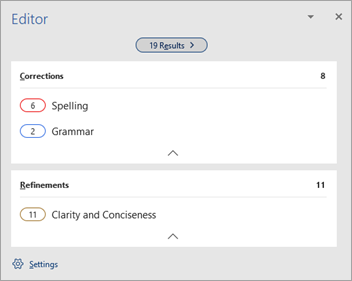
The Editor pane categorizes spelling, grammar, and stylistic issues.
-
Click each category to address the issues.
Note: For keyboard shortcuts in the Editor pane, there’s no need to press Alt. Just use the underlined letter to select the command (like i for Ignore Once, g for Ignore All, etc) .
-
In the Editor pane, click Settings.
-
Under When correcting spelling and grammar in Word, select Settings
-
For Writing Style, select Grammar & Refinements .
-
Scroll down to see all of the options available, and select or clear the rules you want. The settings apply to all the documents that you edit, not just the current one.
Requirements and availability of the Editor pane include the following:
-
Internet connection: Make sure your connection is working.
-
Intelligent Services switched on: Go to File > Options > General and turn on Office Intelligence Services.
-
Language availability: For information about the issues that Word checks for in various languages, see Editor’s spelling, grammar, and refinement availability by language.
Word marks spelling, grammar, and stylistic issues with an underline. Control-click the word or phrase and choose one of the options.
If Word incorrectly underlined a word as misspelled and you want to add that word to your dictionary so that Word will properly recognize it in the future, see Add or edit words in a spell check dictionary.
If spelling or grammatical errors aren’t underlined, you might need to turn on automatic spelling and grammar checking, as follows.
Turn on (or off) automatic spelling and grammar checking
-
On the Word menu, click Preferences > Spelling & Grammar.
-
In the Spelling & Grammar dialog box, under Spelling, check or clear the Check spelling as you type box.
-
Under Grammar, check or clear the Check grammar as you type box.
-
Close the dialog box to save your changes.
-
On the Review tab, click Spelling & Grammar.
-
Word displays the issues it finds in the Spelling & Grammar dialog box.
-
To address an issue, do one of the following:
-
Type the correction in the box and then click Change.
-
Under Suggestions, click the word you want to use, and then click Change.
To skip the error, do one of the following:
-
Click Ignore Once to skip only that instance of the error.
-
Click Ignore All to skip all instances of the error.
-
For a grammatical error, click Next Sentence to skip that instance of the error and move to the next error.
To skip a misspelled word in all documents, click Add to add it to the dictionary. This only works for spelling. You can’t add custom grammar to the dictionary.
-
-
After you correct, ignore, or skip an issue, Word moves to the next one. When Word finishes reviewing the document, you’ll see a message that the spelling and grammar check is complete.
-
Click OK to return to your document.
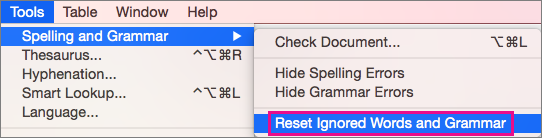
You can clear or reset the list of Ignored Words and Grammar so Word will check for spelling and grammar issues you previously told it to ignore.
Note: When you reset the list of Ignored Words and Grammar, the list is cleared only for the currently open document. Any spelling or grammar issues you told Word to ignore in other documents won’t be affected.
-
Open the document that needs to be checked.
-
On the Tools menu, point to Spelling and Grammar, and then click Reset Ignored Words and Grammar.
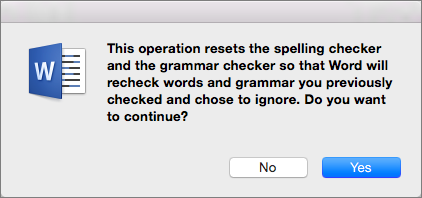
Word displays a warning about the operation resetting the spelling checker and the grammar checker.
-
Click Yes to proceed.
-
Click the Review tab, and then click Spelling & Grammar to check spelling and grammar.
Word marks potential spelling errors with a red squiggly line, and potential grammatical errors are marked with a blue squiggly line.
Right-click on the underlined word or phrase and choose a correction, or ignore the suggestion.
Note: If Word is flagging words as misspelled but you have it spelled the way you want it, select Add to Dictionary to teach Word not to flag that word as misspelled in the future. For more information on this see: Add or edit words in a spell check dictionary.
If you don’t want Office to mark potential errors with squiggly lines while you are working, you can turn automatic spelling and grammar checking off:
-
On the File menu, click Options, and then click Proofing.
-
Select or clear the Check spelling as you type and Mark grammar errors as you type check boxes.
Note: You can turn the spelling checker on or off for the document you’re working with or for all new documents. Select an option in the Exceptions for list, and then select or clear the Hide spelling errors in this document only and Hide grammar errors in this document only check boxes.
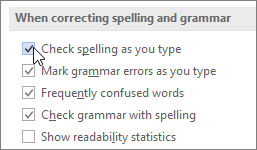
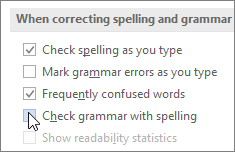
If you don’t want Word to check grammar at all (either when running a spell check or automatically as you type), you can turn it off:
-
On the File menu, click Options, and then click Proofing.
-
Clear the Mark grammar errors as you type and Check grammar with spelling check boxes.
-
On the File menu, click Options > Proofing> Recheck Document.
-
Click Yes when you see the warning message about resetting the spelling and grammar checker.
-
Click OK in the dialog box to get back to the document, and then run the spelling and grammar checker again.
See also
For more information about Microsoft Editor, see Microsoft Editor checks grammar and more in documents, mail, and the web.
For more topics on spelling and grammar, see Spelling and grammar in Word.
To try Microsoft Editor for yourself, download the Editor in Word Tutorial.
In Windows 11/10, misspelled words get autocorrected and highlighted automatically. However, if you want to turn off Spell Checker & Auto-Correct functionalities, you can do it via Settings as well as using REGEDIT and GPEDIT. Today we show you how to do it using the Windows 11 Settings or the Local Group Policy Editor and the Registry Editor in Windows 11/10.

Autocorrect and Highlight misspelled words features are helpful when you need to complete a big writing project quickly and don’t want to spend time proofreading every word. Your Windows 10 computer highlights the misspelled words and changes them automatically so that you don’t have to spend your time on them.
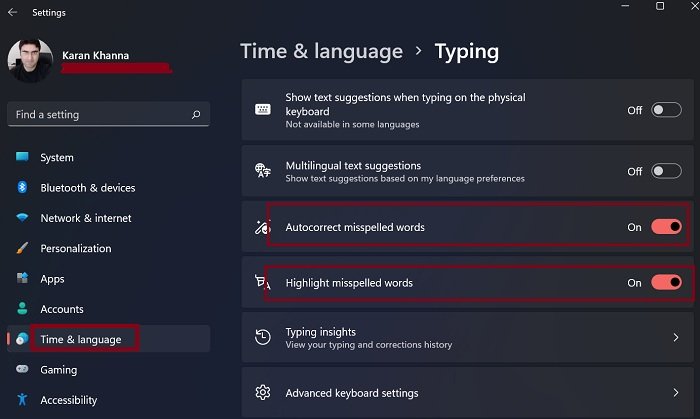
Windows 11 is a considerable improvement as far as usability is concerned. A lot of options in the Settings menu have changed their positions. A lot of options which were previously not a part of the Settings menu have been added as well. One such case is with the option to enable or disable Autocorrect and Highlight Misspelled Words settings in Windows 11. If you wish to know the procedure for the same, it is as follows:
- Right-click on the Start button and select Settings.
- In the Settings menu, go to the Time & language tab on the list on the left-hand side.
- In the right-pane, click on Typing.
- Here you would find 2 options namely Autocorrect mispelled words and Highlight misspelled words. Both have switches to enable or disable them.
Disable Autocorrect and Highlight misspelled words in Windows 11/10 via GPEDIT
To disable Autocorrect and Highlight misspelled words using Group Policy, follow these steps:
- Press Win+R to open the Run dialog.
- Type gpedit.msc and press Enter.
- Go to Regional and Language Options in User Configuration.
- Double-click on the Turn off autocorrect misspelled words and Turn off highlight misspelled words settings.
- Choose the Enabled option.
- Click the OK button.
Let’s delve into these aforementioned in detail.
At first, you have to open the Local Group Policy Editor. For that, press Win+R, type gpedit.msc, and press the Enter button.
Once it is opened, navigate to the following path:
User Configuration > Administrative Templates > Control Panel > Regional and Language Options
Here you can find two settings named Turn off autocorrect misspelled words and Turn off highlight misspelled words. Double-click on each of them and select the Enabled option.

Click the OK button to save the change.
Suppose you want to re-enable Highlight misspelled words and Autocorrect misspelled words features. In that case, you need to open the same settings in the Local Group Policy Editor, choose the Not Configured option, and click the OK button.
Turn off Autocorrect and Highlight misspelled words using Registry in Windows 11/10
To turn Autocorrect and Highlight misspelled words using Registry, follow these steps:
- Press Win+R to open the Run prompt.
- Type regedit and press the Enter button.
- Click on the Yes option.
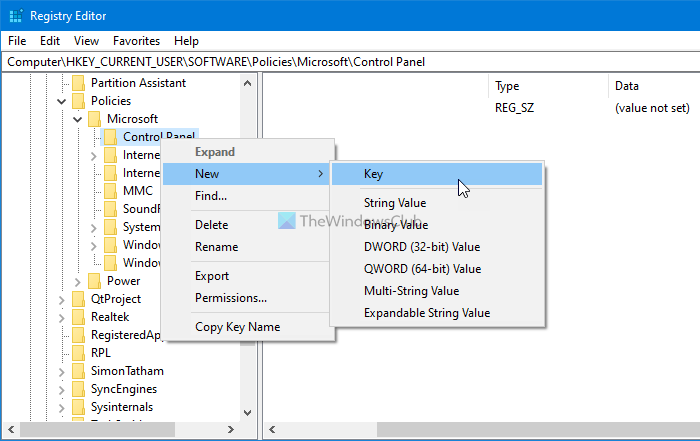
- Navigate to Microsoft in HKEY_CURRENT_USER.
- Right-click on Microsoft > New > Key.
- Name it as Control Panel.
- Right-click on Control Panel > New > Key.
- Name it as International.
- Right-click on International > New > DWORD (32-bit) Value.
- Name it as TurnOffAutocorrectMisspelledWords and TurnOffHighlightMisspelledWords.
- Double-click on each of them and enter 1 as the Value data.
- Click the OK button.
Keep reading to learn more about these steps.
At first, press Win+R, type regedit, press the Enter button, and choose the Yes option to open Registry Editor on your computer. After that, navigate to this path:
HKEY_CURRENT_USERSOFTWAREPoliciesMicrosoft
Right-click on the Microsoft key, select New > Key and name it as Control Panel. Next, right-click on the Control Panel key, select New > Key, and name it International.
Then, you have to create a REG_DOWRD value in the International key.
For that, right-click on it, select New > DWORD (32-bit) Value, and name it as TurnOffAutocorrectMisspelledWords.
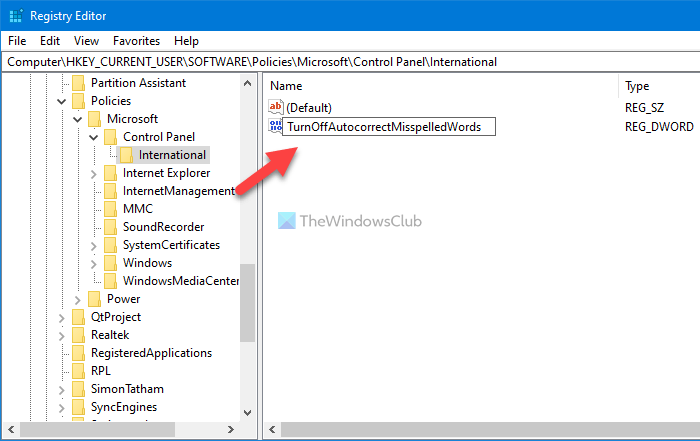
Follow the same steps to create another REG_DWORD value named TurnOffHighlightMisspelledWords.
Now, double-click on each of them to set the Value data as 1.

Click on the OK button to save the change.
If you want to turn them on again, open the same REG_DWORD values, enter the Value data as 0, and click the OK button to save the change.
Hope it helped you.
What is the difference between Autocorrect misspelled words and Highlight misspelled words?
The difference is that the autocorrect option will correct the misspelled word automatically as soon as you hit the Spacebar or Enter. In case of highlight, it would simply highlight the error and you could fix it later. The latter prevents chances of false corrections.
Why has the autocorrect option been introduced so late with Windows when it already existed with phone?
You remember when autocorrect would mess up a word with a false correction with your phone, but it was ok. The applications phones were intended for didn’t need the same accuracy as that with a full-fledged computer. But as the system grew smarter, Microsoft introduced the feature with Windows.
 Please Note:
This article is written for users of the following Microsoft Word versions: 2007, 2010, 2013, 2016, 2019, Word in Microsoft 365, and 2021. If you are using an earlier version (Word 2003 or earlier), this tip may not work for you. For a version of this tip written specifically for earlier versions of Word, click here: Hiding Spelling Errors.
![]()
Written by Allen Wyatt (last updated March 25, 2023)
This tip applies to Word 2007, 2010, 2013, 2016, 2019, Word in Microsoft 365, and 2021
Word includes a feature that checks up on the spelling and grammar in your document as you type. You’ve seen the results—the red and green squiggly underlines that mark spelling and grammar errors.
For some people, the red underlines that denote spelling problems can be distracting, since their appearance can break your concentration as you are composing your document. Perhaps you would rather check spelling as a discrete phase of document development at a later time. If you find the red squiggly underlines distracting, you can turn them off. Simply follow these steps:
- Display the Word Options dialog box. (In Word 2007 click the Office button and then click Word Options. In Word 2010 and later versions display the File tab of the ribbon and then click Options.)
- At the left side of the dialog box, click Proofing. (See Figure 1.)
- At the bottom of the dialog box, make sure the Hide Spelling Errors in This Document Only check box is selected.
- Click on OK.
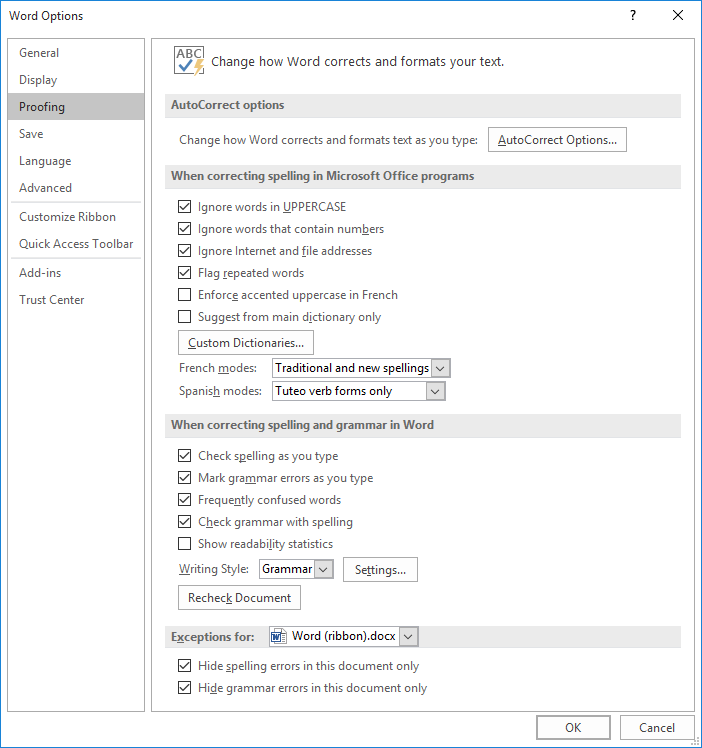
Figure 1. The proofing options of the Word Options dialog box.
Any existing red squiggly underlines should disappear. In order to check your spelling you will now explicitly need to start the spell checker.
WordTips is your source for cost-effective Microsoft Word training.
(Microsoft Word is the most popular word processing software in the world.)
This tip (6104) applies to Microsoft Word 2007, 2010, 2013, 2016, 2019, Word in Microsoft 365, and 2021. You can find a version of this tip for the older menu interface of Word here: Hiding Spelling Errors.
Author Bio
With more than 50 non-fiction books and numerous magazine articles to his credit, Allen Wyatt is an internationally recognized author. He is president of Sharon Parq Associates, a computer and publishing services company. Learn more about Allen…
MORE FROM ALLEN
Skipping Numbering
Got a numbered list, but you want to add other types of non-numbered paragraphs in the middle of the list? It’s easy to …
Discover More
Adding a Macro to the Quick Access Toolbar
One of the easiest ways to quickly access a macro is to assign it to the Quick Access toolbar. Here’s how you can make …
Discover More
Notification when Recalculation is Done
If you manually recalculate your workbooks, you are probably doing so because of the time it takes to do the …
Discover More
More WordTips (ribbon)
Forcing a Complete Spelling and Grammar Check
There are a couple of ways that various parts of a document can have spelling and grammar checking «turned off.» This tip …
Discover More
Spell Checking Only Checking Grammar
Word has a built-in spelling and grammar checker that can help reduce errors in your prose. It may be a bit confusing if …
Discover More
Spellcheck for Two Languages
Are you creating a document that mixes different languages? Word can handle the multi-language scenario, but it may take …
Discover More
![]()
Download Article
![]()
Download Article
This wikiHow teaches you how to turn on the spell checker feature on your computer, and highlight misspelled words as you type.
-
1
Open your Windows Settings. You can open Settings from the Start menu, or press the ⊞ Win+I keys on your keyboard.
-
2
Click Devices in Settings.
Advertisement
-
3
Click Typing on the left panel. This will open your keyboard settings on the right-hand side.
-
4
Slide the Highlight misspelled words switch to the On position. When this option is enabled, Windows will check your spelling as you type, and highlight your spelling errors.
- The switch will turn blue when it’s on.
- Optionally, you can also turn on Autocorrect Misspelled Words here. This way, Windows will automatically correct your spelling mistakes as you type.


Advertisement
-
1
Open Microsoft Word on your computer. The Word app looks like a blue-and-white document icon. You can find it on your Start menu.
- You can open a recent document, or a new, blank sheet.
-
2
Click the File tab. This button is in the upper-left corner of Word. It will open your file menu.
-
3
Select Options from the file menu. You can find it at the bottom of the left sidebar. It will open a new window.
-
4
Click the Proofing tab in Options. You can find it near the top of the left sidebar in the Options window.
-
5
Check the Check spelling as you type option. You can find it in the «When correcting spelling and grammar in Word» section in Proofing.
- When this option is enabled, Word will underline misspelled words as you type.
- Optionally, you can also check some of the other boxes in this section, and enable other correction tools for grammar errors.


Advertisement
-
1
Open your Mac’s System Preferences. Find and click the gray gear icon in your Applications folder, or click the Apple icon on the top-left and select System Preferences on the menu.
-
2
Click Keyboard in System Preferences. This option looks like a tiny keyboard icon on the second row of options. It will open your keyboard and typing settings.
-
3
Click the Text tab. It’s located between Keyboard and Shortcuts at the top.
-
4
Check the Correct spelling automatically box. You can find this option in the upper-right corner of the Text menu. When it’s enabled, your Mac will check your spelling as you type, and automatically correct misspelled words.


Advertisement
-
1
Open Microsoft Word on your computer. The Word app looks like a blue-and-white document icon. You can find it in your Applications folder.
- You can open a saved document, or a new, blank sheet.
-
2
Click the Word tab on your menu bar. This button is in the upper-left corner of your screen. It will open a drop-down menu.
-
3
Click Preferences on the Word menu. This will open your app settings in a new window.
-
4
Click Spelling & Grammar in Preferences. It’s under «Authoring and Proofing Tools» on the top row.
-
5
Check the Always suggest corrections box. It’s the first option under «Spelling.» When it’s enabled, you can right-click on a misspelled word, and see a list of suggestions.
-
6
Check the Check Spelling as you type box. When this option is enabled, Word will automatically underline misspelled words in your document as you type.
-
7
Select any additional spelling and grammar options you want to enable. Click and check the box next to any of the options under the «Spelling» and «Grammar» sections.
-
8
Close the Spelling & Grammar window. Click the red button in the top-left corner to close your Settings.
- Changes to your settings are saved automatically.


Advertisement
-
1
Open an app that lets you type on your Mac. You can open a word processor like TextEdit or Notes, a messaging app like Messages or Mail, an internet browser, or any other app that lets you type text.
-
2
Click the Edit tab on the menu bar. You can find this button in the upper-left corner of your screen. It will open a drop-down menu.
-
3
Hover the mouse over Spelling and Grammar. It should be near the bottom of the Edit menu.
-
4
Click Check Spelling While Typing on the menu. When this option is enabled, your Mac automatically checks your spelling as you type in this app, and highlights misspelled words.
- When it’s enabled, you’ll see a checkmark next to this option on the menu.
- In some apps, you can also enable Check Spelling While Typing and Correct Spelling Automatically here.


Advertisement
Ask a Question
200 characters left
Include your email address to get a message when this question is answered.
Submit
Advertisement
Thanks for submitting a tip for review!
About This Article
Thanks to all authors for creating a page that has been read 25,661 times.
Is this article up to date?
Latest Articles for Microsoft
-

Image: lexiconimages/Adobe Stock
CXOMicrosoft report: Low-code tools a lifeline for overburdened IT teams
A new report underscores the effectiveness of low-code tools in reducing costs and helping IT professionals deal with growing demands.
-
Image: irissca/Adobe Stock
Artificial IntelligenceChatGPT cheat sheet: Complete guide for 2023
Get up and running with ChatGPT with this comprehensive cheat sheet. Learn everything from how to sign up for free to enterprise use cases, and start using ChatGPT quickly and effectively.
-
Image: Farknot Architect/Adobe Stock
SoftwareHow to access Microsoft Remote Desktop on your Mac
If you need to access Windows applications or PCs using your Mac, a remote desktop connection is the way to go. Here’s how to set up and use the connection.
-
Image: PhotoGranary/Adobe Stock
SoftwareMicrosoft PowerToys: A cheat sheet
Users are always searching for ways to make their computing lives better, and the Microsoft PowerToys are made specifically for this purpose.
-
Image: StackCommerce
Tech & WorkRun Windows programs at native speed on macOS, Linux or ChromeOS for just $50
Ditch those clunky emulators and run your Windows software on other operating systems as quickly and easily as on a Windows computer.
-
Image: Microsoft
SoftwareGet lifetime access to Microsoft Office 2021 for just $50
Whether you’re starting a new business venture and need Microsoft Office’s help or you just want to get better organized in your personal life, it’s a good time to take advantage of this limited-time deal.
-
Image: PhotoGranary/Adobe Stock
DeveloperNew ways to bring MongoDB data and apps to Azure Cosmos DB
Microsoft is making it easier to move existing MongoDB workloads to its Cosmos database.
-
Image: wachiwit/Adobe Stock
Tech & WorkTurbocharge your company’s productivity with advanced Excel skills for only $10
Learn all of Excel’s features, plus how to program and streamline your workflow with automated tasks in this Excel Training bundle.
-
Image: Adobe Stock/alvaher
SecurityMicrosoft adds GPT-4 to its defensive suite in Security Copilot
The new AI security tool, which can answer questions about vulnerabilities and reverse-engineer problems, is now in preview.
-
Image: Pixabay
SoftwareLoop components make collaboration easier in Office and Microsoft 365 apps
Structured chunks of data you can share and update in multiple places are showing up in different Office applications. Here’s what you can do with these Loop components.
-
Image: Andy Wolber/TechRepublic
SoftwareGoogle Workspace pricing (2023): How to choose the right plan for your business
Moving to Google Workspace? Understand the differences between business and enterprise plans so you can choose the right one for your business.
-
Image: gguy/Adobe Stock
SecurityMassive adversary-in-the-middle phishing campaign bypasses MFA and mimics Microsoft Office
Microsoft has already seen millions of phishing emails sent every day by attackers using this phishing kit. Learn how to protect your business from this AitM campaign.
-
Image: Hugo Baeta
CloudRunning WordPress on Azure for secure, fast and global content delivery
Learn about Microsoft’s WordPress on Azure App Service, as well as an interesting alternative from WP Engine.
-
Image: PhotoGranary/Adobe Stock
CloudAzure Monitor’s Change Analysis helps you troubleshoot problems quickly
Azure Monitor’s Change Analysis helps you troubleshoot problems quickly.
-
Image credit: Microsoft
Artificial IntelligenceMicrosoft adds Copilot AI productivity bot to 365 suite
Copilot, a natural language bot that can pull from data across the Microsoft 365 suite, is now in testing with select commercial customers.


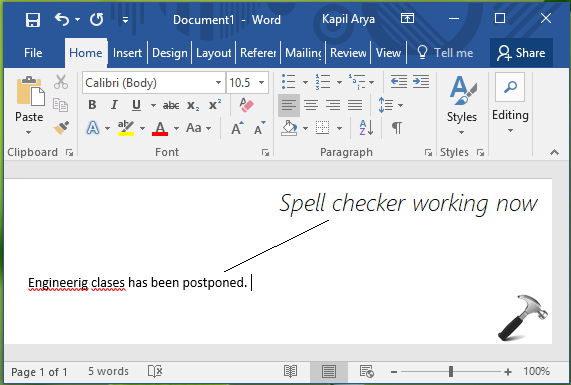
As soon as you type in Microsoft Word, misspelled words are highlighted with red line beneath them. This helps us to check incorrectly type words in a large documents and we easily rectify them by doing a right click and selecting correct spelling for the word(s).
However, sometimes, users may found that spell checker is no longer working in Word application. Under such a condition, it becomes quite difficult to highlight misspelled words and thus grammatical error(s) remain in the documents, which may slash your impression.
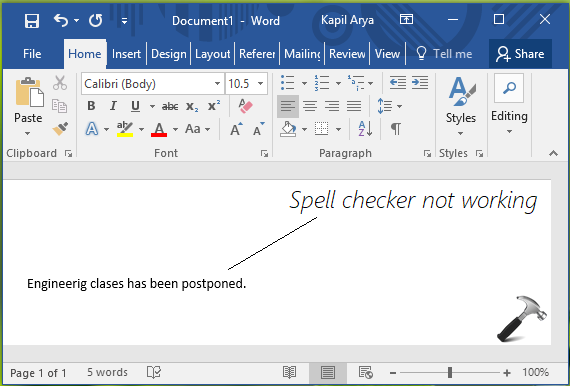
So if you’re facing the problem of spell checker not working, in this article we’ll help you to fix that. Here’s what to do to solve this issue.
FIX: Spell Checker Not Working In Word 2016/13/10/07
FIX 1 – Check Proofing Settings
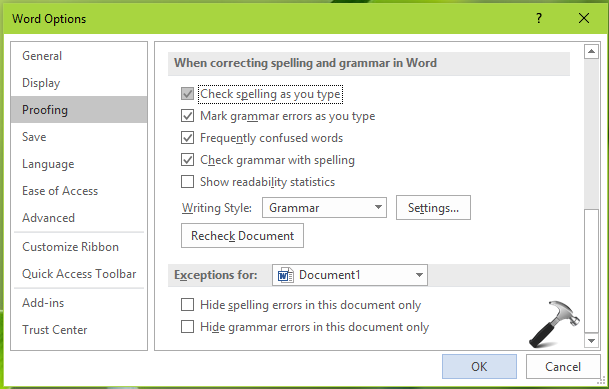
1. Open Word, click on FILE > Options.
2. In the Word Options, switch to Proofing. Under ‘When correcting spelling and grammar in Word‘ heading, make sure following options are checked:
- Check spelling as you type
- Check grammar with spelling
For Exceptions for the document(s), uncheck all the options. Click OK. Return to the document you’ve working on.
This should immediately start spell checker. But if that doesn’t happens, go ahead and try FIX 2.
FIX 2 – Using Registry
Registry Disclaimer: The further steps will involve registry manipulation. Making mistakes while manipulating registry could affect your system adversely. So be careful while editing registry entries and create a System Restore point first.
1. Press  + R and put regedit in Run dialog box to open Registry Editor (if you’re not familiar with Registry Editor, then click here). Click OK.

2. In left pane of Registry Editor window, navigate to following registry key:
HKEY_CURRENT_USERSoftwareMicrosoftShared ToolsProofing Tools1.0Override
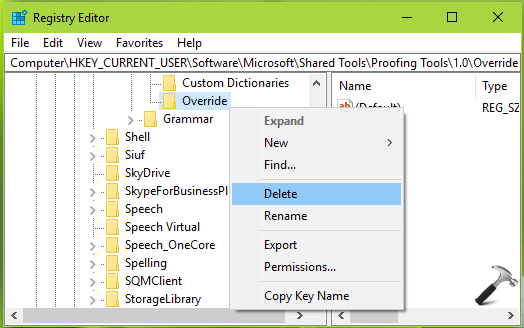
3. Right click on the Override registry key and select Delete. Click Yes on the confirmation prompt shown below.
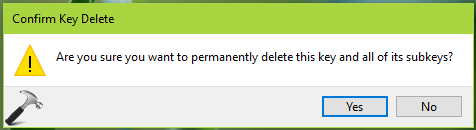
Close Registry Editor. Reboot the machine, spell checker should work after restart.
Hope this helps!
READ THESE ARTICLES NEXT
- Fix: Cannot locate the Internet server or proxy server
- Fix: Microsoft Office cannot verify the license for this product
- Fix: Another account from your organization is already signed in on this computer
- Fix Microsoft 365 Error AADSTS9002313
- Fix: We had a problem installing your Office Program(s)
- Fix: Microsoft Office won’t update automatically
- How to enable dark mode in Office 2021/365
- How to install Office 2021 specific apps you want
- Fix: Outlook isn’t configured to have a default profile
- How to activate Microsoft 365 E5 Developer subscription
Windows 10: How to enable or disable Autocorrect and Highlight Misspelled Words settings in Windows 10
Discus and support How to enable or disable Autocorrect and Highlight Misspelled Words settings in Windows 10 in Windows 10 News to solve the problem; In Windows 10, misspelled words get autocorrected and highlighted automatically. However, if you want to turn off Spell Checker & Auto-Correct…
Discussion in ‘Windows 10 News’ started by WinClub, Jun 2, 2021.
-
How to enable or disable Autocorrect and Highlight Misspelled Words settings in Windows 10
In Windows 10, misspelled words get autocorrected and highlighted automatically. However, if you want to turn off Spell Checker & Auto-Correct functionalities, you can do it via Settings as well as using REGEDIT and GPEDIT. Today we show you how to do it using the Local Group Policy Editor and the Registry Editor.
Autocorrect and Highlight misspelled words features are helpful when you need to complete a big writing project quickly and don’t want to spend time proofreading every word. Your Windows 10 computer highlights the misspelled words and changes them automatically so that you don’t have to spend your time on them.
Disable Autocorrect and Highlight misspelled words in Windows10
To disable Autocorrect and Highlight misspelled words using Group Policy, follow these steps:
- Press Win+R to open the Run dialog.
- Type gpedit.msc and press Enter.
- Go to Regional and Language Options in User Configuration.
- Double-click on the Turn off autocorrect misspelled words and Turn off highlight misspelled words settings.
- Choose the Enabled option.
- Click the OK button.
Let’s delve into these aforementioned in detail.
At first, you have to open the Local Group Policy Editor. For that, press Win+R, type gpedit.msc, and press the Enter button.
Once it is opened, navigate to the following path:
User Configuration > Administrative Templates > Control Panel > Regional and Language Options
Here you can find two settings named Turn off autocorrect misspelled words and Turn off highlight misspelled words. Double-click on each of them and select the Enabled option.
Click the OK button to save the change.
Suppose you want to re-enable Highlight misspelled words and Autocorrect misspelled words features. In that case, you need to open the same settings in the Local Group Policy Editor, choose the Not Configured option, and click the OK button.
Turn off Autocorrect and Highlight misspelled words using Registry
To turn Autocorrect and Highlight misspelled words using Registry, follow these steps:
- Press Win+R to open the Run prompt.
- Type regedit and press the Enter button.
- Click on the Yes option.
- Navigate to Microsoft in HKEY_CURRENT_USER.
- Right-click on Microsoft > New > Key.
- Name it as Control Panel.
- Right-click on Control Panel > New > Key.
- Name it as International.
- Right-click on International > New > DWORD (32-bit) Value.
- Name it as TurnOffAutocorrectMisspelledWords and TurnOffHighlightMisspelledWords.
- Double-click on each of them and enter 1 as the Value data.
- Click the OK button.
Keep reading to learn more about these steps.
At first, press Win+R, type regedit, press the Enter button, and choose the Yes option to open Registry Editor on your computer. After that, navigate to this path:
HKEY_CURRENT_USERSOFTWAREPoliciesMicrosoft
Right-click on the Microsoft key, select New > Key and name it as Control Panel. Next, right-click on the Control Panel key, select New > Key, and name it International.
Then, you have to create a REG_DOWRD value in the International key.
For that, right-click on it, select New > DWORD (32-bit) Value, and name it as TurnOffAutocorrectMisspelledWords.
Follow the same steps to create another REG_DWORD value named TurnOffHighlightMisspelledWords.
Now, double-click on each of them to set the Value data as 1.
Click on the OK button to save the change.
If you want to turn them on again, open the same REG_DWORD values, enter the Value data as 0, and click the OK button to save the change.
Hope it helped you.
This article How to enable or disable Autocorrect and Highlight Misspelled Words settings in Windows 10 first appeared on TheWindowsClub.com.
read more…
-
‘Autocorrect/Highlight misspelled words’ NOT working in Windows 10 Pro
Hello
I am using Windows 10 Pro on my laptop (Lenovo ThinkPad T450) and facing issue with ‘Autocorrect/Highlight misspelled words’ option. Windows is not autocorrecting or highlighting the misspelled words in any of the application. I have checked the following
Windows settings and both these options are enabled there.Settings -> Devices -> Typing -> Spelling -> Autocorrect misspelled words
Settings -> Devices -> Typing -> Spelling -> Highlight misspelled words
I have tried turning off/on these settings but it didn’t help.
Is anybody out there also facing this issue. What could be the resolution steps to fix this?
Please help.
Thanks in advance.
-
Autocorrect misspelled words not working / can I use SwiftKey?
I would like to have misspelled words in Dutch autocorrected while typing in the webbrowser chrome on windows. On my android phone, my keyboard (GBoard) does this fantastically. SwiftKey by Microsoft seems to do the same on android.
In windows 10 PC Settings — Devices — Typing, I have ‘autocorrect misspelled words’ activated. For hardware keyboard, I have ‘autocorrect misspelled words as I type’ activated.
Autocorrection does not work. I see suggested words (see attachment), and when I misspell a word, the correct suggestion usually comes up first. But I have to click the word to have it corrected.
My questions: Am I doing something wrong and does this work for others? If it does not work for others, is there something I can do to get the android kind of typing on windows 10?
My windows version number is 19041.685
-
How to enable or disable Autocorrect and Highlight Misspelled Words settings in Windows 10
Autocorrect in Win10… basically non-existent(?)
In this case, we suggest following the steps below to work around the issue:
- On the Cortana search box, type Typing Settings and press
Enter. - Turn off Autocorrect misspelled words and Highlight misspelled words.
- Restart your PC.
- Do step 1 and 2 but this time turn on Autocorrect misspelled words
and Highlight misspelled words. - Restart your PC.
- Check if the issue still exist.
If you have questions, please let us know.
- On the Cortana search box, type Typing Settings and press
![How to enable or disable Autocorrect and Highlight Misspelled Words settings in Windows 10 [IMG]](https://www.windowsphoneinfo.com/threads/how-to-enable-or-disable-autocorrect-and-highlight-misspelled-words-settings-in-windows-10.558554/proxy.php?image=https%3A%2F%2Fwww.tenforums.com%2Fattachments%2Fgeneral-support%2F313507d1609854548t-autocorrect-misspelled-words-not-working-can-i-use-swiftkey-setting1.png&hash=66007e5d7a7c69391c5fcc45900fefda "How to enable or disable Autocorrect and Highlight Misspelled Words settings in Windows 10")
![How to enable or disable Autocorrect and Highlight Misspelled Words settings in Windows 10 [IMG]](https://www.windowsphoneinfo.com/threads/how-to-enable-or-disable-autocorrect-and-highlight-misspelled-words-settings-in-windows-10.558554/proxy.php?image=https%3A%2F%2Fwww.tenforums.com%2Fattachments%2Fgeneral-support%2F313508d1609854562t-autocorrect-misspelled-words-not-working-can-i-use-swiftkey-setting2.png&hash=14c9197e3605ffe1bc711710337a09f2 "How to enable or disable Autocorrect and Highlight Misspelled Words settings in Windows 10")
![How to enable or disable Autocorrect and Highlight Misspelled Words settings in Windows 10 [IMG]](https://www.windowsphoneinfo.com/threads/how-to-enable-or-disable-autocorrect-and-highlight-misspelled-words-settings-in-windows-10.558554/proxy.php?image=https%3A%2F%2Fwww.tenforums.com%2Fattachments%2Fgeneral-support%2F313506d1609854523t-autocorrect-misspelled-words-not-working-can-i-use-swiftkey-erisietsmis.png&hash=ef2305e36e860fc4208cf2d204829400 "How to enable or disable Autocorrect and Highlight Misspelled Words settings in Windows 10")
How to enable or disable Autocorrect and Highlight Misspelled Words settings in Windows 10
-
How to enable or disable Autocorrect and Highlight Misspelled Words settings in Windows 10 — Similar Threads — enable disable Autocorrect
-
Setting Typing highlight misspelled words always on even though it is turned off
in Windows 10 Gaming
Setting Typing highlight misspelled words always on even though it is turned off: Can someone tell me which program does the setting Typing >»highlight misspelled words» work in???? I tried 10000 apps and it always highlight misspelled words. Please do not say Mail app and skype. In mail and skype apps when I type something misspelled and it always get red… -
Setting Typing highlight misspelled words always on even though it is turned off
in Windows 10 Software and Apps
Setting Typing highlight misspelled words always on even though it is turned off: Can someone tell me which program does the setting Typing >»highlight misspelled words» work in???? I tried 10000 apps and it always highlight misspelled words. Please do not say Mail app and skype. In mail and skype apps when I type something misspelled and it always get red… -
Setting Typing highlight misspelled words always on even though it is turned off
in Windows 10 Customization
Setting Typing highlight misspelled words always on even though it is turned off: Can someone tell me which program does the setting Typing >»highlight misspelled words» work in???? I tried 10000 apps and it always highlight misspelled words. Please do not say Mail app and skype. In mail and skype apps when I type something misspelled and it always get red… -
Autocorrect misspelled words not working / can I use SwiftKey?
in Windows 10 Support
Autocorrect misspelled words not working / can I use SwiftKey?: I would like to have misspelled words in Dutch autocorrected while typing in the webbrowser chrome on windows. On my android phone, my keyboard (GBoard) does this fantastically. SwiftKey by Microsoft seems to do the same on android.In windows 10 PC Settings — Devices -…
-
Your Phone companion keeps highlighting misspelled words. How to stop it?
in Windows 10 Ask Insider
Your Phone companion keeps highlighting misspelled words. How to stop it?: I’m using Your Phone companion app on PC and it keeps highlighting misspelled words when typing SMS texts. I have the «highlight misspelled words» feature turned off in Windows settings but the problem still persists. I can’t find any option inside the app to stop this… -
Misspelled words
in Windows 10 Customization
Misspelled words: I’m finding simple words like «the» and «with» and others within the Microsoft pages and can’t correct them. This is also on other Microsoft pages. I don’t know where the problem originates from, Windows, Microsoft, Edge, etc. I first noticed this with using Goggle Chrome… -
Windows 10 is not underlining misspelled words
in Windows 10 Customization
Windows 10 is not underlining misspelled words: In the new Word, misspelled words are not being underlined. How do I activate it to pick up and underline misspelled words? It was automatic in the old version, but not now!… -
Highlight misspelled words
in Windows 10 Customization
Highlight misspelled words: Hi,Just have a fresh installed Windows 10 Pro with all latest updates. And I have to languages: ENG (US) and RUS.
When I type some random word like «sadfg» in application in windows (Steam, Discord, Chrome) it`s highlight the word with red line like misspelled.I turn off…
-
AutoCorrect in Word
in Windows 10 BSOD Crashes and Debugging
AutoCorrect in Word: Autocorrect spelling not working in Office Word Windows 10 April update. Help.https://answers.microsoft.com/en-us/windows/forum/all/autocorrect-in-word/8e719db2-b957-4235-a080-6fe97780d372