При работе с программным офисным пакетом Microsoft Office в некоторых ситуациях пользователю может понадобиться сделать скрытый текст в Ворде. Это значит, что в документе Word скрытый текст не виден при чтении или печати, как будто его там нет.
Помимо текста можно сделать скрытыми таблицы, графики, изображения или другие элементы, находящиеся внутри документа. В текстовом редакторе Word скрыть текст или другие элементы можно с помощью использования знаков форматирования.
Содержание:
- Для чего бывает нужно скрыть часть текста в Ворде
- Как сделать невидимым текст в Ворде — 1 способ
- Как убрать невидимый текст в Ворде
- Как скрыть текст в Ворде — 2 способ
- Как сделать скрываемый текст в Ворде — 3 способ
- Печать скрытого текста в Ворде
- Как убрать скрытый текст в Ворде — 1 способ
- Как убрать скрытый текст в Word — 2 способ
- Как удалить скрытый текст в Ворде
- Выводы статьи
По сути, скрытый текст — это стандартный текст с примененными метками форматирования. Поэтому любой, кто может редактировать данный документ имеет возможности для получения доступа к скрытым объектам и сможет их отобразить.
Если это не мера безопасности, то почему бы просто не удалить часть текста из документа Word? Дело в том, что невидимый текст в Ворде применяется для нескольких целей.
Для чего бывает нужно скрыть часть текста в Ворде
При предоставлении документа другим лицам, вы можете скрыть часть текста, чтобы они увидели только ту часть в документе, которую им следует просмотреть. Таким способом вы можете сделать невидимыми некоторые абзацы, объекты или спрятать свои пометки.
Вы можете убрать некоторые фрагменты текста из документа, скрыв их для печати. В результате, вы раздадите другим лицам бумажную версию документа без скрытого текста, а у вас останется полная версия этого файла.
При использовании функции печати можно скрыть изображения, графики или другие встроенные объекты в документе Word, чтобы сэкономить расходные материалы: краску принтера или бумагу.
При печати документа скрытые элементы не будут напечатаны на бумаге, и они не отобразятся на экране компьютера.
В этой статье я расскажу о том, как сделать скрытый текст в Ворде несколькими способами, а также как отобразить скрытый текст в Ворде или удалить его полностью.
Как сделать невидимым текст в Ворде — 1 способ
Самый простой способ скрыть текст — установите белый цвет для букв скрываемого фрагмента, который ничем не отличается от цвета фона. Это не канонический способ, но он имеет право на существование, потому что этот методом часто применяют пользователи.
Для повышения конфиденциальности, дополнительно можно уменьшить шрифт, чтобы пустота не бросались в глаза, если невидимый фрагмент текста находится в середине документа. Если использовать подобный метод при печати, скрытый текст не будет виден на бумаге.
Выполните следующие действия:
- Выделите фрагмент текста, который необходимо скрыть, в документе Word.
- Во вкладке «Главная», в группе «Шрифт» щелкните по стрелке, расположенной на кнопке «Цвет шрифта».
- В выпадающем меню «Цвета темы» выберите белый цвет.
- После применения настройки фрагмент текста станет невидимым, потому что он имеет цвет одинаковый с фоном.
Можно изменить размер шрифта, предварительно выделив сокрытый фрагмент, чтобы уменьшить интервалы между абзацами на том месте, где находится скрытый текст.
После этого невидимый текст станет незаметным. Если читатель не подозревает о проделанной операции, то он визуально почти ничего не заметит.
Как убрать невидимый текст в Ворде
Чтобы вернуть все как было, выполните обратные действия:
- Выделите место с невидимым текстом в документе Word.
- Установите цвет шрифта по умолчанию.
Если вы изменили размер шрифта, то сначала выделите этот фрагмент, а потом задайте значение размера шрифта, который используется в данном документе.
Как скрыть текст в Ворде — 2 способ
Существует другой более удобный способ сокрытия текста от посторонних глаз, который следует применять при работе в текстовом редакторе Microsoft Word.
Пройдите несколько шагов:
- Откройте документ Word.
- Выделите текст, который потребовалось сделать невидимым.
- Во вкладке «Главная» нажмите на стрелку в нижнем правом углу группы «Шрифт».
- В окне «Шрифт», во вкладке «Шрифт», в группе «Видоизменение» установите флажок в опции «скрытый».
- Нажмите на кнопку «ОК».
Скрытый текст исчезнет в окне документа Word, как будто его там никогда не было.
Как сделать скрываемый текст в Ворде — 3 способ
Данный вариант аналогичен предыдущему, только он значительно упрощает эту операцию, потому что используются «горячие клавиши» вместо нескольких клацаний мышкой.
Проделайте следующее:
- Выделите фрагмент текста в документе Word.
- Нажмите одновременно на клавиши «Ctrl» + «Shift» + «H».
- В результате скрытый текст исчезнет из документа.
Печать скрытого текста в Ворде
В обычном состоянии при распечатке документа Word скрытый текст не будет напечатан на листе бумаги. В некоторых случаях пользователям нужно распечатать содержимое документа вместе со скрытыми элементами.
Пройдите шаги:
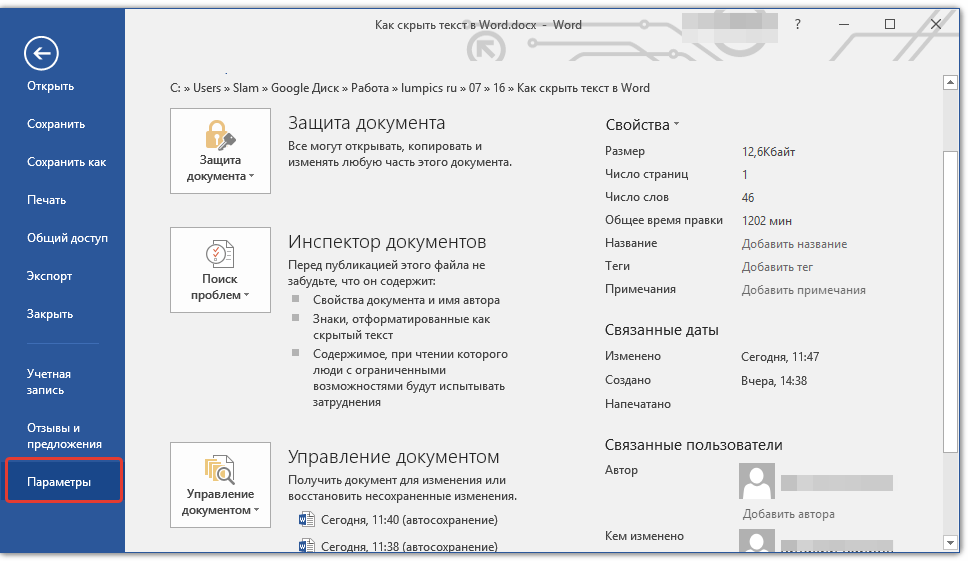
- Войдите во вкладку «Файл».
- Нажмите на кнопку «Параметры».
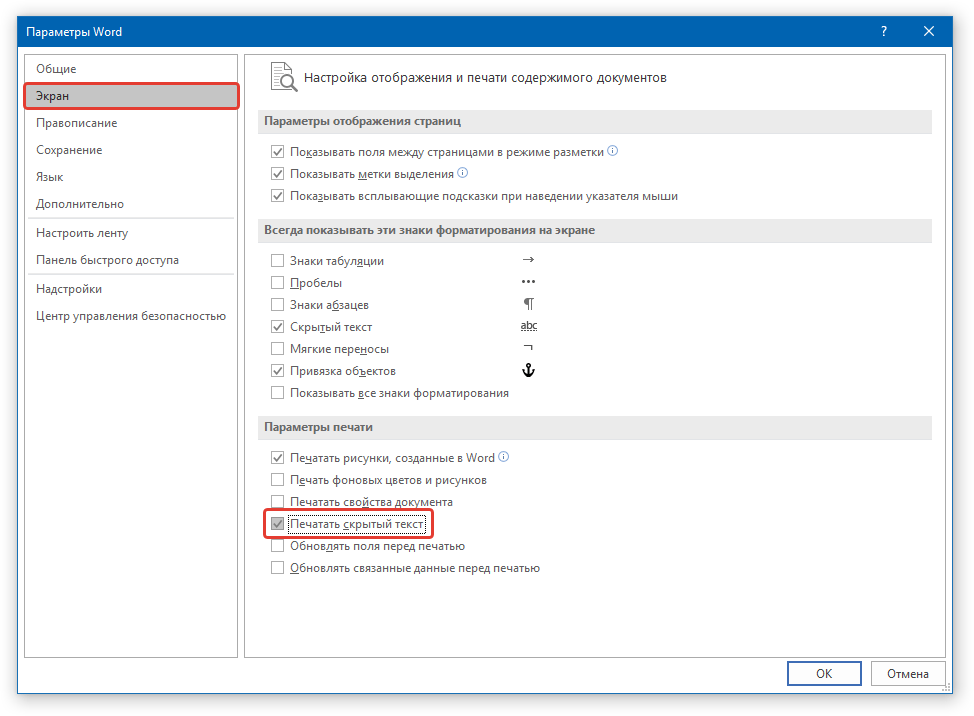
- В окне «Параметры Word» перейдите в раздел «Отображение» («Экран»).
- В опции «Параметры печати» поставьте галку в пункте «Печатать скрытый текст».
- Нажмите на кнопку «ОК».
В результате применения данных настроек, при печати в Ворде появляется скрытый текст на бумажном листе.
Как убрать скрытый текст в Ворде — 1 способ
Если в дальнейшем функция скрытия объектов больше не нужна, необходимо привести содержание документа в первоначальный вид со всеми входящими в него элементами. Давайте посмотрим, как увидеть скрытый текст в Ворде.
Вам нужно сделать следующее:
- В окне открытого файла MS Word войдите во вкладку «Главная».
- В группе «Абзац» нажмите на кнопку «Отобразить все знаки». Можете использовать альтернативный вариант — нажмите на клавиши «Ctrl» + «Shift» + «8».
- В документе отобразятся все непечатаемые символы, в том числе скрытый текст, который будет подчеркнут.
- Выделите скрытый текст.
- Нажмите на стрелку в группе «Шрифт».
- В открывшемся окне «Шрифт» откройте вкладку «Шрифт».
- В разделе «Видоизменение» снимите флажок в опции «Скрытый», а затем нажмите на кнопку «ОК».
Как убрать скрытый текст в Word — 2 способ
Этот способ поможет, когда вам потребуется убрать скрытый текст во всем документе Word, который может иметь много страниц.
Чтобы показать скрытый текст в Word потребуется сделать следующее:
- Нажмите на клавиши «Ctrl» + «A», чтобы выделить все содержимое документа.
- Нажмите на клавиши «Ctrl» + «D».
- В окне «Шрифт», во вкладке «Шрифт» снимите флажок в пункте «скрытый».
Как удалить скрытый текст в Ворде
Данный способ поможет убрать весь скрытый текст из документа Word. Перед выполнением этой операции позаботьтесь о сохранении копии этого документа, потому что это необратимая функция, которая полностью удаляет скрытые объекты из данного файла.
Выполните следующе:
- Из меню «Файл», перейдите в раздел «Сведения».
- Нажмите на кнопку «Найти проблемы» («Поиск проблем»), а в выпадающем меню на «Проверить документ» («Инспектор документов»).
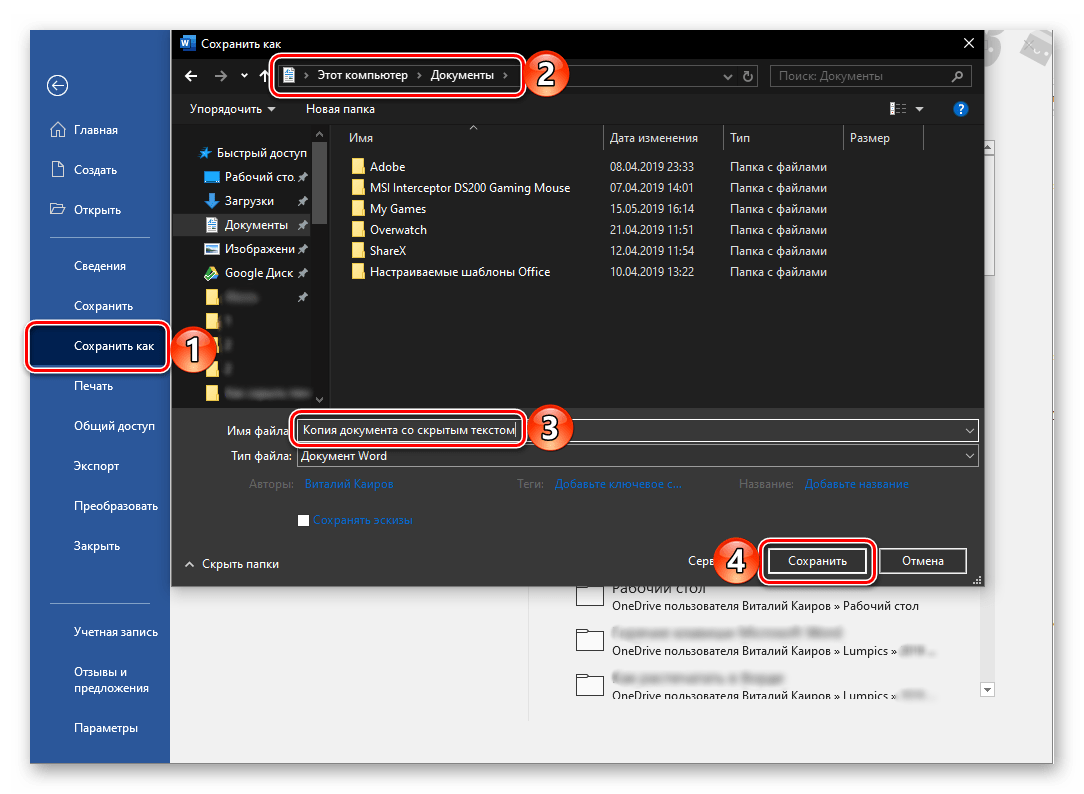
- В окне с предупреждением сохраните или откажитесь от сохранения копии документа.
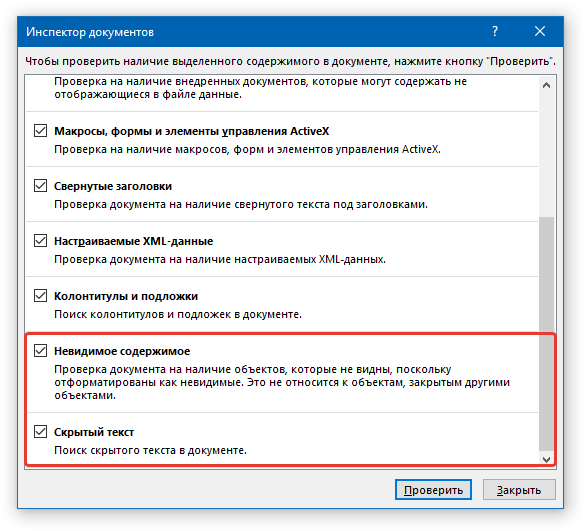
- В окне «Инспектор документов» снимите все флажки кроме параметра «Скрытый текст».
- Нажмите на кнопку «Проверить».
Если в документе кроме текста имеются скрытые объекты, которые необходимо удалить, также активируйте пункт «Невидимое содержимое».
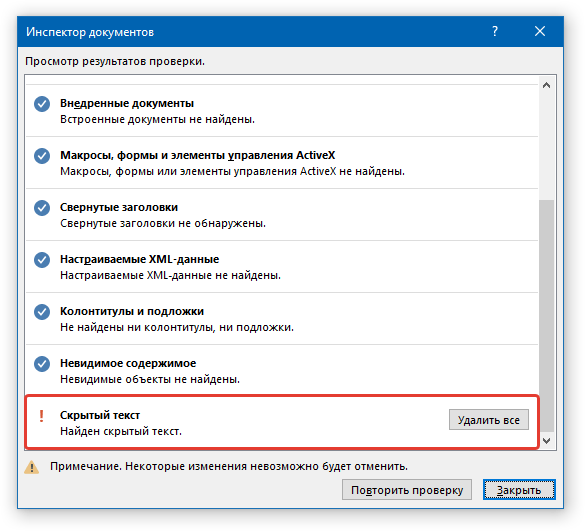
- В следующем окне нажмите на кнопку «Удалить все».
- Закройте «Инспектор документов».
Весь скрытый текст был удален из данного файла Word.
Выводы статьи
При работе с документами встречаются ситуации, когда необходимо воспользоваться малоизвестными функциями текстового редактора, например, узнать о том, как скрыть часть текста в Word. Пользователь может воспользоваться несколькими способами для решения этой задачи. Помимо этого, нужно знать про то, как показать скрытый текст в Ворде или удалить скрытое содержимое документа.
Похожие публикации:
- Как сделать колонки в Word: полное руководство
- Как сделать список литературы в Word
- Лучшие онлайн сервисы для сравнения документов
- Как конвертировать FB2 в PDF — 7 способов
- Как сравнить два документа Word — 4 способа
Содержание
- Скрываем текст в Ворде
- Скрытие текста
- Отображение скрытых элементов
- Быстрый поиск скрытого содержимого в больших документах
- Печать документа со скрытым текстом
- Заключение
- Вопросы и ответы
Среди обилия полезных функций Microsoft Word затерялась одна, которая явно понравится конспираторам — это скрытие текста, а заодно и любых других объектов, которые могут содержаться в документе. Несмотря на то что данная возможность программы расположена чуть ли не на самом видном месте, знают о ней далеко не многие пользователи. Скрытие текста вряд ли можно назвать тем, что нужно всем и каждому, но сегодня мы расскажем именно о нем.
Читайте также: Как в Word скрыть границы таблицы
Скрываем текст в Ворде
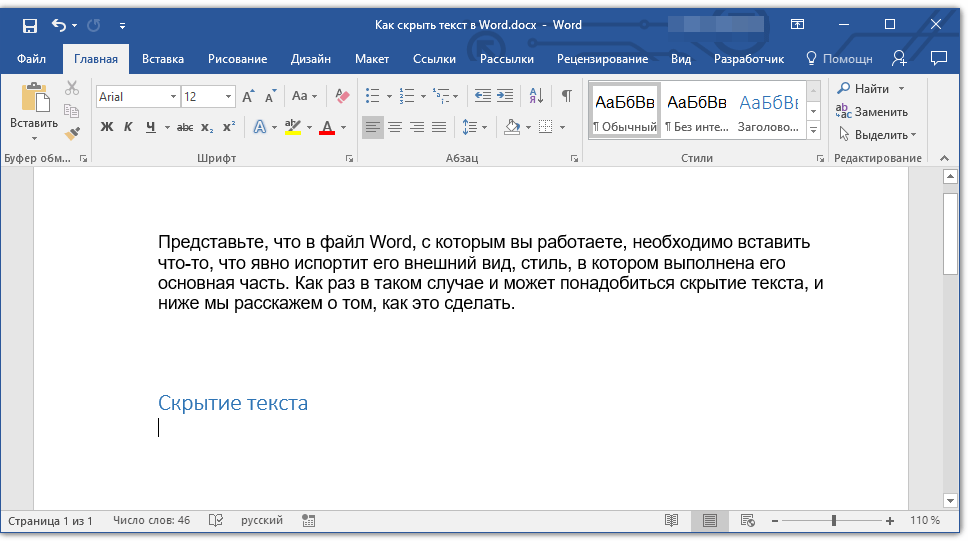
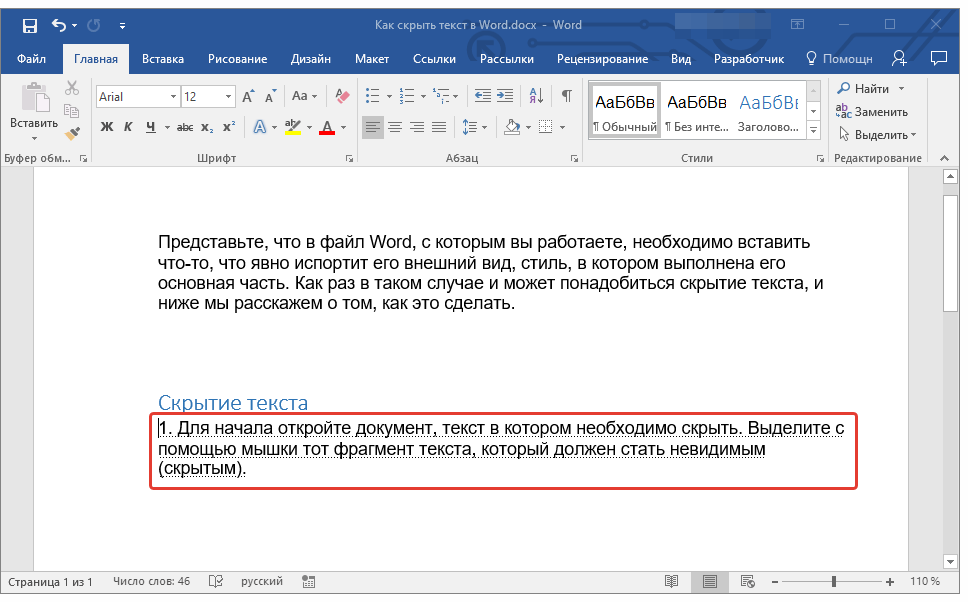
Прежде чем приступить к решению задачи, озвученной в заголовке статьи, отметим, что возможность скрытия текста, таблиц, графиков и графических объектов присутствует в текстовом редакторе от Microsoft отнюдь не конспирации ради — в этом плане от нее не так уж много толку. Основная задача данной функции — расширение возможностей оформления текстового документа. Особенно актуально ее применение, когда в файл Word, с которым вы работаете, необходимо вставить что-то, что явно испортит его внешний вид, стиль, в котором выполнена его основная часть. Как раз в таком случае и может понадобиться скрыть текст.
Читайте также: Как в Ворд вставить документ в документ
Скрытие текста
Итак, у вас есть текстовый документ Microsoft Word, фрагмент которого необходимо скрыть. Для этого выполните следующие действия:
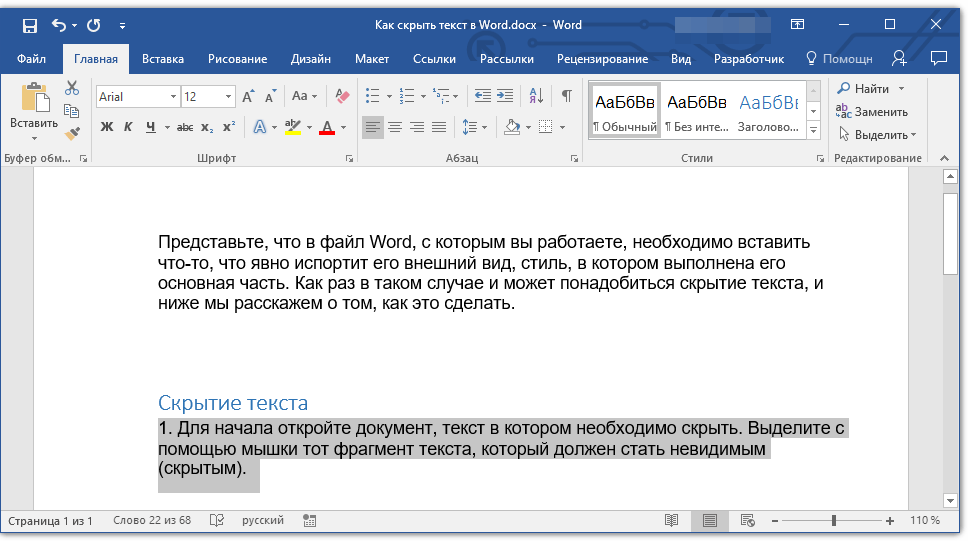
- Выделите с помощью мышки тот фрагмент текста (возможно и вместе с объектами), который должен стать невидимым (скрытым).
Читайте также: Выделение абзацев и фрагментов текста в Ворде
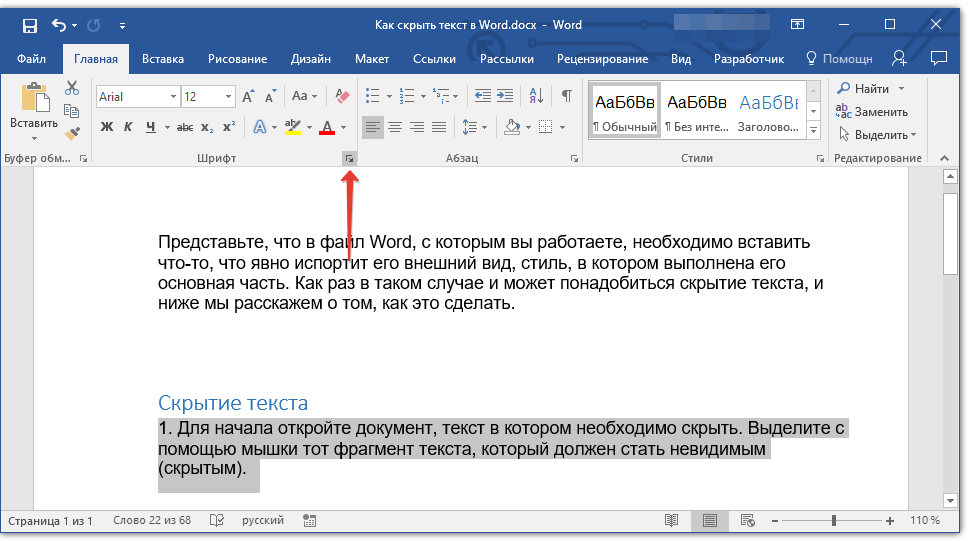
- Раскройте диалоговое окно группы инструментов «Шрифт», нажав на стрелочку в правом нижнем углу этого блока.
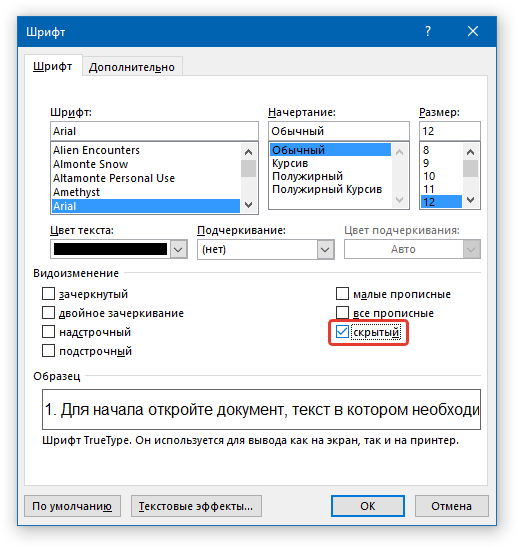
- Во вкладке «Шрифт» одноименного окна установите галочку напротив пункта «Скрытый», расположенного в группе «Видоизменение». Нажмите «ОК» для применения внесенных изменений.
Читайте также: Как изменить шрифт в Word
Выделенный фрагмент текста будет скрыт. Как мы уже сказали выше, аналогичным образом можно скрывать и любые другие объекты, содержащиеся на страницах документа.
Читайте также: Как установить новый шрифт в Ворд
Отображение скрытых элементов
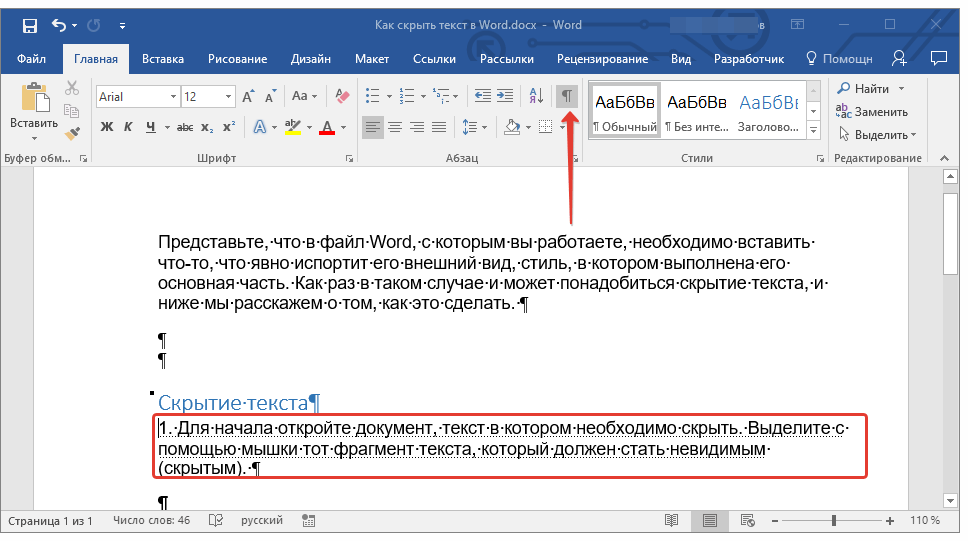
Для того чтобы отобразить ранее скрытые элементы в документе, достаточно нажать всего одну кнопку на панели быстрого доступа — «Отобразить все знаки». Она расположенная в группе инструментов «Абзац» во вкладке «Главная» и показана на изображении ниже.
Подробнее: Невидимые знаки форматирования в Microsoft Word
Быстрый поиск скрытого содержимого в больших документах
Если вам довелось столкнуться с довольно большим по объему и количеству страниц документом, содержащим скрытый текст, будет полезно знать о том, как быстро его найти. Делать это вручную, включив режим отображения всех знаков, о котором мы рассказали выше, будет затруднительно, да и по времени этот процесс может затянуться надолго. Оптимальное решение в такой ситуации — обратиться ко встроенному в Ворд «Инспектору документов». Это средство поиска различных проблем форматирования, рецензирования и не только, и скрытый текст тоже относится к их числу.
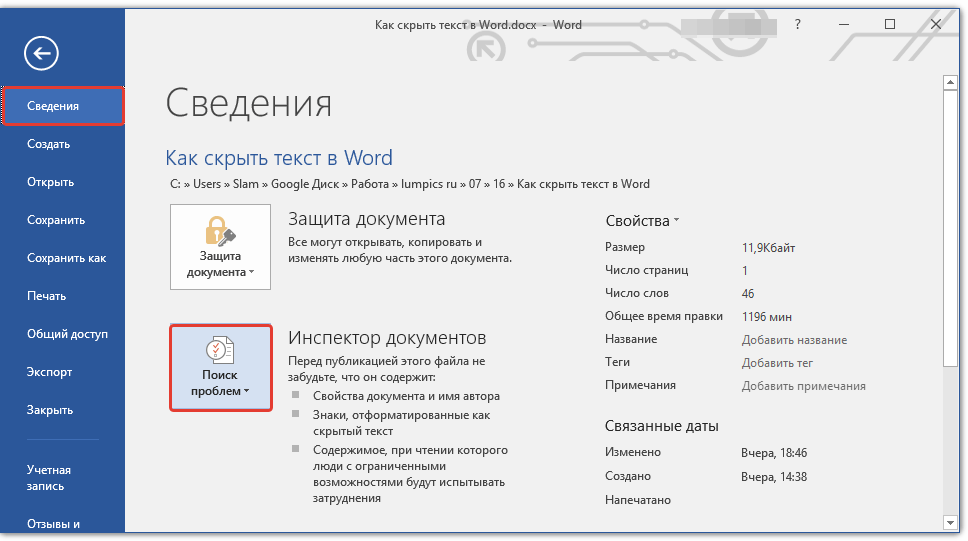
- Откройте меню «Файл» и в разделе «Сведения» нажмите на кнопку «Поиск проблем».
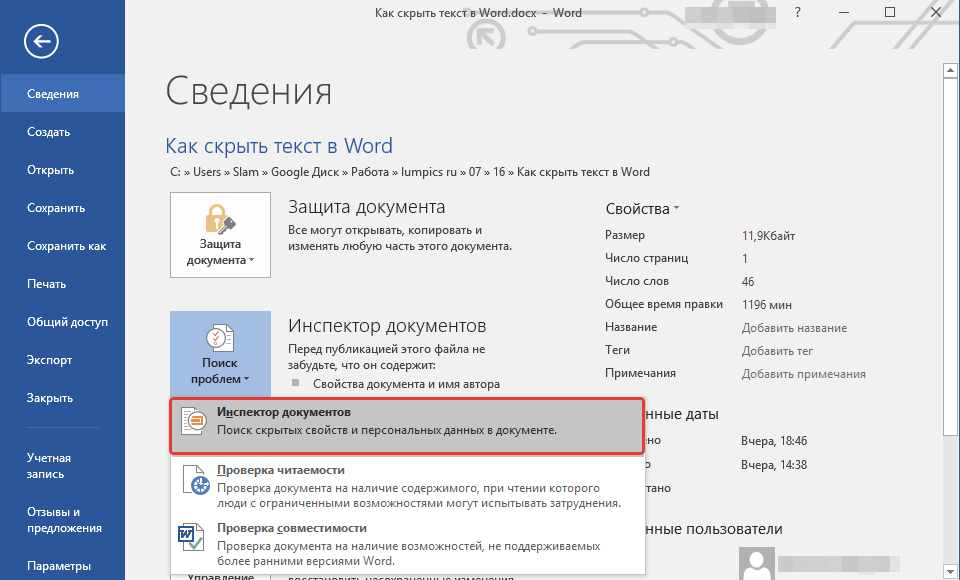
- В меню этой кнопки выберите первый пункт — «Инспектор документов».
- Если программа предложит сохранить документ, обязательно сделайте это.
- Далее будет открыто диалоговое окно, в котором нужно проставить галочки напротив одного или двух пунктов в самом конце списка (зависит от того, что вы хотите найти):
- «Невидимое содержимое» — поиск скрытых объектов в документе;
- «Скрытый текст» — поиск скрытого текста.
- Нажмите кнопку «Проверить» и дождитесь, пока Word выполнит сканирование и предоставит отчет.
К большому сожалению, на данном этапе текстовый редактор от Microsoft не способен самостоятельно отобразить скрытые элементы. Единственное, что предлагает программа, удалить их все. И если вы действительно хотите удалить скрытые элементы, содержащиеся в документе, нажимайте на эту кнопку. Но если нет, создайте резервную копию файла — в ней скрытый текст будет отображен.
Для этого в меню «Файл» программы выберите пункт «Сохранить как», нажмите по кнопке «Обзор», укажите в открывшемся окне «Проводника» конечную папку, задайте новое имя документу и кликните «Сохранить».
Важно: Если вы удалите скрытый текст с помощью «Инспектора документов», восстановить его будет невозможно.
После закрытия «Инспектора документов» (без применения команды «Удалить все» напротив пункта «Скрытый текст») ранее «спрятанное» содержимое электронного документа будет отображено.
Читайте также: Как восстановить несохраненный файл Ворд
Печать документа со скрытым текстом
По умолчанию скрытые элементы документа не выводятся на печать. Если же вам необходимо отобразить на бумажной копии в том числе и все то, что было «спрятано», необходимо внести некоторые изменения в настройки текстового редактора.
- Откройте меню «Файл» и перейдите в раздел «Параметры».
- На боковой панели кликните по вкладке «Экран» (в актуальных версиях Microsoft Word она называется «Отображение») и установите галочку напротив пункта «Печатать скрытый текст» в разделе «Параметры печати». Закройте диалоговое окно, нажав на кнопку «ОК».
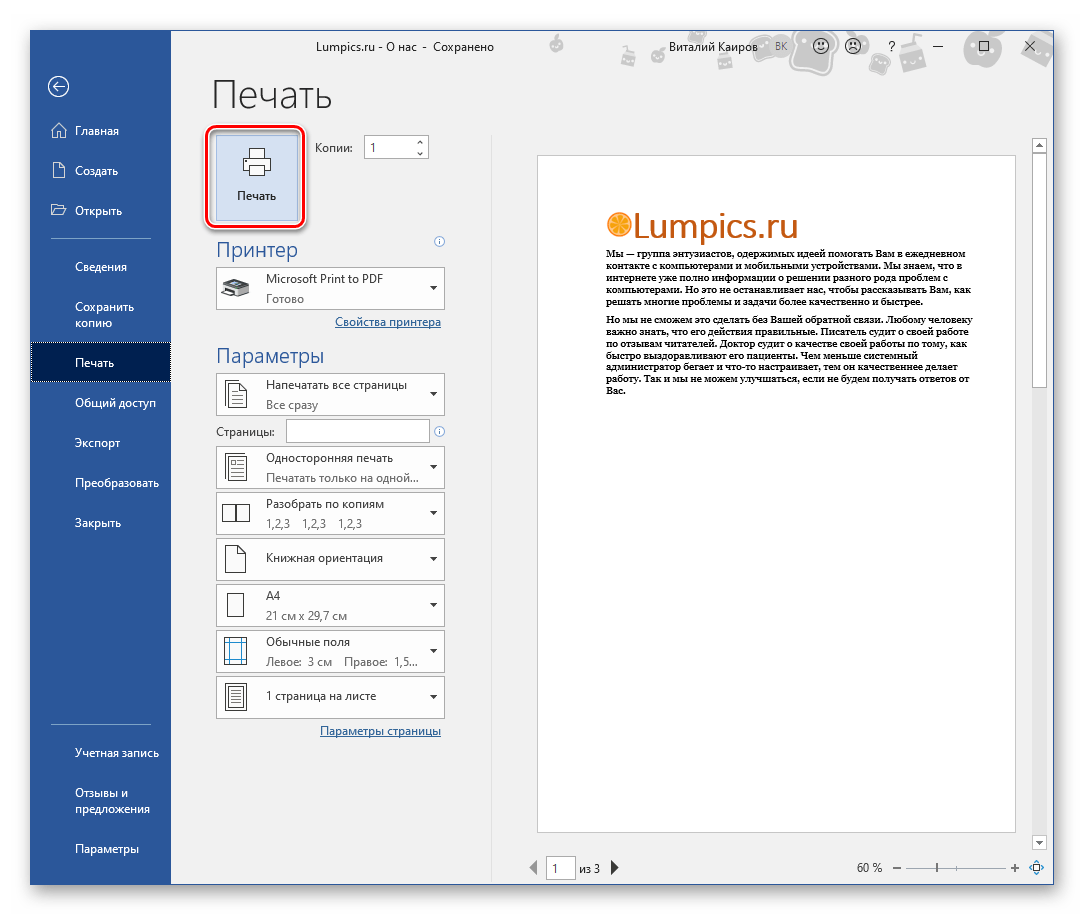
- Распечатайте документ на принтере, воспользовавшись для этого представленной по ссылке ниже инструкцией.
Подробнее: Печать документов в Word
После выполнения изложенных выше манипуляций скрытый текст будет отображаться не только в печатной версии файла, но и в его электронном оригинале, который может быть отправлен, например, на виртуальный принтер. Это действие преобразует его в формат PDF.
Читайте также: Как конвертировать PDF в документ Ворд
Заключение
На этом все. Теперь вы знаете, как скрыть текст (вместе с дополнительными объектами или без таковых) в Microsoft Word, а также о том, как отобразить скрытый текст, если вам «посчастливилось» работать с таким документом.
Как быстро показать скрытый текст на случай, если вы забудете, что он действительно находится в документе?
Используйте кнопки-переключатели, чтобы отображать или скрывать метки форматирования и содержимое документа в Word
Kutools for Word выпускает удобный Параметры дисплея функция, которая помогает пользователям быстро отображать или скрывать все виды меток форматирования и содержимое документа в текущем документе Word, включая скрытый текст, заполнители, метки и т. д.
Kutools for Word: мощная надстройка содержит более 100 инструментов и может повысить эффективность ежедневной работы Word на 80%! Получи это сейчас!
Удивительный! Используйте эффективные вкладки в Word (Office), например Chrome, Firefox и New Internet Explorer!
Подробнее Скачать бесплатно
Скрыть текст в слове
Этот метод поможет вам скрыть фрагмент текста в документе Word. Пожалуйста, сделайте следующее:
1. В документе Word выберите фрагмент текста, который вы хотите скрыть, щелкните правой кнопкой мыши и выберите шрифт из контекстного меню. Смотрите скриншот:
2. В диалоговом окне Шрифт под шрифт вкладку, пожалуйста, проверьте Скрытый и нажмите OK кнопка. Смотрите скриншот:
Теперь вы увидите, что выбранный фрагмент текста скрыт от документа. Смотрите скриншот:
Показать весь скрытый текст в Word
Как видите, найти скрытый текст в документе Word непросто. Здесь я изменю описанный выше метод и быстро покажу весь скрытый текст в документе Word.
1, нажмите Ctrl + A вместе, чтобы выбрать весь документ, щелкните правой кнопкой мыши и выберите шрифт из контекстного меню.
2. В диалоговом окне Шрифт под шрифт вкладка, пожалуйста, снимите флажок Скрытый и нажмите OK кнопка. Смотрите скриншот:
Функции: при открытии диалогового окна «Шрифт» вы получите , установите флажок в первый раз, он станет отмеченным
, теперь щелкните еще раз, и он будет отключен
.
Теперь весь скрытый текст во всем документе отображается сразу.
Переключите, чтобы показать или скрыть весь скрытый текст в Word
Если вам просто нужно временно просмотреть скрытый текст, вы можете использовать кнопку «Показать / скрыть», чтобы переключить отображение или скрытие всего скрытого текста в документе Word.
Нажмите Показать / скрыть отметки редактирования кнопку ( or
) В Пункт группы на Главная вкладка, чтобы показать или скрыть скрытый текст.
Внимание: Вы также можете использовать горячие клавиши Ctrl + Shift + 8 на основной клавиатуре, чтобы легко переключать отображение или скрытие всего скрытого текста.
Постоянно отображать или скрывать весь скрытый текст в Word
Если вы хотите постоянно отображать весь скрытый текст в документе Word, вы можете настроить параметры Word, чтобы это сделать.
1. Нажмите Файл > Опции открыть диалоговое окно Word Options.
2. В диалоговом окне «Параметры Word» нажмите Монитор в левой панели проверьте Скрытый текст вариант в Всегда показывать эти метки форматирования на экране раздел. Смотрите скриншот:
Примечание. Чтобы постоянно скрывать весь скрытый текст, снимите флажок Скрытый текст опцию.
3, Нажмите OK чтобы сохранить изменения.
Теперь вы увидите, что весь скрытый текст отображается с пунктирной линией. Смотрите скриншот:
Показать или скрыть весь скрытый текст на распечатках
Вы могли заметить, что скрытый текст тоже не печатается. Если вам нужно отобразить скрытый текст на распечатках, вам необходимо настроить параметры Word.
1. Нажмите Файл > Опции открыть диалоговое окно Word Options.
2. В диалоговом окне «Параметры Word» нажмите Монитор в левой панели проверьте Распечатать скрытый текст вариант в Параметры печати раздел. Смотрите скриншот:
Примечание. Чтобы не печатать весь скрытый текст, снимите флажок Распечатать скрытый текст опцию.
3, Нажмите OK кнопку.
Отныне весь скрытый текст также будет печататься.
Показать или скрыть скрытый текст с помощью Kutools
Kutools предоставляет вам простой способ показать или скрыть скрытый текст, а также некоторые другие знаки форматирования.
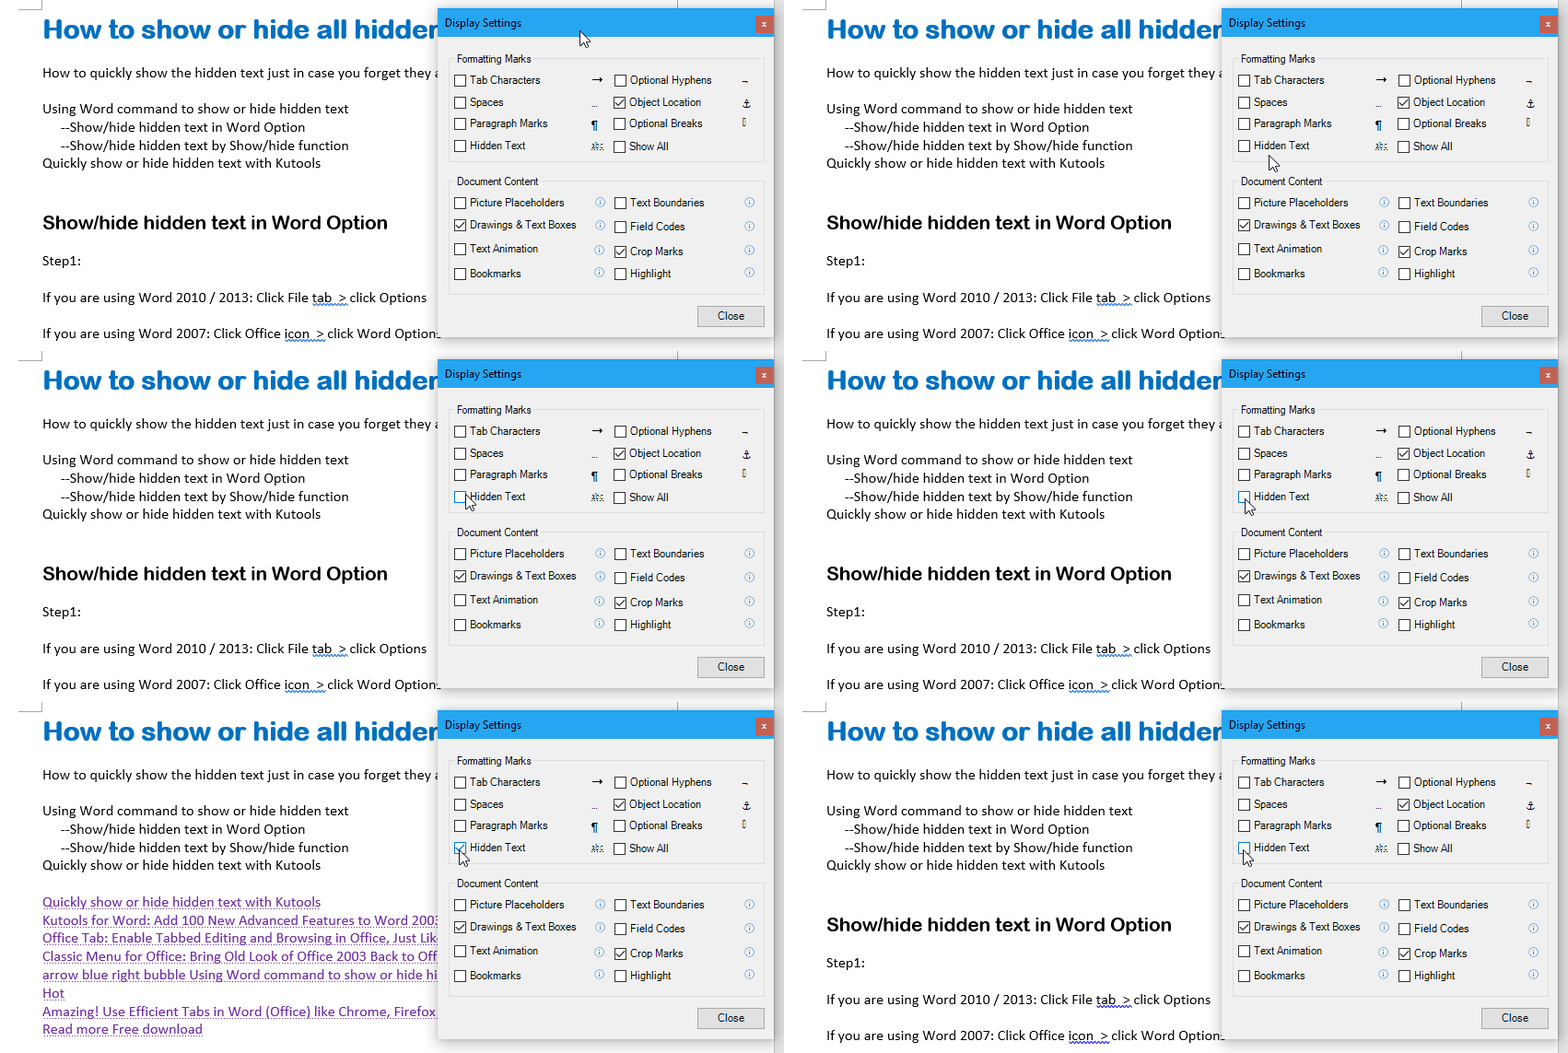
1. Нажмите Кутулс Плюс > Параметры дисплея. Смотрите скриншот:
2. А потом проверьте Скрытый текст во всплывающем диалоговом окне, и вы увидите результат, как показано на скриншоте ниже:
Рекомендуемые инструменты для повышения производительности Word
Kutools For Word — Более 100 расширенных функций для Word, сэкономьте 50% времени
- Сложные и повторяющиеся операции можно производить разово за секунды.
- Вставляйте сразу несколько изображений из папок в документ Word.
- Объединяйте и объединяйте несколько файлов Word из папок в одну в желаемом порядке.
- Разделите текущий документ на отдельные документы в соответствии с заголовком, разрывом раздела или другими критериями.
- Преобразование файлов между Doc и Docx, Docx и PDF, набор инструментов для общих преобразований и выбора и т. Д.
Want to keep certain text in your document invisible to your reader? Here’s how to use hidden text in Microsoft Word on Windows and Mac.
Have you ever wanted to hide certain parts of text in a document? We don’t all have access to invisible ink, but what we do have is an option to hide text in Microsoft Word.
Here, we’ll show you some ways to use hidden text in Microsoft Word, how to view it yourself once you hide it, and how to print the document with and without that invisible text. And whether you use Word on Windows or Mac, we’ve got you covered on both.
You might already have an idea in your head about when hidden text would come in handy. But just in case, here are some great examples of when you can take advantage of the feature.
Test or quiz: If you create a test or quiz in Word, you don’t have to use a separate answer key or two versions of the document. Just hide the answers from the students.
Presenting a document with notes: If you’re presenting a document like a report or a proposal, you can include your notes right in the document next to the points. Print the hidden version for your audience and keep the visible one for yourself.
Sharing a document: Similar to the example above, you may have text that you want to reference if you get questions on a shared document.
How to Hide Text in Microsoft Word on Windows
Hidden text is a formatting feature of Microsoft Word. So just like you can select text and apply bold formatting, for instance, you can apply hidden formatting.
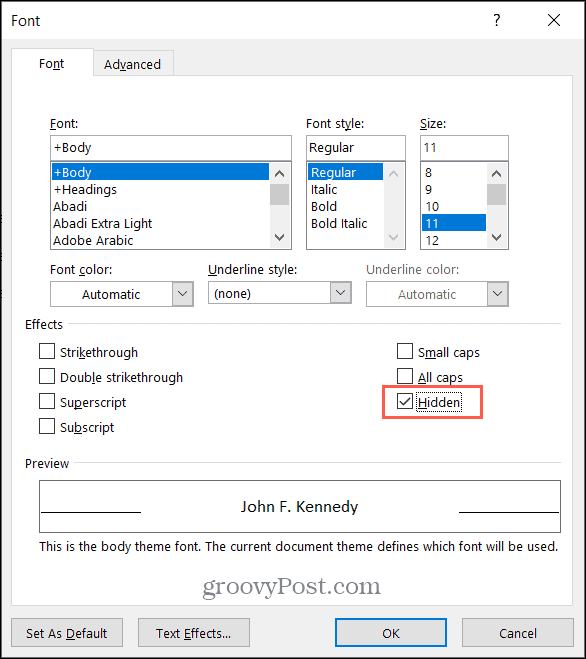
- Select the text you want to hide by dragging through it with your cursor.
- Either right-click and choose Font or click the arrow on the bottom right of the Font section of the ribbon on the Home
- Check the box for Hidden.
- Click OK.
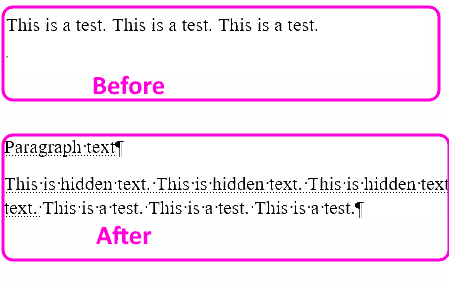
Once you apply the Hidden font format option, your text will disappear from your document.
View Hidden Text on Windows
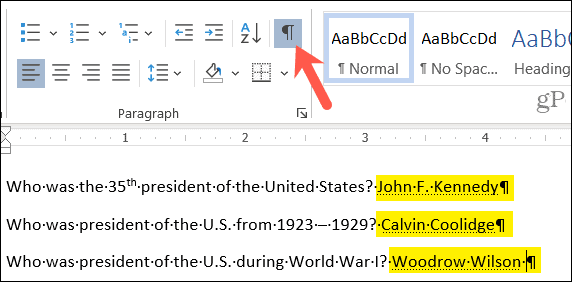
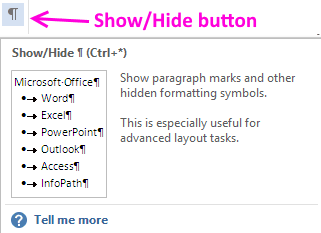
To view hidden text, go to the Home tab and click the Show/Hide button in the Paragraph section of the ribbon. This action displays your hidden text as well as formatting symbols.
If you prefer to see your hidden text only, without displaying formatting symbols, you can adjust a setting in Word.
- Click the File tab and select Options.
- Choose the Display option on the left.
- Check the box for Hidden text under Always show these formatting marks on the screen.
- Click OK.
If you use this second method to always display the hidden text, be sure to go back in and uncheck the box before presenting or sharing.
Print a Document with Hidden Text on Windows
If you want to print two versions of your document, one with the hidden text and one with the text shown, follow these steps.
- Click the File tab and select Options.
- Choose the Display option on the left.
- Check the box for Print hidden text under Printing options. Click OK and continue to print your document.
- Uncheck that box to print the next version of your document with the text hidden. Click OK and print your document.
You’ll see the preview of your document before you hit the Print button. So you can be sure you’re printing with or without the hidden text per your preference.
How to Hide Text in Microsoft Word on Mac
The steps for hiding text in Word on Mac are pretty similar to those for Word on Windows.
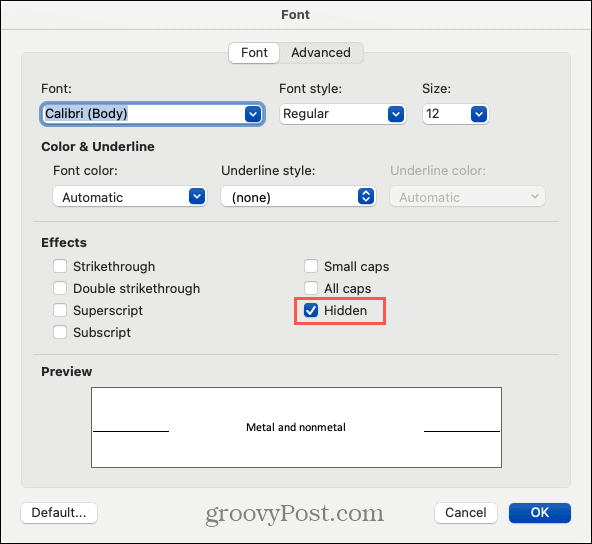
- Select the text you want to hide.
- Either right-click and choose Font or click Format from the menu bar and choose Font.
- Check the box for Hidden.
- Click OK.
View Hidden Text on Mac
Also like on Windows, you can view hidden text from the Home tab. Click the Show/Hide button in the ribbon. This action displays your hidden text along with any formatting symbols.
To see your hidden text without the formatting symbols, you can simply check a box in the settings.
- Click Word > Preferences from the menu bar.
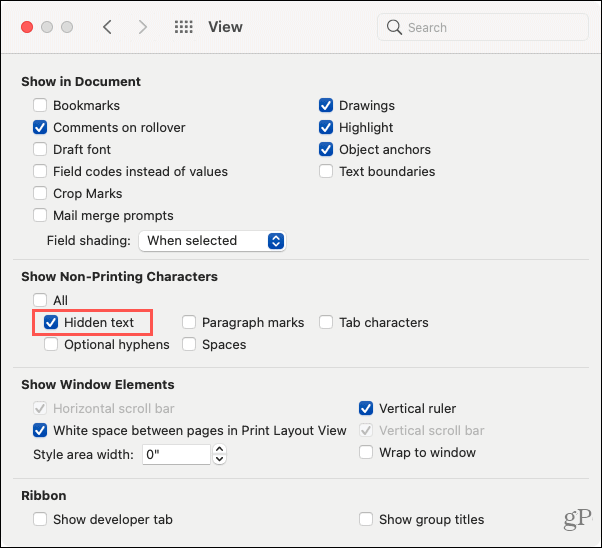
- Choose View.
- Check the box for Hidden text under Show Non-Printing Characters.
- Close the preferences window.
Again, make sure that you uncheck this box when you’re ready to present or share your document.
Print a Document with Hidden Text on Mac
You can print the hidden text for yourself and then print a separate copy for others without it.
- Click Word > Preferences from the menu bar.
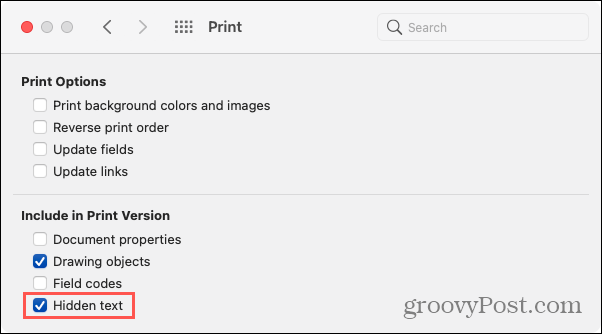
- Choose Print.
- Check the box for Hidden text under Include in Print Version. Close the preferences and print your document.
- Uncheck that box to print the next version of your document with the text hidden. Close the window and print your document.
Important Notes on Hidden Text in Word
Using hidden text in Word is ideal when you’re printing a document. There is no way for your audience to see what you hid. However, if you share your document electronically, your recipient or audience can view the hidden text using the methods above you would use to see it yourself.
Hiding text does not make it secure. So you probably don’t want to use it for confidential or personally identifiable information because of the reason above.
With these things in mind, hidden text in Microsoft Word is still a good time-saving option compared to creating separate instances of the same document, as long as it’s beneficial and safe for your circumstance.
Do You Have Something to Hide?
Hopefully, this tutorial will help you the next time you want to make certain text in a Word document invisible.
For more help on this topic, take a look at how to find and replace formatting as well as how to clear all formatting in Word.
Word lets you hide text so you can read or print your document as if the text isn’t there. This might seem pointless—why not just remove the text if you don’t want someone to read it—but hidden text does have some interesting uses. Let’s take a look at what hidden text is (and what it isn’t), why you might want to hide text, and how to do it.
What is Hidden Text?
Word hides text by using formatting marks—the same way you’d format text as bold or italic. Instead of removing the text, Word applies a formatting mark that means “don’t display this text.”
Because hidden text is just standard text with formatting marks applied, anyone who can edit the document can search for hidden text and display it. So it’s not a security measure, and you should never rely on hidden text to prevent a determined person from reading something in your document. If you don’t want someone to read something you’ve written, either remove the text entirely or don’t send the document to them.
Why Would you Want to Hide Text?
Hiding text does have its uses. If you want to print a document without some text showing up, you can do that with hidden text (although make sure you haven’t turned on the option to print hidden text). One great use for this is if you had a document you want to print and hand out to an audience, but you wanted your copy of the document to contain notes just for you.
You might also want different people to review different parts of a document, and hidden text presents a simple way to show only those parts that you need a person to review (as long as you don’t mind them seeing the hidden text if they find it).
You can also hide images and other embedded objects, which can cut down on print time and cost, as well as make your document more readable if you just want pure text.
Note: You can only do this in the Word client on your computer. Word Online and Word apps for Android and iPhone don’t (yet) allow you to hide text.
How Do You Hide Text?
Hiding text is as simple as it gets. Select the text you want to hide, switch to the “Home” tab on the Ribbon, and then click the arrow at the bottom right of the “Font” group.
This opens up the Font window. Turn on the “Hidden” option and then click the “OK” button.
That’s all there is to it. The text you selected is no longer visible as if you’d deleted it from the document. If all that mouse clicking is too much for you, there’s also a keyboard shortcut to hide text—select your text and hit Ctrl+Shift+H.
How Do You Hide Objects Like Images?
You hide objects in the same way as you hide text—by selecting them and ticking the”Hidden” field in the Font panel (or using Ctrl+Shift+H). This method only works if your object uses the default text wrapping option of “In line with text,” which is when Word treats an object as just another piece of text. If your object has a different text wrapping option, but you still want to hide it, you’ll have to hide the paragraph to which the object is anchored. This hides the anchored object at the same time. (Not sure what an “anchored object” is? Don’t worry, we’ve got you covered with our guide to positioning objects in Word.)
How Do You Unhide Text?
To unhide text, reverse the process. Select it and hit Ctrl+Shift+H or untick the”Hidden” field in the Font panel.
But, how do you select hidden text in the first place if you can’t see it? Because hidden text is just normal text with formatting marks applied, you need to display all of the formatting marks. This shows your hidden text.
To display all the formatting marks, click Home > Show/Hide.
You can also hit Ctrl+Shift+8 if you prefer. This shows all of the non-printing characters your document—things like paragraph marks, spaces, and tab characters.
Hidden text has a dotted line underneath it to differentiate it from regular text.
Select the hidden text and use Ctrl+Shift+H or the Font > Hidden setting to unhide the text.
If you’ve got a lot of hidden text to unhide, or you don’t want to search the whole document for hidden text, no problem. Select all the text in the document by hitting Ctrl+A and then use either of those same methods (Ctrl+Shift+H or Font > Hidden) to unhide all hidden text in the entire document (except in headers or footers, which you’ll have to do separately).
Click Home > Show/Hide or hit Ctrl+Shift+8 again to hide the formatting marks.
We mentioned at the top of this article that you can only hide/unhide text in the Word client and not in Word Online. The same goes for showing formatting marks, which you can do in the Word desktop app.
Can You Delete All Hidden Text at Once?
Yes, and we’ve previously shown you a way of doing this using Find and Replace. You can use that method to choose which hidden text to remove, but if you just want to guarantee that any hidden text is deleted, go to File > Check For Issues > Inspect Document.
The option you’re looking for is right at the bottom, and it’s called “Hidden Text.” Make sure any other options are switched off (unless you want to use them at the same time) and click the “Inspect” button.
If the Document Inspector finds any hidden text, it shows you a “Remove All” button. Click this to delete all hidden text in the document.
You cannot undo this action, so make sure you really want to remove all hidden text or that you’ve saved another copy of the document first.
Does This Work With Shared Documents?
If you use OneDrive or SharePoint, you can share your documents with other people. Hidden text is still hidden when the people with whom you’ve shared it view the document in Word Online because Word Online doesn’t let you hide/unhide text or show formatting marks. They can still download a copy and view it in the Word app. When they do that, they can click Home > Show/Hide and see the hidden text. So once again, don’t share a document with hidden text unless you’re okay with those people potentially seeing what you’ve hidden.
READ NEXT
- › Android’s Nearby Share Has (Unofficially) Arrived on Mac
- › Windows 11 Has a New Photo Gallery in the File Explorer
- › Discord Direct Message Won’t Go Away? Here’s the Fix
- › The New Winamp Is Here, but It’s Not What You’d Expect
- › How to Get a Refund on the PlayStation Store
- › Save Hundreds on Elegoo’s New PHECDA Laser Engraver Through Kickstarter
We have recently discussed how to show hidden formatting characters in Word, but it is also possible to hide text and even images in Microsoft Word, as long as you are using Word desktop on Windows or Mac.
See Find and Remove Hidden Text in Word
Hidden text positioning and formatting tricks in Word
Why hide?
Why would you want to do hide text or other elements?
Well, you might want the option to print the document without some of the text showing, or you might want different versions of the document for different people to work on without being distracted by unnecessary content.
This is not a security measure – anyone with access to the document can display hidden text and search for it. You are only hiding it for convenience or aesthetic purposes, not to keep it away from prying eyes.
A common use of hidden text is for a quiz. Instead of having two documents, one with the questions only and other with questions & answers. Use hidden text to hide the answers for a questions only version of the same document.
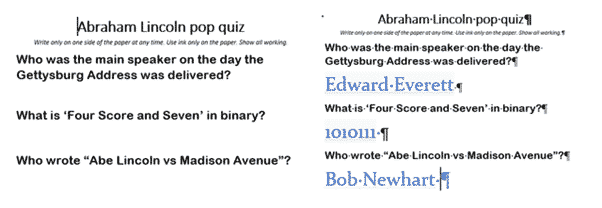
Before we go any further, lets clarify some terms used in Word. The terms Hidden and Visible have specific meanings in Word and the difference is important.
Hidden – is a text attribute, like Bold, Italics, Subscript etc. It can be applied in the Font dialog or part of a style.
Unhidden – just means turning off the Hidden setting, which is the usual way.
Visible – means that text appears on the screen or page. As you can see above right, text can be at the same time both Hidden (with dots underneath) and Visible (shows on the screen)
Text or objects can be Hidden and Invisible (above left) or Hidden and Visible (above right). Of course, text is normally Unhidden and Visible.
There’s a trick to leaving space for answers that we’ll explain as well as using a style to quickly manage hidden text.
How to Hide Text
To hide a piece of text, select the text that you want to hide and either:
- Type Control + Shift + H
- Click the arrow at the bottom right of the Font group on the Home tab.
Then, in the Effects group, tick the Hidden box and click OK.

How to Hide Images or other objects.
You can hide images or any other objects in your text in exactly the same way – select the image and press Control+Shift+H or tick the Hidden box in the Font dialog.
This only works, however, if your image has been set to the default layout option of inline with text.

If your image uses one of the text wrapping options, you will not be able to hide only the image – you will instead have to select the whole paragraph that contains the image and hide that.

Show Hidden Text
To temporarily view hidden text, without actually unhiding it, you do exactly as you would if you wanted to view hidden formatting characters. – type Control+Shift+8 or click the Show/Hide Button on the Home tab.

Any hidden content in the document will now be shown again, but with a dotted line underneath it.

Show ONLY hidden text
If you want to show only hidden text without all the clutter of paragraph marks, dots-for-spaces etc, change the settings for Show All at File | Options | Display | Always show these formatting marks on the screen.

UNcheck all the boxes except make sure Hidden text is the only one selected.
Now the Hidden text is visible, just like the example above, but without the distracting extras.

Unhiding text or objects
Now that you can see the hidden text again, you can permanently unhide it the exact same way that you hid it – type Control+Shift+H or open the Font dialog on the ribbon and this time untick the Hidden box.
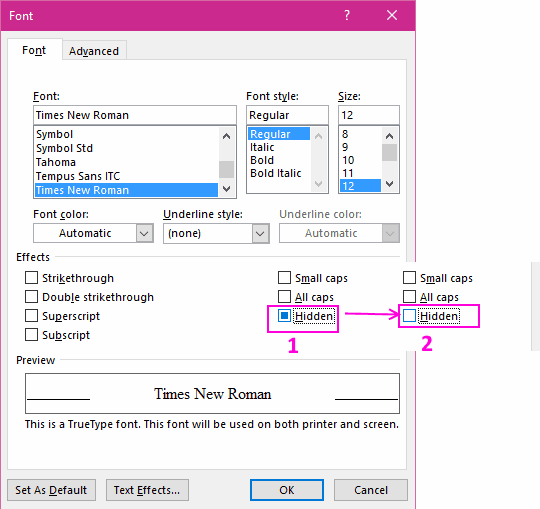
But it would be very time-consuming to do this for every hidden passage if you have a lot of them in a large document. If you want to permanently unhide all of the hidden text in your document, just select the whole document with Control+A and then open the Font dialog again. Note that this time, as you have selected a mixture of hidden and unhidden text, the Hidden box in the dialog will appear with a black square in it.
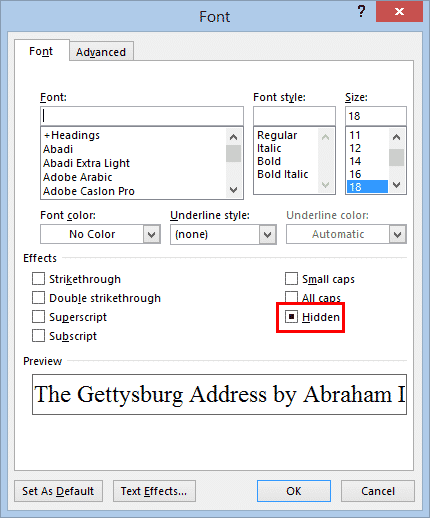
This time you will have to tick on the box twice – the first click will tick the box and hide all text, and the second click will untick it to unhide all the text.
Note that Control+Shift+H will not work for unhiding all the hidden text at once, because this is the equivalent to ticking the Hidden box, and will hide all of the text in your document, and hitting the same keys again won’t unhide the whole document, because it is no longer selected! If you do make this mistake, don’t panic – just type Control+A again to select all of your text and then you can use Control+Shift+H to make it appear again.
Finding within Hidden Text
Hidden text only appears in a Find when the text is visible on the page.
That’s important. If you’re searching a document with hidden text, make sure Show All is ON.
Word Counts and Pagination
Most Word features treat hidden text like it doesn’t exist.
Word Counts ignore hidden text (visible or not).
Pagination and page counts ignore hidden text when it’s not visible on the page (e.g. hide two pages and the doc page count drops).
Hiding in Styles
Hidden is a formatting option in Styles so you can switch all text in a certain style from visible to hidden in a flash.
We did that for the quiz example above. All the answers are in a character style cunningly called ‘Answers’.

Style | Format | Font | Hidden applies the hidden attribute. You can see it listed in the style description.
To switch between the full document and students only version, only the Hidden option (Format | Font) needs changing.
Why a character style not a paragraph style? That’s to leave space for answers.
Print or Don’t Print Hidden Text
When you print a document that has hidden text, by default the hidden text will not be printed, but you can choose to print it if you want. Unfortunately, you can’t choose this on a case by case basis when you’re printing; you have to set your choice in the Word Options before you print.

To set this, go to File | Options | Display. Then go down to the Printing Options area and tick or untick the “Print hidden text” box, depending on your preference.
Reveal Hidden Characters and Word’s secrets with Show All
Sort by hidden column in Word
Hidden Text Printing options and workaround for Word
При работе с программным офисным пакетом Microsoft Office в некоторых ситуациях пользователю может понадобиться сделать скрытый текст в Ворде. Это значит, что в документе Word скрытый текст не виден при чтении или печати, как будто его там нет.
Помимо текста можно сделать скрытыми таблицы, графики, изображения или другие элементы, находящиеся внутри документа. В текстовом редакторе Word скрыть текст или другие элементы можно с помощью использования знаков форматирования.
По сути, скрытый текст — это стандартный текст с примененными метками форматирования. Поэтому любой, кто может редактировать данный документ имеет возможности для получения доступа к скрытым объектам и сможет их отобразить.
Если это не мера безопасности, то почему бы просто не удалить часть текста из документа Word? Дело в том, что невидимый текст в Ворде применяется для нескольких целей.
Для чего бывает нужно скрыть часть текста в Ворде
При предоставлении документа другим лицам, вы можете скрыть часть текста, чтобы они увидели только ту часть в документе, которую им следует просмотреть. Таким способом вы можете сделать невидимыми некоторые абзацы, объекты или спрятать свои пометки.
Вы можете убрать некоторые фрагменты текста из документа, скрыв их для печати. В результате, вы раздадите другим лицам бумажную версию документа без скрытого текста, а у вас останется полная версия этого файла.
При использовании функции печати можно скрыть изображения, графики или другие встроенные объекты в документе Word, чтобы сэкономить расходные материалы: краску принтера или бумагу.
При печати документа скрытые элементы не будут напечатаны на бумаге, и они не отобразятся на экране компьютера.
В этой статье я расскажу о том, как сделать скрытый текст в Ворде несколькими способами, а также как отобразить скрытый текст в Ворде или удалить его полностью.
Как сделать невидимым текст в Ворде — 1 способ
Самый простой способ скрыть текст — установите белый цвет для букв скрываемого фрагмента, который ничем не отличается от цвета фона. Это не канонический способ, но он имеет право на существование, потому что этот методом часто применяют пользователи.
Для повышения конфиденциальности, дополнительно можно уменьшить шрифт, чтобы пустота не бросались в глаза, если невидимый фрагмент текста находится в середине документа. Если использовать подобный метод при печати, скрытый текст не будет виден на бумаге.
Выполните следующие действия:
- Выделите фрагмент текста, который необходимо скрыть, в документе Word.
- Во вкладке «Главная», в группе «Шрифт» щелкните по стрелке, расположенной на кнопке «Цвет шрифта».
- В выпадающем меню «Цвета темы» выберите белый цвет.
- После применения настройки фрагмент текста станет невидимым, потому что он имеет цвет одинаковый с фоном.
Можно изменить размер шрифта, предварительно выделив сокрытый фрагмент, чтобы уменьшить интервалы между абзацами на том месте, где находится скрытый текст.
После этого невидимый текст станет незаметным. Если читатель не подозревает о проделанной операции, то он визуально почти ничего не заметит.
Как убрать невидимый текст в Ворде
Чтобы вернуть все как было, выполните обратные действия:
- Выделите место с невидимым текстом в документе Word.
- Установите цвет шрифта по умолчанию.
Если вы изменили размер шрифта, то сначала выделите этот фрагмент, а потом задайте значение размера шрифта, который используется в данном документе.
Как скрыть текст в Ворде — 2 способ
Существует другой более удобный способ сокрытия текста от посторонних глаз, который следует применять при работе в текстовом редакторе Microsoft Word.
Пройдите несколько шагов:
- Откройте документ Word.
- Выделите текст, который потребовалось сделать невидимым.
- Во вкладке «Главная» нажмите на стрелку в нижнем правом углу группы «Шрифт».
- В окне «Шрифт», во вкладке «Шрифт», в группе «Видоизменение» установите флажок в опции «скрытый».
- Нажмите на кнопку «ОК».
Скрытый текст исчезнет в окне документа Word, как будто его там никогда не было.
Как сделать скрываемый текст в Ворде — 3 способ
Данный вариант аналогичен предыдущему, только он значительно упрощает эту операцию, потому что используются «горячие клавиши» вместо нескольких клацаний мышкой.
Проделайте следующее:
- Выделите фрагмент текста в документе Word.
- Нажмите одновременно на клавиши «Ctrl» + «Shift» + «H».
- В результате скрытый текст исчезнет из документа.
Печать скрытого текста в Ворде
В обычном состоянии при распечатке документа Word скрытый текст не будет напечатан на листе бумаги. В некоторых случаях пользователям нужно распечатать содержимое документа вместе со скрытыми элементами.
Пройдите шаги:
- Войдите во вкладку «Файл».
- Нажмите на кнопку «Параметры».
- В окне «Параметры Word» перейдите в раздел «Отображение» («Экран»).
- В опции «Параметры печати» поставьте галку в пункте «Печатать скрытый текст».
- Нажмите на кнопку «ОК».
В результате применения данных настроек, при печати в Ворде появляется скрытый текст на бумажном листе.
Как убрать скрытый текст в Ворде — 1 способ
Если в дальнейшем функция скрытия объектов больше не нужна, необходимо привести содержание документа в первоначальный вид со всеми входящими в него элементами. Давайте посмотрим, как увидеть скрытый текст в Ворде.
Вам нужно сделать следующее:
- В окне открытого файла MS Word войдите во вкладку «Главная».
- В группе «Абзац» нажмите на кнопку «Отобразить все знаки». Можете использовать альтернативный вариант — нажмите на клавиши «Ctrl» + «Shift» + «8».
- В документе отобразятся все непечатаемые символы, в том числе скрытый текст, который будет подчеркнут.
- Выделите скрытый текст.
- Нажмите на стрелку в группе «Шрифт».
- В открывшемся окне «Шрифт» откройте вкладку «Шрифт».
- В разделе «Видоизменение» снимите флажок в опции «Скрытый», а затем нажмите на кнопку «ОК».
Как убрать скрытый текст в Word — 2 способ
Этот способ поможет, когда вам потребуется убрать скрытый текст во всем документе Word, который может иметь много страниц.
Чтобы показать скрытый текст в Word потребуется сделать следующее:
- Нажмите на клавиши «Ctrl» + «A», чтобы выделить все содержимое документа.
- Нажмите на клавиши «Ctrl» + «D».
- В окне «Шрифт», во вкладке «Шрифт» снимите флажок в пункте «скрытый».
Как удалить скрытый текст в Ворде
Данный способ поможет убрать весь скрытый текст из документа Word. Перед выполнением этой операции позаботьтесь о сохранении копии этого документа, потому что это необратимая функция, которая полностью удаляет скрытые объекты из данного файла.
Выполните следующе:
- Из меню «Файл», перейдите в раздел «Сведения».
- Нажмите на кнопку «Найти проблемы» («Поиск проблем»), а в выпадающем меню на «Проверить документ» («Инспектор документов»).
- В окне с предупреждением сохраните или откажитесь от сохранения копии документа.
- В окне «Инспектор документов» снимите все флажки кроме параметра «Скрытый текст».
- Нажмите на кнопку «Проверить».
Если в документе кроме текста имеются скрытые объекты, которые необходимо удалить, также активируйте пункт «Невидимое содержимое».
- В следующем окне нажмите на кнопку «Удалить все».
- Закройте «Инспектор документов».
Весь скрытый текст был удален из данного файла Word.
Выводы статьи
При работе с документами встречаются ситуации, когда необходимо воспользоваться малоизвестными функциями текстового редактора, например, узнать о том, как скрыть часть текста в Word. Пользователь может воспользоваться несколькими способами для решения этой задачи. Помимо этого, нужно знать про то, как показать скрытый текст в Ворде или удалить скрытое содержимое документа.
Working With Hidden Text in Word Documents
Use the hidden text feature to print different versions of a document
Updated on December 29, 2020
The hidden text feature in Microsoft Word hides text in a document. The text remains a part of the document, but it doesn’t appear unless you choose to display it. Combined with printing options, this feature prints two or more versions of a document from one file. In one, you can omit portions of a document by hiding the text. There’s no need to save two copies of the same file.
Instructions in this article apply to Word for Microsoft 365, Word 2019, Word 2016, and Word 2013.
To hide text in a Microsoft Word document on a Windows computer:
-
Highlight the portion of text that you want to hide.
-
Right-click the highlighted text, then select Font.
-
In the Font dialog box, go to the Font tab.
-
In the Effects section, select the Hidden check box.
-
Select OK.
How to Show Hidden Text in Word
To show the text, press Ctrl+A to select the entire document, then right-click the highlighted text and select Font. In the Font dialog box, clear the Hidden check box.
How to Print Hidden Text in Word
You can print the document with or without the hidden text.
-
Go to File > Options.
-
In the Word Options dialog box, go to the left panel and select Display.
-
In the Printing options section, select the Print hidden text check box to print the document including the hidden text.
Clear the Print hidden text check box to print the document without including the hidden text.
-
Select OK.
Thanks for letting us know!
Get the Latest Tech News Delivered Every Day
Subscribe
Working with Hidden text in MS Word is a bit different experience. There can be a hidden text in Microsoft Word document. This tutorial will explain you some basic as well as advanced features to handle hidden text in MS Word.
Hiding text in MS Word document is a useful feature and you can use it to hide text that you don’t want to show in the normal view of the document. Also it is helpful to take notes for your reference and hide them in the document. By default, you can’t print hidden text, so your document will be printed as it looks like normal in view. However, there are ways around that.
Go through this tutorial to become a pro in handling hidden text in MS Word.
First type your document as usual and then select the text you want to hide. Now do any of the following method to hide the selected text.
Method 1: The easiest and simplest way to hide the text is just select the text and press Ctrl+Shift+H hotkey from your keyboard to hide it. Your selected text will be hidden now.
Method 2: Just select the text and right click on it and choose Font from context menu, a new dialog box will open. Now here from the Effects section click Hidden check mark. Your text will be hidden now.
Now you know How to hide text in MS Word. Of course there are other methods too to hide the text by calling the font dialog box in various ways. To keep it short and simple, I am not describing other methods; you can easily try any of the above 2 methods.
How to View the Hidden Text in MS Word
Here I will describe you how to view the hidden text in MS Word. First of all open the Word Document that contains hidden text. Now simply click Show/Hide button as shown in the below screenshot.
The other method is to press a hotkey combination from your keyboard i.e Ctrl+Shift+8 or in other words Ctrl+* (not from numpad).
Now all the hidden text will be shown in the document with dotted underline as shown.
Also if you want to unhide the the hidden text permanently, you can do this too by using the following method.
Open the document and press Ctrl+A from your keyboard. Now press Ctrl+D hotkey to open the Font dialog box. Now go to Effects section; here you will see Hidden check box semi checked. Click it twice and make the Hidden checkbox unchecked.
Now all the hidden text in the Word Document will became un-hidden and is now shown as a part of the document.
How to Print Hidden text in MS Word
Here is a complete procedure to Print the MS Word Document with Hidden text. As in the above example “unhide the the hidden text permanently” you can take the printout normally as you do. However, if you don’t want to unhide the text, but want to print the document with hidden text, you can do this too.
To do this, just open the document containing hidden text and give a print command from File menu or by pressing the Ctrl+P from your keyboard. Now click Page Setup on the printer dialog box. Now Page Setup dialog box will open. Here click Print Options and check “Print hidden text” from printing options and click OK button to close this dialog box and again click OK to close the Page Setup dialog box.
Now click the Print icon to start the printing process. Your document will be printed with hidden text now.
How to Remove Hidden Text Permanently from MS Word Document
To remove the hidden text from Microsoft Word Document permanently, there are various methods you can apply. For e.g. you can use Find and Replace method or Inspect Document method to delete the hidden text permanently.
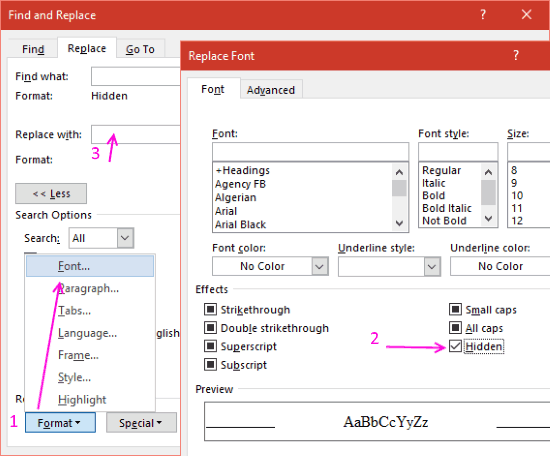
Deleting Hidden Text by using Find and Replace Method: In this method you first have to click the Show/Hide button as shown above. Now press Ctrl+H from your keyboard to open the Find and Replace the dialog box. Now leave the Find what: box blank and move your cursor in it. Now click More >> and select Font from the opening menu. Replace Font dialog box will open and here check the Hidden from the Effects section. Leave the Replace with: box blank and click Replace All to Find and Replace the hidden text from the document.
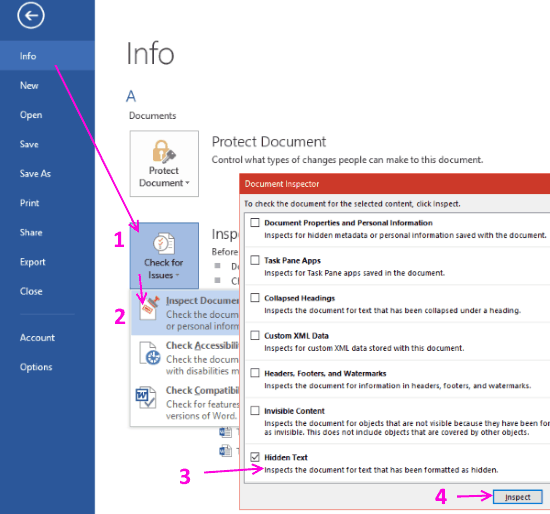
Deleting Hidden Text by using Inspect Document Feature: In this method you have to click File and then from the Info tab click Check for Issues and choose Inspect Element. Your document must be saved before starting this process. Now uncheck all the boxes except Hidden Text checkbox, as shown in the below screenshot, and click Inspect button.
When you click the Inspect button, Click Remove All and close the Document Inspector. All the hidden text in your document will be removed in one go. This method is bit tricky but works fast.
Final Words
As you know that Microsoft Word is a feature rich Word Processing software. There are various methods to do the same task in various ways, like using command menus, by using keyboard shortcuts etc. In the above tutorial you can now easily handle the Hidden Text in MS Word Documents easily in case of inserting hidden text, viewing hidden text, printing hidden text, or deleting hidden text.
Microsoft Word lets you hide any word, line, or image in a document, so you can read or print your document as if the text isn’t there.
Hiding text is as simple as it gets. You can do it in many different ways in MS word. As a public speaker for over 5 years, this feature helps me immensely and will help you too after reading this article.
All the methods to hide text in Word are included in this article. So hop on and follow the method of your choice to hide the texts/images in MS Word.
Follow our guide on how to Insert Word Page Numbers in MS Word
How to Hide Text or Image in Microsoft Word
Microsoft Word uses the formatting option to hide text. You will find that MS Office applies don’t-display-this-text formatting marks to hide your text instead of deleting it. This process is similar to making your text Bold, italic, or color-changing.
Here are the 3 different methods for hiding text or images in MS Word:
For Windows
MS office has included different ways to cloak the text in Windows operating system. All the methods are rapid and easy to execute. But not all procedures work for all the MS Word versions.
However, in the latest version of MS Office (Office 2021), You can use any of these ways. And Method 2 Works for all the versions of Microsoft Word (2003, 2007, 2010, 2013, 2016, 2021).
In this method, I will show you to hide your text using the Home menu. Method 01 works best in Word 2013, 2016, 2019, and 2021.
Here are the steps to hide texts or images using the home menu method:
- Select your Text (Press CTRL+A to select all the text in the Document).
- Tap the Home menu.
- Click the Expand icon In the Front Section in the Home menu.
- Tick mark the Hidden box > Press Ok.
After Pressing Ok, the selected text will be hidden in the document.
Here’s a complete guide on how to set background image on MS Word.
Method 2: Front Option Method
Method 2 works in all the Office versions released till date. After a right-mouse click, a pop-up menu appears in any document on MS Word.
Here are the steps to hide texts or images using the Front option:
- Select the text you want to hide.
- Right-click anywhere on the document.
- Click Front and check the Hidden box.
- Select Ok.
After that, you will see the selected text has vanished from the document.
Also, check out our separate post on how to make only one page landscape in Word.
Method 3: Using Keyboard Shortcut
Using a Keyboard shortcut is the fastest way to hide your selected text. But you have to memorize the shortcut key to execute this procedure.
Here are the steps to hide texts or images with a Keyboard shortcut:
- Select the text you want to hide.
- Press CTRL + SHIFT + H.
And it’s done. The text is hidden right before your eyes.
Furthermore, you can hide images using this method. But you have to select a text/line also with the image to execute the steps. Otherwise, any of the above procedures won’t work on images.
For MacBook
Microsoft Office is also available on the MacBook. But text hide settings are a bit different for Mac OS Word.
Here are the steps to hide text in MS Word MacBook:
This will hide your text on the Mac version of your MS Word.
Check out the easiest way to enable equation editor in Microsoft Word.
How to See Hidden Text or Image in MS Word
You can see which text has been hidden by using a keyboard shortcut or selecting an option in the Home Menu. But the MacBook Version of MS Word is quite different.
Here are the steps to see the Hidden Text or Image in MS Word:
For Windows
Most Word users come from the Windows segment, and the rest from the Mac segment. Seeing MS Word’s hidden text is relatively easy on Windows.
Here are the steps to see the Hidden Text or Image in MS Word (Windows):
- Open the document.
- Click Home.
- Tap the P-like icon.
Else, press CTRL+SHIFT+8.
And you will see the hidden text appears with an underline. Then you can select those hidden texts for further usage.
Quickly check out our epic guide on how to enable word wrap in notepad.
For MacBook
For the MacBook, MS Word settings are slightly different from the Windows version. To see the hidden text, you need to use the preference menu.
Here are the steps to see the Hidden Text or Image in MS Word Mac:
And you will see the hidden text in any document.
Additionally, you can unhide the text in Microsoft Word just by unchecking the Hidden box in the front option or keyboard shortcut. But you have first to enable viewing Hidden Text in MS Word.
Here are the steps to Unhide text in Microsoft Word:
- Select the hidden text.
- Press the Expand icon or Right-click on text > Select Front.
- Uncheck the Hidden box.
- Press OK.
After this, you will see the hidden texts have become unhidden.
Have some time to spare? Quickly check out our epic guide on why can’t I copy paste in Microsoft Word.
How to Print Document with Hidden Text
Generally, when you try to print a document, your hidden texts are excluded. But there’s a way to print the hidden texts with the document.
Here are the steps to print your document with hidden text:
For Windows
- Tap File > Select Options.
- Pick the Display option (On Left).
- Mark Print hidden text under Printing options.
- Click OK.
- Print your document.
For MacBook
Check whether the hidden text is included in the printed version. If they are included, the process is done without any error.
But before that, go through our epic guide on do Microsoft points still work.
Conclusion
To sum up, you can hide the text or images using the Home Menu method, Front Option method, or Keyboard Shortcut. Among those solutions, the Front Option method works on all the Office versions, and the latest MS Office 2021 supports all three.
I’m sure now you can easily hide the text in any MS Word file without breaking any sweat. Also, follow my steps to see the hidden text, unhide the text, or print a document with that hidden text described above.
Comment which method you used to hide your text in Word below.


