
By Foye Robinson
Updated February 10, 2017
i Pixland/Pixland/Getty Images
Microsoft Word 2007 comes with built-in features that help you format documents. You can make your text appear in small caps, superscript and shadows, or, even, hide text you don’t want others to see. When you hide text, any selected text, images, tables and objects are hidden, as well. You can hide a word, paragraph, page or entire document in Word 2007, and display it whenever you need to. You can’t tell that a page contains hidden text unless you reveal the hidden text.
Open the document you want to edit in Microsoft Word 2007.
Select the page you want to hide, including text, tables and other content within the page.
Select the “Home” tab in the Ribbon, and then click on the arrow in the bottom of the “Font” group (keyboard shortcut: Ctrl+D). The “Font” dialog box opens. Select the “Font” tab, and place a check mark by “Hidden.” Click on “OK.” The selected page is now hidden.
Hide multiple pages within your document by selecting the content as you did in Step 2. Open the “Font” dialog box, add a check mark to “Hidden,” and click on «OK.»
Reveal pages by selecting your entire document (keyboard shortcut: Ctrl+A), so you won’t miss hidden content. Open the “Fonts” dialog box. The option for “Hidden” is shaded, indicating that some parts of the document are hidden. Click on the “Hidden” option twice, until there is no shading or check mark, and click on “OK.”
Show hidden text automatically in Word 2007 by selecting the Microsoft Office Button and choosing “Word Options.”
Choose the “Display” category, and place a check mark by “Hidden Text,” and then click on “OK.” Your hidden text and pages are now visible in Word 2007.
Warnings
Hiding text is not secure. You can protect your document by selecting the “Review” tab in Word 2007. Click on “Protect Document” and “Restrict Formatting and Editing.”
![]()
Download Article
![]()
Download Article
This wikiHow article teaches you how to remove stubborn blank pages from anywhere in your Word document. Blank pages in the middle of your document are usually the result of hidden extra paragraphs or page breaks. If the blank page is at the end, it could be the same situation—however, it’s also may be due to Word’s hidden end paragraph feature. You can get rid of blank pages by making paragraph and page breaks markers visible and editing or deleting them manually.
-

1
Go to the blank page in your document. If a strange blank page appears in the middle of your Word document, it’s likely due to an unintentional page break or extra paragraph markers that you can’t see.
-
2
Press Ctrl+⇧ Shift+8 on Windows or ⌘ Cmd+8 on Mac. This displays paragraph markers (¶) at the beginning of each blank line, as well as at the end of every paragraph. If there are any page breaks on this page, you’ll see them marked by dotted lines and the word «Page Break.»
Advertisement
-
3
Look for a small black square next to a paragraph marker. You’ll want to look for this on both the blank page and the page after it. If you see a paragraph marker with a black square beside it, the paragraph has the «Page break before» setting turned on. You’ll want to turn this off. To do so:
- Click the Home tab at the top of Word.
- Right-click the paragraph marker ¶ that has the corresponding black bullet point.
- Select Paragraph… on the menu.
- Click the Lines and Page Breaks tab.
- Remove the check next to «Page break before» (if there is one) and click OK.
-
4
Highlight the ¶ marks and/or Page Break lines with your mouse. If you see both (or more than one of each), highlight it all at once.
- Also check the page right before your blank one for extra page breaks and delete those as well.
- Don’t select paragraph markers that appear on lines that contain actual content.
-
5
Hit the Delete key. This should delete all the ¶ marks and page breaks, which should delete the blank page.
- If the blank page is still there, double-check the pages before for page breaks.
-
6
Press Ctrl+⇧ Shift+8 on Windows or ⌘ Cmd+8 on Mac again. This hides the paragraph markers again.


Advertisement
-
1
Go to the blank last page in your document. If a strange blank page appears at the end of your Word document, it could be due to Word’s hidden undeletable end paragraph.[1]
According to Microsoft, the most reliable way to get rid of that blank page is to make the hidden paragraph very small.- The undeletable hidden paragraph usually occurs when the content of your last real page (not the blank page) goes all the way to the bottom of that page.
-
2
Press Ctrl+⇧ Shift+8 on Windows or ⌘ Cmd+8 on Mac. This displays paragraph markers (¶) at the beginning of each blank line, as well as at the end of every paragraph. Since you have a blank page at the end of your document, you’ll see at least one paragraph marker on that page.
-
3
Delete all of the paragraph markers on the blank page (if there are multiple). If more than one paragraph marker appears on the blank page, deleting all of them will get usually get rid of the blank page. Try that first.
- If there’s only one paragraph marker at the top of the page, deleting it won’t help—continue with this method, if so.
-
4
Change the font size of the paragraph marker to 01. Here’s how:
- Click the Home tab if you’re not already there.
- Highlight the paragraph marker.
- Click the font size next to the font’s name.
- Replace it with 01 and press Enter or Return.
-
5
Press Ctrl+⇧ Shift+8 on Windows or ⌘ Cmd+8 on Mac again. This hides the paragraph markers again, which should delete the blank page at the end by fitting the hidden paragraph on the last page that contains content.
- If you still have a blank page after this, you can reduce the size of the bottom margin instead. To do this, click the Layout tab, select Margins, click Custom Margins, and change the bottom margin to 0.3 inches.


Advertisement
-
1
Click the File menu and choose Save as. If you still have a blank page at the end of your document after fixing hidden end paragraphs, you can omit the last page when saving your document as a PDF.
- This only works on the desktop version of Word—the web version doesn’t let you choose which pages to include in a PDF.
- If your file is synced to One Drive, you won’t see Save as. Click Save as copy instead.
- If the document must be in the Word format, you can convert the PDF back to the Word format after you save it as a PDF.
-
2
Select PDF as the file format. Depending on your version of Word, the file type menu may be in the upper-right corner of the page, or in the «Save as type» menu toward the bottom.
-
3
Click Options or More options. You’ll see one of these two options near the menu from which you selected PDF.
-
4
Click the radio option next to «Page(s).» This allows you to select a range of include in your PDF.
-
5
Enter the page range, minus the last page. Type «1» in the «From» box, and the last real page (before the blank page) into the «To» box.
-
6
Click Ok and then save the document. This saves your document as a PDF, minus the blank page(s) at the end.


Advertisement
Add New Question
-
Question
How can I delete an Excel page copied to Word?

You can usually highlight the entire pasted table and hit the Delete key. If that doesn’t work, try this: highlight the entire table, then right-click on it and select «Cut.»
-
Question
What if the methods described above still don’t work? What can I do then?
A far better and easier way is to save the doc as a pdf, delete the page from the pdf (which is super easy by clicking on «organize pages»), and then resave as a doc.
-
Question
How can I create a word document I can later fill in blanks such as names or other info in a contract?
If it’s for a printed document, just string underscores together to make the blanks for filling in.
See more answers
Ask a Question
200 characters left
Include your email address to get a message when this question is answered.
Submit
Advertisement
Thanks for submitting a tip for review!
About This Article
Article SummaryX
1. Open your document in Microsoft Word.
2. Press «Ctrl + Shift + 8» on Windows or «Command + 8» on Mac to display line break symbols in the document
3. Scroll down to the blank page.
4. Highlight any Page break or Paragraph symbols (¶) on the page.
5. Press «Delete«.
Did this summary help you?
Thanks to all authors for creating a page that has been read 2,352,145 times.
Is this article up to date?
Formatting Microsoft Word can get funky. Here are ways to delete a page in Word, including how to delete a page in Word Mac to manage invisible page breaks.
Microsoft Word is the most popular word-processing application for Windows and Mac systems. It allows you to write content professionally with advanced features to aid your work process.
But blank pages in a Word document can make an unprofessional impression on editors or potential employers. Yet, Microsoft Word sometimes create blank pages in a document. So, you should ensure to delete the these blank pages in Word whenever possible before sharing the document with anyone else.
In this article, we’ll discuss several basic solutions about how to delete a page in Word with step-by-step instructions regardless of your Office skills. This article applies to Word for Microsoft 365, Microsoft Word for Windows, Word for Mac, and Microsoft Word 2021.
If you want to delete a page containing text, graphics, or other content in a Microsoft Word document, or if you’re wanting to get rid of blank pages at the end of your report that won’t appear to go away, here’s how.
Let’s roll our sleeves and get started.
Jump To:
- Summary: Delete a page in Word
- Why you Can’t Delete a Page in Microsoft Word?
- How To Delete a Page in Word with Content (for Windows and Mac)
- Method 1. Hold the Backspace or Delete Key
- Method 2. Select the Page Content and Delete It
- Method 3. Remove a Page From the Navigation Pane
- Method 4. How to delete a page in Word — Delete Extra Paragraph Mark
- Word for Windows
- In Word for Mac
- Method 5. How To Delete Page Breaks in Word
- Method 5. How To Delete Page Breaks in Word
- Method 6. Use an Online Page Removal Tool
- How to delete a blank page in Word
- Convert Word to PDF
- Final Thoughts
Summary: Delete a page in Word
- To delete a page in MS Word that contains text, graphics, or empty paragraphs, you can select the content to delete and press Delete.
- You can also do this:
- Click/tap anywhere on the page you want to delete > press Ctrl+G.
- In the Enter page number box, type page.
- On your Keyboard, Press Enter > then select Close.
- Verify that a page of content is selected > then press Delete on your keyboard.
- Voila! You’ve deleted a page!
- If you’re using macOS or Word for Mac, here’s how to delete a page in Word Mac:
- Click/tap anywhere on the page you wish to delete > then press Option+⌘+G.
- In the Enter page number box, type page.
- Next, press Enter on the keyboard > then select Close.
- Verify that a page of content is selected > then press the Delete button on the keyboard.
Why you Can’t Delete a Page in Microsoft Word?
Word users sometimes struggle to delete pages, often ones that appear empty. At first, this may seem like an error in the application itself. In reality, the problem has simple solutions depending on its cause.
While formatting, you might’ve inserted a page break, which may be hidden from you until you enable visibility for special symbols. This creates a seemingly blank page or whitespace in Word. A similar thing happens if the text color matches your page’s color — for example, white text on a white background. The page will appear blank despite having content on it.
Some users also found text written in a formatted font barely visible. For example, a 1pt font size is incredibly hard to notice on the default zoom setting. If you simply can’t remove a page with content on it, our methods below will help you sort the issue out.
How To Delete a Page in Word with Content (for Windows and Mac)
Don’t give your mouse a workout trying to delete a persistently blank page. Follow our steps to eliminate unwanted pages, blank pages, or whitespace in a Word document.
Method 1. Hold the Backspace or Delete Key
An easy way to delete an entire page in Word is by holding the backspace or delete key to erase every character on the page. This can be tedious for documents with lots of content, but it works.
This method might also work for empty pages, as you might have spaces or other filler characters you can’t see but can delete. Simply move your blinking cursor to the end of the Word document, then press and hold the backspace key or delete key until the page is removed.
Method 2. Select the Page Content and Delete It
A quick way to remove a page in Word is using the Go To function. This is available on all platforms, making it an accessible solution that you can memorize for future use in all environments. Here are the instructions on how to remove a page in Word using the Go-To feature.
- Open the Find and Replace window using the Ctrl + G keyboard shortcut on Windows or ⌘ + option + G on Mac.
- Switch to the Go To tab. In the Enter page number input box, type in “/page” without quotation marks.

- Hit the Enter key on your keyboard, then click Close. This will select all the content on your page. Press the backspace key or the delete key once to erase everything.

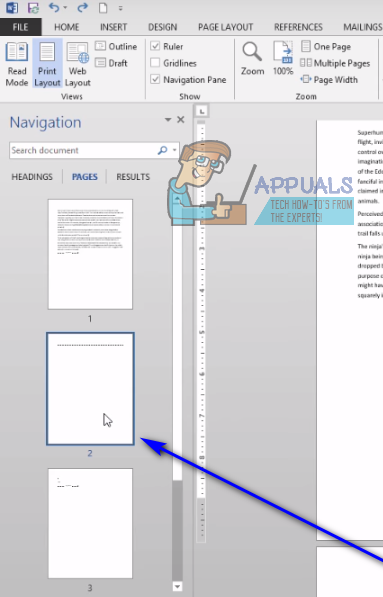
Method 3. Remove a Page From the Navigation Pane
The Navigation pane shows a document preview and allows you to jump to specific pages quickly. However, you can also use it to delete blank pages in Word as well. You can easily spot a blank page and complete the steps below to erase them from your document.
- Go to the View tab in the ribbon displayed on top of your window, and then place a check next to the Navigation Pane option. If you’re using Windows, use the Ctrl + H keyboard shortcut to quickly toggle the pane.

- Switch to the Pages tab in the left panel, and click on the blank page thumbnail preview to instantly jump to the beginning of the page. If you’re deleting a page with content, locate it.

- Scroll to the bottom of the page and click once while holding the Shift key on your keyboard. This will select everything on the page.
- Press the backspace key or the delete key once to remove all contents and delete the page. This should help you remove the page from your document.
Method 4. How to delete a page in Word — Delete Extra Paragraph Mark
In some cases, invisible characters you can’t see by default stop you from deleting a blank page. Pilcrow symbols, displayed with the ¶ character, are used to mark where you begin a new paragraph. They’re not visible by default until you change some of your settings.
Here are the steps to make the paragraph symbol visible in a Word document, then delete it to remove a seemingly blank page or whitespace in your document.
- In most versions of Word, you can toggle the visibility of the paragraph mark from the Home tab in the Ribbon. Simply click on the button which displays the ¶ symbol until you start seeing the marks in your document.

- Erase extra paragraphs where you see the ¶ symbol using the backspace key or the delete key on your keyboard. After removing the last paragraph marker, the page should be deleted.
- If the Show/Hide toggle didn’t work, try these alternative steps to make the paragraph mark visible in Word.

Word for Windows
To delete a blank page in Windows, by making the paragraph mark visible;
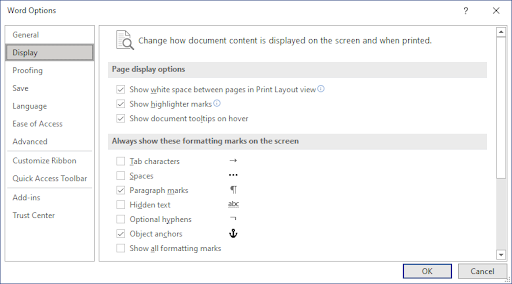
- Go to the File tab and select Options. This is going to open the Word Options dialog box.

- Switch to the Display tab in the left panel.
- Click on the Paragraph marks check box in the Always show these formatting marks on the screen section. You can also turn every mark visible by checking the Show all formatting marks option to reveal more symbols.

- Change how document content is displayed on the screen and when printed
In Word for Mac
- Click on Word from the menu bar on top of your screen and select Preferences. You can also use the ⌘ +, (comma) keyboard shortcut to open the dialog box.
- Select View from the Authoring and Proofing Tools section.
- Place a checkmark next to Paragraph marks in the Show non-printing Characters section. You can also turn every marker visible by selecting the All option.


Method 5. How To Delete Page Breaks in Word
A manual page break you inserted may be stopping you from being able to delete a page in Word. Page breaks usually serve to create separate pages on demand, which may be left in while you alter and delete parts of a Word document.
Below are the steps to learn how to remove a page in Word when you have one or more page breaks in your document.
- Find the ———— Page Break ———— in your document and place your cursor at the end of it.
- Press the backspace key or the delete key to remove the page break. This should also delete the page it was on if the page was empty.

Method 6. Use an Online Page Removal Tool
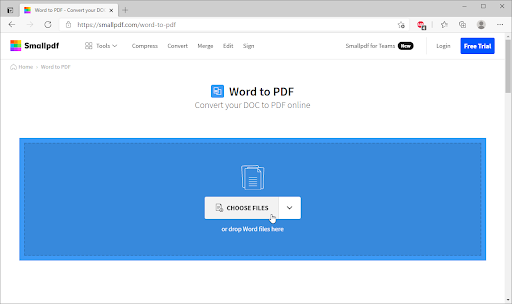
No luck deleting the unwanted page in Word? Your last solution could be an online tool. Smallpdf offers a way to convert your Word documents into a PDF file and then lets you make edits to the converted file. This includes a way to delete any unwanted pages, white pages, and empty pages.
Here’s how you can use the Smallpdf Word to PDF tool and the Delete Pages tool to remove a page in Word.
- Navigate to smallpdf.com/word-to-pdf using any web browser on your device.
- Click on the Choose Files button, or simply drag your Word document into the converter and wait for it to turn into a PDF. The process will automatically begin.

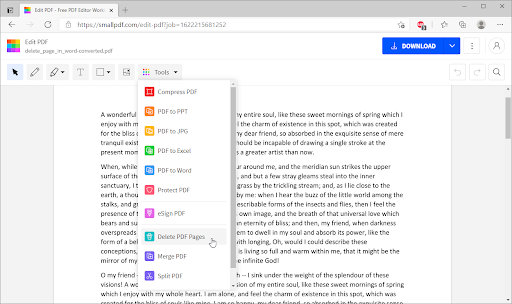
- Once the conversion is complete, click on the Edit PDF button. You’ll be redirected to a new tool, which allows you to remove pages from a Word document.
- Click on Tools from the page toolbar, and then select Delete PDF Pages.
- Hover over the page you want to delete, and then click on the Delete icon displayed by a garbage bin. After deleting every unwanted page, click Apply changes.
- Click the Download button to save the edited file on your computer. If you want to convert the file back to a Word document, use the PDF to Word converter to change your file back to its original format.


How to delete a blank page in Word
Word includes a non-deletable end-paragraph that sometimes gets pushed out to a new, blank page at the end of a document. Wondering how to delete a page in Word — the blank page?
To delete blank pages in a word document, you must make the end-paragraph fit onto the preceding page. The most sure-fire way is to make the end paragraph very small (1 point).
Now, to delete a blank page in Word (including delete a blank page in Word for Mac:Word for Microsoft 365 for Mac, Word 2021 for Mac, Word 2019 for Mac, Word 2016 for Mac, Word 2013, Word 2010):
- Press Ctrl+Shift+8 (⌘+8 on a Mac) to show paragraph marks.
- Select the paragraph mark.
- Select inside the Font size box, type 01, and then press Enter. If you do this, the paragraph now fits on the preceding page, removing the unwanted blank page.
- Press Ctrl+Shift+8 again to hide the paragraph marks (⌘+8 on a Mac).
If that paragraph unfortunately still doesn’t fit on the preceding page, you can make the bottom margin smaller (Layout tab > Margins > Custom Margins, and set the bottom margin to something small, like 0.3 inches). This should work.
Convert word to PDF
Another way to delete blank pages is to convert word to PDF. Here are the steps to help you convert word to pdf.
- Go to File > Save As
- Pick a place to save the file > then choose PDF for the Save as type.
- Select Options in the Save As dialog box.
- Under Page range, choose Page(s) > then specify your non-blank pages. For instance, if page 5 of your document is the blank page you can’t get rid of, specify pages from 1 to 4.
- Select OK, and then select Save.
Recap: How to Delete a page in Microsoft Word
- Click or tap anywhere in the page you want to delete, press Ctrl+G.
- In the Enter page number box, type page.
- Press Enter on your keyboard, and then select Close.
- Verify that a page of content is selected, and then press Delete on your keyboard.
Final Thoughts
We hope you learned how to delete a page in Word. It’s not difficult, right? Now that the pesky page is gone, you can continue working on your projects.
Our Help Center offers hundreds of guides to assist you if you require further help. Return to us for more informative articles, or contact our experts for immediate assistance.
One More Thing
Would you like to receive promotions, deals, and discounts to get our products for the best price? Don’t forget to subscribe to our newsletter by entering your email address below! Be the first to receive the latest news in your inbox.
You May Also Like
» How do I insert or delete a page break in Word?
» How to Unfreeze Word on Mac Without Losing Work
» How to Install Fonts to Word on Mac
Guest
-
#1
How do I hide and then unhide entire pages in Word?
Advertisements
Graham Mayor
-
#2
There is no concept of ‘page’ in Word, so the nearest you can probably
arrange are:
1. To conditionally insert the ‘page’ with includetext or autotext fields
2. Format the text as hidden and display hidden text (or not).
3. Apply a white coloured text attribute to the bit you want to hide and
remove it to display the text.
—
<>>< ><<> ><<> <>>< ><<> <>>< <>><<>
Graham Mayor — Word MVP
My web site www.gmayor.com
<>>< ><<> ><<> <>>< ><<> <>>< <>><<>
Advertisements
Graham Mayor
-
#3
There is no concept of ‘page’ in Word, so the nearest you can probably
arrange are:
1. To conditionally insert the ‘page’ with includetext or autotext fields
2. Format the text as hidden and display hidden text (or not).
3. Apply a white coloured text attribute to the bit you want to hide and
remove it to display the text.
—
<>>< ><<> ><<> <>>< ><<> <>>< <>><<>
Graham Mayor — Word MVP
My web site www.gmayor.com
<>>< ><<> ><<> <>>< ><<> <>>< <>><<>
Want to reply to this thread or ask your own question?
You’ll need to choose a username for the site, which only take a couple of moments. After that, you can post your question and our members will help you out.
Ask a Question
| How do I change a style from «Hide until used» to show it? | 5 | Mar 9, 2009 |
| Checkbox for hide/unhide tables | 4 | Sep 2, 2009 |
| Hide / Unhide each row from StartRow to LastRow for multiple conditions | 6 | Jan 31, 2015 |
| symbols | 8 | Sep 23, 2013 |
| Document won’t print using show/hide parargraph marks. Blocked? | 2 | Feb 20, 2010 |
| Word 2007, Show breaks, hide XE | 3 | Aug 25, 2009 |
| Possible to hide a *numbered* paragraph? | 3 | Jun 25, 2009 |
| How do I view blank pages? | 3 | Sep 18, 2009 |
When typing up a document in Word, users sometimes run into an issue where a blank page, for some reason, takes up residence in the middle or at the very end of their document. It is for this reason, and for a number of other reasons (such as being able to delete and entire unwanted page at a time) that Word users need to know how they can delete an entire page in Word at one time.
Deleting entire pages in Microsoft Word is quite simple – exactly as it should be. However, there are a number of different ways Word users can go about deleting pages in Microsoft’s uber-popular word processor, and the way that works for a specific user depends on multiple different factors, chief among which is how the page that needs to be deleted came into existence in the first place. The following are the most effective methods you can use to delete an entire page in Word 2010 to 2016:
Method 1: Use your Backspace key
This is perhaps the simplest method that can be used to delete an entire page in Word 2013. All you need to do is:
- Click on the very bottom-right corner of the page that you want to delete. Doing so will bring the text cursor to the very end of that page.
- Press the Backspace key on your keyboard and keep it pressed until everything on the target page is deleted. Once everything on the target page has been deleted, the page itself will also disappear.
Method 2: Delete the page using the Navigation Pane
Word 2013 comes with a feature named Navigation Pane that makes it quite easy for users to delete an entire page from a Word document at one time. To use the Navigation Pane to delete a page in Word 2013, you need to:
- Navigate to the View tab.

- In the Show section of the View tab, check the checkbox beside the Navigation Pane option. This will open up the Navigation Pane in the left corner of Microsoft Word.

- In the Navigation Pane, locate the page of the document you want to delete and click on it to select it.

- Press the Delete key on your keyboard, and the page will be deleted as soon as you do so.
- Repeat steps 3 and 4 for any other pages of the same document that you want to delete.


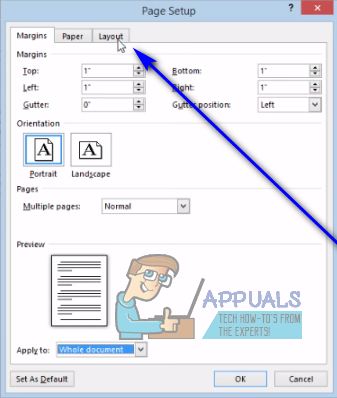
Method 3: Adjust your Page Layout to delete the unwanted page(s)
If neither of the methods listed and described above have worked for you, you can also try to delete the unwanted page(s) of the document in question by adjusting it’s Page Layout. To do so, simply:
- Navigate to the Page Layout tab.

- Click on Margin to open up a dropdown menu.

- Click on Custom Margins… in the dropdown menu.
- Navigate to the Layout tab.

- Open the dropdown menu next to Section start: and click on New Page to select it.

- Click on OK.


Method 4: Enable paragraph symbols and delete whatever is on the target page
Microsoft Word users can have the word processor show them every single paragraph symbol and all other formatting symbols in a document, and you can use this to your advantage if you’re trying to delete a specific page of a document. You can enable this feature to see what’s on the target page and then delete everything that’s on there, consequently deleting the target page as well. To delete a page in Word 2013 using this method, you need to:
- Navigate to the Home tab.
- Click on the Show/Hide ¶ button to have Word display all the paragraph symbols and other formatting symbols in the document.

- Navigate to the page you want to delete.
- Check to see if there are any paragraph symbols (¶) or other formatting symbols on the page.
- If you find any paragraph symbols (¶) or other formatting symbols on the target page, simply select each of them one by one and delete them. Once all of the symbols have been deleted and there’s nothing left on the page, the page will be deleted as well.


Note: If you have a blank page that you can’t seem to get rid of in the very middle of your Word document, the blank page may be there because of a manual page break. With paragraph symbols (¶) or other formatting symbols shown, you will also be able to see manual page breaks, so all you need to do is locate the manual page break, select it and delete it, and the pesky unwanted blank page will also be deleted.

Kevin Arrows
Kevin Arrows is a highly experienced and knowledgeable technology specialist with over a decade of industry experience. He holds a Microsoft Certified Technology Specialist (MCTS) certification and has a deep passion for staying up-to-date on the latest tech developments. Kevin has written extensively on a wide range of tech-related topics, showcasing his expertise and knowledge in areas such as software development, cybersecurity, and cloud computing. His contributions to the tech field have been widely recognized and respected by his peers, and he is highly regarded for his ability to explain complex technical concepts in a clear and concise manner.
Need some help with how to delete a blank page in Word?
If you’re reading this, you’re probably wrestling with an extra page break or a blank page or a lot of space within your document somewhere.
In this blog I’m going to show you how to delete a blank page in Word using several different fixes, starting with the easiest and moving to the more unusual fixes.
1. Removing unwanted extra paragraphs
2. Removing unwanted page breaks
3. Checking the pagination settings
4. Removing a section break (the safe way)
5. Removing a blank last page
1. Removing unwanted extra paragraphs
On the Home tab click on the Show Hide character button.
Once that’s on you will see a little symbol on your screen. This represents where the Enter key has been hit on the keyboard to start a new paragraph.
If you can see a whole heap of little symbols that means somebody has pressed the Enter key many times to start a new page.
To remove them, select over the symbols and press your Delete key. This will delete the empty paragraphs and remove the extra space, hopefully removing your blank or wanted page.
2. Removing unwanted page breaks
When you have your Show/Hide characters turned on you can also see where a page break has been inserted into the document.
Creating a page break is simple. You can place your insertion point wherever you want to start information on a new page and on the Insert tab click the Page Break button.
This inserts a page break symbol.
So, all you need to do is delete the symbol and you will remove the page break and bring your text back together again. To get rid of those extra pages you may need to remove unwanted page breaks.
3. Checking the pagination settings
Checking pagination settings isn’t something a lot of people think of when trying to work out how to delete a blank page in Word.
If you have a big gap and you can’t see any paragraph markers or page break symbols, check your pagination settings.
First click into the paragraph at the top of the next page (the paragraph after the big gap).
Right-click over the paragraph and select Paragraph.
When the Paragraph dialog box opens click on to the Line and Page Breaks tab.
Remove the check mark from the Page break before option box and click OK.
You should now have removed the big gap and your paragraphs will be back together again.
4. Removing a section break (the safe way)
Section breaks can cause extra pages in your document. But before you remove them, just be careful.
If you delete a section break you may delete any headers and footers you have in the previous section.
A section break ‘sections’ your document so that you can have different page formats in different sections.
For example, in section 1 you can have a header and page numbering. In section 2 you can turn these off.
Deleting the section break between section 1 and section 2 will apply the header and footer settings from section 2 only, removing section 1’s formats. Therefore, your header and page numbering will disappear.
So proceed with caution.
What you can do prior to deleting the section break is go into the header, footer or page number settings for section 2, and connect these from section 1 by clicking the Link to Previous button. This will then continue the same formatting settings into section 2.
Click Yes to connect to the header/footer in the previous section.
Now, with your Show/Hide characters on you should be able to see the Section Break symbol. Just select it and press Delete to remove it.
And the extra page will now be gone, and your headers and footers should still be fine.
5. Removing a blank last page
If you have a blank last page in your document that isn’t disappearing when you select the paragraph marker and press Delete, try this.
From the Home tab turn on your Show/Hide characters and then go to the second to last page of your document.
If you can see a page break symbol, select it, and delete it.
If you can see many paragraph symbols with empty paragraphs, select these and delete these.
You should now have removed your blank last page.
Was this blog helpful? Let us know in the Comments below.
Instructions
1. Remove unwanted extra paragraphs
- Go to the Home tab.
- Select the Show/Hide character button. If you can see a whole heap of little symbols that means somebody has pressed the Enter key many times to start a new page.
- Select over the symbols and press then Delete.
2. Remove unwanted page breaks
Turning on Show/Hide characters also shows you where a page break has been inserted. To remove the page break, delete the page break symbol.
3. Check Page break before isn’t selected
- Click into the paragraph at the top of the next page (the paragraph after the big gap).
- Right-click over the paragraph and select Paragraph.
- When the Paragraph dialog box opens click on to the Line and Page Breaks tab.
- Remove the check mark from the Page break before option box and then click OK.
4. Delete a section break
Note: deleting a section break between sections can apply unwanted formatting settings. To avoid this from happening follow the steps below:
Link to Previous
- Go into the Header, Footer or Page number settings for the blank page.
- Connect these from section 1 by clicking the Link to Previous button.
- Click Yes to connect to the Header/Footer to the previous section.
Delete the section break:
- On the Home tab, click Show/Hide to turn this option on.
- Select over the Section Break symbol.
- Press Delete.
5. Remove a blank last page
- From the Home tab turn on your Show/Hide characters.
- Go to the second to last page of your document.
- If you can see a page break symbol, select it, and delete it.
- If you can see many paragraph symbols with empty paragraphs, select these and delete these.
This problem sometimes occur out of the blue and for no apparent reasons. Normally, Microsoft Word should remove the last page when there is no text, but it doesn’t in some cases.
I have experienced this multiple times. So, here is a solution that should work for you —
Here, is a blank page that is not going even after deleting everything from that page:

I need to get rid of this right away, else this’s gonna be printed along with the first page. Now go to ‘home’ tab and click on ¶ to see something like this:

(note: I have got a lot of ¶ in the second page while replicating this problem. You might get just one or two)
Now go to ‘view’ tab and select ‘Draft’ as shown:

Scroll down to the last page you want to remove. Each page in this ‘Draft’ mode is separated by a thin ———— line, just like this:

Select every ¶ symbol from below that last thin line and hit ‘delete‘
That’s it.
Now, in the ‘view’ tab, click on ‘Print Layout’. You will be taken to the layout with which we are most familiar, I mean this:

Now, click on the ‘Home’ tab. It’s time to remove all those ¶ symbols. For this, just ‘Unmark’ ¶:

Voila, the annoying last page is gone now:

Save the document in desired format and try giving a print command. Last empty page shouldn’t be printed now, because there is none 
Hope this helps.
In Microsoft Word documents, unwanted pages — usually blank pages — are a common mishap. When entering content from the keyboard, pressing Ctrl + Enter or Command + Return is the manual method for forcing a new page. While I recommend you not use that method, most Word documents have a few hard page breaks.
Considering how easy it is to end up with a blank page, you might expect Word to provide an easy way to delete a page, regardless of how it’s inserted, but there’s no quick-click option that will do so. In this article, I’ll show you four ways to delete an unwanted page in a Word document.
SEE: Software Installation Policy (TechRepublic Premium)
I’m using Microsoft 365 on a Windows 10 64-bit system, but you can use an earlier version. For your convenience, you can download the demonstration .docx and .doc files. Word for the web doesn’t support the Navigation pane method. In fact, Word for the web doesn’t display the entire blank page the way the desktop version does — it is hard to select a blank page. Show/Hide is available though.
As you work through the different methods, remember to use Ctrl + Z or Command + Z to undo the page delete between sections, so you always have a blank page to delete.
Before you begin: How to find page breaks in Word
Word supports two types of page breaks: a hard page break, entered by pressing Ctrl + Enter or Command + Return, and a soft page break, entered by Word to wrap text at the right margin. The only way to delete the latter is to remove characters before or after it.
Either way, a soft return will be in the mix somewhere if the text wraps to the top of the next page. You can sometimes adjust where a soft return occurs, but you don’t actually delete them. This discussion is about hard page breaks.
When working with page breaks, try enabling Word’s Show/Hide feature. Doing so displays both hard page and section breaks, making it easy to locate and remove them. Figure A shows a three-page document with two page breaks.
Figure A
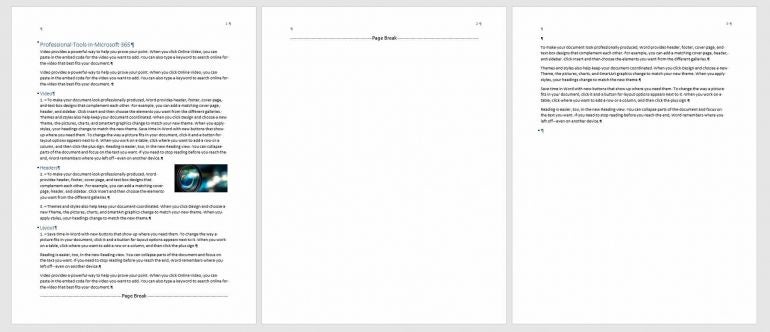
You’ll find this option on the Home tab in the Paragraph group. Once you find the page breaks, they’re easy to delete when working with only a few.
1. How to use the Ctrl + Page Up Windows shortcut in Word
On Windows devices, when you need to display a single page, regardless of its contents, position the cursor at the beginning of the page that follows the page you want to remove, and press Delete.
In other words, if you want to remove page 2 of your document, you would need to go to the top of page 3 and press Delete. This works because the last character or code before the following page has to be a page break. Unfortunately, there’s no shortcut for moving the cursor to the top of the current page, so you have to manually position the cursor yourself.
The Ctrl + Page Up might be a bit of help, but it goes to the top of the previous page. What this means is that you can use this shortcut if the page is truly blank. Even then, you might have trouble if there are paragraph marks before the page break. If the page has content, including blank lines, Ctrl + Page Up won’t work as expected. Fortunately, there’s an easier method.
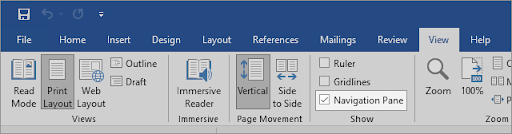
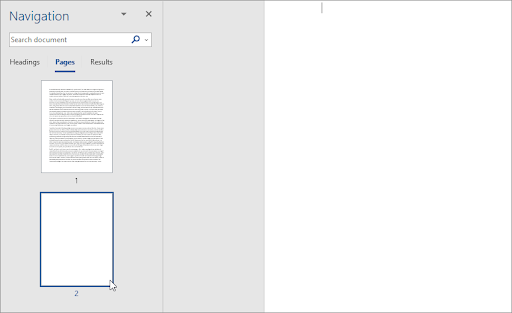
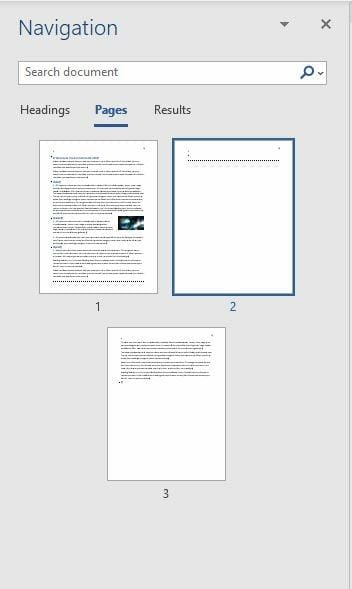
2. How to use the Navigation pane to delete pages in Word
Possibly the easiest way to change a single page is to use Word’s Navigation pane. It requires only a few clicks:
- Click the View tab and then click Navigation pane in the Show group.
- In the Navigation pane, click Pages.
- Click the blank page (Figure B), and press Delete. You’ll know the page is selected by the thick blue border.
If the blank page happens to have a few paragraph marks before the page break, you will have to press Delete accordingly — once per paragraph mark.
Figure B
Sometimes there’s no hard page break to remove; what do you do then?
3. What to do when there’s no hard page break to delete in Word
It’s possible to force a new page using hard line returns. Figure C shows a blank page created by hard paragraph returns, also known as paragraph marks. The paragraph marks are a visual representation of pressing the Enter key.
Figure C

To delete this page full of paragraph marks, select all the marks (Figure C), and press Delete.
When the page you want to delete is the last page of the document, simply click inside the last page and start hitting Delete until you reach the bottom of the previous page.
4. How to select and delete a page in Word
If you can see the page break, you can delete it without a shortcut or special pane. Simply select it and press Delete. As you can see in Figure D, there are two page breaks: one at the bottom of page one and a second at the top of page two — the blank page. In this case, select the one at the top of page 2 by clicking (twice) in the left margin next to the page break. Then, press Delete.
Figure D

What’s curious is the page break at the bottom of page 1. It appears to be totally unnecessary. It’s a good idea to check page breaks when you find them so close to the bottom of a page and you don’t intend to force a new page.
Chances are, as in this case, you can delete the page break without moving content. This situation happens more often that you might think. That’s why I recommend enabling Show/Hide when cleaning up individual page breaks.
The recent article, How to quickly delete multiple page breaks in a Word document shows you how to delete multiple page breaks.
Microsoft Word is the most popular word processor in the world. Most people have already worked with the software, written a letter, created invitations or put together a resume. Therefore, most users know how to delete the content of a page. Just like with many other programs, any content can be deleted again with the backspace or deletekeys. But can you also delete an empty page? Yes, Word also has a solution for this.
Contents
- Removing a blank page in Word — Why would you need to?
- How to delete a page in Word
$1 Domain Names
Register great TLDs for less than $1 for the first year.
Why wait? Grab your favorite domain name today!
![]() Matching email
Matching email
![]() SSL certificate
SSL certificate
![]() 24/7/365 support
24/7/365 support
Removing a blank page in Word — Why would you need to?
Often, when writing documents, anything you need to get rid of can be deleted with the backspace key. This way you can remove individual letters, whole words or even complete paragraphs from the document. But sometimes a whole page has got to go. For example, a page without content might sneak into your document. Sometimes, undesired blank pages only appear at the end, sometimes in the middle. Either way, it can sometimes be harder than it seems to delete this blank page in Word. In other cases, you need to delete whole pages of content, because you are no longer satisfied with the text.
Unwanted blank pages are usually caused by manual page breaks. In the default view, Word hides the appropriate control characters, so it’s difficult to spot the correct place to delete the page. It’s easier if you adjust the view.
The function Show/hide paragraph marks helps you with that. You activate this function by clicking in the “Home” tab on the paragraph sign “¶”. Now all break characters are displayed.
Tip
You can also use the shortcut [Ctrl] + [Shift] + 8 to display the control characters.

This will help you to delete in the right places. Paragraph marks and page breaks are clearly displayed in this view. Move the cursor in front of the corresponding character and press the deletekey. Word automatically deletes the offending page once there are no characters left on the page to be deleted, and you have also removed the page break.
If it is not a blank page, but one with content, you must first remove text, images, and tables. The easiest way to do this should be if you use the mouse to highlight the area you want to delete and then hit the delete key. You can then remove any remaining paragraph marks and finally get rid of the entire page as explained above.
Tip
To swiftly navigate pages in large documents, you can use the Go to function. You can use the shortcut [Ctrl] + [G] to open the window and either enter the specific page number or use [+] and [-] to jump relative to your current position in the document.

How to create a table of contents in Word
Microsoft Word makes it easy to create smart text documents with its diverse template styles. This includes pre-formatted table of contents templates. With our illustrated, step-by-step guide, we’ll show you how to find the templates and how to customize the design.
How to create a table of contents in Word

Inserting, editing and deleting comments in Word
The built-in comment function in Microsoft Word is a great way of adding helpful information to your own documents or other texts. Any comments you add will be visible to all other users. Whether or not they can be edited or deleted depends on how the document access rights are configured. This guide explains how to insert comments in Word, and also how to edit and delete them.
Inserting, editing and deleting comments in Word

Activate and adjust hyphenation in Word
Hyphenation in Word is a handy tool that is often used to create a more legible document. This feature avoids excessive line breaks and large spaces that sometimes occur in Word documents. We’ll show you how to activate and customize automatic hyphenation in Word.
Activate and adjust hyphenation in Word
How to change line spacing in Word easily
The default settings for Microsoft Word line spacing are not always enough. Fortunately, the software offers several options for customizing your documents. Unfortunately, these options are often hard to find. For example, if you want to change the line spacing in Word, you might have to search for this. We’ll help you find this feature so you can learn how to double-space in Word and more.
How to change line spacing in Word easily

Word table: Creating a table in Microsoft Word
In Word, tables prove useful in the most diverse situations, and you have several options for creating them. You can either use the table templates provided by the Microsoft tool, or you can design your own. This enables you to improve your reports, invoices or the performance of household tasks. Even data from Excel can be integrated as a table into a Word file.
Word table: Creating a table in Microsoft Word