In Word, you can select all text in a document (Ctrl+A), or select specific text or items in a table by using the mouse or keyboard. You can also select text or items that are in different places. For example, you can select a paragraph on one page and a sentence on a different page.
Select all text
-
Click anywhere within the document.
-
Press Ctrl+A on your keyboard to select all text in the document.
Select specific text
You can also select a specific word, line of text, or one or more paragraphs.
-
Place your cursor in front of the first letter of the word, sentence, or paragraphs you want to select.
-
Click and hold while you drag your cursor to select the text you want.
Other ways to select text
-
To select a single word, quickly double-click that word.
-
To select a line of text, place your cursor at the start of the line, and press Shift + down arrow.
-
To select a paragraph, place your cursor at the start of the paragraph, and press Ctrl + Shift + down arrow.
Select text by using the mouse
Select text in the body of a document
Notes: To select an entire document, do one of the following:
-
On the Home tab, in the Editing group, click Select, and then click Select All.
-
Move the pointer to the left of any text until it turns into a right-pointing arrow, and then triple-click.
|
To select |
Do this |
|---|---|
|
Any amount of text |
Click where you want to begin the selection, hold down the left mouse button, and then drag the pointer over the text that you want to select. |
|
A word |
Double-click anywhere in the word. |
|
A line of text |
Move the pointer to the left of the line until it changes to a right-pointing arrow, and then click. |
|
A sentence |
Hold down CTRL, and then click anywhere in the sentence. |
|
A paragraph |
Triple-click anywhere in the paragraph. |
|
Multiple paragraphs |
Move the pointer to the left of the first paragraph until it changes to a right-pointing arrow, and then press and hold down the left mouse button while you drag the pointer up or down. |
|
A large block of text |
Click at the start of the selection, scroll to the end of the selection, and then hold down SHIFT while you click where you want the selection to end. |
|
An entire document |
Move the pointer to the left of any text until it changes to a right-pointing arrow, and then triple-click. |
|
Headers and footers |
In Print Layout view, double-click the dimmed header or footer text. Move the pointer to the left of the header or footer until it changes to a right-pointing arrow, and then click. |
|
Footnotes and endnotes |
Click the footnote or endnote text, move the pointer to the left of the text until it changes to a right-pointing arrow, and then click. |
|
A vertical block of text |
Hold down ALT while you drag the pointer over the text. |
|
A text box or frame |
Move the pointer over the border of the frame or text box until the pointer becomes a four-headed arrow, and then click. |
Select items in a table
|
To select |
Do this |
|---|---|
|
The contents of a cell |
Click in the cell. Under Table Tools, click the Layout tab. In the Table group, click Select, and then click Select Cell. |
|
The contents of a row |
Click in the row. Under Table Tools, click the Layout tab. In the Table group, click Select, and then click Select Row. |
|
The contents of a column |
Click in the column. Under Table Tools, click the Layout tab. In the Table group, click Select, and then click Select Column. |
|
The contents of multiple cells, rows, or columns |
Click in a cell, a row, or a column and then hold the left mouse button down while you drag across all the cells, rows, or columns that contain the content that you want to select. To select the contents of cells, rows, or columns that are not next to each other, click in the first cell, row, or column, press CTRL, and then click the additional cells, rows, or columns that contain the content that you want to select. |
|
The contents of an entire table |
Click in the table. Under Table Tools, click the Layout tab. In the Table group, click Select, and then click Select Table. |
Select text in different places
You can select text or items in a table that are not next to each other. For example, you can select a paragraph on one page and a sentence on a different page.
-
Select some text or an item in a table.
-
Hold down CTRL while you select any additional text or item in a table that you want.
Select text in Outline view
To view your document in Outline view, click the View tab, and then click Outline in the Document Views group.
|
To select |
Move the pointer to |
|---|---|
|
A heading |
The left of the heading until it changes to a right-pointing arrow, and then click. |
|
A heading, its subheading, and body text |
The left of the heading until it changes to a right-pointing arrow, and then double-click. |
|
A paragraph of body text |
The left of the paragraph until it changes to a right-pointing arrow, and then click. |
|
Multiple headings or paragraphs of body text |
The left of the text until it changes to a right-pointing arrow, and then drag up or down. |
Notes:
-
In Outline view, clicking once to the left of a paragraph selects the entire paragraph instead of a single line.
-
If you select a heading that includes collapsed subordinate text, the collapsed text is also selected (even though it is not visible). Any changes that you make to the heading — such as moving, copying, or deleting it — also affect the collapsed text.
Select text by using the keyboard
Select text in the body of a document
Note: To select an entire document, press CTRL+A.
|
To select |
Do this |
|---|---|
|
One character to the right |
Press SHIFT+RIGHT ARROW. |
|
One character to the left |
Press SHIFT+LEFT ARROW. |
|
A word from its beginning to its end |
Place the insertion point at the beginning of the word, and then press CTRL+SHIFT+RIGHT ARROW. |
|
A word from its end to its beginning |
Move the pointer to the end of the word, and then press CTRL+SHIFT+LEFT ARROW. |
|
A line from its beginning to its end |
Press HOME, and then press SHIFT+END. |
|
A line from its end to its beginning |
Press END, and then press SHIFT+HOME. |
|
One line down |
Press END, and then press SHIFT+DOWN ARROW. |
|
One line up |
Press HOME, and then press SHIFT+UP ARROW. |
|
A paragraph from its beginning to its end |
Move the pointer to the beginning of the paragraph, and then press CTRL+SHIFT+DOWN ARROW. |
|
A paragraph from its end to its beginning |
Move the pointer to the end of the paragraph, and then press CTRL+SHIFT+UP ARROW. |
|
A document from its end to its beginning |
Move the pointer to the end of the document, and then press CTRL+SHIFT+HOME. |
|
A document from its beginning to its end |
Move the pointer to the beginning of the document, and then press CTRL+SHIFT+END. |
|
From the beginning of a window to its end |
Move the pointer to the beginning of the window, and then press ALT+CTRL+SHIFT+PAGE DOWN. |
|
The entire document |
Press CTRL+A. |
|
A vertical block of text |
Press CTRL+SHIFT+F8, and then use the arrow keys. Press ESC to turn off the selection mode. |
|
The nearest character |
Press F8 to turn on selection mode, and then press LEFT ARROW or RIGHT ARROW; press ESC to turn off the selection mode. |
|
A word, a sentence, a paragraph, or a document |
Press F8 to turn on selection mode, and then press F8 once to select a word, twice to select a sentence, three times to select a paragraph, or four times to select the document. Press ESC to turn off the selection mode. |
Select items in a table
|
To select |
Do this |
|---|---|
|
The contents of the cell to the right |
Press TAB. |
|
The contents of the cell to the left |
Press SHIFT+TAB. |
|
The contents of adjacent cells |
Hold down SHIFT while you repeatedly press the appropriate arrow key until you’ve selected the contents of all the cells that you want. |
|
The contents of a column |
Click in the column’s top or bottom cell. Hold down SHIFT while you repeatedly press the UP ARROW or DOWN ARROW key until you have selected the contents of the column. |
|
The contents of an entire table |
Click in the table, and then press ALT+5 on the numeric keypad (with NUM LOCK off). |
Stop selecting the entire word
-
Click the File tab, and then click Options.
-
Click Advanced.
-
Under Editing options, clear the checkbox next to When selecting, automatically select entire word.
Important:
Office 2007 is no longer supported. Upgrade to Microsoft 365 to work anywhere from any device and continue to receive support.
Upgrade now
Select text by using the mouse
Select text in the body of a document
Note: To select an entire document, do one of the following:
-
On the Home tab, in the Editing group, click Select, and then click Select All.
-
Move the pointer to the left of any text until it turns into a right-pointing arrow, and then triple-click.
|
To select |
Do this |
|---|---|
|
Any amount of text |
Click where you want to begin the selection, hold down the left mouse button, and then drag the pointer over the text that you want to select. |
|
A word |
Double-click anywhere in the word. |
|
A line of text |
Move the pointer to the left of the line until it changes to a right-pointing arrow, and then click. |
|
A sentence |
Hold down CTRL, and then click anywhere in the sentence. |
|
A paragraph |
Triple-click anywhere in the paragraph. |
|
Multiple paragraphs |
Move the pointer to the left of the first paragraph until it changes to a right-pointing arrow, and then press and hold down the left mouse button while you drag the pointer up or down. |
|
A large block of text |
Click at the start of the selection, scroll to the end of the selection, and then hold down SHIFT while you click where you want the selection to end. |
|
An entire document |
Move the pointer to the left of any text until it changes to a right-pointing arrow, and then triple-click. |
|
Headers and footers |
In Print Layout view, double-click the dimmed header or footer text. Move the pointer to the left of the header or footer until it changes to a right-pointing arrow, and then click. |
|
Footnotes and endnotes |
Click the footnote or endnote text, move the pointer to the left of the text until it changes to a right-pointing arrow, and then click. |
|
A vertical block of text |
Hold down ALT while you drag the pointer over the text. |
|
A text box or frame |
Move the pointer over the border of the frame or text box until the pointer becomes a four-headed arrow, and then click. |
Select items in a table
|
To select |
Do this |
|---|---|
|
The contents of a cell |
Click in the cell. Under Table Tools, click the Layout tab. In the Table group, click Select, and then click Select Cell. |
|
The contents of a row |
Click in the row. Under Table Tools, click the Layout tab. In the Table group, click Select, and then click Select Row. |
|
The contents of a column |
Click in the column. Under Table Tools, click the Layout tab. In the Table group, click Select, and then click Select Column. |
|
The contents of multiple cells, rows, or columns |
Click in a cell, a row, or a column and then hold the left mouse button down while you drag across all of the cells, rows, or columns that contain the content that you want to select. To select the contents of cells, rows, or columns that are not next to each other, click in the first cell, row, or column, press CTRL, and then click the additional cells, rows, or columns that contain the content that you want to select. |
|
The contents of an entire table |
Click in the table. Under Table Tools, click the Layout tab. In the Table group, click Select, and then click Select Table. |
Select text in different places
You can select text or items in a table that are not next to each other. For example, you can select a paragraph on one page and a sentence on a different page.
-
Select some text or an item in a table.
-
Hold down CTRL while you select any additional text or item in a table that you want.
Select text in Outline view
To view your document in Outline view, click the View tab, and then click Outline in the Document Views group.
|
To select |
Move the pointer to |
|---|---|
|
A heading |
The left of the heading until it changes to a right-pointing arrow, and then click. |
|
A heading, its subheading, and body text |
The left of the heading until it changes to a right-pointing arrow, and then double-click. |
|
A paragraph of body text |
The left of the paragraph until it changes to a right-pointing arrow, and then click. |
|
Multiple headings or paragraphs of body text |
The left of the text until it changes to a right-pointing arrow, and then drag up or down. |
Notes:
-
In Outline view, clicking once to the left of a paragraph selects the entire paragraph instead of a single line.
-
If you select a heading that includes collapsed subordinate text, the collapsed text is also selected (even though it’s not visible). Any changes that you make to the heading — such as moving, copying, or deleting it — also affect the collapsed text.
Select text by using the keyboard
Select text in the body of a document
Note: To select an entire document, press CTRL+A.
|
To select |
Do this |
|---|---|
|
One character to the right |
Press SHIFT+RIGHT ARROW. |
|
One character to the left |
Press SHIFT+LEFT ARROW. |
|
A word from its beginning to its end |
Place the insertion point at the beginning of the word, and then press CTRL+SHIFT+RIGHT ARROW. |
|
A word from its end to its beginning |
Move the pointer to the end of the word, and then press CTRL+SHIFT+LEFT ARROW. |
|
A line from its beginning to its end |
Press HOME, and then press SHIFT+END. |
|
A line from its end to its beginning |
Press END, and then press SHIFT+HOME. |
|
One line down |
Press END, and then press SHIFT+DOWN ARROW. |
|
One line up |
Press HOME, and then press SHIFT+UP ARROW. |
|
A paragraph from its beginning to its end |
Move the pointer to the beginning of the paragraph, and then press CTRL+SHIFT+DOWN ARROW. |
|
A paragraph from its end to its beginning |
Move the pointer to the end of the paragraph, and then press CTRL+SHIFT+UP ARROW. |
|
A document from its end to its beginning |
Move the pointer to the end of the document, and then press CTRL+SHIFT+HOME. |
|
A document from its beginning to its end |
Move the pointer to the beginning of the document, and then press CTRL+SHIFT+END. |
|
From the beginning of a window to its end |
Move the pointer to the beginning of the window, and then press ALT+CTRL+SHIFT+PAGE DOWN. |
|
The entire document |
Press CTRL+A. |
|
A vertical block of text |
Press CTRL+SHIFT+F8, and then use the arrow keys. Press ESC to turn off the selection mode. |
|
The nearest character |
Press F8 to turn on selection mode, and then press LEFT ARROW or RIGHT ARROW; press ESC to turn off the selection mode. |
|
A word, a sentence, a paragraph, or a document |
Press F8 to turn on selection mode, and then press F8 once to select a word, twice to select a sentence, three times to select a paragraph, or four times to select the document. Press ESC to turn off the selection mode. |
Select items in a table
|
To select |
Do this |
|---|---|
|
The contents of the cell to the right |
Press TAB. |
|
The contents of the cell to the left |
Press SHIFT+TAB. |
|
The contents of adjacent cells |
Hold down SHIFT while you press the appropriate arrow key repeatedly until you have selected the contents of all of the cells that you want. |
|
The contents of a column |
Click in the column’s top or bottom cell. Hold down SHIFT while you press the UP ARROW or DOWN ARROW key repeatedly until you have selected the contents of the column. |
|
The contents of an entire table |
Click in the table, and then press ALT+5 on the numeric keypad (with NUM LOCK off). |
Stop selecting the entire word
-
Click the Microsoft Office Button
, and then click Word Options.
-
Click Advanced.
-
Under Editing options, clear the check box next to When selecting, automatically select entire word.
It is fairly straightforward to quickly select all the text in MS Word documents. We will go over 3 ways to do it.
- Select All using a ShortCut Key
- Select All using Mouse
- Select all using the Select tool
Method 1: Select All Using a Shortcut Key
Step 1: Open an MS Word Document.
Step 2: Hit the keyboard shortcut keys.
- Click on any part of the page.
- Then, press the Ctrl + A keys on your keyboard.
- Right after that, you’ll notice that all of the text, including any object in your document, has been selected.
Method 2: Select All by Clicking and Dragging
Step 1: Open an MS Word Document.
Step 2: Highlight your content.
- Once your document is ready, move your mouse pointer to the very beginning of your file.
- Then, click and hold the left mouse button and drag it to the bottom of your window.
- This will allow MS Word to automatically scroll down the pages of your document. Hence, highlighting every line of the content.
Method 3: Select All Using the Select Tool
Step 1: Open an MS Word Document.
Step 2: Click the Select button.
- Go to the Home Tab and click the Select button.
- This will open a drop-down menu.
- Click on Select All.
- This will select all the text in the document.
Conclusion
You’ve finally arrived at the end of this article.
We hope you’ve found this article helpful!
Check Out These 6 Ways to Select All in Microsoft Word Documents
by Avantix Learning Team | Updated March 24, 2022
Applies to: Microsoft® Word® 2010, 2013, 2016, 2019, 2021 or 365 (Windows)
In Microsoft Word documents, you can select all using the Ribbon or keyboard shortcuts. You can select all text in a document, select from the cursor to the end or the beginning of the document, select all text with similar formatting or select all cells in a table.
Recommended article: 10 Microsoft Word Tips, Tricks and Shortcuts for Selecting in Tables
Do you want to learn more about Microsoft Word? Check out our virtual classroom or in-person Word courses >
When you select all using a keyboard shortcut or the Ribbon, the main content of the document is highlighted and headers and footers are selected only if there are section breaks in the document because headers and footers are attached to sections. Headers and footers for the last section are not included as the last section is not followed by a section break. If you are trying to select all to change the font and size for an entire document, a better strategy is to use themes and styles.
1. Select all using a keyboard shortcut
To select all using a keyboard shortcut, click in the document and then press Ctrl + A to select the entire document.
2. Select all using the Ribbon
To select all using the Ribbon:
- Click in the document.
- Click the Home tab in the Ribbon.
- In the Editing group, click Select. A drop-down menu appears.
- Click Select All.
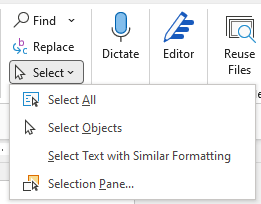
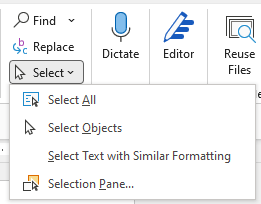
Select All appears in the Select drop-down menu on the Home tab in the Ribbon:
3. Select all from the cursor to the end of the document
To select all from the cursor to the end of the document using a keyboard shortcut, position the cursor where you want to start the selection and then press Ctrl + Shift + End.
4. Select all from the cursor to the beginning of the document
To select all from the cursor to the beginning of the document, position the cursor where you want to start the selection and then press Ctrl + Shift + Home.
5. Select all text with similar formatting
To select all text with similar formatting:
- Select the text with the desired formatting.
- Click the Home tab in the Ribbon.
- In the Editing group, click Select. A drop-down menu appears.
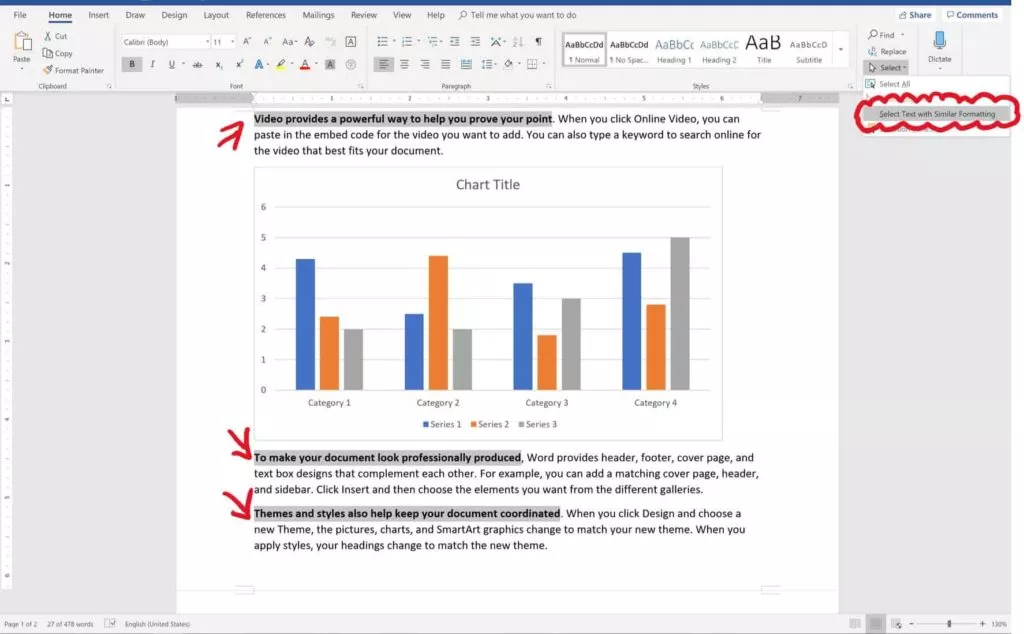
- Click Select Text with Similar Formatting.
All text with the same formatting will be selected and you can clear the formatting or apply other formatting.
Select Text with Similar Formatting appears in the Select drop-down menu on the Home tab in the Ribbon:
6. Select all cells in a table
To select all cells in a table, click in the table, press Alt and then double-click. You can also click the four-arrow pointer on the top left of the table.
Subscribe to get more articles like this one
Did you find this article helpful? If you would like to receive new articles, join our email list.
More resources
How to Find and Replace in Word (and Use Wildcards)
How to Create, Save, Use and Edit Templates in Microsoft Word
How to Keep Text Together in Microsoft Word (Words, Lines or Paragraphs)
How to Insert a Check Mark in Word (5 Ways to Insert a Check or Tick Mark with Shortcuts)
10+ Great Microsoft Word Navigation Shortcuts for Moving Around Quickly in Your Documents
Related courses
Microsoft Word: Intermediate / Advanced
Microsoft Word: Designing Dynamic Word Documents Using Fields
Microsoft Word: Long Documents Master Class
Microsoft Excel: Intermediate / Advanced
Microsoft PowerPoint: Intermediate / Advanced
VIEW MORE COURSES >
Our instructor-led courses are delivered in virtual classroom format or at our downtown Toronto location at 18 King Street East, Suite 1400, Toronto, Ontario, Canada (some in-person classroom courses may also be delivered at an alternate downtown Toronto location). Contact us at info@avantixlearning.ca if you’d like to arrange custom instructor-led virtual classroom or onsite training on a date that’s convenient for you.
Copyright 2023 Avantix® Learning
Microsoft, the Microsoft logo, Microsoft Office and related Microsoft applications and logos are registered trademarks of Microsoft Corporation in Canada, US and other countries. All other trademarks are the property of the registered owners.
Avantix Learning |18 King Street East, Suite 1400, Toronto, Ontario, Canada M5C 1C4 | Contact us at info@avantixlearning.ca
PDNob Users Worldwide
2,582,819
by Rachel Jones|2023-01-29 |
3 min read
When using Microsoft word and creating different reports and files, you may need to select all the words on a document to copy or delete it, but it may be challenging for the people who are new to Microsoft word. If you are one of them, then here is a quick guide for you that will help you select all on word whether you are using Windows or Mac computer.
So, let’s get started.
-
1. Select All Word Shortcut
- How to Select All on Windows
- How to Select All on Mac
- 2. How to Select with Mouse
- 3. How to Select with Select Tool
1. Select All Word Shortcut
Selecting all words or an entire document using Microsoft Word is easy if you know the right way. There are some shortcut keys that you can use to do that, depending on your computer’s operating system. Besides that, there are also some other ways which can help you select all on MS Word.
Let’s get to know each method.
How to Select All on Windows
If you are a windows user and using Microsoft Word to create or edit documents, then selecting all would be so much easy for you. Because Windows have already given a select all shortcut which is Ctrl + A. You can use this shortcut key, which will select all words on the file in a matter of seconds.
But, if you don’t want to use this shortcut key or it is not convenient for you, then there is also another way which could be helpful for you. You can use PDNob Shortcut to create a custom button and select everything on a document.
Let’s learn how to select all using the PDNob Shortcut tool.
-
Download and Install PDNob Shortcut
-
Press the middle mouse button to open the panel. Click on the empty space and select Stimulate Keystrokes. Save Ctrl + A as the stimulated keys. This will successfully create the shortcut button to select all or everything on Microsoft Word.
-
Open the MS Word file. Hit the middle mouse button to open the panel and click on the created shortcut key. This will automatically select everything on the document, making it easier to select all without touching the keyboard with just a single click.
How to Select All on Mac
If you are using a MacBook or running MacOS on your computer, the method mentioned above will not work for you. The reason is: that MacOS is way different from how to select all on Windows, which is why Mac has its own shortcut to select all in MS Word document.
Besides, you also can’t use PDNob Software on Mac because it is only available for Windows Computers.
So, the question is how to select all on Mac or what is the select all shortcut for MacOS?
You will have to press the Command + A button together. It will select everything on your MS Word document, making it easier for you to Copy, Delete, or Replace anything on the file.
2. How to Select with Mouse
Select with mouse is also great if you don’t want to use any of the above methods. All you have to do is click and hold on the start of the Word Document and then drag your cursor to the downside to the end of the document.
This will select everything on the file.
3. How to Select with Select Tool
There is another way to select everything on MS Word. Microsoft Word comes with a built-in tool named Select. You can use that tool in order to select all on the file.
For this, look at the top right corner of the Word document; here, you will find an option Select. You will have to click on it and then click on the Select All button that appears below.
It will immediately select everything on the document, making it convenient for you to modify the document.
Conclusion
So, this is how to select all in the MS Word document. You can use any of the above-given methods according to your computer’s operating system. But, the recommended one is select all using PDNob Shortcut. By following this method, you can easily select everything on the document without even touching the keyboard.
You can also create other shortcuts using PDNob, making your user experience better.
PDNob Windows Shortcuts
Discover how PDNob can improve your productivity.
In this article you’ll learn all of the different Select All shortcuts in Word, Excel and PowerPoint, and how to use Select All to quickly grab things like:
- Objects (PowerPoint)
- Text with similar formatting (Word)
- Formulas (Excel)
- Constants (Excel)
- Comments (Excel)
- And more!
This allows you to quickly grab EXACTLY what you need in each of the programs when you need it. This saves you from otherwise having to manually selecting everything yourself, one-by-one.
Select All shortcut (A Must Know)
The universal Select All shortcut for most program (Mac or PC) is:

Select All shortcut (PC Users): Ctrl + A
Select All shortcut (Mac Users) Cmd + A
That said there are a variety of different ways you can use the shortcut in Word, Excel and PowerPoint to finish your tasks faster and get you to Happy Hour (all discussed below).
How to best use the Select All command?
In short, this command is best used to quickly grab all the text, numbers, objects, formulas etc. that you want to quickly format or work with.
This allows you to quickly make changes to everything at once. For example:
- Change the font style of all the text in a Word document
- Grab all the formulas or constants in an Excel spreadsheet to change their font color
- Grab all your PowerPoint objects on a slide to change their shape fill
Which makes sense, right?
Why bother doing things manually (one-by-one) when you can select all your objects at once.
And it’s this kind of know-how why one person leaves the office at a decent hour, while another wastes away at the office all night.
How to Select All in Word
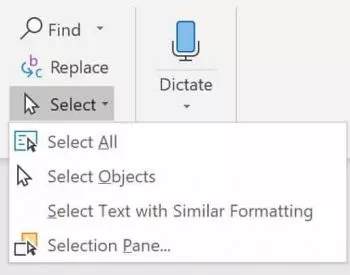
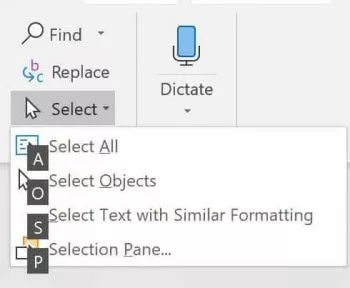
You have 4 different types of selection options in Microsoft Word.
And if you are on a PC, you can additionally shortcut all of these using your Ribbon Guides (details below).
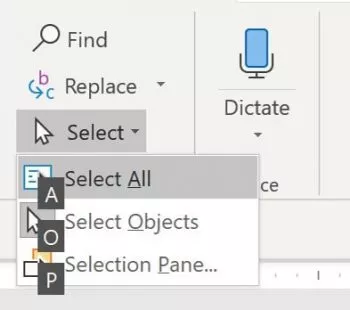
1. Select All (Ctrl + A)
Selects everything within your document so that you can make all the formatting edits that you want at the same time.
Clicking this command with your mouse is the same as hitting Ctrl + A on your keyboard (Cmd + A on a Mac).
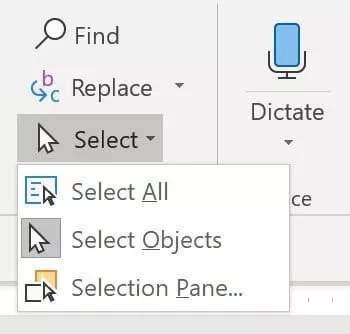
2. Select Objects
Changes your mouse cursor into an arrow symbol that allows you to select an element (chart, picture, SmartArt graphic, etc.) as an object.
This is different than when you click things with your mouse. When you click with your mouse, you normally click into the object as if you are going to edit it.
The Select Objects command ensures that you select the object itself. That way you can cut and paste it, or move it around within your document.
3. Select Text with Similar Formatting
Selects all of the text within a Word document that matches the formatting of the text that you have already selected.
This is one of the coolest features in Microsoft Word that hardly anyone knows about. This command grabs all of the same formatted text within a document, so you can change it’s formatting all at once.
Ahem… amazing!
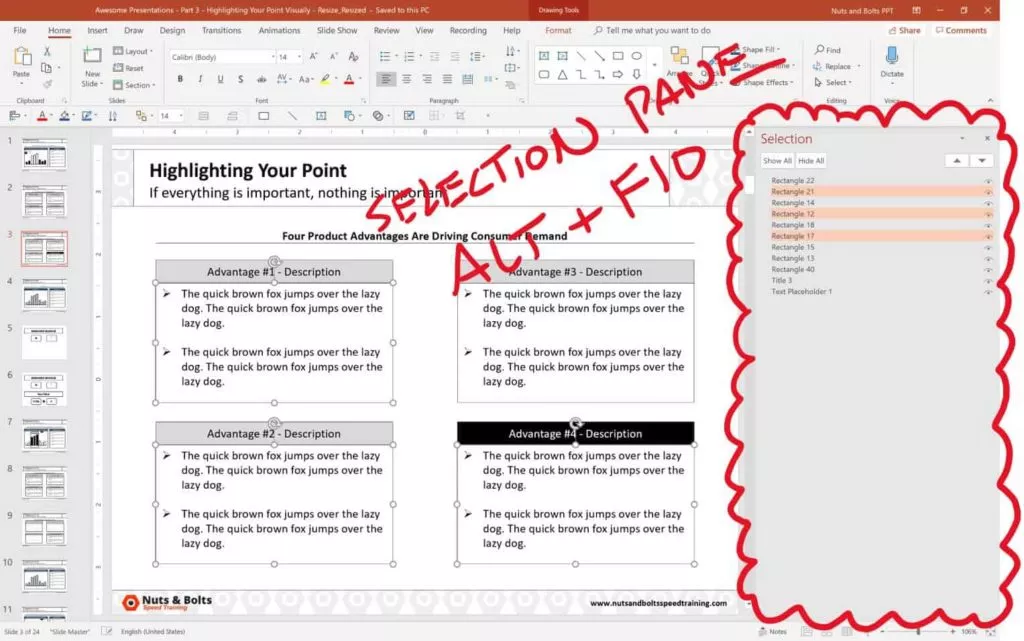
4. The Selection Pane in Word (Alt + F10)
Opens or closes the Selection Pane in Microsoft Word.
Inside the Selection Pane you can see (and quickly manipulate) all the objects in a Word document.
Similar to the Selection Pane in PowerPoint, it only only shows you the objects on the current page you are currently working on.
That means that if you have 100 charts in your Word document but only 1 chart on your current page, you will only see 1 chart in the Selection Pane.
Select All Shortcuts in Word (Ribbon Guides)
Instead of using your mouse to access the selection commands, on a PC you can use your Ribbon Guides.
To use these shortcuts, simply hit the Alt key on your keyboard. Hitting the Alt key, you will see alphabetical sequences to the commands across your Ribbon.
On a PC, your select all Ribbon Guide shortcuts are:
- Select All: Alt, H, SL, A
- Select Objects: Alt, H, SL, O
- Select Text with Similar Formatting: Alt, H, SL, S
- Selection Pane: Alt, H, SL, P
Note: When using your Ribbon Guide shortcuts in Word, you do not need to hold them down. Instead, simply hit and let go of them one at a time (following the letters forward).
To learn more about the Microsoft Office ribbon, see this guide by Microsoft here.
Select All in Excel
Because there are so many more inputs that can go into an Excel spreadsheet, there are 7 different selection commands in Excel (all covered below)
1. Select All (Ctrl + A)
Hitting Ctrl + A triggers the Select All command (which is otherwise not up in your Excel ribbon.
It’s also important to note that the Select All command works a little bit differently in Excel.
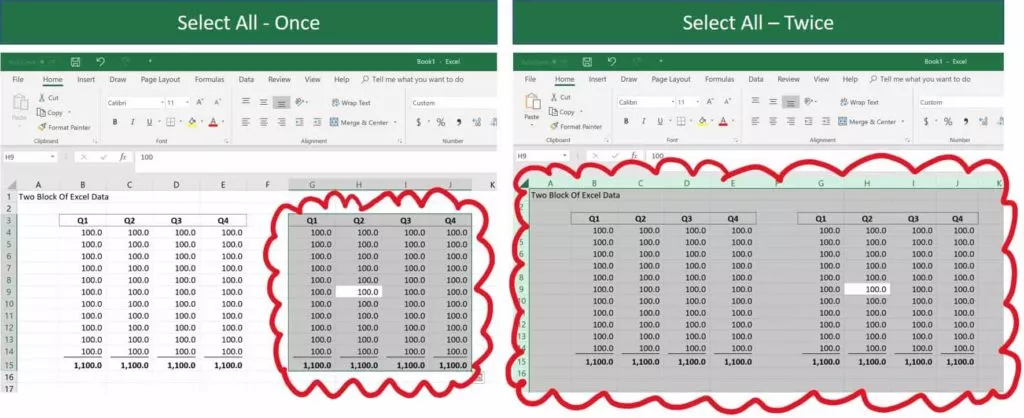
Using the command once, first selects the block of cells that you are currently active in.
Using the command a second time, then selects everything within your spreadsheet.
See images above for hitting it once, then twice.
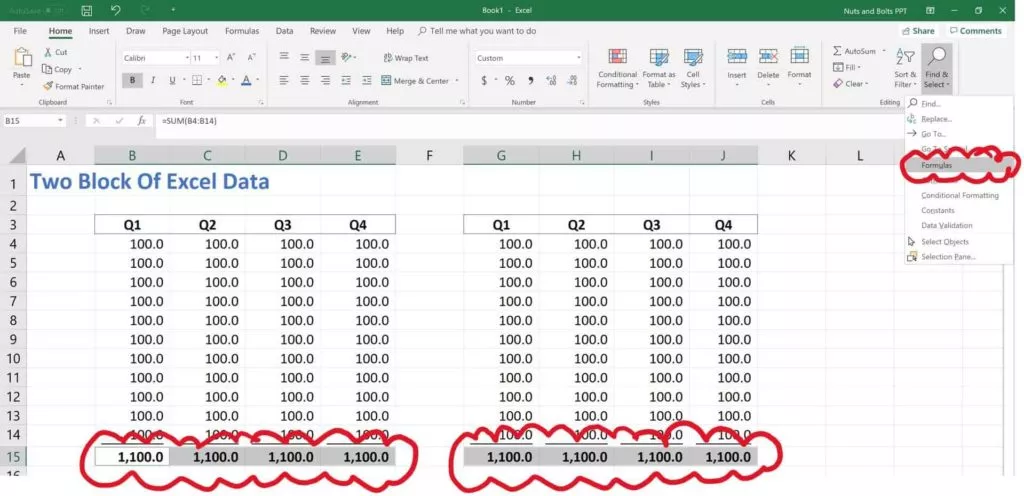
2. Select Formulas
Clicking Formulas will grab all the formulas in your current spreadsheet (pictured below).
This is a fast way and easy way to quickly identify and change the formatting of any formulas in your spreadsheet.
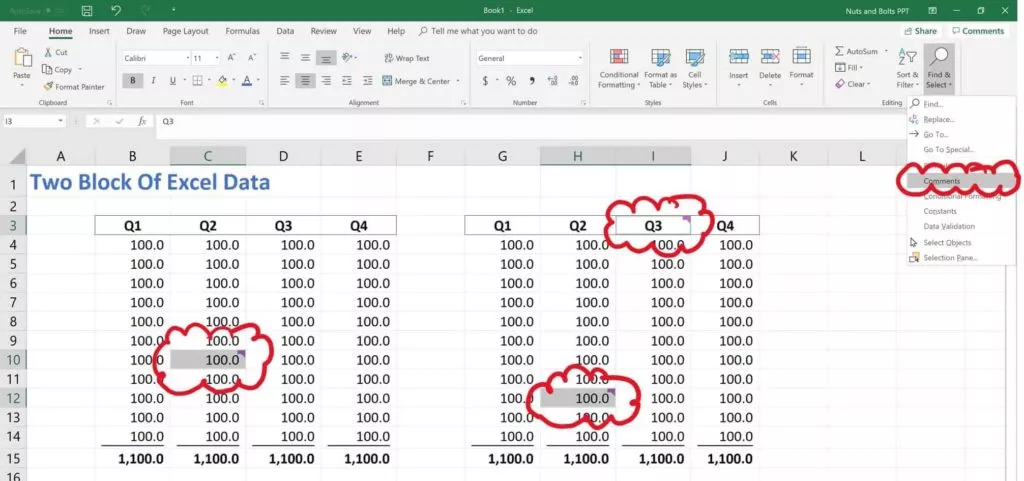
3. Select Comments
Clicking Comments automatically selects all of the comments in your spreadsheet (pictured below).
Comments show up in your spreadsheet as little markers in the upper-right hand corner of your cells. If you don’t want to waste time searching for them, simply use these command.
This allows you to quickly grab all the comments in your spreadsheet and format the cells.
4. Select Conditional Formatting
Clicking Conditional Formatting selects any cells within your spreadsheet that have conditional formatting in them.
This allows you to spot check or change the conditional formatting rules for those specific cells.
To learn more about conditional formatting rules, and how to use them, see this article by Microsoft here.
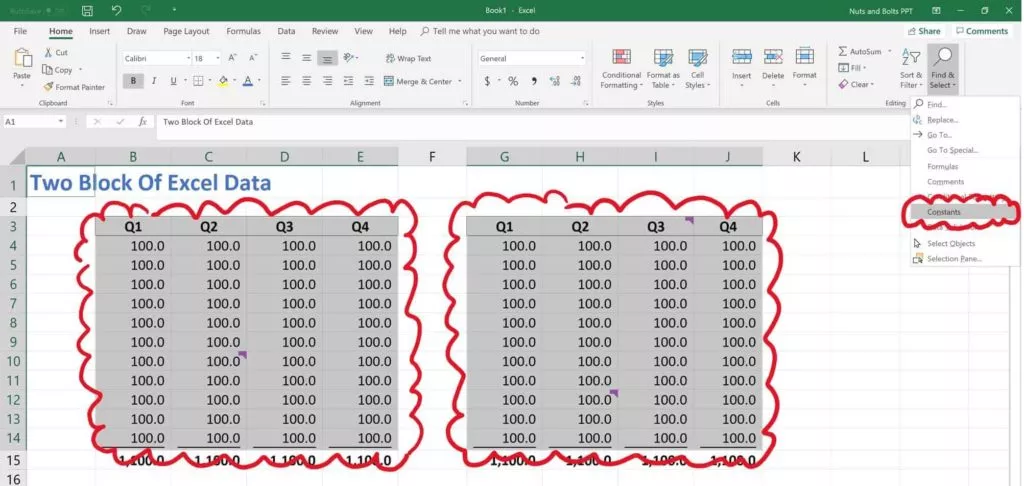
5. Select Constants
Selects all the constant values in your spreadsheet (i.e. values that are not formula-driven).
This is a fast and easy way to find all of the inputs that someone is using in their financial model or spreadsheet so that you can double-check their assumptions (pictured below).
6. Select Objects
Turns your cursor into an arrow that allows you to select objects that are within your spreadsheet (charts, pictures, SmartArt graphics etc.).
This is useful when you have a large spreadsheet or dashboard and you want to just select a single graphic without accidentally selecting the cells around it.
7. The Selection Pane in Excel (Alt + F10)
Opens the Selection Pane in Excel, showing you all of the charts, pictures, SmartArt graphics, etc., that are currently within your active spreadsheet.
Just keep in mind that the Selection Pane will only show you objects that are within the current sheet you are on. It will not show you objects that are on other sheets within your Excel file.
Select All Shortcuts in Excel (Ribbon Guides):
On top of using your mouse to activate the different Select commands in Excel, if you are on a PC, you can also use your Ribbon Guides to shortcut these commands (see key combinations below).
If you use any of these selection commands A LOT when working in Excel and are on a PC, I highly recommend learning these key combinations to save you time.
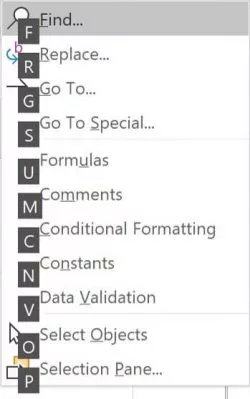
On a PC, your Ribbon Guide Shortcuts to these different commands are:
- Formulas: Alt, H, FD, U
- Comments: Alt, H, FD, M
- Conditional Formatting: Alt, H, FD, C
- Constants: Alt, H, FD, N
- Data Validation: Alt, H, FD, V
- Select Objects: Alt, H, FD, O
- Selection Pane: Alt, H, FD, P
Note: When using your Ribbon Guide shortcuts, you do not need to hold down the keys to make them work. Instead, simply hit and let go of them one at a time.
Select All in PowerPoint
You have 3 different types of selection options in PowerPoint (all of which you can shortcut on a PC using your Ribbon Guide shortcuts as discussed further below).
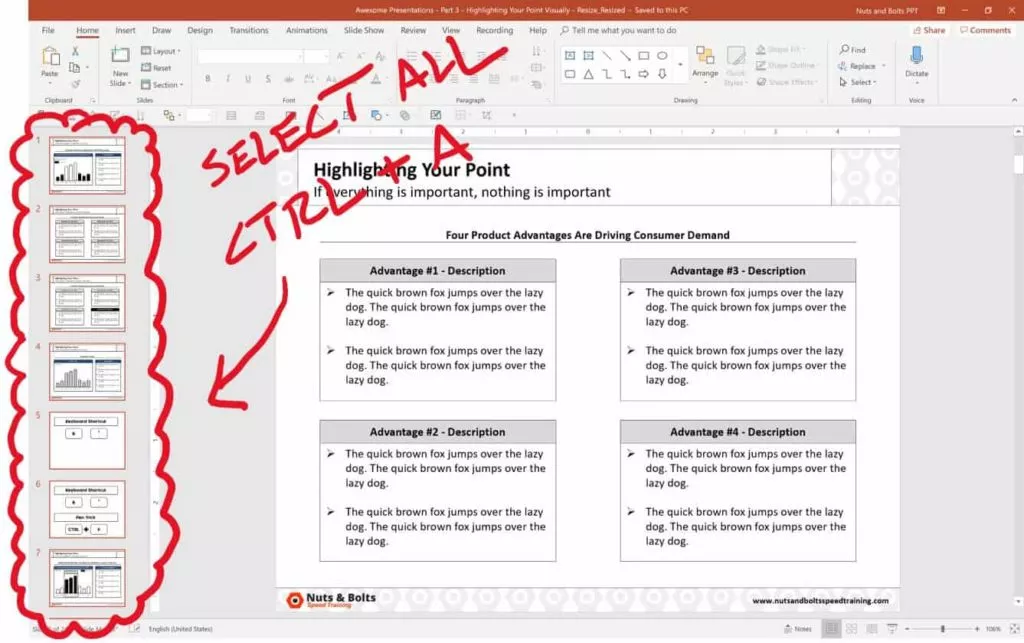
1. Select All (Ctrl + A)
Selects all of the objects that are currently on your slide.
This shortcut works in all of the different PowerPoint views including:
- The Normal View
- The Slide Master View
- The Handout Master View
- The Notes Master View, etc.
To learn more about setting up these different views in PowerPoint, see our guide on custom PowerPoint templates here.
On top of that, if you first click into the thumbnail view (pictured below) you can use the command to grab all of your slides. This allows you to copy and paste those slides, apply a new layout, reset the slides, etc.
2. Select Objects
This is the default selection option in PowerPoint, allowing you to select objects (shapes, text boxes, charts, SmartArt graphics, etc.) which is what all of your slides are made of.
3. Selection Pane in PowerPoint (Alt + F10)
Opens the Selection Pane in PowerPoint, giving you a bird’s eye view of everything that is on your slide (even if it is buried beneath something else).
To learn other useful PowerPoint shortcuts like this to save you time in the program, see our guide here.
Selection Pane Shortcuts in PowerPoint
To learn more about how to use the Selection Pane shortcuts in PowerPoint, watch the short video below.
Inverse selected objects in PowerPoint
Another way to cleverly use the Select All command in PowerPoint is to ‘inverse-select’ your objects.
For example, let’s say you want to select EVERYTHING on your slide except for the title.
To do so, follow these steps:
- Hit Ctrl + A to select everything on your slide
- While holding the Shift key or the Ctrl key, select your Title to un-select it
Doing so leaves you with everything on your slide selected except for your slide title (or whatever else you unselected by holding the Shift or Ctrl key).
Select All shortcuts in PowerPoint (Ribbon Guides)
Besides navigating these selection commands using your mouse, you can also use your Ribbon Guide shortcuts to access them if you are on a PC.
To use your Ribbon Guide shortcuts, simply hit and let go of the Alt key, and then follow the alphabetical or numerical queues to find your command (all shortcut combinations are listed below).
On a PC, your Select All Ribbon Shortcuts are:
- Select All: Alt, H, SL, A
- Select Objects: Alt, H, SL, O
- Selection Pane: Alt, H, SL, P
Note: When using your Ribbon Guide shortcuts, you do not need to hold down the keys to make them work. Instead, simply hit and let go of them one at a time.
Conclusion
So those all the different ways you can Select All in Word, Excel and PowerPoint, and the different Select All shortcuts available to you if you are on a PC version of Microsoft Office.
Knowing how to properly use these, allows you to quickly grab exactly what you’re looking for so you can format it. This saves you time and gets you once step closer to Happy Hour.
If you are interested in taking your PowerPoint skills to the next level, you can learn more about our online courses and training here.


 , and then click Word Options.


