Word for Microsoft 365 Word for Microsoft 365 for Mac Word for the web Word 2021 Word 2021 for Mac Word 2019 Word 2019 for Mac Word 2016 Word 2016 for Mac Word 2013 Word 2010 Word for Mac 2011 More…Less
You can control the vertical space between the lines of text in your document by setting the line spacing. Or, you can change the vertical space between paragraphs in your document by setting the spacing before or spacing after paragraphs. You can also choose to keep lines of text together or keep paragraphs together on a page.
Change the line spacing in an entire document
-
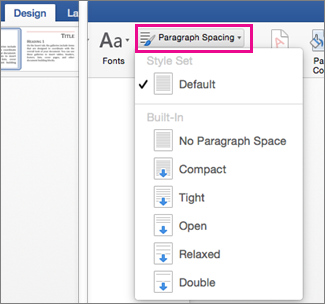
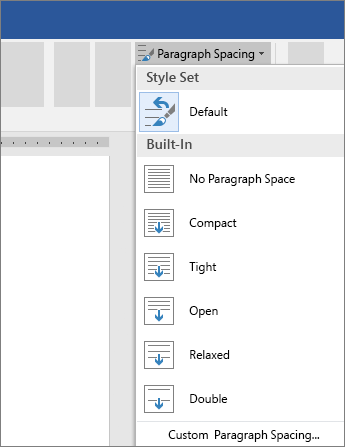
Go to Design > Paragraph Spacing.
-
Choose an option. To single space your document, select No Paragraph Space.
To return to the original settings later, go to Design > Paragraph Spacing and choose the option under Style Set. This may be Default or the name of style you’re currently using.
Change the line spacing in a portion of the document
-
Select one or more paragraphs to update. Press Ctrl + A to select all.
-
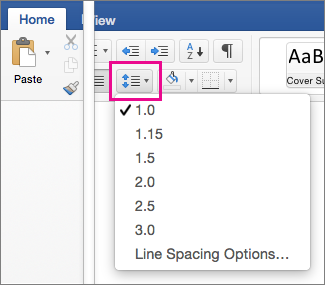
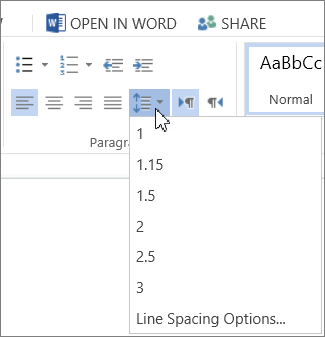
Go to Home > Line and Paragraph Spacing
-
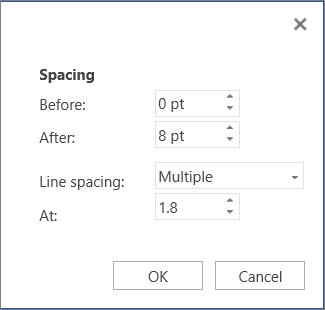
Select Line Spacing Options and choose an option in the Line spacing box.
-
Adjust the Before and After settings to change spacing between paragraphs.
-
Select OK.
For more info, see Adjust indents and spacing.
Change the line spacing in an entire document
-
Go to Design > Paragraph Spacing.
-
Choose the option you want. If you want to single space your document, choose No Paragraph Space.
This overrides the settings of the style you’re currently using. If you decide later to return to the original settings, go to Design > Paragraph Spacing and choose the option under Style Set. The option might be Default, as shown above, or it will show the name of style you’re currently using.
Change the line spacing in a portion of the document
-
Select the paragraphs you want to change.
-
Go to Home > Line and Paragraph Spacing.
-
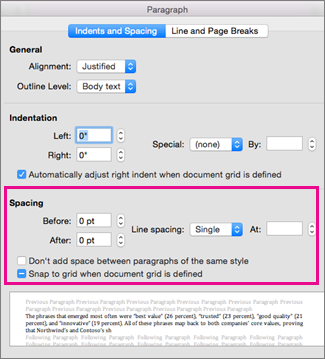
Choose the number of line spaces you want or select Line Spacing Options, and then select the options you want under Spacing.
-
To change the spacing before or after each of the paragraphs in the text you selected, click the arrow next to Before or After and enter the amount of space that you want.
-
Select OK.
-
Select the paragraph whose lines you want to keep together.
-
Go to Format > Paragraph >Line and Page Breaks.
-
Select Keep lines together.
-
Select the first of the two paragraphs that you want to keep together.
Tip: If you want to keep more than two paragraphs together, select all but the last paragraph.
-
Go to Format > Paragraph.
-
Go to Line and Page Breaks.
-
Select Keep with next.
-
Select OK.
-
Select the paragraphs you want to change, or press Ctrl+A to select everything.
-
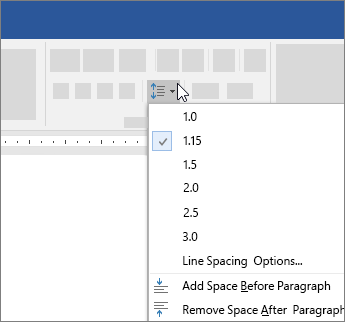
Go to Home > Line Spacing.
-
Choose the number of line spaces you want, or select Line Spacing Options and then select the options you want in the Paragraph dialog box under Spacing:
Tip: If you want to change the spacing before or after the selected paragraphs, select the arrows in the Before or After boxes, or type a number directly.
Need more help?
Change the line spacing in Word
-
Select Design > Paragraph Spacing.
-
Hover the cursor over each option to see a preview, and then select the option you want.
For single spacing, select No Paragraph Space.
Change line spacing for part of your document
-
Select the paragraphs you want to change.
-
Select Home > Line and Paragraph Spacing, and choose the spacing you want.
-
To customize spacing, select Line Spacing Options. You can adjust several areas including spacing before and after paragraphs.
See Also
Add and format text
Create a bulleted or numbered list
Apply styles
Apply themes
Change the default line spacing
Need more help?
Want more options?
Explore subscription benefits, browse training courses, learn how to secure your device, and more.
Communities help you ask and answer questions, give feedback, and hear from experts with rich knowledge.
There are several ways to adjust line spacing in Microsoft Word. Today’s tutorial explains the basic method using the ribbon and a more advanced method using the Paragraph dialog box.
See the Quick Tip at the bottom of this tutorial to learn how to single-space an entire document from the Paragraph dialog box.
This tutorial is available as a YouTube video showing all the steps in real time.
Watch more than 150 other document software tutorials on my YouTube channel.
The images below are from Word for Microsoft 365.The steps are the same in Word 2021, Word 2019, and Word 2016, and similar for Word 2013 and Word 2010. However, your interface may look slightly different in those older versions of the software.
Basic Method: Adjust Line Spacing from the Ribbon
- Select the Home tab in the ribbon.
- (Optional Step) Select the Show/Hide button in the Paragraph group to show paragraph break symbols and other formatting that may affect line spacing.
- Select the text with the line spacing that needs to be changed.
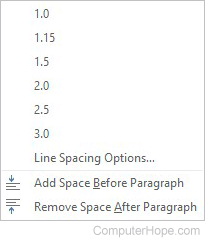
- Select the Line and Paragraph Spacing button in the Paragraph group.
- Select an option from the drop-down menu:
A. Numbers 1.0 through 3.0 add space between lines.
B. Add Space Before Paragraph adds space before paragraphs but not before the lines within them.
C. Remove Space After Paragraph removes space after paragraphs but not after the lines within them.
These three options are based on your current font size with 1.0 being the equivalent of single-spacing.
Your changes will be applied immediately.
Note that you can apply the individual line spacing (the numbers 1.0 through 3.0) and the paragraph spacing to the same text to further customize your results.
- (Optional Step) Select the Show/Hide button again to hide paragraph symbols and other formatting (see figure 2).
Now, let’s move on to an advanced method offering additional spacing options.
Advanced Method: Adjust Line Spacing from the Paragraph Dialog Box
- Select the Home tab in the ribbon (see figure 1).
- (Optional Step) Select the Show/Hide button in the Paragraph group to show paragraph break symbols and other formatting that may affect line spacing (see figure 2).
- Select the text with the line spacing that needs to be changed (see figure 3).
Pro Tip: PC users can press Ctrl + A to select the entire document if all the line spacing needs to be changed. However, this includes items you may not want to alter, including headings, tables, table titles, figure captions, tables of contents, footnotes, endnotes, and reference lists.
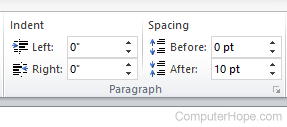
- Select the dialog box launcher in the Paragraph group.
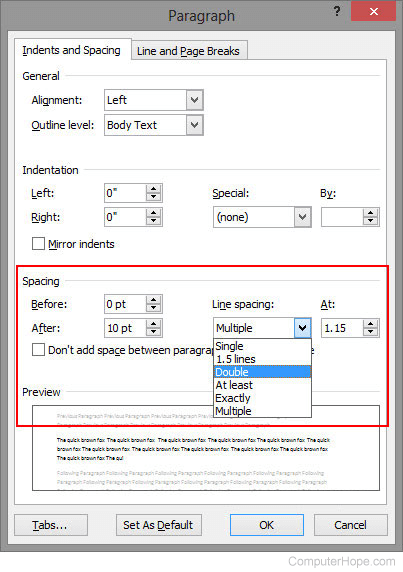
- Make changes in the Spacing section of the Paragraph dialog box:
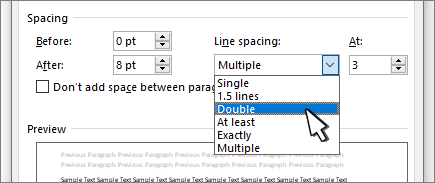
A. The Before and After boxes represent the spaces before and after paragraphs measured in points with one point being 1/72 of an inch tall. Use the increment arrows to choose a whole number or enter a number with a decimal (e.g., 2.75) directly into the box.
B. The Line spacing drop-down menu offers six options:
1. Single—Creates single-spacing based on your current font size.
2. 1.5 Lines—Creates a space and a half as large as your current font size.
3. Double—Creates double-spacing based on your current font size.
4. At Least—Determines the minimum amount of space between lines based on the number of points entered in the At box.
5. Exactly—Creates space between lines based on the number of points entered in the At box.
6. Multiple—Creates spacing multiplied by the number entered in the At box. For example, if you enter four in the At box, your spacing will be four times as large as your current single-spacing.
C. Don’t add space between paragraphs of the same style—For many users, this will remove spaces between all paragraphs because general documents commonly have only one paragraph style.
Note that the Preview box updates as you make adjustments in the Spacing section.
- Select the OK button to close the Paragraph dialog box.
- (Optional Step) Select the Show/Hide button again to hide paragraph symbols and other formatting (see figure 2).
Quick Tip: Single-Space an Entire Document from the Paragraph Dialog Box
- Select the Home tab in the ribbon (see figure 1).
- Select the entire document. (PC users can press Ctrl + A.)
- Select the dialog box launcher in the Paragraph group (see figure 7).
- Enter 0 in the Before box in the Paragraph dialog box (see figure 8).
- Enter 0 in the After box in the Paragraph dialog box (see figure 8).
- Select Single in the Line spacing drop-down menu (see figure 8).
- Select the OK button (see figure 9).
Related Resources
How to Adjust Letter Spacing in Microsoft Word (PC & Mac)
How to Adjust the Space between Words in Microsoft Word
How to Adjust Page Margins in Microsoft Word
Updated June 25, 2022
Updated: 05/03/2022 by
When typing in Microsoft Word, you might need to change the line spacing, depending on the document’s style. The steps to enable double spacing differ slightly between versions. Consequently, you may need to use intuition to adapt them for older versions.
Tip
Use the keyboard shortcuts Ctrl+1 to single space, Ctrl+2 to double space, or Ctrl+5 to set the spacing to 1.5 line spacing on any line, paragraph, or all highlighted text.
Note
When pressing Enter, it starts a new paragraph with extra space between the two paragraphs. If you want to go to the next line without starting a new paragraph, press Ctrl+Enter.
To increase or decrease line spacing or enable double spacing, select a link below and follow the steps.
Enable double spacing for the whole document
Microsoft Word 2016 and 2019 (Office 365)
- Open Microsoft Word.
- On the Home tab, in the Paragraph group, click the Line and Paragraph Spacing (
) icon.
- Select the desired spacing option from the available list.
- For additional spacing options, select Line Spacing Options in the list.
Microsoft Word 2007, 2010, and 2013
- Open Microsoft Word.
- On the Home tab, in the Styles group, right-click Normal.
- Select Modify from the drop-down menu.
- Under Formatting, click the Double Space button (shown below).
- Click OK.
or
- Open Microsoft Word.
- Click the Page Layout tab.
- Click the down arrow in the bottom right corner next to Paragraph to bring up the Paragraph window.
- In the Paragraph window, make sure you are on the Indents and Spacing tab.
- Click the down arrow next to the Line spacing box.
- Select Double and click the OK button.
Modify line spacing for all or part of an existing document
Microsoft Word 2007 and later
- Open Microsoft Word and the document you want to modify.
- Highlight the text where you want to change the line spacing or select all.
- Right-click the highlighted text, and select Format and then Paragraph, or only Paragraph depending on your version of Word.
- In the Paragraph window, make sure you are on the Indents and Spacing tab.
- Click the down arrow in the Line spacing drop-down box.
- Select Double and click the OK button.
Download PC Repair Tool to quickly find & fix Windows errors automatically
Readability is a crucial factor when it comes to preparing documents. If the space between two lines, aka Line Spacing, is too less, it will be hard to read. If it’s too much, there will be too much distraction. When reading the newspaper, you must have noticed that space between lines is way too little than what you read online. Saving space is crucial for newspapers because of the cost, while it is not so much when it comes to online reading. That said, in this post, we will share how you can change line spacing in Microsoft Word.
What is Double Spacing?
Along with other options, one popular way to increase space is Double Spacing. It instantly doubles the space between the lines of the document. In simple words, with Double Spacing, you add a full line of space between each line of writing. Depending on the amount of text, it definitely helps you to increase readability.
In Microsoft Office 365, you can instantly increase the line space with predefined options.
- Open the Word document
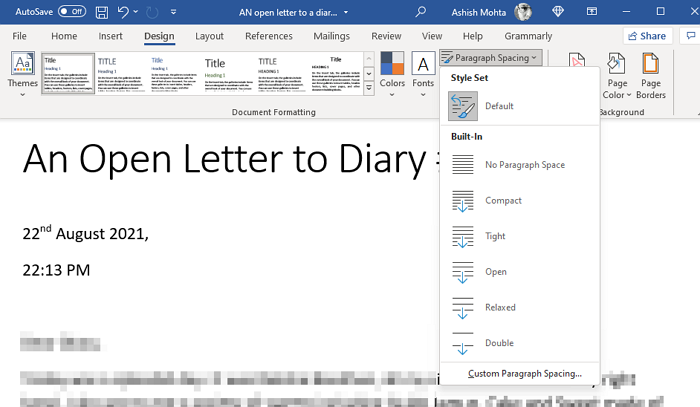
- Click on the Design tab
- Locate Paragraph Spacing under Document formatting, and click on it.
- You have the following options
- Default,
- No Paragraph Space,
- Compact,
- Tight,
- Open,
- Relaxed, and
- Double Space
- Select one.
When you choose any of the options, it is applied to the entire document. If you want to apply only to a certain paragraph, you can select it and apply the change.
Custom Line Spacing
If the default line spacing doesn’t work, you can create your line spacing. It is specifically useful when you need to print or when that’s how you need the document to be. It can specifically be helpful when there is a lot of text, and you do not want many pages, even if they are going to be used on the computer.
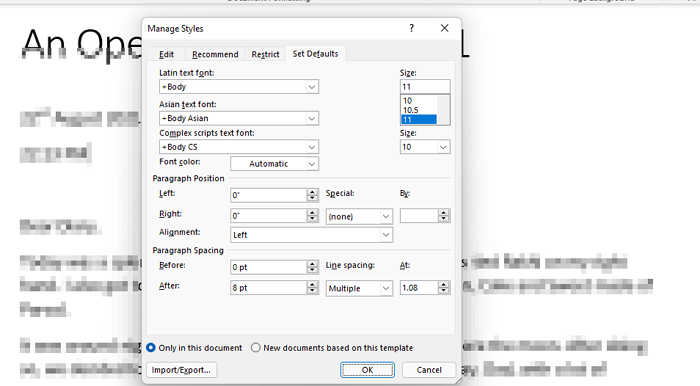
Go to Design > Paragraph Spacing > Custom Paragraph Spacing. It will open the Manage Styles windows where you can change the spacing for before and after fir paragraphs, and then you can also change line spacing as well.
You can then choose to apply the setting for the current document or new documents for the current template.
Office 2007-2010
If you are using an older version of Office, then you need to follow these steps:
Double-space the entire document
- On the Home tab, in the Styles group, right-click Normal and then click Modify.
- Under Formatting, click the Double Space button, and then click OK.
- Formatting for the entire document changes to double spacing.
Double-space the selected text
- Select the text that you want to change.
- On the Home tab, in the Paragraph group, click Line and Paragraph Spacing (Line Spacing in Word 2007)
- Click 2.0 and apply the changes.
What Is Standard Double Spacing in Word?
Microsoft Word defaults to a spacing of 1.08 lines, which is slightly larger than single-spaced. Within paragraphs, a space-and-a-half is best for line spacing, according to UX standards. Approximately 150 percent is 1.5 times the size of the font.
I hope the post was easy to follow, and you were able to clearly understand the concept of Line Spacing and how to use it in your document.
Ashish holds a Bachelor’s in Computer Engineering and is a veteran Windows and Xbox user. He has work experience as a Database and Microsoft.NET Developer. He has been a Microsoft MVP (2008-2010) and excels in writing tutorials to improve the day-to-day experience with your devices.


