

If you’re creating a Word document with multiple page layouts, you may wish to make a single page landscape. Here’s how.
Photo Credit — iStockPhoto
When you’re creating Word documents, you have two-page layout options available—landscape or portrait. Portrait mode is the default option, but you can switch to landscape mode instead if you want your text sideways.
If you want to use both types of layouts in Word, you’ll need to use a few workarounds using section breaks and Word’s own page formatting options to do so. Here’s how.
If you want to quickly make one page landscape in Word, here’s what you’ll need to do:
- Open your Word document and place the blinking cursor at the start of the page you wish to change to landscape mode.
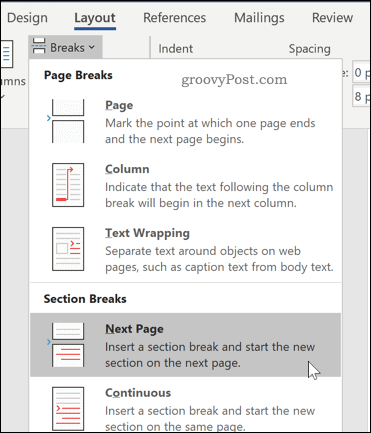
- Click on the Layout menu in the ribbon bar.
- Select Breaks > Next Page in the Section Breaks section. This will insert a section break and push your text onto a new page.

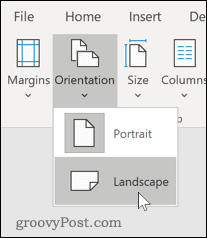
- In the Layout menu, press Orientation > Landscape. This will switch the current page and all the following pages to landscape mode.

- You’ll now need to turn the remaining pages back to portrait mode. Scroll down to the next page, then place the blinking cursor at the start of the page.
- Press Layout > Breaks > Next Page to insert a new section break.
- Click on Orientation > Portrait to switch the pages to portrait mode.


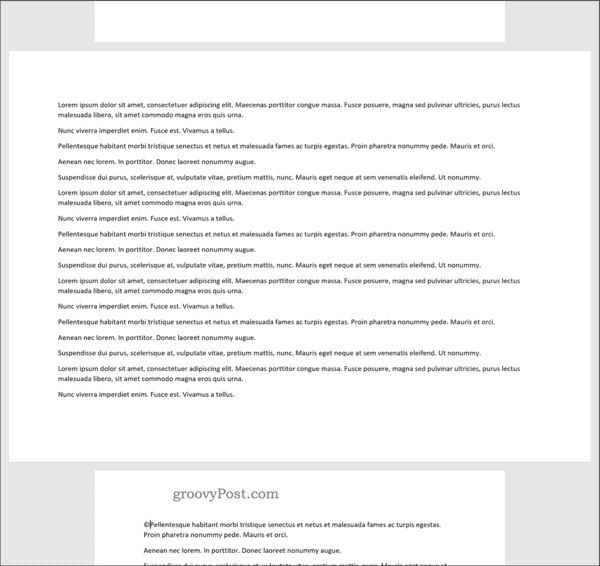
If you followed the steps correctly, you should now have one single landscape page, with all other pages remaining in portrait mode.
How to Make Specific Text Landscape in Word
If you don’t want all of the text on your page to appear on the landscape page, you can choose to make a landscape page that only contains specific text.
- To do this, start by highlighting the text that you want to appear on the landscape page.

- In the Layout menu, click on Margins, then select the Custom Margins… option at the bottom of the drop-down menu.

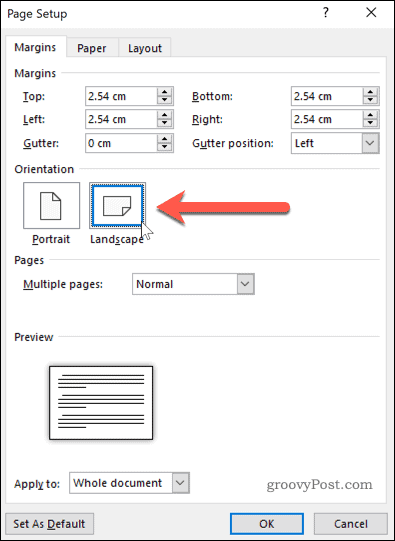
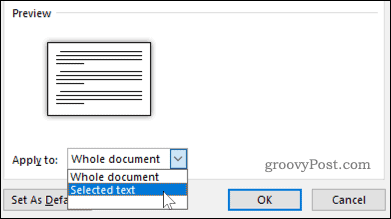
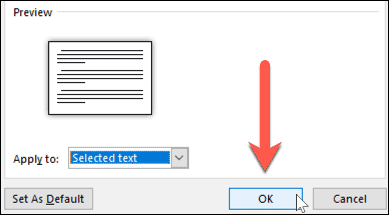
- In the Page Setup window, click on the Landscape option in the Margins tab, under the Orientation section.

- In the Apply to box, choose Selected Text.

- Click OK to confirm the settings you’ve selected.


You should now have a landscape page that contains the text you previously highlighted, creating a section break that uses a different page layout to the rest of your Word document.
You can use this method to turn an entire page landscape—to do this, select all of the text on the page before you start and repeat the steps above to complete the change.
Formatting Microsoft Word Documents
Now that you know how to make a single page landscape in Word, you can start creating documents with as many combinations of landscape and portrait pages as you want. This is where learning how to rearrange pages in Word might just come in handy.
If you’re looking for other ways to take your Word documents further, why not learn how to insert an Excel table into Word. For academic documents, you may wish to create a table of contents in Word to keep your document organized.
![]()

Select the text on the page you want to be landscape in your document, then go to the Layout tab and open the «Page Setup» window. Set the orientation to «Landscape,» and pick «Selected Text» in the drop-down menu.
By default, Microsoft Word orients its pages in portrait view. While this works fine in most situations, you may have a single page that would look better in landscape view. Here are two ways to make one page landscape in Word.
Change One Page to Landscape With Page Setup
The quickest and easiest way to convert a page from portrait to landscape in Word is to select the content and turn only that page. This method works with text, images, tables, and other items you have on the page.
RELATED: Tables and Other Formatting Controls
Select all items on the page. If you have text, drag your cursor through all of it. If you have an image, table, chart, or another type of object, simply select it.

Go to the Layout tab and click the arrow on the bottom right corner of the Page Setup section of the ribbon. This opens the Page Setup dialog box.
Confirm that you’re on the Margins tab. Below Orientation, choose “Landscape.” Then at the bottom, click the Apply To drop-down box and choose “Selected Text.” Click “OK.”
When the dialog box closes, you will see your page turn to landscape view.
Make One Page Landscape by Inserting a Break
While the above method is the simplest, you may run into difficulties if you have different types of items on your page. For instance, you might have an image or table with text wrapped around it.
Although you can select all the content on the page, it may display on more than one page when you change the orientation. Luckily, there is another way to make one page landscape in these situations using a section break.
Place your cursor at the start of the page you want to change before any text or items.
Go to the Layout tab, click the Breaks drop-down arrow, and choose “Next Page.” This inserts a section break in your document.
Stay on the Layout tab, click the Orientation drop-down arrow, and pick “Landscape.” This changes the current and all subsequent pages to landscape view.
To return the remaining pages to portrait view, go to the next page and place your cursor at the beginning of the content.
Go to the Layout tab, click the Breaks drop-down arrow, and choose “Next Page.” This inserts another break in your document.
Now on the Layout tab, click the Orientation drop-down arrow and pick “Portrait.”
You’ll then see the remaining pages turn back to portrait view, leaving the one page you chose in landscape view.
If you use Google Docs as well as Microsoft Word, you can change the page orientation in Google Docs just as easily.
READ NEXT
- › 7 Reasons to Use Your Monitor in Portrait Mode
- › Spotify Is Shutting Down Its Free Online Game
- › This 64 GB Flash Drive From Samsung Is Just $8 Right Now
- › Five Types of Phone Damage That Aren’t Covered by Your Free Warranty
- › Save Hundreds on Elegoo’s New PHECDA Laser Engraver Through Kickstarter
- › Microsoft Outlook Is Adding a Splash of Personalization
- › Why Your Phone Charging Cable Needs a USB Condom
How-To Geek is where you turn when you want experts to explain technology. Since we launched in 2006, our articles have been read billions of times. Want to know more?
See how to use both landscape and portrait orientation in the same document.
Use different orientations in the same document
There may be times when you want certain pages or sections of your document to have a different orientation from the rest of it. Note that Word puts selected text on its own page, and the surrounding text on separate pages.
-
Select the pages or paragraphs whose orientation you want to change.
-
Click PAGE LAYOUT > Page Setup dialog box launcher.
-
In the Page Setup box, under Orientation, click Portrait or Landscape.
-
Click the Apply to box, and click Selected text.
Note: Word automatically inserts section breaks before and after the text that has the new page orientation. If your document is already divided into sections, you can click in a section (or select multiple sections), and then change the orientation for only the sections that you select. Read about how to find out where the section breaks are in documents.
Where are the section breaks in a document?
When you add section breaks in your document, the easiest way to see where they begin and end is to first display all formatting marks.
-
Click HOME > Show/Hide.
-
The section breaks that you have added will start and end with Section Break (Continuous). There are other kinds of section breaks and will be labeled as such.
Want more?
Add section breaks
Add different page numbers or number formats to different sections
Video: Headers and footers
Let’s say we are working on a long document that looks great in portrait orientation, except for a few pages that have big tables.
Well, rather than choose between nice-looking text and readable tables, we can have it both ways.
Right-click the Table Selection icon, and choose Table Properties.
On the Table tab, under Text wrapping, make sure None is selected, and click OK.
Next, go to the PAGE LAYOUT tab, and in the Page Setup group, click the dialog box launcher.
Go to it if you want to get into all the details of Page Setup in one place.
Margins, Paper, Layout, all right here. On the Margins tab, under Orientation, click Landscape.
Then, go down here and click the arrow next to Apply to, and choose Selected text.
Now the only thing that will change to landscape is the selected text. Click OK.
The table is now in landscape orientation on its own page, and when we scroll to another page, you can see that the rest of the document is still in portrait orientation.
Now we can go back to the table and adjust the column widths to stretch the table out to fit nicely on the page.
So, what exactly is going on here? First, go to the VIEW tab and let’s click Multiple Pages.
Now you can see the landscape page in the same view with the portrait pages.
Next, go to the HOME tab, and click Show/Hide Paragraph Marks.
And there’s the secret to mixing portrait and landscape in one document – Section Break (Next Page). I’ll zoom back a bit.
When we applied landscape to just the selected text, Word added section breaks before and after the table.
This placed the table in its own section, on a page by itself. Then, Word was able to change just that page to landscape.
By the way, section breaks also allow you to change the margins on the landscape pages without affecting the rest of the document.
You can add the same type of section break manually, whenever you want to change the layout or formatting of a page or pages, by going to the PAGE LAYOUT tab and clicking Breaks. Then, go down to Section Breaks and click Next Page.
After you use multiple page orientations and margins to create the frames for your document, you can think about the best way to lay out your content within the frames.
Check out the next video in this course, Design considerations for orientation.
Page orientation defines the direction for printing or displaying the document in Word, but one
does not have to be the same for the entire document. Usually, the whole article, paper, or
report is printed in the Portrait mode, but for a page with the big table, it is more
convenient to use the Landscape mode. On the Layout tab in the Page Setup
group, you can easily change the page orientation both for the entire document and for a
single page. Microsoft Word inserts sections breaks before and after the selected page, and
you can add more pages to this section later.
To change the page orientation for whole document Word, on the
Layout tab, in the Page Setup group, click Orientation:

From the Orientation dropdown list, choose the orientation you need:

To change the orientation of one page, or a few pages of
the document, do the following:
1. Select the text of the page or of the several
pages for which you want to change the page orientation.
2. On the Layout tab, in the Page Setup
group, click Margins:

Select Custom Margins… from the Margins dropdown list:

3. In the Page Setup dialog box, on the Margins
tab:
- In the Orientation group, choose Portrait or Landscape orientation,
- In the Apply to list, choose Selected text:

4. Click OK.
Notes:
- Microsoft Word automatically inserts section breaks before and after the text
that has the new page orientation. If you write a book or a long report and
your document is already divided into sections, you can click in the section
(or select multiple sections), and then change the orientation only for the
sections that you have chosen:

- The option Selected text in the Apply to list appears only if
there is selected text in the document.
See also this tip in French:
Comment changer l’orientation d’une page dans Word.
Please, disable AdBlock and reload the page to continue
Today, 30% of our visitors use Ad-Block to block ads.We understand your pain with ads, but without ads, we won’t be able to provide you with free content soon. If you need our content for work or study, please support our efforts and disable AdBlock for our site. As you will see, we have a lot of helpful information to share.
268
268 people found this article helpful
How to Insert a Landscape Page Into a Portrait Document in Word
Having trouble fitting that wide graph into your document?
Updated on February 13, 2022
What To Know
- Manual: Select Layout on the Ribbon. Go to Page Setup > Breaks > Next Page. Pick an area. Set the margins and choose your orientation.
- Auto: Go to Layout > Page Setup > Page Setup > Margins. Set the orientation and Apply to the Selected Text in the preview.
This article explains how to insert a page with a different orientation from the rest of your Word document. There are two ways to perform this action in Word, by inserting section breaks manually at the top and the bottom of the section that you want in the opposite orientation or by selecting text and allowing Word to insert the new sections for you. This article applies to Word 2019, Word 2016, Word 2013, Word 2010, and Word for Microsoft 365.
Manually Insert Section Breaks
Here’s how to tell Microsoft Word where to change the orientation.
-
In your document, place your cursor before the area where the pages should rotate. On the ribbon, select Layout.
-
In the Page Setup group, select Breaks > Next Page.
-
Move your cursor to the end of the area you want to rotate and repeat the steps above. Then, place your cursor in the area you want to rotate.
-
In the Page Setup group, select the Page Setup dialog box launcher (the small arrow in the lower-right corner of the group).
-
In the Page Setup dialog box, select the Margins tab.
-
In the Orientation section, select the orientation you want the section to have, Portrait or Landscape. Toward the bottom of the dialog box, in the Apply to dropdown menu, select This section. Select OK.
-
The selected section now reflects the orientation you chose.
Let Word Do It For You
You’ll save mouse clicks if you let Word insert the section breaks for you. However, when you use this method, the breaks may not end up exactly where you want them. So, make sure you’re careful when selecting the elements (paragraphs, images, tables, etc.) you want in the new layout orientation.
-
Select all the text, images, and pages that you want to switch to the new orientation.
-
On the ribbon, select Layout. In the Page Setup group, select the Page Setup dialog box launcher (the small arrow in the lower-right corner of the group).
-
In the Page Setup dialog box, select the Margins tab.
-
In the Orientation section, select the orientation you want the section to have, Portrait or Landscape. In the Preview section, in the Apply to dropdown menu, choose Selected text. Select OK.
-
The selected section now reflects the orientation you chose.
You may need to perform some formatting adjustments to make the text look the way you want in the new orientation.
FAQ
-
How do I change the orientation of an entire document in Word?
Select Layout > Orientation and select the orientation you’d like.
-
How do I use both portrait and landscape orientations in the same Word document?
Select the paragraph or page you want to change. Then, choose PAGE LAYOUT > Page Setup. Select Portrait or Landscape > Apply to > Selected text.
Thanks for letting us know!
Get the Latest Tech News Delivered Every Day
Subscribe