This article is written for users of the following Microsoft Word versions: 2007, 2010, 2013, 2016, 2019, and Word in Microsoft 365. If you are using an earlier version (Word 2003 or earlier), this tip may not work for you. For a version of this tip written specifically for earlier versions of Word, click here: Understanding the Gutter Margin.
Written by Allen Wyatt (last updated July 24, 2021)
This tip applies to Word 2007, 2010, 2013, 2016, 2019, and Word in Microsoft 365
When you design how your printed document is going to look, you need to consider whether you will be working with a facing-pages layout or a single-sheet layout. A facing-pages layout is used when you intend on printing on both sides of a sheet of paper, whereas a single-sheet layout means you intend on printing on only a single side of the paper.
If you are working with a facing-pages layout, the gutter margin comes into play. The gutter margin is a typographical term used to designate an additional margin added to a facing-pages layout to compensate for the part of the paper made unusable by the binding process. The gutter margin is on the very inside of both pages.
If you are working with a single-sheet layout, the gutter margin isn’t that critical, but Word still allows you to set it, if you desire. In this layout scenario, the gutter margin is typically the area where you might three-hole punch your paper. Word allows you to specify a gutter margin at either the left or top edges of the page, provided you are using a single-sheet layout.
To set the gutter margin in Word, you follow these steps:
- Display the Page Layout tab of the ribbon.
- Click the Margins tool in the Page Setup group. Word displays a list of potential margin settings.
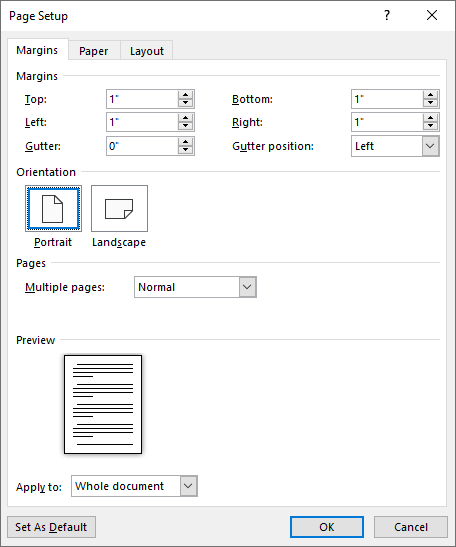
- Click Custom Margins. Word displays the Margins tab of the Page Setup dialog box. (See Figure 1.)
- Using the Multiple Pages control, choose either Normal or Mirror Margins. (Normal is used for single-sheet layout and Mirror Margins is used for facing-pages layout.)
- If you specified Normal in step 4, use the Gutter Position control to indicate whether the gutter should be added to the Left or Top edges of the page.
- Using the Gutter control, indicate how wide you want the gutter margin to be.
- Click OK.
Figure 1. The Margins tab of the Page Setup dialog box.
WordTips is your source for cost-effective Microsoft Word training.
(Microsoft Word is the most popular word processing software in the world.)
This tip (9037) applies to Microsoft Word 2007, 2010, 2013, 2016, 2019, and Word in Microsoft 365. You can find a version of this tip for the older menu interface of Word here: Understanding the Gutter Margin.
Author Bio
With more than 50 non-fiction books and numerous magazine articles to his credit, Allen Wyatt is an internationally recognized author. He is president of Sharon Parq Associates, a computer and publishing services company. Learn more about Allen…
MORE FROM ALLEN
Changing the Default Highlighting Color
One of the tools that Word makes available on the Home tab of the ribbon is the Text Highlight tool. This functions …
Discover More
Tracking Down Invalid References
When you discover that there is an invalid reference in a workbook, you can have a bear of a time tracking down the …
Discover More
Printing Images Based on Hidden Text Setting
When you print your document, the images in the document are normally printed. What if you want only some of your images …
Discover More
More WordTips (ribbon)
Adding Page Numbers in Headers or Footers
While Word has a default format for page numbers, you can design and specify how you want them to appear in your …
Discover More
Getting a Proper Total Page Count
Word allows you to insert dynamic page numbers within your document. With some page number formatting, though, it is …
Discover More
Default Font for Page Numbers
Page numbers are a common addition to documents, and a great aid to readers. If you want to easily format page numbers, …
Discover More
A gutter margin is a useful page margin feature found in Microsoft Word documents. It provides extra space to accommodate binding or two-sided printing, allowing you to adjust the width of the binding for your document. This simple feature allows you to customize your document to achieve the desired look and feel. This article will provide an overview of gutter margin and explain how to use it in Microsoft Word.
A gutter margin is an extra space on the side of a document that is used for binding or two-sided printing. It is a type of margin that adds more space to the document to accommodate the binding or printing on both sides of the page. The gutter margin is usually set to the width of the binding so that the text is not cut off when the document is bound.
A gutter margin can also be used to create a larger space between the text and the edge of the page. This can be useful for creating a more aesthetic document, as the extra space prevents the text from running too close to the edge of the page.
What Is the Significance of Gutter Margin?
The gutter margin is important when printing documents because it allows the page to be folded without causing any of the text or images to overlap. It also helps to create a consistent look across all pages of a document, as the gutter margin ensures that the margins on all pages will be the same size.
The gutter margin also helps prevent text from running off the page when the document is printed. By adding a gutter margin, the text on the page can be read without it running onto a different page. This is especially important if the document has several pages, as it will make it easier for readers to keep track of the content.
Finally, the gutter margin can also be used to ensure that the text on the page is correctly aligned. If the text is too close to the edge of the page, it may appear distorted when printed, so the gutter margin ensures that the text is spaced correctly.
Overall, the gutter margin is an essential element of printed documents as it helps to ensure that the document is correctly aligned, neat, and professional-looking, and that the text does not run off the page.
How to Use Gutter Margin in Microsoft Word?
Gutter margin is a feature in Microsoft Word that allows you to adjust the margin on the page so that the text is aligned with the binding edge of the page when it is printed. This is especially useful when printing on both sides of the page, as it ensures that the text on the back side of the page is aligned with the text on the front side of the page.
To use the gutter margin in Microsoft Word, follow these steps:
- Step 1: Go to the Layout tab and click the Margins button.
- Step 2: In the Margins drop-down menu, select the Gutter Margins option. This will bring up a dialog box where you can set the margin size for the gutter margin. A margin of.25 inches is generally recommended.
- Step 3: Once you’ve determined the Gutter margin size, click OK to save your changes.
You can change the size of the gutter margins at any time by returning to the Margins menu and editing the settings.The gutter margin will be applied to all pages in the document, so make sure that the size you choose is appropriate for the type of document you are creating.
Additionally, you can also adjust the alignment of the text on the page by selecting the Different Odd and Even option in the Margins menu. This will apply the gutter margin to the left side of the even-numbered pages and the right side of the odd-numbered pages. Using a gutter margin in Microsoft Word is an easy way to ensure that your documents look professional and consistent when printed.
Benefits of Using Gutter Margins
The benefits of using a gutter margin include improved readability, better alignment, and a more professional overall look. Other benefits of this feature include:
- Readability improves significantly when a gutter margin is used, as it prevents the text from being lost at the edge of the page. This is especially helpful for documents that are printed on both sides, such as books, magazines, and brochures. When a gutter margin is used, the text is kept from running off the page, and the reader can easily read the entire document without having to turn the page back and forth.
- The gutter margin also helps with alignment. The extra space allows for the text to be properly aligned when the document is printed double-sided. This is important for documents such as brochures and newsletters, in which the text needs to be aligned correctly in order to look professional.
- Finally, using a gutter margin can give a document a more professional look. Documents that have gutter margins look more organized and appear more polished. This can be helpful when printing documents that will be seen by potential customers or clients.
What is Ads Exchange Platform, How to Log in and Uses
FAQs on Gutter Margin
The following FAQs about the gutter margin feature of MS Word will give you a better understanding of it.
What exactly is Gutter Margin?
Gutter margin is a setting in Microsoft Word that adds additional space to the side of a document. It is commonly used to allow for the binding and folding of printed documents.
In Microsoft Word, how do I use the gutter margin?
To use the gutter margin in Microsoft Word, open the “Page Setup” window and select the “Margins” tab. In the “Gutter” section, enter the desired amount of space for the gutter margin. Click “OK” to save the settings.
What are the benefits of using a gutter margin?
Using a gutter margin ensures that the text on a printed page will not be cut off when folded or bound. It also allows for an even margin on both sides of the page.
What size should I use for gutter margins?
The size of the gutter margin depends on the size of the document and how it will be bound or folded. Generally, a gutter margin of 0.5 inches provides enough space for binding and folding.
Are there any special settings I should use for gutter margin?
No special settings are needed for the gutter margin, but you may need to adjust the left and right margins to keep the text from spilling into the gutter.
Gutter margin is an essential tool for creating professional documents in Microsoft Word. It allows you to add extra space to the document to accommodate binding or two-sided printing. It also helps to create a more aesthetic document by keeping the text away from the edge of the page. To adjust the gutter margin in Microsoft Word, simply open the Page Setup window and enter a value in inches or millimeters. By using a gutter margin, you can ensure that your documents look professional and consistent.
Among other formatting options, Microsoft Word lets you adjust the page layout of a document. Two key factors in this respect are the margins and page orientation. Both of these have a big effect on how a document looks, so check out our guide below to find out how they work.
Margins in Microsoft Word
The margins in a document are the spaces at the edge of each page. You may need to change these to leave space to make notes (e.g., in a college paper). Or you may simply want to control where text appears on the page. In either case, you can adjust the margins in a document by:
- Going to Layout > Page Setup on the main ribbon.
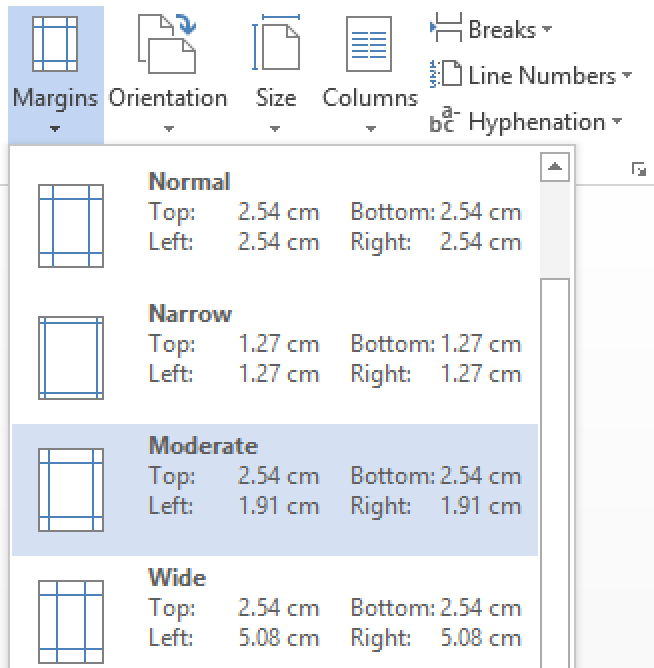
- Clicking Margins and then either:
- Selecting on of the preset margin options.
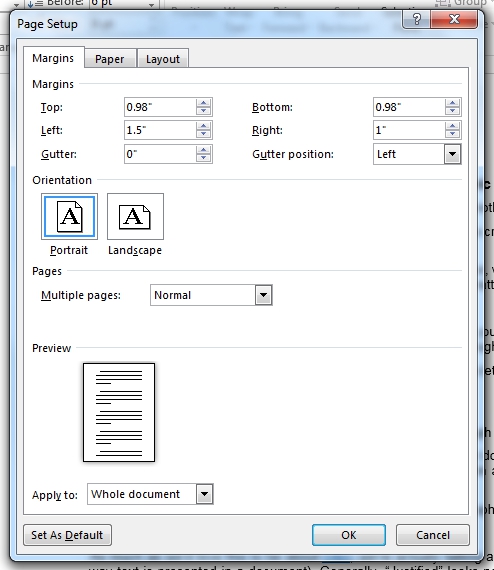
- Clicking Custom Margins… to open the Page Setup menu and setting the size of the top, bottom, left, and right margins as required.
In Microsoft Word for Windows, you can also access the Page Setup menu by clicking the arrow in the bottom right of the relevant section on the ribbon. Margin options available here include:
- Gutter margin size and position – A gutter margin is extra space on the page used for binding. This won’t be necessary for most documents, but you can add one here if required.
- Mirror margins – Selecting mirror margins from the Multiple Pages submenu will change the “Left” and “Right” margin options to “Inner” and “Outer” margins. This ensures that the margins on facing pages are equal if you’re binding something as a book.
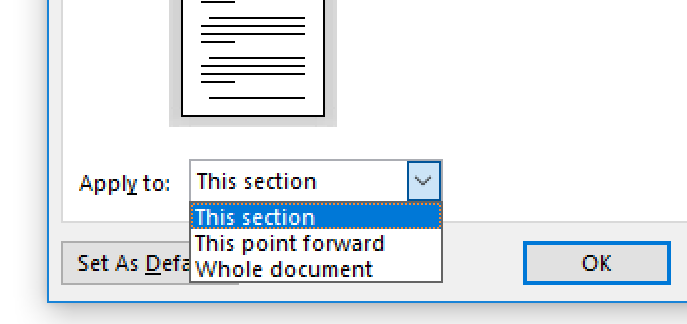
You can also use the Apply To options in the Page Setup menu to control which part of the document you format (e.g., Whole document, This section only, or This point forward). However, you may also want to add your own section breaks for full control over where margin formatting is applied.
Page Orientation
Page orientation refers to whether the document is landscape or portrait. Most documents will be portrait, which is the default in Microsoft Word. But the landscape format can be useful in some cases, such as when a document contains illustrations or charts too wide to fit on a portrait page.
Find this useful?
Subscribe to our newsletter and get writing tips from our editors straight to your inbox.
To adjust the page orientation in a whole Microsoft Word document:
- Go to Layout > Page Setup > Orientation on the main ribbon.
- Select either Portrait or Landscape as required.
To change the orientation of part of a document, you will need to either:
- Add section breaks before and after the section you want to format.
- Open the Page Setup window, select an orientation, and pick which part of the document you want to format via the Apply To menu (as described above in relation to margins).
This will let you present one page in a landscape format (e.g., to fit in a chart). But make sure to add section breaks before changing the orientation.
TheTechieSenior.com is reader supported. We may earn a commission if you buy through links on this site. As an Amazon Associate, we earn from qualifying purchases. Learn more here.
It is important to set your margins and gutters correctly when formatting a book. To save the cost of paying someone to format their books, some indie authors choose to format their books in the same app they use to write. In this article you’ll learn to properly set margins for a print book in Microsoft Word.
Table of Contents
What is the trim size in books?
Every paperback and hardcover book has a trim size. If you pick up a paperback book and measure the width and height of the book, the measurements you get will be the trim size for that book.
The trim size for a hardcover book is based on the book block, not the cover which may be slighter wider than the pages.
When print books are produced, the sheets that contain the pages are stacked, then trimmed by knives in a machine. The exact process for that varies depending on the process and machinery used to print the books.
Choosing a trim size for your indie book
There are many available trim sizes, but some of the most common are 5” X 8”, 5.5” X 8.5”, and 6” X 9” in the U.S. or their approximate equivalents in other countries.
You may find that the actual size of the finished book is different from your chosen trim size by a tiny bit. For example, I had one of my books in Amazon KDP and IngramSpark at the same time. Both books had a chosen trim size of 5” X 8”.
The book printed by Amazon KDP actually measured 5” X 7.9375” (7 15/16”). The same book printed by IngramSpark measured 5” X 8”.
You will want to determine the trim size of your book before you set margins, gutters, etc..One reason is that there are usually more words per page in a 6” X 9” book than a 5” X 8” book.
More words per page can result in a book with fewer pages and therefore, a lower print cost.You’ll also need to consider your target reader when determining your trim size. If your target reader is sight-challenged, a larger print version might be appropriate. Most large print books are printed with a trim size of at least 6” X 9”.
The correct trim size for your books can also change if you write children’s books.
If you hope to market your novel as a mass-market paperback, you might choose a smaller trim size along with smaller fonts.
Amazon KDP has the following trim sizes available for paperbacks as of the date this article is written. Certain page count restrictions apply.
- 5″ x 8″
- 5.06″ x 7.81″
- 5.25″ x 8″
- 5.5″ x 8.5″
- 6″ x 9″
- 6.14″ x 9.21″
- 6.69″ x 9.61″
- 7″ x 10″
- 7.44″ x 9.69″
- 7.5″ x 9.25″
- 8″ x 10″
- 8.25″ x 6″
- 8.25″ x 8.25″
- 8.5″ x 8.5″
- 8.5″ x 11″
- 8.27″ x 11.69″
The following trim sizes are available for hardcover books from Amazon KDP with some page count restrictions.
- 5.5″ x 8.5″
- 6″ x 9″
- 6.14″ x 9.21″
- 7″ x 10″
- 8.25″ x 11″
Similarly, IngramSpark has approximately thirty trim sizes available for paperback and hardcover in black and white and color.
Setting margins for print books in MS Word
Once you’ve determined the best trim size for your book, the next step in formatting a book for print is to set the page margins.
How wide should book margins be?
Margins requirements vary based of which company you choose to print your book. Amazon KDP recommends .25” minimum for the top, bottom and outside margins. The outside margin is the side that opens, opposite the bound side.
Although there is a .25” minimum for top and bottom, KDP recommends a one inch margin for both.
IngramSpark requires a .5” margin on all four sides excluding gutter. All printing must be constrained within that 1/2” margin. That includes page numbers.
These measurements do not include the gutter.
What is a gutter margin?
I’m sure you’ve noticed that part of the margin on the bound side of a book page seems to be swallowed up by the binding. The thicker the book, or the more pages it contains, the more difficult it is to actually see the inside edge of the page. You may see exceptions if the book is cheaply bound or binding of a book is completely worn out.
The gutter is that part of the page that is taken up by the binding. It is an additional margin allowance so that there is always a sufficient margin between the binding and the text.
Amazon KDP and IngramSpark take different approaches in setting up your margins for the gutter.
IngramSpark speaks of the gutter as a separate measurement. They say to add .125” to the inside margin – the right margin on a left page or the left margin on a right page. So, that would mean a total of .625” on the inside including the .5” margin and the .125” gutter.
Amazon KDP just refers to the gutter as the inside margin. Rather than simply adding .125” to the inside margin as IngramSpark suggests, KDP has different inside margin requirements for different page counts.
KDP’s inside margin requirements are:
- .375” for 24-150 pages
- .5” for 151-300 pages
- .625” for 301-500 pages
- .75” for 501-700 pages
- .875” for 701-828 pages
Gutter vs inside margin. Should I use both?
Amazon recommends leaving the gutter to 0” in Word or any other software authors use to format their books. They recommend setting the inside margin wide enough to include the additional gutter.
IngramSpark calls for a minimum specific gutter and margin. In reality, what is required is the combined total measurement. You can set the gutter to zero and the inside margin to the total of the recommended margin plus gutter.
As long as you set your inside margin wide enough to account for the normal page margin plus the gutter allowance, there is no difference in the end.
What is bleed and how does it affect margins?
In the simplest terms, bleed is the portion of any full width or full page printed part that would have extended beyond the trim edge of the page when it was printed but before the actual cutting occurred.
An example would be a full-page image. When you look at the image in the finished book, you might think the image had simply fit nicely into the space that was available for it.
Another situation where a bleed would be required is a page that is formatted with a colored background from edge to edge.
The reality is that the image in question would have been inserted into the book file slightly wider and taller than the trim page size. The colored background would be set to cover the entire page of the document including any margins and bleeds.
Amazon KDP allows a shift of .125” in any direction. IngramSpark allows a shift of .0625” of any printed object. If the image you insert into your book file is only as wide or tall as the final trimmed page and a shift occurs during the printing process, there could be a thin blank strip down the edge, top, or bottom of the image in the finished book.
Bleed allowances exist to make room for those shifts. If there is a .125” bleed allowance and the printing shifts .05”, the image would still be full width in the final product.
Amazon KDP and IngramSpark use the same bleed allowance of .125”.
Headers, footers, and margins
The top and bottom margins in MS Word are measured above and below the text block.
When printers discuss top and bottom margins, they are referring to the distance between any readable parts and the edge of the paper.
In Word, headers and footers are inside the top or bottom margin of the document. The text contained in the header and footer must still have the proper margins above or below the text to satisfy KDP or IngramSpark.
There is no margin around bleed parts (background images, etc.) since they print all the way to the edge of the paper.
How to set margins and gutters for Amazon KDP and IngramSpark
If you intend to submit your book only to Amazon KDP, you would of course need to meet just their formatting requirements. Same idea applies if you submit your work only to IngramSpark.
If I were formatting a book and there was any chance at all that I might submit the book to both companies, I would format one file to meet the requirements of both.
Neither company will reject your file simply for having margins that are greater than their requirements. If you format your book to cover the margin requirements for Amazon KDP and IngramSpark, you can use the same file for printing at both.
Because Amazon KDP requires wider inside margins with higher page counts, you’ll need to keep an eye on your page count. Page count can change with font size changes.
If your book contains parts that require bleed allowances, you’ll want to add the bleed measurement in as well.
Format one file for submission to Amazon KDP and IngramSpark
To format your book to satisfy the requirements of both companies, I would first determine which has the widest margin requirement.
For outside margins, IngramSpark requires the widest margin at .5”. For top and bottom margins, Amazon KDP requires .25″ but recommends 1″. We’ll go with 1″.
For the inside, or gutter margin, IngramSpark’s requirement of .625” (.5″ margin + .125″ gutter) is the same as Amazon KDP’s requirement for books with 301 to 500 pages. It is greater than KDP’s requirements for lower page counts.
At this point, if your book’s total page count, including all front and back matter is 500 or lower, I would stick with IngramSpark’s inside/gutter because it satisfies their minimum and KDP’s for books up to 500 pages. Remember, you can have a margin wider than the required, just not narrower.
The recommendation changes if your book will contain more than 500 pages. In that case, I would still use IngramSpark’s required outside measurement of .5” for the outside margin. I would still use KDP’s 1″ margin on top and bottom.
However, because AmazonKDP’s inside (gutter) margin requirement is higher than IngramSpark’s for books with page counts above 500, I would use KDP’s required inside margin of .75” for 501-700 pages or .875” for 701-828 pages.
Now, your margins satisfy both companies.
If your book contains anything on any page that is a bleed object, you will also need to add another .125” to the top, bottom and outside to satisfy the requirements of both companies.
In that case, you will have an inside (gutter) margin of at least .625” for books up to 500 pages. (More for books with more pages.)
The outside margin will be the total of the basic margin of .5” plus .125” added if a bleed allowance is required.
The top and bottom margins would be 1″ plus .125″ additional if a bleed allowance is required.
Note: The bleed allowance is not added to the inside or gutter margin because that is the binding side.
Set the book trim size and margins in Microsoft Word
You’ll set your book’s trim size in Microsoft Word by setting the page size.
Where to set custom page sizes in Word for Macs:
In MS Word for Macs, there is a page size button under the Layout tab. That button only gives you a few page sizes that do not correspond with book trim sizes. There is no option to create custom sizes there.
- Go to the File menu.
- Choose Page Setup.
- Under the large box on the left side, click the + button.
- On the right side, click in the box beside Paper Size.
- In first setting, fill in the Width and Height to match your trim size. If your book requires a bleed allowance, add .125″ to the Width and .25″ to the Height (to cover .125″ at the top and bottom).
- Leave the non-printable areas all set to User Defined.
- Leave Top, Left, Right, and Bottom all set to Zero.
- If you wish to name your custom page size, double click the new name in the left side and type in the new name.
- Click the OK button.
Where to set custom page sizes in Word for Windows:
- Go to the Layout tab.
- Click the Size button.
- At the bottom of the list, click Custom Sizes.
- Under Paper Size, Select Custom Size and fill in the Width and Height to match your trim size. If your book requires a bleed allowance, add .125″ to the Width and .25″ to the Height (to cover .125″ at the top and bottom).
- At the bottom, beside Apply to, select Whole document.
- Click the OK button.
Where to set the margins for a print book in Microsoft Word
The following instructions assume you’ve already set your page size appropriately.
To set your book’s margins in Microsoft Word:
- Open the Layout tab.
- Click the Margins button (second button from the left).
- Click Custom Margins at the bottom of the panel.
- Open the Margins tab.
- Set Top and Bottom to 1″. Add .125″ to both when a bleed is required.
- Set Inside to 0.625″. (MS Word will round it to .63 after you save your settings.)
- Set Outside to .5″. Add .125″ when a bleed is required.
- Set Gutter to 0″.
- Beside Multiple pages, click and select Mirror Margins.
- Near the bottom, beside Apply to: click and select Whole document.
The page setup panel in Ms Word for Windows offers the same settings.
That should give your book the proper margins for printing through Amazon KDP or IngramSpark. If your particular requirements call for a different trim size, you should be able to do so using the same procedure.
Other articles in this series:
Formatting Images and Captions in Microsoft Word for Print Books
How to Set Headers and Footers for a Print Book in Microsoft Word
How Many Words Are On A Page?
How to Use Text Boxes in Microsoft Word to Format a Print Book
We will start with a blank document and set our page size and margins. Word can offer you various templates to use but you ideally want to start with a blank document and format your book to your own specification.
Microsoft Word – Pages Size
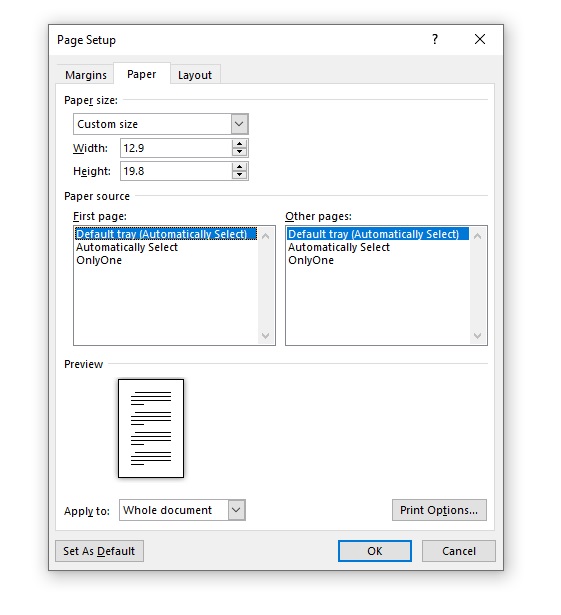
After we have chosen our blank document it is time to choose the page size. There are plenty of sizes to choose from and it is something that will need a lot of thinking. Today we will format a B-Format book at 198mm high x 129mm wide. This is a standard size for a novel. If you are struggling to find a page size that you think is suitable for your book, then head over to our other post for more information – Hardback and Paperback Book Sizes.
To change the page size, we go to Layout > Size > More Paper Sizes…
This will bring up another window where we can input our own custom size.
Under paper size, you want to click the drop-down box and select custom size and then fill out the width and height of the finished paper size you want. In our case, we want a book 198mm high x 129mm wide. As my word document measurements are in cm’s we will fill this out accordingly. You will need to check if your document is in mm’s, cm’s, inches etc. The paper source we will leave as default for now.
After we have filled out the height of 19.8 cm’s and the width of 12.9 cm’s and selected to apply to the whole document, it is time to move on to the next part, the margins.
Microsoft Word – Page Margin
As standard Word will set the margins to 1″ / 2.54cm. The margin size you will want will depend on a few different factors;
- The final page length of your book
- Finished size of your book
- Fiction or non-fiction
- Your book’s genre
There are a few other factors to consider but the best advice we have given our customers is to have a look at other books which are like yours and simply measure the margins. You will find that many books will be different, you just need to choose the right size for your book.
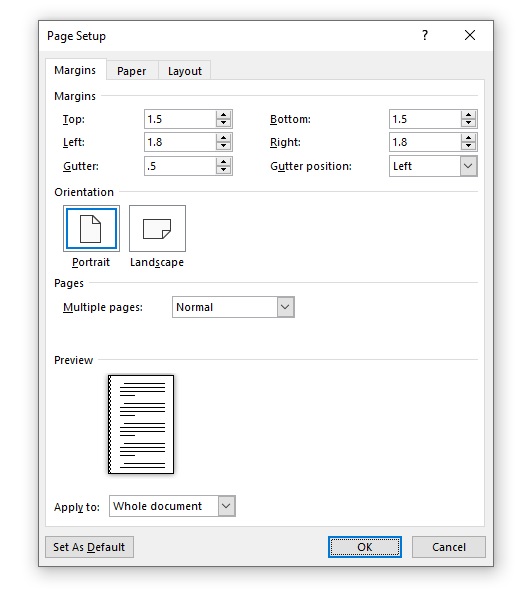
We are going to choose margin sizes of 18mm for the left and right and 15mm for the top and bottom. When we set this up in Microsoft Word it will be 1.8cm left and right and 1.5cm top and bottom.
Microsoft Word – Gutter Size
We then have the option of setting the gutter and the gutter position. This is a term used in the printing industry which describes the side on which a book will be bound. For a normal book printed and bound in the UK, Europe, USA and many other countries, this will be on the left-hand side. The gutter measurement allows us to set extra space on the bound side. This means you have equal margin space on the left and right sides of your document, plus extra space for when all the pages get bound together so you don’t have to ‘break’ the spine of the book.
The gutter measurement will depend on how many pages your book will be. For a small number of pages in the range of 20 to 50, a gutter size of 5mm may be sufficient. However, if you have a large number of pages, 300+ you may want to increase the gutter size to 10mm. Again, this is something that if you are unfamiliar with, you will want to have a look at some books in the same genre and decide.
For our book, we are going to use a gutter size of 5mm and set it to the left-hand side, the orientation set to portrait and the multiple pages option set to mirror margins.
We now have a document that is starting to look like a traditional book but we are far from finished. You should have something which looks like the image below.
Formatting a book in Microsoft Word is very similar to Adobe InDesign and other typesetting software. We are now going to work on the paragraph styles. You can bring up the paragraph options under the layout tab and click the little arrow underneath. For our novel, we are going to use a basic style which is common in most fiction novels.
The alignment will be set to justify and the outline level will be body text. The indentation will be set to 0cm but under special we will set the first-line indentation. For our book, we are going to have a 5mm first-line indent. Again, have a look at other books and make a decision based on what you feel would look right for your book. The spacing of the paragraphs will be set to 0pt before and after and the line spacing set to single.
You will now have a book that looks like the one below. You will notice that in this paragraph style we have set indents for every first line of every paragraph. Now with our book, we don’t want to have the first line of the first paragraph indented. We will have to manually adjust this setting by clicking on the first line of the first paragraph and adjusting the margins using the step above.
Microsoft Word – Chapter Titles
The next step will be to start amending our chapter titles. The chapter titles should be in a larger font than the rest of the text with some additional spacing between the top of the page and the main body of the text. For our book, we are going to use the same font as the main body but in 16pt. The spacing is a personal preference, use what you think is best for your book.
This is how the first page of the main body of our book looks. We are starting to get a nice clean layout that resembles a standard novel.
Now we will start to look into the fonts for our book. This part could be a whole post all to itself as there are many different variables. For more of an understanding of fonts you could check out some of the following posts; How to Choose the Right Font for Your Book, How to Choose the Right Font for your Design and What Font Should You Use for Your Book.
To change the font of your book you will need to click on the home tab at the top of the document. You will then be able to see all the standard options to edit your book. Select what font you will like from the drop-down and the font size. Remember if you have already set your chapter size if you change the font size with all the text selected it will apply that font size setting to everything.
Our book is going to be set in Garamond at 12pt. This is a popular font type used in novels. Some other popular fonts are Palatino and Minion Pro but there are thousands of fonts to choose from so make sure you have a good look around before you decide.
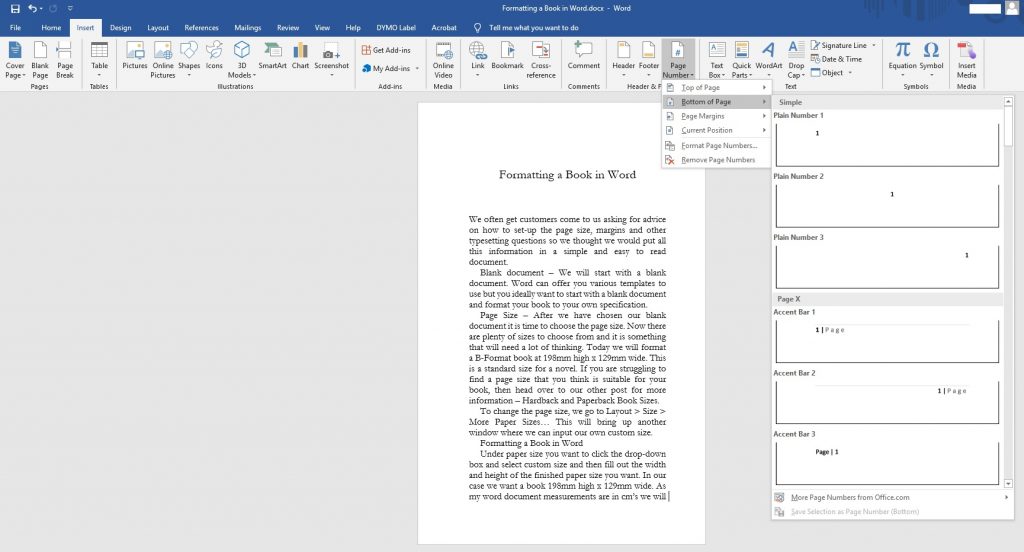
We are now going to add page numbers to our book. To do this you want to go to, Insert > Page Number > Bottom of Page and then select a style that has the page number in the middle of the page.
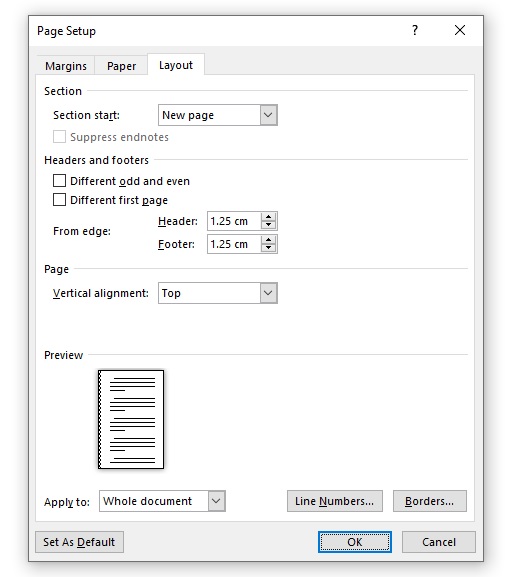
You will then have page numbers added to every page of your document. The page numbers will need spacing in the footer. Our book is going to have a spacing of 1.25cm Header from Top and 0.3cm Footer from the Bottom.
This is how our book now looks.
We have a completed book that has been formatted in Microsoft Word which when exported as a PDF will be press-ready. There are a few little extras that can make your book look more professional but unfortunately, Microsoft Word doesn’t provide those options. Formatting a book in Word is not able to replace professional typesetting software such as InDesign but it can do a very good job of providing you with a press-ready PDF file that looks fantastic and will be suitable for 90% of books.
If you need helping to format your book to print we recommend the services of Book Design UK.

