Microsoft Editor runs in Word for Microsoft 365 to analyze your document and offer suggestions for spelling, grammar, and stylistic issues, like making sentences more concise, choosing simpler words, or writing with more formality.
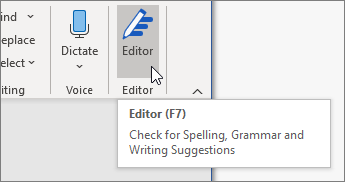
To use Editor, on the Home tab choose Editor.
Reviewing suggestions
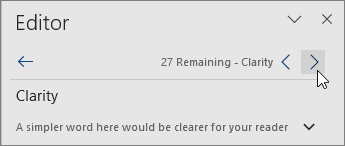
To focus on the issues you care most about, choose a correction or refinement type, like Grammar or Clarity. Then, use the arrows near the top of the pane to step through each of that type of issue.
Choose a suggestion to incorporate it into your document. If you don’t like the suggestion, choose Ignore Once. Or, if you never want this type of suggestion, choose Don’t check for this issue.
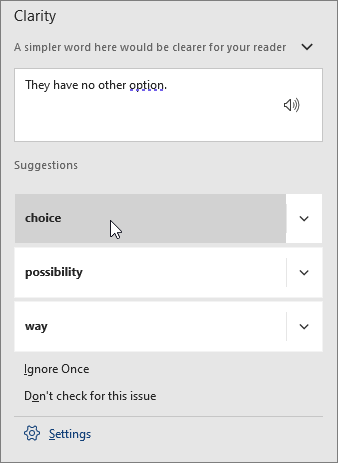
Note: If you change your mind about an issue you ignored, close and reopen the document, and go back to Editor. Editor will find the issue again.
Tailor what Editor checks for
By default, Editor checks for several categories of issues, and the suggestions may or may not suit your writing style. To finely tune Editor for suggestions you want, do the following:
-
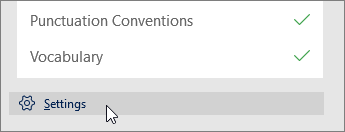
In the Editor pane, choose Settings.
-
In the Word Options dialog box, next to Grammar & Refinements, choose Settings.
-
Scroll through the list of options. Select issues you want Editor to check, and clear the issues you want Editor to ignore.
Note: Choosing Reset All returns to the default settings.
-
Choose OK.
Tip: Editor is designed to empower you to bring out the best in your writing. We are continually making updates to its suggestions and experimenting to learn which suggestions are most welcome. If you have feedback for us, choose Help Improve Office? at the top of the Word window to open the Feedback pane.
You might notice Editor’s red, blue, and purple underlines in your document even when the Editor pane is closed. That’s because Editor is always running in the background, checking for spelling, grammar, and some style issues.
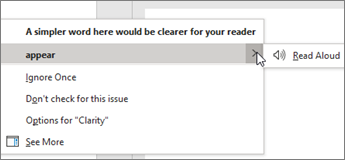
Right-click the underlined text to see the suggestion. Use context menu to:
-
Listen to the suggestion by clicking the arrow next to the suggestion and then choosing Read Aloud.
-
Skip this instance of the issue by choosing Ignore Once.
-
Tell Editor to stop checking for this issue by choosing Don’t check for this issue.
-
Fine tune the settings for this type of issue by choosing the Options link.
-
Get more information about the issue by choosing See More.
Your document might be written in more than one language, or you might want to switch to another language for Editor to check. If you are set up to use multiple authoring languages (File > Options > Language), Word detects the language you’re writing in, and Editor will check for issues in that language.
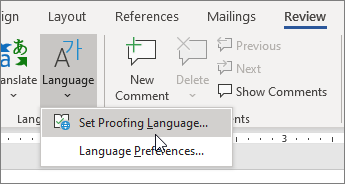
However, you might be writing in a language that Word doesn’t detect automatically. In that case, you can get Editor to check text in that language by selecting the text and going to Review > Language > Set Proofing Language, and then choose your language.
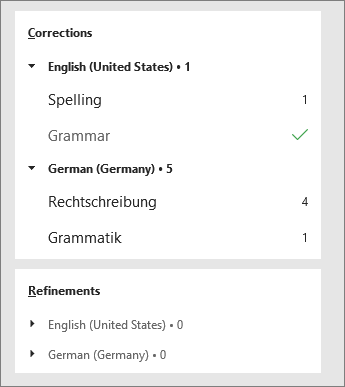
When Editor is checking more than one language, the Editor pane lists corrections and refinements for each language in the document.
For information about the issues that Editor checks in various languages, see Editor’s spelling, grammar, and refinement availability by language.
When you work on documents in Word on the web, Editor provides a rich set of features that are coming soon to Word for Windows. Even when you’re not using Word, the Editor browser extension helps you with writing on websites like LinkedIn, Twitter, Facebook, and Gmail.
Word marks spelling, grammar, and stylistic issues with an underline. Right-click the underlined word, and then choose the suggestion you want, or learn more about the error and how to correct it.
Or, open the Editor pane to address issues by category.
-
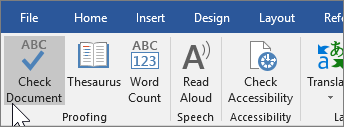
On the Review tab, select Check Document.
-
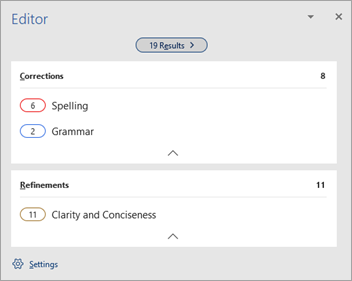
The Editor pane categorizes spelling, grammar, and stylistic issues.
-
Click each category to address the issues.
Note: For keyboard shortcuts in the Editor pane, there’s no need to press Alt. Just use the underlined letter to select the command (like i for Ignore Once, g for Ignore All, etc) .
-
In the Editor pane, click Settings.
-
Under When correcting spelling and grammar in Word, select Settings
-
For Writing Style, select Grammar & Refinements .
-
Scroll down to see all of the options available, and select or clear the rules you want. The settings apply to all the documents that you edit, not just the current one.
Requirements and availability of the Editor pane include the following:
-
Internet connection: Make sure your connection is working.
-
Intelligent Services switched on: Go to File > Options > General and turn on Office Intelligence Services.
-
Language availability: For information about the issues that Word checks for in various languages, see Editor’s spelling, grammar, and refinement availability by language.
Word marks spelling, grammar, and stylistic issues with an underline. Control-click the word or phrase and choose one of the options.
If Word incorrectly underlined a word as misspelled and you want to add that word to your dictionary so that Word will properly recognize it in the future, see Add or edit words in a spell check dictionary.
If spelling or grammatical errors aren’t underlined, you might need to turn on automatic spelling and grammar checking, as follows.
Turn on (or off) automatic spelling and grammar checking
-
On the Word menu, click Preferences > Spelling & Grammar.
-
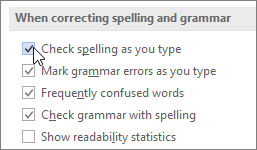
In the Spelling & Grammar dialog box, under Spelling, check or clear the Check spelling as you type box.
-
Under Grammar, check or clear the Check grammar as you type box.
-
Close the dialog box to save your changes.
-
On the Review tab, click Spelling & Grammar.
-
Word displays the issues it finds in the Spelling & Grammar dialog box.
-
To address an issue, do one of the following:
-
Type the correction in the box and then click Change.
-
Under Suggestions, click the word you want to use, and then click Change.
To skip the error, do one of the following:
-
Click Ignore Once to skip only that instance of the error.
-
Click Ignore All to skip all instances of the error.
-
For a grammatical error, click Next Sentence to skip that instance of the error and move to the next error.
To skip a misspelled word in all documents, click Add to add it to the dictionary. This only works for spelling. You can’t add custom grammar to the dictionary.
-
-
After you correct, ignore, or skip an issue, Word moves to the next one. When Word finishes reviewing the document, you’ll see a message that the spelling and grammar check is complete.
-
Click OK to return to your document.
You can clear or reset the list of Ignored Words and Grammar so Word will check for spelling and grammar issues you previously told it to ignore.
Note: When you reset the list of Ignored Words and Grammar, the list is cleared only for the currently open document. Any spelling or grammar issues you told Word to ignore in other documents won’t be affected.
-
Open the document that needs to be checked.
-
On the Tools menu, point to Spelling and Grammar, and then click Reset Ignored Words and Grammar.
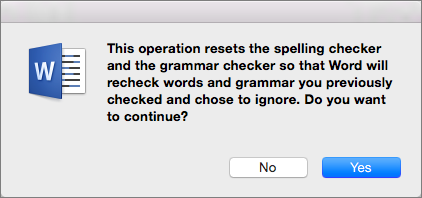
Word displays a warning about the operation resetting the spelling checker and the grammar checker.
-
Click Yes to proceed.
-
Click the Review tab, and then click Spelling & Grammar to check spelling and grammar.
Word marks potential spelling errors with a red squiggly line, and potential grammatical errors are marked with a blue squiggly line.
Right-click on the underlined word or phrase and choose a correction, or ignore the suggestion.
Note: If Word is flagging words as misspelled but you have it spelled the way you want it, select Add to Dictionary to teach Word not to flag that word as misspelled in the future. For more information on this see: Add or edit words in a spell check dictionary.
If you don’t want Office to mark potential errors with squiggly lines while you are working, you can turn automatic spelling and grammar checking off:
-
On the File menu, click Options, and then click Proofing.
-
Select or clear the Check spelling as you type and Mark grammar errors as you type check boxes.
Note: You can turn the spelling checker on or off for the document you’re working with or for all new documents. Select an option in the Exceptions for list, and then select or clear the Hide spelling errors in this document only and Hide grammar errors in this document only check boxes.
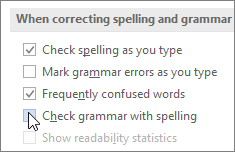
If you don’t want Word to check grammar at all (either when running a spell check or automatically as you type), you can turn it off:
-
On the File menu, click Options, and then click Proofing.
-
Clear the Mark grammar errors as you type and Check grammar with spelling check boxes.
-
On the File menu, click Options > Proofing> Recheck Document.
-
Click Yes when you see the warning message about resetting the spelling and grammar checker.
-
Click OK in the dialog box to get back to the document, and then run the spelling and grammar checker again.
See also
For more information about Microsoft Editor, see Microsoft Editor checks grammar and more in documents, mail, and the web.
For more topics on spelling and grammar, see Spelling and grammar in Word.
To try Microsoft Editor for yourself, download the Editor in Word Tutorial.
Write Confidently
Become a Word Wonder
No matter what you write, LanguageTool ensures flawless and stylistically superior writing to help you communicate your message clearly and effortlessly.
Style Suggestions
Style That Will Wow Your Audience
LanguageTool refines your writing style by suggesting improvements that’ll enhance your tone, voice, and word choice, making your writing more effective.

Grammar, Spelling, and Punctuation
Crystal-Clear Communication
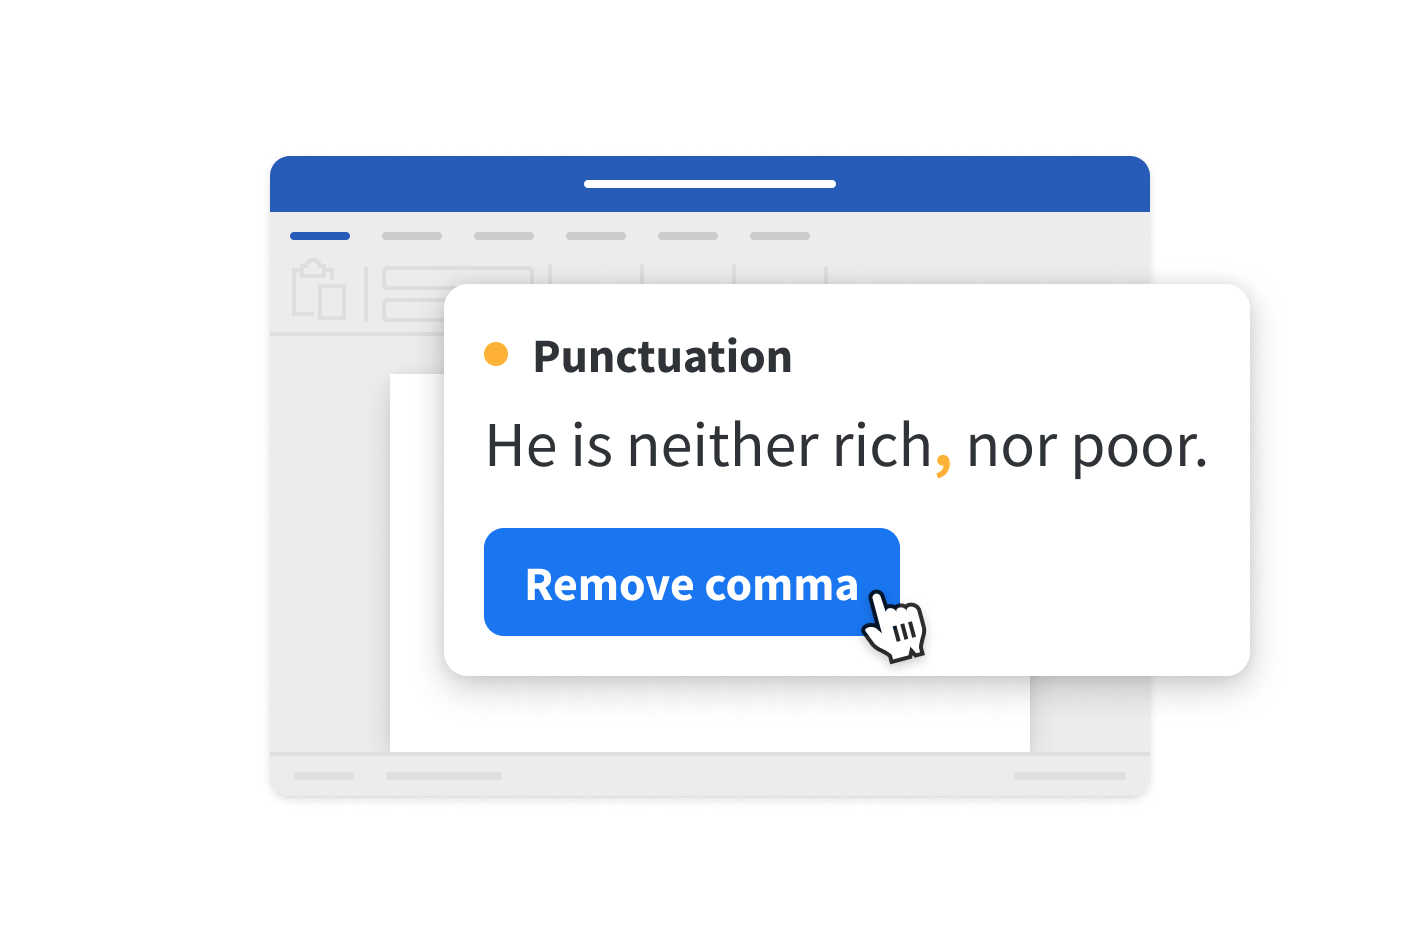
Say goodbye to spelling, grammar, and punctuation errors and hello to clarity. With LanguageTool, there’s need to worry about typos and mistakes slipping into your writing.
Multilingual Support
Worldly Writing in 30+ Languages
LanguageTool supports more than thirty languages and dialects, meaning your text will be perfecto, regardless of which language you’re writing in.
Write Wonderfully
Wherever, Whenever
Whether you’re using the add-in or integrated LanguageTool with Word on the Mac app, you can rest assured that your text will leave a lasting impression with every word you write.
There are many grammar check tools on the web, but only one is the best. By using a trusted and professional Microsoft Word grammar check Add-on, you’ll make writing more accessible, better, and even faster. For that reason, I’ll show you today the best writing corrector for Word that comes with spell check on Facebook, social media, web browsers, also proofreading, punctuation check, and more.
Complete grammar check for MS Word
Grammarly is a great grammar correction and also a spell check software. The tool integrates automatically into your web browser and checks your online writing. That includes social media sites and email accounts like Gail, Yahoo, and others.
Grammarly is the most popular software for grammar, spell check, and proofreading among students, and professional writers. Additionally, it’s the number one recommended tool for many universities across the US and the world. The reason for that is the level of check that the software offers.
In reality, Grammarly works faster, and it provides accurate spell checks and editing. Furthermore, it comes with lots of options such as the plagiarism check, sentence corrector, and more.
Because it’s advanced software, Grammarly checks for comma splices, punctuations, complete sentences, grammar, and more. Unlike other options that are available online, this is a professional grammar check solution that fixes issues while typing on Instagram, Snapchat, and not only editing programs. So, it makes sense to use its pro version because it comes with more complicated grammar corrections, complex sentence structure, and higher levels of text scan.
Now, if you think that checking grammar in Word is enabled by default in MS Office, then, think again. The default grammar check in MS Office misses most of the complex issues. And by skipping what Grammarly finds as writing problems, it won’t be an excellent way to compete with others who use the tool and write better sentences, essays, and papers.
How does the Word grammar check work?
Adding Grammarly to Word is easy, and you don’t need any complicated installs or configurations. That’s because the company offers an Add-in for Microsoft Office that’s well-coded and works faster. Indeed, the first step is to create your Grammarly account for free.
Then, if you want, you can upgrade to the premium account to get the full list of features and more checkpoints. For example, you get a premium quality proofreading and plagiarism check.
Next, you can download the add-in and then enable the tool from the top right corner. Now, everything will work, and you can just start writing in Word or adding your text by copying and pasting. But first, make sure to choose the editing category that you need. That includes different checking types like General, Medical, Business, Casual, and more.
In addition to the above details about the Grammarly add-in for Word, there is another important thing to mention here. We’re in a world where people can copy your content and post it on their sites and blogs. The same things happen every day; you may find yourself using someone else’s phrase accidentally.
So, it’s recommended to have a good MS Office plagiarism add-on. However, you don’t have to look elsewhere if you have Grammarly. The tool detects plagiarism directly from your document. And that’s what can make you wring stand out from others.
It’s even more helpful for students who need plagiarism-free essays, and when teachers see that their work was already there on the web, it’s not a comfortable situation for everyone. But once you install this good app, then, spelling and grammar checks in your Word editor will be faster, more accurate, and more comfortable.
Fix your grammar in Microsoft Word
The Microsoft Word grammar check software works by scanning your entire document for every single mistake you made. Then, it compares the words with the ones in the huge database. Finally, it suggests the right corrections. So, it’s a complete tool that lets you check for grammar mistakes and correct your sentence structure.
Compared to other tools such as Ginger, Grammarly is faster and more accurate for Microsoft Office tools, Google Chrome browser, and others. When you enable the grammar check in Word, the app works in the background and in real-time. So, when you start typing words, it checks the sentences for issues and helps you to fix them with one click.
Also, it lets you check for vocabulary errors, and spelling mistakes, and finds missing or wrong punctuation.
Grammarly is the most accurate grammar tool that you can use with Microsoft Office, including Word, and others. Also, you can use it for Outlook, and all the websites. In other words, it’s an online grammar tool that works in real-time by scanning the text while you write.
The software comes with a great punctuation checker. So, you can check your document for missing and, wrong punctuation and even, get suggestions and explanations.
On the other hand, the Grammarly plugin for Word works better than any other application you can find on the web. The quality is better, and the software is optimized for better processor speed and performance. Thus, you’ll be able to correct your grammar mistakes, without even slowing down your computer.
Of course, the tool works for the different Windows OS versions without problems. Also, you can use it online with your private account of Grammarly’s editor tool.
Conclusion
In conclusion, Grammarly is the recommended grammar check Add-on for Microsoft Word that checks for different levels of writing problems and also corrects spelling errors. It’s a lightweight tool that integrates well into the OS and works better. The software comes with different levels of checking, and that will save you lots of time and effort. When you test the free version of the app, make sure you upgrade. It’s better all the way.
The software works for Windows computers. But also, you can install it on Mac as well. If you have only a Mac, you can use the online editor. It’s your account where you can check for writing mistakes online and for free. You can copy and paste any text, and then, correct the mistakes and get the final copy using it free of grammatical errors.
Learn how to add Grammarly to Microsoft Word step by step in this article and cut down on time spent writing.
A grammar check is a great add-on to any word-processing program. Downloading a writing editor can help catch spelling and grammatical errors as you type and improve your writing skills. Grammarly offers apps that integrate into common word processors like Microsoft Word. They’re available in both free and premium versions.
Here is a step-by-step guide detailing how to install Grammarly on Word. It only takes a few minutes to set up. For starters, ensure you have an active Grammarly account. (If you’re still unsure about this software, read our Grammarly review).
Contents
- Adding Grammarly to Word for Windows
- 1. Set Up Grammarly
- 2. Download Grammarly for Your Computer
- 3. Use Word as Normal
- 4. Grammar Check Your Work
- Tip: Turn Off Grammarly in Word
- FAQ On Add Grammarly To Microsoft Word
- Resources
- Author
Best Grammar Checker
Grammarly
Grammarly is a top spelling, grammar and plagiarism checker. It’ll help you find and fix errors fast, and it works everywhere. It’s trusted by millions of writers for a reason.
Become a Writer Today is reader-supported. When you buy through links on our site, we may earn an affiliate commission.
Adding Grammarly to Word for Windows
1. Set Up Grammarly
Go to Grammarly.com and set up either a free or premium account using your best email or social login. If you’re unsure which version, check out our comparison of Grammarly Free vs Grammarly Premium.
2. Download Grammarly for Your Computer
Inside the Grammarly web app, navigate to the app section on the left-hand side toolbar. Now, download the relevant app for Windows or Mac. Complete the installation and log into your Grammarly account. The Grammarly app works across all writing apps and is the easiest way to use it inside Word. Alternatively, simply install Grammarly for your browser and then follow the below steps.
Note: Previously, Grammarly offered a plugin or add-on for Word, but nowadays, it’s easier to use the app.
3. Use Word as Normal
Write or work within Microsoft Word as normal. You can still check for grammar errors using the traditional checker or by pressing F7. However, when you want to edit in Word, look for the floating Grammarly icon. Click on this to activate its suggestions.
4. Grammar Check Your Work
Grammarly automatically checks your Word documents for grammar and spelling mistakes as you work. To see and fix these mistakes, click within a cell and work through them using the tooltip navigation. Start with the critical grammar errors, i.e., those in red. Then move on to other clarity and engagement suggestions, i.e., those underlined in blue. The AI-powered full sentence rewrites are a particular time-save for Word users.
If you want to grammar check outside of Word, you can copy and paste the contents of your Word file into the Grammarly web app.
Tip: Turn Off Grammarly in Word
If you find writing in Word challenging due to Grammarly’s suggestions, turn it off. Simply click on the Grammarly icon, click on the gear cog, and turn it off indefinitely or for thirty minutes. When you need to reactivate, reopen Grammarly.
What is the Grammarly keyboard shortcut in Word?
There is no keyboard shortcut for Grammarly once you’ve downloaded and installed it into Word. It should work in the background for you, automatically flagging errors.
If you would like to download the Grammarly Keyboard app for your phone, You can look it up in the app store on your phone or navigate to their If you would like to download the Grammarly Keyboard app for your phone, You can look it up in the app store on your phone or navigate to their Keyboard page.
Resources
Quilltbot vs Grammarly
PaperRater vs Grammarly
Grammarly vs Copyscape
Grammarly vs Microsoft Editor
Style Writer vs Grammarly
Hemingway App vs Grammarly
Grammarly vs Chegg
Grammarly vs Outwrite
ProWritingAid vs Grammarly
Grammarly Review
How To Use Grammarly In VS Code
Best Grammar Checker
Join over 15,000 writers today
Get a FREE book of writing prompts and learn how to make more money from your writing.
Keeping up with the grammar rules isn’t really an easy task. Even professionals need help. However, some provisions can help you keep to the rules and help speed up revising text documents created with Microsoft word. These provisions are grammar check add-ons you can use on your MS (Microsoft) Office.
Grammar checking add-ons are packages that spot grammatical blunders in our articles. Some of these grammar-checking add-ons go as far as providing recommendations for words that could make your article richer.
Microsoft Office comes with a grammar checker add-on by default. However, the fact that you are reading this article shows that you probably need a more capable grammar check, and that’s what we are going to explore in this article.
Searching for top-notch grammar-checking add-ons can be a chore, considering the numerous options available. However, this article helps streamline your search as we explore a comprehensive list of 7 of the best grammar checking add-ons for MS Office. These add-ons are outlined below:
1. Grammarly
Grammarly is typically the go-to service for anything relating to grammar. Its operations over the years have left its footprint on many platforms. Grammarly can be accessed as an add-on for MS-Office, an extension for chrome, and lots more. Its aims at securing you from grammatical blunders.
Grammarly highlights errors in different colors depending on the type of error to make spotting grammatical errors easy. A spelling error is typically highlighted with a red underline. Grammarly corrects wrong spellings, punctuations.
It also helps provide more suitable words and helps avoid passive voice in wrong cases. Furthermore, Grammarly will also give you info on why the sentence isn’t correct, which would help improve your grammar prowess. Features like this usually sound like you will be needed to pay a premium, and that’s true. Getting the full Grammarly package will require you to pay a premium, which shouldn’t be much of a worry considering its usefulness.
2. Google Docs
Google Docs is basically one of the top-notch platforms to consider if you are in search of free grammar checking add-ons for MS office. It offers a torn of features that help in creating a good grammatically structured article.
The essentials are taking with utmost priority. The Google docs grammar checker ad-on underlines wrong spellings, invalid word use, and lots more. Much like Grammarly, the Google docs grammar checker offers different color highlights for different cases. In a nutshell. It’s pretty much the same grammar check you use when editing documents on Google docs. It’s effective and free.
3. Consistency checker
Consistency comes in as one of the apt options for enthusiasts who aren’t totally satisfied with the default Microsoft Office spell checker’s offerings. It is a companion grammar checking add-on that makes your work tend words seamless.
In his capacity, the Consistency checker can scan your document hyphenation, variations in spellings, numbers in sentences, abbreviations in multiple forms, typos, and lots more.
Using a consistency checker is a very seamless process. It has a scan button that runs through your article to churn out data on wrongly used grammar, spellings, and phrases.
4. Pro Writing Add-ons
Get ready to write like a pro. The Pro writing add-on for MS-Office gives a top-notch rendition that turns your average writing skill into a top-notch one.
The Pro writing add-ons have a straightforward and intuitive mode of operation. Once set in motion, Pro writing will highlight the errors in your article, providing the corrections. This system of highlighting errors makes sporting errors easier. It allows you to spot errors without having to read the whole article first.
However, the Pro writing app isn’t entirely free; getting access to some of its top-notch/extraordinary features will require you to pay a premium. Something you would probably be expecting.
5. Hemingway
Still on the topic of best grammar checking add-ons for MS Office. The Hemingway Editor is yet another awesome you should totally consider if you desire to take the articles created in MS-Office to the next level.
The Hemingway app lets you create well-structured sentences. It helps you avoid the use of passive voices, avoiding too many adjectives, and lots more. However, one thing the Hemingway add-on isn’t a spell checker; it doesn’t correct wrong spellings, so you’d probably skip this if not having a spell checker is a deal-breaker for you.
6. Ginger
Ginger helps reduces the anxiety that goes along with the desire to create articles that are clear from mistakes. It’s one of the goto add-ons for enthusiasts that aren’t totally satisfied with Microsoft office’s default grammar checker.
Ginger helps correct grammatical errors with the inclusion of wring punctuation, sentence structure, and style. It is an easy-to-use tool that highlights the error in the document.
The Ginger grammar checker also provides language translation within 40 languages, which in my opinion, would come in useful in times when you desire to send written documents to people with languages different from yours.
However, enthusiasts would have limited offerings on the package; part of it is – having only 350 words inputted for correction. To go further, you will need to pay for its premium package.
7. Language Tool
Last but certainly not least is the language tool, which also functions as a grammar checking add-on for MS-Office. Much like the already outlined ad-on, the language tool makes it easier to spot errors and make corrections.
Aside from being able to correct grammatical errors, as wrong spellings in English, the language tool is also able to correct errors in more than 20 other languages. This places it as one of the top-notch grammar checker platforms available.
wrapping up
There you have it – a comprehensive list of 7 of the best grammar checking add-ons for MS Office. If you have any personal favorites or other recommendations, please let us know in the comment section below.


