Office Open XML
Office Open XML is introduced by Microsoft to work with documents. For e.g.: — read/write MS word documents.
Prerequisites
- Visual Studio
- MS Word Document
- Open XML SDK
Execute below command to Install DocumentFormat.OpenXml SDK in your project
- Install-Package DocumentFormat.OpenXml Install-Package DocumentFormat.OpenXml
In this example, I am using a windows form application to interact with word document and display the result on the screen.
How to find first table from word document?
- Table table = doc.MainDocumentPart.Document.Body.Elements<Table>().First();
Here .First() is extension method to find first table from word document.
The WordprocessingDocument Methods
|
EXTENSION METHOD |
DESCRIPTION |
|
.Elements<Table>().First() |
To get the first table from the word document |
|
.Elements<Table>().Last() |
To get the last table from the word document |
|
.Elements<Table>().FisrtOrDefault() |
To get the first table from the word document or return the default value if the document does not contain table. |
|
.Elements<Table>().LastOrDefault() |
To get the Last table from word document or return the default value if the document does not contain table. |
|
.Elements<Table>().ElementAt(Index) |
To get the exact table from the word document by index number. Default index number is 0. |
|
Table.Elements<TableRow>().ElementAt(index) |
To get the exact table row from selected table by index number. Default index number is 0. |
|
Row.Elements<TableCell>().ElementAt(Index) |
To get the exact row cell from selected row by index number. Default index number is 0. |
Execute the following code to read the first table from the word document,
- using System;
- using System.Collections.Generic;
- using System.Data;
- using System.Linq;
- using System.Windows.Forms;
- using DocumentFormat.OpenXml.Packaging;
- using DocumentFormat.OpenXml.Wordprocessing;
- namespace ReadTable
- {
- public partial class Form1 : Form
- {
- public Form1()
- {
- InitializeComponent();
- }
- private void btnBrowse_Click(object sender, EventArgs e)
- {
- DialogResult result = this.openDB.ShowDialog();
- if (result == DialogResult.OK)
- {
- txtBrowse.Text = openDB.FileName;
- }
- }
- private void btnReadTable_Click(object sender, EventArgs e)
- {
- using (var doc = WordprocessingDocument.Open(txtBrowse.Text.Trim(), false))
- {
- DataTable dt = new DataTable();
- int rowCount = 0;
- Table table = doc.MainDocumentPart.Document.Body.Elements<Table>().First();
- IEnumerable<TableRow> rows = table.Elements<TableRow>();
- foreach (TableRow row in rows)
- {
- if (rowCount == 0)
- {
- foreach (TableCell cell in row.Descendants<TableCell>())
- {
- dt.Columns.Add(cell.InnerText);
- }
- rowCount += 1;
- }
- else
- {
- dt.Rows.Add();
- int i = 0;
- foreach (TableCell cell in row.Descendants<TableCell>())
- {
- dt.Rows[dt.Rows.Count — 1][i] = cell.InnerText;
- i++;
- }
- }
- }
- dgvTable.DataSource = dt;
- }
- }
- }
- }
Output
In the above example, I have used .First() extension method to get the first table from word document. You can use other extension methods to find exact table or you can use for/foreach loop to find the exact table from the word document.
Summary
In this session, I discussed how to read the table from the word document using c#. I hope the above session will help you to read the table from the word document using C#.
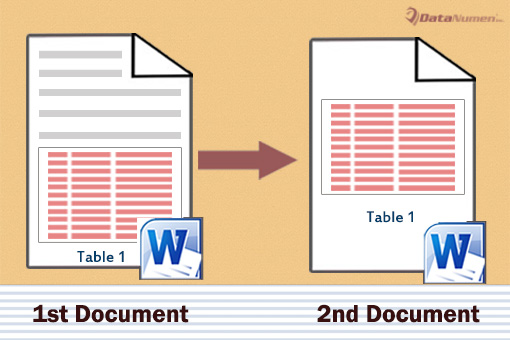
In this article, we are glad to show you with 4 methods to extract multiple tables from one Word document to another.
Table is the most used mean we use to hold tabular information. It arranges data in rows and columns, presenting readers a clear view of all information. A long document can contain many tables, so there is the need to export them to a new document for various purposes.
Here are our 4 approaches.
Method 1: Batch Export All Tables from One Document to Another
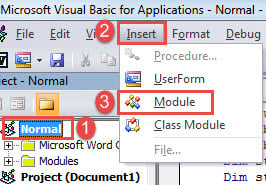
- First and foremost, press “Alt+ F11” to trigger the VBA editor in Word.
- Then click “Normal” project and the “Insert” tab next.
- Choose “Module” on the drop-down menu.
- And double click to open the module and bring out the editing space on the right side.
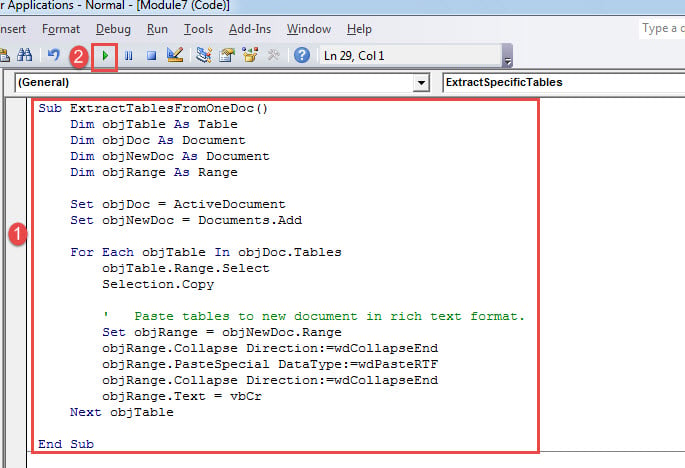
- Now copy and paste the following macro there:
Sub ExtractTablesFromOneDoc()
  Dim objTable As Table
  Dim objDoc As Document
  Dim objNewDoc As Document
  Dim objRange As Range

  Set objDoc = ActiveDocument
  Set objNewDoc = Documents.Add

  For Each objTable In objDoc.Tables
    objTable.Range.Select
    Selection.Copy

    '  Paste tables to new document in rich text format.
    Set objRange = objNewDoc.Range
    objRange.Collapse Direction:=wdCollapseEnd
    objRange.PasteSpecial DataType:=wdPasteRTF
    objRange.Collapse Direction:=wdCollapseEnd
    objRange.Text = vbCr
  Next objTable

End Sub
- Finally, click “Run”.
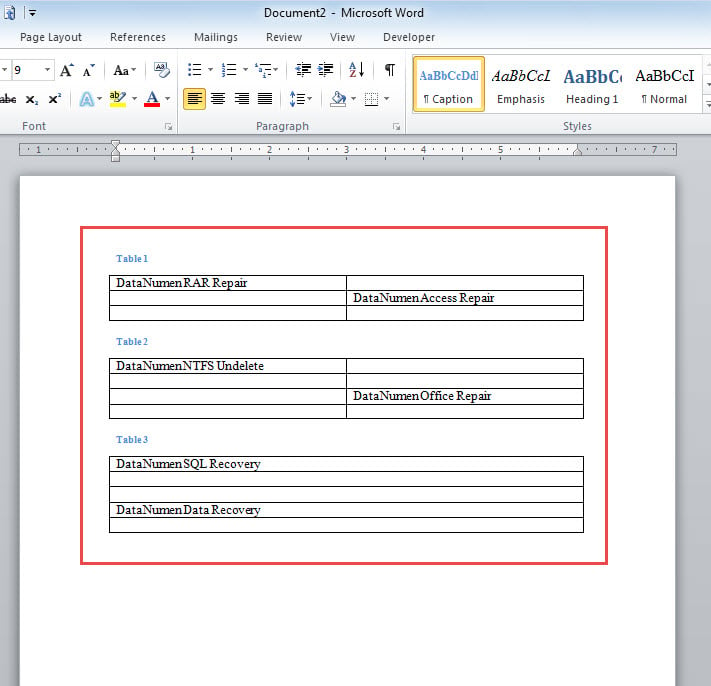
This macro will extract both tables and their captions as well.
Method 2: Extract a Specific Table from a Document
Now, in case there are many tables in your document, but you need to send one particular table to someone. Then the following macro will do you a lot help.
- First, install and run macro following steps in method 1.
- Second, replace that macro with this one:
Sub ExtractSpecificTables()
  Dim objTable As Table
  Dim objDoc As Document
  Dim objNewDoc As Document
  Dim objRange As Range
  Dim strTable As String

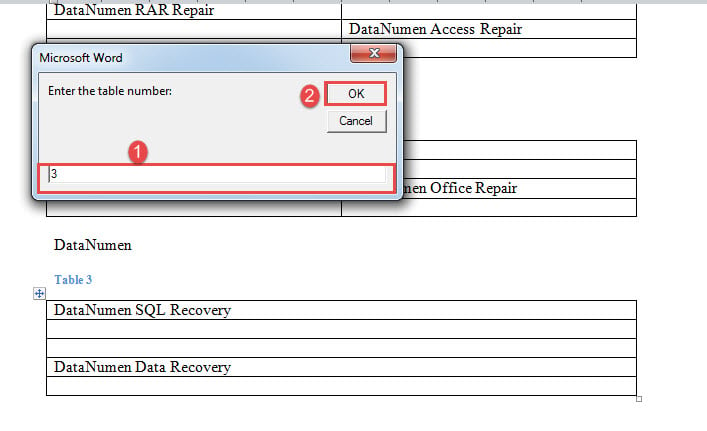
  strTable = InputBox("Enter the table number: ")
  Set objDoc = ActiveDocument
  Set objNewDoc = Documents.Add

  objDoc.Tables(strTable).Range.Select
  Selection.Copy

  Set objRange = objNewDoc.Range
  objRange.Collapse Direction:=wdCollapseEnd
  objRange.PasteSpecial DataType:=wdPasteRTF

End Sub
- Now there will be an input box popping up.
- Enter a table number and click “OK”.
Method 3: Batch Extract All Tables from Multiple Documents
- To start with, arrange all files in one folder.
- Then install and run a macro with exact above instructions.
- Replace macro with this one:
Sub ExtractTablesFromMultiDocs()
  Dim objTable As Table
  Dim objDoc As Document, objNewDoc As Document
  Dim objRange As Range
  Dim strFile As String, strFolder As String

  '  Initialization
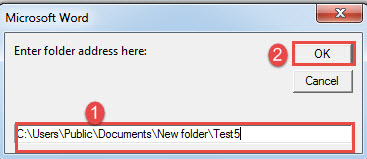
  strFolder = InputBox("Enter folder address here: ")
  strFile = Dir(strFolder & "" & "*.docx", vbNormal)

  Set objNewDoc = Documents.Add

  '  Process each file in the folder.
  While strFile <> ""
    Set objDoc = Documents.Open(FileName:=strFolder & "" & strFile)
    Set objDoc = ActiveDocument

    For Each objTable In objDoc.Tables
      objTable.Range.Select
      Selection.Copy

      Set objRange = objNewDoc.Range
      objRange.Collapse Direction:=wdCollapseEnd
      objRange.PasteSpecial DataType:=wdPasteRTF
      objRange.Collapse Direction:=wdCollapseEnd
      objRange.Text = vbCr
    Next objTable

    objDoc.Save
    objDoc.Close
    strFile = Dir()
  Wend

End Sub
- Now in the prompting box, enter the folder address where you store your documents and click “OK”.
Method 4: Copy Tables out Manually
However, if you don’t feel comfortable with VBA, you are fine to do the job manually as long as there are a limited number of tables.
- Firstly, click the plus sign at upper-left corner to select target table.
- Then press “Ctrl+ C” to copy it.
- Next open a new document.
- And press “Ctrl+ V” to paste the table in new document.
- Remember to save the new document.
Handle with Document Problems
As long as we keep using Word, there will always be Word damage. However, fear no more. It’s not an unfixable problem anymore. With a qualified recovering tool, you have a high chance to retrieve all your valuable data.
Author Introduction:
Vera Chen is a data recovery expert in DataNumen, Inc., which is the world leader in data recovery technologies, including corrupt xlsx and pdf repair software products. For more information visit www.datanumen.com
Worf
Well-known Member
-
#2
The following code will:
· Find the string typed by user on the Word document
· Create an index for each Word table, based on its position
· Build an Excel range with Word table information
· Find the desired table number on the range
· Copy that table from Word to Excel
Code:
' Excel module
Sub FindTable()
Dim i%, j%, ow, mydoc As Document, mytext$, spos, lr$, tn%
Set ow = GetObject(, "Word.Application")
ow.Visible = True
Set mydoc = ow.ActiveDocument
mytext = InputBox("Enter text to find")
ow.Selection.HomeKey wdStory
ow.Selection.Find.ClearFormatting
With ow.Selection.Find
    .ClearFormatting
    .Text = mytext
    .Forward = True
    .Wrap = wdFindStop
    .Execute                                                            ' find string
End With
ow.Selection.HomeKey wdLine
spos = CStr(ow.Selection.Information(wdActiveEndPageNumber) + _
(ow.Selection.Information(wdFirstCharacterLineNumber) / 100))           ' string position index
spos = Replace(spos, ",", ".")
If mytext = "" Then Exit Sub
Sheets("sheet4").Activate
[a:b].ClearContents
For i = 1 To mydoc.Tables.Count
    mydoc.Tables(i).cell(1, 1).Select
    Cells(i, 1) = ow.Selection.Information(wdActiveEndPageNumber) + _
    (ow.Selection.Information(wdFirstCharacterLineNumber) / 100)        ' table position index
    Cells(i, 2) = i                                                     ' table number
Next
Sorter Sheets("sheet4"), [a1].CurrentRegion                             ' sort table information
lr = CStr(Range("a" & Rows.Count).End(xlUp).Row)
tn = Cells(Evaluate("=match(vlookup(" & spos & ",a1:b" & lr & ",2,true),b1:b" & lr & ",0)+1"), 2)
Sheets("results").Activate
For i = 1 To mydoc.Tables(tn).Rows.Count                                ' import desired table
    For j = 1 To mydoc.Tables(tn).Columns.Count
        Cells(i, j) = WorksheetFunction.Clean(mydoc.Tables(tn).cell(i, j).Range.Text)
    Next
Next
Set mydoc = Nothing
Set ow = Nothing
MsgBox "end of code"
End Sub


Sub Sorter(ws As Worksheet, r As Range)
ws.Sort.SortFields.Clear
ws.Sort.SortFields.Add ws.[a1], xlSortOnValues, xlAscending, , xlSortNormal
With ws.Sort
    .SetRange r
    .Header = xlNo
    .MatchCase = False
    .Orientation = xlTopToBottom
    .SortMethod = xlStroke
    .Apply
End With
End Sub
-
#3
Thank you Worf for the input — I’m having trouble getting it to work — Do I paste the whole thing into «ThisWorkbook» area? Or should one of the subs be pasted into a separate module?
I pasted it all into then hit run — It generated the input field msgbox, I typed in something to search and it returned:
«Run-time error 9: Subscript out of range»?
(the cursor stops/is flashing on this line — between the C and the Str):
spos = CStr(ow.Selection.Information(wdActiveEndPageNumber) + _
I noticed further down there was refc of «Sheet 4» and my workbook only had Sheet 1 present, I so went ahead and clicked the «+» to add Sheets 2, 3, & 4 to see if that helped matters…
Re-ran and this time, I got a different error..
«Run-time error 13 — Type mismatch —
???
Any ideas what might be going wrong?
Thank you, C
Worf
Well-known Member
-
#4
— Paste the code into a standard module (Module1, Module2…)
— The code assumes that the Word document is already opened.
— The necessary information table is generated at Sheet4, but you may change that.
— A sheet named Results is also required.
— The code currently does not perform error checking on the Word find method, so make sure you type something that is above and outside a table on that document. We can refine this later after it is working on your end.
— Please test again and report eventual errors mentioning line and error message.
-
#5
Here’s some simpler code for you to adapt. It takes the document name & table name as arguments.
Code:
Sub GetMiscTable(strDocNm As String, strTblNm As String)
Dim r As Long, xlWkSht As Worksheet
If strTblNm = "" Then Exit Sub
Set xlWkSht = ActiveWorkbook.Worksheets("RESULTS")
r = xlWkSht.Cells.SpecialCells(xlCellTypeLastCell).Row + 1
Dim wdApp As New Word.Application, wdDoc As Word.Document, wdTbl As Word.Table
With wdApp
  Set wdDoc = .Documents.Open(strDocNm)
  With wdDoc
    For Each wdTbl In .Tables
      With wdTbl.Range
        If InStr(.Characters.First.Previous.Paragraphs.First.Range.Text, strTblNm) = 1 Then
          .Copy: xlWkSht.Paste Destination:=Range("A" & r): Exit For
        End If
      End With
    Next
    .Close False
  End With
  .Quit
End With
Set wdTbl = Nothing: Set wdDoc = Nothing: Set wdApp = Nothing: Set xlWkSht = Nothing
End Sub
The code could be run from a standard module, a sheet module, workbook module, userform, or a standard module — just add it to whatever module you want to call it from.
PS: When posting questions whose scope includes applications other than Excel, you should post in: General Excel Discussion & Other Questions
Last edited: Jan 31, 2017
-
#6
WORF: Thanks for expanding — I moved the first sub to Mod1 and the smaller one to Mod 2,
Opened a Word doc (which I did not have done prior — not realizing it was necessary) —
NOW it works great! — The table is extracted and placed on the «RESULTS» tab — however,
Can you tell me what the output is that has appeared on «Sheet 4»?
It looks like this:
(it is a time clock/tracking of speed of code perhaps?)
1.12 1
2.03 2
3.03 3
4.03 4
7.02 5
7.22 6
8.03 7
Thank you very much for your help! — This is a huge help to that problem where the NAME of the table was outside the table..
-
#7
MACROPOD:
knowing from experience — this has got to be something awesome as well — but I’m not able to get it working..
=-/
Using the same test file, I created a 3rd module: «Module 3» and pasted in your code.
Created a new sheet called «RESULTS»
Hit run —but it does not find the code in the list to run it —
(the only thing that appears to select is the code that’s sitting in Module 1 within this workbook that WORF suggested)
I checked to make sure the full paste was there… saved…. verified all the Tool>Refcs were check-marked (yes, I’ve learned lessons from the past) lol —
So — why is Module 3’s code not appearing as an option to pick to run…?
PS — I (did) post this in the ‘Gen Excel Disc & Other Questions’ area — so I’m not sure what I did wrong?
Last edited: Jan 31, 2017
-
#8
Using the same test file, I created a 3rd module: «Module 3» and pasted in your code.
Created a new sheet called «RESULTS»
Hit run —but it does not find the code in the list to run it —
(the only thing that appears to select is the code that’s sitting in Module 1 within this workbook that WORF suggested)
Compare that with:
The code could be run from a standard module, a sheet module, workbook module, userform, or a standard module — just add it to whatever module you want to call it from.
PS — I (did) post this in the ‘Gen Excel Disc & Other Questions’ area — so I’m not sure what I did wrong?
No, I moved it here from ‘Excel Questions’ — just like I did with your other automation threads…
-
#9
oh— ok Macropod — didn’t realize it was to be added to an existing module —
assumed it needed to go into a nice clean Standard Module of its own —
Sorry— didn’t realized you’d moved them —
I’ll make note — thanks for the heads up —
Compare that with:
No, I moved it here from ‘Excel Questions’ — just like I did with your other automation threads…
-
#10
Having a problem:
The code has been running great on the .DOCX files — but won’t work on the .DOC files..
I looked for references of «docx» to be able to change the extension in the code — but am not seeing it…
Is there a toggle number perhaps that I need to change — like from «1» to «2» to make it run on .DOC file types?
After a summer break (or I can say a busy summer) I decided to blog about a problem that I bumped into and I see that is bothering many people but I didn’t manage to find nice implementation.
Recently I had some task to extract data from word documents and well I thought: “Easy one… just use the API that Microsoft has and in all will be done in no-time”. I was so naïve to believe that the API will be without bugs (some of them reported and many unreported ones…).
One of the greatest challenges that I faced was exactly determining the structure of the table in a word document. The table can have horizontally or vertically merged cells and table header row(s). I didn’t pay much attention for the borders and shades since that is artistic thing and not really important for the table structure (when referring the information that the table holds).
So first thing is simple table (no merging, just pure table):
| Column 1 | Column2 | Column 3 | |
| Line 1 | |||
| Line 2 | |||
| Line 3 |
Let’s suppose that I have created following classes for representing Cells and Tables
using System;
using System.Collections.Generic;
using Word = Microsoft.Office.Interop.Word;
using Office = Microsoft.Office.Core;
using Microsoft.Office.Tools.Word;
using System.Windows.Forms;
using Microsoft.Office.Interop.Word;
using System.Xml;

public class CustomCell
{
public int cellRow;
public int cellColumn;
public int cellRowSpan;
public int cellColumnSpan;
public String cellText;
}
public class CustomTable
{
public int rowsField;
public int columnsField;
public List cells;
}
In order to get the structure of the given table we simply need to loop through each row and cell and its contents. Simple as 1,2,3… If we have selected a table in Word we can use the following code:
Table wordTable = Application.Selection.Tables[1];
CustomTable table = new CustomTable();
table.cells = new List();
for (int row = 1; row <= wordTable.Rows.Count; row++)
{
for (int column = 1; column <= wordTable.Rows[row].Cells.Count; column++)
{
CustomCell cell = new CustomCell();
cell.cellColumn = column;
cell.cellRow = row;
cell.cellText = wordTable.Cell(row, column).Range.Text;
table.cells.Add(cell);
}
}
This code works also for a table like this:
| Merged cell | ||
| Line 1 | ||
| Line 2 |
Usually the users get creative and want something more in the tables like merged columns or cells for better data representation. In these cases this code is useless… In case of vertically merged cells this code will still work but it is not the case if there are horizontally merged cells. There is a nice solution to use the Cell.Next method that the Word API offers. In that case the code would look like:
Table wordTable = Application.Selection.Tables[1];
Cell wordCell = wordTable.Cell(1, 1);
CustomTable table = new CustomTable();

table.cells = new List();
while(wordCell!=null)
{
CustomCell cell = new CustomCell();
cell.cellColumn = wordCell.RowIndex;
cell.cellRow = wordCell.ColumnIndex;
cell.cellText = wordCell.Range.Text;
table.cells.Add(cell);
wordCell = wordCell.Next;
}
Here is some a little bit more complex table:
| Text | Text | Text | ||
| Text | ||||
| Text |
So when you think that all your problems are solved someone comes and asks for exact row and column span of each cell because maybe they want to have Word documents viewer or just embed the table in a web site. In this case the API doesn’t help with a method or attribute.. you have to find your own algorithm how to get this information. I read and read many ideas and forums: some had broken cells apart and them merged them (?!), then someone was using the height value/weight attribute to decide if the cells have row or column span and many more creative ideas. They all seemed a bit impossible for me because I thought of many exceptions that might happen and the code wouldn’t work properly. So I bumped into a comment saying that the XML structure of the table is a good place to start. So since there is a lot of documentation how to form a legal XML structure for a table I will refer to the following link http://msdn.microsoft.com/en-us/library/office/ff951689.aspx
After you master somewhat the structure you will understand the following code that goes through the cells and gets the information you need:
Table wordTable = Application.Selection.Tables[1];
Cell wordCell = wordTable.Cell(1, 1);
CustomTable table = new CustomTable();
table.cells = new List();

String s = Application.Selection.Tables[1].Range.XML;
XmlDocument xmlDoc = new XmlDocument();
xmlDoc.LoadXml(s);
XmlNamespaceManager nsmgr = new XmlNamespaceManager(xmlDoc.NameTable);
nsmgr.AddNamespace("w", "http://schemas.microsoft.com/office/word/2003/wordml");

while (wordCell != null)
{
CustomCell cell = new CustomCell();
cell.cellRow = wordCell.RowIndex;
cell.cellColumn = wordCell.ColumnIndex;
int colspan;
XmlNode exactCell = xmlDoc.SelectNodes("//w:tr[" + wordCell.RowIndex.ToString() + "]/w:tc[" + wordCell.ColumnIndex.ToString() + "]/w:tcPr/w:gridSpan", nsmgr)[0];
if (exactCell != null)
{
colspan = Convert.ToInt16(exactCell.Attributes["w:val"].Value);
}
else
{
colspan = 1;
}

int rowspan = 1;
Boolean endRows = false;
int nextRows = wordCell.RowIndex + 1;
XmlNode exactCellVMerge = xmlDoc.SelectNodes("//w:tr[" + wordCell.RowIndex.ToString() + "]/w:tc[" + wordCell.ColumnIndex.ToString() + "]/w:tcPr/w:vmerge", nsmgr)[0];

if ((exactCellVMerge == null) || (exactCellVMerge != null && exactCellVMerge.Attributes["w:val"] == null))
{
rowspan = 1;
}
else
{
while (nextRows <= wordTable.Rows.Count && !endRows)
{
XmlNode nextCellMerge = xmlDoc.SelectNodes("//w:tr[" + nextRows.ToString() + "]/w:tc[" + wordCell.ColumnIndex.ToString() + "]/w:tcPr/w:vmerge", nsmgr)[0];
if (nextCellMerge != null && (nextCellMerge.Attributes["w:val"] == null))
{
nextRows++;
rowspan++;
continue;
}
else
{
endRows = true;
}
}
}
cell.cellRowSpan = rowspan;
cell.cellColumnSpan = colspan;
cell.cellText = wordCell.Range.Text;
table.cells.Add(cell);
wordCell = wordCell.Next;
}
Last words: Copy, paste, test, use, reuse but don’t abuse 🙂
- Remove From My Forums
-
Question
-
Hi
This should be easy but I can not see any options to do this in Word 2007.
I have a table that is used in a customers document format with various colour options etc that is not based on any standard style or font. I want to create a table style from it so I can then quickly apply the style to tables in my document in order
to easily convert our standard format docs to look like theirs. They have not created any syles in their document unfortunately.I just want to select the table and then create new style based on it. I can click the Table Tools design new Style but I want it to say «based on selected» but there is nothing like that, I have to use a standard style.
Any help would be appreciated
Thanks in advance
J
Answers
-
Hi J,
How to apply a table style to an existing table in Word 2007, you can do following steps:
- Select the table. The Design and Layout tabs for
Table Tools are added to the ribbon (A). - Select the Design tab.
- In the Table Style group (on the left [B]), select the check boxes for the effects you want. For example, if this table has a header row, select that check box; if you want banded rows, select that check box; if you have a Totals row, select
that one, etc. (See also:
Tips for using built-in table styles.) - In the Table Styles group (C), click the drop-down arrow to the right of the example styles to see ‘thumbnail’ views of various table styles; scroll down to see all the variations.
- Hover over various thumbnails (D) to see how each one looks when applied to your table.
- Click on the thumbnail for the style you want to apply.
Hope that helps.
-
Marked as answer by
Thursday, October 21, 2010 5:20 AM
- Select the table. The Design and Layout tabs for


