
Word for Microsoft 365 Word for Microsoft 365 for Mac Word 2021 Word 2021 for Mac Word 2019 Word 2019 for Mac Word 2016 Word 2016 for Mac Word 2013 Word 2010 Word for Mac 2011 More…Less
To create a form in Word that others can fill out, start with a template or document and add content controls. Content controls include things like check boxes, text boxes, date pickers, and drop-down lists. If you’re familiar with databases, these content controls can even be linked to data.
Show the Developer tab
If the developer tab isn’t displayed in the ribbon, see Show the Developer tab.
Open a template or a blank document on which to base the form
To save time, start with a form template or start from scratch with a blank template.
-
Go to File > New.
-
In Search online templates, type Forms or the type of form you want and press ENTER.
-
Choose a form template, and then select Create or Download.
-
Go to File > New.
-
Select Blank document.
Add content to the form
Go to Developer, and then choose the controls that you want to add to the document or form. To remove a content control, select the control and press Delete. You can set properties on controls once inserted.
Note: You can print a form that was created using content controls, but the boxes around the content controls will not print.
In a rich text content control, users can format text as bold or italic, and they can type multiple paragraphs. If you want to limit what users add, insert the plain text content control.
-
Click or tap where you want to insert the control.
-
Select Developer > Rich Text Content Control
 or Plain Text Content Control .
 or Plain Text Content Control
  .
.To set specific properties on the control, see Set or change properties for content controls.
A picture control is often used for templates, but you can also add a picture control to a form.
-
Click or tap where you want to insert the control.
-
Select Developer > Picture Content Control
.
 .
.To set specific properties on the control, see Set or change properties for content controls.
Use building block controls when you want people to choose a specific block of text. For example, building block controls are helpful when you need to add different boilerplate text depending on the contract’s specific requirements. You can create rich text content controls for each version of the boilerplate text, and then you can use a building block control as the container for the rich text content controls.
-
Click or tap where you want to insert the control.
-
Go to DeveloperBuilding Block Gallery Content Control
(or Building Block Content Control). -
Select Developer and content controls for the building block.
 (or Building Block Content Control).
-
Click or tap where you want to insert the control.
To set specific properties on the control, see Set or change properties for content controls.
In a combo box, users can select from a list of choices that you provide or they can type in their own information. In a drop-down list, users can only select from the list of choices.
-
Go to Developer > Combo Box Content Control
or Drop-Down List Content Control . -
Select the content control, and then select Properties.
-
To create a list of choices, select Add under Drop-Down List Properties.
-
Type a choice in Display Name, such as Yes, No, or Maybe.
Repeat this step until all of the choices are in the drop-down list.
-
Fill in any other properties that you want.
Note: If you select the Contents cannot be edited check box, users won’t be able to click a choice.
 or Drop-Down List Content Control
  .
.-
Click or tap where you want to insert the date picker control.
-
Select Developer > Date Picker Content Control
.
 .
.To set specific properties on the control, see Set or change properties for content controls.
-
Click or tap where you want to insert the check box control.
-
Select Developer > Check Box Content Control
.
 .
.To set specific properties on the control, see Set or change properties for content controls.
Legacy form controls are for compatibility with older versions of Word and consist of legacy form and Active X controls.
-
Click or tap where you want to insert a legacy control.
-
Go to Developer > Legacy Forms
drop-down. -
Select the Legacy Form control or Active X Control that you want to include.
 drop-down.
Set or change properties for content controls
Each content control has properties that you can set or change. For example, the Date Picker control offers options for the format you want to use to display the date.
-
Select the content control that you want to change.
-
Go to Developer > Properties.
-
Change the properties that you want.

Add protection to a form
If you want to limit how much others can edit or format a form, use the Restrict Editing command:
-
Open the form that you want to lock or protect.
-
Select Developer > Restrict Editing.
-
After selecting restrictions, select Yes, Start Enforcing Protection.


Advanced Tip:
If you want to protect only parts of the document, separate the document into sections and only protect the sections you want.
To do this, choose Select Sections in the Restrict Editing panel. For more info on sections, see Insert a section break.

Show the Developer tab
If the developer tab isn’t displayed in the ribbon, see Show the Developer tab.
Open a template or use a blank document
To create a form in Word that others can fill out, start with a template or document and add content controls. Content controls include things like check boxes, text boxes, and drop-down lists. If you’re familiar with databases, these content controls can even be linked to data.
-
Go to File > New from Template.
-
In Search, type form.
-
Double-click the template you want to use.
-
Select File > Save As, and pick a location to save the form.
-
In Save As, type a file name and then select Save.

-
Go to File > New Document.
-
Go to File > Save As.
-
In Save As, type a file name and then select Save.

Add content to the form
Go to Developer, and then choose the controls that you want to add to the document or form. To remove a content control, select the control and press Delete. You can set Options on controls once inserted. From Options, you can add entry and exit macros to run when users interact with the controls, as well as list items for combo boxes, .
-
In the document, click or tap where you want to add a content control.
-
On Developer, select Text Box, Check Box, or Combo Box.
-
To set specific properties for the control, select Options, and set .
-
Repeat steps 1 through 3 for each control that you want to add.

Options let you set common settings, as well as control specific settings. Select a control and then select Options to set up or make changes.
-
Set common properties.
-
Select Macro to Run on lets you choose a recorded or custom macro to run on Entry or Exit from the field.
-
Bookmark Set a unique name or bookmark for each control.
-
Calculate on exit This forces Word to run or refresh any calculations, such as total price when the user exits the field.
-
Add Help Text Give hints or instructions for each field.
-
OK Saves settings and exits the panel.
-
Cancel Forgets changes and exits the panel.
-
-
Set specific properties for a Text box
-
Type Select form Regular text, Number, Date, Current Date, Current Time, or Calculation.
-
Default text sets optional instructional text that’s displayed in the text box before the user types in the field. Set Text box enabled to allow the user to enter text into the field.
-
Maximum length sets the length of text that a user can enter. The default is Unlimited.
-
Text format can set whether text automatically formats to Uppercase, Lowercase, First capital, or Title case.
-
Text box enabled Lets the user enter text into a field. If there is default text, user text replaces it.
-
-
Set specific properties for a Check box.
-
Default Value Choose between Not checked or checked as default.
-
Checkbox size Set a size Exactly or Auto to change size as needed.
-
Check box enabled Lets the user check or clear the text box.
-
-
Set specific properties for a Combo box
-
Drop-down item Type in strings for the list box items. Press + or Enter to add an item to the list.
-
Items in drop-down list Shows your current list. Select an item and use the up or down arrows to change the order, Press — to remove a selected item.
-
Drop-down enabled Lets the user open the combo box and make selections.
-
-
Go to Developer > Protect Form.
Note: To unprotect the form and continue editing, select Protect Form again.
-
Save and close the form.

If you want, you can test the form before you distribute it.
-
Protect the form.
-
Reopen the form, fill it out as the user would, and then save a copy.
Show the Developer tab
-
On the right side of the ribbon, select
, and then select Ribbon Preferences. -
Under Customize, select Developer .
 , and then select Ribbon Preferences.
Open a template or a document on which to base the form
You can start with a blank document and create your own form. Or, to save time, you can start with a form template.
-
Go to File > New from Template.
-
In the left pane, expand Online Templates, and then select Forms.
-
Double-click the form template that you want to use.
Add content controls to the form
-
In the document, click where you want to add the control.
-
On the Developer tab, under Form Controls, select Text Box, Check Box, or Combo Box.
-
To set specific properties for the control, select Options, and then configure the properties that you want.
Note: To create a list of drop-down items in a combo box, select the combo box placeholder, click Options, and then add the items that you want to appear in the drop-down list.
-
Repeat steps 1 through 3 for each control that you want to add.
Add instructional text (optional)
Instructional text (for example, «Type First Name») in a text box can make your form easier to use. By default, no text appears in a text box, but you can add it.
-
Select the text box control that you want to add instructional text to.
-
On the Developer tab, under Form Controls, select Options.
-
In Default Text, type the instructional text.
-
Make sure that Fill-in enabled is selected, and then select OK.
Protect the form
-
On the Developer tab, under Form Controls, select Protect Form.
Note: To unprotect the form and continue editing, click Protect Form again.
-
Save and close the form.
Test the form (optional)
If you want, you can test the form before you distribute it.
-
Protect the form.
-
Reopen the form, fill it out as the user would, and then save a copy.
Creating fillable forms isn’t available in Word for the web.
You can create the form with the desktop version of Word with the instructions in Create a fillable form.
When you save the document and reopen it in Word for the web, you’ll see the changes you made.
Need more help?
Sometimes when you are filling forms online or doing quizzes and polls, you will be required to select your choice from a drop-down menu. Microsoft Word has tools that will help you to make your own poll, or form using drop-down menus.
Below is a step-by-step process of how you can achieve this.
- Go to the ‘File’ tab on the Ribbon.
On it, select ‘Options’ at the bottom of the vertical list that appears.

- A Word Options dialog box will appear.
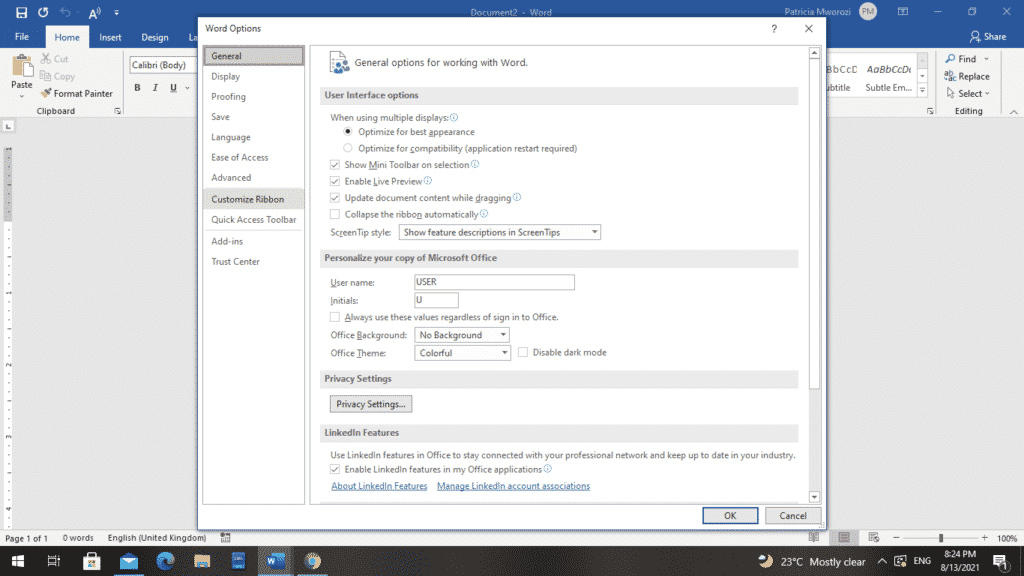
On the vertical list at the extreme left of your screen, choose ‘Customize Ribbon.’
- Another dialog box will appear.
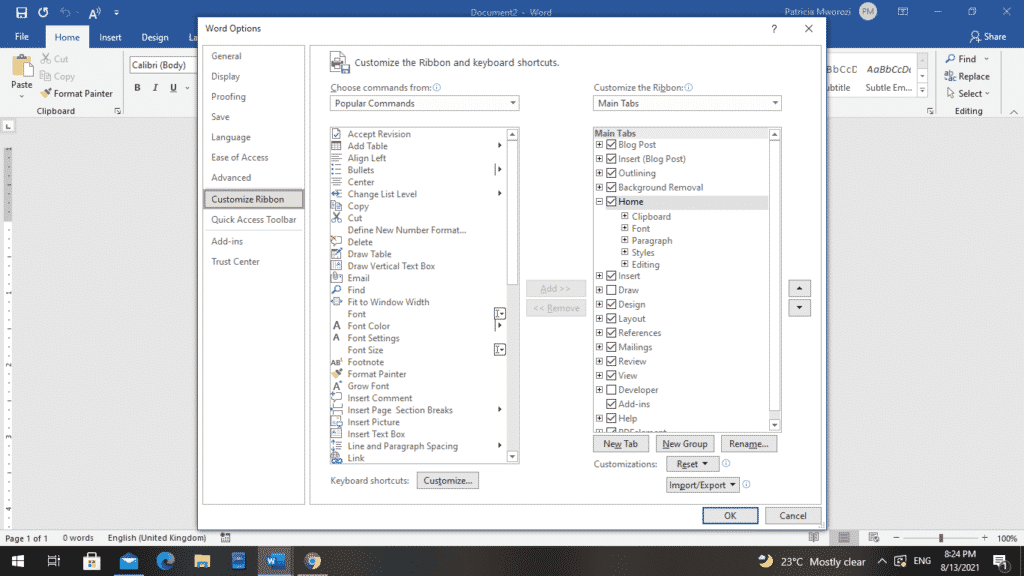
This is the ‘Customize the Ribbon and keyboard shortcuts.’ Under the second column titled, ‘Customize the Ribbon,’ check the box next to ‘Developer.’
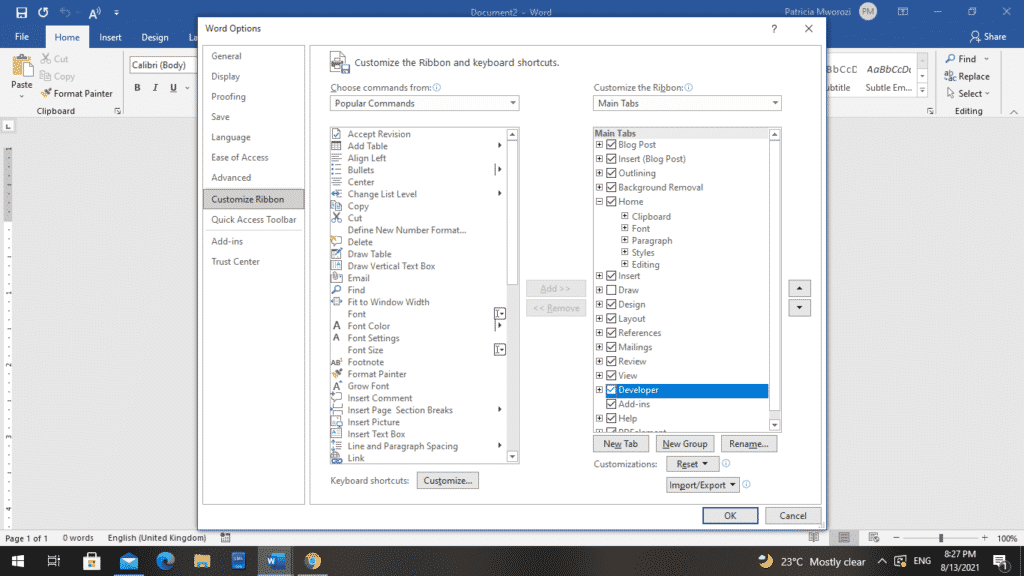
- Click OK.
- Go back to the Ribbon.
You will notice that the ‘Developer’ tab has been added to the Ribbon.

- Place the cursor where you want the Drop-Down List Content Control to appear in the document.
- Go back to the ‘Developer’ tab on the Ribbon.
- There are several options to choose from. First, select the ‘Drop-Down List Content Control.’ It is under ‘Mailings; second row, third column. Suppose you want to be sure that you have selected the right control. Leave the cursor on it: ‘Drop-Down List Content Control’ will appear.
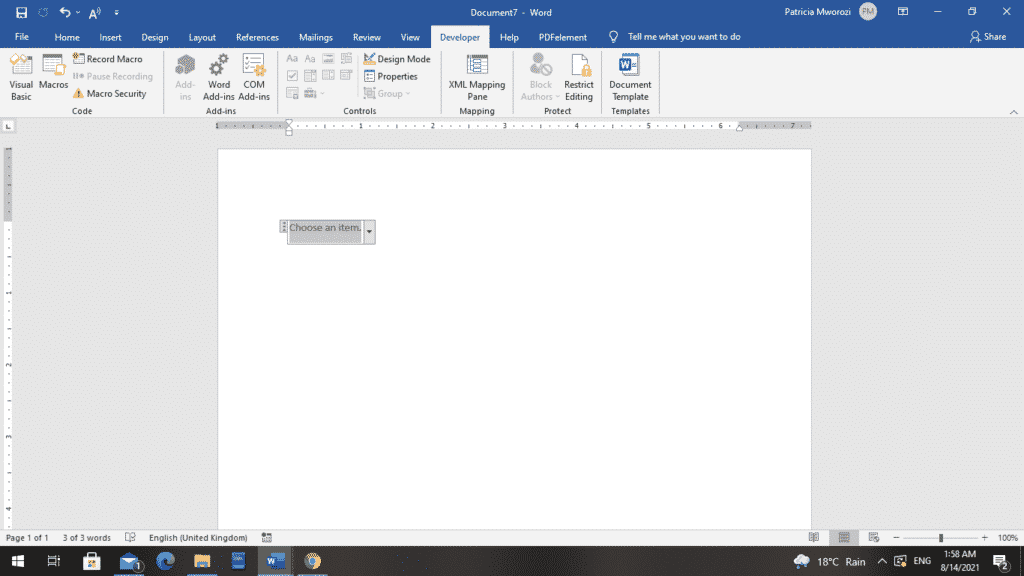
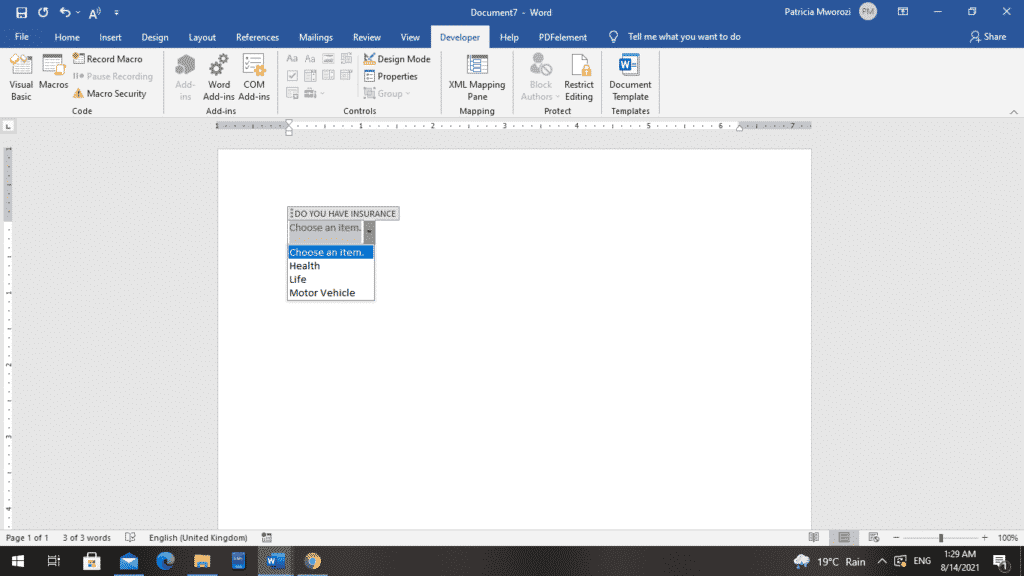
- You will notice that a new ‘drop-down’ menu has been inserted into the document. It is titled ‘Choose an item.’
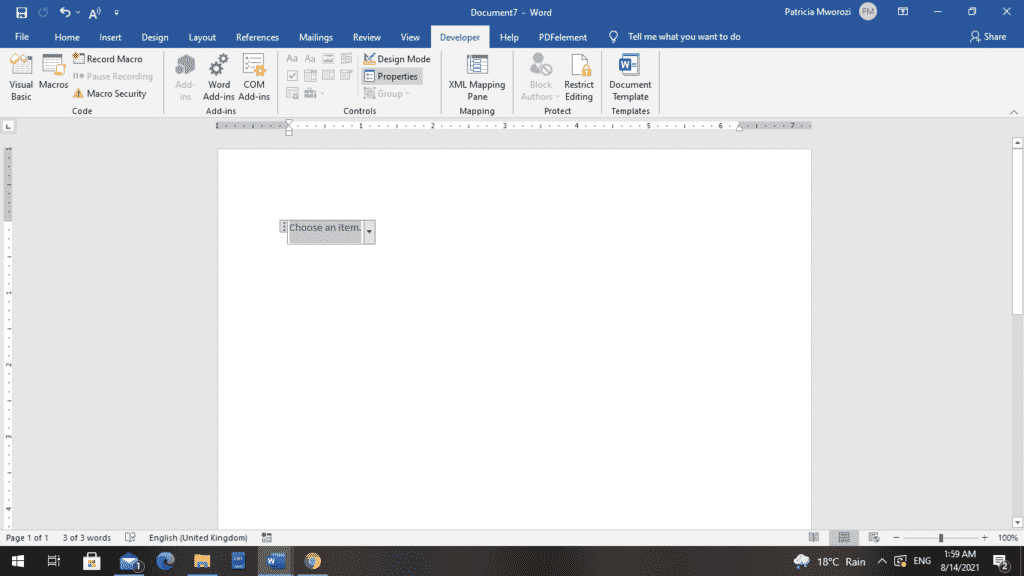
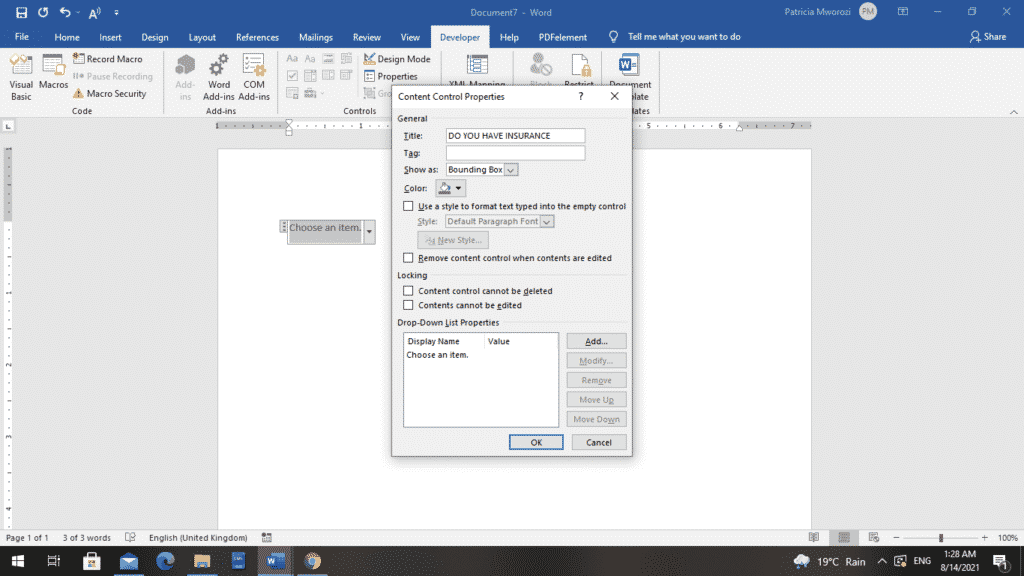
- Click ‘Properties’ on the Controls area of the Ribbon on the Developer tab.
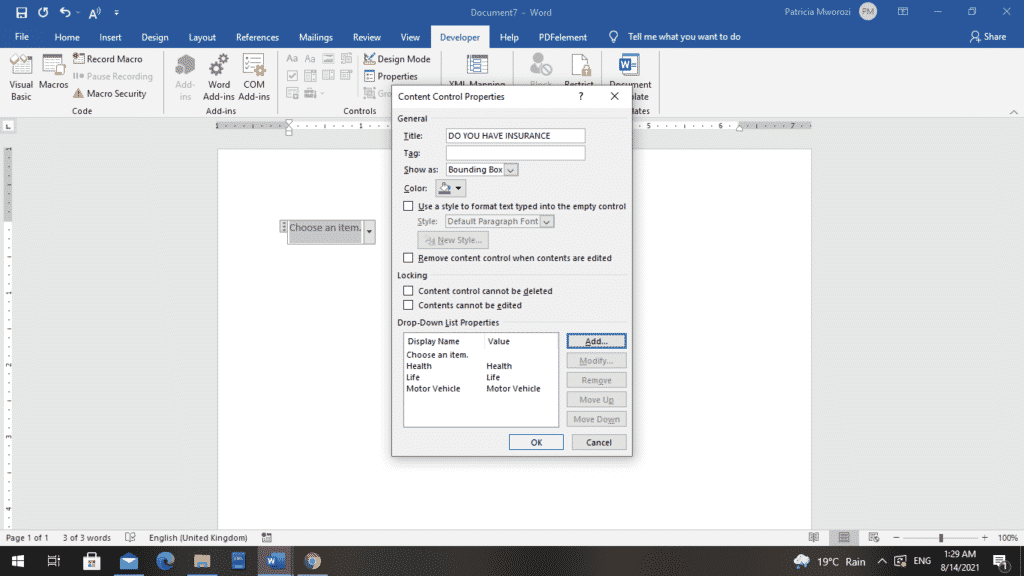
- A dialog box will appear
- Now you can fill in the following:
- Title: Use this box to give your drop down list a heading/name/title.
- Go back to the ‘Drop-Down List Properties’ section at the bottom, and select ‘Add.’
- A smaller dialog box will appear. Under ‘Display Name,’ type a choice and then click OK.
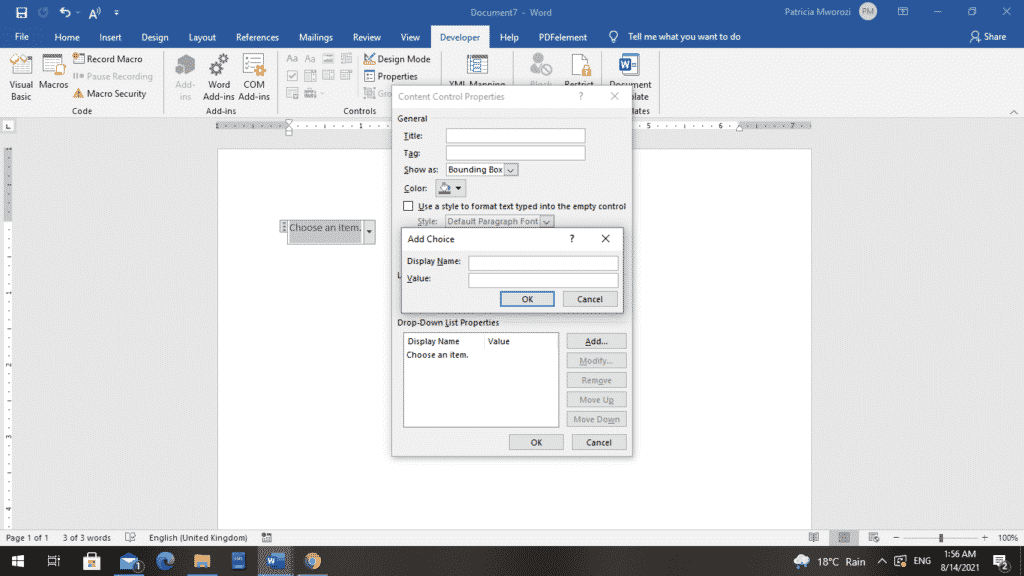
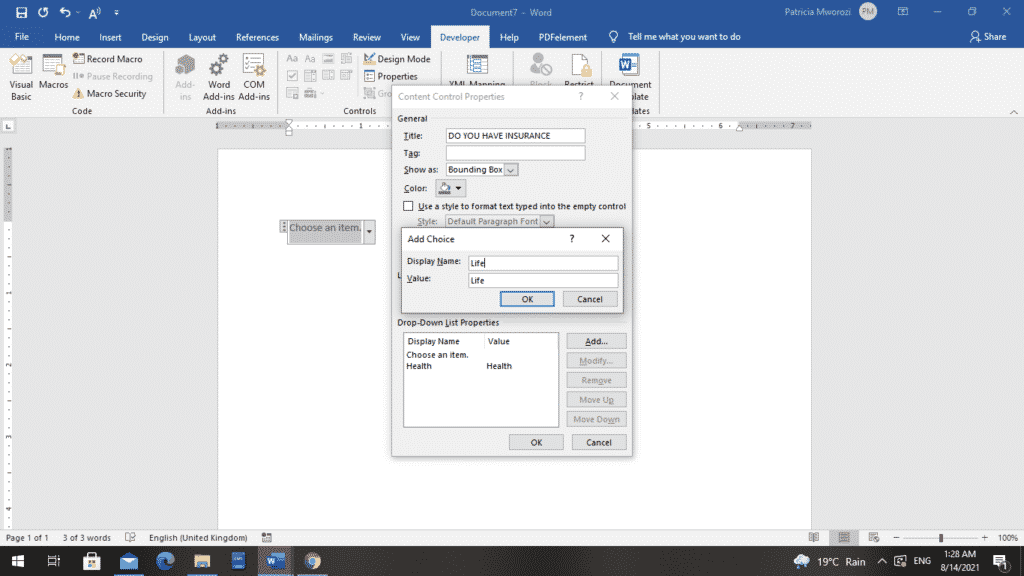
- You can now repeat step II) and III) for as many choices as you have/ want to include in your drop-down field.
- As you can see, in our example, I have added three choices: health insurance, life insurance, and motor vehicle insurance.

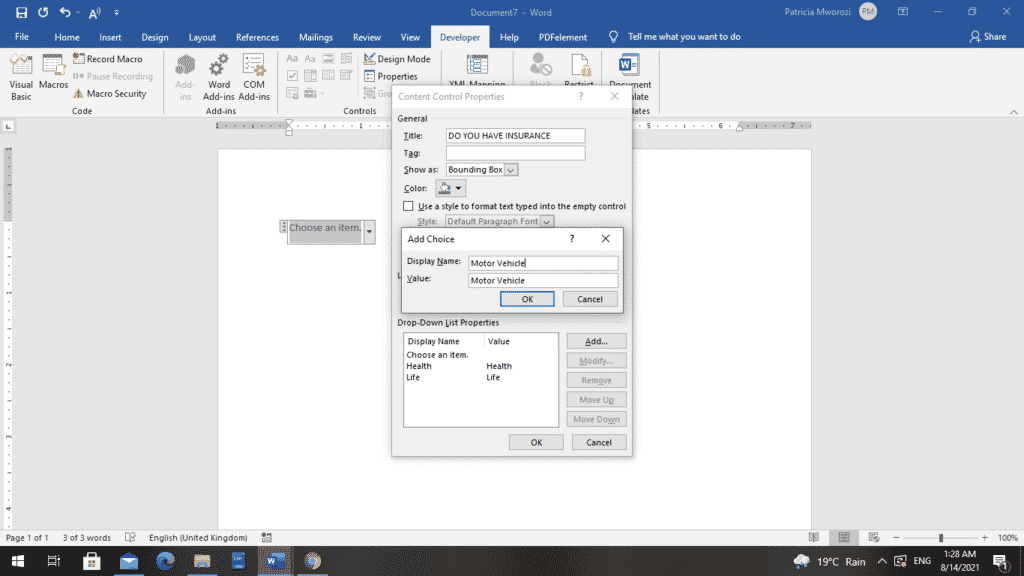
- Click the OKbutton in the Content Control Properties dialog box.
As you can see, our drop-down field has three options.
Are you taking a class that is mostly group work? Do you need a tool that will enable you and your groupmates to discuss and type assignments easily, without having to send each other several emails with attachments all the time?
Simul Docs is the answer for you.
The first step is downloading Simul Docs then you can get started.
After writing your first draft in Microsoft Word, upload it to Simul Docs. This will automatically make it the first version. Now, another colleague can open it and make their edits. This will create another version different from the first.
Whenever another person opens a version and makes edits, a new version is created with the latest changes.
Sometimes, you might be in a rush and forget to turn on tracked changes so your modifications can be updated. Simul Docs automatically records these edits regardless of your online or offline status.
Since it is a collaboration, a bonus feature is the ability to add comments to the document. If you want a colleague to review the changes by a specific time, or any other instructions, you can let them know in the comment section. Later on, these comments can be removed after your groupmates have seen and executed the instructions.
Additionally, you and your groupmates can work on the document at the same time. You can save time by working on a document at once, and Simul Docs keeps each version separately.
Let us say another co-worker is supposed to include their input, but they do not have Simul Docs. All you have to do is download the document or forward it by email. Alternatively, you can upload it to any storage software like one drive, and once their changes have been made, they can forward it to you once again, and you can open it in Simul Docs.
Once all the necessary edits have been made, you can save the final version containing all the modifications with one click.
You and your groupmates can work on the same document from the comfort of your homes or workplaces.
Simul is the most convenient collaborative tool yet. Centralising your written project avoids mishaps like losing your work or losing its original format.
Visit simuldocs.com and simplify group edits today.

Make data entry easier or avoid issues like misspellings by adding a drop-down list in Word. It takes only a minute, and we’ll show you how.
You don’t have to make a long, fillable form in Microsoft Word to take advantage of form controls. You may have just one or two spots where you want to add something like a drop-down list. This allows you or your reader to select an item from your choices. It can help eliminate errors with data entry and spelling.
Here, we’ll show you how to add a simple drop-down list to a Word document.
Add the Drop-Down Form Control
You must use the Developer tab to work with form controls in Word. If you don’t see this tab, you can add it easily by following our how-to, How to Enable the Developer Tab on the Microsoft Office Ribbon.
- Place your cursor in the document where you want to add the drop-down list.
- Go to the Developer tab and click the Drop-Down List Content Control button.
- You’ll see the control pop into your document as a box with “Choose an item.” inside. You can then move on to setting up the list.

Next, you’ll add the list of items, give the control a name, and adjust a few other settings per your preference. Select the control, go back to the Developer tab, and click Properties in the Controls section of the ribbon.

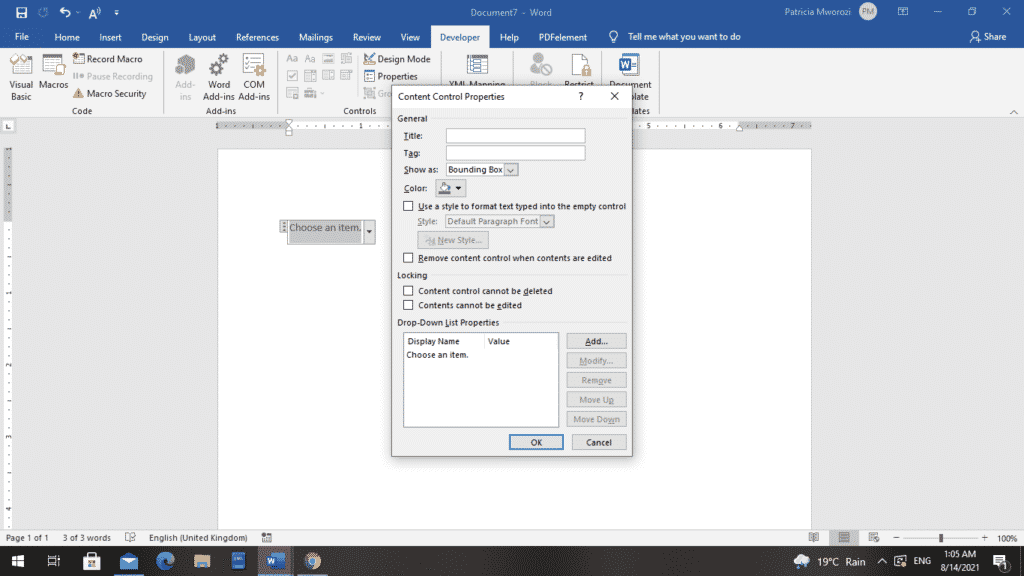
The Content Control Properties window will open, ready for your list details.

Title and Tag: Enter the Title and, optionally, a Tag you want to use for the list.
Show as: By default, this is set to Bounding Box. If you prefer, you can change it to display with Start/End Tags.

Color and Style: If you want to give your control color or a particular style, you can select those next.
Remove the control: Optionally, you can remove the control when contents are edited by checking the next box.
Locking: You’ll see two locking options for the control. So you can restrict it from being deleted and the contents from being edited by checking one or both of those options.
Add Your List Items
Finally, you’ll add your list of items. You’ll notice that “Choose an item.” is a list option. You can keep it, edit it by clicking Modify, or delete it by clicking Remove.

Next, click Add to insert a list item. The Value will automatically enter as you type the Display Name. Click OK when you finish. Then continue to insert your remaining list items the same way.

Once you have all of your list choices, you can rearrange them using the Move Up and Move Down buttons on the right.

When you’re happy with your list set up, click OK to apply the properties.

And that’s all there is to it! To use the drop-down list, click it and choose an option using the arrow.

Limit Data Entry Options Using a Drop-Down List in Word
A drop-down list is a useful form control in Word for simplicity or to avoid data entry issues. You can make sure that only specific items are available for yourself or others to select.
For more, take a look at how to automate forms in Word with custom fields or how to create a simple Word checklist.
![]()
Word has this nice feature which enables insertion of text fields, check boxes, drop-down lists, etc. You can use these elements to create a form in Word.
These elements are available under the tab menu Developer in the Word Ribbon. If you are unable to find this tab in the Ribbon, most likely you need to enable this using the Word Options dialog box.
To enable the Developer tab (Word 2007)
1. Click the Office button ![]() . A drop-down list appears.
. A drop-down list appears.
2. Click the Word Options button from the bottom of the list. Word Options dialog box appears.
3. On the dialog box, under the category Popular (see on the left hand side), select the option Developer tab in the Ribbon. Now, you can view the Developer tab in the Ribbon. See below image.
To insert a legacy check box
1. Click the Developer tab.
2. Under the group Controls, click the Legacy Tools button. A drop-down list of icons appears. See below image.
3. Under the section Legacy Form, click the check box icon as shown in the below image. Word creates a check box at the cursor position. By default, the checkbox is in design mode (you can see the Design Mode icon being enabled within the Controls group)

Note: If you wish, you can remove the shading of the check box by clicking the Form Field Shading icon under Legacy Form.
4. By the way, you cannot use the checkbox in design mode. To disable design mode, click the Design Mode icon within the Controls group.
Also, you should enforce protection to the document (or form) before you share it with others to capture information.
This step is applicable to all other controls as well.
To enforce protection
1. Under the Developer tab, within the group Protect, click icon Protect Document. A drop-down list appears.
2. From the drop-down menu, click Restrict Formatting and Editing. Restrict Formatting and Editing task pane appears on the right hand side.
3. From this dialog box, select option Allow only this type of editing in the document option. A drop-down is enabled. Select Filling in forms option from the drop-down list. See below image.
4. Click button Yes, Start Enforcing Protection. The Start Enforcing Protection dialog box appears, which prompts you to enter a password.
5. Enter a password and retype password. Your document is protected and the check box is now clickable.

Important: Remember that you cannot edit a protected document. If you wish to make changes in the document, you have to remove protection by entering the valid password.
To stop protection
1. Under the Developer tab, within the group Protect, click Protect Document. The Restrict Formatting and Editing task pane appears.
2. From the bottom of the dialog box, click the button Stop Protection. Enter valid password to remove protection.
To insert a drop-down list
1. Under the Developer tab, within the group Controls, click the Drop-Down List icon. A drop-down list appears in the document. See below image.

2. You can see the Properties button being enabled within the Controls group. Click Properties. The Content Control Properties dialog box appears.
3. In the dialog box, under section General, enter a Title of the drop-down list.
4. Under section Drop-Down List Properties , click button Add to enter the display name and value for the first list item in the Add Choice dialog box and then click OK. Item is added to the list.
In the similar way, you can keep adding items to the list.
5. Click the Modify/Remove button to edit/delete list items.
6. Finally, click OK to close the Content Control Properties dialog box. You can view the drop-down list displays all the list items. See below image.

7. Enforce protection to the document, so that list values cannot be modified.
To insert an ActiveX Control check box
1. Click the Developer tab.
2. Under the group Controls, click the Legacy Tools button.
3. From category ActiveX Controls, click the check box icon. A check box is created at the insertion point. See below image.
You can notice that the Design Mode icon being enabled within the Controls group. This is important to edit the check box properties.
4. Right-click the check box. From the right-click menu, click CheckBox Object and then click Edit. The check is in edit mode. You can enter a name of the checkbox.
5. From the right-click menu, click Properties to control properties of the check box.
6. Click Design Mode to disable. The check box is now clickable.

Note: The difference between a legacy and ActiveX control check box is that, ActiveX checkbox provides advanced or extended features, i.e. you can write program for it in visual basic to make the check box behave in different ways.
Insert text fields
1. Click the Developer tab.
2. Under the group Controls, click the icon Rich Text or Text. A text field is created in the document. See below image.
3. You can change the default text appearing in the text box by enabling the Design Mode button in the Control Group.

Insert a Combobox
- Under the Developer tab, within the group Controls, click the Combobox icon . A combobox is created at the cursor position.
- Select the combobox and then click Properties (available within the group Controls. The Content Control Properties dialog box appears.
- In the dialog box, under the section General, enter a Title of the combobox.
- In the dialog box, under the section Drop-down List Properties, click the Add button. Add Choice dialog box appears.
- Enter a display name and value for the first list item. Click OK.
- Click Add again to enter a second list item. Click OK. You can keep adding as many item as you need.
- Finally, click OK.
 . A combobox is created at the cursor position.
The combobox list is populated with the list items. Remember, the combobox should not be in Design Mode to view the list of items. You can find the Design Mode icon within the group Controls . See below image.

Also See:
https://wordknowhow.wordpress.com/2014/04/03/how-to-create-radio-buttons-option-buttons-in-ms-word/
https://wordknowhow.wordpress.com/2014/04/03/how-to-create-or-add-checkboxes-checkbox-controls-to-your-word-document/
https://wordknowhow.wordpress.com/2014/04/08/how-to-add-a-text-field-in-word/

Sometimes in a Microsoft Word Document, we want to add in our Document a Drop-Down List where someone can select from a restricted set of choices. We will be giving them a variety of options, where all that is need is to select one option from the Drop-Down List. This is where the Content Controls show up, where all we need to do is to create one. A quite simple procedure but very helpful one. All you need to do is to keep on reading the post below.

What are Content Controls thought first? They are individual controls that we can add and customize for use in templates, forms, and documents. For example, many online forms are designed with a drop-down list control that provides a restricted set of choices for the user of the form. Content controls can provide instructional text for users, and we can set controls to disappear when users type in their own text. Source here.
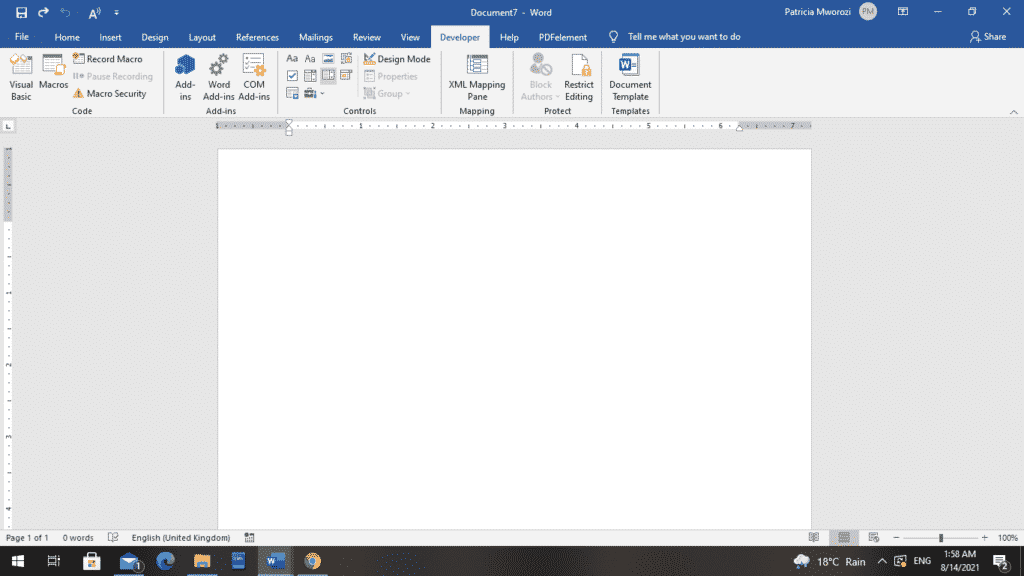
In the image below I have activated the Developer tab, where we can see the areas that the Ribbon contains.

We must then select the Drop-Down List Content Control command from the area of the ribbon named Controls as shown below, where we will be able to Insert A Drop-Down List Content Control.

Before we select the command, we must place the cursor at the place where want our Drop-Down List Content Control to be inserted in our Document. Once we have done that, we select the command and then in our Document we notice a Control Picker mentioning Choose An Item. Once the Control Picker is still selected, we select the command Properties of the Controls area of the ribbon on the Developer tab as shown below.

Once we select the Properties command, the Content Control Properties dialog box appears as shown in the image below.
The Drop-Down List Content Control Properties dialog box is separated in the following areas where we can use the following commands below:
Under the area General:
- Title: We type in the Title of the Content Control.
- Tag: We type in the Tag of the Content Control.
- Shown As: We can select one of the following options: Bounding Box, Start/End Tag, None
- Color: We can select the Color of the Content Control
- Use A Style To Format Text Typed Into The Empty Control
- Style: We can select one of the existing Styles for the Content Control.
- New Style: We can create a New Style for the Content Control.
- Remove Content Control When Contents Are Edited
Under the area Locking:
- Contents Control Cannot Be Deleted
- Contents Cannot Be Edited
Under the area Drop-Down List Properties:
We can use the buttons Add, Modify, Remove, Move Up and Move Down for the Items in the text box.

In the image below, I have selected the command Add at the right of the area Drop–Down List Properties, the Add Choice dialog box appears where we must type in the text area what we want to be displayed in our Drop–Down List. For my example, I have typed in Microsoft Word. Once finished we press the Ok button.

In the image below, I have selected the command Add at the right of the area Drop-Down List Properties, the Add Choice dialog box appears where we must type in the text area what we want to be displayed in our Drop–Down List. For my example, I have typed in Microsoft Excel. Once finished we press the Ok button. In my example I have repeated the procedure another two times, typing in Microsoft PowerPoint and Microsoft Outlook.

Finally, in the image below, we can see the Title of our Drop-Down List which is Microsoft Office Applications, and the Display Name where we can select from will be one of the following: Microsoft Word, Microsoft Excel, Microsoft PowerPoint and Microsoft Outlook.

Whatever adjustment we make, at the end we must select the Ok button which is located at the bottom right corner of the Content Control Properties dialog box for them to take place.
In the image below, we can see our Drop-Down List Content Control create with the name Microsoft Office Applications. We are prompted to Choose An Item from the List, where all we have to do is to select the arrow at the right of the Drop-Down List Content Control.

In the image below, we have selected the Drop-Down List Content Control where we can choose from one of the Items in the List.

Below you can check out the video describing How To Create A Drop-Down List in a Microsoft Word Document?
Don’t Forget To Subscribe To My YouTube Channel.
