|
0 / 0 / 1 Регистрация: 27.01.2015 Сообщений: 107 |
|
|
1 |
|
|
18.02.2015, 17:11. Показов 13105. Ответов 8
Помогите! Работала так с VBA. Миниатюры
0 |
|
blackstar 116 / 116 / 42 Регистрация: 27.02.2013 Сообщений: 899 |
||||||||
|
18.02.2015, 19:11 |
2 |
|||||||
|
вот пример кода:
Подключи только в начале библиотеку Word и добавь ее в Reference:
0 |
|
116 / 116 / 42 Регистрация: 27.02.2013 Сообщений: 899 |
|
|
18.02.2015, 19:17 |
3 |
|
Lina_A, вот держи, нашел у себя… делал подобное задание. Надеюсь поможет мой проект)
0 |
|
0 / 0 / 1 Регистрация: 27.01.2015 Сообщений: 107 |
|
|
18.02.2015, 19:48 [ТС] |
4 |
|
blackstar, к сожалению, у вас программа сделана в более новой версии. а у меня Visual Studio 2010 года Добавлено через 4 минуты
0 |
|
blackstar 116 / 116 / 42 Регистрация: 27.02.2013 Сообщений: 899 |
||||
|
18.02.2015, 20:14 |
5 |
|||
|
Lina_A, подключил в references???? на скрине, посмотри. А вот код самой программы:
Изображения
1 |
|
0 / 0 / 0 Регистрация: 29.09.2015 Сообщений: 1 |
|
|
29.09.2015, 11:55 |
6 |
|
привет Lina_A!
0 |
|
0 / 0 / 0 Регистрация: 11.12.2017 Сообщений: 2 |
|
|
18.06.2018, 19:19 |
7 |
|
Здраствуёте
0 |
|
8927 / 4839 / 1885 Регистрация: 11.02.2013 Сообщений: 10,246 |
|
|
18.06.2018, 23:38 |
8 |
|
Fpfn, причин может быть миллион. Создайте новую тему, в покажите ваш код, пример документа и поясните толком, что и куда не вносится.
0 |
|
0 / 0 / 0 Регистрация: 11.12.2017 Сообщений: 2 |
|
|
19.06.2018, 15:49 |
9 |
|
Я нашёл альтер код. Спасибо )
0 |
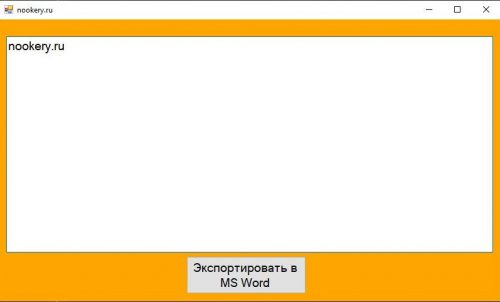
В этом примере мы узнаем, как экспортировать значение texbox в MS Word.
Шаг 1: Дизайн Формы. Добавить текстовое поле и кнопку .
Шаг 2: Измените свойство MultiLine элемента управления textBox.
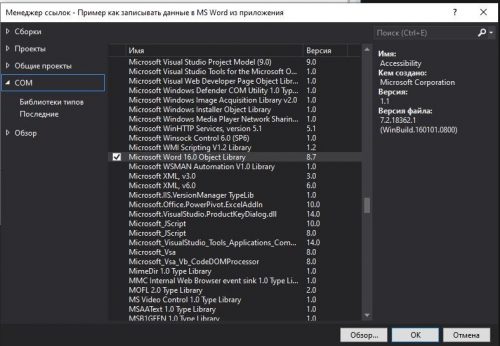
Шаг 3: Нажмите правой кнопкой в обозревателе решений Добавить>ссылка…, Выберите нужную из списка как изображено на скрине ниже.
Шаг 4: Исходный код программы.
|
1 2 3 4 5 6 7 8 9 10 11 12 13 14 15 16 17 18 19 20 21 22 23 24 25 26 27 28 29 30 31 32 33 34 35 36 37 |
using System; using System.Collections.Generic; using System.ComponentModel; using System.Data; using System.Drawing; using System.Linq; using System.Text; using System.Threading.Tasks; using System.Windows.Forms; using exportWord = Microsoft.Office.Interop.Word; namespace Пример_как_записывать_данные_в_MS_Word_из_приложения { public partial class Form1 : Form { public Form1() { InitializeComponent(); } private void Form1_Load(object sender, EventArgs e) { this.BackColor = Color.Orange; } private void button1_Click(object sender, EventArgs e) { exportWord.Application wordapp = new exportWord.Application(); wordapp.Visible = true; exportWord.Document worddoc; object wordobj = System.Reflection.Missing.Value; worddoc = wordapp.Documents.Add(ref wordobj); wordapp.Selection.TypeText(textBox1.Text); wordapp = null; } } } |
If you use forms at work, you’ll love the convenience of interactive or fillable forms in Microsoft Word. Forms that you can fill out make gathering information easy.
With a fillable form, all you’ve got to do is create a form in Word. Then you can use it over and over again. There’s nothing to print, so interactive forms are good for both your budget and the environment.
If you want a fillable form that also looks good, then begin with a template in Word. Form templates for Microsoft Word are available in Envato Elements and GraphicRiver.
In this tutorial, you’ll learn how to create a fillable form in Word, so you can reap all the benefits of an interactive form.
Find Great Form Templates on Elements
Fillable forms in Word have a variety of uses. Human resources use forms to capture employee and consultant information. Organizations use forms to register members, students, or clients. You also use forms to take orders for your products and services. Those are only a few examples of how useful fillable forms are.
Ideally, you want your Microsoft Word forms to be consistent with your branding. Well-designed forms reflect your credibility and professionalism. That’s why you want to avoid generic-looking forms. Want to know how to make a fillable form in Word that’s aligned with your visual brand?
The easiest way is by using templates for Word with pre-built tables or forms. One awesome source for Word templates is Envato Elements. Elements has an irresistible offer: for one low monthly fee, you get unlimited downloads of the millions of creative assets in its library. These include:
- Word templates
- fonts
- graphics
- photos
- and more
Whatever you need to make your forms look as good as possible, you can find in Elements.
If you need to create only one form, then a better source for Word templates is GraphicRiver. It’s got the same massive library of creative assets but on a pay-per-use basis. For the one-off project in Word, GraphicRiver is a terrific and budget-friendly option.
How to Create Fillable Forms in Word
You may be wondering, «How do I make a fillable form in Word?» Let me take you step-by-step through how to create a fillable form in Word.
Note: In the following tutorial, I’m using Microsoft Word for Mac version 16.48. If you’re using a different version, then the steps and interface may be different. But these steps should still be helpful for you.
1. Show the Developer Tab
As a first step, make sure that the Developer tab is showing up for you. This may be hidden by default. If you don’t see the Developer tab, follow these steps:
Go to Word > Preferences.
The Word Preferences menu opens. Click on the Ribbon & Toolbar button.
The Ribbon & Toolbar menu pops up. Under Main Tabs, scroll down and check Developer. Click Save.
The Developer tab should now be visible.
2. Determine the Layout and Structure of the Form
The next step is to determine the layout and structure of the fillable form. This will depend on what information you want to capture. You may want to sketch this on a sheet of paper first.
When you know what the form will look like, create a table in Word. By creating your form as a table in Word, it’ll be easier for you to keep things aligned and organized. The cells of the table are the form fields. Keep this in mind as you create your interactive form. This tutorial shows you the steps for how to make a table in Word:
Another option is to use a Word template with a pre-built table as a form. This way, the form has already been professionally designed. All you’ve got to do is to customize the form in Word according to your needs. Remember that the form template must have been built as a table so that you can make the form interactive in Word.
In the steps that follow, I’m going to create a form from scratch by first creating a table in Word:
Now, it’s time to make this a fillable form in Word.
3. Add Form Fields With Content Controls
You create a fillable form in Word by adding form fields. There are different types of form fields with content controls, depending on the types of responses you’re looking for.
Under the Developer tab, you’ll see buttons for creating a Text Box, Check Box, and Combo Box (or drop-down form field).
Let me show you how to create each type of form field:
How to Add a Word Fillable Form Text Box
Place the cursor where you would like to create a text field. Click on the Developer tab, then the Text Box button.
A text box is created. To change the text box settings, click on Options. The Text Form Field Options menu opens.
Here, choose various settings. For example, you’ve got several Text Types to choose from:
- Regular Text
- Number
- Date
- Current Date
- Current Time
- Calculation
Add a Default Text for the form field to guide respondents in filling out the form. You can also specify the Maximum Length and Text or Number Format.
When you’re happy with the settings, click OK. Repeat for each text box you want to create.
How to Add a Check Box to a Fillable Form in Word
Next, let’s make check boxes. First type the text for the check box items. Then, place your cursor in front of the first item. Go to Developer > Check Box.
A check box appears where your cursor was. Again, change the check box settings by clicking on the Options button.
The Check Box Form Field Options menu opens. Here you can determine whether the Default Value for the check box is Not Checked or Checked. Specify the Check Box Size and other options. When you’re done setting up the check box options, click OK.
Repeat these steps for the other check boxes.
How to Create a Drop-down Field in a Fillable Form in Word
Finally, let’s add a drop-down field in our form. Place the cursor where you want the drop-down menu to be, then go to Developer > Combo Box.
To add the drop-down menu items, click on the Options button. The Drop-Down Form Field Options menu opens.
Type a drop-down item, then click the + sign.
Repeat for each drop-down item you want to include in your fillable form. When you’re done, click OK.
Only the first drop-down item will appear. You’ll see the rest when you test the form.
4. Finalize the Form
Before using the fillable form in Word, it’s a good idea to first test it. To do this, click the Protect Form button on the Developer ribbon.
Now that the form is protected, fill the form fields like your respondents would. You’ll notice that the drop-down menu items appear when you click on the field or the arrow beside it.
When you’re happy with how the fillable form works, finalize the document by formatting the page. Click Protect Form again to un-protect it, so you can edit the document. Now’s the time to change fonts, colors, add logos, and format the form as you wish.
This is what my final fillable form looks like:
You may also decide to remove the shading for each form field. To do so, go to Developer > Shading.
I’m going to keep the Shading on, to make it clear to my respondents where they’re supposed to type in their answers. That’s because I deleted the borders of my table to give my form a cleaner appearance. If you keep the table borders, then it makes sense to switch off the form field Shading.
5. Use and Distribute Fillable Forms in Word
Once the fillable form in Word is completed, share it with your users or respondents. Do this by sharing the fillable form as an email attachment.
First, make sure that the form is protected. This ensures that other users won’t be able to edit the form when you share it with them.
Next, click on Share > Share a Copy.
In the menu that opens, click Email as Attachment.
This launches your default email application with the fillable form attached.
3 Top Form Templates for Word (Unlimited Downloads from Elements)
If you want a form with an impressive design, it’s best to start with a form template for Word. Templates with built-in forms are designed by professional graphic designers. This means the biggest—and hardest—design decisions have already been made for you. By customizing the colors and fonts and adding your logo, you can make the template truly your own.
Below are a few form templates for Word that look great:
1. Clean Business Registration Form Template
The Clean Business Registration Form template for Word allows you to gather basic personal information and contact details. It’s useful for registering employees, clients, members, vendors, and more. This form template comes in A4 size. You’ve got the option of customizing it with your branding colors. The template comes in Microsoft Word files, as well as files for InDesign, Adobe Illustrator, and Photoshop.
2. Order Form
Receive orders for your products or services with this Order Form for Word. This A4-sized template uses paragraph styles, making it easy to edit in Microsoft Word. It also comes in Adobe InDesign files, if you’re more comfortable editing in that application. A file guide is included to help you customize this template.
3. Client Questionnaire
Impress your clients with this Client Questionnaire template that looks anything but generic. Editable in both Microsoft Word and Adobe InDesign, this form template comes in A4 size. A 34-page guide walks you through how to edit and use the template files.
More of the Best Word Templates for Your Business or Organization
Now you know how to create a fillable Word document. But aside from fillable forms, your business or organization needs other types of documents. Using templates for MS Word helps you create professional-looking documents quickly. Premium Word templates are designed to be easy to customize, so you end up with materials that are coherent with your brand.
Here are more Word templates you can customize to easily create impressive documents for your business or organization:
Learn More About Using Microsoft Word for Your Business and Personal Needs
Whether for personal or business use, MS Word lets you create various kinds of documents. But with power comes complexity, so it can take time to learn how to use its robust features.
The best place to start is with our ultimate guide, Learn How to Use Microsoft Word (Beginner Tutorial Guide). It takes you from the basics of opening and creating Word files, to more advanced skills like comparing and merging two Word documents.
These Word tutorials will also help:
Enhance Your Workflow With Fillable Forms in Word
You’ve seen how convenient it is to use an interactive, fillable form. And now, you know how to create your own fillable form in Word.
Take it up a notch by starting with a Word template, such as those from Elements or GraphicRiver. These professionally-designed templates for Word are sure to impress your clients, employees, or members.
For unlimited downloads of Word templates, take your pick of the vast options in Envato Elements. For one small monthly subscription, you get unlimited downloads of anything you want in its massive library. These include photos, fonts, graphics, as well as sound effects, music, and stock video. If you create many marketing and communication materials, Elements gives you massive value.
For one-off projects, GraphicRiver is another massive library of Word templates and other creative elements. But with GraphicRiver, you pay only for each single use of each item. It’s an affordable way of getting the same professional results.
C#,Windows Form, WPF, LINQ, Entity Framework Examples and Codes
In this example, we’ll learn how to export texbox value to MS Word.
Step 1: Form Design. Add TextBox and Button.
Step 2: Change the MultiLine property of the textBox control.
Step 3: Rigth click on References then click Add Reference.
Step 4: Click COM and Search for Word library. Then use Microsoft Word Object Library ( Maybe version will be changed on your computer)
Step 5: Add those using to alias.
|
using exportWord = Microsoft.Office.Interop.Word; |
Step 6: Button1_Click Code
|
private void button1_Click(object sender, EventArgs e) { exportWord.Application wordapp = new exportWord.Application(); wordapp.Visible = true; exportWord.Document worddoc; object wordobj = System.Reflection.Missing.Value; worddoc = wordapp.Documents.Add(ref wordobj); wordapp.Selection.TypeText(textBox1.Text); wordapp = null; } |
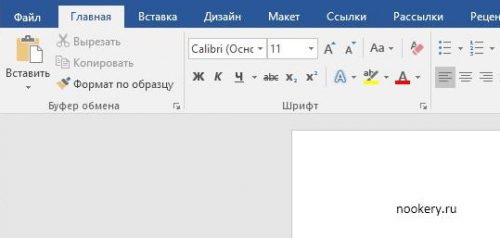
Output:
All of the Codes:
|
1 2 3 4 5 6 7 8 9 10 11 12 13 14 15 16 17 18 19 20 21 22 23 24 25 26 27 28 29 30 31 32 33 34 35 36 37 38 39 |
using System; using System.Collections.Generic; using System.ComponentModel; using System.Data; using System.Drawing; using System.Linq; using System.Text; using System.Threading.Tasks; using System.Windows.Forms; using exportWord = Microsoft.Office.Interop.Word; namespace export_word { public partial class Form1 : Form { public Form1() { InitializeComponent(); } private void Form1_Load(object sender, EventArgs e) { this.BackColor = Color.Orange; } private void button1_Click(object sender, EventArgs e) { exportWord.Application wordapp = new exportWord.Application(); wordapp.Visible = true; exportWord.Document worddoc; object wordobj = System.Reflection.Missing.Value; worddoc = wordapp.Documents.Add(ref wordobj); wordapp.Selection.TypeText(textBox1.Text); wordapp = null; } } } |
You may also like
Содержание
- 1 Add TextBox and format it
- 2 Copy workbook differences to the worksheet
- 3 Read input from TextBox and assign the value to ActiveCell
- 4 Set the selection in a TextBox
Add TextBox and format it
<source lang="vb">
Sub AddTextBox()
   ActiveSheet.Shapes.AddTextBox(msoTextOrientationHorizontal, 2.5, 1.5, _
       116, 145).TextFrame.Characters.text = "This is a test of inserting a text box to a sheet and adding some text."
   With Selection.Characters(Start:=1, Length:=216).font
       .name = "Arial"
       .FontStyle = "Regular"
       .size = 10
       .Strikethrough = False
       .Superscript = False
       .Subscript = False
       .OutlineFont = False
       .Shadow = False
       .Underline = xlUnderlineStyleNone
       .ColorIndex = xlAutomatic
   End With
   range("I15").Select
End Sub
</source>
Copy workbook differences to the worksheet
<source lang="vb">
Private Sub cmdCopy_Click()
   Workbooks("Compare WorkBooks.xls").Worksheets("Sheet1").Activate
   Cells.Clear
   Range("A1").Select
   yourTextField.SelStart = 0
   yourTextField.SelLength = Len(txtReferences.Text)
   yourTextField.Copy
   ActiveSheet.Paste
End Sub
</source>
Read input from TextBox and assign the value to ActiveCell
<source lang="vb">
Private Sub OKButton_Click()
   If CStr(SpinButton1.Value) = TextBox1.Text Then
       ActiveCell = SpinButton1.Value
       Unload Me
   Else
       MsgBox "Invalid entry.", vbCritical
       TextBox1.SetFocus
       TextBox1.SelStart = 0
       TextBox1.SelLength = Len(TextBox1.Text)
   End If
End Sub
</source>
Set the selection in a TextBox
<source lang="vb">
Private Sub TextBox1_Enter()
   TextBox1.SelStart = 0
   TextBox1.SelLength = Len(TextBox1.Text)
End Sub
</source>


