
To create a form in Word that others can fill out, start with a template or document and add content controls. Content controls include things like check boxes, text boxes, date pickers, and drop-down lists. If you’re familiar with databases, these content controls can even be linked to data.
Show the Developer tab
If the developer tab isn’t displayed in the ribbon, see Show the Developer tab.
Open a template or a blank document on which to base the form
To save time, start with a form template or start from scratch with a blank template.
-
Go to File > New.
-
In Search online templates, type Forms or the type of form you want and press ENTER.
-
Choose a form template, and then select Create or Download.
-
Go to File > New.
-
Select Blank document.
Add content to the form
Go to Developer, and then choose the controls that you want to add to the document or form. To remove a content control, select the control and press Delete. You can set properties on controls once inserted.
Note: You can print a form that was created using content controls, but the boxes around the content controls will not print.
In a rich text content control, users can format text as bold or italic, and they can type multiple paragraphs. If you want to limit what users add, insert the plain text content control.
-
Click or tap where you want to insert the control.
-
Select Developer > Rich Text Content Control
 or Plain Text Content Control .
 or Plain Text Content Control
  .
.To set specific properties on the control, see Set or change properties for content controls.
A picture control is often used for templates, but you can also add a picture control to a form.
-
Click or tap where you want to insert the control.
-
Select Developer > Picture Content Control
.
 .
.To set specific properties on the control, see Set or change properties for content controls.
Use building block controls when you want people to choose a specific block of text. For example, building block controls are helpful when you need to add different boilerplate text depending on the contract’s specific requirements. You can create rich text content controls for each version of the boilerplate text, and then you can use a building block control as the container for the rich text content controls.
-
Click or tap where you want to insert the control.
-
Go to DeveloperBuilding Block Gallery Content Control
(or Building Block Content Control). -
Select Developer and content controls for the building block.
 (or Building Block Content Control).
-
Click or tap where you want to insert the control.
To set specific properties on the control, see Set or change properties for content controls.
In a combo box, users can select from a list of choices that you provide or they can type in their own information. In a drop-down list, users can only select from the list of choices.
-
Go to Developer > Combo Box Content Control
or Drop-Down List Content Control . -
Select the content control, and then select Properties.
-
To create a list of choices, select Add under Drop-Down List Properties.
-
Type a choice in Display Name, such as Yes, No, or Maybe.
Repeat this step until all of the choices are in the drop-down list.
-
Fill in any other properties that you want.
Note: If you select the Contents cannot be edited check box, users won’t be able to click a choice.
 or Drop-Down List Content Control
  .
.-
Click or tap where you want to insert the date picker control.
-
Select Developer > Date Picker Content Control
.
 .
.To set specific properties on the control, see Set or change properties for content controls.
-
Click or tap where you want to insert the check box control.
-
Select Developer > Check Box Content Control
.
 .
.To set specific properties on the control, see Set or change properties for content controls.
Legacy form controls are for compatibility with older versions of Word and consist of legacy form and Active X controls.
-
Click or tap where you want to insert a legacy control.
-
Go to Developer > Legacy Forms
drop-down. -
Select the Legacy Form control or Active X Control that you want to include.
 drop-down.
Set or change properties for content controls
Each content control has properties that you can set or change. For example, the Date Picker control offers options for the format you want to use to display the date.
-
Select the content control that you want to change.
-
Go to Developer > Properties.
-
Change the properties that you want.

Add protection to a form
If you want to limit how much others can edit or format a form, use the Restrict Editing command:
-
Open the form that you want to lock or protect.
-
Select Developer > Restrict Editing.
-
After selecting restrictions, select Yes, Start Enforcing Protection.


Advanced Tip:
If you want to protect only parts of the document, separate the document into sections and only protect the sections you want.
To do this, choose Select Sections in the Restrict Editing panel. For more info on sections, see Insert a section break.

Show the Developer tab
If the developer tab isn’t displayed in the ribbon, see Show the Developer tab.
Open a template or use a blank document
To create a form in Word that others can fill out, start with a template or document and add content controls. Content controls include things like check boxes, text boxes, and drop-down lists. If you’re familiar with databases, these content controls can even be linked to data.
-
Go to File > New from Template.
-
In Search, type form.
-
Double-click the template you want to use.
-
Select File > Save As, and pick a location to save the form.
-
In Save As, type a file name and then select Save.

-
Go to File > New Document.
-
Go to File > Save As.
-
In Save As, type a file name and then select Save.

Add content to the form
Go to Developer, and then choose the controls that you want to add to the document or form. To remove a content control, select the control and press Delete. You can set Options on controls once inserted. From Options, you can add entry and exit macros to run when users interact with the controls, as well as list items for combo boxes, .
-
In the document, click or tap where you want to add a content control.
-
On Developer, select Text Box, Check Box, or Combo Box.
-
To set specific properties for the control, select Options, and set .
-
Repeat steps 1 through 3 for each control that you want to add.

Options let you set common settings, as well as control specific settings. Select a control and then select Options to set up or make changes.
-
Set common properties.
-
Select Macro to Run on lets you choose a recorded or custom macro to run on Entry or Exit from the field.
-
Bookmark Set a unique name or bookmark for each control.
-
Calculate on exit This forces Word to run or refresh any calculations, such as total price when the user exits the field.
-
Add Help Text Give hints or instructions for each field.
-
OK Saves settings and exits the panel.
-
Cancel Forgets changes and exits the panel.
-
-
Set specific properties for a Text box
-
Type Select form Regular text, Number, Date, Current Date, Current Time, or Calculation.
-
Default text sets optional instructional text that’s displayed in the text box before the user types in the field. Set Text box enabled to allow the user to enter text into the field.
-
Maximum length sets the length of text that a user can enter. The default is Unlimited.
-
Text format can set whether text automatically formats to Uppercase, Lowercase, First capital, or Title case.
-
Text box enabled Lets the user enter text into a field. If there is default text, user text replaces it.
-
-
Set specific properties for a Check box.
-
Default Value Choose between Not checked or checked as default.
-
Checkbox size Set a size Exactly or Auto to change size as needed.
-
Check box enabled Lets the user check or clear the text box.
-
-
Set specific properties for a Combo box
-
Drop-down item Type in strings for the list box items. Press + or Enter to add an item to the list.
-
Items in drop-down list Shows your current list. Select an item and use the up or down arrows to change the order, Press — to remove a selected item.
-
Drop-down enabled Lets the user open the combo box and make selections.
-
-
Go to Developer > Protect Form.
Note: To unprotect the form and continue editing, select Protect Form again.
-
Save and close the form.

If you want, you can test the form before you distribute it.
-
Protect the form.
-
Reopen the form, fill it out as the user would, and then save a copy.
Show the Developer tab
-
On the right side of the ribbon, select
, and then select Ribbon Preferences. -
Under Customize, select Developer .
 , and then select Ribbon Preferences.
Open a template or a document on which to base the form
You can start with a blank document and create your own form. Or, to save time, you can start with a form template.
-
Go to File > New from Template.
-
In the left pane, expand Online Templates, and then select Forms.
-
Double-click the form template that you want to use.
Add content controls to the form
-
In the document, click where you want to add the control.
-
On the Developer tab, under Form Controls, select Text Box, Check Box, or Combo Box.
-
To set specific properties for the control, select Options, and then configure the properties that you want.
Note: To create a list of drop-down items in a combo box, select the combo box placeholder, click Options, and then add the items that you want to appear in the drop-down list.
-
Repeat steps 1 through 3 for each control that you want to add.
Add instructional text (optional)
Instructional text (for example, «Type First Name») in a text box can make your form easier to use. By default, no text appears in a text box, but you can add it.
-
Select the text box control that you want to add instructional text to.
-
On the Developer tab, under Form Controls, select Options.
-
In Default Text, type the instructional text.
-
Make sure that Fill-in enabled is selected, and then select OK.
Protect the form
-
On the Developer tab, under Form Controls, select Protect Form.
Note: To unprotect the form and continue editing, click Protect Form again.
-
Save and close the form.
Test the form (optional)
If you want, you can test the form before you distribute it.
-
Protect the form.
-
Reopen the form, fill it out as the user would, and then save a copy.
Creating fillable forms isn’t available in Word for the web.
You can create the form with the desktop version of Word with the instructions in Create a fillable form.
When you save the document and reopen it in Word for the web, you’ll see the changes you made.
Examples from texts
Given this, the cell sap contains useful natural substances in native (live) form in the maximal, concentrated amount.
При этом клеточный сок содержит полезные природные вещества в нативном (живом) виде в максимальном, концентрированном количестве.
According to the information received, many migrant holding centres are overcrowded and conditions of detention do not respect international norms, standards and principles, and at times amount to inhumane or degrading treatment.
Согласно полученной информации, многие центры для содержания мигрантов перенасыщенны, а условия задержания не соответствуют международным нормам, стандартам и принципам, а порой и равносильны негуманному или унизительному обращению.
© Организация Объединенных Наций, 2010 год
The petitioners included in CV an amount for profit which was based on the profit of a surrogate Dutch equipment manufacturer.
Просители включили в CV резерв на прибыль, основанный на прибыли компании-аналога: голландского производителя оборудования.
Исаенко, Алексей,Щербаков, АлександрIsayenko, Oleksiy,Shcherbakov, Alexander
ayenko, Oleksiy,Shcherbakov, Alexander
Isayenko, Oleksiy,Shcherbakov, Alexande
аенко, Алексей,Щербаков, Александр
Исаенко, Алексей,Щербаков, Александ
For a sufficiently large sphere, the existence of local irregularities should not significantly affect the amount of matter in the sphere, and hence should not affect the existence of a closed trapped surface round us at the present time.
Для достаточно большой сферы существование локальных неоднородностей не должно заметно влиять на количество материи в ней и потому не должно сказываться на существовании замкнутых ловушечных поверхностей вокруг нас в современную эпоху.
Hawking, Stephen,Ellis, G.F.R. / The large scale structure of space-timeХокинг, Стивен,Эллис, Дж. / Крупномасштабная структура пространства-времени
Крупномасштабная структура пространства-времени
Хокинг, Стивен,Эллис, Дж.
© Cambridge University Press, 1973
© Перевод на русский язык, «Мир», 1977
The large scale structure of space-time
Hawking, Stephen,Ellis, G.F.R.
© Cambridge University Press 1973
China supported the Secretary-General’s proposals on speeding-up and streamlining the Initiative and increasing the amount of debt relief.
Китай поддерживает предложения Генерального секретаря об ускорении реализации и рационализации Инициативы и увеличении суммы освобождения от уплаты задолженности.
© Организация Объединенных Наций, 2010 год
For example, addition of acetone arabinose ketal to the isooctane/n-heptane model mixture (4:1) in an amount of about 8% by weight practically does not affect the octane number thereof.
Например, введение кеталя ацетона и арабинозы в модельную смесь изооктан — н-гептан (4:1) в количестве около 8 вес. %, практически, не сказывается на ее октановом числе.
Good words do not last long unless they amount to something.
Добрые слова долго не живут, если они ничем не оборачиваются.
Brown , Dee / Bury my Heart at Wounded KneeБраун, Ди / Схороните мое сердце у Вундед-ни
Схороните мое сердце у Вундед-ни
Браун, Ди
© Издательство «Прогресс», 1984
Bury my Heart at Wounded Knee
Brown , Dee
Even on that basis, the investment flows lost over the period of 10 years would amount to between $200 million and $400 million.
Даже если исходить из этих данных, то приток инвестиций, который прекратился и не осуществлялся в течение 10 лет, составил бы 200–400 млн. долл.
© Организация Объединенных Наций, 2010 год
Guarantee No12 dated 05.07.2005 to MEMR RK on the assurance by JSC «KazMunayTengiz SNC» to adhere to the terms and conditions of the PSA with regard to the»Kurmangazy»structure dated 06.07.2005 for an amount of US$25.8 million.
Гарантия №12 от 05.07.2005 г. перед МЭМР РК на обеспечение соблюдения АО «МНК «КазМунайТениз» условий и положений СРП в отношении структуры «Курмангазы» от 06.07.2005 г. на сумму 25,8 млн. долл. США
© 2010 АО Национальная компания «КазМунайГаз»
© 2010 National Company KazMunayGas JSC
The actual amount of the investments of the actual investments aimed at new construction and expansion was RUB 178,230 thousand.
Фактический объем капитальных вложений, направленных на новое строительство и расширение, составил 178 230 тыс. руб.
© 2004-2011, ОАО «МРСК Центра»
© 2004-2010, IDGC of Centre
Nevertheless, at the moment we do not know the amount of government orders that will take place.
Тем не менее, в данный момент мы не располагаем данными по суммарному объему государственного заказа.
The fine shall be established in an amount from 25 to 1,000 minimum wages, and salaries or in an amount of any other income for a period from two weeks to one year.
Штраф устанавливается в размере от двух тысяч пятисот до одного миллиона рублей или в размере заработной платы или иного дохода осужденного за период от двух недель до пяти лет.
© 2002 г. НПП Гарант-Сервис (информация)
We invest a substantial amount of money in business development, and the time factor here plays a critical role — drawing out a decision, say, for half a year, is simply unacceptable.
Мы вкладываем очень большие деньги в развитие бизнеса, и временной фактор здесь играет ключевую роль — затягивание принятия решений, скажем, на полгода просто недопустимо.
This was also proved by analysis of amount of non-muscle myosin bonded to actinic fibrils.
Этот вывод также был подтвержден анализом количеств немышечного миозина, связанного с актиновыми фибриллами.
In the known method a hydrogenated fraction with the boiling point in the range of 300 to 400° C. is used in the amount of 1-5% by weight as the liquid activating additive.
В известном способе, в качестве жидкой активирующей добавки, применяют гидрированную фракцию с т. кип. 300 — 400°С в количестве 1-5 мае. %.
Add to my dictionary
amount1/21
ə’mauntNounвеличина; количествоExamples
a large amount of work — много работы
considerable amount — значительное количество
enormous / huge / large / tremendous amount — огромное количество
moderate amount — умеренное количество
negligible / paltry / small amount — ничтожно мало
the full amount — полный объём
No amount of fire or freshness can challenge what a man can store up in his ghostly heart. — Никакая сила пламени или свежести не может сравниться с тем, что человек может таить в своем тёмном и непонятном сердце.
User translations
The part of speech is not specified
Collocations
account for an amount
отчитываться в сумме
actual amount
фактическая сумма
advance amount paid-in
досрочный платеж
advance in the amount of
аванс на сумму
aggregate amount
общий итог
aggregate amount
совокупная сумма
amount at risk
страховая сумма
amount available
наличная сумма
amount available
сумма, имеющаяся в распоряжении
amount collected
инкассированная сумма
amount deposited
внесенная сумма
amount drawn
сумма, снятая со счета
amount due
сумма к получению
amount duefor
сумма к получению
В случае, если вам необходимо создать документ Word для заполнения другими людьми, например, создать анкету участника конференции, чтобы упростить процесс, вы можете создать форму для заполнения в Microsoft Word. Форма в ворде позволяет создавать заполнители для различных типов информации, таких как текст, дата, да-нет вопросы и т. д.
Включение вкладки «Разработчик»
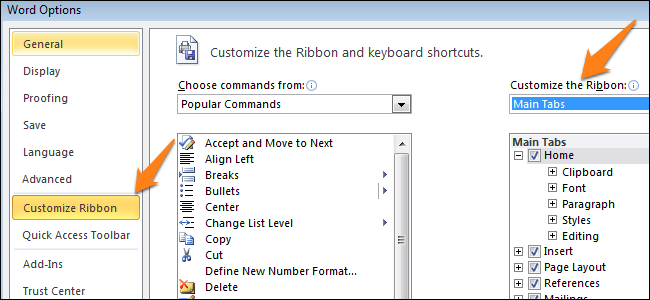
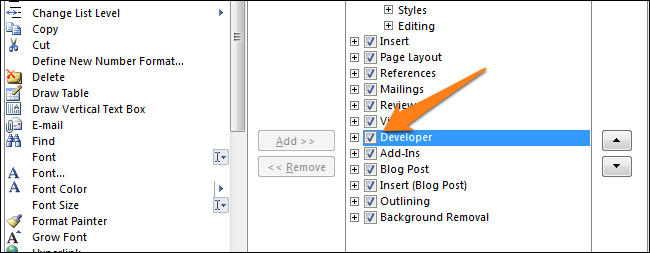
Прежде чем перейти к созданию формы в ворде, вам нужно активировать вкладку «Разработчик» на ленте. Для этого нажмите «Файл» —> «Параметры», чтобы открыть диалоговое окно «Параметры Word». Выберите «Настроить ленту», затем установите флажок для вкладки «Разработчик».

Создание формы в Word – Параметры Word
Теперь на ленте появится вкладка «Разработчик».

Создание формы в Word – Вкладка Разработчик
Добавление полей формы в ворде
Теперь мы готовы перейти к созданию формы в ворде. Для этого мы будем использовать разнообразные поля, которые будут являться составляющими нашей будущей формы для заполнения в ворде.
Чтобы добавить поле формы для заполнения, поместите курсор в нужное место, затем выберите необходимый элемент из группы «Элементы управления» на вкладке «Разработчик». Вы можете навести указатель мыши на поля, чтобы увидеть различные параметры. В этом примере мы добавляем текстовое поле, чтобы пользователи могли вводить свои имена.

Создание формы в Word – Элементы управления для создания формы в ворде
В документе появится тестовое поле:

Создание формы в Word – Текстовое поле
Вы можете добавить несколько типов полей для создания формы в ворде. Например, вы можете добавить флажок для выбора:

Создание формы в Word – Поле «флажок»
Или даже поле выбора даты:

Создание формы в Word – Поле для выбора даты
После того, как вы добавили все поля в документ, ваша форма в ворде готова, и вы можете отправлять ее другим пользователям!
Настройка полей формы в ворде
Если вы хотите еще больше контролировать способ отображения полей своей формы в ворде, вы можете включить «Режим конструктора» в группе «Элементы управления» на вкладке «Разработчик».

Создание формы в Word – Режим конструктора
Затем вы можете изменить свойства для каждого поля вашей формы в ворде, включая текст, который будет отображаться в каждом поле. Если вы готовы потратить немного времени на настройку каждого поля, вы можете создать довольно прочную форму. Например, вы можете создать в своей форме заполнения собственный выпадающий список, как в приведенном ниже примере:

Создание формы в Word – Использование выпадающего списка в форме
В итоге в нашем примере, мы получили следующую форму для заполнения в ворде:

Создание формы в Word – Пример формы для заполнения в ворде
В этой статье мы рассмотрели основы создания формы в ворде. Теперь вы можете с легкостью создать собственную форму для заполнения в Microsoft Word.
Can someone help me make a money denomination program in VB.NET.
The problem is when you enter a number the program should convert it to word format.
If you enter in
'98534671.23'
the program should convert it to
"ninety eight million five hundred thirty four thousand six hundred
seventy one and twenty three cents".
See Also:
How can I convert an integer into its verbal representation?
![]()
asked Mar 20, 2009 at 14:42
2
Convert integers to written numbers
You should be able to use this topic to help you. All you should have to do is convert the code from C# to VB.NET
![]()
answered Mar 20, 2009 at 14:46
![]()
TheTXITheTXI
37.3k10 gold badges85 silver badges110 bronze badges
Создавать формы в Microsoft Word легко. Трудности начинаются, когда Вы решаете создать заполняемые формы, которые можно будет разослать людям, чтобы они их заполнили. В этом случае MS Word поможет решить вашу задачу: будь то форма для сбора информации о людях или опрос для получения обратной связи от пользователей о программном обеспечении или о новом товаре.
Содержание
- Включаем вкладку «Разработчик»
- Быть или не быть Шаблону?
- Наполняем форму элементами
- Текстовые блоки
- Добавляем выбор даты
- Вставляем раскрывающийся список
- Вставляем чек-боксы
- В заключение
Включаем вкладку «Разработчик»
Чтобы создавать заполняемые формы, сначала нужно активировать вкладку Developer (Разработчик). Для этого откройте меню File (Файл) и кликните по команде Options (Параметры). В появившемся диалоговом окне откройте вкладку Customize Ribbon (Настроить ленту) и выберите Main Tabs (Основные вкладки) из выпадающего списка.
Поставьте галочку в строке Developer (Разработчик) и нажмите ОК.
Теперь на ленте появилась новая вкладка.

Быть или не быть Шаблону?
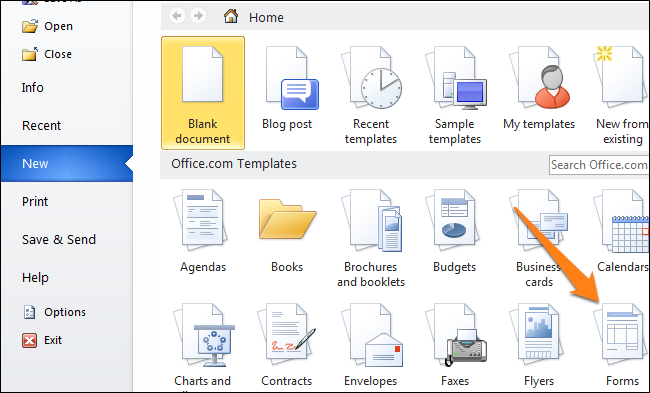
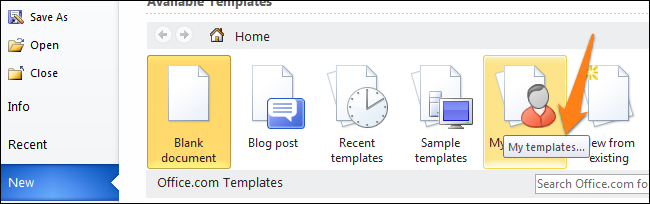
Есть два варианта, с которых можно начать создавать формы. Первый проще, при условии, что Вы подберёте подходящий шаблон. Чтобы найти шаблоны, откройте меню File (Файл) и нажмите New (Создать). Вы увидите множество шаблонов, готовых для скачивания. Остаётся лишь кликнуть по Forms (Формы) и отыскать нужный шаблон среди предложенных.
Когда найдёте подходящий шаблон, загрузите его и редактируйте форму, как пожелаете.
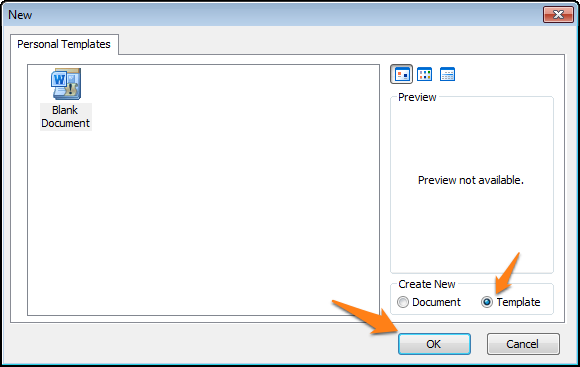
Это самый простой путь, но может случиться так, что Вы не найдёте подходящий шаблон среди предложенных. В этом случае можно создать форму из черновика. Сперва откройте настройки шаблонов, но вместо уже готовой формы выберите My Templates (Мои шаблоны).
Выберите Template (Шаблон) и кликните по ОК, чтобы создать чистый шаблон. В завершение нажмите Ctrl+S, чтобы сохранить документ. Назовём его Form Template 1.
Наполняем форму элементами
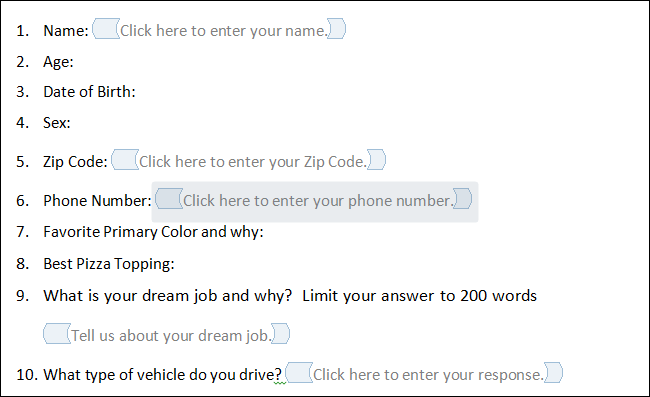
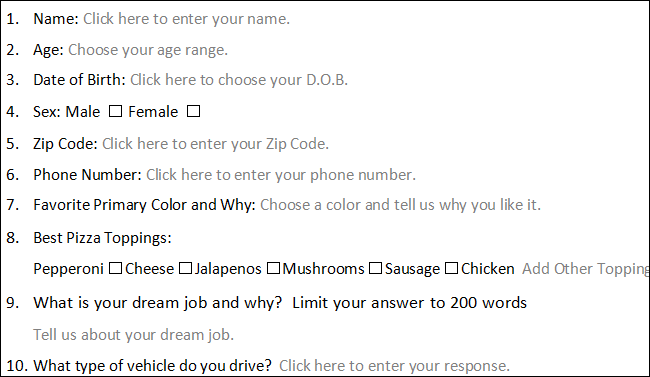
Теперь у Вас есть пустой шаблон, значит уже можно добавлять информацию в форму. Форма, которую мы создадим в этом примере, – это простой опросник для сбора информации о людях, которые будут его заполнять. Первым делом вставьте основные вопросы. В нашем случае мы будем узнавать следующую информацию:
- Name (Имя) – обычный текст
- Age (Возраст) – раскрывающийся список
- D.O.B. (День Рождения) – выбор даты
- Sex (Пол) – чек-бокс
- Zip Code (Почтовый индекс) – обычный текст
- Phone Number (Номер телефона) – обычный текст
- Favorite Primary Color and why (Какой любимый цвет и почему) – поле со списком
- Best Pizza Toppings (Любимая начинка пиццы) – чек-бокс и обычный текст
- What is your dream job and why? Limit your answer to 200 words (О какой работе Вы мечтаете и почему) – форматированный текст
- What type of vehicle do you drive? (Какой у Вас автомобиль) – обычный текст
Чтобы приступить к созданию различных вариантов элементов управления, откройте вкладку Developer (Разработчик), которую Вы добавили ранее, и в разделе Controls (Элементы управления) выберите Design Mode (Режим конструктора).
Текстовые блоки
Для любых вопросов, требующих ответа в форме текста, можно вставить текстовые блоки. Это делается при помощи:
- Rich Text Content Control (Элемент управления содержимым «форматированный текст») — пользователь может настраивать форматирование
- Plain Text Content Control (Элемент управления содержимым «обычный текст») — допускается только обычный текст без форматирования.
Давайте создадим поле для ответа форматированным текстом на вопрос 9, а затем поле для ответа обычным текстом на вопросы 1, 5, 6 и 10.
Не забывайте, что можно изменять текст в поле элемента управления содержимым, чтобы он соответствовал вопросу. Для этого кликните по полю и введите текст. Результат показан на изображении выше.
Добавляем выбор даты
Если Вам нужно добавить дату, можно вставить Date Picker Content Control (Элемент управления содержимым «выбор даты»). Используем этот элемент для вопроса 3.

Вставляем раскрывающийся список
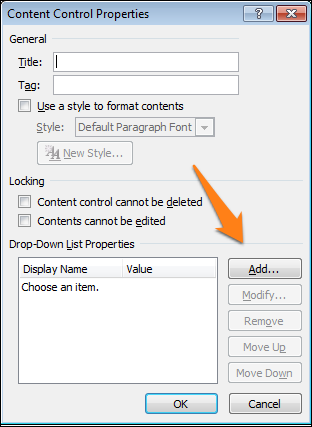
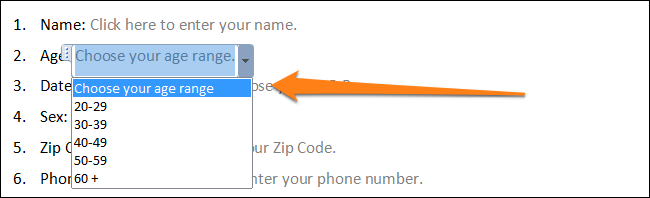
Для вопросов, подразумевающих единственный ответ (например, вопрос 2), удобно использовать раскрывающийся список. Вставим простой список и заполним его возрастными диапазонами. Разместите поле элемента управления содержимым, кликните по нему правой кнопкой мыши и выберите пункт Properties (Свойства). В появившемся диалоговом окне Content Control Properties (Свойства элемента управления содержимым) нажмите Add (Добавить), чтобы добавить в список возрастные диапазоны.
Когда закончите, у Вас должно получиться примерно то, что изображено на рисунке ниже. При этом режим конструктора нужно отключить!
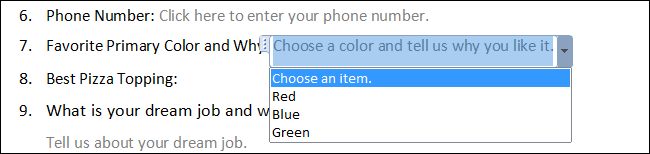
Ещё можно использовать Combo Box (Поле со списком), в котором легко составить список из любых нужных элементов. При необходимости пользователь сможет ввести дополнительный текст. Давайте вставим поле со списком для вопроса 7. Так как мы будем использовать этот элемент, пользователи смогут выбрать один из предложенных вариантов и ввести ответ, почему им нравится выбранный цвет.
Вставляем чек-боксы
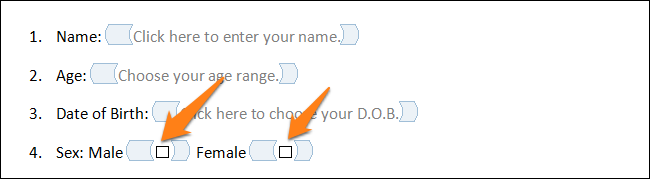
Для ответа на четвёртый вопрос вставим чек-боксы. Для начала нужно ввести варианты ответов (male – мужчина; female – женщина). Затем добавить элемент управления содержимым Check box (Флажок) рядом с каждым вариантом ответа:
Повторите это действие для любого вопроса, который подразумевает один или несколько вариантов ответа. Мы добавим чек-бокс к ответу на вопрос 8. Кроме того, чтобы пользователь мог указать вариант начинки пиццы, которого нет в списке, мы добавим элемент управления содержимым Plain Text (Обычный текст).

В заключение
Готовая пустая форма с включённым и с выключенным режимом конструктора должна выглядеть, как на рисунках ниже.
Режим конструктора включен:
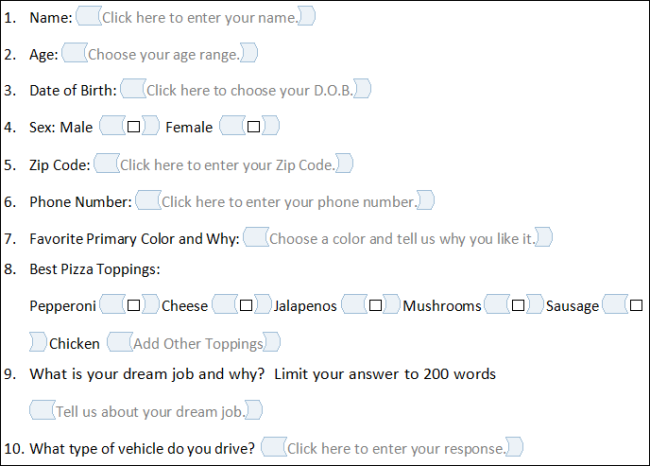
Режим конструктора выключен:
Поздравляем! Вы только что освоили основные приёмы создания интерактивных форм. Вы можете отправить файл DOTX людям, и когда они его запустят, он автоматически откроется как обычный документ Word, который можно заполнить и отправить обратно.
Оцените качество статьи. Нам важно ваше мнение: