
Creating fill in the Blanks (FITB) documents can be a wonderful way for educators to assess their student’s understanding of a particular topic. Fill in blanks is an interactive and efficient method for teachers to gauge comprehension without overwhelming or intimidating students. In this guide, we will explain how to create fill in the blanks documents in Microsoft Word to make assessment and grading simple and efficient. From inserting blanks to adding answer options, we will walk through the creating process fill in blanks documents so you can confidently assess your students’ understanding.
What is Fill in the Blanks Documents
Fill in the blanks documents are a type of document that allows users to input information into pre-defined fields. It is document type used in surveys and applications, as they provide structure and only allow specific responses. These documents include multiple blank spaces or questions to be filled out by the user. When complete, the form will contain all the necessary information to process or complete a task. These documents are an effective way to gather and organize data for analysis and decision-making. They can also help streamline document management processes, since the required fields allow for easy organization of collected information.
Step-By-Step Guide
1. Open MS Word and create a new document.
2. Fill in the text of the document, leaving out words or phrases where you want the reader to enter their information.
3. Select the word or phrase that you want to be filled in and highlight it with your cursor.
4. Go to “Format” and click on “Font.” In the front window, select the “Text Fill” option and enter a color for the background of your fill in the Blank text.
5. Go back to “Format” and select “Paragraph.” A new window will appear; here, you can adjust the alignment of your fill in the Blank text.
6. Go to “Insert” and select “Shapes.” Choose a shape that you want to appear around the fill in the Blank text, such as a rectangle or circle, and drag it onto the document.
7. Highlight the fill in the Blank text and the shape you just inserted. Right-click on one of them and select “Grouping,” then select “Group.”
8. Finally, save your document for your computer or print it to share with others.
Tips for Customizing
1. Use the fill in the blanks feature to create simple, multiple-choice questions within your document quickly and easily.
2. Consider using blanks to generate forms or questionnaires that can be used as surveys or assessments.
3. Utilize blanks dropdown menus to give readers multiple selections instead of just one answer.
4. Create blanks options that appear only when necessary, allowing you to provide extra resources or relevant content based on the reader’s answers.
5. Choose two blank sections that are not immediately visible, so readers must search for them.
6. Use Blanks to create interactive quizzes or activities that can be used for educational purposes.
7. Fill in the blanks document sections can also hide secret messages or bonus content, adding an extra layer of excitement and mystery.
8. Make blanks sections appear differently on the page using different font styles, colors, or sizes.
9. Fill in Blank documents can also generate unique usernames and passwords for readers needing access to specific information.
10. Fill in blanks documents is a great way to condense long forms into more manageable chunks, making them easier for readers to complete. Get to know about ChatGPT Essay Writing.
Best Practices
When creating a blanks document, it is essential to ensure it is accessible to all users. Here are some best practices to ensure accessibility:
1. Use plain language – avoid technical jargon; be clear and concise when writing your blanks sentences. This will help readers understand what they must do without ambiguity or confusion.
2. Include visual cues – adding visuals, such as images and illustrations, can help break up the blanks text and provide a clearer understanding of what needs to be done. Visual cues can also help draw attention to important document parts that should not be overlooked.
3. Use simple editing tools – when creating fill in the blank’s documents, use basic MS Word operations such as underlining, bolding, capitalizing, and inserting tabs for clarity and organization.
4. Ensure readability – make sure your blanks document is easily scannable using bulleted lists, headings, and white space. This will make the document much easier to navigate and comprehend.
Troubleshooting Common Issues
Troubleshooting common issues when creating a fill in the blanks document in Microsoft Word can help ensure your document is created properly. If you experience any problems with blanks functionality, such as not being able to enter text into designated fields or difficulty formatting the document, there are a few steps you can take to isolate and resolve the issue.
First, check your “Word Options” to ensure fill in the blanks is enabled; from the File menu, select “Options,” followed by “Advanced.” Scroll down until you see the fill in blanks settings, and make sure they are set to enabled. If blanks is already enabled, disable it, and then re-enable the feature.
If blanks is still not working properly, double check the fill in the blank field settings by going to “Design” in the ribbon and selecting “Properties.” This will open a dialog box containing blanks settings, and you should make sure “Show Fill-in Prompts” is checked.
You may also need to adjust the font size of your file in Blank fields; if they are too small, text may not be visible. To change the font size, highlight the fill in the blanks field, right-click on it, and select “Font” from the menu. From there, you can adjust the font size as needed.
If filling in blanks still does not seem to be working properly, try creating a new Fill in the Blank document from scratch. This will ensure your current document does not contain any incompatible settings or formatting that may prevent fill in blanks from working.
![]()
Testing Your Fill in the Blanks Document
Once you have created your fill in the blanks document, testing it to ensure that everything works properly is important. You can fill in the blanks with random words and phrases and then preview or print the document to make sure that everything appears as expected. It may also be helpful to send a copy of the document to a friend or colleague to evaluate it out and ensure that they can fill in all the blanks correctly. Testing your fill in blank documents is important to ensure it functions properly and looks professional.
Final Thoughts
Creating fill in the blanks documents in MS Word is an easy and efficient way. It generates forms or assessments without starting from nothing. Fill in blanks documents are highly customizable, allowing users to tailor them to their needs. Creating Blanks documents is quick and straightforward. It allows users to produce documents with minimal effort quickly. fill in the blank’s documents are a great tool for quickly creating forms, surveys, and assessments that can be reused multiple times. With MS Word’s fill in the blanks feature, professionals can easily generate copious amounts of content quickly and efficiently.
Microsoft Word 2010 is an optimal business choice for communications leaving your office, such as letters, invoices and marketing materials, but don’t rule out the software program for when you’re seeking to bring in information as well. Let Word help you design fill-in-the-blank forms, ideal for culling job applicants, preparing new hires for confidentiality agreements and anywhere else you want people to be able to give you input. Word’s fill-in forms can be a jumping off point for your electronic information gathering or they can be printed for manual completion.
-
Launch Word and type the form name at the top of the Word page. You can also type additional information such as the department using the form, the form creator’s name and any directions for using the form.
-
Press “Enter” to drop to a new line or “Enter” twice for a line of space below the top text. Type the first form question or command, such as “Name” or “Job Title Applied For.”
-
Click the “Insert” tab, then click the “Shapes” button. Click the basic Line shape. When the cursor changes to a plus sign, hold down the “Ctrl” key to give you a straight drawing line, and drag the cursor to the right of the text you just typed, giving your form recipients a place to write.
-
Press “Enter” and type the next question on the form. Right-click the line you drew above and press the “Ctrl-C” keys to copy the line. Press the “Ctrl-V” keys to paste in the copied line and drag it into place to the right of the new question you just typed. Adjust line size as needed.
-
Type the next question. Press “Ctrl-V” to paste another copy of the line. You do not have to keep clicking and copying the line, as it is still in memory. Adjust the line sizes for each question. For example, a fill-in line for someone’s birth date will be shorter than the line for a description of a past job.
-
Add any additional text and lines to the rest of the form page or pages as necessary. For questions in which you want recipients to have multiple lines, paste copies of the line and drag them directly underneath each other, with a small space in between each for recipients to write.
-
Save the form to your network or desktop in a location you’ll remember.
Basic rules: Create the form using the forms toolbar. Protect it. Here’s the
details…
First, you need the Forms toolbar. Turn it on by going to View Toolbars Forms.
Here’s the Forms toolbar, let’s get to know it better.
I have never used the tables or frame tools here, so I don’t
explain them. However, I do strongly recommend tables to create forms whenever
your forms are laid out in «boxes».
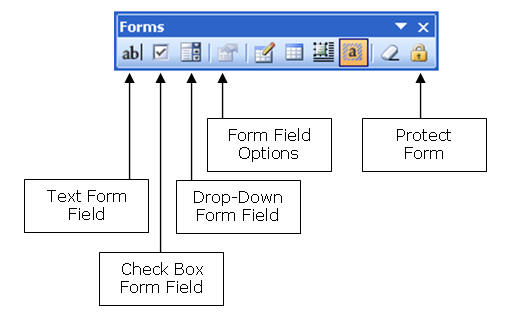
From left to right, here’s the buttons we’re reviewing. The
options dialog boxes are accessed by double-clicking the field, or by hitting
the Form Field Options button.
Text Form Field
This inserts a field designed for text entry. You can format it
for other things by double-clicking it, or by hitting the Form Field Options
icon. Change the type drop-down to a desired field type, such as a number or
date. You can set a maximum number of characters to be entered for items like
account numbers. You can choose Date as the type, and change the Text format to
read Sunday, June 19, 2005 instead of 6/19/2005.
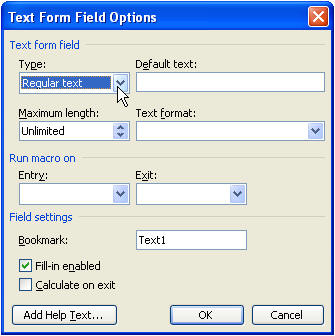
You can also set a bookmark name here. Leave it as the default
Text# or change it to something meaningful, such as CoName. Then, when you later
want the Company name to appear again without making the user type it again, you
can create a
reference to the bookmark. If you plan to use the values entered in these
text form fields later in calculations, please check the Calculate on exit box!
Doing so makes your calculation field update as the values on which it is
dependent are entered.
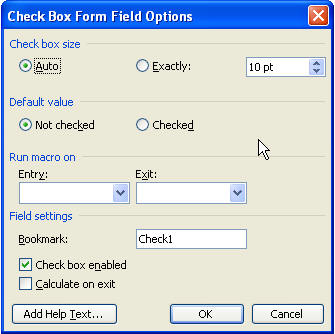
Check Box Form Field
I don’t think I’ve ever checked these options out before, but
here they are. Unfortunately, checkboxes don’t work like option buttons do. If
you place multiple checkboxes, then multiple checkboxes can be chosen. If you
want only one checkbox to be chosen, you need Office VBA:
Macros You Can Use Today, which contains a macro by
Cindy Meister that
you can use, or you need to use Option buttons from the Control
Toolbox. Either option requires macro code.
Drop-Down Form Field
Drop-Downs are very cool and extremely easy to make. The only
drawback is that you’re limited to 25 entries, so you can’t use it for days of
the month or to list the US states.
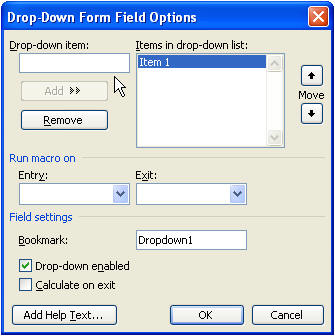
Tip: To defeat the 25-item limit, try
separating your items into groups, such as east and west or 1 to 7, 7 to 14,
etc., or see this Microsoft KB Entry
http://support.microsoft.com/Default.aspx?kbid=306258
Tip: If you don’t want an item chosen by
default (or perhaps you want your form to be «blank» for printing), enter spaces
in the Drop-down item box to create a «blank» item, just make sure you move it
to the top.
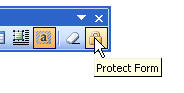
Protect the Form
This button is used to test your form while you create it.
Protect the form to see how your form fields will work. Unprotect to continue
building your form.
Final Protection
You don’t have to use it, but I recommend it. When your form is
completely built and you’re ready to distribute it, choose Tools Protect
Document from the menu to bring up the Protect Document task pane. Choose
Editing restrictions, and Filling in forms.
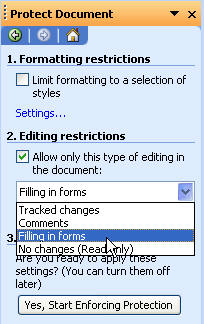
You may only want to
protect certain
areas of your document. Once you’re done, hit the Yes, Start Enforcing
Protection button and (we highly recommend) enter a password.
More Tips
-
For best results, create your forms in tables. Place the label
in one cell and the form field in another cell next to it. -
To restrict entry to a certain amount of space, insert a
one-row, one-column table, and set the row height to «Exactly».
Click the card to flip 👆

Other sets by this creator
Verified questions
vocabulary
Verified answer
literature
Verified answer
vocabulary
Verified answer
Recommended textbook solutions
Other Quizlet sets
There are many uses for fields in MS Word. You can, for example, use SEQ codes to create automatic numbering which can be extremely helpful in the business world and in academia.
- Then there are the Fill-In fields, which you can use in a template. You know, say a form that you use in your business all the time wherein the user enters variables throughout the document. Some folks might compare this feature to the keyboard merges in WordPerfect.
Most often, folks insert fields in their documents using the Fields dialog. The easiest method to do this in version 2010 is to use the keyboard combination shortcut of Alt + I + F.
In earlier versions of MS Word, you used to access the Fields command by clicking on your Insert menu. Now though, you have choices!
The Field command can now be accessed in a couple of places:
- The Insert tab;
- The Text Group;
- In Qick Parts;
- On the Mailings tab; and
- On the Write & Insert Fields Group.
In order for your Fill-In fields to work for you, you must do the following:
- Embed them in a template;
- Put the template in the default template location in Word; and
- Open a new document based on the template.
- To open a new document based on the template, click on File tab | New.
Let’s have a go at it shall we?
- Simply start with a blank document or, if you prefer, with a form you have already created.
- Position your cursor where your first variable information should be inserted.
- Open the Fields dialog by clicking Alt + I + F.
- Find the Fill-In fields command.
- You can now add a specific pompt as a guide to users.
- You can also set up a default response if you like, which will be inserted automatically into the document if the user should leave that field blank.
- Simply click OK or tap your enter key.
- A prompt box will appear, but since you are still creating your template, do not key in anything in the box.
- Click OK and the code will be inserted at your cursor position.
- Unless you specifically elect to display your codes while creating your template, you will not be able to see them so it would be a good idea to have them displayed so you can see what you are doing. To display your codes, click Alt + F9.
Continue inserting your Fill-In fields where appropriate and when you are finished, save your document as a template. - To save your document as a template:
- Click the File tab on your Ribbon or use the shortcut Alt + F (not simultaneously),then click Save As or the letter A.
- It is very important that you save your Word 2010 document as a template (*.dotx) or as a Word 97-2003 template (*.dot).
- After you have saved your template, users will be able to create a new document based on it by clicking on File | New | My Templates.
- Once you see your template, double-click it or click OK.
- When your document opens, the first prompt will appear. Key in the variable information and click OK.
- Continue through your document doing the same for each prompt.
Once you have keyed in all the variables in your document, you will be returned to your doucment where you can make any changes you deem necessary.
I can think of many, many instances where you have a document with boiler-plate language and only a few variables, such as contracts, Last Will and Testament, Powers of Attorny, etc.. Just think of the time and effort you could save using these fields!