
Word for Microsoft 365 Word for Microsoft 365 for Mac Word 2021 Word 2021 for Mac Word 2019 Word 2019 for Mac Word 2016 Word 2016 for Mac Word 2013 Word 2010 Word 2007 More…Less
After you have created a table of contents in Word, you can customize the way it appears. Customizing your table of contents applies your preferences to your existing table. Like what you see, select OK. If you’re not happy with the look, just select Cancel and all changes are forgotten. Your table of contents will still be there.
To customize your existing table of contents:
-
Go to References > Table of Contents.
-
Select Custom table of contents.
-
Use the settings to show, hide, and align page numbers, add or change the tab leader, set formats, and specify how many levels of headings to show. For more info, see Custom table of contents .
-
Go to References > Table of Contents > Custom Table of Contents.
-
Select Modify. If Modify is grayed out, change Formats to From template.

-
In the Styles list, click the level that you want to change and then click Modify.
-
In the Modify Style pane make your changes.
-
Select OK to save changes. Repeat steps 3 and 4 for all the levels that you want to display in your table of contents.
To customize your existing table of contents:
-
Go to References > Table of Contents.
-
Select Custom table of contents.
-
Use the settings to show, hide, and align page numbers, add or change the tab leader, set formats, and specify how many levels of headings to show.
-
Go to References > Table of Contents > Custom Table of Contents.
-
Select Modify. If Modify is grayed out, change Formats to From template.
-
In the Styles list, click the level that you want to change and then click Modify.
-
In the Modify Style pane, make your changes.
-
Select OK to save changes. Repeat steps 3 and 4 for all the levels that you want to display in your table of contents.
To customize your existing table of contents, or create a new table:
-
Go to References>Table of Contents>Insert Table of Contents.
-
If you’ve already got a table of contents, customizations will be applied. If not, this will insert a new customized table.
-
Use the settings to show, hide, and align page numbers, add or change the tab leader, set formats, and specify how many levels of headings to show. For more info, see Custom table of contents .
-
Go to References > Table of Contents > Insert Table of Contents.
-
Select Modify. If Modify is grayed out, change Formats to From template.
-
In the Styles list, click the level that you want to change and then click Modify.
-
In the Modify Style pane make your changes.
-
Select OK to save changes. Repeat steps 3 and 4 for all the levels that you want to display in your table of contents.
Do you have a question about Word that we didn’t answer here?
Post a question on the Word Answers forum.
Need more help?
Want more options?
Explore subscription benefits, browse training courses, learn how to secure your device, and more.
Communities help you ask and answer questions, give feedback, and hear from experts with rich knowledge.
![]()
Download Article
![]()
Download Article
- Adding a Table of Contents
- Updating the Table of Contents
- Stylizing the Table of Contents
- Video
|
|
|
This wikiHow teaches you how to customize and update the table of contents in your Word document. When you create a table of contents in Word, page numbers are added automatically based on the headings you’ve added to each section. Word makes it easy to customize the way the page numbers and section titles appear on the table. If you make changes to your document that affects your section headers or page numbers, you’ll need to choose the Update Table option so the table of contents remains correct.
-
1
Format the headings of each section of your document. Word’s table of contents builder automatically generates a table of contents based on the headings in your document.[1]
This means each section that you want represented in your table of contents must have a properly-formatted heading.- If a section should appear as a primary section in the table of contents, select its heading, click the Home tab, and then select Heading 1 on the «Styles» panel.
- To add a sub-section to the primary section in the table of contents, give that section a Heading 2 header: Select its heading and choose Heading 2 from the Styles section.
- You can can also use Heading 3, Heading 4, etc., to add even more pages to your table of contents.
- Make sure any page you want to include in the table of contents has a heading.
-
2
Click the location where you want to insert the table of contents. Typically this will be at the beginning of your document.
Advertisement
-
3
Click the References tab. It’s at the top of Word.
-
4
Click Table of Contents on the toolbar. It’s at the upper-left corner of Word. A list of Table of Contents styles will expand.
-
5
Select an automatic style template. Several style options appear for your table of contents—choose one of the suggested styles to get started. Once selected, this will add a table of contents that lists the page numbers for each of your formatted sections.


Advertisement
-
1
Click the References tab. It’s at the top of Word.[2]
- Use this method if you’ve made a change (changing a heading, adding/removing pages) to your document and need to update the table of contents to reflect that change.
- The only way to change the name of a section on the table of contents is to change the name of the corresponding header in the document.
-
2
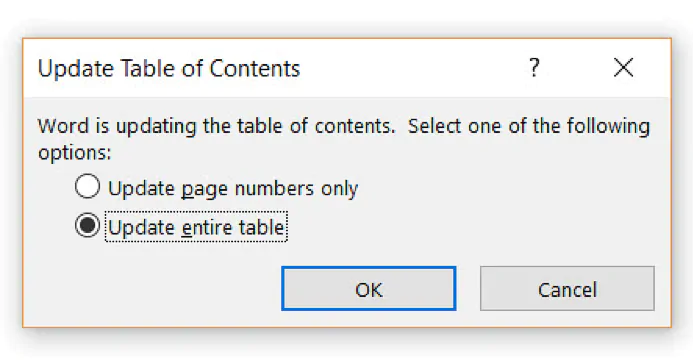
Click Update Table on the «Table of Contents» panel. It’s in the upper-left corner. Two options will appear.
-
3
Select an update option.
- Select Update page numbers only if you want to refresh the page numbers without applying any changes you’ve made to the headings.
- Select Update entire table to apply all heading and page number changes.
-
4
Click OK. The table of contents is now up-to-date.


Advertisement
-
1
Click the References tab. It’s at the top of Word.
-
2
Click Table of Contents on the toolbar. It’s at the upper-left corner of Word. A list of Table of Contents styles will expand.
-
3
Click Custom table of contents on the menu. This opens the Table of Contents dialog box.
-
4
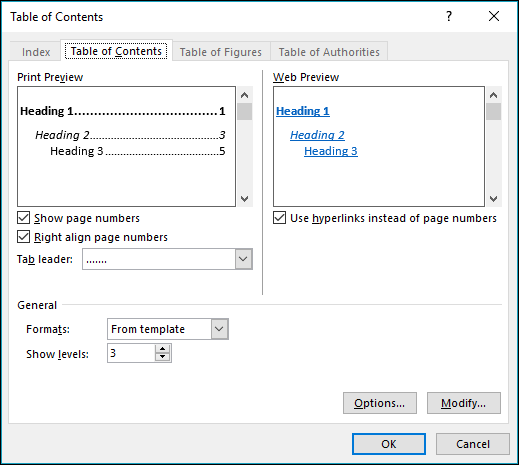
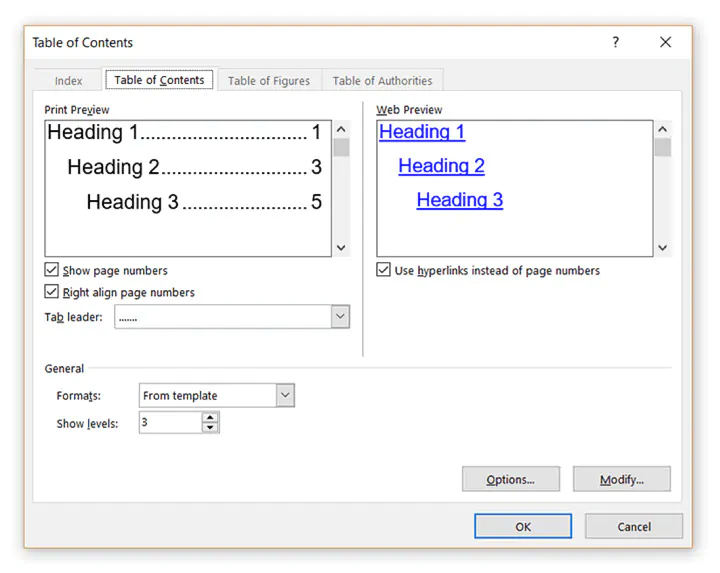
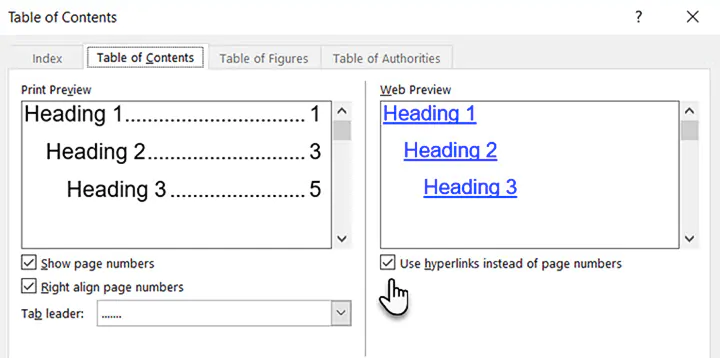
Adjust your general preferences. The «Print Preview» box at the upper-left corner shows you how the printed table of contents will appear, while the «Web preview» box displays how it will look on the web.[3]
- Use the checkbox next to «Show page numbers» to show or hide page numbers. If you just want to hide page numbers on the web version of the table of contents, check the box next to «Use hyperlinks instead of page numbers.»
- Use the checkbox next to «Right align pages numbers» top adjust the alignment.
- To change the style of the line or pattern that separates the heading title and the page number, make your selection from the «Tab leader» menu.
- To choose another theme, select something from the «Format» menu.
- To adjust how many heading levels are displayed in the table, select an option from the «Show levels» menu (the default is 3).
-
5
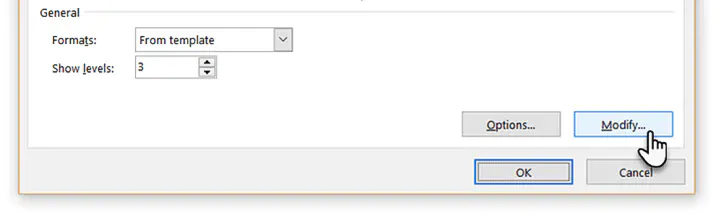
Click the Modify button. It’s in the lower-right corner of the window. This is where you can change the properties of the text on the table of contents page.
- If you don’t see this button, click the «Formats» menu and select From template. It should appear then.
-
6
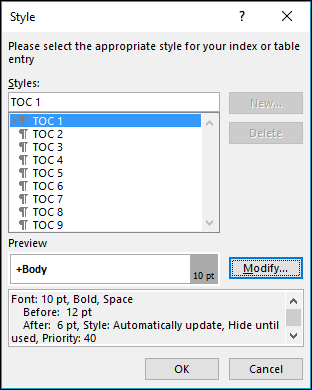
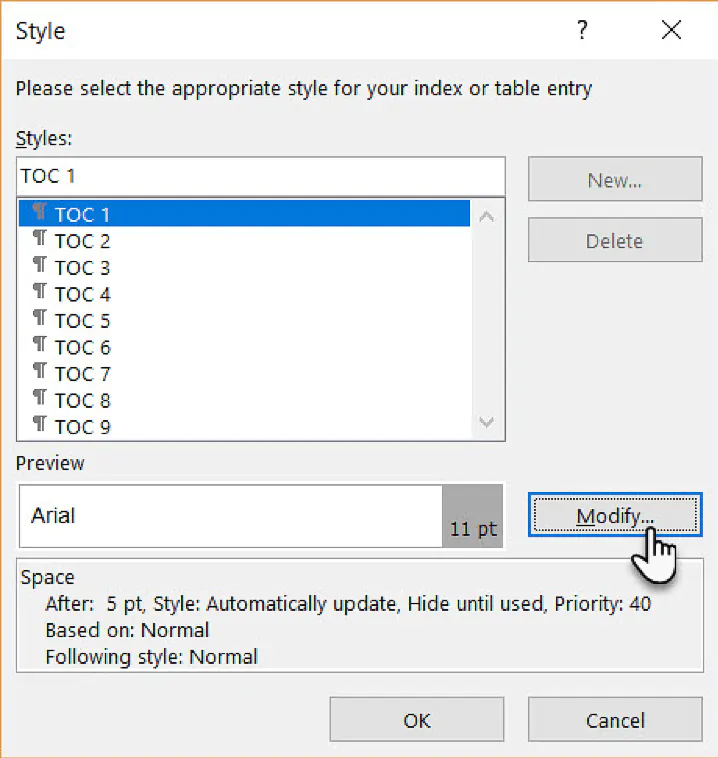
Select a style and click Modify. The styles you can change appear in the «Styles» box on the left side of the window. When you click a style (e.g., TOC 1), you’ll see the font size, spacing, and other details—clicking Modify allows you to change these details.
-
7
Make your changes and click OK. You can choose different fonts, alignments, colors, and numerous other details for each selected style. Alternatively, you can keep the defaults, which come from the table of contents template you selected.
-
8
Click OK. The style changes you’ve made will apply to your table of contents immediately.


Advertisement
Ask a Question
200 characters left
Include your email address to get a message when this question is answered.
Submit
Advertisement
Video
Thanks for submitting a tip for review!
About This Article
Article SummaryX
1. Click the References tab.
2. Click Update Table.
3. Select an update option.
4. Click OK.
Did this summary help you?
Thanks to all authors for creating a page that has been read 60,117 times.
Is this article up to date?
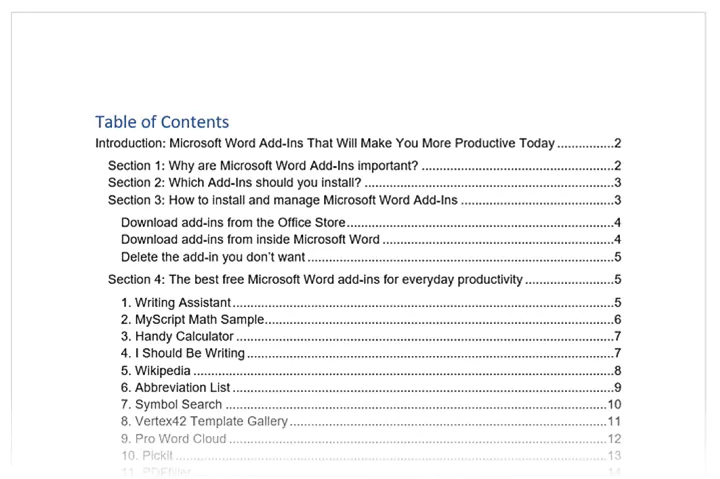
When you work with a long Word document that includes headings, you may want or need to meet the requirements for creating a Table of Contents or several Tables of Contents. The Table of Contents lists the headings in a document, along with the numbers of the pages where the headings appear.
By default, adding a Table of Contents can make it easy for the reader to locate document content quickly. The Table of Contents allows jumping from one location to another.
Word offers several ways to create a Table of Contents. Some of the common ways:
1. Create a pre-defined Table of Contents (simplest way).
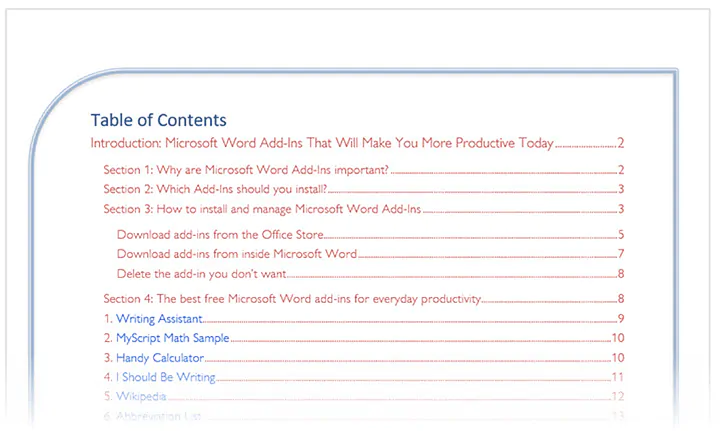
By default, Word creates a Table of Contents from the text formatted with sequential heading styles: Heading 1, Heading 2, Heading 3:

2. Create a custom Table of Contents.
You can include or exclude in a Table of Contents any of the used styles such as custom styles:

3. Create a Table of Content from parts of texts:

A Table of Contents created by the appropriate functionality has hyperlinks to navigate the document quickly. To use a hyperlink, hover the mouse over the appropriate entry in the table and Ctrl+Click to follow the link (see how open hyperlinks without holding Ctrl).
Notes:
- Some requirements recommend creating a Table of Contents if the document has more than 10 pages.
- You can also download templates and use them to fulfill the requirements.
Preparing a document for creating a Table of Contents
Before creating a Table of Contents in Word, ensure that all needed headings are formatted with Word’s heading styles. These allow Word to recognize and include them in the appropriate list.
You can create a Table of Contents, then apply a heading style to some paragraphs and update created Table of Contents to fulfill it.
Don’t forget to update headings and any related items in the document!
Create a Table of Contents – simplest way
To create a Table of Contents in a Word document, do the following:
1. Position the cursor in the document where you want to insert the Table of Contents.
2. On the Reference tab, in the Table of Contents group, click the Table of Contents button:

3. From the Table of Contents dropdown list, select one of the built-in Tables:

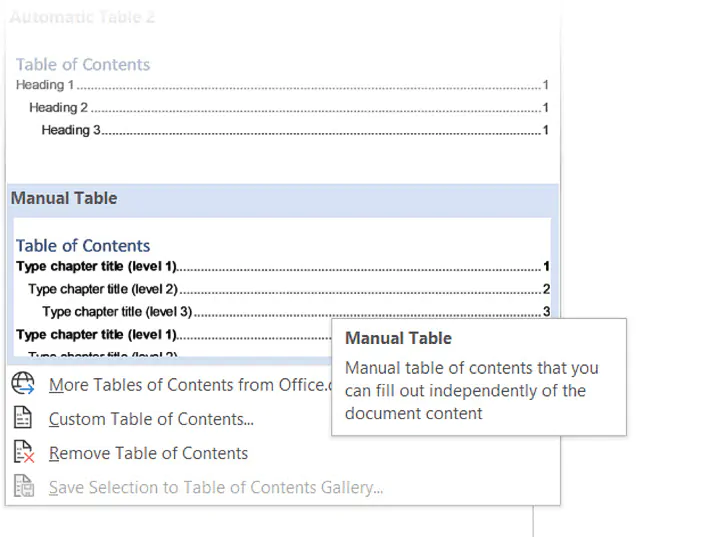
- Automatic Table 1 inserts a Table of Contents with the title Contents and includes all text styled as Heading 1, Heading 2, or Heading 3.
- Automatic Table 2 inserts a Table of Contents with the title Table of Contents and includes all text styled as Heading 1, Heading 2, or Heading 3.
- Manual Table inserts a Table of Contents with the title Table of Contents and includes placeholders that are not linked to the document content (see an example):

Note: See how to modify a style of Table of Contents.
After selecting any of the built-in tables, Word creates a Table of Contents using the selected template. E.g.:
Create a custom Table of Contents
To create a Table of Contents that contains not only Heading 1 – Heading 3 styles, do the following:
1. Position the cursor in the document where you want to insert the Table of Contents.
Note: The custom Table of Contents does not automatically create a title (e.g., Table of Contents or Contents).
2. On the Reference tab, in the Table of Contents group, click the Table of Contents button:
3. From the Table of Contents dropdown list, select Custom Table of Contents…:

In the Table of Contents dialog box, on the Table of Contents tab (is displayed by default, all other tabs are grayed):

- In the General section (we recommend starting from this section because its options can change the selected parameters in other sections):
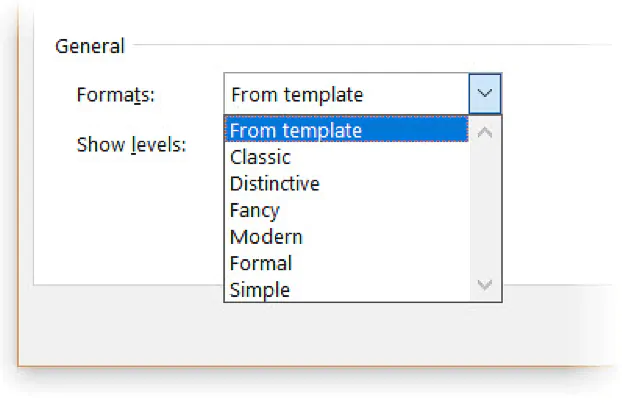
- From the Format dropdown list, select a visual format:

- From template is based on the styles established in the current template
- Classic
- Distinctive
- Centered
- Formal
- Simple
Note: Choose any proposed formats and see how the new list will look in the Print Preview section. E.g., the Formal format:

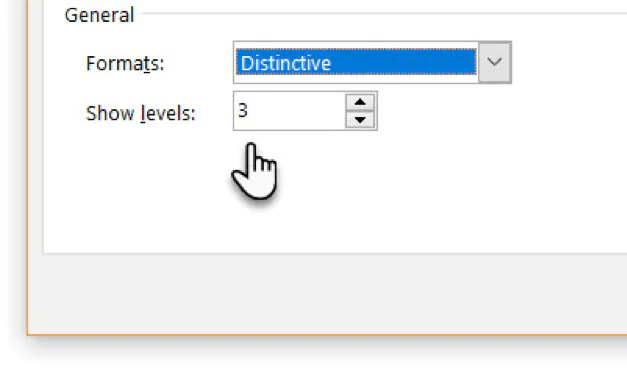
- In the Show levels field, type or select the number of levels you want to include in the Table of Contents. Word will display headings starting from Heading 1 to the selected level (see how to customize which heading or styles should be displayed). E.g., 5 levels:
- From the Format dropdown list, select a visual format:


See all the changes and choices in the Print Preview and Web Preview sections:
- In the Print Preview section (the selected Format in the General section can change all options in that section):
- Clear the Show page numbers check box if you prefer to hide page numbers (see how to hide page numbers for some headings):
If you deselect this option, all other options in the Print Preview section will disappear.
- Clear the Right align page numbers check box to display page numbers right after items text:
If you deselect this option, you can’t choose the tab leader for page numbers.
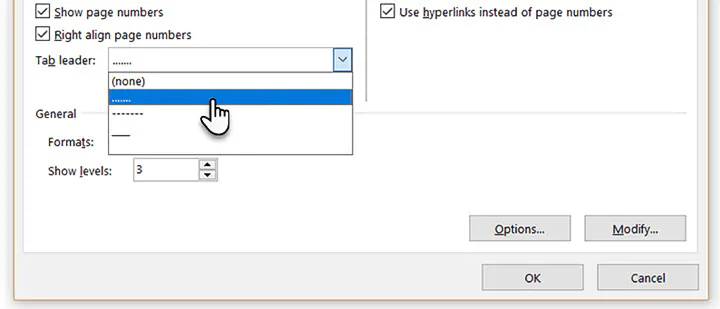
- From the Tab leader dropdown list, select the tab leader you need. You can select dots, dashes, or lines that appear before the page numbers (see how to customize tab leaders for different headings):
- Clear the Show page numbers check box if you prefer to hide page numbers (see how to hide page numbers for some headings):
- In the Web Preview section of the Table of Contents dialog box (shows how your Table of Contents will look if you convert your Word file to a web page):
- Clear the Use hyperlinks instead of page numbers check box if you prefer to see the same view as in Print Preview:
- Clear the Use hyperlinks instead of page numbers check box if you prefer to see the same view as in Print Preview:
- Click the Options… button to customize which styles and in which order should be included in the Table of Contents. See Create a Table of Contents of non-predefined styles and Table entry fields for more details.


Customize a Table of Contents styles
- Click the Modify… button to modify pre-defined styles for a Table for Contents.
In the Style dialog box, select the style you want to modify:

- In the Preview field, see how the selected style looks,
- Under the Preview field, see the main options of the selected style,
- If you need to change the selected style, click the Modify… button.
In the Modify Style dialog box, make changes you need, then click the OK button:


See how to customize Table of Contents styles for more details.
Add a title to the custom Table of Contents
After inserting a new Table of Contents, manually type a title above the list. E.g.:

To see the proposed field and have all the features of the standard Table of Contents, do the following:
1. Add the pre-defined Table of Contents in the simplest way (see above).
2. Edit the Table of Contents to apply any customization you need.
Attention! We highly recommend checking the formatting requirements, accepted by your college, university, company, or established on the project, etc.
Notes: See also how to customize a Table of Contents for more details.
Empty the Table of Contents
After creating a Table of Contents, it can be created with the message “No table of contents entries found”:
![]()
The main cause for this message is that Word could not find the text with style Heading 1, Heading 2, or Heading 3 in the document (by default, a Table of Contents contains only these three styles, see how to customize it to choose styles you need).
To solve that problem, for each heading that you want to be displayed in the Table of Contents, select the heading text (paragraph or block of text). Then do one of the following:
- On the Home tab, in the Styles group, choose any of the Headings:

- Right-click on the selection, click the Styles button in the Mini toolbar, then select a Heading style you want:

- Position the cursor in a paragraph with the text you want to change to the Heading. Then on the Reference tab, in the Table of Contents group, click the Add Text button, then choose the level you need:

- Use the shortcuts for Headings:
- Alt+Ctrl+1 to apply Heading 1,
- Alt+Ctrl+2 to apply Heading 2,
- Alt+Ctrl+3 to apply Heading 3.


Don’t forget to update headings and any related items in a document!
Update a Table of Contents
Word will not automatically update any Table of Contents after adding, deleting, or modifying included headings and pages. You need manually update them, follow the next steps:
1. Click on the Table of Contents and do one of the following:
- On the References tab, in the Table of Contents group, click the Update Table button:

Note: If Word doesn’t recognize any Table or List in the document as a Table of Content, it shows the appropriate message (to solve that, fix or recreate a Table of Contents):

- Right-click the list and select Update Field from the shortcut menu:

- Click anywhere in the Table of Contents to show the field options. At the top of the field borders, click the Update Table… button:


See also how to lock and unlock updating for fields.
2. In the Update Table of Contents dialog box, select what you need to update:

We recommend selecting the Update entire table option always.
3. Click the OK button to start updating.
Select a Table of Contents
To make any changes, such as modifying the Table of Contents, you need to select the total Table of Contents lines, including the last, empty line right after the Table of Contents entries:

To select all the Table of Contents, you can also click the Field button:

Edit an existing Table of Contents
If you need to modify an existing Table of Contents, you can:
- Delete existing Table of Contents and create a new one,
- Edit an existing field.
To edit the existing Table of Contents, follow the next steps:
1. Do one of the following:
- Click anywhere on the Table of Contents, then on the References tab, in the Table of Contents group, click the Table of Contents button, then select Custom Table of Contents… from the dropdown list.
- Select all the lines of the Table of Contents (see how to select it above), then right-click on the selection and choose Edit Field… in the popup menu:

In the Field dialog box, click the Table of Contents… button:

Note: You can see that button only if you have selected all the existing Table of Contents lines.
2. In the Table of Contents dialog box, on the Table of Contents tab, select the options you need.
Be careful! Some options selected for the existing Table of Contents can be lost.
Delete a Table of Contents
To delete a Table of Contents, do one of the following:
- On the References tab, in the Table of Contents group, click the Table of Contents button, then choose Remove Table of Contents from the dropdown list:

- Click inside the Table of Contents to show the field options. At the top of the field borders, click the Table of Contents button, then choose Remove Table of Contents:


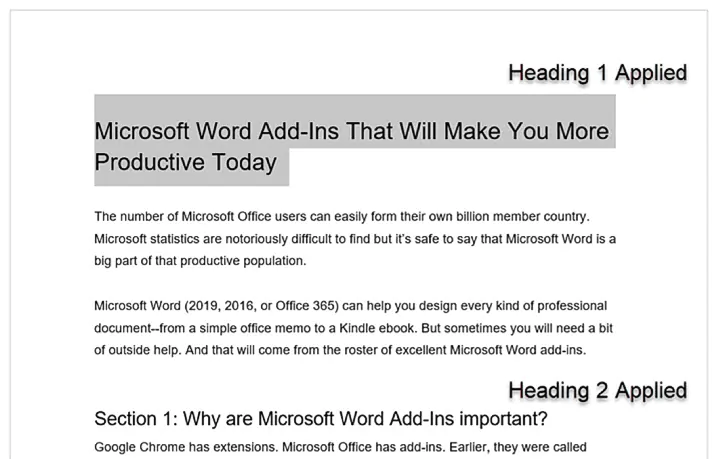
Look at the nearest Microsoft Word document you have. There’s a good chance that it’s a document that’s just a few pages long. And without a Word table of contents.
But pick up software documentation or a research report. It wouldn’t be called a “professional document” without a pretty well-formatted Table of Contents.
You shouldn’t look at the job of making a Table of Contents (we will occasionally call it a TOC also) as a chore. Making a TOC isn’t only for dense reports or your next bestseller. It can be for something as simple as a daily journal or a school assignment. You should create a Table of Contents whenever appropriate.
Microsoft Word makes it easy. We will look into a few ways to create a Table of Contents in Word.
But first, let’s go into the benefits of a Table of Contents for a Word document.
Get your free Word shortcuts cheatsheet!
Download the print-ready shortcut cheatsheet for Word.
Why is a Table of Contents so essential?
Are TOCs relevant when we have bookmarks and advanced search features on digital devices? The short answer is — Yes. A Table of Contents isn’t just for navigating long documents.
Here are five benefits you should immediately look at:
- It gives the reader a bird’s eye view of the document. A TOC is like an outline. At a glance, you can see how a document will flow from one topic to the next.
- It makes a document look professional. A document with a TOC looks more organized and professional than a document that lacks one.
- It is a key organizational aid for the author. Think of it like a roadmap and the first draft for a TOC can help you arrange your thoughts (and even brainstorm).
- It makes a document easier to discuss. A TOC can signal the quality of the document. Your teacher or your book agent can tell at a glance if the material is worth a read by just glancing at the table of contents.
- It gives you a learning path. A TOC is a well-ordered series of steps. Steal them from an instructional book to understand the learning path on any subject of your choice.
Check out this quick video on how to create a table of contents in Word:
How to Create a Table of Contents in Word
Microsoft Word can automatically build a Table of Contents for you. You need to only outline the content and then specify the heading styles with basic formatting. Let’s take this step by step.
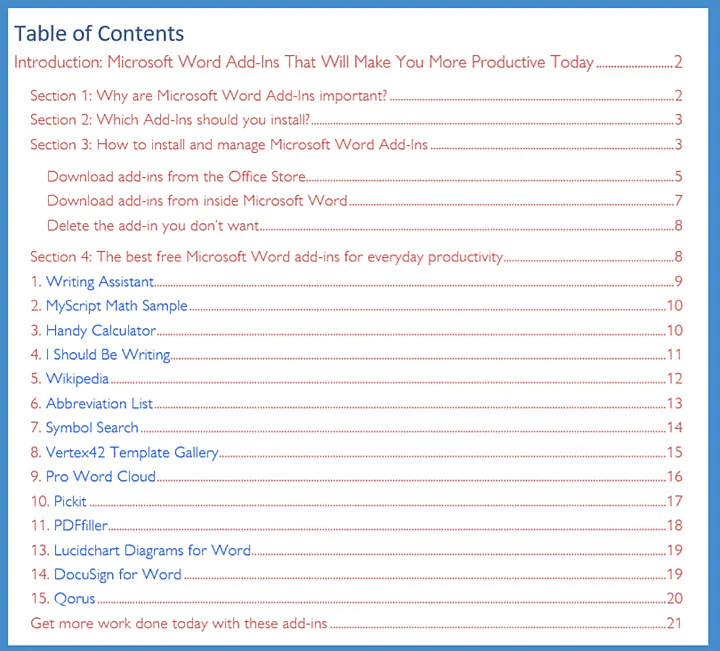
1. Format your document using heading styles. Select each chapter in your document and apply Heading Styles to them. Here, you are marking up the section headers so that Word can recognize them.
Go to Ribbon > Home > Styles. Select the text and apply headings for all the text you want to include in the table of contents.
 You can create a hierarchy within the main chapters with the help of the heading styles. For instance, use Heading 1 for new sections or chapters. Heading 2 for subsections within the section, and Heading 3 for smaller units or topics inside them.
Word scans the document for any text formatted as either Heading 1, 2, or 3 and then uses these to create the format for the TOC.
2. Position the Table of Contents on the page. Place the cursor on the specific position where you want the TOC to appear in your document. This is commonly somewhere at the beginning of the document.
4. Click the Table of Contents command. Go to Ribbon > References > Table of Contents. Choose from one of the two automatic types available. The only difference between the two is the heading of «Contents» or «Table of Contents» at the top.
 5. The Table of Contents is inserted automatically. Word scans the document and uses the heading styles to construct the order of the sections and subsections and their page numbers. This is a barebones TOC and you can continue to work with this and make it more stylish.
6. Update the Table of Contents anytime. You can always update a Table of Contents that has been created automatically. Update the table if you change the heading styles, rearrange the contents, or change the text. Also, update it if you make any changes to the content that affects the page numbers.
To update a table of contents that was created automatically, click References > Update Table.
 Choose to Update page numbers only or Update entire table if you want to update the page numbers and the text.
 7. Create a Table of Contents manually. When the automatic method is so effortless, why would you feel the need to make one manually? There could be two reasons:
- The document is without any styles which Word can recognize.
- The document has too much of variety makes an automatic TOC difficult.
To create a manual table, go to References > Table of Contents > Click the dropdown to reveal the option for Manual Table.
Microsoft Word inserts a TOC with placeholders which you can now edit. You can modify this with your own fonts and colors. Do remember that you also have to insert the page numbers manually too.
A TOC created manually cannot be updated automatically.
You do not have to settle for the basic Table of Contents that Microsoft Word creates for you. You can modify any TOC and even create a custom Table of Contents of your own.
How to customize the Table of Contents
You can easily customize a TOC with the Table of Contents dialog box. Go to References > Table of Contents > Custom Table of Contents to launch the dialog.
Any changes you make here will be visible in the Print Preview and Web Preview windows.
Seven advanced techniques to customize the TOC
1. Choose a different format for the TOC
You can change an entire table by choosing a different format. In the General section, expand the dropdown for Formats and choose an appearance.
2. Change the appearance of the items in the TOC
Remember, the appearance of your TOC is ultimately controlled by style definitions. You may want to tweak the overall look of the TOC by creating your own styles for the headings. These modified styles can be saved alongside the in-built ones and applied across the document for a consistent look. Follow these steps.
1. Click Modify. If the Modify button is grayed out, change Formats to From template.
 2. In the Styles list, click the level that you want to change and then click Modify. Here, TOC 1 corresponds to heading level 1 in your document, TOC 2 to heading level 2, TOC 3 to heading 3 and so on.
 3. In the Modify Style dialog box, you can change the font or its color. Make any other formatting change like text indentation and then click OK.
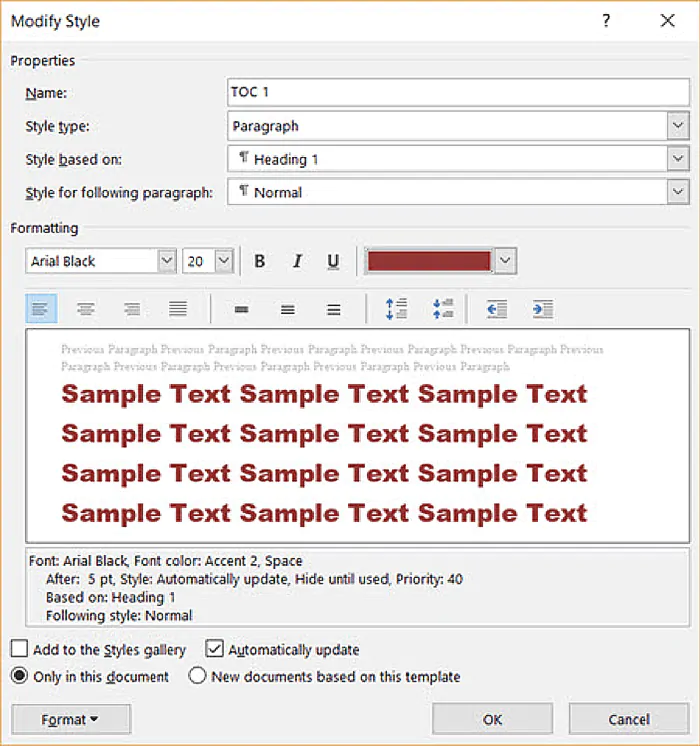
4. Before you click OK, you can choose whether the style change applies to the current document or to all future documents. To save it for future use, click the checkbox for Add to the Styles gallery.
3. Change the levels of the style headings shown
A TOC can be itemized, or you can just include the major sections. The Show levels number allows you to change the number of levels displayed in your table of contents. The “Levels” here refers to the style headings you have applied to your sections.
For instance: H1, H2, H3… etc. If you set it on 2, then all text with the Heading 1 style or the Heading 2 style is displayed.
4. Change or add dot leaders in the TOC
Dot leaders are the lines or dots that connect the items in the index to page numbers. These leader lines are mentioned in many style guides as a necessary part of thesis documents.
In the Table of Contents dialog box, click the dropdown for the Tab leader list and select the dotted line option. Alternatively, choose the leader line you want or select “none” to remove it from the TOC.
5. Add a non-heading style
Word won’t include a non-heading style when it inserts an automatic TOC. By default, Word only includes headings 1 through 9. But it gives you a method to include any other style you create in the index. Let’s say you want to add another heading called “A Brief Guide” at the top of the content and the TOC.
In the Table of Contents dialog box, click the Options button to open this screen:
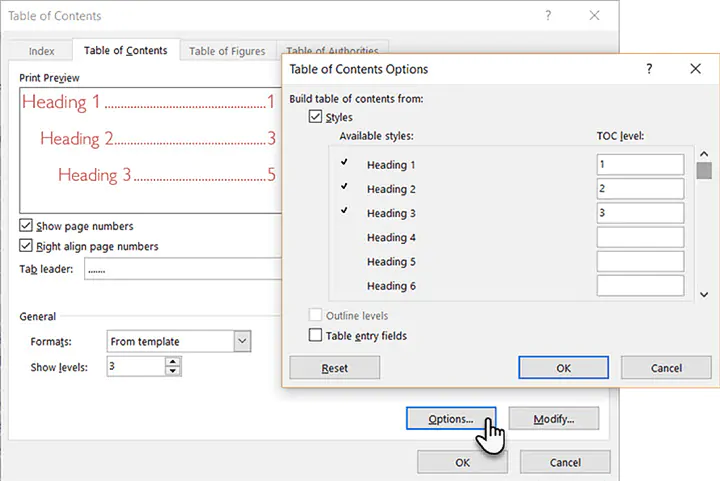
Right now, it maps the styles in use only to the TOC levels. As you can see, the three styles, Heading 1, Heading 2, and Heading 3 are mapped as levels 1. 2, and 3.
Go down the boxes until you find Title, which has no mapped TOC level. Enter 1 to map Title to the TOC top level.
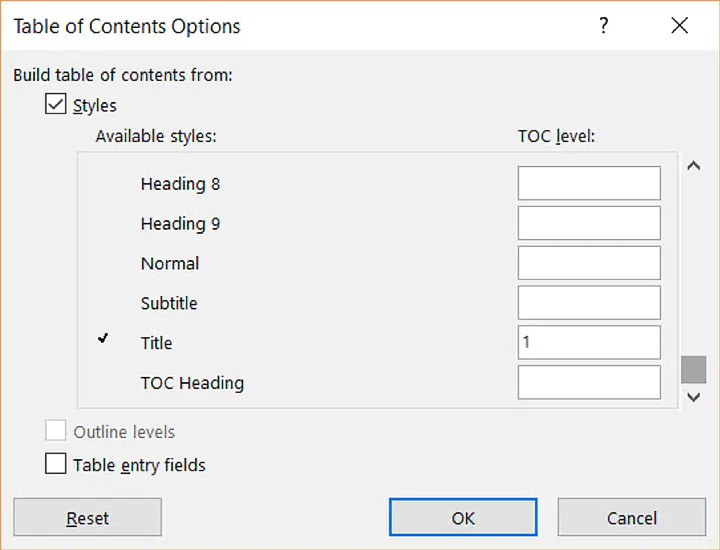
Click OK twice to exit the dialogs. Word will prompt you to replace the contents. Click Yes to replace the TOC.
6. Create a clickable Table of Contents
Creating a hyperlinked Table of Contents is expected in the digital age. Navigation is faster. It is also another condition to submit a thesis or dissertation.
Click the Use hyperlinks instead of page numbers checkbox.
Also, uncheck the Show page numbers box if you just want to use the hyperlinks.
7. Place a simple border around the Table of Contents
You can use Word’s Shapes feature to insert a border around the TOC. Set Shape Fill to “No Fill” and then add Shape Styles or use Format Shape to design the look of the pseudo-border around the table.
Remember to add Table of Contents to your documents
The automatic Table of Contents feature is a time saver. But to catch the eye, you need to dive into different styles and custom tables. To sum up:
- Structure your document.
- Decide the levels you want to display.
- Change the style attributes to match your needs.
As you begin making your own, you will have your own questions. Hopefully, this guide has illustrated the basic process well enough for you to take the plunge. Are you more comfortable with Table of Contents now?
If you are looking to sharpen your Microsoft Office skills, check out our Microsoft Word course to learn time-saving tips and tricks for formatting your documents.
Ready to master Microsoft Office?
Start learning for free with GoSkills courses
Start free trial
Insert, Format and Update a Table of Contents or TOC in Microsoft Word (The Easy Way)
by Avantix Learning Team | Updated April 14, 2022
Applies to: Microsoft® Word® 2013, 2016, 2019, 2021 or 365 (Windows)
You can create a table of contents quickly in Word using built-in heading styles. Although you can insert a table of contents (TOC) using different strategies in Word documents, it’s easiest to use Heading 1, Heading 2 and so on to format headings and then generate your table of contents. You can then change the formatting and update the TOC when your document changes.
Because a table of contents is a Word field, you should not type over it as any typing will be removed when you update the TOC.
There are 4 steps for creating a table of contents in Word using heading styles:
- Prepare the document by applying built-in heading styles such as Heading 1, Heading 2 and so on
- Create or insert the table of contents
- Format the table of contents
- Update the table of contents
Both custom and automatic table of contents can be updated when changes are made to the document. An automatic table of contents is inserted in a content control and some users may have difficulty working with, or understanding, content controls (which act as containers for specific content). The Manual Table that appears in the Insert Table of Contents drop-down menu is an option that requires the user to type entries and is not an efficient way to create a table of contents in Word (and should rarely be used).
Recommended article: 14 Timesaving Microsoft Word Shortcuts to Quickly Select Text
Do you want to learn more about Microsoft Word? Check out our virtual classroom or in-person classroom Word courses >
Step 1: Prepare the document by applying built-in heading styles
In order to easily insert a table of contents in Word, you’ll need to apply heading styles to titles and subheadings in your document first.
To apply a built-in heading style to a title or subheading:
- Click in the title or subheading to which you wish to apply a built-in heading style. Each title or subheading is a paragraph and should be followed by a hard return (you pressed Enter or Return).
- Click the Home tab in the Ribbon and in the Styles group, click a heading style (such as Heading 1). You can click the down arrow on the bottom right of the Styles Gallery to display more styles.
Below is the Styles Gallery in the Home tab in the Ribbon in Word:

It’s common to have one or two levels of headings (Heading 1 and Heading 2), but you can apply multiple heading levels. By default, Word will typically display the next heading level if a previous level has been used in the document.
You can also click in a title or subheading and press Ctrl + Alt + 1 to apply Heading 1, Ctrl + Alt + 2 to apply Heading 2 and so on.
Step 2: Create or insert the table of contents
Once you have applied built-in heading styles, you can easily create a custom table of contents or TOC.
To create or insert a table of contents:
- Click in the document where you want to insert or create a table of contents (typically at the beginning of the document).
- Type «Contents» or «Table of Contents» and press Enter. Format the text, but do not use built-in heading styles.
- Click below the title where you want to insert the table of contents.
- Click the References tab in the Ribbon and click Table of Contents in the Table of Contents group. A drop-down menu appears.
- Select Custom Table of Contents. A custom table of contents will not appear in a content control. A dialog box appears.
- Enter the number of levels to display in the table of contents beside Show levels (such as 2).
- Select or check Use hyperlinks instead of page numbers if you want to create active hyperlinks or links if you save the document as a PDF (Portable Document Format) file. This will enable users to click the table of contents in the PDF to jump to specific locations in the file.
- Ensure Show page numbers is selected if you want page numbers to appear in the table of contents. If you select Show page numbers, the page numbers are typically right aligned by default. If necessary, select a tab leader from the Tab leader drop-down menu to change the character that leads up to the page numbers in the table of contents.
- Select an option from the Formats drop-down menu if necessary. It’s best to select From template if you want to modify the formatting of the table of contents.
- Click OK. A table of contents appears in the document. This is a Word field so if you click in it, it will normally appear in grey. Do not type manual entries in the table of contents.
The Table of Contents dialog box appears as follows:

Step 3: Format the table of contents
You can format a table of contents in many ways using the Table of Contents dialog box:
- Click in the table of contents.
- Click the References tab in the Ribbon and click Table of Contents in the Table of Contents group. A drop-down menu appears.
- Select Custom Table of Contents. A dialog box appears.
- Click Modify. Note: you will not be able to select Modify if you have selected any option other than From Template from the Formats drop-down menu. A dialog box appears with TOC styles.
- Click a TOC style. For example, click TOC 1 if you want to format the first level items in the table of contents.
- Click Modify. The Modify Style dialog box appears.
- Select the desired options (such as font size, bold, etc.). You can also select Format and choose other options from the drop-down menu. It’s a good idea to turn off Automatically update so if a user selects and formats paragraphs manually in a table of contents, the table of contents does not update with the changes. It’s also usually best to select Only in this document so that the formatting changes apply only to the current document, not future documents based on the template (typically the Normal template).
- Click OK.
- Repeat for other TOC levels.
- Continue clicking OK until you return to the document. A dialog box appears asking if you want to replace the table of contents.
- Click OK.
You can modify an automatic table of contents in the same way. Click in the automatic table of contents and follow steps 2-9.
Below is the Style dialog box that appears when you click Modify:

If you selected 2 heading levels to include in your table of contents, you may want to modify TOC 1 and TOC 2.
When you click a TOC style and then click Modify, the following Modify Style dialog box appears:

You can select options under Formatting or click Format on the bottom left and select other options such as Font or Paragraph.
The following table of contents example includes 2 heading levels (TOC 1 and TOC 2):

Step 4: Update the table of contents
After you edit your document, you can update the table of contents at any time.
To update a table of contents:
- Click in the table of contents.
- Right-click and select Update Field from the drop-down menu or press F9. You can also click the References tab and then click Update Table in the Table of Contents group. A dialog box appears.
- Click Update page numbers only or Update entire table (recommended).
- Click OK.

Navigate to table of contents entries
If you want to quickly jump to a table of contents entry, Ctrl-click it in the table of contents.
Remove a table of contents
You can remove a table of contents if it’s no longer required.
To remove a table of contents:
- Click in the table of contents.
- Click the References tab in the Ribbon and click Table of Contents in the Table of Contents group. A drop-down menu appears.
- Select Remove Table of Contents.
You can also select the entire table of contents by dragging over it and then pressing Delete.
Table of contents can be generated easily from built-in heading styles so it’s best to use the built-in styles when formatting your Word documents rather than creating new styles for headings.
This article was first published on February 8, 2020 and has been updated for clarity and content.
Subscribe to get more articles like this one
Did you find this article helpful? If you would like to receive new articles, JOIN our email list.
More resources
How to Create, Edit, Use and Save Templates in Microsoft Word
10 Microsoft Word Navigation Shortcuts for Moving Around Faster
How to Insert an Em or En Dash in Word (4 Ways with Shortcuts)
How to Keep Text Together in Microsoft Word (Words, Lines or Paragraphs)
How to Convert a PDF to Word in Microsoft Office (No Third Party Programs Needed)
Related courses
Microsoft Word: Intermediate / Advanced
Microsoft Excel: Intermediate / Advanced
Microsoft PowerPoint: Intermediate / Advanced
Microsoft Word: Long Documents Master Class
Microsoft Word: Styles, Templates and Tables of Contents
Microsoft Word: Designing Dynamic Word Documents Using Fields
VIEW MORE COURSES >
Our instructor-led courses are delivered in virtual classroom format or at our downtown Toronto location at 18 King Street East, Suite 1400, Toronto, Ontario, Canada (some in-person classroom courses may also be delivered at an alternate downtown Toronto location). Contact us at info@avantixlearning.ca if you’d like to arrange custom instructor-led virtual classroom or onsite training on a date that’s convenient for you.
Copyright 2023 Avantix® Learning
Microsoft, the Microsoft logo, Microsoft Office and related Microsoft applications and logos are registered trademarks of Microsoft Corporation in Canada, US and other countries. All other trademarks are the property of the registered owners.
Avantix Learning |18 King Street East, Suite 1400, Toronto, Ontario, Canada M5C 1C4 | Contact us at info@avantixlearning.ca