
Word for Microsoft 365 Outlook for Microsoft 365 Word 2021 Outlook 2021 Word 2019 Outlook 2019 Word 2016 Outlook 2016 Word 2013 Outlook 2013 Word 2010 Outlook 2010 Word 2007 Outlook 2007 More…Less
To convert text to a table or a table to text, start by clicking the  Show/Hide paragraph mark on the Home tab. This lets you see how text is separated in your document.

Convert text to a table
-
Insert separator characters—such as commas or tabs—to indicate where to divide the text into table columns.
Note: If you have commas in your text, use tabs for your separator characters.
-
Use paragraph marks to indicate where you want to begin a new table row.
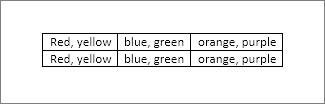
In this example, the tabs and paragraph marks will produce a table with 3 columns and 2 rows:

-
Select the text that you want to convert, and then click Insert > Table > Convert Text to Table.
-
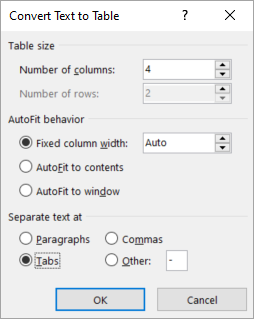
In the Convert Text to Table box, choose the options you want.
Under Table size, make sure the numbers match the numbers of columns and rows you want.
Under AutoFit behavior, choose how you want your table to look. Word automatically chooses a width for the table columns. If you want a different column width, choose one of these options:
To do this
Choose this option
Specify a width for all the columns
In the Fixed column width box, type or select a value.
Resize the columns to fit the width of the text in each column
AutoFit to contents
Resize the table automatically in case the width of the available space changes (for example, web layout or landscape orientation)
AutoFit to window
Under Separate text at, choose the separator character you used in the text.
-
Click OK. The text converted to a table should look something like this:


Convert a table to text
-
Select the rows or table you want to convert to text.
-
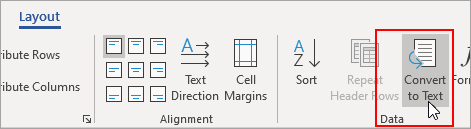
On the Layout tab, in the Data section, click Convert to Text.
-
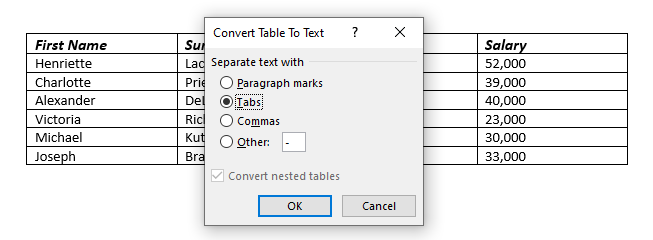
In the Convert to Text box, under Separate text with, click the separator character you want to use in place of the column boundaries. Rows will be separated by paragraph marks.
-
Click OK.
Need more help?
After creating a table and filling it, the main task is to format the data and the table itself. The data in a table is formatted like any other text in Word by changing the font, aligning the text, etc.
A table is a collection of information or data, usually represented in horizontal rows and vertical columns. The box at the junction of each column and row is a cell that contains data such as text, numeric information, or images. You can select the cell, row, column, or entire table and apply formatting to the selected region.
Note that you can sort data in a table, perform calculations on numbers in a Word table, insert some formulas and functions. You can use a cell address to refer to a cell in the formula.
Select table elements
To select table a single cell:
- Using the mouse: Click the left edge of the cell:

- Using the keyboard: Position the cursor on the cell and select its content by pressing Shift+arrow (left or right).
To select multiple cells:
- Using the mouse: Click the left or right edge of the highest or lowest left cell in the range and move the mouse pointer diagonally to other cells to the right or left, down or up:

- Using the keyboard: Click the first cell you want to select, and then do one of the following:
- To select adjacent cells, hold down the Shift key, and click the last cell you want to select. The first, last, and all the cells in between will be selected.
- To select non-adjacent cells, hold down the Ctrl key, and click each additional cell you want to select. All the cells you clicked will be selected.

To select a single table column:
- Using the mouse: Click the column’s top gridline or top border:

- Using the keyboard: Point to the top of the column. When the cursor changes to a downward-pointing arrow, click the column.

To select multiple columns:
- Using the mouse: Click the column’s top gridline or top border and move the mouse pointer to the right or left.
- Using the keyboard: When the cursor changes to a downward-pointing arrow, click the first column. Then do one of the following:
- To select adjacent columns, hold down the Shift key, and then click to select the last column.
- To select non-adjacent columns, hold down the Ctrl key, and then click to select each additional column.
To select a single table row:
- Using the mouse: Click to the left of the row:

- Using the keyboard: Point to the left edge of the row. When the cursor changes to an upward-pointing arrow, click to select the row.
To select multiple rows:
- Using the mouse: Click to the left of the row and move the mouse pointer to the rows above or below.
- Using the keyboard: When the cursor changes to an upward-pointing arrow, click the first row. Then do one of the following:
- To select adjacent rows, hold down the Shift key, and then click to select the last row.
- To select non-adjacent rows, hold down the Ctrl key, and then click to select each additional row.
See also how to select the entire table.
Format table elements
After creating a table, you can format individual cells (spaces formed by the intersection of a row and a column) or entire rows and columns by aligning text in cells, resizing columns and rows, and adding borders, shading, or colors.
Merge and split cells
You can merge multiple cells into one cell that spans multiple columns or rows. For example, if you want to enter a heading for multiple table columns in the first row, you can merge cells in the first row (see example above).
To merge cells, select them and do one of the following:
- On the Table Layout tab, in the Merge group, click the Merge Cells button:

- Right-click the selection and select Merge Cells in the popup menu:


In addition to merging multiple cells to create one cell, you can split one cell to create multiple cells.
To split the cell, select it, then do one of the following:
- On the Table Layout tab, in the Merge group, click the Split Cells button:
- Right-click the selection and select Split Cells… in the popup menu:

Note: The Split Cells… item in the popup menu is displayed if only one cell is selected or the cursor is positioned inside the cell. If you select multiple cells, you won’t see Split Cells… in the popup menu.


In the Split Cells dialog box, specify the number of columns and rows created in place of the split cell:

Note: If you select several cells, the Merge cells before split check box in the Split Cells dialog box is selected by default:
- The selected Merge cells before split check box to force Word to merge selected cells into one, then split that one cell into the specified number of rows and columns.
- The deselected Merge cells before split check box to force Word to split every cell into the specified number of rows and columns.
Resize a table and table elements
- Using the mouse:
To resize individual rows and columns, do one of the following:
- Hover your pointer over a row or column border until your pointer becomes two lines with two arrows:

Click and hold as you drag the border to resize the row or column.
- Drag the sliders in the Table Ruler to set to desired height and width. E.g.:

See how to resize an entire table.
- Hover your pointer over a row or column border until your pointer becomes two lines with two arrows:
- Using the keyboard:
- Select what you need to change:
- Position the cursor in a cell in the row or the column, or
- Select entire row or column, or multiple rows or columns.
- Do one of the following:
- On the Layout tab, in the Cell Size group, change the values in the Height and Width fields:

- Open the Table Properties dialog box by doing one of the following:
- On the Table Layout tab, in the Table group, click the Properties button:

- Right-click the table and select Table Properties… in the popup menu:

In the Table Properties dialog box:
- On the Row tab, under Size, select the Specify height check box, then:
- In the Specify height field, type or select the value you need,
- In the Row height is dropdown list, select one of the items:
- At least to specify the minimal height,
- Exactly to fix the row height:

Note: To specify a height for other rows, click the Previous Row and Next Row buttons. Word highlights the appropriate row.
- On the Column tab, under Size, select the Preferred width check box, then:
- In the Preferred width field, type or select the value you need,
- In the Measure in dropdown list, select one of the items:
- Percent to specify the percentage of the table width,
- Inches to fix the column width:
Note: To specify a width for other columns, click the Previous Column and Next Column buttons. Word highlights the appropriate column.
- On the Cell tab, select the Preferred width check box to specify the width for the current column:
- On the Table Layout tab, in the Table group, click the Properties button:
- On the Layout tab, in the Cell Size group, change the values in the Height and Width fields:
- Select what you need to change:


Note: See more about formatting a table.
Align text in a Word table cell
To align the text in one or more cells, select them, and then on the Table Layout tab, in the Alignment group, choose one of the nine proposed alignments:

- Align Top Left (the default alignment),
- Align Top Center,
- Align Top Right,
- Align Center Left,
- Align Center,
- Align Center Right,
- Align Bottom Left,
- Align Bottom Center,
- Align Bottom Right:

Modify text Direction
To change the text direction, select a cell or several cells, and then on the Table Layout tab, in the Alignment group, click the Text Direction button multiple times to cycle through the available directions:

Change the cell margins
When you fill a table, you can change the cell spacing using the Paragraph options. Word offers the options to change the cell margins:

To customize cells margins, select a cell or several cells, then do one of the following:
- On the Table Layout tab, in the Alignment group, click the Cell Margins button:

In the Table Options dialog box:
- To specify cell margins, in the Default cell margins section, type or select the values for Top, Bottom, Left, and Right margins:

- If you prefer to resize the table according to cell margins and specified spacing, leave the Automatically resize to fit contents check box selected.
If you prefer to leave the table without changes, clear the Automatically resize to fit contents check box.
- To specify cell margins, in the Default cell margins section, type or select the values for Top, Bottom, Left, and Right margins:
- Open the Table Properties dialog box.
In the Table Properties dialog box, on the Cell tab, click the Options… button:
In the Cell Options dialog box:
- Clear the Same as the whole table check box,
- To specify cell margins, in the Default cell margins section, type or select the values for Top, Bottom, Left, and Right margins:


Change the space between cells
To increase or decrease the spacing between cells, select a cell or several cells, then do the following:
- On the Table Layout tab, in the Alignment group, click the Cells Margins button:
In the Table Options dialog box:
- To specify the spacing between cells, in the Default cell spacing section, select the Allow spacing between cells check box, then type or select the value for spacing:
- If you prefer to resize the table according to cell margins and specified spacing, leave the Automatically resize to fit contents check box selected.
If you prefer to leave the table without changes, clear the Automatically resize to fit contents check box.
- To specify the spacing between cells, in the Default cell spacing section, select the Allow spacing between cells check box, then type or select the value for spacing:

For example, spacing between cells = 0.2 inches:

AutoFit features
After filling a table, editing the content, or inserting a text, it is possible to autoformat a table for the perfect look.
To use the Word AutoFit features, do the following:
1. Select a table.
2. On the Table Layout tab, in the Size group:
- To make all columns the same width, click the Distribute Columns button.
- To make each row the same height, click the Distribute Rows button.
- Click the AutoFit button, then choose one of the options:

- To fit the columns to the text (or page margins if cells are empty), select AutoFit Contents.
- To fit the table to the document content, select AutoFit Window.
- To keep Word from automatically adjusting the column size, select Fixed Column Width.

 Please Note:
This article is written for users of the following Microsoft Word versions: 2007, 2010, 2013, 2016, and 2019. If you are using an earlier version (Word 2003 or earlier), this tip may not work for you. For a version of this tip written specifically for earlier versions of Word, click here: Converting Text Into a Table.
![]()
Written by Allen Wyatt (last updated November 2, 2019)
This tip applies to Word 2007, 2010, 2013, 2016, and 2019
There are two major ways you can create tables in Word. One way is to create a blank table by any of the various methods provided by Word (such as drawing the table or using the Insert Table tool). The other method is to convert existing text into a table. To convert text into a table, follow these steps:
- Make sure the text that is to be converted into the table contains only a single tab character between each column.
- Select the text you want converted into a table.
- Display the Insert tab of the ribbon.
- Click the Table tool and then click Convert Text to Table. Word displays the Convert Text to Table dialog box. (See Figure 1.)
- Make sure all the table settings in the dialog box are correct.
- Click OK.
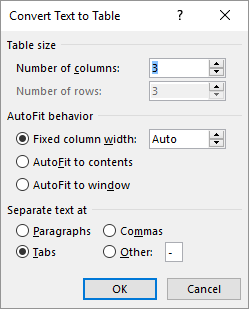
Figure 1. The Convert Text to Table dialog box.
The selected text is immediately converted into a table. In some instances, the width of columns in the resulting table may need to be adjusted. You will know if this is the case because the table will look very strange. Sometimes you can get files from programs such as a spreadsheet that use commas to separate columns. Word will also convert this comma-separated text to a table.
WordTips is your source for cost-effective Microsoft Word training.
(Microsoft Word is the most popular word processing software in the world.)
This tip (7725) applies to Microsoft Word 2007, 2010, 2013, 2016, and 2019. You can find a version of this tip for the older menu interface of Word here: Converting Text Into a Table.
Author Bio
With more than 50 non-fiction books and numerous magazine articles to his credit, Allen Wyatt is an internationally recognized author. He is president of Sharon Parq Associates, a computer and publishing services company. Learn more about Allen…
MORE FROM ALLEN
Inserting Foreign Characters
It is not unusual to need to insert foreign characters (often called diacritical marks) as part of your typing. Word …
Discover More
Protecting Worksheets from Deletion
If you share a workbook with others in your office, you will probably want to make sure that some of the worksheets don’t …
Discover More
Word Count for Headers and Footers
Getting a word count for an entire document is rather easy. If you want a word count for a special part of a document …
Discover More
More WordTips (ribbon)
Cannot Set Heading Rows in a Table
Word allows you to specify which rows in a table should be considered headings. What if setting the headings doesn’t work …
Discover More
Blank Lines Before Tables
Adding a blank line before your table is easy, but Word’s behavior as you attempt to make the insert can depend on where …
Discover More
Borders Disappear on Shaded Table Rows
When creating a table, it is possible that adding row or cell shading can affect how cell borders are displayed. This …
Discover More
Converting Text Into A Table format can help you better organise your data for people reading it.
It also allows you to easier transfer your data between Word and Excel, making it great for any user of both.
If you are learning either software you can view our Excel Course Offerings or Word Course Offerings here.
Converting Your Text To A Table – Simple Example
When Converting your text to a table, you need to first have some text in Word. Here you can see my text, under the title “Alpheius Global Enterprises”.
To convert text into a table the text needs to be in columns using some sort of separator – for example a tab, hyphen, comma or other symbol. My text specifically is seperated by tabs and has 4 columns (this will be important later).

- Highlight the piece of text to be converted into a table format.
- In the Insert ribbon there is a table button.
- Click on the table button and convert text to table.

- A dialog box will appear asking how many columns you want, how you want the text to fit and what are the separators used in your document
- Choose the number of columns required, fixed column width and our document has tabs which are separating the text then click OK.
- Your document will now be in a table format.

After selecting your options hit OK. For this example I chose 4 columns as you can see from the inital data, as well as that they are seperated by tabs. For your data you will want to specify differently based on your own data. After hitting OK you should see the results immediately. Below you can see my data changed into a table!

If you want to learn more about Tables and how they can be formatted, read our guide on columns for a newsletter in Word.
Why Convert Between Table And Text?
Going between tables and texts allows you simply to have different types of visual representation.
Ultimately the choice will be up to your discretion but follow these brief guidelines!
If you are doing a presentation based more on raw statistics and important facts maybe a table is more suitable. Tables are more analytical in nature and tend to lend themselves more to situations that are more formal and possibly educational (for example sending your coworker a plan for your business).
If you want to do a more graphically appealing layout maybe the raw text with some formatting is more appropriate (more on Font Formatting In Excel here). Text tends to be better for more informal presentations, and in general for a more casual audience (for example just sending a friend over some information found).
Converting From Table To Text
You can now also convert your table back to text if need be!
- First off just highlight the table using the table highlight option in the top right corner of the table
- Go to the Table Tools and select the layout ribbon
- In the data group at the end of the ribbon you will find the command convert to text
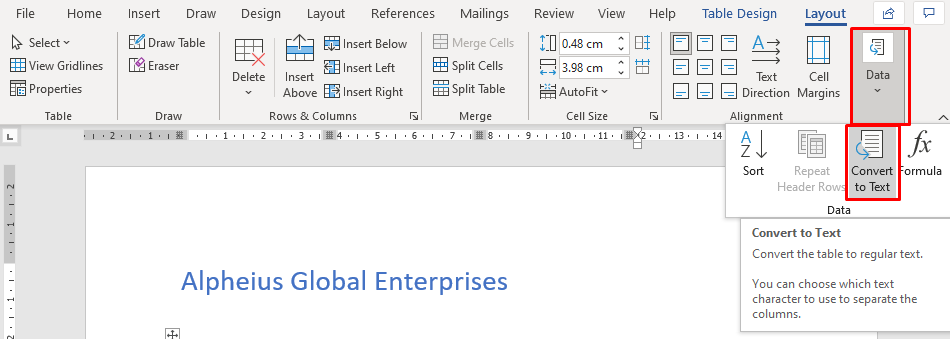
- The convert to text dialog box will appear. Use the tab option as this will keep your text in similar columns to your table
This will take your text back to it’s original form. Whichever you decide, Table or Text, you can save either for later use – read our guide here on How to Create and Use Building Blocks in Word.
Conclusion:
This guide has given you the tools on how to convert text into a Word table and a Word table back into text. Becoming proficient in these simple tools will help greatly when presenting your work, as well as when trying to move your work between Word and Excel. Try and experiment with these different types of representation to see what fits you best – but follow our rough guidelines if you are in need of guidance.
Create, Modify and Apply Table Styles in Word Documents
by Avantix Learning Team | Updated August 21, 2022
Applies to: Microsoft® Word® 2013, 2016, 2019, 2021 or 365 (Windows)
You can apply table styles to your Word tables to format them quickly and consistently. Word is shipped with several built-in table styles or you can create your own. You can edit table styles by modifying borders, shading, character formatting, paragraph formatting and table properties. If your document includes multiple tables, table styles can save a lot of time.
Note: Buttons and Ribbon tabs may display in a different way (with or without text) depending on your version of Word, the size of your screen and your Control Panel settings. For newer versionns of Word, Ribbon tabs may appear with different names. For example, the Table Tools Design tab may appear as Table Design.
Recommended article: How to Keep a Microsoft Word Table Together on One Page
Do you want to learn more about Microsoft Word? Check out our virtual classroom or live classroom Word courses >
Table styles and themes
Every Word document uses a document theme which includes a font theme and color theme. The colors used in table styles are based on the color theme.
You can select document themes, color themes and font themes using the Themes, Colors or Fonts drop-down menus on the Design tab in the Ribbon:

You can also create your own custom color themes so your tables can be formatted using your organization’s colors.
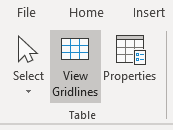
Display gridlines
When you are working with tables, it’s a good idea to turn gridlines on. Borders, which are a format, will print. Gridlines do not print.
To display gridlines:
- Click in a table.
- Click the Table Tools Layout or Table Layout tab.
- Click View Gridlines. Gridlines will stay on for all Word documents.
View Gridlines appears on the Table Tools Layout or Table Layout tab when you click in a table:
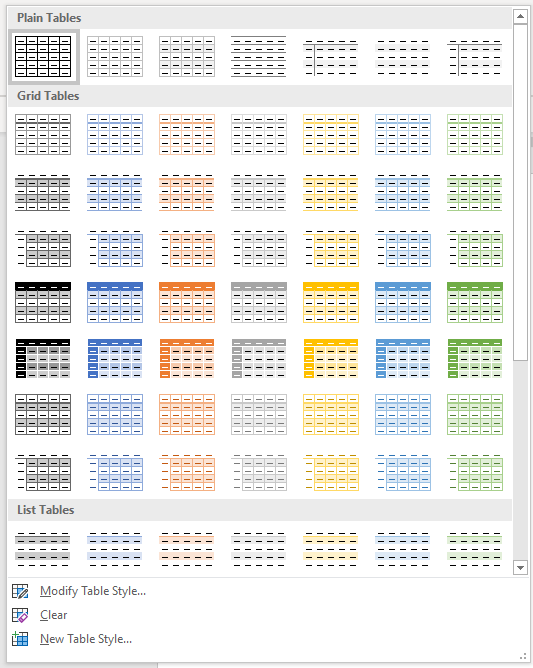
Apply a table style
If your Word document contains multiple tables that you want to format in a consistent way, it’s best to use table styles rather than applying manual or direct formatting to each table.
To apply a table style to a table:
- Click in the table.
- Click the Table Tools Design or Table Design tab in the Ribbon.
- Click the More down arrow on the bottom right in the Table Styles gallery. A drop-down menu appears.
- Hover over the various table styles. The table formatting will change as you move over different table styles in the gallery.
- Click the table style you want to apply.
Below is the Table Styles gallery (the current theme is the Office theme):
Note: Table styles do not include row height, column width or custom cell formatting for individual cells. If a user applies manual or direct formatting to a table (such as fills and borders) on the Table Tools Design or Table Design tab, this formatting will override the table style.
Apply Table Style Options
Once you have selected a table style, you can select or check different Table Style Options (which are affected by the formats in the selected table style).
The six Table Style Options that you can apply are: Header Row, Total Row, Banded Rows, First Column, Last Column and Banded Columns. If you have selected a plain table style, you may not notice any changes in the table formatting if you select different Table Style Options.
Table Style Options appear on the Table Tools Design or Table Design tab as follows when you click in a table:
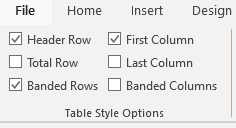
To select Table Style Options:
- Click in the table.
- Click the Table Tools Design or Table Design tab in the Ribbon.
- In Table Style Options, check or uncheck Header Row. If this option is checked, the header row will be formatted differently from the body rows.
- In Table Style Options, check or uncheck Total Row. If this option is checked, the last row will be formatted differently from the body rows.
- In Table Style Options, check or uncheck Banded Rows or Banded Columns for alternate row or column shading.
- In Table Style Options, check First Column or Last Column if you want the first or last column formatted differently from the other columns.
In the following table, Header Row and Banded Rows are checked in Table Style Options:

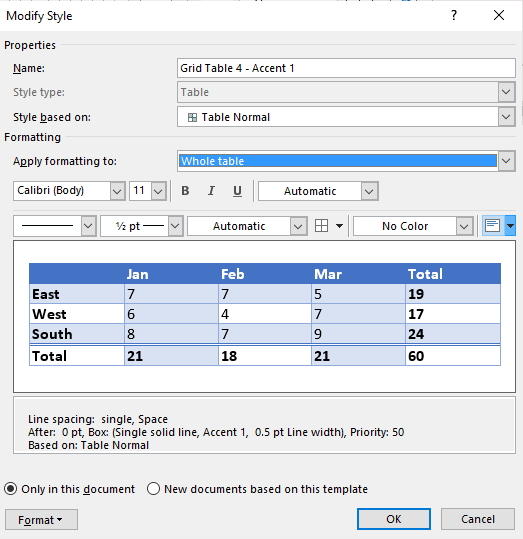
Modify a table style
You can modify a table style in a Word document and all tables using that table style will change.
To modify a table style:
- Click in the table.
- Click the Table Tools Design or Table Design tab in the Ribbon.
- Click the More down arrow on the bottom right in the Table Styles gallery. A drop-down menu appears.
- Click Modify Table Style. A dialog box appears. You can also right-click a table style and select Modify.
- From the Apply Formatting to drop-down menu, select the element that you want to modify (such as Header row).
- Select the desired formatting such as font, font size, font color, fill and border.
- From the Apply Formatting to drop-down menu, select the next element that you want to modify.
- Select the desired formatting such as font, font size, font color, fill and border.
- Repeat for other elements.
- Select Only in this document or New documents based on this template. If you select Only in this document, the modified style will only be available for the current document. If you select New documents based on this template, then the table style will be modified for future documents based on the current template (usually the Normal template).
- Click OK.
Below is the Modify Style dialog box:
You can also click Format at the bottom of the dialog box and choose other options such as Font or Paragraph.
If you modify a table style and the tables using that style do not change, it’s likely that direct or manual formatting has been applied to the table which then overrides the table style. You may need to clear formatting in the table by selecting the table and clicking Clear Formatting on the Home tab in the Font group.
You can also modify Table Properties in a table style. Table properties include table alignment, row settings and cell margins.
To modify Table Properties in a table style:
- Click in the table.
- Click the Table Tools Design or Table Design tab in the Ribbon.
- Click the More down arrow on the bottom right in the Table Styles gallery. A drop-down menu appears.
- Click Modify Table Style. A dialog box appears. You can also right-click a table style and select Modify.
- Click Format on the bottom left of the dialog box. A drop-down menu appears.
- Click Table Properties. A dialog box appears.
- Click the Table tab and select an Alignment.
- Click the Row tab and select the desired options. For example, turn off Allow row to break across pages.
- Select any other formatting options you want to apply to the entire table.
- Click OK.
- Select Only in this document or New documents based on this template.
- Click OK.
Below is the Table Properties dialog box with the Table tab selected:

Create a new table style
You can also create a new or custom table style.
To create a custom table style:
- Click in the table.
- Click the Table Tools Design or Table Design tab in the Ribbon.
- Click the More down arrow on the bottom right in the Table Styles gallery. A drop-down menu appears.
- Click a table style to apply it as a base style.
- Click the More down arrow on the bottom right in the Table Styles gallery. A drop-down menu appears.
- Click New Table Style. A dialog box appears.
- Enter a name for the new table style in the Name box.
- Select the desired formatting.
- Select Only in this document or New documents based on this template.
- Click OK.
New Table Style appears at the bottom of the Table Styles gallery:
The new table style will appear in the Table Styles gallery under Custom (at the top of the gallery). If you want to delete it, right-click it in the gallery and select Delete Table Style.
Clear a table style
To clear a table style and remove formatting:
- Click in the table.
- Click the Table Tools Design or Table Design tab in the Ribbon.
- Click the More down arrow on the bottom right in the Table Styles gallery. A drop-down menu appears.
- Click Clear.
Clear appears at the bottom of the Table Styles gallery:
Set a default table style
You can also set a default table style for new tables in the current document or all new documents.
To set a default table style:
- Click in the table.
- Click the Table Tools Design or Table Design tab in the Ribbon.
- Click the More down arrow on the bottom right in the Table Styles gallery. A drop-down menu appears.
- Right-click the table style you want to use as the default style and select Set as Default from the drop-down menu. A dialog box appears.
- Select This document only or All documents based on the Normal.dotm template (the default template in Word is the Normal template).
- Click OK.
If you are working with documents with multiple tables, formatting with table styles can ensure that your tables are formatted consistently and save a lot of time.
Subscribe to get more articles like this one
Did you find this article helpful? If you would like to receive new articles, JOIN our email list.
More resources
4 Ways to Create a Table in Word
14 Shortcuts to Quickly Select Text in Microsoft Word
How to Create Headings in Word (Using Heading Styles)
How to Quickly Remove Hard Returns in Word Documents
10 Microsoft Word Tips, Tricks and Shortcuts for Selecting in Tables
Related courses
Microsoft Word: Intermediate / Advanced
Microsoft Excel: Intermediate / Advanced
Microsoft PowerPoint: Intermediate / Advanced
Microsoft Word: Long Documents Master Class
Microsoft Word: Styles, Templates and Tables of Contents
Microsoft Word: Designing Dynamic Word Documents Using Fields
VIEW MORE COURSES >
Our instructor-led courses are delivered in virtual classroom format or at our downtown Toronto location at 18 King Street East, Suite 1400, Toronto, Ontario, Canada (some in-person classroom courses may also be delivered at an alternate downtown Toronto location). Contact us at info@avantixlearning.ca if you’d like to arrange custom instructor-led virtual classroom or onsite training on a date that’s convenient for you.
Copyright 2023 Avantix® Learning
Microsoft, the Microsoft logo, Microsoft Office and related Microsoft applications and logos are registered trademarks of Microsoft Corporation in Canada, US and other countries. All other trademarks are the property of the registered owners.
Avantix Learning |18 King Street East, Suite 1400, Toronto, Ontario, Canada M5C 1C4 | Contact us at info@avantixlearning.ca