
Word provides tools and features that allow you to create custom documents. One type of document you can design is a fillable form, which lets you add content controls — such as text controls, which are text boxes in which other users can enter text. After you create a form, you can lock it so that anyone who works with the document cannot change or delete the text boxes or other controls, although they can still type into them.
Step 1
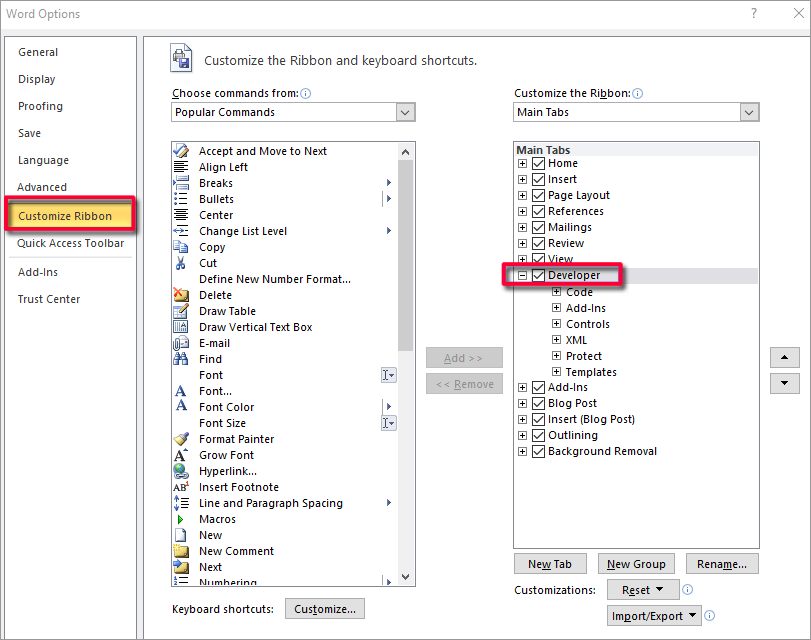
Display the Developer tab of the ribbon if it is not already visible. Select the «File» tab and click «Options.» Select «Customize Ribbon.» Select the «Developer» check box in the Main Tabs list under Customize the Ribbon and click «OK.»
Step 2
Add a text control. Place the cursor where you want the text box to appear. Select the «Developer» tab and click «Design Mode» in the Controls group. Click «Rich Text Content Control» to allow users to format the text or type an entire paragraph or select «Plain Text Content Control» to limit the text they can add.
Step 3
Set the text box properties. Click on the control to select it. Click the «Developer» tab and click on «Properties» in the Controls group to open the Content Control Properties dialog. Choose the options you want to apply and click «OK.»
Step 4
Lock the form. Press «Ctrl-A» to select the entire document or click «Select» in the Editing group of the Home tab and click «Select All.» Click on the «Developer» tab and click «Restrict Editing» in the «Protect» group.
Step 5
Select «Allow Only This Type of Editing in the Document» in the Editing Restrictions section and choose «Filling in Forms» in the drop-down list. Click the «Yes, Start Enforcing Protection» button and save the document.
References
Writer Bio
Tricia Goss’ credits include Fitness Plus, Good News Tucson and Layover Magazine. She is certified in Microsoft application and served as the newsletter editor for OfficeUsers.org. She has also contributed to The Dollar Stretcher, Life Tips and Childcare Magazine.
Image Credit
Jupiterimages/Photos.com/Getty Images
Open a Word document that has text boxes. Click the “Review” tab, then click the “Restrict Editing” button in the Protect group. Word displays a pane allowing you to manage editing permissions for specific parts of the document, including text boxes.
Contents
- 1 How do I lock text in Word?
- 2 How do I lock text?
- 3 How do I restrict editing in Word 2016?
- 4 How do I lock a text box so it doesn’t move in Word?
- 5 Can you password protect text messages?
- 6 Can you lock fields in Word?
- 7 How do I protect a form in Word?
- 8 How do I lock text boxes in Word?
- 9 How do you anchor a text box in Word?
- 10 What is lock anchor in Word?
- 11 Can you hide text messages?
- 12 How do I send a private text message?
- 13 Is there a way to hide a text thread?
- 14 How do I lock a form in Microsoft Word?
- 15 How do you lock fields?
- 16 Can you lock a Microsoft form?
- 17 What does the anchor symbolize?
- 18 How do I find an anchored object in Word?
- 19 What are anchor text links?
On the Review tab, in the Protect group, click Protect Document, and then click Restrict Formatting and Editing. In the Editing restrictions area, select the Allow only this type of editing in the document check box. In the list of editing restrictions, click No changes (Read only).
How do I lock text?
There are a few ways to learn how to lock text messages on Android.
Signal Private Messenger: Chat Lock & Disappearing Messages
- Tap on your profile in the Signal app.
- Go to Privacy.
- Under Privacy, you should be able to enable or disable screen lock.
How do I restrict editing in Word 2016?
Start protection
- Open a document in Word 2016.
- Switch to the Review tab on the ribbon.
- Click Restrict Editing in the Protect section of the ribbon.
- In the Restrict Editing panel on the right, check Allow only this type of editing in the document under 2.
- No changes (Read only) is the default restriction type.
How do I lock a text box so it doesn’t move in Word?
Prevent text boxes from moving (Word 2010)
- The Text Box Tools Tab — Position Drop-Down.
- The Layout Dialog: The Position Tab.
- The Layout Dialog: The Text Wrapping Tab.
- The Wrap Text Drop-Down.
Can you password protect text messages?
Neither Android or iOS have a built-in way to password protect message apps, so if this is the route you want to go down then it will require third-party software. Sadly, iOS doesn’t allow third-party app lockers, so only Android users have this option.
Can you lock fields in Word?
To Lock Fields
On the toolbar ribbon, on the Review tab, under Protect, click Protect Document, and then click Restrict Formatting and Editing.
How do I protect a form in Word?
Protect the form
- Go to Developer > Protect Form. Note: To unprotect the form and continue editing, select Protect Form again.
- Save and close the form.
How do I lock text boxes in Word?
Click on the “Select sections” option and then select the section of your document where your text box is located. Click on the “OK” option and then click on the “Yes, Start Enforcing Protection” button.
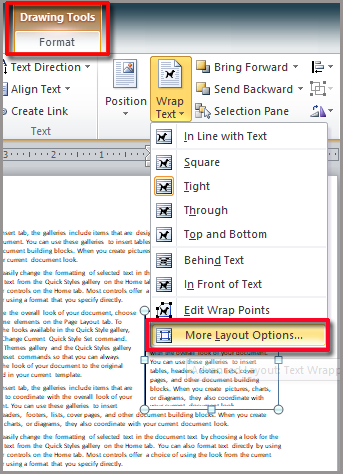
How do you anchor a text box in Word?
Follow these steps to anchor an object in Word:
- Select an object.
- On the Ribbon’s Format tab, go to the Arrange group and choose Position→More Layout Options.
- Click the Position tab.
- (Optional) Set the position of an object precisely using controls in this dialog.
- Under Options, select the Lock Anchor check box.
What is lock anchor in Word?
When you turn on “Lock Anchor,” you can then move your image to any position on the same page as the anchor paragraph, and the object will stay in that position. However, if you move the anchor paragraph to another page, the object will also move to that page, but stay in the same relative position on the page.
Can you hide text messages?
If you want to hide your texts from the home screen, here’s what to do: Open the Messaging app on your phone. Then, tap on the three dot icon in the upper right-hand corner to access the Settings menu.Doing this will disable all pop-up messages so that no one can see them.
How do I send a private text message?
Send anonymous texts by email
- AT&T. SMS (a text-only message): [email protected]
- Metro PCS. SMS/MMS: [email protected]
- Sprint. MMS: [email protected]
- T-Mobile. SMS/MMS: [email protected]
- Verizon Wireless. MMS: [email protected]
Is there a way to hide a text thread?
The most simple way to hide text messages on your Android phone is by securing it with a password, fingerprint, PIN or lock pattern. If someone can’t get past the lock screen they can’t access your text messages.
How do I lock a form in Microsoft Word?
Lock/Unlock a form
- Step 1: Show the Developer tab on the ribbon. Right click on any of the ribbon commands. For example, right click on Home and then click Customize the Ribbon. Open Customize the Ribbon dialog.
- Step 2: Lock or unlock the form. On the Developer tab, click Restrict Editing command. Where is it?
How do you lock fields?
To lock a field, perform these steps:
- Select the field you want to lock.
- Update the field, if desired, by pressing Shift+F9.
- Press Ctrl+F11.
Can you lock a Microsoft form?
Microsoft Word provides a function called Restrict Editing that lets you either lock down the form in its entirety or allow users to access only the fillable areas within the form.
What does the anchor symbolize?
In ancient times, the anchor was viewed as a symbol that represented safety; because of this, Christians adopted the anchor as a symbol of hope.The anchor was chosen as it holds a ship in place, representing strength and security.
How do I find an anchored object in Word?
Figure 1.
- Display the Word Options dialog box. (In Word 2007 click the Office button and then click Word Options.
- Click Display at the left side of the dialog box. (See Figure 2.)
- To view object anchors, make sure the Object Anchors check box is selected.
- Click on OK.
What are anchor text links?
Anchor text is the clickable text in a hyperlink.The words contained in the anchor text help determine the ranking that the page will receive by search engines such as Google or Yahoo and Bing. Links without anchor text commonly happen on the web and are called naked URLs, or URL anchor texts.
After creating a fillable form in Microsoft Word, you may want to lock it down to prevent users from accidentally editing content outside the fillable areas. Microsoft Word provides a function called Restrict Editing that lets you either lock down the form in its entirety or allow users to access only the fillable areas within the form.
Lock Down Form
-
Open the form that you need to lock down, and press “Ctrl-A” to select all content within the form. Click the “Developer” tab, and then click “Restrict Editing” on the Protect group; if you cannot see the “Developer” tab, click “File | Options | Customize Ribbon | Developer | OK.”
On the Restrict Editing pane that shows up, check «Allow Only This Type of Editing,» then click the pull-down menu under Editing Restrictions. Select “Filling in Forms” to prevent users from editing the content outside the fillable areas, or select “No changes (Read Only)” to lock down the entire form, including the ability to fill in anything. Click “Yes, Start Enforcing Protection,” then enter a password into both the «New Password» and «Reenter Password» boxes. Click «OK.»
Disclaimer
-
Information in this article applies to Microsoft Word 2013. It may vary slightly or significantly with other versions.
Word for Microsoft 365 Word for Microsoft 365 for Mac Word 2021 Word 2021 for Mac Word 2019 Word 2019 for Mac Word 2016 Word 2016 for Mac Word 2013 Word 2010 Word for Mac 2011 More…Less
To create a form in Word that others can fill out, start with a template or document and add content controls. Content controls include things like check boxes, text boxes, date pickers, and drop-down lists. If you’re familiar with databases, these content controls can even be linked to data.
Show the Developer tab
If the developer tab isn’t displayed in the ribbon, see Show the Developer tab.
Open a template or a blank document on which to base the form
To save time, start with a form template or start from scratch with a blank template.
-
Go to File > New.
-
In Search online templates, type Forms or the type of form you want and press ENTER.
-
Choose a form template, and then select Create or Download.
-
Go to File > New.
-
Select Blank document.
Add content to the form
Go to Developer, and then choose the controls that you want to add to the document or form. To remove a content control, select the control and press Delete. You can set properties on controls once inserted.
Note: You can print a form that was created using content controls, but the boxes around the content controls will not print.
In a rich text content control, users can format text as bold or italic, and they can type multiple paragraphs. If you want to limit what users add, insert the plain text content control.
-
Click or tap where you want to insert the control.
-
Select Developer > Rich Text Content Control
 or Plain Text Content Control .
 or Plain Text Content Control
  .
.To set specific properties on the control, see Set or change properties for content controls.
A picture control is often used for templates, but you can also add a picture control to a form.
-
Click or tap where you want to insert the control.
-
Select Developer > Picture Content Control
.
 .
.To set specific properties on the control, see Set or change properties for content controls.
Use building block controls when you want people to choose a specific block of text. For example, building block controls are helpful when you need to add different boilerplate text depending on the contract’s specific requirements. You can create rich text content controls for each version of the boilerplate text, and then you can use a building block control as the container for the rich text content controls.
-
Click or tap where you want to insert the control.
-
Go to DeveloperBuilding Block Gallery Content Control
(or Building Block Content Control). -
Select Developer and content controls for the building block.
 (or Building Block Content Control).
-
Click or tap where you want to insert the control.
To set specific properties on the control, see Set or change properties for content controls.
In a combo box, users can select from a list of choices that you provide or they can type in their own information. In a drop-down list, users can only select from the list of choices.
-
Go to Developer > Combo Box Content Control
or Drop-Down List Content Control . -
Select the content control, and then select Properties.
-
To create a list of choices, select Add under Drop-Down List Properties.
-
Type a choice in Display Name, such as Yes, No, or Maybe.
Repeat this step until all of the choices are in the drop-down list.
-
Fill in any other properties that you want.
Note: If you select the Contents cannot be edited check box, users won’t be able to click a choice.
 or Drop-Down List Content Control
  .
.-
Click or tap where you want to insert the date picker control.
-
Select Developer > Date Picker Content Control
.
 .
.To set specific properties on the control, see Set or change properties for content controls.
-
Click or tap where you want to insert the check box control.
-
Select Developer > Check Box Content Control
.
 .
.To set specific properties on the control, see Set or change properties for content controls.
Legacy form controls are for compatibility with older versions of Word and consist of legacy form and Active X controls.
-
Click or tap where you want to insert a legacy control.
-
Go to Developer > Legacy Forms
drop-down. -
Select the Legacy Form control or Active X Control that you want to include.
 drop-down.
Set or change properties for content controls
Each content control has properties that you can set or change. For example, the Date Picker control offers options for the format you want to use to display the date.
-
Select the content control that you want to change.
-
Go to Developer > Properties.
-
Change the properties that you want.

Add protection to a form
If you want to limit how much others can edit or format a form, use the Restrict Editing command:
-
Open the form that you want to lock or protect.
-
Select Developer > Restrict Editing.
-
After selecting restrictions, select Yes, Start Enforcing Protection.


Advanced Tip:
If you want to protect only parts of the document, separate the document into sections and only protect the sections you want.
To do this, choose Select Sections in the Restrict Editing panel. For more info on sections, see Insert a section break.

Show the Developer tab
If the developer tab isn’t displayed in the ribbon, see Show the Developer tab.
Open a template or use a blank document
To create a form in Word that others can fill out, start with a template or document and add content controls. Content controls include things like check boxes, text boxes, and drop-down lists. If you’re familiar with databases, these content controls can even be linked to data.
-
Go to File > New from Template.
-
In Search, type form.
-
Double-click the template you want to use.
-
Select File > Save As, and pick a location to save the form.
-
In Save As, type a file name and then select Save.

-
Go to File > New Document.
-
Go to File > Save As.
-
In Save As, type a file name and then select Save.

Add content to the form
Go to Developer, and then choose the controls that you want to add to the document or form. To remove a content control, select the control and press Delete. You can set Options on controls once inserted. From Options, you can add entry and exit macros to run when users interact with the controls, as well as list items for combo boxes, .
-
In the document, click or tap where you want to add a content control.
-
On Developer, select Text Box, Check Box, or Combo Box.
-
To set specific properties for the control, select Options, and set .
-
Repeat steps 1 through 3 for each control that you want to add.

Options let you set common settings, as well as control specific settings. Select a control and then select Options to set up or make changes.
-
Set common properties.
-
Select Macro to Run on lets you choose a recorded or custom macro to run on Entry or Exit from the field.
-
Bookmark Set a unique name or bookmark for each control.
-
Calculate on exit This forces Word to run or refresh any calculations, such as total price when the user exits the field.
-
Add Help Text Give hints or instructions for each field.
-
OK Saves settings and exits the panel.
-
Cancel Forgets changes and exits the panel.
-
-
Set specific properties for a Text box
-
Type Select form Regular text, Number, Date, Current Date, Current Time, or Calculation.
-
Default text sets optional instructional text that’s displayed in the text box before the user types in the field. Set Text box enabled to allow the user to enter text into the field.
-
Maximum length sets the length of text that a user can enter. The default is Unlimited.
-
Text format can set whether text automatically formats to Uppercase, Lowercase, First capital, or Title case.
-
Text box enabled Lets the user enter text into a field. If there is default text, user text replaces it.
-
-
Set specific properties for a Check box.
-
Default Value Choose between Not checked or checked as default.
-
Checkbox size Set a size Exactly or Auto to change size as needed.
-
Check box enabled Lets the user check or clear the text box.
-
-
Set specific properties for a Combo box
-
Drop-down item Type in strings for the list box items. Press + or Enter to add an item to the list.
-
Items in drop-down list Shows your current list. Select an item and use the up or down arrows to change the order, Press — to remove a selected item.
-
Drop-down enabled Lets the user open the combo box and make selections.
-
-
Go to Developer > Protect Form.
Note: To unprotect the form and continue editing, select Protect Form again.
-
Save and close the form.

If you want, you can test the form before you distribute it.
-
Protect the form.
-
Reopen the form, fill it out as the user would, and then save a copy.
Show the Developer tab
-
On the right side of the ribbon, select
, and then select Ribbon Preferences. -
Under Customize, select Developer .
 , and then select Ribbon Preferences.
Open a template or a document on which to base the form
You can start with a blank document and create your own form. Or, to save time, you can start with a form template.
-
Go to File > New from Template.
-
In the left pane, expand Online Templates, and then select Forms.
-
Double-click the form template that you want to use.
Add content controls to the form
-
In the document, click where you want to add the control.
-
On the Developer tab, under Form Controls, select Text Box, Check Box, or Combo Box.
-
To set specific properties for the control, select Options, and then configure the properties that you want.
Note: To create a list of drop-down items in a combo box, select the combo box placeholder, click Options, and then add the items that you want to appear in the drop-down list.
-
Repeat steps 1 through 3 for each control that you want to add.
Add instructional text (optional)
Instructional text (for example, «Type First Name») in a text box can make your form easier to use. By default, no text appears in a text box, but you can add it.
-
Select the text box control that you want to add instructional text to.
-
On the Developer tab, under Form Controls, select Options.
-
In Default Text, type the instructional text.
-
Make sure that Fill-in enabled is selected, and then select OK.
Protect the form
-
On the Developer tab, under Form Controls, select Protect Form.
Note: To unprotect the form and continue editing, click Protect Form again.
-
Save and close the form.
Test the form (optional)
If you want, you can test the form before you distribute it.
-
Protect the form.
-
Reopen the form, fill it out as the user would, and then save a copy.
Creating fillable forms isn’t available in Word for the web.
You can create the form with the desktop version of Word with the instructions in Create a fillable form.
When you save the document and reopen it in Word for the web, you’ll see the changes you made.
Need more help?
Patricio Hidalgo
-
#1
Hi,
I designed a form with some fields and when press a button to sign the
document I need locked these fields with information. Can I do that in word
with VBA?
Thanks a lot for the helpful
Advertisements
macropod
-
#2
Hi Patricio,
You do this with code like:
Sub LockFmFlds()
Dim oFmFld As FormField
With ActiveDocument
For Each oFmFld In .FormFields
If oFmFld.Type = wdFieldFormTextInput Then oFmFld.Enabled = False
Next
End With
End Sub
The above code locks all text formfields. If you want to lock a specific formfield, you could usecode like:
Sub LockOneFld()
ActiveDocument.FormFields(«Text1»).Enabled = False
End Sub
where «Text1» is the bookmark name assigned to the formfield.
Advertisements
Patricio Hidalgo
-
#3
Thanks macropod,
Sorry for the delay with the status, I was on vacaction.
Your solution is great, that’s running well.
Patricio
macropod said:
Hi Patricio,
You do this with code like:
Sub LockFmFlds()
Dim oFmFld As FormField
With ActiveDocument
For Each oFmFld In .FormFields
If oFmFld.Type = wdFieldFormTextInput Then oFmFld.Enabled = False
Next
End With
End SubThe above code locks all text formfields. If you want to lock a specific formfield, you could usecode like:
Sub LockOneFld()
ActiveDocument.FormFields(«Text1»).Enabled = False
End Sub
where «Text1» is the bookmark name assigned to the formfield.—
Cheers
macropod
[MVP — Microsoft Word]Patricio Hidalgo said:
Hi,
I designed a form with some fields and when press a button to sign the
document I need locked these fields with information. Can I do that in word
with VBA?Thanks a lot for the helpful
Want to reply to this thread or ask your own question?
You’ll need to choose a username for the site, which only take a couple of moments. After that, you can post your question and our members will help you out.
Ask a Question
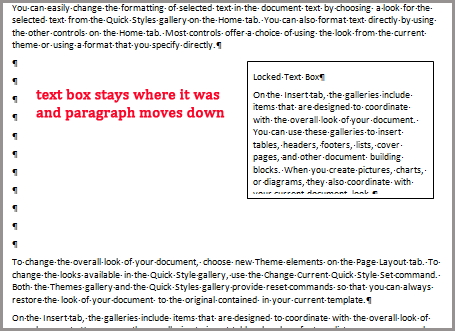
If by “lock” you mean to lock the position so that your text box moves with the text, you do that with the Text Wrapping dialog box.
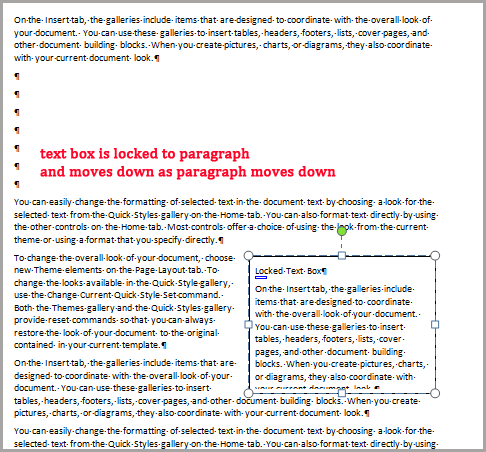
On the Position tab there are two settings at the bottom: Move object with text and Lock anchor.
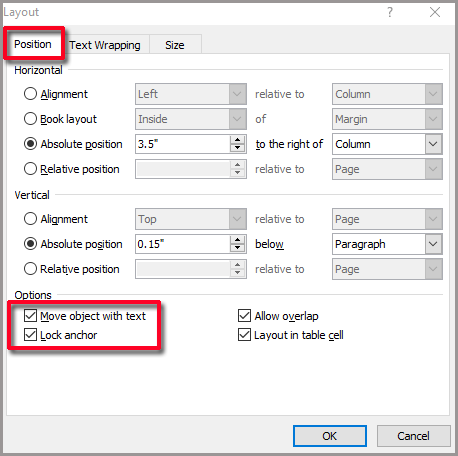
With these two options selected, this is what happens with my text box when I add more text to the preceding paragraphs.
In this example, I unselect Move object with text, but leave Lock anchor selected.
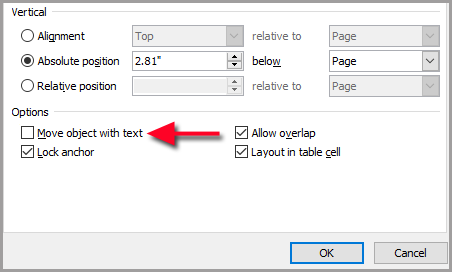
See the difference when the paragraph is moved down. The text box remains locked where it was on the page.
If, on the other hand, you want to lock the box and the text inside of it you can use the Restrict Editing feature. On the Review tab click on Restrict Editing.
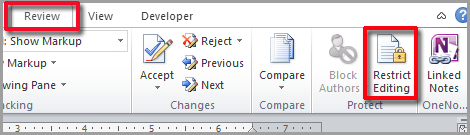
If the Restrict Editing option does not appear, you may have to enable the display of the Developer tab.
Once you click on Restrict Editing, the Restrict Editing pane will appear.
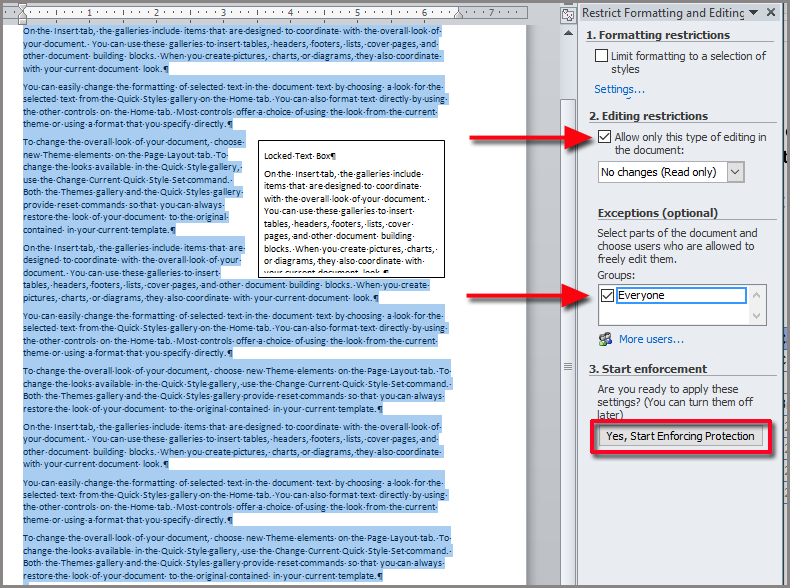
First, press Ctrl+A to select the entire document, even if there isn’t much text yet. Now while leaving the document selected, Ctrl+click on the text box to unselect it.
Then, check the number 2 box – Editing restrictions and make sure that no changes are enabled.
In the Exceptions section click on Everyone. This will allow everyone to make changes to the area you just selected within the body of the document.
Now click on Yes, Start Enforcing Protection.
You will be prompted for a password, which is optional. (If you assign one, make sure you remember it or you will never to able to edit this textbox again!) Once you click on OK for the password, the Restrict Formatting and Editing pane will show the following options. You can unselect Highlight the regions I can edit so that the yellow markings disappear.

Now users will be able to edit the document but not touch the textbox.
Hope one of these answered your question.
You may have an enclosed text box within the content in your MS Word document. By default, the text box moves with the content. If you do not want it to move with the content, you must lock the text box.
If you are sharing your document with others, you may not want them to change the content within the text box. Again, you can lock the text box.
Word allows you to lock the text box for the above cases. Thus, by locking the text box, you can:
- Prevent the text box from moving with the content.
- Protect the contents of the text box.
We will explain both methods stepwise. Let us start.
Method #1: Prevent the text box from moving with the content
Step #1: Open the Word document
Open the Word document that has at least one text box.

Note that if you add more lines/text to the top of the paragraph, the text box moves down with the text.

Step #2: Enable Drawing Tools
Click the bottom of the text box to select it.
Drawing Tools tab will be visible on the top menu bar.

Step #3: Lock the text box position
Click on the Format tab under Drawing Tools to change the ribbon.
In the section Arrange, click on the Wrap Text icon to open a drop-down menu.

In the drop-down menu, click on Move with Text to remove the tick mark next to it.
Note that now the tick mark appears against Fix Position on Page.

Now, the text box remains locked on the page and will not move with the text.

Method #2: Protect the contents of the text box.
Step #1: Open the Word document
Open the Word document that has at least one text box.

Step #2: Restrict editing
Click on the Review tab on the top menu bar to change the ribbon.

Under section Protect, click on the Restrict Editing icon to open the Restrict Editing drop-down menu.

In the Restrict Editing drop-down menu, click the checkbox under Editing Restrictions so that a tick mark appears in the box.
In the box under the checkbox, select No Changes (Read only).

Step #3: Select the exceptions
Now select the entire document with Ctrl+A.
Holding the Ctrl key down, click on the text boxes to unselect them.

In the Restrict Editing drop-down menu, under Exceptions (optional), click on the box beside Everyone. Ensure a check mark appears in the box.

Under Start enforcement, click on Yes, Start Enforcing Protection to open a dialog box.

Step #4: Enforce the Protection
In the Start Enforcing Protection dialog box, click to enable Password.
Enter a password of your choice in Enter new password (optional).
Repeat the password entry in Reenter password to confirm.
Note: if you do not enter a password, no one, including you, will be able to edit the text box ever again. The same will happen if you forget the password you have entered.

Click on Ok to change the Restrict Editing dialog box.

The editable text in the document will have a yellow highlight.

Step#5: Remove the highlight
In the Restrict Editing dialog, click on Highlight the regions I can edit to remove the tick mark in the box.
Exit the Restrict Editing dialog by clicking on the X button on the top right-hand corner.

Word will remove the yellow highlight in the document.
Now, anyone can edit the document. But to edit the text box contents, they will require a password.
Conclusion
Follow our instructions to lock a text box. You can prevent the text box from moving with the text. You can also disallow editing the text box contents.
В ситуациях, когда над одним документом работает несколько человек, может понадобиться защита от редактирования Word, чтобы оставить текст документа без изменений. Этим вы покажете другим пользователям, что дальнейшее внесение правок в данный документ нежелательно.
В результате, программа ограничит редактирование документа, потому что он станет доступным только для чтения и в него нельзя вносить изменения.
Содержание:
- Как включается защита документа Word от редактирования
- Как ограничить редактирование в Word с разрешением редактировать часть документа
- Как найти части документа, которые можно редактировать
- Как в Word снять защиту на редактирование документа
- Получение доступа к полной копии защищенного документа
- Как получить копию файла Word с помощью Документов Google
- Выводы статьи
- Защита от редактирования документа Word (видео)
Существует еще один способ защиты — установка пароля на документ Microsoft Word. Но это не защита документа от редактирования, так как зашифрованный документ становится недоступен для открытия без ввода правильного пароля. В этом случае, у пользователей не будет доступа к тесту документа.
Рассматриваемый нами способ: защита документа от редактирования, отличается от установки пароля на открытие документа Word, потому что мы предоставляем доступ к документу всем другим пользователям, а запрещаем только вносить изменения в текст файла. Кроме того, мы можем разрешить редактировать только отдельные участки текста документа, запрещая вносить изменения в другие части документа.
Из этого руководства вы узнаете, как предотвратить несанкционированные изменения в документе, используя функцию защита Ворд от редактирования. Также вы найдете инструкцию о том, как отключить защиту от редактирования в Word, если это ограничение больше не требуется.
Предложенные методы одинаково работают в разных версиях текстового редактора Microsoft Word: Word для Microsoft 365, Word 2021, Word 2019, Word 2016, Word 2013, Word 2010, Word 2007.
Как включается защита документа Word от редактирования
В некоторых ситуациях, нам необходимо в Ворд ограничить редактирование, чтобы запретить изменение текста документа другими пользователями. При этом, документ Word можно открыть, но в него нельзя будет вносить правки.
Пройдите несколько шагов, чтобы задать ограничение:
- Откройте документ MS Word на компьютере.
- Войдите во вкладку «Рецензирование».
- В группе «Защитить» щелкните по кнопке «Защитить».
- В выпадающем меню нажмите «Ограничить редактирование».

- Справа откроется панель «Ограничить редактирование».
- В разделе «Ограничение на редактирование» установите флажок в пункте «Разрешить только указанный способ редактирования документа:».
- Выберите способ ограничения редактирования «Только чтение».
- В разделе «Включение защиты» нажмите на кнопку «Да, включить защиту».

- В окне «Включить защиту» в поле «Новый пароль (необязательно):» введите желаемый пароль, а в поле «Подтверждение пароля:» добавьте его снова.
Защита паролем от редактирования предполагает, что для снятия ограничений на редактирование содержимого документа Word, необходимо ввести правильный пароль, чтобы отключить защиту. Имейте в виду, что документ не зашифрован, поэтому пользователи-злоумышленники могут изменить файл и удалить пароль.
Если вы оставите пустыми поля для ввода пароля, то тогда для полного доступа к редактированию документа другому пользователю достаточно будет нажать на кнопку «Отключить защиту» в области «Ограничить редактирование».

Теперь документ доступен только для чтения.
Как ограничить редактирование в Word с разрешением редактировать часть документа
В ситуации, когда вам необходимо защитить от изменений только некоторую часть документа, вы можете использовать ограниченное редактирование в Ворде. В этом случае, часть документа можно будет редактировать как обычно, а другая часть будет защищена от внесения изменений.
Выполните следующие действия:
- В окне открытого документа Word перейдите во вкладку «Рецензирование».
- Нажмите на значок «Защитить» в группе «Защитить».
- Выберите параметр «Ограничить редактирование», который открылся в выпадающем меню.
- В области «Ограничить редактирование» установите флажок в параметре «Разрешить только указанный способ редактирования документа».
- В списке ограничений на редактирование выберите пункт «Только чтение».
- Выделите те части документа (заголовки, абзацы, предложения или слова), которые можно будет редактировать.
Чтобы за один раз выделить участки текста в разных местах документа Word, нажмите и удерживайте клавишу «Ctrl», а затем выделите нужные части с помощью левой кнопки мыши.
- В опции «Исключения (необязательно)» необходимо выбрать пользователей, которым разрешено вносить изменения в содержимое документа. Выберите группу «Все», установив флажок напротив этой настройки.

- Щелкните по кнопке «Да, включить защиту».
- В окне «Включить защиту» дважды введите пароль, чтобы защитить документ.
Как найти части документа, которые можно редактировать
В окне документа Word текст, доступный для редактирования, выделяется цветом и квадратными скобками.

Благодаря этому, вы можете визуально искать участки текста, которые можно редактировать. Чтобы быстро найти эти части документа необходимо открыть область «Ограничить редактирование».
В опции «Ваши разрешения» по умолчанию установлен флажок в пункте «Выделить области, которые я могу редактировать». Вы можете нажать на кнопки «Найти следующую область, которую я могу редактировать» или «Показать все области, которые я могу редактировать», чтобы переместиться в другую часть документа.

Как в Word снять защиту на редактирование документа
Если ограничения для редактирования документа Word перестали быть актуальными, вы можете снять защиту на редактирование, чтобы все пользователи имели возможность работать с этим файлом.
Защита документа Word от редактирования включена, рассмотрим шаги как снять эти ограничения:
- После открытия документа Word войдите во вкладку «Рецензирование».
- Нажмите «Защитить» в группе «Защитить».
- Выберите «Ограничить редактирование».
- В области «Ограничить редактирование» нажмите на кнопку «Отключить защиту».

- В окне «Снятие защиты» введите пароль.

После выполнения этих действий все пользователи могут редактировать данный документ MS Word.
Получение доступа к полной копии защищенного документа
Существует простой способ обойти ограничение на редактирование и получить полную копию защищенного документа.
Сделайте следующее:
- Откройте документ Word, в котором запрещено редактирование.
- Нажмите на клавиши «Ctrl» + «A», чтобы выделить все содержимое документа.
- Скопируйте выделенный документ.
- Откройте новый документ Word, а затем вставьте туда скопированные данные.
- В результате, у вас появится полная копия исходного документа, которую вы можете редактировать.
Как получить копию файла Word с помощью Документов Google
Сейчас мы посмотрим, как снять защиту в Ворде на редактирование, используя Google Документы (Google Docs).
Пройдите шаги:
- Откройте Документы Google, а затем нажмите «Пустой файл».
- В окне «Новый документ» войдите в меню «Файл», выберите «Открыть».
- В окне «Откройте файл» перейдите во вкладку «Загрузка».
- Выберите документ Word на компьютере или перетащите его в специальную область.
- Содержимое документа доступно для редактирования в интерфейсе Документов Google.

Вы можете сохранить документ, чтобы продолжить редактирование на своем устройстве.
- Зайдите в меню «Файл».
- В контекстном меню сначала выберите «Скачать», а потом «Microsoft Word (DOCX)».

Откройте файл Word на компьютере, теперь его можно редактировать.
Выводы статьи
Некоторым пользователям во время работы с документом Word необходимо ограничить редактирование всего документа или его отдельных частей. В программе Microsoft Word имеется функция защиты от редактирования, которой вы можете воспользоваться из параметров приложения. Если нужда в подобном ограничении отпала, вы узнали, как в Ворде отключить защиту от редактирования, чтобы документ снова стал доступен для внесения изменений.
Защита от редактирования документа Word (видео)
Похожие публикации:
- Как убрать красные подчеркивания в Word — 3 способа
- Как конвертировать RTF в Word — 7 способов
- Как удалить сноски в Word: все способы
- Как вставить GIF в Word — 3 способа
- Как поставить знак градуса в Word
INTELLIGENT WORK FORUMS
FOR COMPUTER PROFESSIONALS
Contact US
Thanks. We have received your request and will respond promptly.
Log In
Come Join Us!
Are you a
Computer / IT professional?
Join Tek-Tips Forums!
- Talk With Other Members
- Be Notified Of Responses
To Your Posts - Keyword Search
- One-Click Access To Your
Favorite Forums - Automated Signatures
On Your Posts - Best Of All, It’s Free!
*Tek-Tips’s functionality depends on members receiving e-mail. By joining you are opting in to receive e-mail.
Posting Guidelines
Promoting, selling, recruiting, coursework and thesis posting is forbidden.
Students Click Here
Word — how to lock text fields to prevent changes?Word — how to lock text fields to prevent changes?(OP) 27 Jun 05 01:49 Hi, I’m working on some templates, and I wish to prevent others from modifying certain teext boxes on my spread. Is ther some feature that will allow me to «lock» a text box — thus preventing modification? Thanks! Red Flag SubmittedThank you for helping keep Tek-Tips Forums free from inappropriate posts. |
Join Tek-Tips® Today!
Join your peers on the Internet’s largest technical computer professional community.
It’s easy to join and it’s free.
Here’s Why Members Love Tek-Tips Forums:
- Talk To Other Members
- Notification Of Responses To Questions
- Favorite Forums One Click Access
- Keyword Search Of All Posts, And More…
 Talk To Other Members
Register now while it’s still free!
Already a member? Close this window and log in.
Join Us Close