
List of Words Formed Using Letters of ‘secret’
There are 48 words which can be formed using letters of the word ‘secret‘
which can be formed using the letters from ‘secret’:
which can be formed using the letters from ‘secret’:
which can be formed using the letters from ‘secret’:
which can be formed using the letters from ‘secret’:
which can be formed using the letters from ‘secret’:
Other Info & Useful Resources for the Word ‘secret’
| Info | Details |
|---|---|
| Points in Scrabble for secret | 8 |
| Points in Words with Friends for secret | 9 |
| Number of Letters in secret | 6 |
| More info About secret | secret |
| List of Words Starting with secret | Words Starting With secret |
| List of Words Ending with secret | Words Ending With secret |
| 7 Letter Words Starting with secret | 7 Letter Words Starting with secret |
| 7 Letter Words Ending with secret | 7 Letter Words Ending with secret |
| List of Words Containing secret | Words Containing secret |
| List of Anagrams of secret | Anagrams of secret |
| List of Words Formed by Letters of secret | Words Created From secret |
| secret Definition at Wiktionary | Click Here |
| secret Definition at Merriam-Webster | Click Here |
| secret Definition at Dictionary | Click Here |
| secret Synonyms At Thesaurus | Click Here |
| secret Info At Wikipedia | Click Here |
| secret Search Results on Google | Click Here |
| secret Search Results on Bing | Click Here |
| Tweets About secret on Twitter | Click Here |
- Top Definitions
- Synonyms
- Quiz
- Related Content
- Examples
- British
- Idioms And Phrases
This shows grade level based on the word’s complexity.
This shows grade level based on the word’s complexity.
adjective
done, made, or conducted without the knowledge of others: secret negotiations.
kept from the knowledge of any but the initiated or privileged: a secret password.
faithful or cautious in keeping confidential matters confidential; close-mouthed; discreet.
designed or working to escape notice, knowledge, or observation: a secret drawer;the secret police.
secluded, sheltered, or withdrawn: a secret hiding place.
beyond ordinary human understanding; esoteric.
(of information, a document, etc.)
- bearing the classification secret.
- limited to persons authorized to use information documents, etc., so classified.
noun
something that is or is kept secret, hidden, or concealed.
a mystery: the secrets of nature.
a reason or explanation not immediately or generally apparent.
a method, formula, plan, etc., known only to the initiated or the few: the secret of happiness;a trade secret.
a classification assigned to information, a document, etc., considered less vital to security than top-secret but more vital than confidential, and limiting its use to persons who have been cleared, as by various government agencies, as trustworthy to handle such material.Compare classification (def. 5).
(initial capital letter)Liturgy. a variable prayer in the Roman and other Latin liturgies, said inaudibly by the celebrant after the offertory and immediately before the preface.
QUIZ
CAN YOU ANSWER THESE COMMON GRAMMAR DEBATES?
There are grammar debates that never die; and the ones highlighted in the questions in this quiz are sure to rile everyone up once again. Do you know how to answer the questions that cause some of the greatest grammar debates?
Which sentence is correct?
Idioms about secret
in secret, unknown to others; in private; secretly: A resistance movement was already being organized in secret.
Origin of secret
First recorded in 1350–1400; Middle English secrette, from Old French secret, from Latin sēcrētus “hidden,” originally past participle of sēcernere “to secern”
OTHER WORDS FROM secret
se·cret·ly, adverbse·cret·ness, nounnon·se·cret, adjective, nounqua·si-se·cret, adjective
sem·i·se·cret, adjectivesu·per·se·cret, nounul·tra·se·cret, adjective
Words nearby secret
second wind, Second World, Second World War, secos, secrecy, secret, secret admirer, secret agent, secretagog, secretagogue, secretaire
Dictionary.com Unabridged
Based on the Random House Unabridged Dictionary, © Random House, Inc. 2023
Words related to secret
classified, covert, furtive, hush-hush, mysterious, obscure, private, secluded, undercover, underground, undisclosed, unknown, unpublished, confidential, restricted, secretive, surreptitious, code, key, mystery
How to use secret in a sentence
-
It could require a whole new breakthrough, or the secret ingredient may already be out there, waiting in a stack of old research papers.
-
Part of the beauty of the Tabard Inn is that everyone thinks it’s their little secret, their special spot.
-
According to Forbes, Americans are inundated with 4,000 to 10,000 every single day, and it’s no secret that they start to filter them out eventually.
-
Many of the alleged secrets were not revealed, but Mak is believed to have passed intelligence related to quieting submarine propulsion to avoid detection.
-
It’s no secret that our infrastructure needs a major overhaul.
-
In secret, before the referendum, the council went ahead and fluoridated the water anyway.
-
The death toll, which experts believe has been significantly undercut by secret burials, stands at 7,905.
-
Henri Paul actually worked for the French Secret Service and he had €200,000 in his account when he only earned €30,000 a year.
-
Never mind the huge buildup of clandestine operatives and secret warriors since 9/11.
-
Slowly, slowly, dance classes may cease to be such secret and guilty pleasures in Iran.
-
The remarkable thing was that all the hurrying people she met seemed also each of them to be on a secret and mystic errand.
-
To Berthier, if to any one, Bonaparte entrusted his secret designs, for he knew that he could do so in safety.
-
He must be The saltest fish that swims the sea.And, oh!He has a secret woe!
-
Dr. Adam Weishaupt, professor of canon law at Ingolstadt, founded the secret society of the illuminati.
-
The obeying of several hints, of secret impulses, argues great wisdom.
British Dictionary definitions for secret
adjective
kept hidden or separate from the knowledge of othersRelated adjective: cryptic
known only to initiatesa secret password
hidden from general view or usea secret garden
able or tending to keep things private or to oneself
operating without the knowledge of outsidersa secret society
outside the normal range of knowledge
noun
something kept or to be kept hidden
something unrevealed; mystery
an underlying explanation, reason, etc, that is not apparentthe secret of success
a method, plan, etc, known only to initiates
liturgy a variable prayer, part of the Mass, said by the celebrant after the offertory and before the preface
in the secret among the people who know a secret
Derived forms of secret
secretly, adverb
Word Origin for secret
C14: via Old French from Latin sēcrētus concealed, from sēcernere to sift; see secern
Collins English Dictionary — Complete & Unabridged 2012 Digital Edition
© William Collins Sons & Co. Ltd. 1979, 1986 © HarperCollins
Publishers 1998, 2000, 2003, 2005, 2006, 2007, 2009, 2012
Other Idioms and Phrases with secret
see in secret; open secret.
The American Heritage® Idioms Dictionary
Copyright © 2002, 2001, 1995 by Houghton Mifflin Harcourt Publishing Company. Published by Houghton Mifflin Harcourt Publishing Company.
Word for Microsoft 365 Word for Microsoft 365 for Mac Word 2021 Word 2021 for Mac Word 2019 Word 2019 for Mac Word 2016 Word 2016 for Mac Word 2013 Word 2010 Word for Mac 2011 More…Less
To create a form in Word that others can fill out, start with a template or document and add content controls. Content controls include things like check boxes, text boxes, date pickers, and drop-down lists. If you’re familiar with databases, these content controls can even be linked to data.
Show the Developer tab
If the developer tab isn’t displayed in the ribbon, see Show the Developer tab.
Open a template or a blank document on which to base the form
To save time, start with a form template or start from scratch with a blank template.
-
Go to File > New.
-
In Search online templates, type Forms or the type of form you want and press ENTER.
-
Choose a form template, and then select Create or Download.
-
Go to File > New.
-
Select Blank document.
Add content to the form
Go to Developer, and then choose the controls that you want to add to the document or form. To remove a content control, select the control and press Delete. You can set properties on controls once inserted.
Note: You can print a form that was created using content controls, but the boxes around the content controls will not print.
In a rich text content control, users can format text as bold or italic, and they can type multiple paragraphs. If you want to limit what users add, insert the plain text content control.
-
Click or tap where you want to insert the control.
-
Select Developer > Rich Text Content Control
 or Plain Text Content Control .
 or Plain Text Content Control
  .
.To set specific properties on the control, see Set or change properties for content controls.
A picture control is often used for templates, but you can also add a picture control to a form.
-
Click or tap where you want to insert the control.
-
Select Developer > Picture Content Control
.
 .
.To set specific properties on the control, see Set or change properties for content controls.
Use building block controls when you want people to choose a specific block of text. For example, building block controls are helpful when you need to add different boilerplate text depending on the contract’s specific requirements. You can create rich text content controls for each version of the boilerplate text, and then you can use a building block control as the container for the rich text content controls.
-
Click or tap where you want to insert the control.
-
Go to DeveloperBuilding Block Gallery Content Control
(or Building Block Content Control). -
Select Developer and content controls for the building block.
 (or Building Block Content Control).
-
Click or tap where you want to insert the control.
To set specific properties on the control, see Set or change properties for content controls.
In a combo box, users can select from a list of choices that you provide or they can type in their own information. In a drop-down list, users can only select from the list of choices.
-
Go to Developer > Combo Box Content Control
or Drop-Down List Content Control . -
Select the content control, and then select Properties.
-
To create a list of choices, select Add under Drop-Down List Properties.
-
Type a choice in Display Name, such as Yes, No, or Maybe.
Repeat this step until all of the choices are in the drop-down list.
-
Fill in any other properties that you want.
Note: If you select the Contents cannot be edited check box, users won’t be able to click a choice.
 or Drop-Down List Content Control
  .
.-
Click or tap where you want to insert the date picker control.
-
Select Developer > Date Picker Content Control
.
 .
.To set specific properties on the control, see Set or change properties for content controls.
-
Click or tap where you want to insert the check box control.
-
Select Developer > Check Box Content Control
.
 .
.To set specific properties on the control, see Set or change properties for content controls.
Legacy form controls are for compatibility with older versions of Word and consist of legacy form and Active X controls.
-
Click or tap where you want to insert a legacy control.
-
Go to Developer > Legacy Forms
drop-down. -
Select the Legacy Form control or Active X Control that you want to include.
 drop-down.
Set or change properties for content controls
Each content control has properties that you can set or change. For example, the Date Picker control offers options for the format you want to use to display the date.
-
Select the content control that you want to change.
-
Go to Developer > Properties.
-
Change the properties that you want.

Add protection to a form
If you want to limit how much others can edit or format a form, use the Restrict Editing command:
-
Open the form that you want to lock or protect.
-
Select Developer > Restrict Editing.
-
After selecting restrictions, select Yes, Start Enforcing Protection.


Advanced Tip:
If you want to protect only parts of the document, separate the document into sections and only protect the sections you want.
To do this, choose Select Sections in the Restrict Editing panel. For more info on sections, see Insert a section break.

Show the Developer tab
If the developer tab isn’t displayed in the ribbon, see Show the Developer tab.
Open a template or use a blank document
To create a form in Word that others can fill out, start with a template or document and add content controls. Content controls include things like check boxes, text boxes, and drop-down lists. If you’re familiar with databases, these content controls can even be linked to data.
-
Go to File > New from Template.
-
In Search, type form.
-
Double-click the template you want to use.
-
Select File > Save As, and pick a location to save the form.
-
In Save As, type a file name and then select Save.

-
Go to File > New Document.
-
Go to File > Save As.
-
In Save As, type a file name and then select Save.

Add content to the form
Go to Developer, and then choose the controls that you want to add to the document or form. To remove a content control, select the control and press Delete. You can set Options on controls once inserted. From Options, you can add entry and exit macros to run when users interact with the controls, as well as list items for combo boxes, .
-
In the document, click or tap where you want to add a content control.
-
On Developer, select Text Box, Check Box, or Combo Box.
-
To set specific properties for the control, select Options, and set .
-
Repeat steps 1 through 3 for each control that you want to add.

Options let you set common settings, as well as control specific settings. Select a control and then select Options to set up or make changes.
-
Set common properties.
-
Select Macro to Run on lets you choose a recorded or custom macro to run on Entry or Exit from the field.
-
Bookmark Set a unique name or bookmark for each control.
-
Calculate on exit This forces Word to run or refresh any calculations, such as total price when the user exits the field.
-
Add Help Text Give hints or instructions for each field.
-
OK Saves settings and exits the panel.
-
Cancel Forgets changes and exits the panel.
-
-
Set specific properties for a Text box
-
Type Select form Regular text, Number, Date, Current Date, Current Time, or Calculation.
-
Default text sets optional instructional text that’s displayed in the text box before the user types in the field. Set Text box enabled to allow the user to enter text into the field.
-
Maximum length sets the length of text that a user can enter. The default is Unlimited.
-
Text format can set whether text automatically formats to Uppercase, Lowercase, First capital, or Title case.
-
Text box enabled Lets the user enter text into a field. If there is default text, user text replaces it.
-
-
Set specific properties for a Check box.
-
Default Value Choose between Not checked or checked as default.
-
Checkbox size Set a size Exactly or Auto to change size as needed.
-
Check box enabled Lets the user check or clear the text box.
-
-
Set specific properties for a Combo box
-
Drop-down item Type in strings for the list box items. Press + or Enter to add an item to the list.
-
Items in drop-down list Shows your current list. Select an item and use the up or down arrows to change the order, Press — to remove a selected item.
-
Drop-down enabled Lets the user open the combo box and make selections.
-
-
Go to Developer > Protect Form.
Note: To unprotect the form and continue editing, select Protect Form again.
-
Save and close the form.

If you want, you can test the form before you distribute it.
-
Protect the form.
-
Reopen the form, fill it out as the user would, and then save a copy.
Show the Developer tab
-
On the right side of the ribbon, select
, and then select Ribbon Preferences. -
Under Customize, select Developer .
 , and then select Ribbon Preferences.
Open a template or a document on which to base the form
You can start with a blank document and create your own form. Or, to save time, you can start with a form template.
-
Go to File > New from Template.
-
In the left pane, expand Online Templates, and then select Forms.
-
Double-click the form template that you want to use.
Add content controls to the form
-
In the document, click where you want to add the control.
-
On the Developer tab, under Form Controls, select Text Box, Check Box, or Combo Box.
-
To set specific properties for the control, select Options, and then configure the properties that you want.
Note: To create a list of drop-down items in a combo box, select the combo box placeholder, click Options, and then add the items that you want to appear in the drop-down list.
-
Repeat steps 1 through 3 for each control that you want to add.
Add instructional text (optional)
Instructional text (for example, «Type First Name») in a text box can make your form easier to use. By default, no text appears in a text box, but you can add it.
-
Select the text box control that you want to add instructional text to.
-
On the Developer tab, under Form Controls, select Options.
-
In Default Text, type the instructional text.
-
Make sure that Fill-in enabled is selected, and then select OK.
Protect the form
-
On the Developer tab, under Form Controls, select Protect Form.
Note: To unprotect the form and continue editing, click Protect Form again.
-
Save and close the form.
Test the form (optional)
If you want, you can test the form before you distribute it.
-
Protect the form.
-
Reopen the form, fill it out as the user would, and then save a copy.
Creating fillable forms isn’t available in Word for the web.
You can create the form with the desktop version of Word with the instructions in Create a fillable form.
When you save the document and reopen it in Word for the web, you’ll see the changes you made.
Need more help?
Создавать формы в Microsoft Word легко. Трудности начинаются, когда Вы решаете создать заполняемые формы, которые можно будет разослать людям, чтобы они их заполнили. В этом случае MS Word поможет решить вашу задачу: будь то форма для сбора информации о людях или опрос для получения обратной связи от пользователей о программном обеспечении или о новом товаре.
Содержание
- Включаем вкладку «Разработчик»
- Быть или не быть Шаблону?
- Наполняем форму элементами
- Текстовые блоки
- Добавляем выбор даты
- Вставляем раскрывающийся список
- Вставляем чек-боксы
- В заключение
Включаем вкладку «Разработчик»
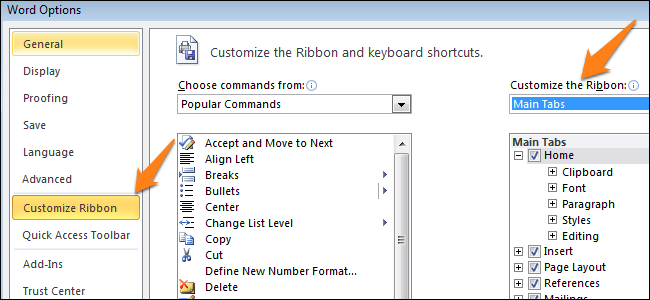
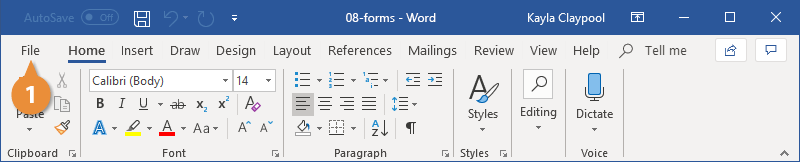
Чтобы создавать заполняемые формы, сначала нужно активировать вкладку Developer (Разработчик). Для этого откройте меню File (Файл) и кликните по команде Options (Параметры). В появившемся диалоговом окне откройте вкладку Customize Ribbon (Настроить ленту) и выберите Main Tabs (Основные вкладки) из выпадающего списка.
Поставьте галочку в строке Developer (Разработчик) и нажмите ОК.
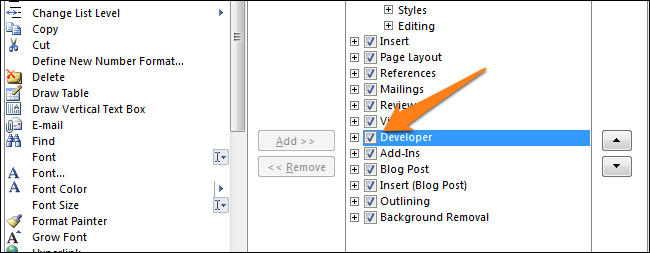
Теперь на ленте появилась новая вкладка.

Быть или не быть Шаблону?
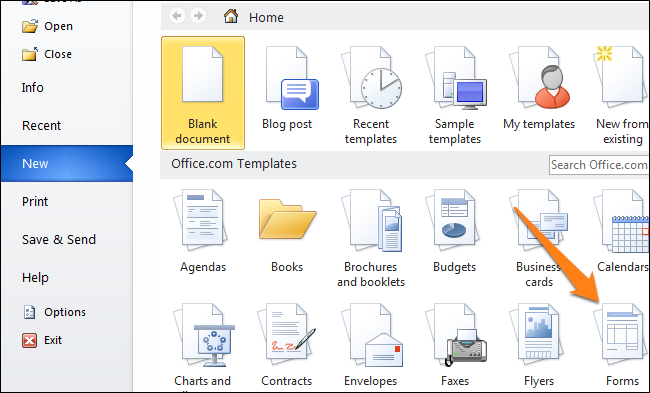
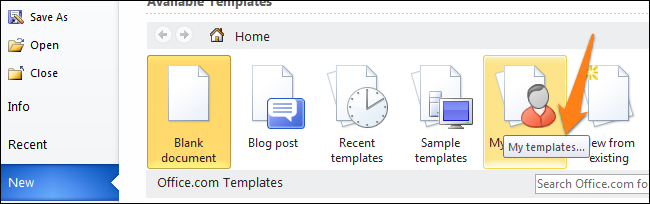
Есть два варианта, с которых можно начать создавать формы. Первый проще, при условии, что Вы подберёте подходящий шаблон. Чтобы найти шаблоны, откройте меню File (Файл) и нажмите New (Создать). Вы увидите множество шаблонов, готовых для скачивания. Остаётся лишь кликнуть по Forms (Формы) и отыскать нужный шаблон среди предложенных.
Когда найдёте подходящий шаблон, загрузите его и редактируйте форму, как пожелаете.
Это самый простой путь, но может случиться так, что Вы не найдёте подходящий шаблон среди предложенных. В этом случае можно создать форму из черновика. Сперва откройте настройки шаблонов, но вместо уже готовой формы выберите My Templates (Мои шаблоны).
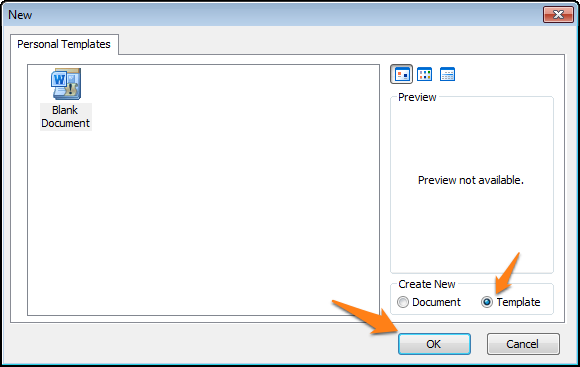
Выберите Template (Шаблон) и кликните по ОК, чтобы создать чистый шаблон. В завершение нажмите Ctrl+S, чтобы сохранить документ. Назовём его Form Template 1.
Наполняем форму элементами
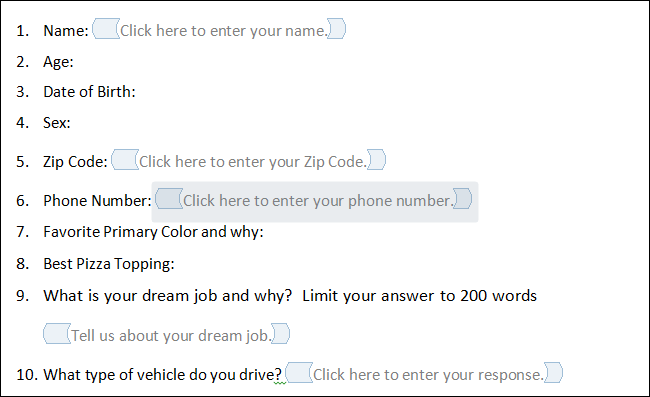
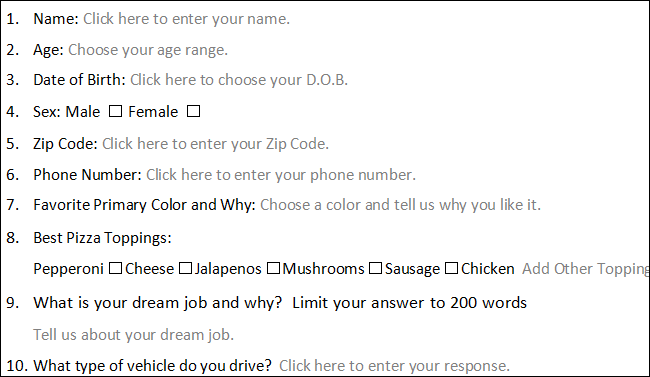
Теперь у Вас есть пустой шаблон, значит уже можно добавлять информацию в форму. Форма, которую мы создадим в этом примере, – это простой опросник для сбора информации о людях, которые будут его заполнять. Первым делом вставьте основные вопросы. В нашем случае мы будем узнавать следующую информацию:
- Name (Имя) – обычный текст
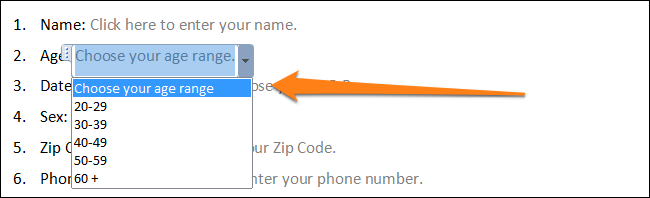
- Age (Возраст) – раскрывающийся список
- D.O.B. (День Рождения) – выбор даты
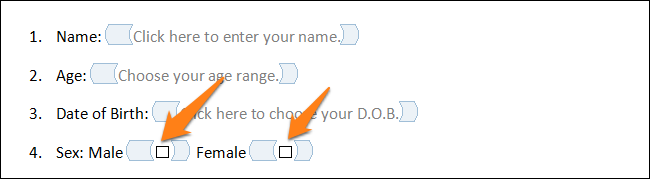
- Sex (Пол) – чек-бокс
- Zip Code (Почтовый индекс) – обычный текст
- Phone Number (Номер телефона) – обычный текст
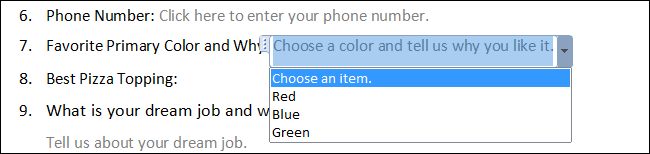
- Favorite Primary Color and why (Какой любимый цвет и почему) – поле со списком
- Best Pizza Toppings (Любимая начинка пиццы) – чек-бокс и обычный текст
- What is your dream job and why? Limit your answer to 200 words (О какой работе Вы мечтаете и почему) – форматированный текст
- What type of vehicle do you drive? (Какой у Вас автомобиль) – обычный текст
Чтобы приступить к созданию различных вариантов элементов управления, откройте вкладку Developer (Разработчик), которую Вы добавили ранее, и в разделе Controls (Элементы управления) выберите Design Mode (Режим конструктора).
Текстовые блоки
Для любых вопросов, требующих ответа в форме текста, можно вставить текстовые блоки. Это делается при помощи:
- Rich Text Content Control (Элемент управления содержимым «форматированный текст») — пользователь может настраивать форматирование
- Plain Text Content Control (Элемент управления содержимым «обычный текст») — допускается только обычный текст без форматирования.
Давайте создадим поле для ответа форматированным текстом на вопрос 9, а затем поле для ответа обычным текстом на вопросы 1, 5, 6 и 10.
Не забывайте, что можно изменять текст в поле элемента управления содержимым, чтобы он соответствовал вопросу. Для этого кликните по полю и введите текст. Результат показан на изображении выше.
Добавляем выбор даты
Если Вам нужно добавить дату, можно вставить Date Picker Content Control (Элемент управления содержимым «выбор даты»). Используем этот элемент для вопроса 3.

Вставляем раскрывающийся список
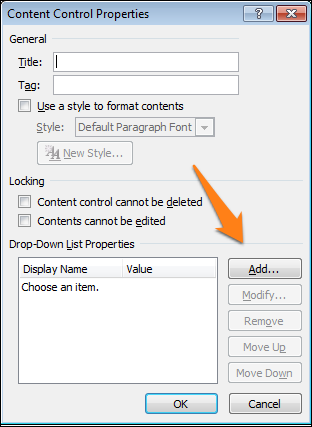
Для вопросов, подразумевающих единственный ответ (например, вопрос 2), удобно использовать раскрывающийся список. Вставим простой список и заполним его возрастными диапазонами. Разместите поле элемента управления содержимым, кликните по нему правой кнопкой мыши и выберите пункт Properties (Свойства). В появившемся диалоговом окне Content Control Properties (Свойства элемента управления содержимым) нажмите Add (Добавить), чтобы добавить в список возрастные диапазоны.
Когда закончите, у Вас должно получиться примерно то, что изображено на рисунке ниже. При этом режим конструктора нужно отключить!
Ещё можно использовать Combo Box (Поле со списком), в котором легко составить список из любых нужных элементов. При необходимости пользователь сможет ввести дополнительный текст. Давайте вставим поле со списком для вопроса 7. Так как мы будем использовать этот элемент, пользователи смогут выбрать один из предложенных вариантов и ввести ответ, почему им нравится выбранный цвет.
Вставляем чек-боксы
Для ответа на четвёртый вопрос вставим чек-боксы. Для начала нужно ввести варианты ответов (male – мужчина; female – женщина). Затем добавить элемент управления содержимым Check box (Флажок) рядом с каждым вариантом ответа:
Повторите это действие для любого вопроса, который подразумевает один или несколько вариантов ответа. Мы добавим чек-бокс к ответу на вопрос 8. Кроме того, чтобы пользователь мог указать вариант начинки пиццы, которого нет в списке, мы добавим элемент управления содержимым Plain Text (Обычный текст).

В заключение
Готовая пустая форма с включённым и с выключенным режимом конструктора должна выглядеть, как на рисунках ниже.
Режим конструктора включен:
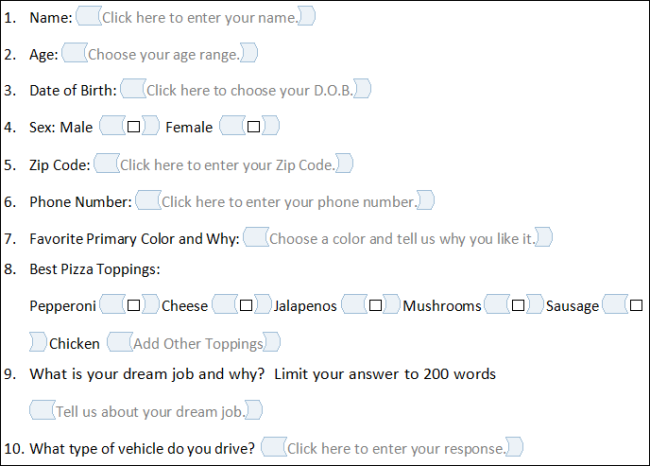
Режим конструктора выключен:
Поздравляем! Вы только что освоили основные приёмы создания интерактивных форм. Вы можете отправить файл DOTX людям, и когда они его запустят, он автоматически откроется как обычный документ Word, который можно заполнить и отправить обратно.
Оцените качество статьи. Нам важно ваше мнение:
Creating forms with Microsoft Word is useful and easy, but the challenge comes in when you decide to create fillable forms with options that you can send to colleagues or clients and have them fill out the form digitally. Whether you need a form for gathering information or if you are trying to create a survey to test out user response to software or a new product, Microsoft Word can assist in this process. It’s a slightly more technical job and requires access to the Developer tab in Microsoft Word, but is more than easily achievable with not too much hassle!
First off, you will require the Developer Tab of Microsoft Word to be enabled.
- For Word 2007 go to File > Word Options > Popular > select ‘Show Developer Tab in Ribbon’.

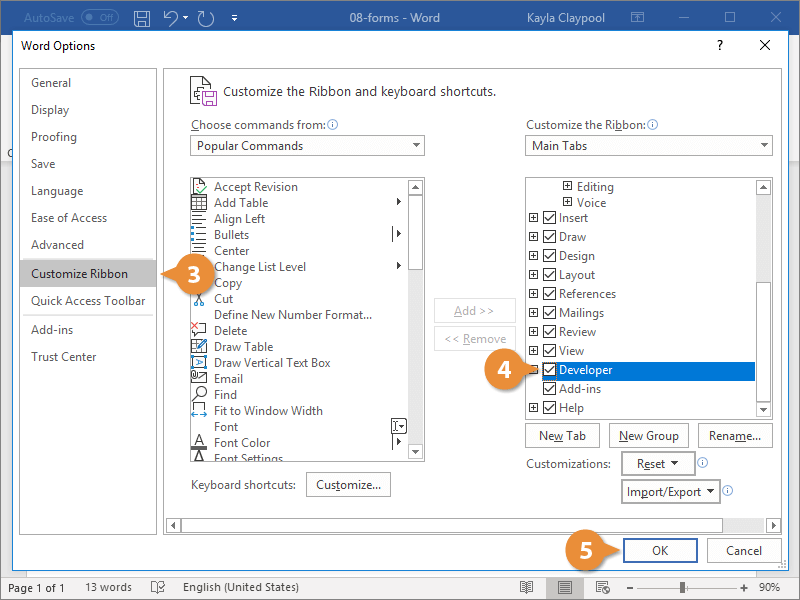
If you have a later edition of Word 2010 and onwards then go to File > Options > Customize Ribbon. In the right side of the Options dialog box, select Main Tabs and turn on Developer tab.


- The Developer tab should now be visible on your word document and we can get started on this tutorial.
- You will now have to make a decision to either use an existing Microsoft Word form template or to make a new one. Using an existing template is a great time saving option if you can find a template that satisfies your needs. To look through the templates go File>New>Forms, you can then have a browse to see if any might work for you.

- This tutorial will show you how to create a new form from scratch rather than using an existing one. To start this process go to File > New > My Templates.

- Select ‘Template’ in the bottom right hand corner and press ‘OK’.


- Now we have a blank template, we are ready to start adding information to the form. To highlight a range of responses available on forms we will create a simple form with the following responses:
- Name (Plain Text Response)
- Age (Drop-Down List)
- D.O.B. (Date Response)
- Sex (Check Box)
- Click on the “Developer” tab which you added earlier and under the “Controls” section; choose “Design Mode” to begin creating different control options. If you want to see what it looks like in action, remember to deselect the “Design Mode” option.

- For any answers that require a text based answer, you can add text sections. You will do this by selecting the Rich Text Content Control
 (allows users to edit formatting) or the Plain Text Content Control (only allows plain text without formatting) option. So for question one we will enable a plain text response. Write the question and then at the end of the question select the plain text response in the tool bar.

- It should look something like this:

10: For the ‘Age’ question we will add a drop down list.
For questions that only allow one answer such as numbers (question 2), a drop-down list is handy. ![]() We will add simple list and populate it with age ranges. You will need to add the content control box, right-click on it, and select the “Properties” option.
We will add simple list and populate it with age ranges. You will need to add the content control box, right-click on it, and select the “Properties” option.

12: Give the drop down list a title e.g. What is your age. Next, click on ‘add’ to add age ranges.
13: When you have finished adding in the age ranges click OK.
14: Finally on this form we are going to add in a check box for the person’s gender. We write our options and then include check boxes ![]() after each option.
after each option.
15: Now that your form is complete you will want to add in some permissions before sending it out so that only certain parts of the form are editable. To do this on the Review tab, in the Protect group, click Restrict Editing.

16: In the Editing restrictions area, select the Allow only this type of editing in the document check box.

17: In the list of editing restrictions, click No changes (Read only). Select the part of the document where you want to allow changes. For example, choose the boxes, tick boxes, and dropdown menu’s that you have created previously in this walkthrough. In the exceptions box choose tick the box everyone so that anyone can fill this form in.
Alternatively, if you have created form fields for everything that needs editing, select Filling in Forms in the editing restrictions section.

Well done! You have now created an editable form and learnt how to lock it so that only certain parts of the form are editable by others. The form that we created is not the most attractive to the eye and it is advised that you either use an existing template, or create a new template that can be used on multiple occasions if you are likely to be creating these regularly.
You can use Word to create interactive digital forms that other people can fill out on their computers before printing or sending them back to you. It takes a little preparation but keeps you from having to decipher messy handwriting! Some of the tools you will use when creating a form include:
- Templates: Forms are normally saved as templates so that they can be used again and again.
- Content controls: The areas where users input information in a form.
- Tables: Tables are often used in forms to align text and form fields, and to create borders and boxes.
- Protection: Users can complete the form fields without being able to change the form’s text and/or design.
Show the Developer Tab
Before you can create a form, you’ll need to turn on the Developer tab to get access to the advanced tools.
- Click the File tab.

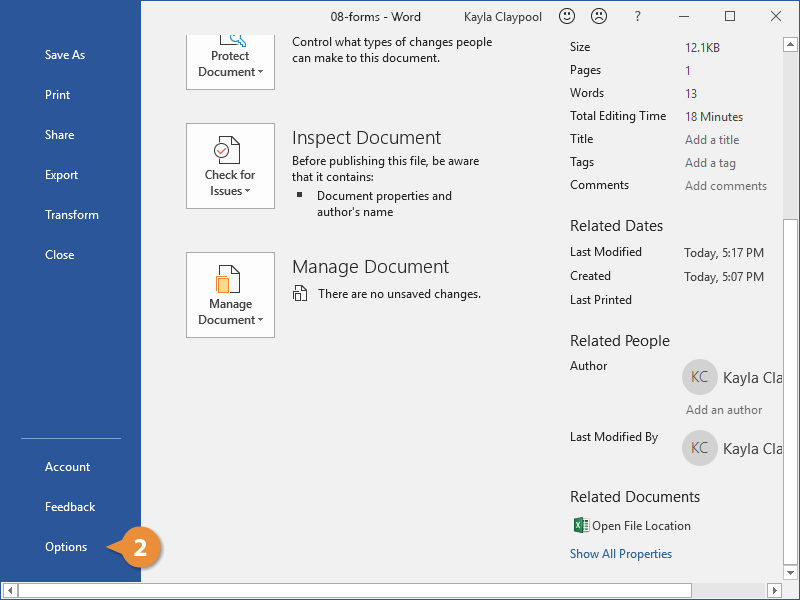
- Select Options.

The Word Options window opens.
- Click the Customize Ribbon tab on the left.
The column on the right controls which ribbon tabs are enabled.
- Check the Developer check box.
- Click OK.
The Developer tab now appears on the ribbon. In addition to advanced tools for macro recording, add-ins, and document protection, we now have access to form controls.
Create a Form
Once you’ve enabled the Developer tab, and created the layout and structure of the form, you can start adding form fields to your document with Content Controls.
- Place the text cursor where you want to insert the form field.
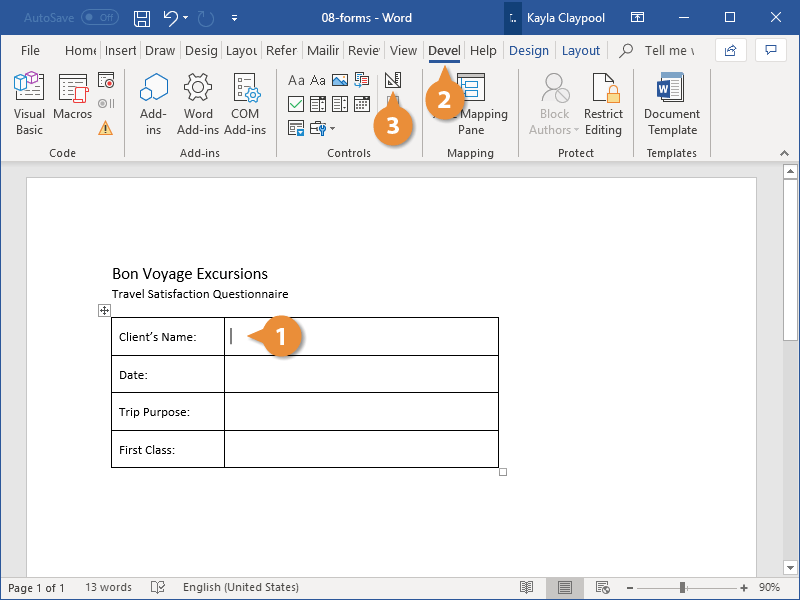
- Click the Developer tab on the ribbon.
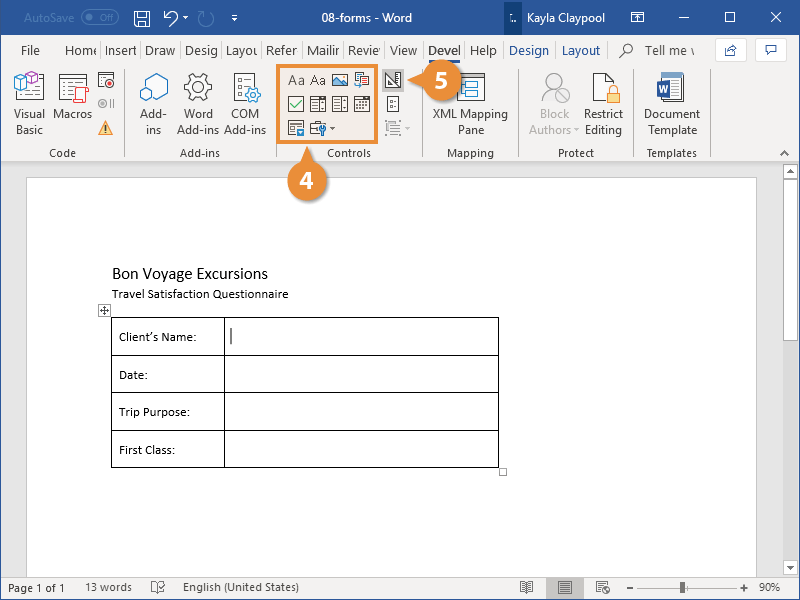
The Controls group contains the different kinds of content controls you can add to a form, as well as the toggle button for Design Mode.
- Click the Design Mode button in the controls group.
While Design Mode is active, controls you insert won’t be active, so clicking a check box to move it around won’t also check it. You can also customize placeholder text for some controls.
- Click a Content Control buttons to insert the selected type of control.
The content control is inserted.
Select a form field and click the Properties button on the ribbon to edit a control’s options. Depending on the type of control you’ve inserted, you can change its appearance, set up the options in a list, or lock the control once edited.
- When you’re done, click the Design Mode button again to exit Design Mode.
You leave Design Mode, and the content controls that you’ve inserted can now be used.
Types of Form Controls
There are many different types of form controls you can add to a form that will allow people to add different types of responses.
Finalize a Form
When you’re ready to distribute a form so others can fill it out, you can restrict the form so that content controls cannot be removed or changed by those filling it out.
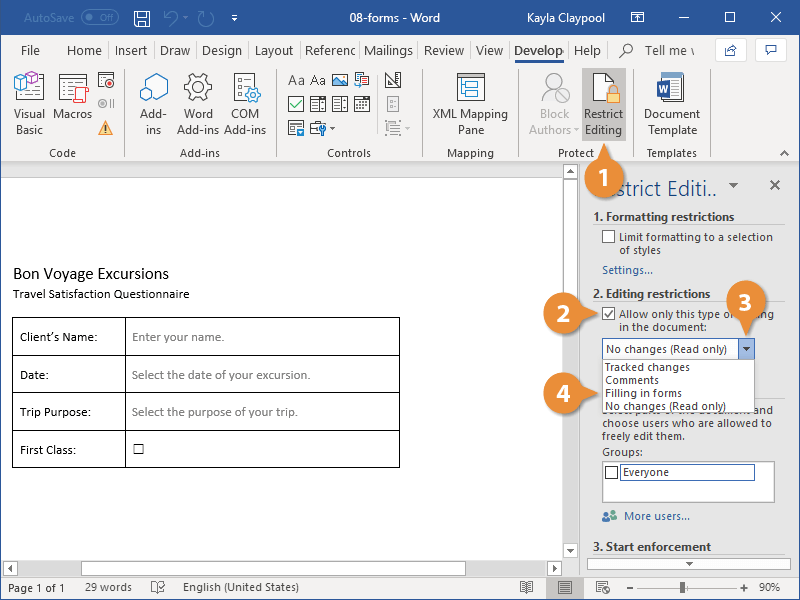
- Click the Restrict Editing button on the Developer tab.
The Restrict Editing pane appears on the right.
- Check the Editing restrictions check box.
- Click the Editing restriction list arrow.
- Select Filling in forms.
When this option is enabled, the only change that anyone else can make to this document is the filling in of form fields. They won’t be able to move, delete, or edit the fields themselves until protection is turned off.
- Click the Yes, Start Enforcing Protection button.
A password is not required to start enforcing protection, but you can add one if you’d like to prevent just anyone from turning this protection off.
- Enter a password (optional), then click OK.
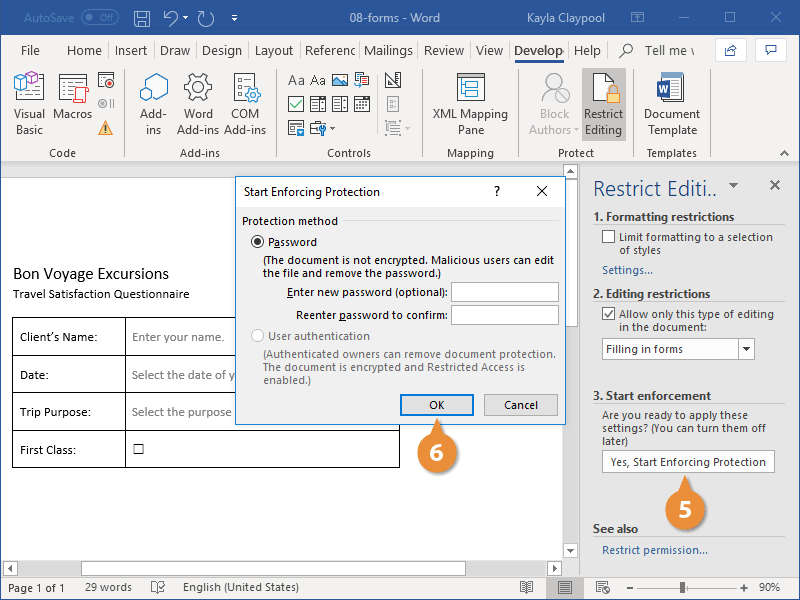
The document is now restricted, and anyone you send it to will only be able to fill in the forms.

FREE Quick Reference
Click to Download
Free to distribute with our compliments; we hope you will consider our paid training.