
How to Recover an Unsaved Word When the Computer Shuts Down
My computer shut down and I lost my Word document, how to recover unsaved Word document 2007 after shutting down? There are three useful solutions you can try to retrieve when you forgot to save a word document.
| Workable Solutions | Step-by-step Troubleshooting |
|---|---|
| Fix 1. Recover recent documents | Open Word > click Open > click File > click Recent > click Recover from Recent Documents…Full steps |
| Fix 2. Recover from Manage Document | Run Word > open a new file > click File > click Info and then Manage Document…Full steps |
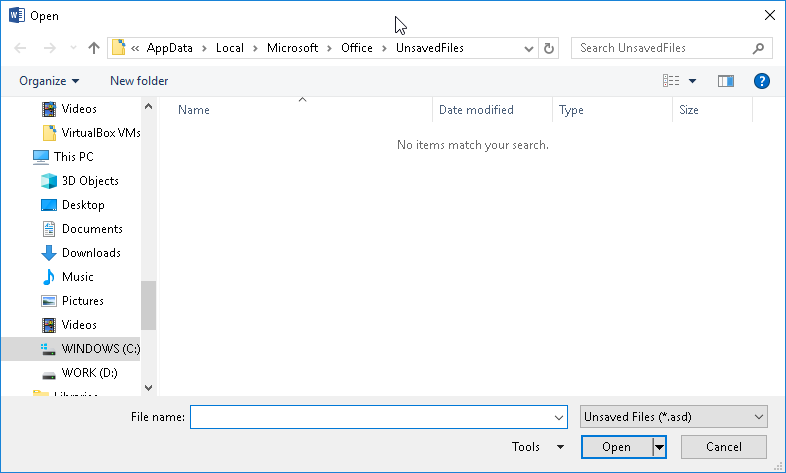
| Fix 3. Recover temporary files | Locate the temp files in C:UsersUser_NameAppDataLocalMicrosoftOfficeUnsavedFiles…Full steps |
| Bonus Tip: Recover deleted Word Documents | Use a reliable data recovery tool to restore deleted or lost Word documents in simple 3 steps…Full steps |
In fact, none of the data recovery software on the market can recover unsaved Word documents. Typically, the third-party software only helps when you at least have an original file located on your computer’s hard disk or a connected USB drive. You can use these data recovery tools to restore lost saved Word document, which is later missing due to accidental deletion, disk formatting, virus attack, partition loss, etc.
But if you want to recover a document that didn’t save by computer crash or shutting down, the answer is NO, even the EaseUS Data Recovery Wizard software on this page, which is very famous in the field of data recovery. Then, how to recover when you forgot to save a Word document after the computer restarts? Follow the three effective solutions below.
Microsoft Office offers users the AutoRecover to restore the on-editing Word document automatically. You can enable this function by going to «File» > «Options» > «Save» > checking «Save AutoRecover». You can change the time of the AutoSave interval. As long as this feature starts to work, you can recover the unsaved Word document after a computer restart, crash, or shutting down with the following methods. If your Word version is below version 2010, see another post on how to recover unsaved Word document 2007/2003.
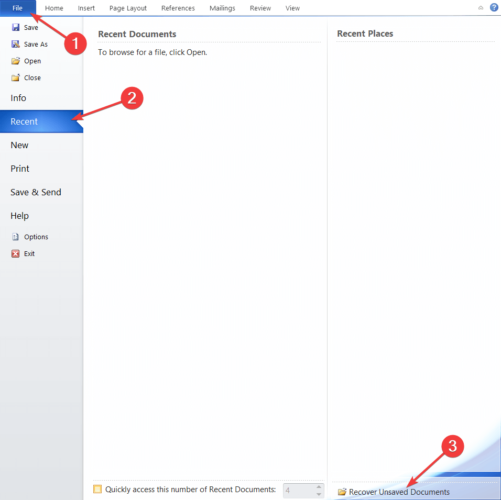
Method 1. Recover from Recent Documents (Word 2010/2013/2016/2019)
- Open Word application and click the «Open» > «File» tab.
- Click «Recent».
- Scroll to the bottom of your Recent Documents and then click «Recover Unsaved Documents».
- The saved drafts will open in a new window. Click «Save As» to restore the disappeared unsaved Word document after a computer problem.

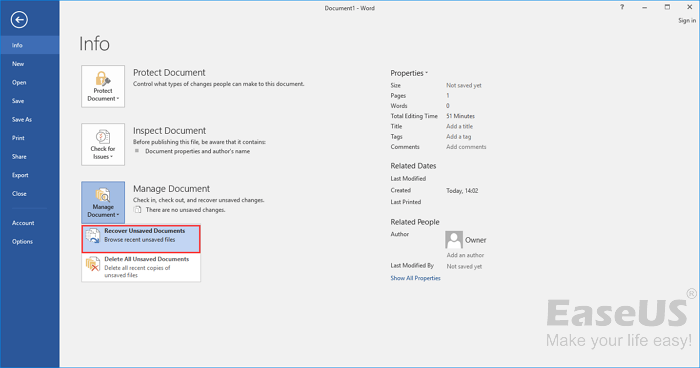
Method 2. Recover from Manage Document
- Run Word > open a new file or an existing file.
- Click the «File» tab > «Info» > click «Manage Document».
- Click «Recover Unsaved Documents».
- You will see the list of your unsaved files. Select the file and click «Open» > «Save As» to store the Word file.
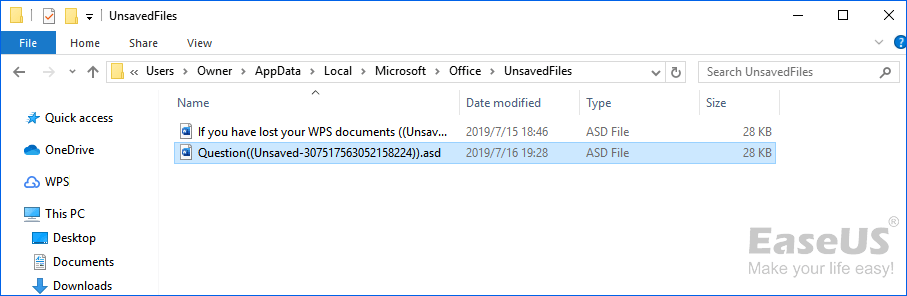
Method 3. Recover from Temporary Files
- You can find the temp files in this path: C:UsersUser_NameAppDataLocalMicrosoftOfficeUnsavedFiles.
- Choose the one you need to recover and open with Word application to save again.
If you have deleted the Unsaved Files folder and lost all the temporary files, you can use EaseUS Data Recovery to restore the deleted tempory files.
How to Recover Deleted or Lost Word Document on Windows 10/8/7
As explained before, a data recovery tool can’t help you get back the unsaved Word document, but it provides you with an effective and easy way to recover deleted files. And EaseUS EaseUS Data Recovery Wizard, a renowned document recovery program, enables you to restore lost DOC/DOCX, XLS/XLSX, PPT/PPTX, PDF, CWK, HTML/HTM, INDD, and EPS with a few clicks.
EaseUS Word Recovery Software
- Recover 1000+ file types including .doc, .xlsx, jpg, .png, .gif, .mp4, .mov, .ppt, .pdf, and more.
- Repair corrupted files after the data recovery, support photo repair, video repair, and document repair
- Support data recovery for sudden deletion, formatting, hard drive corruption, virus attack, system crash under different situations
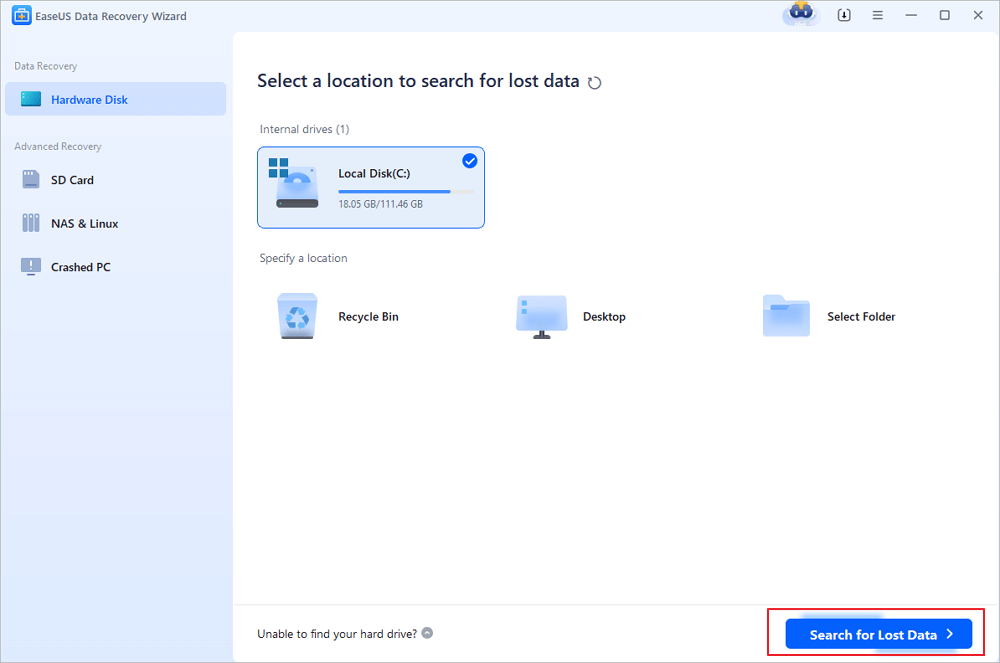
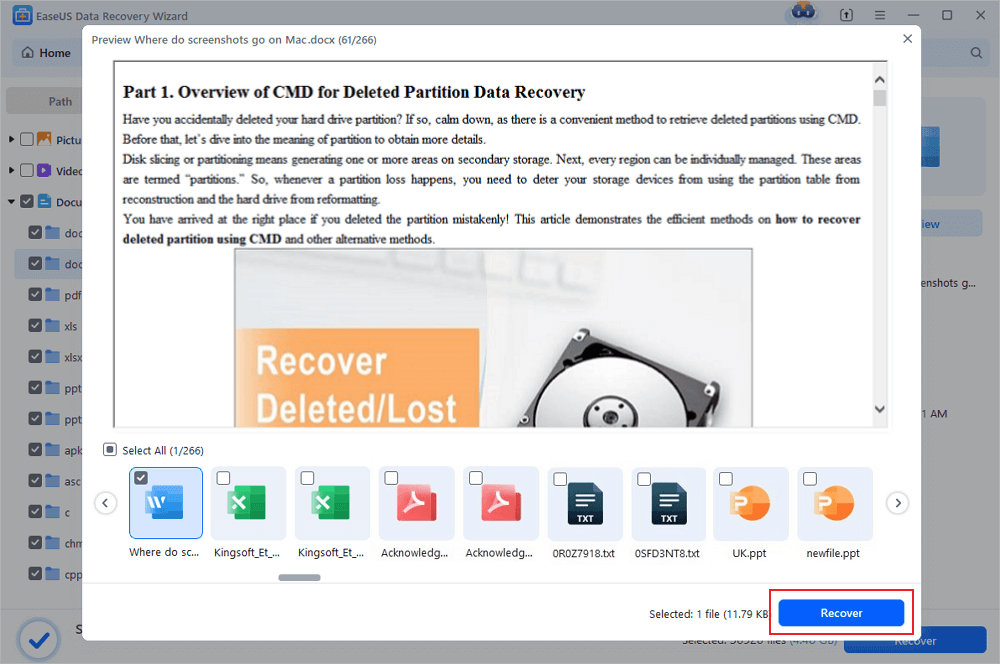
Step 1. Choose the Word file location
Choose the drive or a specific folder and click the «Scan» button.
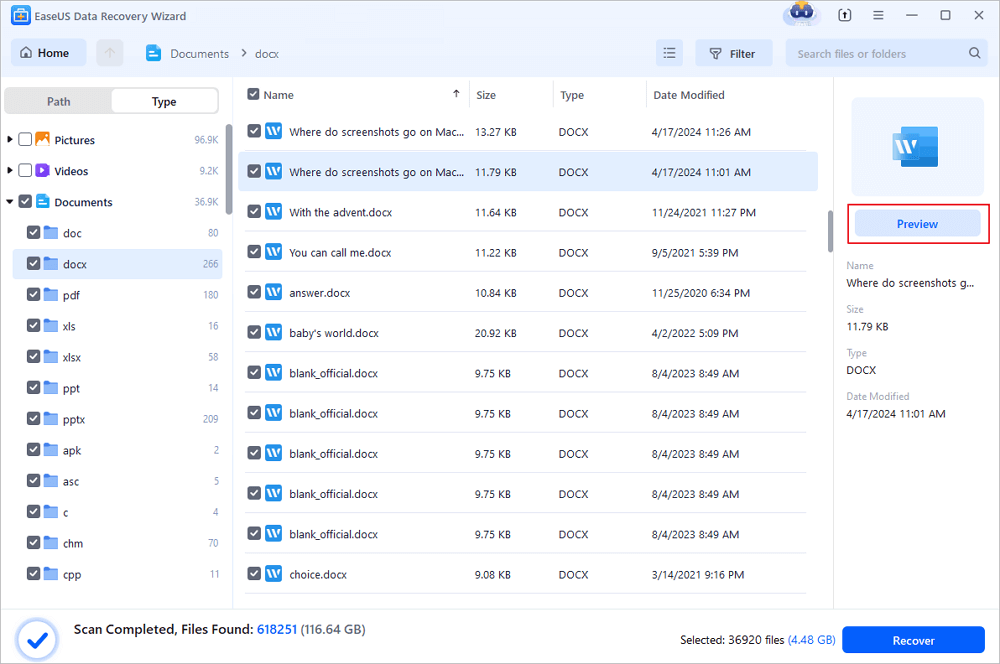
Step 2. Locate your Word files
The software will start immediately scanning all lost data on the selected drive. After the scan, click the «Documents» option in the left panel. Choose «Word» from the category bar. Then, click «Preview».
Step 3. Recover Word files
After previewing the lost Word files, select the desired Word files and click «Recover». Then, select a folder to store the Word files.
People also ask
1. How do I recover an unsaved Word document 2007 after shutting down?
If your computer shut down and you lost your Word document, you can recover unsaved Word document 2007 in three ways, either recover from recent documents, manage document, or from temporary files.
2. Can I recover a word doc that I didn’t save?
If you forgot to save Word document or your computer restarted and lost Word document, you can use the AutoRecover feature to recover unsaved Word document. Open Word, click the File tab > click Info > click Manage Document > click Recover Unsaved Documents. Then, find the unsaved Word document, click Open > Save As.
3. How do I recover an unsaved Word document in 2019?
Same as all previous versions of Word, Word 2019 also has the AutoRecover feature to help users recover unsaved Word document when computer shuts down. You can enable this function by going to File > Options > Save > checking Save AutoRecover. Once this function works, it can save your on-editing Word document at regular intervals. So you can recover unsaved Word document that didn’t save.
Last updated: 14th April 2010
This is a post following on from a previous article called Good Word Habits — Save Save Save! and aims to try to help you if you didn’t follow the advice in the article.
In other words, you forgot to save your Word Document or accidentally deleted it!! Arrghhh! OK, it happens to us all at some point — there are other creative ways of losing a Word document too, I might share them with you sometime! But you want to know what to do if you forgot to save that document you spent 4 hours on!
OK, first I have to prepare you for something. I think you need to swallow, digest and accept this fact now before we get into any potential solutions:
Your Word document is probably lost forever.
Please go back and read this statement again and reconcile yourself to the probable fact that if you closed down Word without saving your document even once, there is no way to get it back. Face that awful fact now, and then if we DO manage to do anything to get it back it will be a pleasant surprise. OK?
How to maybe get your document back
How do people usually lose their documents, and what are the options for retrieving your valuable file? First, before you do anything, as one visitor pointed out, check your Recycle Bin! You never know, if you simply accidentally deleted it, it might actually have served its purpose for once! Be on the lookout both for .doc files, and .asd files, as described below in 3.i). Heck, even look out for a .tmp file in there, these get saved by Word too and there might be something salvageable in one of them. But here are the typical scenarios, if this doesn’t bear fruit:
1) SCENARIO: Forgot to save the document at all, even when exiting Word/closed Word without saving! This is the worst case scenario — when you worked for minutes or even hours in Word without EVER saving the document even once, hence it still bears the name Document1. When you exit Word it will always ask you whether you want to save the document and, without thinking, you press NO.
To the best of my knowledge, if you press NO at this point there is no way to retrieve the document (I will GLADLY be corrected on this point)! Word assumes, fairly reasonably, that you do not want it anymore and deletes it both from any temporary files and the Autorecover file that it may have been saving regularly while you were working. And it’s no good looking in the Recycle bin, because it won’t be there either.
SOLUTION: weep quietly, or try some of the following solutions in case you got very very lucky.2) SCENARIO: Computer, Windows or Word crashed while you were working before you had time to save. You may not have saved the document at all, or you did save it, but not a recent copy. SOLUTION: This is a much better scenario — Word should be set up to regularly save your document using the AutoRecover feature, and (as of Office 2003, or maybe one before, I can’t remember) when you restart Word, a panel should appear at the side of the screen showing which documents you were working on when the crash happened. You should look at the time saved to check to see which is the more recent saved version of your document — is it the one YOU saved (if you saved at all), or the one AutoRecover saved. Click on the file and save it under a different name, just so you are sure you have a salvaged version.
In the examples, the last versions saved of these two documents were both saved by me, since Autorecover is usually set up to save every 10 minutes (Tools -> Options -> Save tab -> Save AutoRecover info every: [choose your interval]). So remember, you are ALWAYS going to lose all your work done AFTER either a) your last manual save or b) the last AutoRecover save, so make sure one or the other is frequent!
3) SCENARIO: I haven’t managed to recover my document using the above suggestions — HELP! Like I said, I hope you are reconciled to the probable loss of your document and that you will take my advice to save, save, save in future. Also, it wouldn’t harm to have a backup solution in place that helps prevent you losing files by making regular, automatic backups to an online service, so you don’t even have to think about it. I wrote about one such backup service here, check out the article. Otherwise, you could try one of the following:
i) Look under Tools -> Options -> File locations tab in Word and see where Word saves its AutoRecovery files. By default it is something like: DRIVE:Documents and Settings[your windows username]Application DataMicrosoftWord
In that directory there MAY be some files with the extension .asd which are really just Word files. If by some amazing chance Word didn’t delete the temporary file, it may be there called AutoRecovery save of… [your filename]. Simply copy it to somewhere safe and rename it with a .doc extension instead of an .asd extension and it will load fine into Word. Frankly though if you find your file this way someone must be smiling on you, because like I already said, Word deletes those files if they are not claimed before Word is closed…
ii) Try a specialised «undelete» tool, like WinUndelete, which will also help you if you accidentally deleted the file. You will have to shell out a bit of money, but it is a product that ought to pay for itself, because it will deal with all kinds of lost files, not just Word files. However, although I am happy for you to buy WinUndelete through my site, because I get a few modest pennies in commission, I have to be frank and say there is no guarantee that this will recover your file. Word just seems to obliterate the file you were working on. All I can suggest is, give the trial version a go and see if it saves your bacon — I believe it lets you search for lost or accidentally deleted files, but only the full paying version lets you actually recover them, which is fair enough I suppose, you can see if your file is there without actually paying for the software.
That about wraps it up. I am sorry to paint such a bleak picture, but I think it is realistic. If you have any additional tips I will be happy to hear them and include them, but the message once again has to be save, save, save! And if you have trouble doing that, this suggestion on how to stop losing files may help you too.
Also, you could try to recover lost or accidentally deleted files with WinUndelete
Make sure you backup your files in order to prevent data loss.
by Milan Stanojevic
Milan has been enthusiastic about technology ever since his childhood days, and this led him to take interest in all PC-related technologies. He’s a PC enthusiast and he… read more
Updated on August 18, 2022
Reviewed by
Vlad Turiceanu

Passionate about technology, Windows, and everything that has a power button, he spent most of his time developing new skills and learning more about the tech world. Coming… read more
- Sometimes users forget to save their Word documents, or their application unexpectedly closes.
- Fortunately, Word has an autosave feature that periodically saves your documents to prevent data loss.
- But where are autosaved Word files stored? Here’s the answer you’ve been looking for.
- There are multiple ways to access the Word autosave location and we will show you all of them.
XINSTALL BY CLICKING THE DOWNLOAD FILE
This software will keep your drivers up and running, thus keeping you safe from common computer errors and hardware failure. Check all your drivers now in 3 easy steps:
- Download DriverFix (verified download file).
- Click Start Scan to find all problematic drivers.
- Click Update Drivers to get new versions and avoid system malfunctionings.
- DriverFix has been downloaded by 0 readers this month.
Microsoft Word is one of the most popular text processors in the world, and millions of users use it on daily basis. Creating documents in Word is fairly simple.
Sometimes, you can forget to save your documents, so you might find search for the Word autosave location.
In order to prevent file loss, many users are using the autosave feature that will save your documents in specified intervals.
In case your Word document cannot be saved, check out our solutions for the issue.
How to access autosave files in Word?
If you’re using the feature, today we’re going to show you how to access Word autosave location on Windows 10.
1. Access Word autosave location through the MS Word settings
AutoRecover feature in Word is extremely useful because it will save your files in specified intervals and prevent data loss.
This feature is useful if you accidentally forget to save your file, or if a system crash occurs.
Alternatively, you can use a tool listed in our fresh article about the best software to prevent data loss.
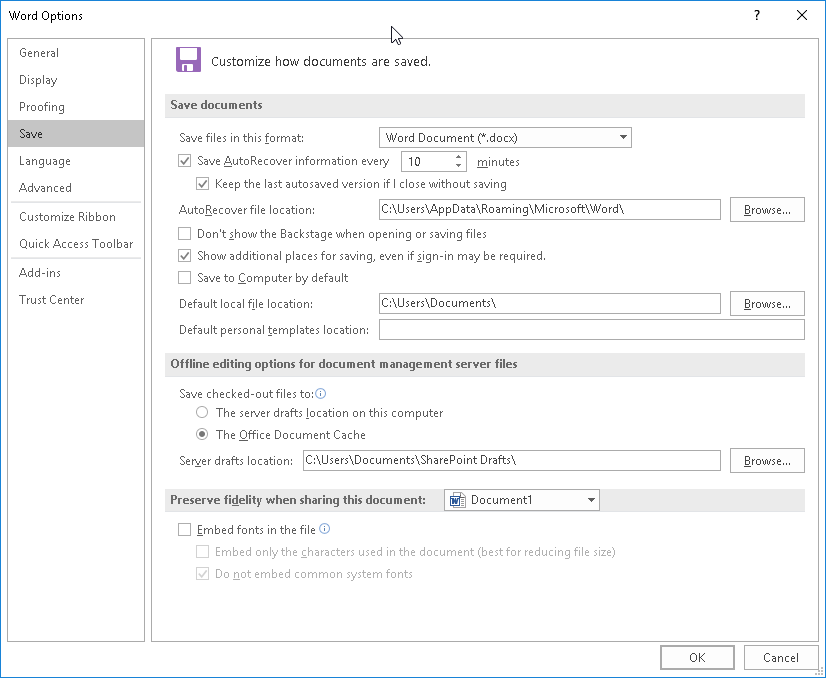
To turn on the autosave feature, you need to do the following:
- Open Word and click on File > Options.
- Now go to Save section and make sure that Save AutoRecover information option is checked. Here you can set the desired time interval for auto save.
- Look for AutoRecover file location field. It will show you the location of the autosave directory. By default the location should be C:UsersYour_usernameAppDataRoamingMicrosoftWord. If you want, you can easily change the location by clicking the Browse button and choosing a different directory on your PC.
After you locate Word autosave location on your PC, you need to open Word, navigate to that directory, locate the file it automatically saves and open it in Word.
Keep in mind that this directory might be hidden on your PC, especially if it’s located in the AppData folder.
To quickly access this folder, you can simply paste its location into File Explorer’s address bar.
If you want to access the folder manually, just follow the path, but be sure to go to the View tab. Then, check the Hidden items option so you can reveal the hidden AppData folder.

After doing that, you’ll be able to access Word autosave location without any problems.
2. Check the AppData folder to find the Word autosave location
By default, Word’s autosave location is the AppData folder. There are several locations where Microsoft Word can save your files. Usually, the autosave location is one of these two: C:UsersYour_usernameAppDataLocalMicrosoftWord C:UsersYour_usernameAppDataLocalTemp
Newer versions of Word use a different location, and you can find all your unsaved files in here: C:UsersYour_usernameAppDataLocalMicrosoftOfficeUnsavedFiles
There are different types of Word files in these folders, and usually, these files will have a tilde or a squiggly line before the file name. Most of these files will have a .tmp extension and a 4-digit number.
For example, a Word document will look like this ~wrdxxxx.tmp. The temp document file will look like ~wrfxxxx.tmp, while the auto recovery file will look like ~wraxxxx.tmp.
Some PC issues are hard to tackle, especially when it comes to corrupted repositories or missing Windows files. If you are having troubles fixing an error, your system may be partially broken.
We recommend installing Restoro, a tool that will scan your machine and identify what the fault is.
Click here to download and start repairing.
Lastly, complete auto-recovery files will not have a .tmp extension and they’ll use the .wbk extension instead. After you find one of those files, simply open it in Word and save them.
3. Access Word autosave location using Recover Unsaved Documents
If you accidentally close Word or if it crashes for some reason, you can open the autosave location by using the Recover Unsaved Documents option.
It is built-in on Microsoft Word and helps you restore any files which you was not able to save before closing the app.
1. Open Microsoft Word on your PC.
2. Go to File in the top left corner of the UI.
3. Choose Recent from the list of options.
4. Click on Recover Unsaved Documents.
5. You can also navigate to File>Info>Manage Versions>Recover Unsaved Documents in order to access the autosave location.
6. After finding the automatically saved file, open it and choose the Save as option to save it.
4. Access Word autosave location through the document directory
Sometimes autosave location is set to the same directory where you save your file. However, autosave files are usually hidden and in order to see them, you need to follow these steps:
- Open Word.
- Click File > Open > Browse.
- Navigate to the directory in which you saved the file.
- Change File type from All Word documents to All Files.
- Now you should see a backup file. The file will have Backup of in its name, so it will be easily recognizable.
- Open the file and save it.
As you can see, Word sometimes saves unsaved files to the same directory in which your currently open file is stored in order to make it easily accessible.
If you didn’t save changes to your Word document, be sure to try this method.
- 6 Best Password Recovery Tools for Microsoft Word
- 6 Best Backup Software for Windows 11 [2022 Guide]
- How to open hidden files on Windows 10
5. Search for .wbk or .asd files to find the Word autosave location
Although Word automatically saves your files, sometimes it can be hard to find the autosave location. If you can’t find the location on your own, you might want to search for a specific file extension.
Word autosave files usually use .wbk or .asd file extension, and in most cases, the Word autosave directory will have these files in it. To search your system for these files, do the following:
- Open File Explorer. You can do that quickly by pressing the Windows Key + E shortcut.
- When File Explorer opens, go to the search bar in the top right corner and enter .wbk or .asd, and press Enter.

- Windows 10 will now search your system for all .wbk or .asd files. If any files are found, simply right-click the file and choose Open file location from the menu.
- This will open Word autosave location and you’ll be able to see all automatically saved files.

If you can’t find any .wbk or .asd files, be sure to search your system for .tmp files. Keep in mind that .tmp files aren’t strictly related to Word, so some of them might be a part of different applications.
For more information on what temporary Word files look like, be sure to check Solution 2.
Losing your data can be a major problem. Because of that, Microsoft Word usually saves your documents to its autosave location.
Even if you forget to save your document, you can restore it by accessing the Word autosave location and opening the unsaved documents in Word.
![]()
Newsletter
You’re working diligently on an Excel spreadsheet, making sure all the figures are accurate and everything looks great. You’re a machine: There’s nothing that can stop you from acing this task and impressing your boss. Except, however, for a power outage that shuts your PC down before you had a chance to save. Now you either have to start all over, or quit your job and never look back.
Not so fast: While not saving your work is a bit dangerous, losing such a document isn’t a death sentence. If you accidentally closed out of an Office document without saving for any reason, you don’t need to worry about starting from scratch. There’s an easy way to get the file back, using a recovery tool built right into the Office app you’re using.
When you’re working on a document in Word, Excel, or another Office app, the file isn’t only backed up when you hit the “Save” button. The app in question has the data for that file saved to its roaming folder in your user account’s AppData folder. This folder, typically out of sight for most users, saves data from various Windows apps for your user account.
In most cases, a recently-closed unsaved Office document can be found here. There are two main methods to find it. The first is the easiest and most direct, as it will take you directly to the roaming folder that contains the missing document. To start, open the app you closed out of originally, click the “File” tab in the top left, then choose “Info.” Now, click “Manage Document,” then “Recover Unsaved Documents.” Here, you should see the file you closed without saving: Select it, then click “Save As” to make sure you don’t lose it again.
If you want to feel a bit more “techy,” there’s a slightly more advanced method you can use to achieve the same result. Press Windows+R to open the “Run” window. Then, type %appdata% and run it to open the roaming folder. From here, follow the file path to your app’s folder (for example, open the Microsoft folder, then the Word folder). This is the folder the first method takes you to directly, so you should see your missing file. Again, open it, then save it.
[Reddit]
Contents
- Method 1: Fix this issue quickly
- Method 2: Checking Word settings
- Method 3: Checking the AppData folder
- Method 4: Using the option for recovering unsaved documents
- Method 5: Checking the recycle bin
- Method 6: Searching your computer for .asd or .wbk files
- Method 7: Checking the document directory
- Method 8: Searching for the document via Search

One of the most popular text processors in the world is undeniably Microsoft Word. For most users, this program allows them to easily create text documents. However, many of us tend to forget to save our work. This is also the reason why the autosave feature exists. Such feature helps us avoid data loss. If you’re wondering how you can find, activate, and access the Word autosave location on Windows 10, well, you’d be glad you found this article!
Today, we’re going to teach you how to open Word autosave location on Windows 10. Read through this post to know how you can retrieve files that you forgot to save.
P.S. If you don’t want to read the full article, you may simply watch a short video showing a quick fix here:

UPDATE: To use the autosave feature in Microsoft Word 2021, the file you’re editing must be saved in the Microsoft cloud. If you’ve installed the latest Office version and wish to use autosave for your local files in Windows 11, follow these steps:
- Open the document and go to File > Info.
- Select Upload and then select Save to Cloud.
- Choose OneDrive or SharePoint.
From now on, you don’t need to worry about recovering unsaved Word files. Your document is automatically updated as you work.
Method 1: Fix this issue quickly
You can try using a safe and totally free tool developed by the Auslogics team of experts.
A few simple steps to troubleshoot the issue:
- Download the tiny Auslogics TroubleShooter tool.
- Run the application (no installation is needed).
- The app will check for the issue mentioned in the article. When the scan is done, check that this is the issue you were looking to solve and click ‘Apply now’ to apply the recommended fix.
- You can use the app to troubleshoot other malfunctions for free by simply typing in a brief description of the issue your PC is experiencing. Or you can scan your PC for performance issues using the My Scanner tab.

Developed for Windows 10 (8, 7, Vista, XP). Please review EULA and Privacy Policy.
Method 2: Checking Word settings
Of course, before you learn how to open Word autosave location on Windows 10, you must know how to activate the feature first. You can do that by following the instructions below:
- Launch Word, then click File.
- Select Options, then click Save on the left-pane menu.
- Make sure that the ‘Save AutoRecover information’ option is selected. You can also choose your preferred time interval for automatic saving.

- Go to the AutoRecover File Location field. Here, you will see the location of the autosave directory. By default, it is set to C:UsersuserAppDataRoamingMicrosoftWord. However, you can always change that to your preferred location by clicking the Browse button.
Once you’ve located the autosave location on your computer, you need to launch Word and navigate to the directory. Look for the automatically saved file and double-click it to open it in Word. It is worth noting that the directory may be hidden in your computer, especially when it is located in the AppData folder. You can quickly access the folder by pasting the location in the address bar of File Explorer.
Of course, you can still manually access that folder. You just have to follow the path. Remember to reveal the hidden items so you can see the AppData folder. Once you’ve done this, you will be able to access the Word autosave location without any issues.
Despite several face-lifts Microsoft gave to Windows 11, the procedure remains the same. So if you’re looking for how to open Word autosave location on Windows 11, follow the same steps.
Method 3: Checking the AppData folder
As we’ve mentioned, the default autosave location for Word is the AppData folder. Microsoft Word can save the files in various locations, including C:UsersYour_usernameAppDataLocalMicrosoftWord and C:UsersYour_usernameAppDataLocalTemp. Most recent versions of the program use a different location. In some cases, unsaved files can be found in C:UsersYour_usernameAppDataLocalMicrosoftOfficeUnsavedFiles.
If you’re using Microsoft 365 subscription on Windows 10 or Windows 11, your options are simpler. If a backup document was created, you’ll find it in one of the two locations:
- C:Users<UserName>AppDataRoamingMicrosoftWord
- C:Users<UserName>AppDataLocalMicrosoftOfficeUnsavedFiles
You will find various types of Word files in the aforementioned folders. Typically, the autosave files have a squiggly line or tilde before the file name. They also have a .tmp extension along with a 4-digit number assigned to them. Here are some things to consider:
- A Word document inside an autosave folder will look like this: ~wrdxxxx.tmp.
- A temporary document file will look like this: ~wrfxxxx.tmp.
- An auto recovery file will look like this: ~wraxxxx.tmp.
It is worth noting that complete auto recovery files will not have a .tmp extension. Instead, you will see them with a. wbk extension. Once you find one of those files, double-click it. Doing so will open the document in Word. Make sure you save the file after opening it.
Method 4: Using the option for recovering unsaved documents
If Word unexpectedly crashes or you accidentally close the program, don’t panic. You can still open the autosave location by following the instructions below:
- Open Word, then go to File.
- Select Recent, then click Recover Unsaved Documents.
- You will now be able to see the autosave location folder. Now, you can select the document you wish to restore.
Another option for accessing the autosave location would be to navigate to this path:
File ->Info ->Manage Versions ->Recover Unsaved Documents
Make sure you save the file once you open it.
Discussing document recovery, we absolutely cannot ignore the problem of accidentally deleted files on your computer. Would you like to restore something that you have unintentionally deleted before? Use the File Recovery tool to get back the files you need.
Method 5: Checking the recycle bin
Another way to retrieve unsaved documents on Windows 11 is to check the recycle bin. Word often creates autosaves that end up in the recycle bin if not restored. You might also check there to restore a document you previously deleted.
- Double-click the Recycle Bin on your desktop to open it.
- Search through the files for your unsaved or missing documents. Pay attention to file names ending with doc, .docx, and .dot. extensions.
- If you find the document you’re looking for, right-click the file and select Restore to recover it.
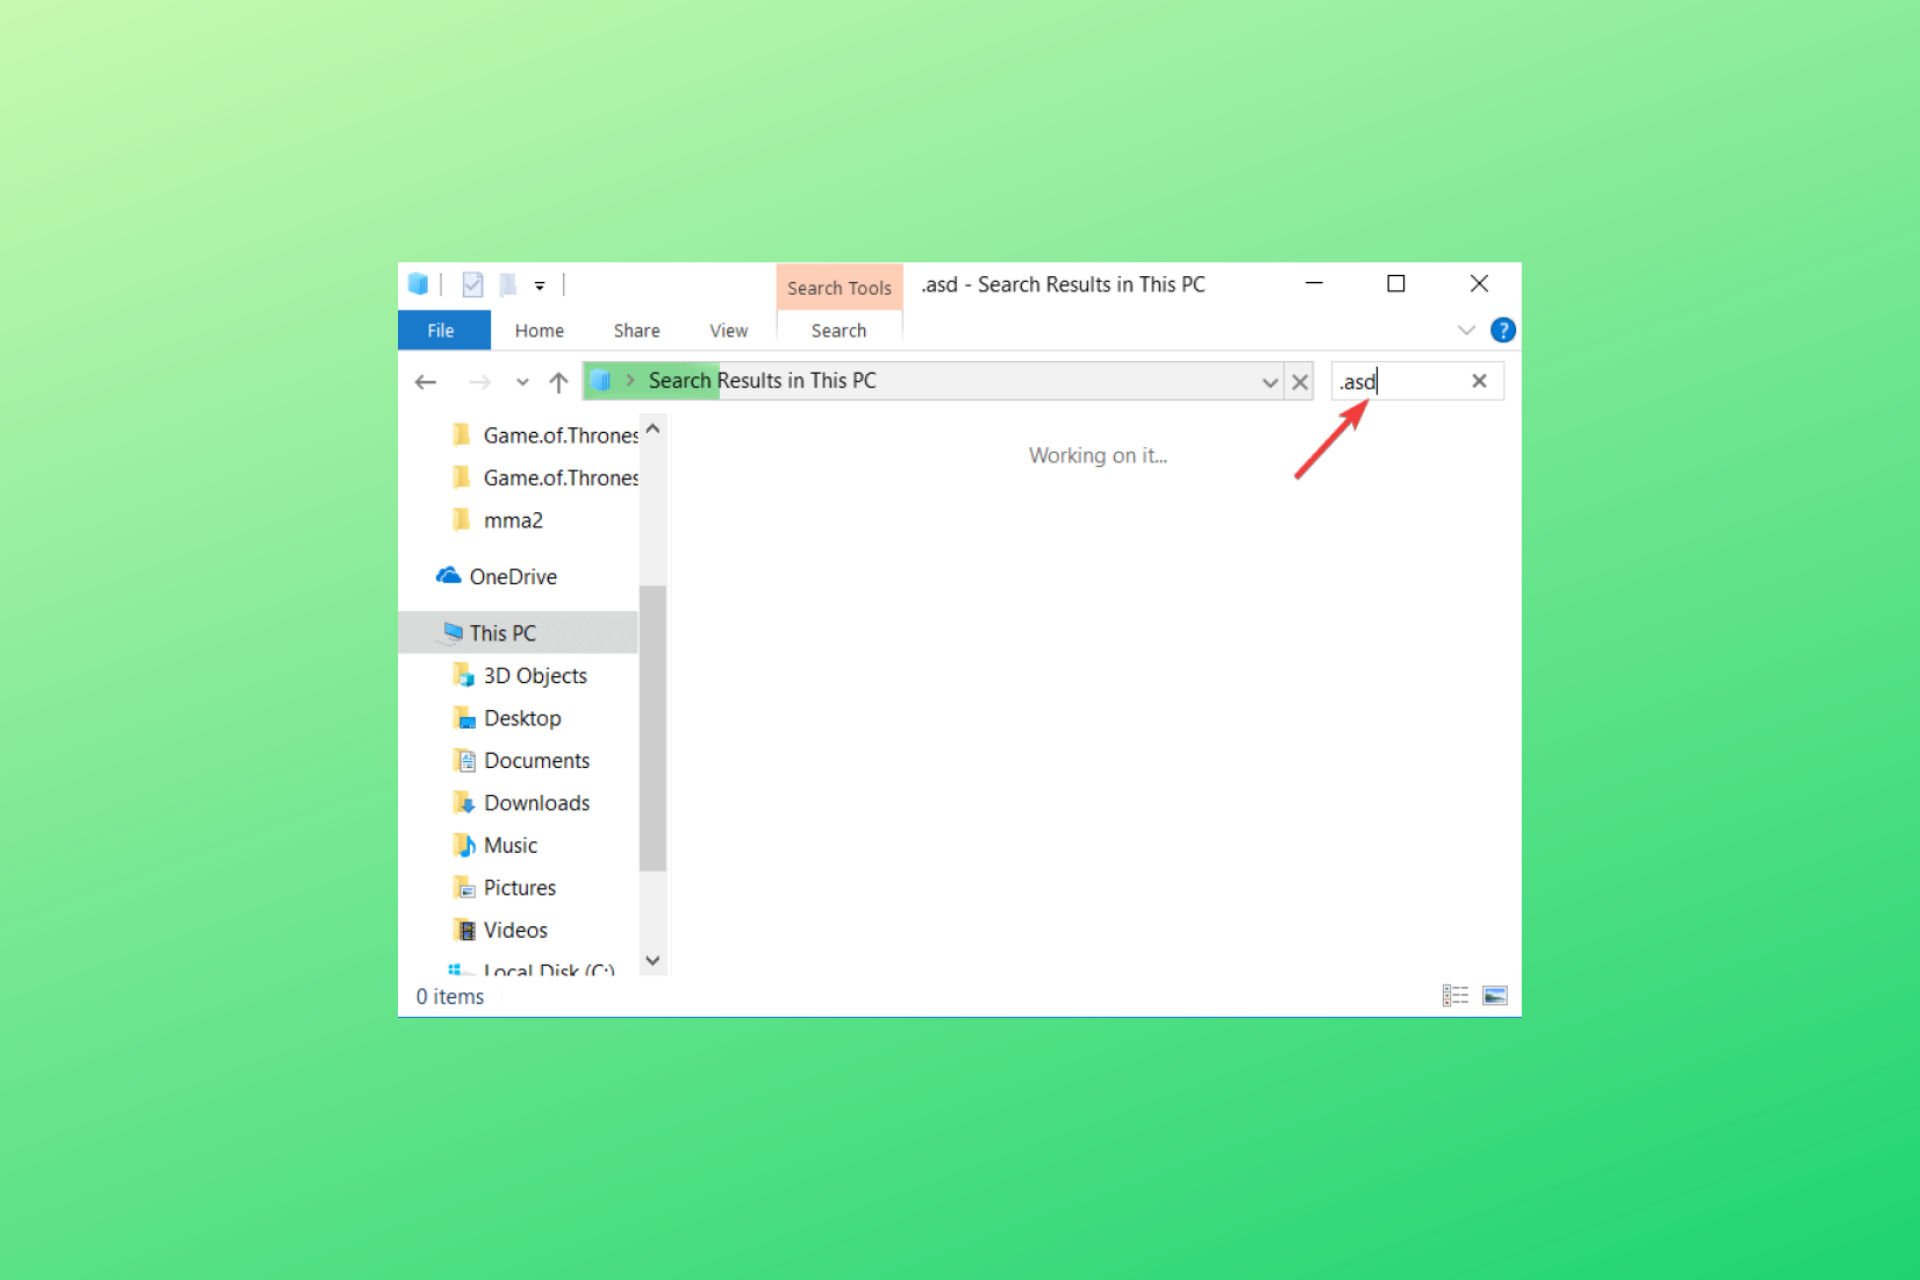
Method 6: Searching your computer for .asd or .wbk files
Word automatically saves your files. However, there are some instances when it can be difficult to find the autosave location. If you can’t find where this is, it would be ideal to search for the specific file extension. Autosaved Word files typically have a .asd or .wbk file extension. You can search for these files by following these instructions:
- On your keyboard, press Windows Key+E. This should launch File Explorer.
- Once File Explorer is up, click the search bar in the top right corner.
- Type “.wbk” or “.asd” (no quotes), then press Enter.
- Your system will search for all .wbk and .asd files. Right-click the file and select Open File Location. Doing so will open the Word autosave location. This will allow you to see all your automatically saved files.
If you can’t locate any .asd or .wbk files, make sure to search for .tmp files. It is worth noting that .tmp files are not necessarily related to Word. So, some of them might be part of other applications. You can go back to Method 2 to learn how to identify temporary files associated with Word.
It is true that the Word autosave feature is quite useful. However, the autosaved files are still prone to corruption. If they get infected by viruses, you will lose them entirely. So, to protect your autosaved files and your entire system, make sure you use a reliable security tool like Auslogics Anti-Malware. This program detects common and unusual threats and attacks that may damage your files and harm your computer. With this program, you can rest easy knowing that your PC and your files are sufficiently protected.
Method 7: Checking the document directory
In some cases, the autosaved files can be found in the same directory where you saved your file. However, these files are typically hidden. You can reveal them by following the steps below:
- Launch Word.
- Go to File, then click Open.
- Click Browse then navigate to the directory where you saved the file.
- Make sure you change the File Type from ‘All Word documents’ to ‘All Files’.
- You should be able to see the backup file. This file is easily recognizable because it will have ‘Backup of’ in its name.
- Open the file, then save it.
Method 8: Searching for the document via Search
It’s possible that you already saved the document but forgot about it. It’s also possible that you mistakenly saved it to a location which you can’t remember. It might even have been saved to the cloud. This can happen in Windows 7 where the latest Word versions use OneDrive as the default save location. Try searching for the document on your Windows 11 PC:
- Hit the Windows key and then type the document name. If you can’t remember the name, use a combination of keywords.
- If the result list contains the document you’re looking for, click the document to open it.
Can you suggest improvements for this article?
Share them in the comments below!
And if you’ve faced any other kind of problem related to your PC, like your computer turning off without warning, let us know, and we’ll find a smart solution specially for you.