
Try the following options to help determine the problem:
Test printing in other programs
-
Open WordPad.
-
In a new document, type This is a test.
-
On the File menu, select Print.
-
Select OK or Print to print the file.
If you couldn’t print from WordPad, the printing problem is not specific to your Microsoft 365 app. You can try fixing the problem by following steps in Fix printer connection and printing problems in Windows.
If you were able to print from WordPad, continue to the next step.
Test printing another file
-
In the same Microsoft 365 app, open a new blank file.
-
Type the following text: This is a test.
-
Save the file, and then try to print.
If you don’t have problems printing the test file, try changing the font so it’s the same as the original file. Also, if the original file has a table, clip art, or a drawing object, make sure the test file includes this as well.
Once you’ve made those changes, save the file, and then try to print.
If you’re able to print the test file, the original file may be damaged. For information about how to troubleshoot damaged Microsoft 365 files, go to one of the following articles:
-
For Excel: Repairing a corrupted Excel workbook
-
For Word: How to troubleshoot damaged documents in Word
-
For PowerPoint: How to troubleshoot a damaged presentation in PowerPoint
If you have problems printing the test file and the original file, continue to the next step.
Run an online repair
Follow the steps in Repair an Office application to run an online repair and then try to print the file.
In this article we’ll assume that you’ve already checked a few of the obvious things such as:
-
Is the printer turned on?
-
Is there paper, ink and/or toner in the printer?
-
All cables to the printer and the computer are securely connected?
Note: If your printer is displaying an error message please contact the manufacturer of the printer for support of that specific error message.
This article is for troubleshooting when you can’t get your document to print at all. If you have questions about how to print a document in Office for Mac or how to do special things like print on both sides of the page (duplex) see Print a document in Word for Mac.
Make sure you have all Apple software updates installed
The first thing to do in troubleshooting print issues is to make sure you have all of your Apple software updates installed. To do that: click the Apple button at the top left corner and choose Software Update. Walk through the Software Update wizard and have it download and install any updates that it finds.
Once the updates are complete, reboot your computer then try your print job again. If it still won’t print your printer may be paused or another print job may be holding up the queue.
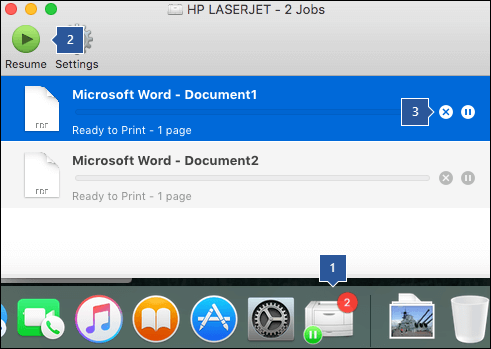
Make sure your printer isn’t paused
-
Click the printer’s icon in the Dock to open the printer’s queue window
 .
. -
If you see the Resume button in the toolbar
that suggests that the printer is paused. Click the Resume button and see if printing proceeds.
 .
. that suggests that the printer is paused. Click the Resume button and see if printing proceeds.
If the printer isn’t paused, but print jobs are stacking up anyhow, it’s possible that another print job is holding up the queue because of an error with that job. To clear that job select it, then click the Delete Job button on the right  .
.
Test printing in a new document
It’s possible that the problem is in your document, so let’s try printing from a different document to test that idea.
-
Create a new file in the Office program (Word, Excel, PowerPoint etc.) that you’re having trouble printing from. To do that click File > New
-
Type a few words of random text
-
Try to print the document
If it prints successfully that tells us that the problem is in your existing document. See how to Recover your Word files and documents.
If it doesn’t print successfully try changing the font of your text by selecting your sample text, choosing the Font drop down on the ribbon, and selecting a different font. Try printing again. If it prints successfully that tells us the problem is with the font you’re using. The easiest solution is to use a different font for your text.

Try printing from another program
To test whether another program can communicate with the printer, and whether the printer driver is functioning, try to print from another program such as Notes. Start the Notes app on your Mac, open an existing note or create a new note with some sample text, then click File> Print and see if it will print.
If it prints successfully from Notes that tell us that you have a problem with your installation of Microsoft Office. In that case you may need to uninstall Office 2016 from your Mac and then reinstall it. See Troubleshoot Office 2016 for Mac issues by completely uninstalling before you reinstall.
If it does not print successfully from other programs that suggests there may be a problem with the printer drivers or configuration.
Delete the printer and reinstall it in OSX
To delete and add the printer, follow these steps:
-
Click the Apple logo in the upper-left of the screen
-
Click System Preferences
-
Click Printers & Scanners
-
Select the printer that you want to remove
-
Click Delete (-)
-
To add a new printer and test it, Click Add (+)
-
In the Connection Method list, click the connection method that your printer uses
-
In the Printer list, click the printer that you want to add, and then click Add
Go back to your Microsoft Office application and try printing to the printer you just re-added. If it still won’t print, it may be that you need to replace your print driver files.
Remove and reinstall your print driver files
Deleting and reinstalling your printer resets that printer’s settings but may not always replace the print driver files. Follow these steps to replace those:
-
Click the Apple logo in the upper-left of the screen
-
Choose System Preferences
-
Choose Printers & Scanners
-
Control+Click anywhere in the device list. Choose Reset printing system from the shortcut menu.
-
In Finder choose Go > Go to Folder and go to the /Library/Printers/ folder.
-
In the Printers folder that appears click Edit > Select All then choose File > New folder with Selection to create a new folder containing those drivers. The folder will be named «New Folder With Items» by default, which is fine for our purposes. When we’re done you can delete that folder to save space.
-
Repeat the process you did for deleting and reinstalling the printer. This time your system will download and install new printer drivers too.
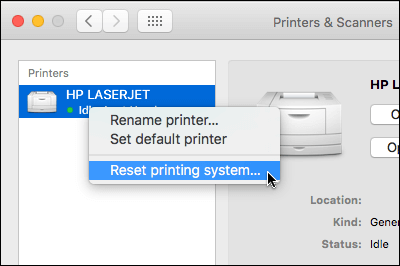
Go back to Office and test your printing again. If it still doesn’t work your printer preference files might be causing the problem.
Replace the printer preference files
Corrupted printer preference files may cause printing issues. To replace the printer preference files, follow these steps:
-
On the desktop, click File, click New Folder, type Print Prefs, and then press RETURN on your keyboard
-
On the Go menu, click Home
-
Open Library
Note: The Library folder is hidden in MAC OS X Lion. To display this folder, hold down the OPTION key while you click the Go menu
-
Click Preferences
-
Hold down the Apple or Command key, and then click each com.apple.print.*.plist file. For example, hold down the Apple key, click com.apple.print.PrintCenter.plist, and then click com.apple.print.PrintingPrefs.plist. In this example, the com.apple.print.PrintCenter.plist and com.apple.print.PrintingPrefs.plist files should be highlighted
-
Drag the files that you highlighted in step 5 to the Print Prefs folder that you created in step 1.
-
Restart your Mac
Try printing again from Microsoft Office for Mac.
See also
Resolve printer issues on your Mac
If your Microsoft Office Word documents are not printing correctly or properly, here are some solutions you can try to fix the problem. The problem could be a driver issue, font problem, the Word document itself, or even a general PC issue. However, before we go ahead, we suggest you go to System > Troubleshoot > Other Troubleshooters. Click the Printer Troubleshooter option, and then click on the Run button. Then try to print and see if it works. If it doesn’t, go ahead with the advanced troubleshooting.

Follow these suggestions if the Microsoft Office Word documents are not printing correctly or properly:
- Test printing of other documents
- Test in WordPad
- Test printing from other programs
- Repair Office
- Test for problems in Windows
- Test printing with different printer drivers
You will need an administrator account to get this done.
1] Test printing of other documents
If your documents or graphics contain damaged fonts, this can cause printing problems in Microsoft Word. Before reinstalling your drivers or software, try testing Word’s printing ability. You can achieve this by testing in a new word document.
- Open Word, and then click the new blank document template.
- To insert ten paragraphs of sample text on the document’s first line, type
=rand(10)and press Enter. - Turn on the Printer, and use Ctrl + P to check if the document prints.
- If the document prints, then you need to try with different objects that Word supports. The list includes
- Clip art, a table
- Drawing object
- Fonts
- Online Photos and so on.
- Try to print again and check if this works.
These tests determine whether Microsoft Word can print documents correctly. They may also reveal issues with specific fonts or graphics not printing correctly.
If you are not receiving any errors when trying to print a document, but the document will not print, the document may be damaged. Even if you can print the same document on another computer, this may be due to file damage that is not apparent on all computers. In this case, check out how you can fix the damaged Word documents.
Additionally, if the printer works when you change the font, you must remove it from the PC and reinstall it to check. If it doesn’t, choose a different font.
If none of these works, check out the second method.
2] Test in WordPad
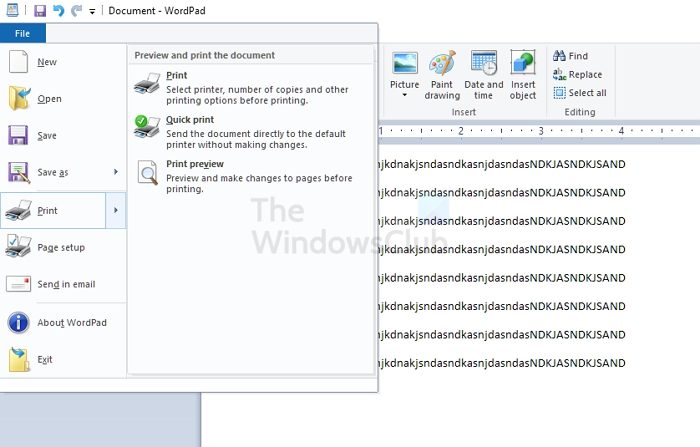
- Click on the Start button.
- In the Search box, type Wordpad.
- In the list of programs, click on WordPad.
- In the WordPad document, type some random words
- On the File menu, click Print.
- In the Print dialog box, click OK or Print.
If this is the first time you use WordPad, you may be prompted to select the printer. Done that, you can also add images and other supported objects to check if the print works.
If this doesn’t work, we need to check if the print is working from another program.
3] Test printing from other programs
After you finish creating the document in WordPad, you can test the print functions in your web browser or another Office program. You can also try to print a test page for your printer. To print a text page, follow these steps:
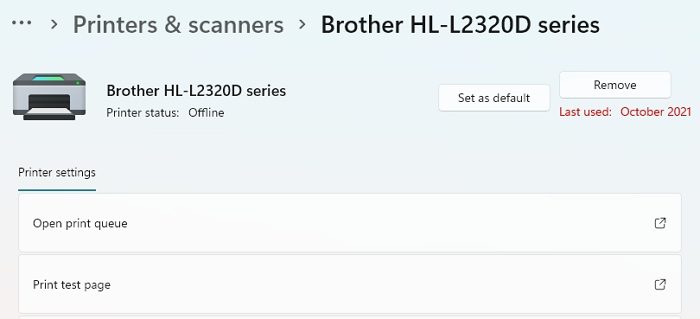
- Open Windows Settings using Win + I
- Navigate to Bluetooth and devices > Printers and Scanners
- Select your printer to expand the option
- Click on select Print Test Page.
If this doesn’t work, then the issue is with the printer. You must reinstall the printer driver and check if the issue is resolved. However, if this solution works, you can print from anywhere except Microsoft Word. Check out the following suggestion to fix the issue.
4] Repair Office
If the printing problem continues, follow these steps to run the repair program and reinstall any missing or damaged program files.
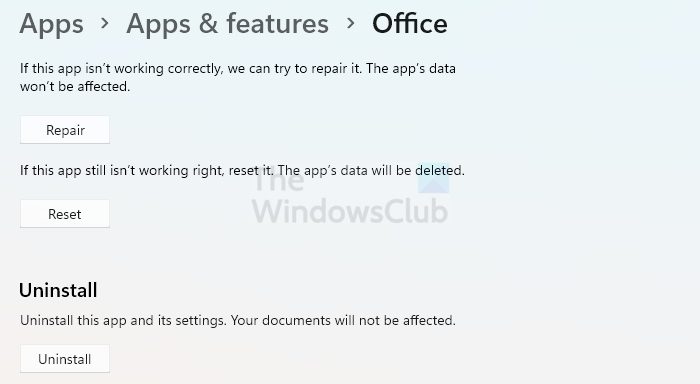
- Exit all Office programs.
- Open Windows Settings, navigate to Apps > Apps & features list,
- Locate, and select the Office and then click on the three-dot menu and click on Advanced Options
- Scroll, look for the Repair button, click on it, and let the wizard complete the process.
Once done, open Word again and check if you can print.
5] Test for problems in Windows

To troubleshoot potential issues with your device drivers or memory-resident programs, you can start Windows in safe mode and test printing to a file in Word. To start Windows in safe mode, follow the steps below.
- Remove all USB devices from your computer, and then restart your computer.
- Restart your PC, and press the F8 keys as the computer boots.
- Keep it pressed unless you see the Advanced Boot Options screen
- You can then navigate to Safe Mode by going to Troubleshoot
- Log on to your PC, and try printing from Word again.
If you don’t experience the Word printing problem when you start Windows in safe mode, you can use the same steps to troubleshoot after you do a clean start. It will help you determine the source of the problem.
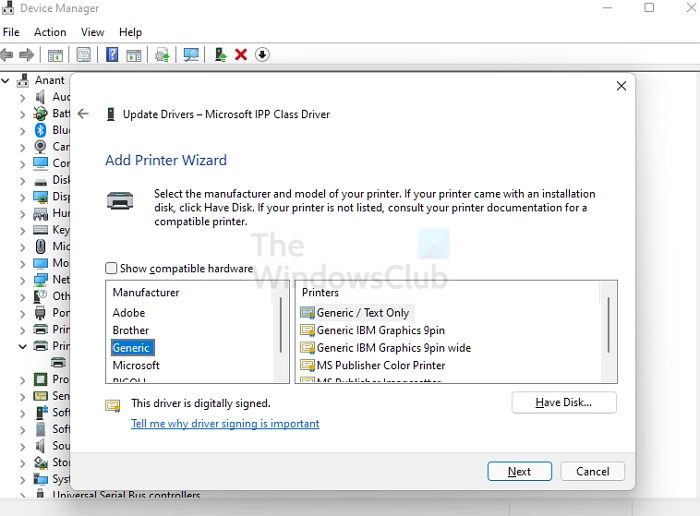
6] Test printing with different printer drivers
To determine whether the printer driver is the cause of the problem, you can test different drivers. You can start by updating the printer driver, and if that doesn’t work, you need to use the generic, text-only printer driver to test printing from Word. To do this, follow these steps:
- Open Power Menu using Win + X
- Click on Device Manager
- Expand the Printers section, and select the printer
- Right-click and click on Update driver > Browser for drivers on your computer
- Then click on Let me pick from the list of available drivers on my computer
- Uncheck Show Compatible Hardware

- Click on Generic and then select Generic / Text only
- Click next to apply the changes, and then try to print.
If you see an error message when you try to print a file that only contains text but not when you use the generic, text-only printer driver, your printer driver may be damaged. In this case, contact the manufacturer to help remove the printer driver and install an updated version.
Why is my Microsoft Word not opening?
When Word’s document cannot be opened, it may be because of corrupted documents or mistakes like using a picture as a document’s icon. Other reasons include using Word with other programs and add-ons.
Where are unsaved Word documents stored?
These Word files can be found via File > Open and click the Recover Unsaved Documents button at the bottom of the Recent File List.
Does your printer produce Microsoft Word documents with strange fonts, jumbled paragraphs, missing text, or almost nothing? Try these potential fixes.
There are many reasons for Microsoft Word documents to print out strangely. Some involve errors with the program; others could hint at more far-reaching issues.
If your Microsoft Word documents are printing out incorrectly on Windows, try these troubleshooting options to get perfect prints every time.
Finding Out What the Problem Is
Before we begin, you should know that a few of these troubleshooting techniques to find out why Microsoft Word isn’t printing correctly involve some test printing. If you want to conserve printer toner or ink, here’s how to change settings to make Microsoft Word print in black and white.
Print a Test Page
Before you try any other potential fix, it’s best to rule out an error with your printer. This will give you an idea of where the issue lies. Follow these steps to print a test page on your printer.
- Click on the Start menu and type ‘control panel.’
- Click on the Control Panel app.
- In Category view, look under Hardware and Sound for the View devices and printers option. In Icon view, it is called Devices and Printers.
- Right-click on your printer and select Printer properties. (Make sure your printer is connected to your computer and switched on. The printer will be grayed out if it is not.)
- Under the General tab, click on the Print Test Page button.
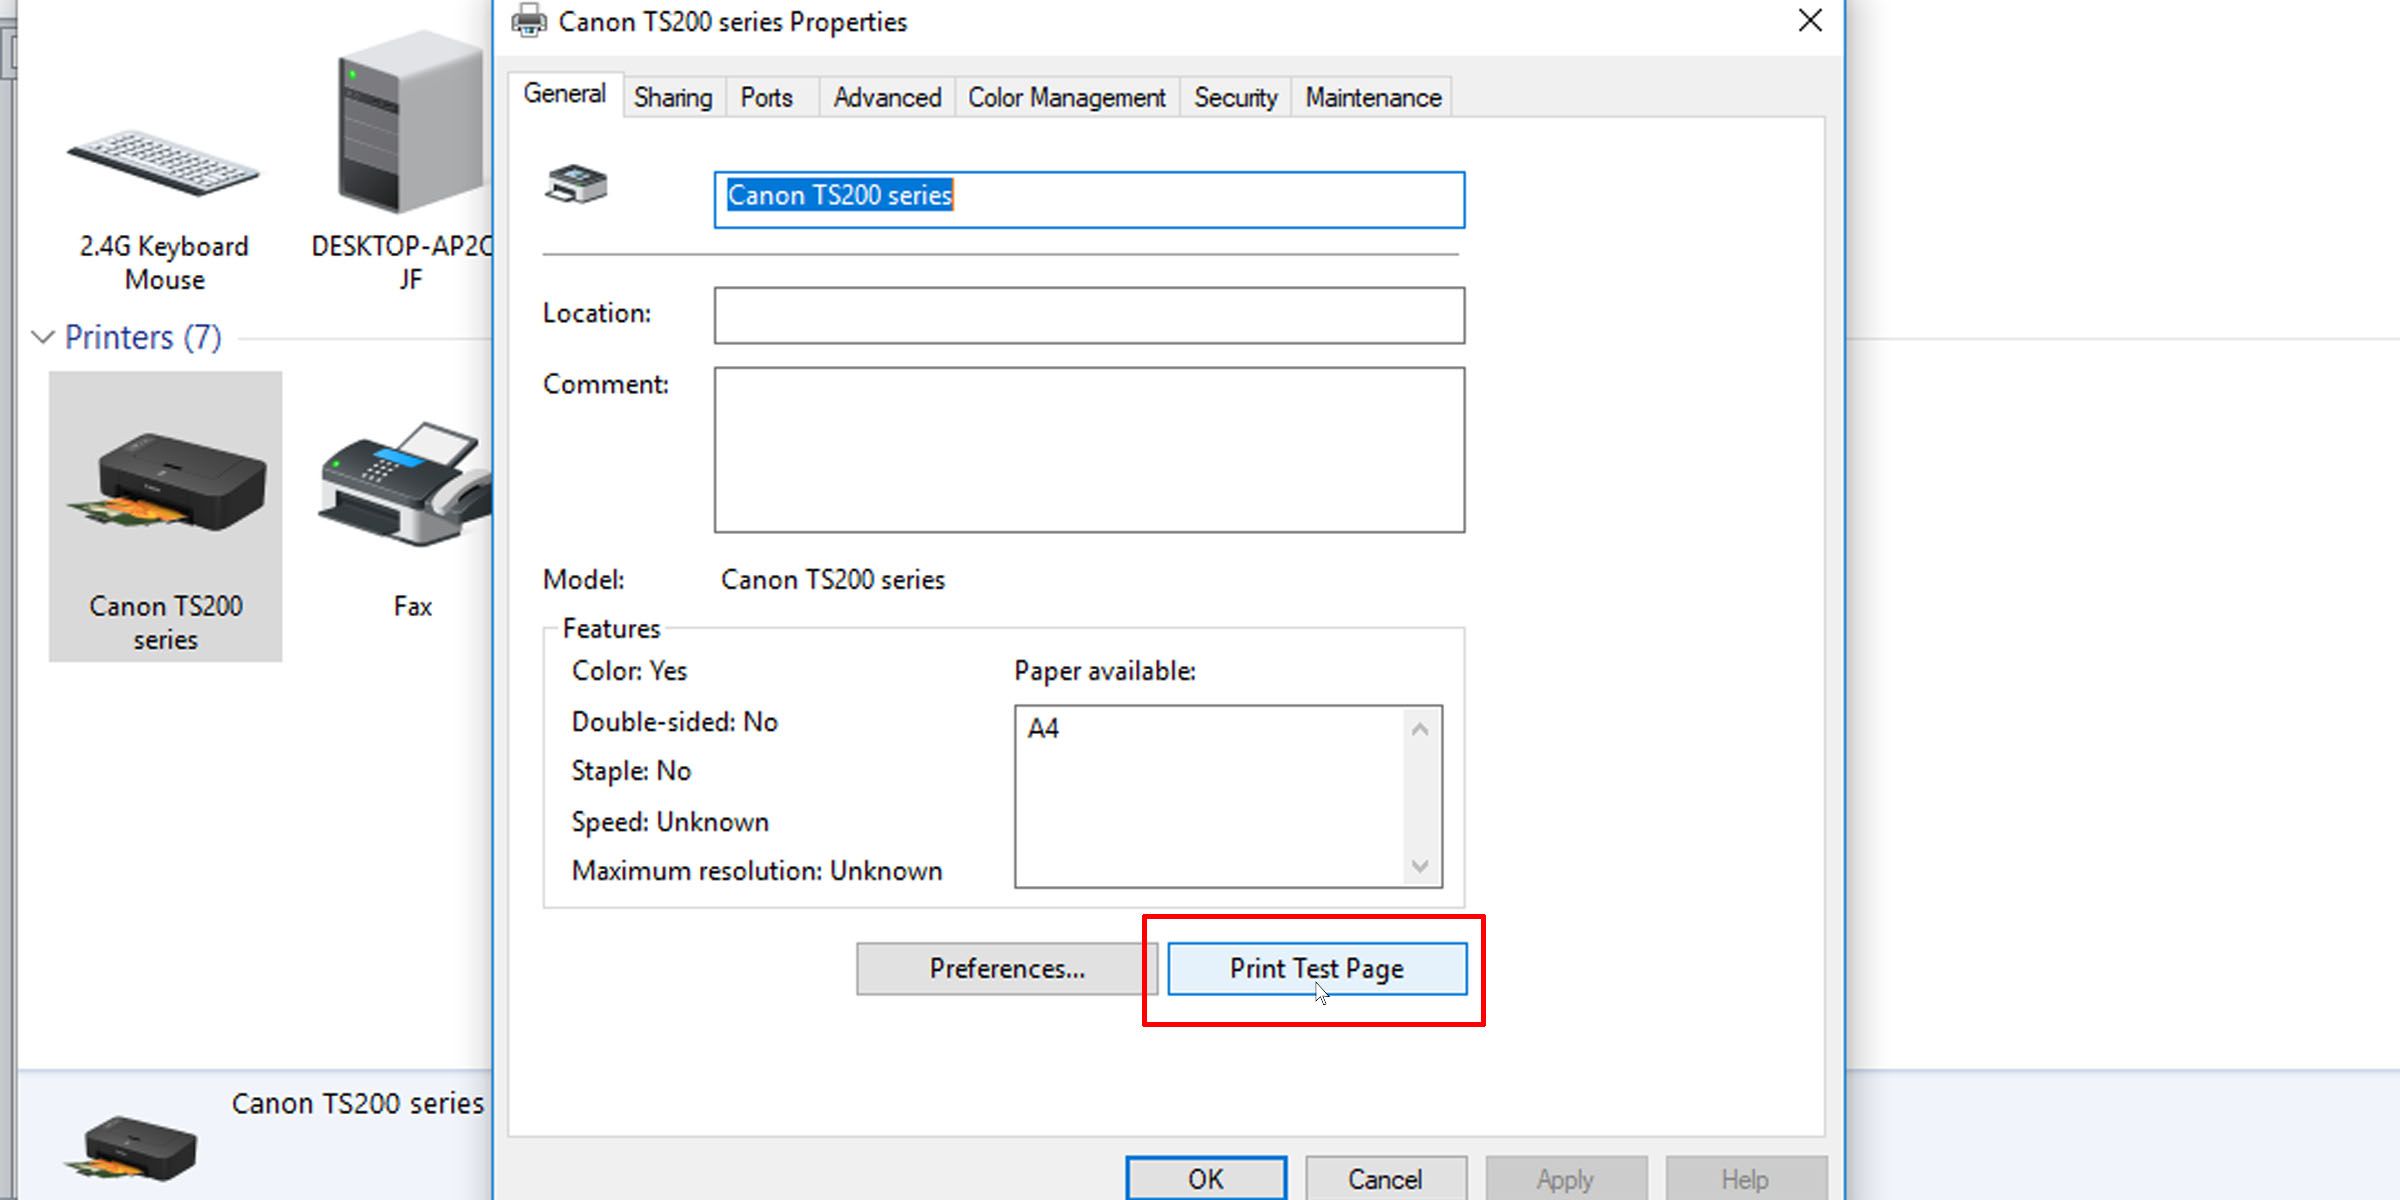
The test page should tell you whether your printer has been installed correctly. If there is an issue with your printer, this guide on what to do when your printer is not working should help you resolve the issue.
If the test page prints out correctly, the issue is probably not with your printer. It could be Microsoft Word or even Windows that is causing the print error.
Fixes You Can Try to Fix Printing Issues in Microsoft Word
1. Print Other Microsoft Word Documents
Is the problem with a specific document? A particular file may have corrupted contents, or the file itself may be corrupted. This could cause printing errors with Microsoft Word. Try the following fix:
- Open a new Microsoft Word file.
- Copy and paste your text and other data into the new Word document.
- Print the newly created document.
If your document prints out as desired, it may be an error with the original file. This probably means that the print error was an isolated issue, and this should resolve it.
If the page doesn’t print out correctly, it could be an issue with Microsoft Word or some of its settings.
2. Print Documents in Other Formats
To know whether the printing issue you are having is Microsoft Word-specific, try printing another document on your computer, maybe a PDF file or even a website. Pressing Ctrl + P on most web pages should pull up the print options.
If PDF documents print out correctly, here’s a temporary fix: When you’ve finalized the contents in your Microsoft Word document, covert it to PDF and print that instead.
Here’s how to convert a Microsoft Word document into a PDF document. In Microsoft Word on Windows, simply go to File > Save As, then choose PDF at the Save as type dropdown.
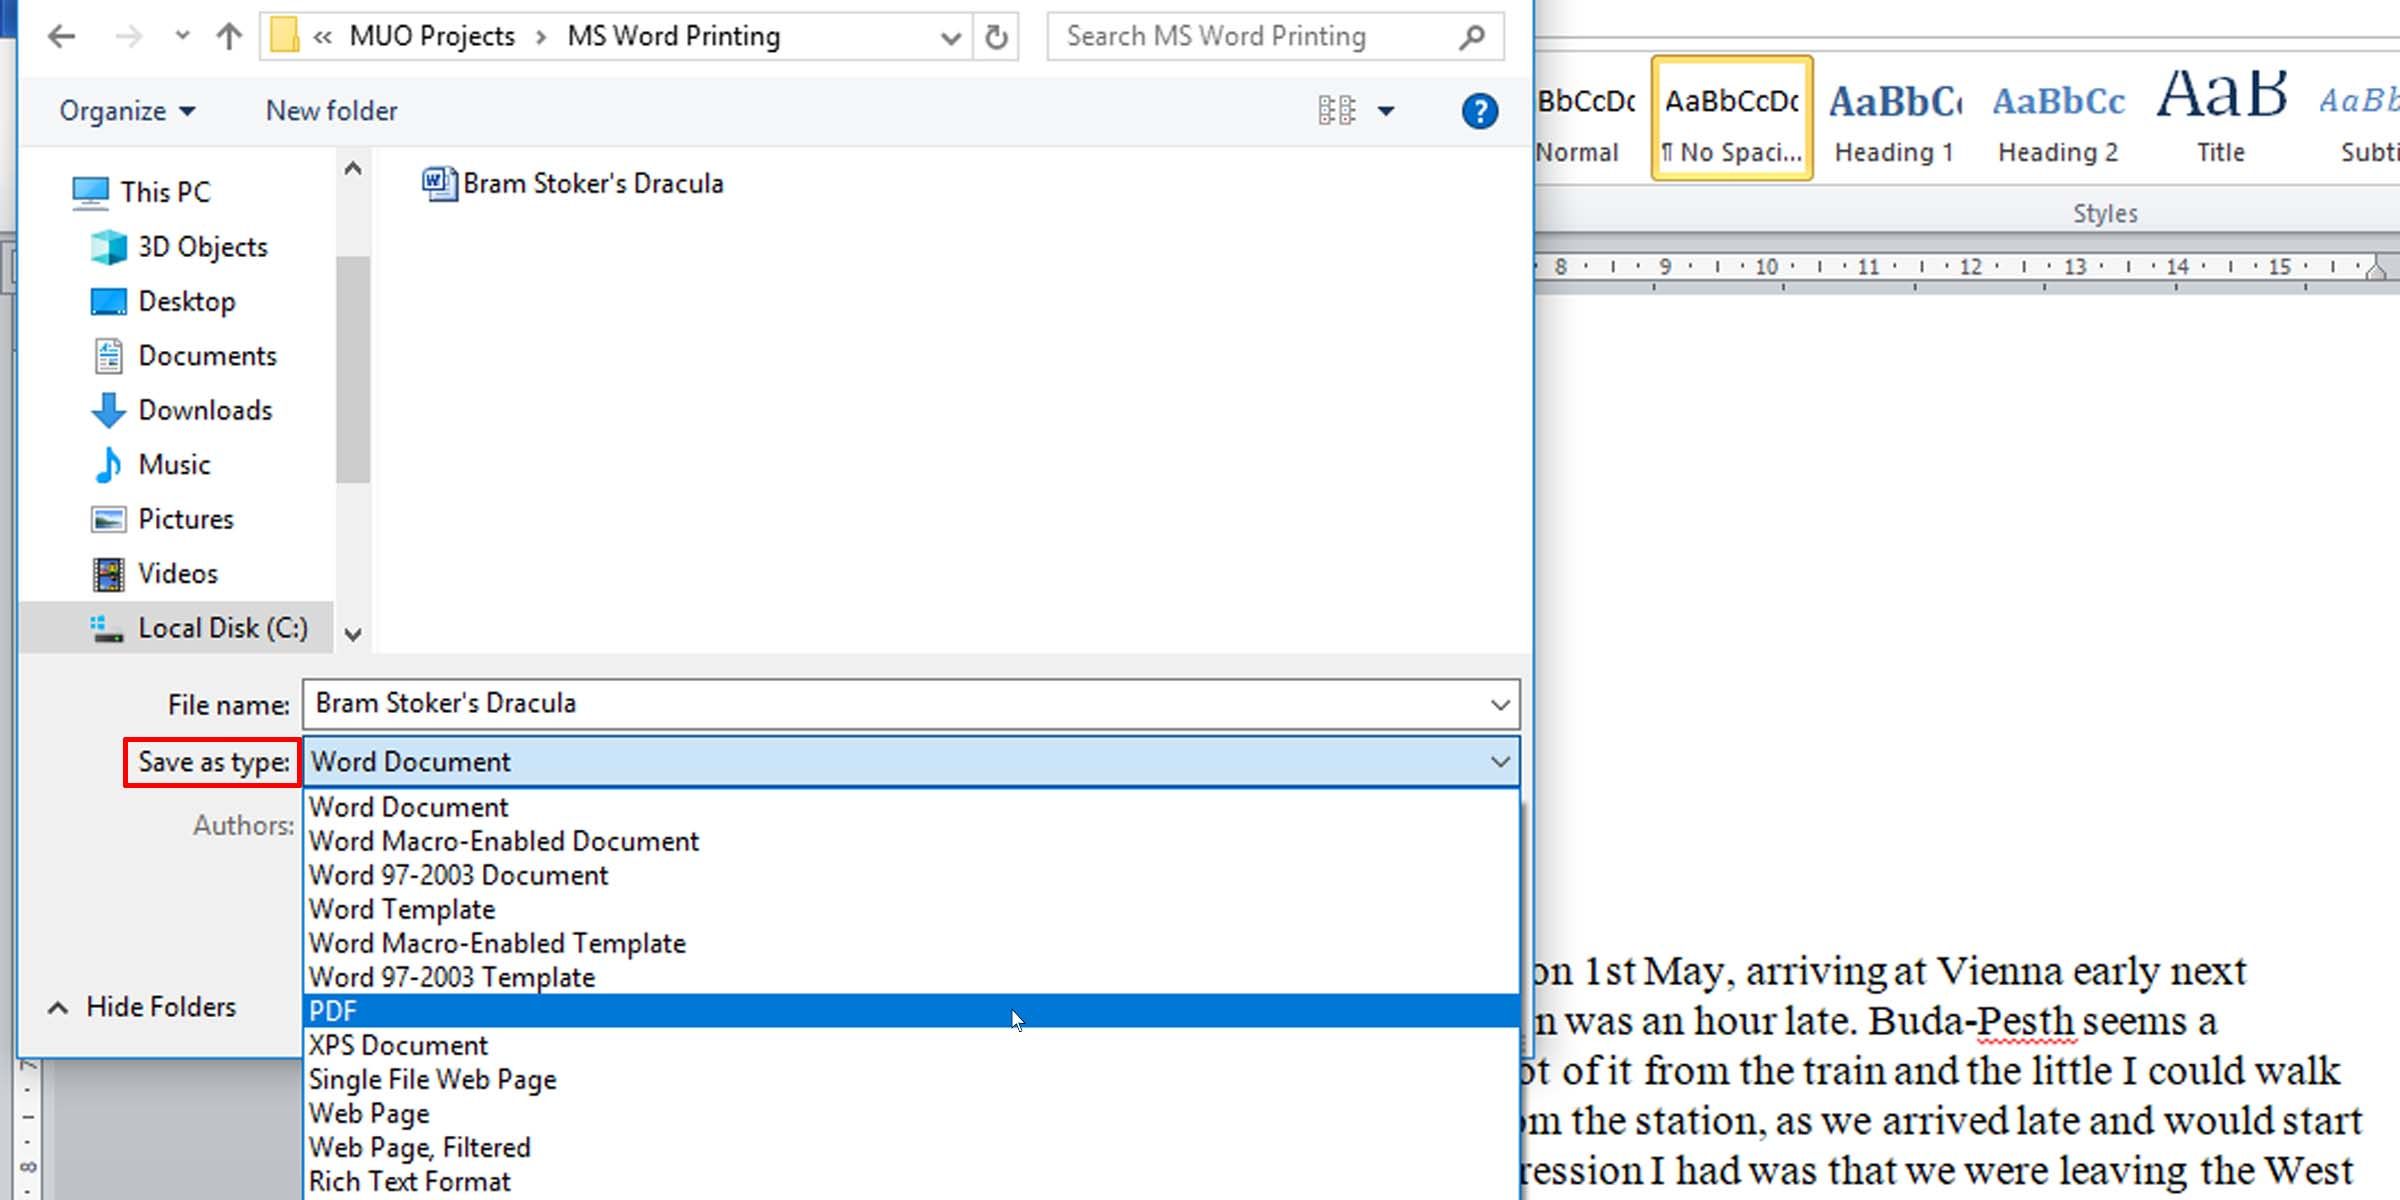
Here’s a helpful article on how to convert Word files to PDF on a Mac computer.
3. Check Printer Drivers
If other documents are printing out correctly, a potential fix may be to uninstall and reinstall either your printer drivers or your printer, or both. As Microsoft themselves put it, “Word is a very printer-intensive program. Therefore, a minor problem in the printer driver tends to affect Word before it affects other programs.”
Here’s a guide on fixing printer driver issues and getting your printer functioning normally again on Windows.
4. Check for Problems With Windows
The problem might be add-ons that you’ve installed with Microsoft Word or even misbehaving device drivers. Follow this guide to get in and out of Safe Mode in Windows 10 to test why Microsoft Word won’t print documents correctly.
If you are able to print properly in Safe Mode, you may want to perform a clean boot to isolate and identify the cause of your problem.
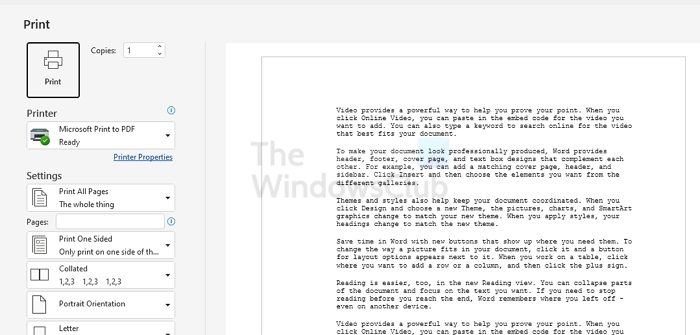
5. Scaled Printing Issue
A less common issue is when pages print at a fraction of the actual size, taking up only a small portion of the printed paper. This is possibly a problem with scaling factors. Here’s how to check and remove the scaling on Microsoft Word documents when printing.
- Press Ctrl + P or go to File > Print when working in the Word document.
- Click on Printer Properties under your printer.
- Under the Page Setup tab, in the Page Layout section, make sure the Scaled option isn’t selected. If it is, switch it to Normal-size.
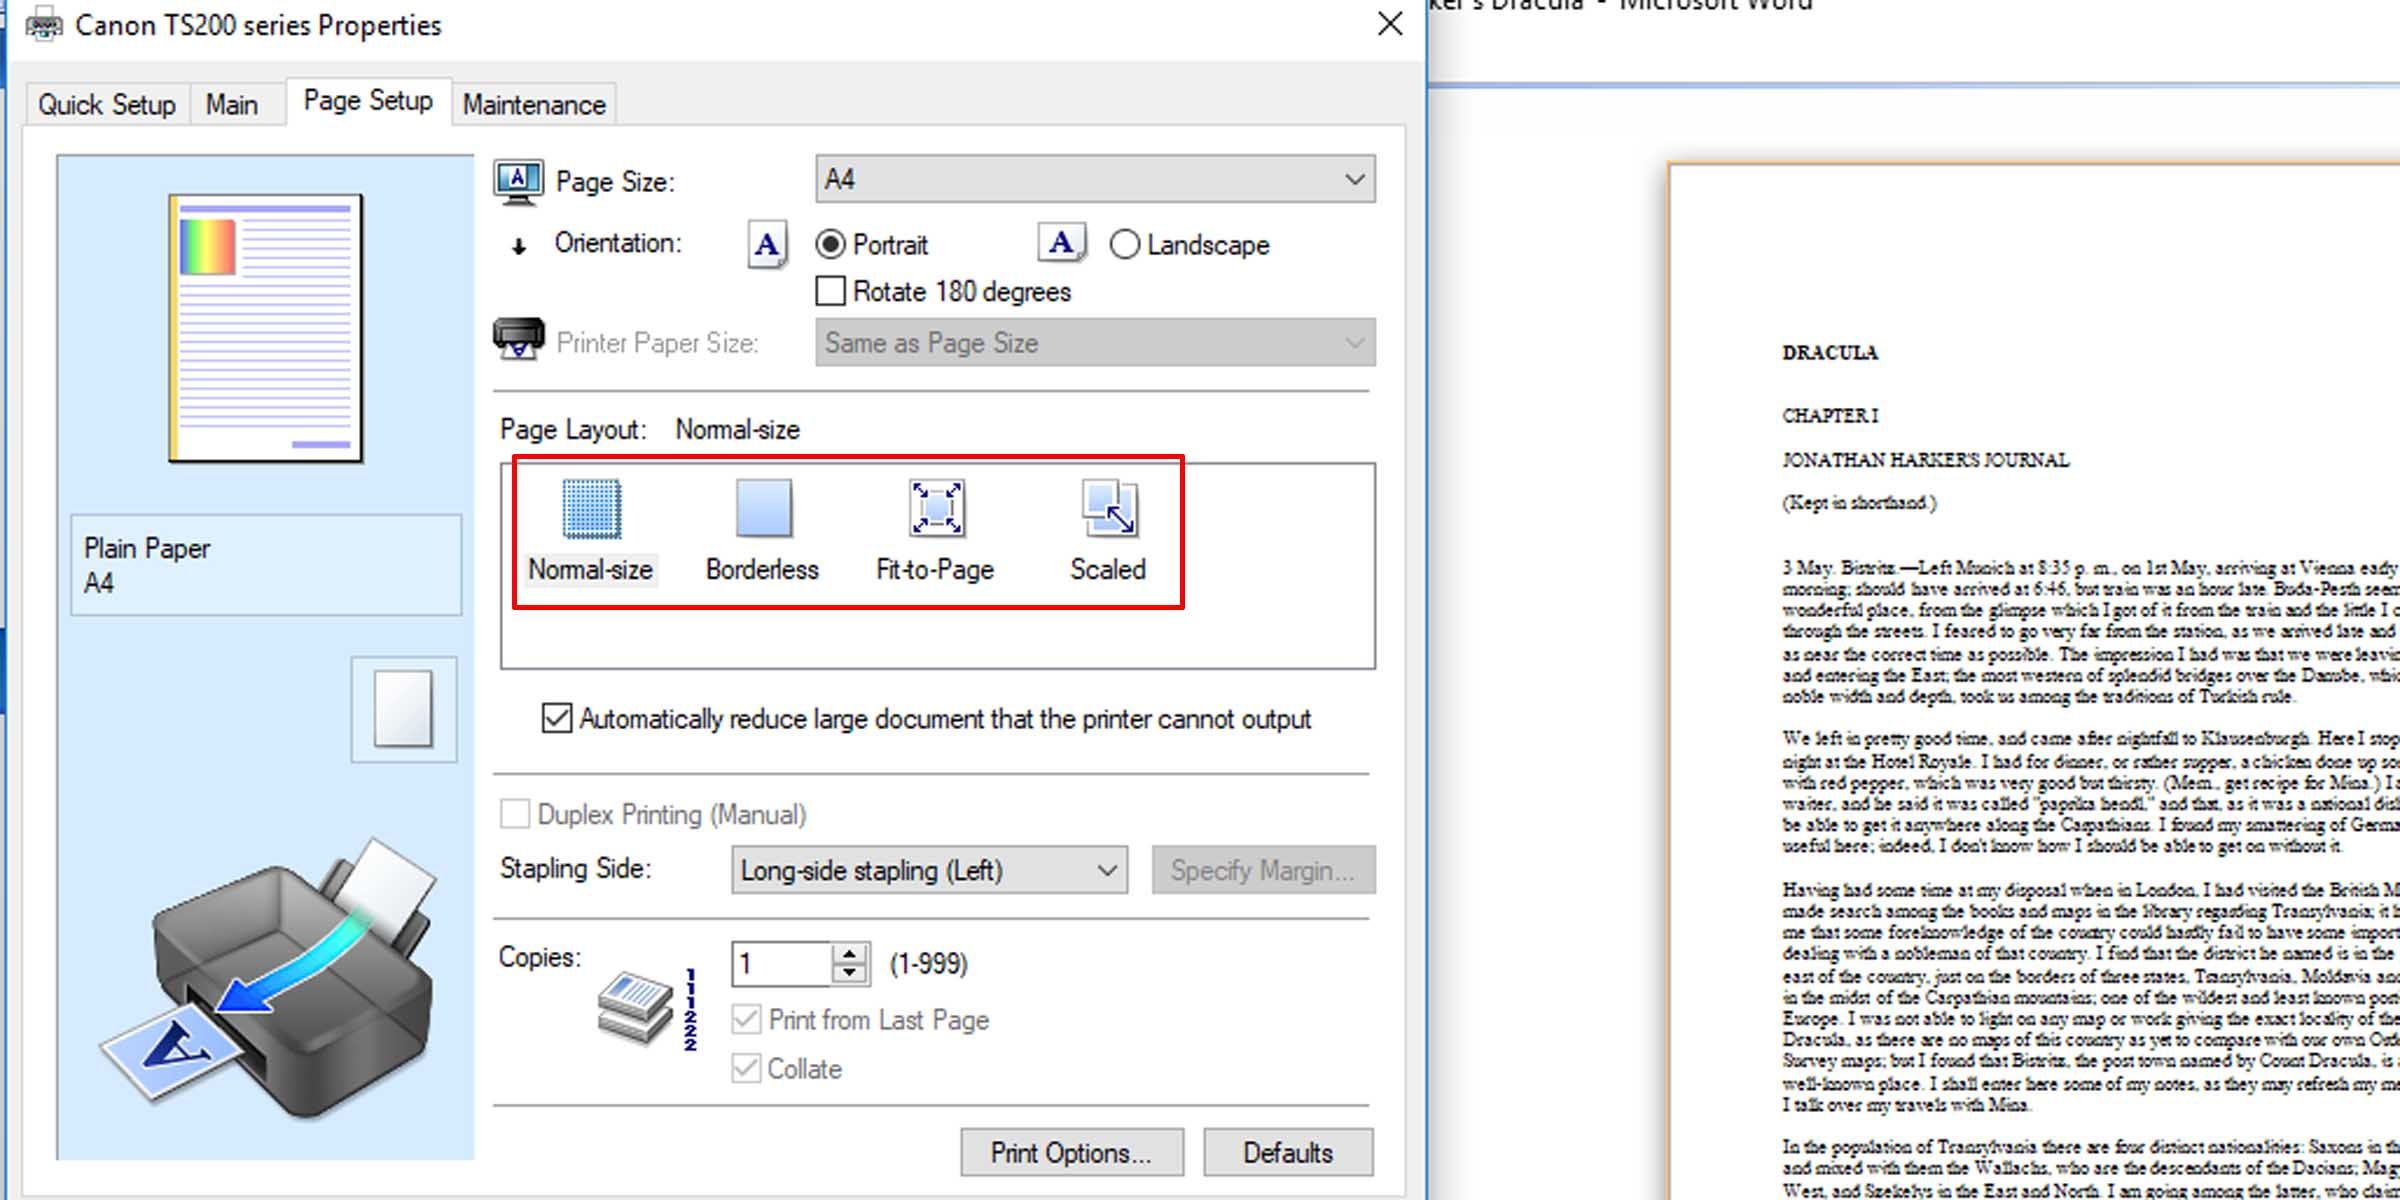
This should make the pages print at full size, with text and any graphics filling the entire page.
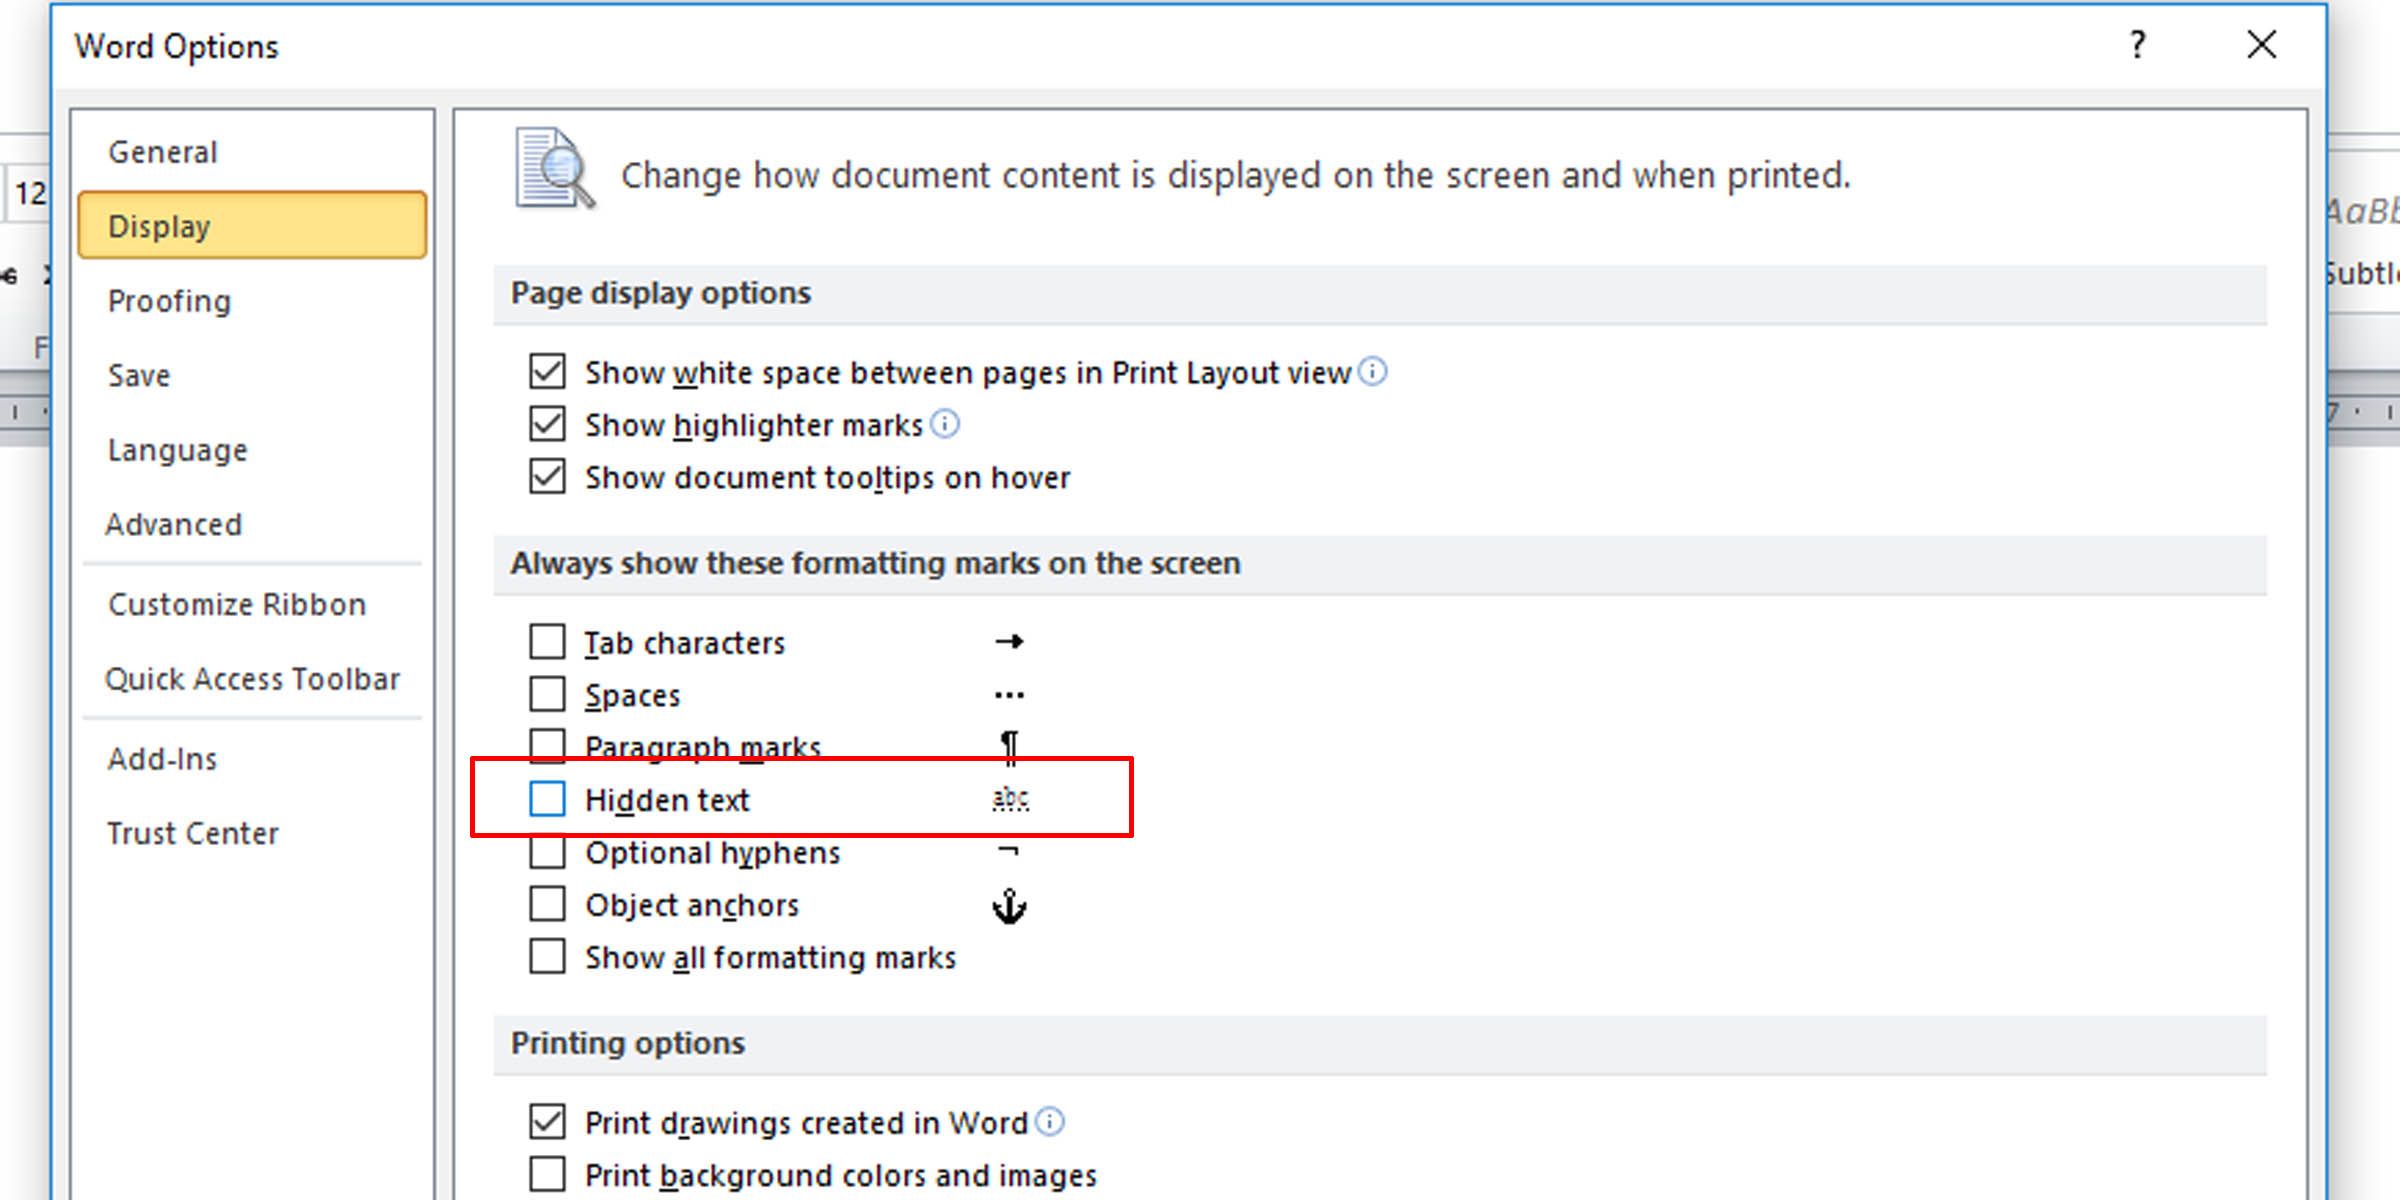
6. Check for Hidden Text
Microsoft Word affords the option of hiding text on the page. The hidden text has the same properties as formatting marks, which are characters that take up space in a document but don’t appear when printed, such as spaces, line breaks, and tab characters.
If your prints are missing part of your soft copy text, here’s how to check whether you have text hidden in the document.
- In the Word document you want to check, click on File > Options.
- Under the Display tab, make sure the Hidden text option in unchecked.
-

Print the document to see if this fixes the problem.
This informative article gives more background on non-printing or invisible characters in word processors.
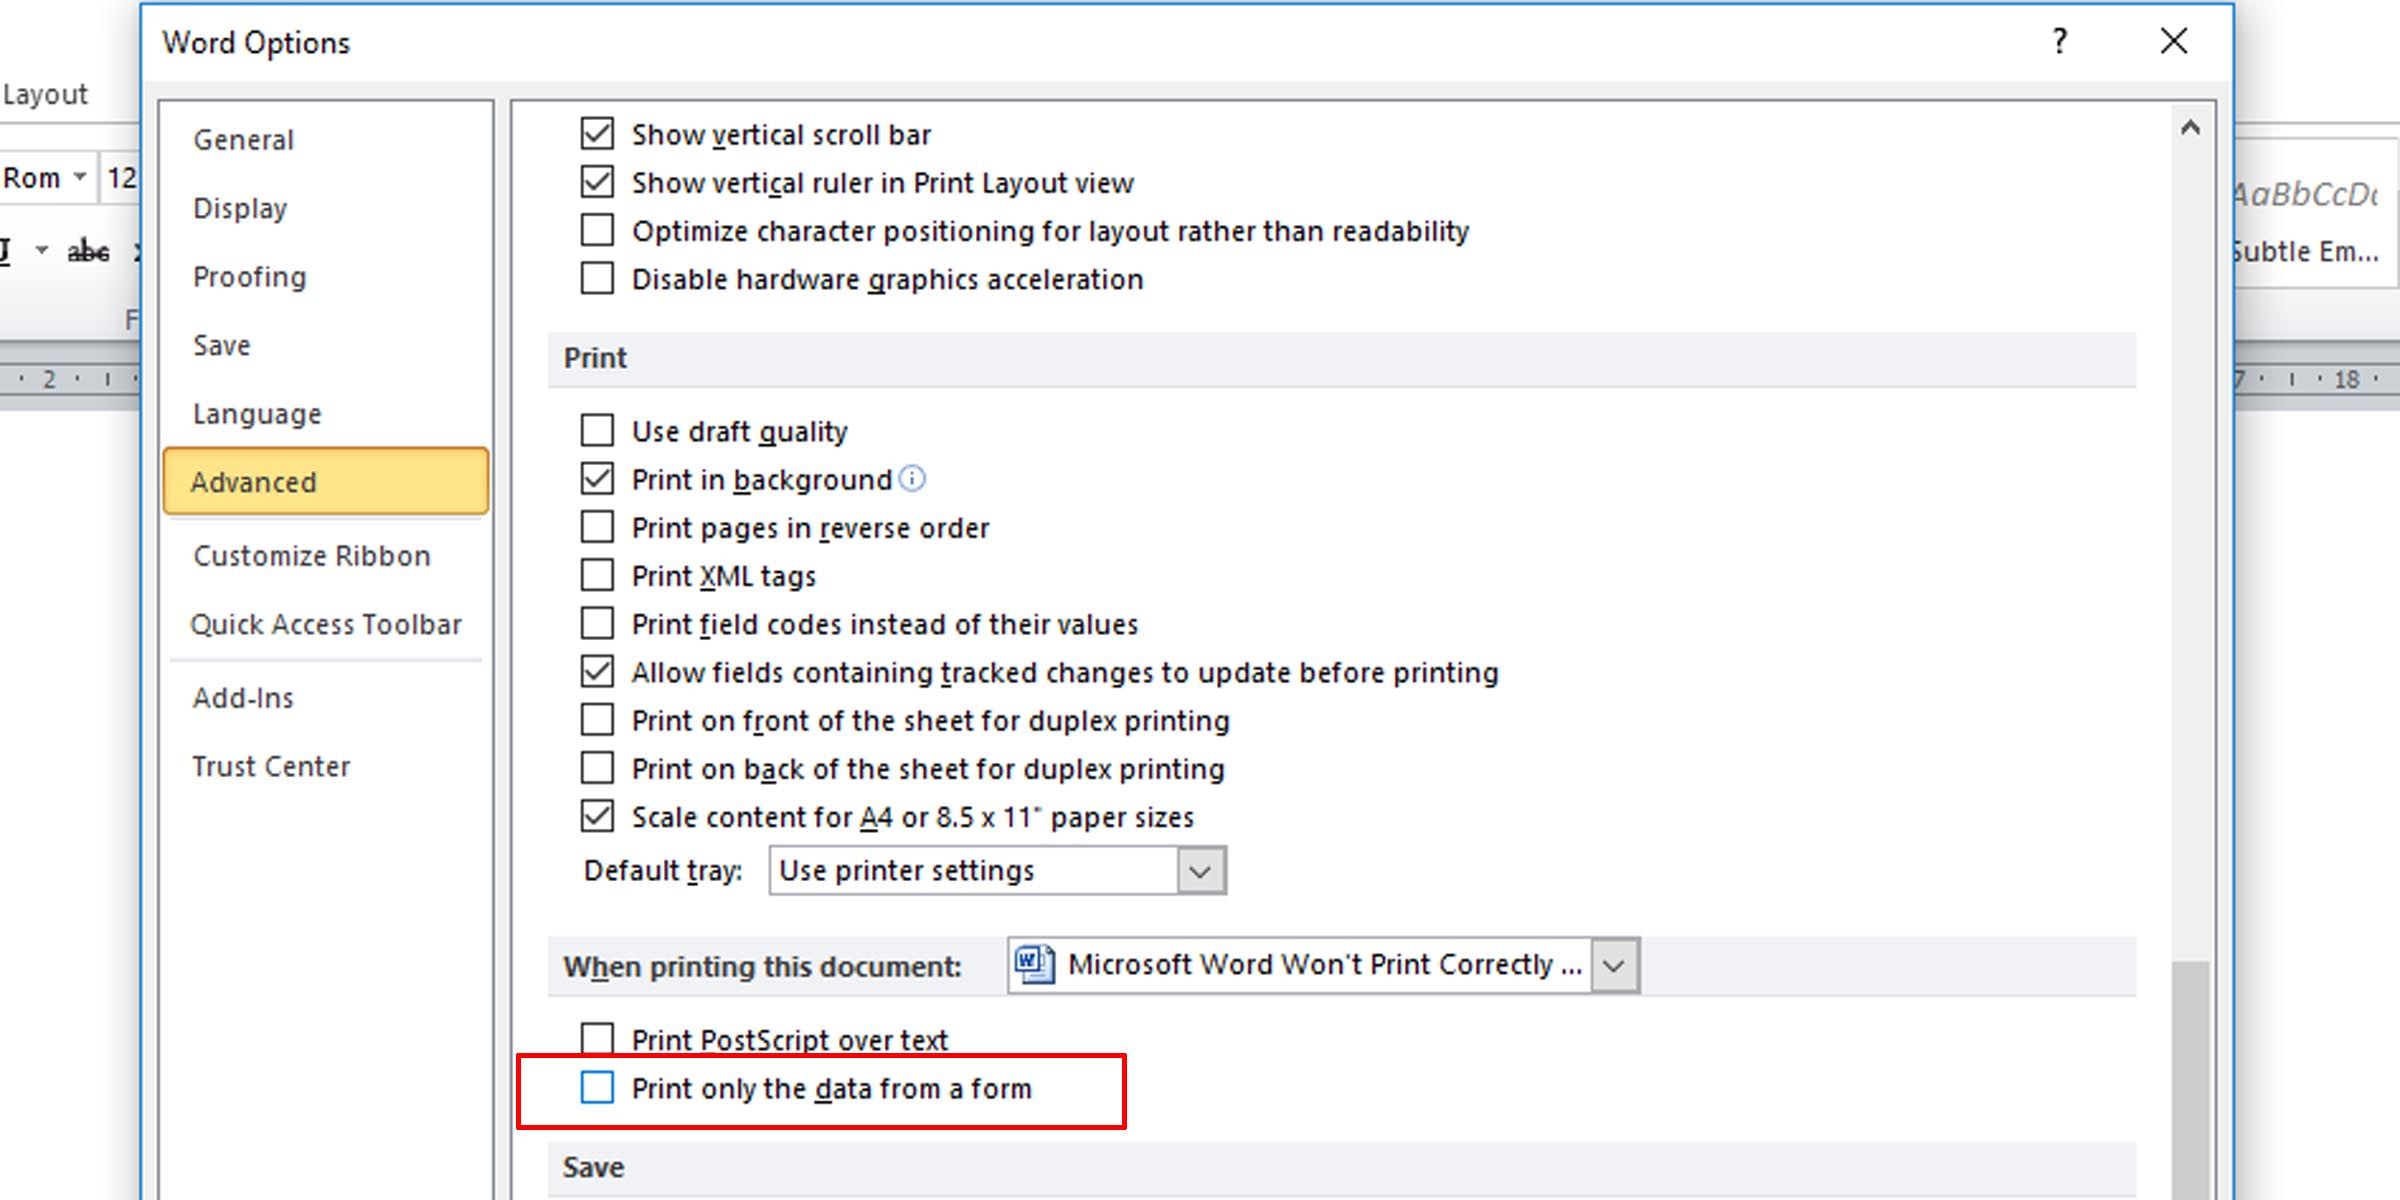
7. Check Form Data Print Options
A not-so-common occurrence is table borders not showing up in final prints. This can be easily remedied.
- In the Word document, go to File > Options.
- Under the Advanced tab, scroll down to the Print section.
- Make sure that the checkbox for printing only the data from a form is unchecked.
8. Print Directly to the Printer
Some errors when printing Microsoft Word documents causes pages to have only portions of text. This might be because of a spooling issue.
- Open the Control Panel app.
- Click on the option for devices and printers.
- Right-click on your printer and select Printer properties.
- Under the Advanced tab, select Print directly to the printer.
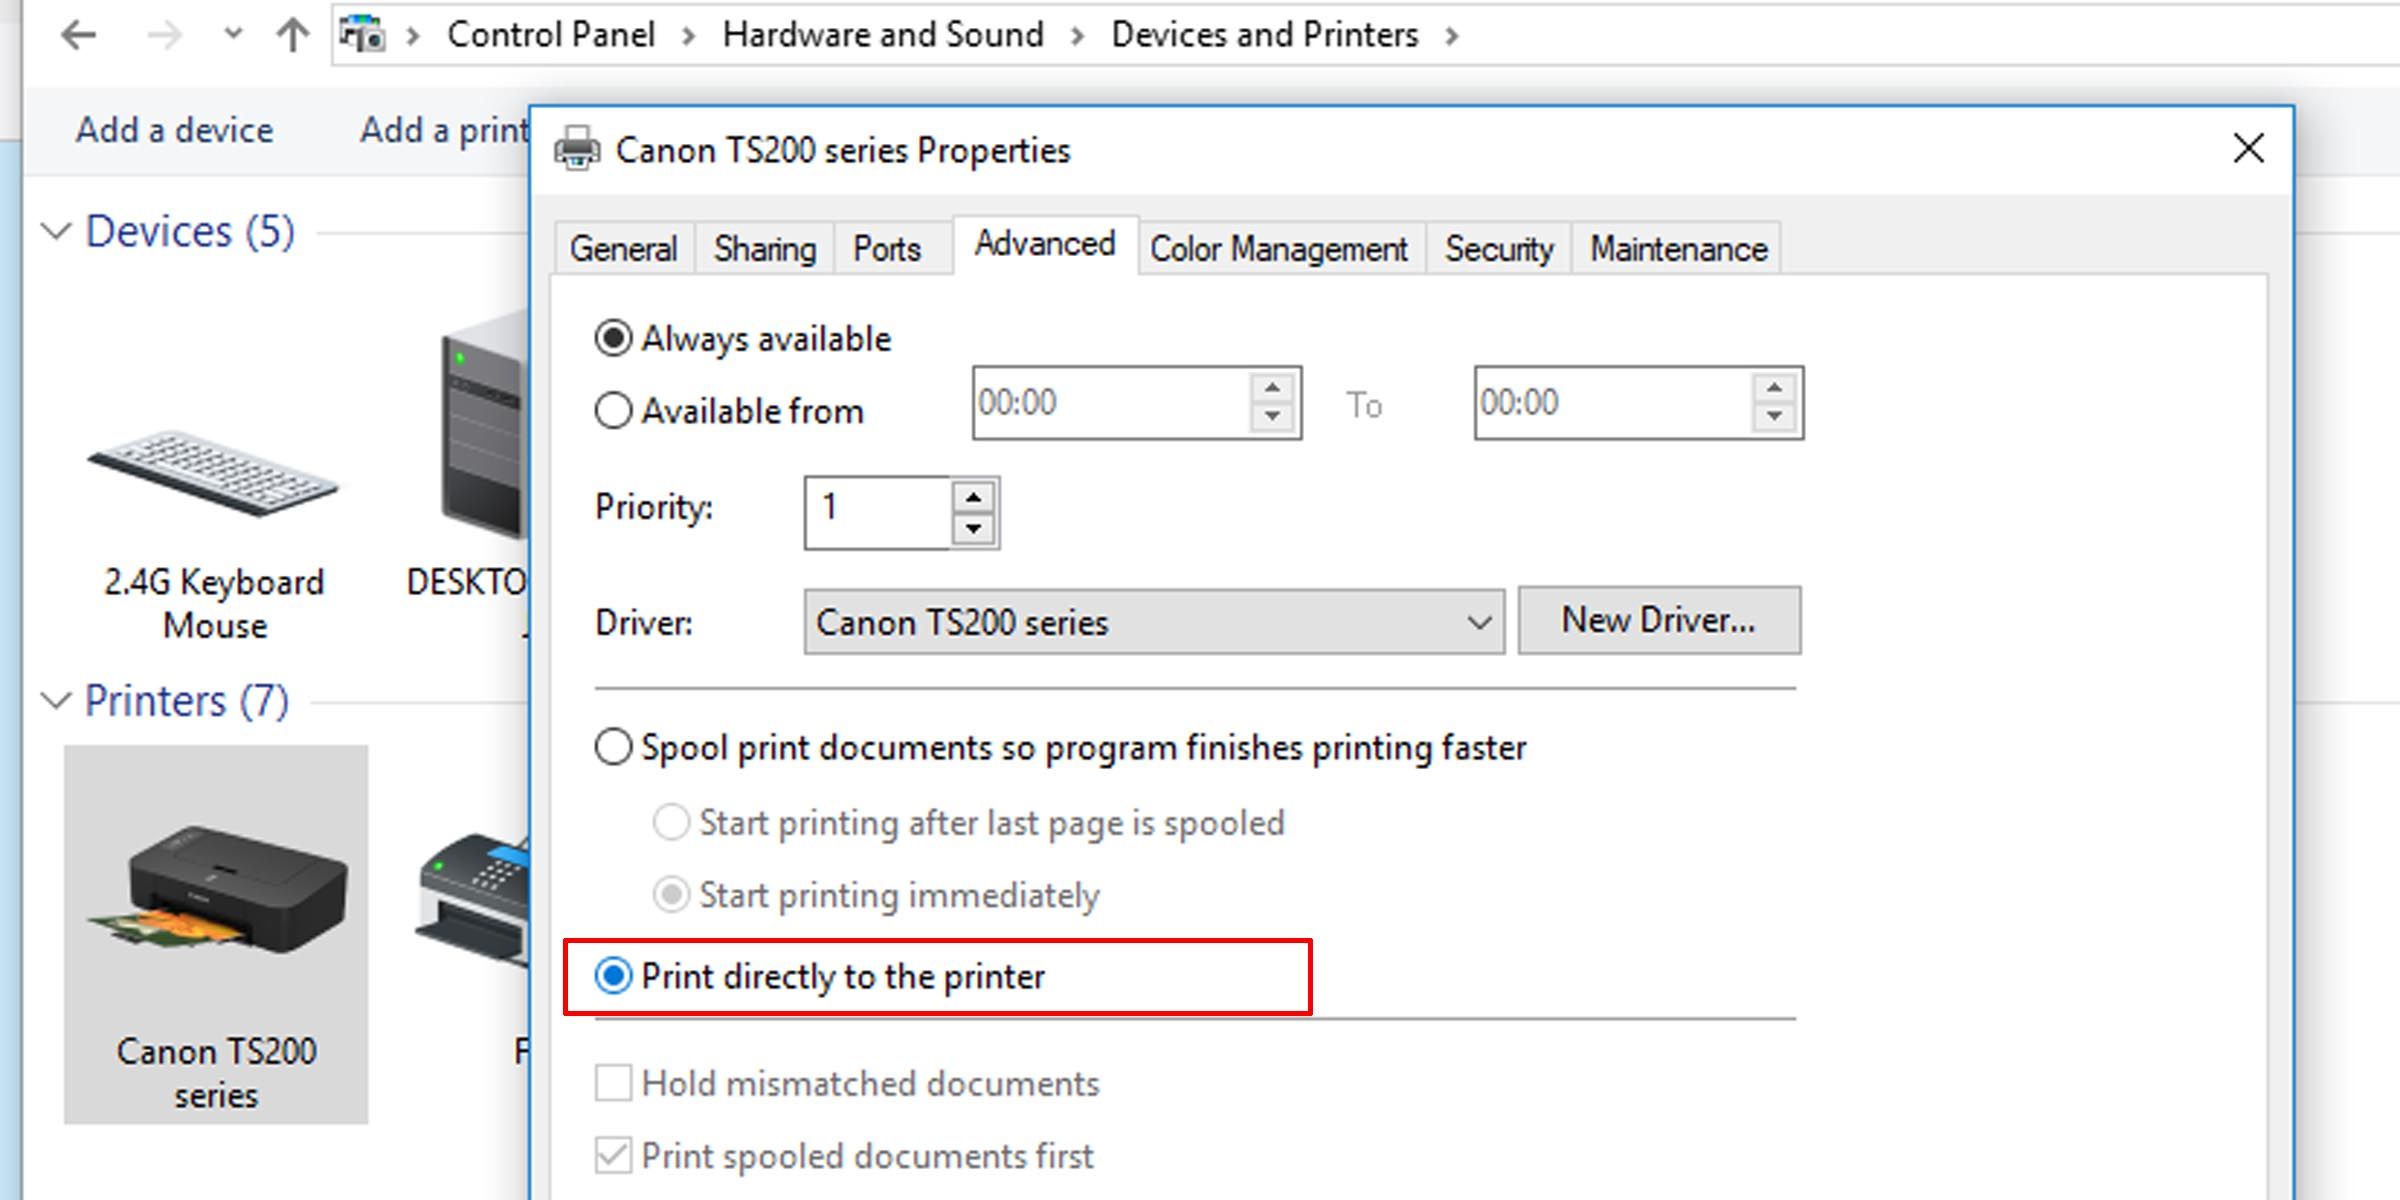
If your computer is connected directly to a printer, you don’t need the spool print option turned on. However, turning it off may slow down your PC when printing.
9. Repair Microsoft Office Suite
If you’ve tried all these potential fixes for Microsoft Word not printing properly and the issue persists, repairing your copy of Microsoft Word might solve the problem. To detect problems and repair Word on your Windows PC, do the following:
- Click on the Start menu and type «control panel.”
- Click on the Uninstall a program option under the Program heading in Category view, or the Programs and Features option in Icon view.
- Search for your Microsoft Office suite or Word program; right-click it and select Change or Modify.
- Select the Repair option and click Continue.
This will reset the settings on the 2010, 2013, 2016, and 2019 editions of Microsoft Word.
Get Printing Again
Hopefully, one of these troubleshooting tips should serve its purpose and resolve your printing issue, and you’ll be printing error-free pages just as you see them on your computer.

There’s nothing more frustrating than working endless hours on a document only to be greeted with an error message when it’s time to print. Here are a few suggestions to get Word to work with your printer again.
Basic Checks
First, it’s a good idea to do some basic hardware checks to ensure everything is hooked up as it should be.
Here are a few things to check before we look at Word:
- Make sure the USB cable that connects your PC to your printer is hooked up properly. If your printer is wireless, make sure it’s turned on.
- Double-check the internet connection (wired or wireless).
- Make sure the printer is plugged in and turned on.
- See if there’s a paper jam.
- Ensure your printer is compatible with your computer. Search Google and the printer manufacturer’s website for more information.
These might seem like obvious things to check, but they’re also easy to forget. It’s always best to try the basics first and avoid wasting time unnecessarily.
A Quick Solution
This tip won’t fix your printing issues, but it will allow you to print from your computer in a pinch. If you don’t have time to figure out what’s going on with Word, but really need to print a document, convert the file to a PDF. Then, you can print it from a different application.
To convert a Word document to a PDF, open the document you want to convert, click “File,” and then click “Save As” in the pane on the left.

You see a box that shows you the type of file the document is; click the arrow next to it. In the drop-down menu, click “PDF,” and then click “Save.”
Now, open the file in another program (like Acrobat) and print it.
Microsoft’s Printing Troubleshooter for Windows
Microsoft has a printing troubleshooter you can download. To get it, click the link in “Step 5” on the Microsoft support page.
Open the tool. On the homepage, you see basic information about what the software does; click “Next.”
The diagnosis runs. If the troubleshooter doesn’t find anything, Microsoft will suggest you run the tool as an Administrator—go ahead and do so.
A message appears that asks you to choose the printer with which you’re having issues. Select it, and then click “Next.”
The program runs the diagnosis and makes suggestions as it goes. When the troubleshooter is finished, try to print your Word document again.
Install the Latest Driver
Outdated drivers are often the cause of printing problems, so make sure yours is up to date. There are two ways you can do this. First, check the “Drivers” section on your printer manufacturer’s website for any driver updates.
RELATED: How to Manage a Printer in Windows 10
The second way is to update your PC because Windows might find an updated driver for your printer. To check for an update, click the Start button on your Windows PC, and then click the gear icon to open the “Settings” menu.
In the “Settings” window, click the last option on the list, “Update & Security.”
Click “Windows Update.”
If you’re on a Mac, click the Apple icon in the top-left corner, and then click “Software Update.”
When the update is complete, try to print your Word document again.
Remove and Reinstall a Printer in Windows
Another solution is to remove and reinstall your printer, as this will include all the latest updates.
RELATED: How to Install the Same Printer Twice (With Different Settings) on Windows
To remove your printer, click the Start button on your Windows PC, and then click the gear icon to open the “Settings” menu.
Click “Devices.”
Next, click “Printers & Scanners.”
Select the printer you want to remove from the list, and then click “Remove Device.”
Now, to reinstall the printer, click “Add a Printer or Scanner” at the top of the menu.
Select your printer from the list, and then click “Install.”
When the installation is complete, try to print your Word document.
Remove and Reinstall a Printer in MacOS
On a Mac, the process to remove and reinstall a printer is a bit different.
To get started, click the Apple icon in the top-left corner, and then select “System Preferences.”
Next, click “Printers & Scanners.”
Finally, select the printer you want to remove, and then click the minus sign (-) at the bottom of the screen to delete it.
To reinstall the printer, click the plus sign (+). Select your printer from the list that appears, and then click “Add.”
After you reinstall your printer, try again to print your Word document.
Low System Resources
Low system resources can definitely cause issues when you try to print a document.
To see if this is the problem in Windows, press the Windows key, and then type “resource monitor.” The Resource Monitor app appears in the results; press “Enter” to select it.
On a Mac, this app is called “Activity Monitor.” To find it, press Command+Spacebar, and then type “Activity Monitor” in the Spotlight search bar.
After it opens, you can investigate if low system resources are causing your printing issues. The simplest way to find out is to restart your computer, and then try to print your Word document again.
These are just a few ways you can diagnose and fix printing issues in Word. However, there could be other causes we didn’t cover.
If you’ve experienced a printing issue with Word and resolved it, please share your tips in the comment section—it might help others who are dealing with the same problem.
READ NEXT
- › How to Make a Poster Using Microsoft PowerPoint
- › How to Print Double-Sided in Microsoft Word
- › How to Print Double-Sided on Windows 11
- › Windows 11 Has a New Photo Gallery in the File Explorer
- › The New Winamp Is Here, but It’s Not What You’d Expect
- › How to Get a Refund on the PlayStation Store
- › Discord Direct Message Won’t Go Away? Here’s the Fix
- › Save Hundreds on Elegoo’s New PHECDA Laser Engraver Through Kickstarter
The printing order typically starts from page 1 and proceeds up to the last page. Printed papers that emerge from the printer come out with the last page on top and the first page at the bottom of the pile. If your document had only about 5-10 pages, sorting them manually—to bring page one on the top—is no major task.
Now, instead of a few pages, what if your document was actually a book with a few hundred pages?
After you have printed all the pages, sorting them to bring page 1 on the top could soon become a tedious exercise.
Well, the solution is very simple—why not start the printing process beginning with the last page and finish with page one?
The process is termed printing in reverse order, and the printer you are using may allow doing so because of a built-in functionality.
However, all printers may not possess that facility, so you can set up Microsoft Word to do that for you.
We will guide you through the process of printing your Word document in reverse order following a few simple steps. In fact, you can do that in two ways.
- Set Word to print in reverse order by default.
- Reverse print the document using custom print options.
Lets start.
Method #1: Set Reverse Printing as default
This method will set up Word to print any document in the reverse order—very useful if you are working steadily on a single large document and not switching documents frequently.
Step #1: Open Microsoft Word
Start Microsoft Word.

Step #2: Open Word Options
In the bottom left corner, click on Options. This will open the Word Options page.

Step #3: Set Print in Reverse Order
- Click on the Advanced tab on the left side. Scroll down the right side until you reach the section Print.
- Click on Print pages in reverse order, making sure that a tick-mark appears inside the small square immediately in the left.
- Click on OK to exit.
The above steps set up Word to print in the reverse order of pages for any document you open from now onwards.
To go back to printing starting from page 1, simply follow the above steps again, and make sure there is no tick-mark against Print pages in reverse order in Word Options.
Method #2: Reverse Printing using Printer Options
Use this method if you print several different Word documents frequently, and only some require printing in reverse order.
Step #1: Open a Word Document
Open a Word document. Click on the File tab on the top menu bar. The File dialog will open.

Step #2: Set Up the Print Dialog
- Click on the Print tab on the left. The Print dialog will now open, showing a print preview of the document on the right side.
- Under Settings, click on Print All Pages. An options menu will drop.
- Click on Custom Print. The options menu will close with the cursor blinking inside a blank field.

Step #3: Set Up Custom Print to print in reverse order.
Word offers hints for filling up the blank field. You can see these hints if you hover the mouse pointer on the Instructions icon to the right of the blank field.
To print in reverse order, type the number of the last page with which you want to start the printing, followed by a hyphen, and then the number of the page on which you want the printing to end.
For instance, you may type 5-1, or 8-4, or other, depending on your requirement.
Word displays the current page and the total number of pages at the bottom for your convenience and reference.

Step #4: Print
Click the Print icon to start printing. Once printing has completed, Word will revert to printing all pages in regular order for other documents when you open them next.
Conclusion
If your printer is capable of printing in reverse order, you may use that specific feature. However, it is possible to reverse print with any printer, and Word allows you to do that in two ways—one for all documents, and the other for the current document. We have explained both methods in simple steps.