
What’s a word that means «pictures or video»/»pictures and video»? I was considering «media» but not sure if that would be correct.
For example, when discussing the smartphone app Snapchat, it becomes very repetitive to say things like «with Snapchat pictures and videos can be shared with friends».
asked Jan 19, 2015 at 8:11
![]()
CeleritasCeleritas
2,86826 gold badges52 silver badges74 bronze badges
7
I suggest «visual media«. (See the 2005 collection of essays on literature and the visual media here.)
answered Jan 19, 2015 at 9:33
![]()
If you’re looking for a title for your smart phone, try «Visual».
answered Sep 5, 2018 at 14:48
![]()
In the context given by the OP, I think imagery would be unambiguous. If the description needed tightening, that could be refined to ‘visual imagery‘.
answered Sep 5, 2018 at 15:13
![]()
Robin BettsRobin Betts
5832 silver badges8 bronze badges
I am familiar with the phrase ‘Audio-Visual aids’ but it mainly relates to audio + pictures.
However, possibly that would be of help as well.
answered Jan 19, 2015 at 8:29
![]()
SharkushaSharkusha
4673 silver badges7 bronze badges
Multimedia — ODO
adj. 1.1 (Of computer applications) incorporating audio and video, especially interactively
«multimedia applications»noun 1.1 An extension of hypertext allowing the provision of audio and video material cross-referenced to a computer text
«Many of our fellows also worked in the sphere of multimedia as well as computer games.»
![]()
answered Jul 28, 2016 at 17:17
![]()
1
What about visual content. I think it is quite represent them.
answered Sep 28, 2022 at 18:16
![]()
2
pics & vids is short and exactly matches the request if you don’t mind that the expression is informal.
media would be an obvious choice when talking about online services like Snapchat except that it also includes audio and other things. Wikipedia says: «[…] This also includes text, audio, video, and graphics that are transmitted over the internet […].»
content is another broad term often used to refer to things you watch or share online. Merriam-Webster: «content — the principal substance (such as written matter, illustrations, or music) offered by a website»
answered Sep 28, 2022 at 20:15
![]()
eltomitoeltomito
1,3442 silver badges11 bronze badges
I usually call these «Assets».
answered Oct 25, 2022 at 17:55
![]()
1
I usually use «data» but I think this word doesn’t refer to Messages, Pictures and videos.
I’m trying to say «Share Messages, Pictures and Videos between devices, Smoothly.»
But the sentence is too long and I don’t want to repeat «Messages, Pictures and Videos» too many times.
I’m thinking about using «Data» or «Output» instead, but they may refer to so many things rather than just «Messages, Pictures and Videos».
asked Jun 26, 2018 at 18:24
![]()
AdamAdam
1337 bronze badges
3
Is this for marketing material?
Seamlessly share messages and media
Or even just:
Share seamlessly
This doesn’t seem to have the same pleasant sound to my ears, but works:
Share smoothly
Share holds that sense generally, if you’re in the world of apps. The object is understood.
answered Jun 26, 2018 at 18:59
![]()
De NovoDe Novo
1,4589 silver badges14 bronze badges
0
I believe the normal word for this is content…
substantive information or creative material viewed in contrast to its actual or potential manner of presentation
• publishers, record companies, and other content providers
definition from dictionary.com[uncountable] (computing) the information or other material contained on a website or other digital media
• online content providers
• Record companies have had to transform themselves into digital content providers.
definition from oxfordlearnersdictionaries.com
![]()
answered Jun 26, 2018 at 19:07
![]()
HellionHellion
59.1k21 gold badges130 silver badges212 bronze badges
I suggest files.
I share files with my networked devices and with friends.
In the Oxford dictionary the second meaning of file has
1.2 Computing A collection of data, programs, etc. stored in a computer’s memory or on a storage device under a single identifying
name. ‘you can save the file to your hard disk’
answered Jun 26, 2018 at 18:43
![]()
Weather VaneWeather Vane
18.5k3 gold badges36 silver badges53 bronze badges
5
From the Wikipedia article on Graphical User Interface (emphasis by me)
Large widgets, such as windows, usually provide a frame or container for the main presentation content such as a web page, email message or drawing.
It would seem that things displayed on a computer screen which are not icons, containers, or pointers are referred to as content.
So you would say «Share content between devices, smoothly» Or «Smoothly share content between devices.«
answered Jun 26, 2018 at 19:20
![]()
When autocomplete results are available use up and down arrows to review and enter to select. Touch device users, explore by touch or with swipe gestures.
Similar ideas popular now


Acts 4:12 KJV Neither is there salvation in any other: for there is none other name under heaven given among men, whereby we must be saved.

Acts 4:12 KJV Neither is there salvation in any other: for there is none other name under heaven given among men, whereby we must be saved.


Acts 4:12 KJV Neither is there salvation in any other: for there is none other name under heaven given among men, whereby we must be saved.


There is none like him!!!! All glory and honor goes to my great Lord and savior, JESUS CHRIST! AMEN.

Microsoft Word includes several image editing tools that allow you to make changes to images in your documents. Here’s how to use them.
You don’t need expensive photo editing software like Photoshop to edit photos and other images for Microsoft Word documents. Although the Microsoft Office Picture Manager has been retired, there are still plenty of built-in tools to edit images in Word.
Microsoft Word allows you to format colors and brightness, add borders, crop image sizes, add special effects, and more, so here’s how to do it. While the instructions may vary, these instructions should work for Word 2016 and higher, including Microsoft 365 (formerly O365) and Online.
There are a few ways to crop an image in Microsoft Word. Start by inserting the image into your Word document (Insert > Pictures) and selecting the image.

To begin formatting your selected image, click Format > Crop (or Format > Crop > Crop). You can also enter the image cropping mode by right-clicking the image and selecting Crop.
This will change the outline around your image from resizing to cropping.

Move the crop outline tools around your image to reduce the image area to its final size. Grayed-out areas will be removed from the final image once the crop edit has been confirmed.
Once you’re happy, click once outside of the image or press Enter on your keyboard.

Formatting Image Colors
Word allows you to format the colors used in your image without exporting it to a photo editor first. You can customize the image sharpness, brightness, saturation, tone, and contrast levels, either manually or using one of several preset filters.
To access the image formatting tools, right-click on your image and press Format Picture at the bottom.

This will bring up the Format Picture menu on the right-hand side. Click the Picture icon (furthest right) to access the image color editing tools.
Under Picture Corrections, move the sliders for each category to sharpen or soften an image or increase or decrease the brightness and contrast levels. You can also click Presets for each category, selecting one of the thumbnails to apply those changes to your image instead.

Under Picture Color, you can change the tone and saturation levels for your selected image. Move the sliders for each option left or right to increase or decrease each level.
Click Presets to set these levels using one of the provided preset options.

If you’re unhappy with any of the color changes you’ve made, click the Reset button underneath each category to return your image to its original state.
Adding Special Effects to Images
Microsoft Word also includes several special effects that can be easily applied to images. These include image shadow, glow and reflection, soft edges, and a 3D bevel effect.
To add these special effects, enter the Format Picture menu (right-click > Format Picture) and click the Effects icon (second from the left). Click on each sub-category to access each setting.
To add a shadow to your image, click Shadow and move the sliders to set transparency, size, angle, color, etc. You can also click Preset to preview and add a Word-defined drop shadow instead.

Click Reflection and follow the same instructions to add a custom or preset image reflection to your image. Do the same to Glow to add an image glow and Soft Edges to soften the edges around your image.
To add a 3D bevel effect to your image, click 3-D Format. Select the effect you want for both the top and bottom sections of your image by clicking Top Bevel and Bottom Bevel, selecting one of the pre-defined options.
You can also customize the depth, contour, material effect, and lighting levels for your 3D bevel effect using the drop-down menus and option boxes.

You can also add one of several preset artistic effects to your image. These combine several effects into one to change your image design.
To do this, click the Artistic Effects sub-category, then click the Artistic Effects icon. Select one of the preset options using your mouse to apply it to your image.

Compressing Images in Microsoft Word
Adding images to a Word document can vastly increase its size. By compressing the images, you can reduce the file size of your document as a whole.
To format a single picture, click Format > Compress Images and ensure that the Apply only to this picture checkbox is enabled. If you want to compress all of your attached images, click to uncheck this checkbox.
Compressing images will reduce the quality on a sliding scale from HD quality (330 pixels per inch) to basic email quality (96 pixels per inch).
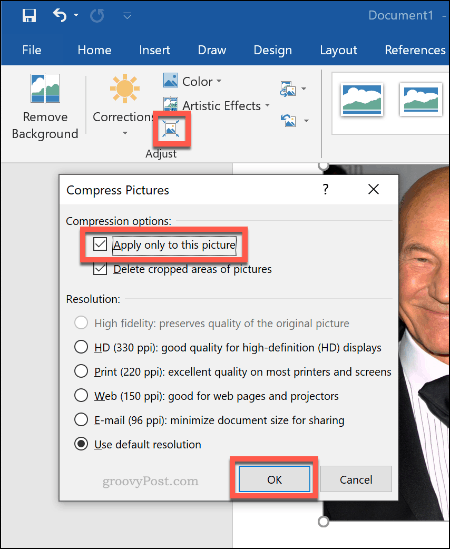
The higher the quality, the bigger the Word file, so choose your preferred quality, then click OK to compress your images.
Basic Image Editing Made Easy
These editing tools make it easy to make basic changes to images in Microsoft Word. You can also resize images in Windows 10 without needing an image editor too.
If you need to make bigger changes to your images, you can try some of these free Photoshop alternatives instead.
![]()
More than ever, pictures are critical to the effectiveness of your communication materials. With the image formatting and layout tools in Microsoft Word, it’s possible to add and manipulate pictures in your document—even if you’re a beginner.


Starting with a Microsoft Word template makes it even easier. With a well-designed Word template, the positioning and formatting of pictures have already been done for you. All you’ve got to do is to drag your pictures into the image placeholders.
Even if you’re using a template for Word, it’s good to know how to format pictures so you can make your document look exactly the way you want it to.
In this article, you’re going to see, step-by-step, how to work with pictures in Microsoft Word.
(Note: The screenshots below show Microsoft Word for Mac. The screens and steps may be slightly different if you’re using a different version of Word.)
How to Insert a Picture in Word
To add a picture to a Word document, click Insert > Pictures. From here, you’ve got three options:
1. Photo Browser
If you choose this option, you’ll be able to select an image from the existing photo sets on your computer. On a Mac, that includes photos in iPhoto and Photo Booth. When you find the picture you want to use, click on it, then drag it into the document.


2. Picture From File
This option lets you insert an image from another location on your computer. Find the image file, select it, then click Insert.


3. Online Pictures
Insert pictures in Word from the web by selecting Online Pictures…. This opens a Bing image search right inside your document. Type a keyword or phrase in the search bar.


By default, the Creative Commons only filter is checked. Keep this selected to make sure you don’t violate any copyright laws. Click on the filter icon to filter the image results by other parameters.


Select an image by clicking on it, then click Insert. You can select several images before clicking the Insert button.


Microsoft Word automatically includes the image attribution and license details as a caption.


Note: While you can import many image formats into Word, the ones that work best are JPG and PNG.
How to Format Pictures in Word
After importing pictures into Word, you can apply different formatting settings to each Microsoft Word picture and control its appearance. Below are some of the most basic image formatting you can apply in Word:
1. Resize an Image
Resize a picture in two ways:
Resizing Method 1
Click on the picture. Press and hold the Shift key, then click and drag one of the sizing handles either towards or away from the center.


Holding the Shift key ensures that the proportion of the picture is retained. Otherwise, it would become distorted and your entire document will look amateurish.
Resizing Method 2
This method allows you to resize the picture to a specific length or width. Click on the picture, then click on the Picture Format tab. Type the length or width you wish the image to have.


By default, the original proportion of the image is retained even when you change either the length or width of the image. Keep this checked to avoid distorting the image.
2. Rotate or Flip Images
To rotate an image, do so either manually or by a specific amount.
Manual Image Rotation
To rotate an image manually, click on the image to select it. Click on the rotation handle and drag it in the direction you want.


Flip or Rotate an Image By a Specific Amount
Rotate a picture by a specific amount. Click on the picture, then go to Picture Format > Rotate. From here, you’ve got the option to:
- Rotate Right 90°
- Rotate Left 90°
- Flip Vertical
- Flip Horizontal
- Select More Rotation Options
To rotate a picture to an exact angle, choose Select More Rotation Options.


Type in the amount you wish to rotate the object, then click OK.


How to Crop Photos in Word
If you’re wondering how to crop a picture in Microsoft Word, it’s not difficult. Follow the steps below to not only crop an image, but also to dress it up by cropping it to a shape or adding decorative borders:
1. Basic Image Cropping
To crop a picture, select the picture, then go to Picture Format > Crop > Crop.
Black cropping handles appear on the sides of the picture. From here:
- Crop one side. Drag one side handle inward.
- Crop two adjacent sides at the same time. Drag one corner inward.
Click outside the image to apply the crop.
2. Crop Image to a Shape
To crop the picture to a specific shape, select the picture. Go to Picture Format > Crop > Crop to Shape. Select a shape from the selection that appears.


Click away from the picture to apply the new shape.


3. Frames and Borders
Borders are an easy way to dress up a picture in Microsoft Word. To add a border, select the picture, go to Picture Format. Click on the Picture Border button on the ribbon to reveal the border options.


From here, choose the color, weight, and dash style you wish to use for the border.


To add a frame, click on the picture, then go to Picture Format. Click on the Picture Quick Styles button on the ribbon. Select the border you want to use.


How to Use Image Editing Tools
There are many Word image editing tools. Learn how to format pictures in Word by removing the background or adjusting the brightness. Here’s how:
1. Remove Background
Microsoft Word allows you to remove the background from your pictures. This feature works best if the color of the background is distinct from the colors on the main subject of the picture.
To remove the background, select the image. Go to Picture Format > Remove Background.


Use the tools provided to select which parts of the image you wish to keep and which parts you want to remove.


The parts that’ll be removed are colored pink.
When you’re happy with the selection, click Keep Changes.


2. Sharpness and Brightness Corrections
Improve the sharpness and brightness of your pictures in Microsoft Word. To adjust these, select the picture. Go to Picture Format > Corrections. Select the sharpness and brightness/contrast settings you wish to use.


To more finely control these settings, go to Picture Format > Corrections > Picture Corrections Options. The Format Picture sidebar appears. It allows you to provide specific settings for sharpness, brightness, and contrast.


3. Picture Color
Microsoft Word also allows you to control the color saturation and tone of your picture. And you can recolor the entire picture for special effects. Select the picture, go to Picture Format > Color. Select any of the options that appear.


From here choose:
- More Variations. Recolors the image with a different color from the options provided.
- Set Transparent Color. Makes certain colors transparent so that the color of the background shows through.
- Picture Color Options. Opens the Format Picture sidebar, where you can fine-tune the settings for color saturation, tone, and recolor.
How to Use Layout Options
Microsoft Word’s layout options for images lets you control how photos are displayed alongside text.
By default, a picture is set to be «In line with text.» This means the picture is treated as an object that moves with the text. This means whatever formatting is applied to the text applies to the picture as well, which may not be how you want it to appear. When a picture is in line with text, you won’t be able to drag and drop it to a different part of the document.
To set up a picture’s layout options, select the image, then go to Picture Format > Position. Select one of the pre-configured layout options to position your picture on the page.


Gain more control by going to Picture Format > Wrap Text.


Select one of the text wrapping options:
- Square — wraps text around the picture in a square shape


- Tight — wraps text following the shape of the picture


- Through — shows text through all the “open” parts of the picture (may only be visible with certain picture shapes)


- Top and Bottom — wraps text only above and below the picture


These text wrapping options allow you to overlay pictures in Word or merge them together into a collage-type layout.
You’ve got other options:
- Behind text. Overlays the text in front of the picture
- In Front of Text. Places text behind the picture, covering it
- Edit Wrap Boundary. Lets you fine-tune how text wraps around the picture, which is especially useful if it’s irregularly shaped
- Move with text. Keeps the picture anchored to the text
- Fix position on page. Keeps the picture on the same position relative to the page, even if the text moves
- More Layout Options …. Gives you precise control over the picture layout
How to Move Pictures in Word and Arrange them on the Page
You may be wondering how to move a picture in Microsoft Word. The easiest way to move a picture is by clicking and dragging it. If this doesn’t work, the picture is probably set to be inline with text. Follow the instructions above to select a different text wrapping option.
To move multiple images, hold the shift key down as you click on each picture. Then, drag and drop them into place.
You can also move images using precise measurements. Select the image, go to Picture Format > Position > More Layout Options …. Specify the horizontal and vertical position of the picture relative to an element of the page.


Get Creative With Pictures in Word
Use the skills you learned above to add pictures in your Word documents and display them exactly the way you envision. As you’ve seen, it’s easy to control the appearance and placement of images on the page. By following the steps above, you can produce professional-looking documents all by yourself. However, we’ve only scratched the surface of the many ways you can work with pictures in Word!
Of course, if you prefer to have these design choices made for you, you’ve got the option to start with a Microsoft Word template. If you make a lot of Word documents, then you’ll like the cost-effectiveness of Envato Elements. You get unlimited downloads of templates as well as fonts, stock photos, and more for one low subscription price. On the other hand, GraphicRiver may be a better option if you only need the one-off template.
This gives you the ultimate convenience because professionally-designed Word templates have image placeholders. All you’ve got to do is to drag and drop your own pictures into the placeholders. The picture formatting steps in this article will help you fine-tune the image settings as you wish.
Now you, too, can get more creative—and effective—with pictures in Microsoft Word. But first, get your head start by downloading your favorite MS Word Template from Envato Elements or GraphicRiver.