
Filters
Most terms are adjectives
Suggest
If you know synonyms for Not changeable, then you can share it or put your rating in listed similar words.
Suggest synonym
Menu
Not changeable Thesaurus

Photo search results for Not changeable


Cite this Source
- APA
- MLA
- CMS
Synonyms for Not changeable. (2016). Retrieved 2023, April 14, from https://thesaurus.plus/synonyms/not_changeable
Synonyms for Not changeable. N.p., 2016. Web. 14 Apr. 2023. <https://thesaurus.plus/synonyms/not_changeable>.
Synonyms for Not changeable. 2016. Accessed April 14, 2023. https://thesaurus.plus/synonyms/not_changeable.
I’m looking for a word that is the opposite of «adaptable.» I would like to say «unadaptable,» but that’s not a real word according to my dictionary. So, what’s the best word out there for not-able-to-change?
Update: I’m embarrassed to admit I was accidentally searching the Mac’s built-in thesaurus, not dictionary, when I checked to see if unadaptable was a word. My bad! I’ll still award Jasper the answer for pointing out my obvious oversight.
Update 2:
To respond to the various calls for clarification, I’m specifically using this word in a report talking about the development of certain kinds of subdivisions, especially very homogenous single-family subdivisions in outer ring suburban areas. In my report I’m referring to a neighborhood that can change at the micro-level, ie. it can improve or deteriorate, but it cannot change what it is: ie. the infrastructure pattern is not capable of supporting a different land use, and it is not economically feasible to retrofit the infrastructure, therefore the nature of the subdivision cannot be changed, while the condition of the subdivision (if it is deteriorating) may cause people to wish that it could be changed.
So, with that in mind:
-
Why not immutable?» Immutable is a great word, but I understand it’s connotation to mean «permanent, unchanging», in the sense that something simply is not subject to change, not that it might like to change but cannot.
-
Why not «inflexible?» Inflexible connotes being «unwilling» to change, or perhaps being able to be changed (or reshaped / bent) but only slowly and with much resistance.
So, in this situation I am looking for an adjective that describes an inability to adapt to changing market conditions by shifting from one land use to another. In this case I specifically use the word «adaptable» in many places to describe the opposite, and given the context I think «unadaptable» will be better understood than any of the other suggestions, even though I am aware of (and agree with) the comments about it’s status as a rarely used and therefore imperfect choice.
Thank you all for the feedback!
You can mark a document as read-only and still allow changes to selected parts.
You can make these unrestricted parts available for anyone who opens the document, or you can grant permission to specific individuals so that only they can change the unrestricted parts of the document.
Protect a document and mark the parts that can be changed
-
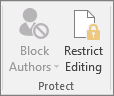
On the Review tab, in the Protect group, click Restrict Editing.

-
In the Editing restrictions area, select the Allow only this type of editing in the document check box.
-
In the list of editing restrictions, click No changes (Read only).
-
Select the part of the document where you want to allow changes.
For example, select a block of paragraphs, a heading, a sentence, or a word.
Tip: To select more than one part of the document at the same time, select the part that you want, then press CTRL and select more parts while you hold down the CTRL key.
-
Under Exceptions, do one of the following:
-
To allow anyone who opens the document to edit the part that you selected, select the Everyone check box in the Groups list.
-
To allow only particular individuals to edit the part that you selected, click More users, and then type the user names.
Include your name if you want to be able to edit that part of the document. Separate each name with a semicolon.
Important: If you intend to protect the document with user authentication rather than password protection, be sure to type e-mail addresses for user names.
-
Click OK, and then select the check boxes next to the names of the individuals that you are allowing to edit the part that you selected.
Note: If you select more than one individual, those individuals are added as an item to the Groups box, so that you can quickly select them again.
-
-
Continue to select parts of the document and assign users permission to edit them.
-
Under Start enforcement, click Yes, Start Enforcing Protection.
-
Do one of the following:
-
To assign a password to the document so that users who know the password can remove the protection and work on the document, type a password in the Enter new password (optional) box, and then confirm the password.
Note: Use this option if you want other people to be able to work on the document at the same time.
Use strong passwords that combine uppercase and lowercase letters, numbers, and symbols. Weak passwords don’t mix these elements. Strong password: Y6dh!et5. Weak password: House27. Passwords should be 8 or more characters in length. A pass phrase that uses 14 or more characters is better. .
Make sure you remember the password. If you forget the password, Microsoft cannot retrieve it. Store passwords you write down in a secure place away from the information they help protect.
-
To encrypt the document so that only authenticated owners of the document can remove the protection, click User authentication.
Note: Encrypting the document prevents others from working on the document at the same time.
-
Unlock a protected document
To remove all protection from a document, you might need to know the password that was applied to the document. Or you might have to be listed as an authenticated owner for the document.
If you are an authenticated owner of the document, or if you know the password for removing document protection, do the following:
-
On the Review tab, in the Protect group, click Restrict Editing.
-
In the Restrict Editing task pane, click Stop Protection.
-
If you are prompted to provide a password, type the password.
Make changes in a restricted document
When you open a protected document, Word restricts what you can change based on whether the document owner granted you permission to make changes to a specific part of the document.
The Restrict Editing task pane displays buttons for moving to the regions of the document that you have permission to change.
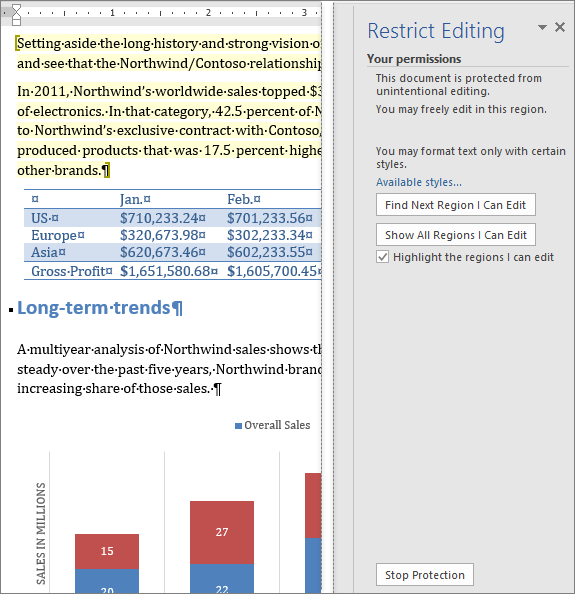
If you do not have permission to edit any parts of the document, Word restricts editing and displays the message, «Word has finished searching the document» when you click the buttons in the Restrict Editing task pane.
Find parts you can edit
If you close the Restrict Editing task pane and then try to make changes where you do not have permission, Word displays the following message in the status bar:
This modification is not allowed because the selection is locked.
To return to the task pane and find a region where you have permission to edit, do the following:
-
On the Review tab, in the Protect group, click Restrict Editing.
-
Click Find Next Region I Can Edit or Show All Regions I Can Edit.
See also
Information Rights Management in Office
Restrict or permit formatting changes
Add or remove protection in your document, workbook, or presentation
What is File Block?
What do you want to do?
-
Add protection and mark the parts that can be changed
-
Unlock a protected document
-
Make changes in a restricted document
Add protection and mark the parts that can be changed
-
On the Review tab, in the Protect group, click Restrict Editing.
-
In the Editing restrictions area, select the Allow only this type of editing in the document check box.
-
In the list of editing restrictions, click No changes (Read only).
-
Select the part of the document where you want to allow changes.
For example, select a block of paragraphs, a heading, a sentence, or a word.
Tip: To select more than one part of the document at the same time, select the part that you want, then press CTRL and select more parts while you hold down the CTRL key.
-
Under Exceptions, do one of the following:
-
To allow anyone who opens the document to edit the part that you selected, select the Everyone check box in the Groups list.
-
To allow only particular individuals to edit the part that you selected, click More users, and then type the user names.
Include your name if you want to be able to edit that part of the document. Separate each name with a semicolon.
Important: If you intend to protect the document with user authentication rather than password protection, be sure to type e-mail addresses, not Microsoft Windows or Windows Vista user accounts, for user names.
-
Click OK, and then select the check boxes next to the names of the individuals that you are allowing to edit the part that you selected.
Note: If you select more than one individual, those individuals are added as an item to the Groups box, so that you can quickly select them again.
-
-
Continue to select parts of the document and assign users permission to edit them.
-
Under Start enforcement, click Yes, Start Enforcing Protection.
-
Do one of the following:
-
To assign a password to the document so that users who know the password can remove the protection, type a password in the Enter new password (optional) box, and then confirm the password.
Note: You must use this option if you intend to post the document so that multiple people can work on it at the same time.
Use strong passwords that combine uppercase and lowercase letters, numbers, and symbols. Weak passwords don’t mix these elements. Strong password: Y6dh!et5. Weak password: House27. Passwords should be 8 or more characters in length. A pass phrase that uses 14 or more characters is better.
It is critical that you remember your password. If you forget your password, Microsoft cannot retrieve it. Store the passwords that you write down in a secure place away from the information that they help protect.
-
To encrypt the document so that only authenticated owners of the document can remove the protection, click User authentication.
Note: Encrypting the document prevents authoring by more than one person at the same time.
For more information about user authentication, see Information Rights Management in Office 2010.
-

Unlock a protected document
To remove all protection from a document, you might need to know the password that was applied to the document. Or you might have to be listed as an authenticated owner for the document.
If you are an authenticated owner of the document, or if you know the password for removing document protection, do the following:
-
On the Review tab, in the Protect group, click Restrict Editing.
-
In the Restrict Formatting and Editing task pane, click Stop Protection.
-
If you are prompted to provide a password, type the password.
Make changes in a restricted document
When you open a protected document, Microsoft Word 2010 restricts what you can change based on whether the document owner granted you permission to make changes to a specific part of the document.
The Restrict Formatting and Editing task pane displays buttons for moving to the regions of the document that you have permission to change.
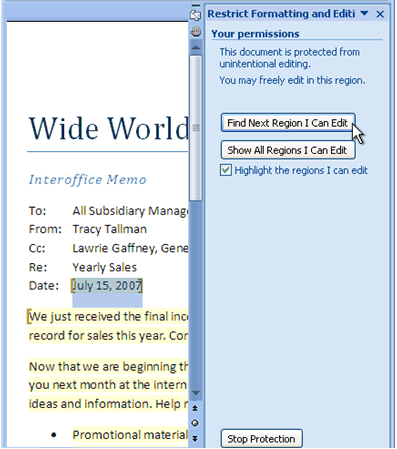
If you do not have permission to edit any parts of the document, Word restricts editing and displays the message, «Word has finished searching the document» when you click the buttons in the Restrict Formatting and Editing task pane.
Open the Restrict Formatting and Editing task pane
If you close the task pane and then try to make changes where you do not have permission, Word displays the following message in the status bar:
This modification is not allowed because the selection is locked.
To return to the task pane and find a region where you have permission to edit, do the following:
-
On the Review tab, in the Protect group, click Restrict Editing.
-
Click Find Next Region I Can Edit or Show All Regions I Can Edit.
See also
Information Rights Management in Office
Restrict or permit formatting changes
Add or remove protection in your document, workbook, or presentation
What is File Block?
Important:
Office 2007 is no longer supported. Upgrade to Microsoft 365 to work anywhere from any device and continue to receive support.
Upgrade now
What do you want to do?
-
Add protection mark the parts that can be changed
-
Unlock a protected document
-
Make changes in a restricted document
Add protection mark the parts that can be changed
-
On the Review tab, in the Protect group, click Protect Document, and then click Restrict Formatting and Editing.
-
In the Editing restrictions area, select the Allow only this type of editing in the document check box.
-
In the list of editing restrictions, click No changes (Read only).
-
Select the part of the document that you want to be unrestricted.
For example, select a block of paragraphs, a heading, a sentence, or a word.
Tip: To select more than one part of the document at the same time, select the part that you want, then press CTRL and select more parts while you hold down the CTRL key.
-
Under Exceptions, do one of the following:
-
To allow anyone who opens the document to edit the part that you selected, select the Everyone check box in the Groups list.
-
To allow only particular individuals to edit the part that you selected, click More users, and then type the user names. Separate each name with a semicolon. Click OK, and then select the check boxes next to the names of the individuals that you are allowing to edit the part that you selected.
Important: If you intend to protect the document with user authentication rather than password protection, be sure to type e-mail addresses, not Microsoft Windows or Windows Vista user accounts, for user names.
Note: If you select more than one individual, those individuals are added as an item to the Groups box, so that you can quickly select them again.
-
-
Continue to select parts of the document and assign users permission to edit them.
-
Under Start enforcement, click Yes, Start Enforcing Protection.
-
Do one of the following:
-
To assign a password to the document so that users who know the password can remove the protection, type a password in the Enter new password (optional) box, and then confirm the password.
Use strong passwords that combine uppercase and lowercase letters, numbers, and symbols. Weak passwords don’t mix these elements. Strong password: Y6dh!et5. Weak password: House27. Passwords should be 8 or more characters in length. A pass phrase that uses 14 or more characters is better.
It is critical that you remember your password. If you forget your password, Microsoft cannot retrieve it. Store the passwords that you write down in a secure place away from the information that they help protect.
-
To encrypt the document so that only authenticated owners of the document can remove the protection, click User authentication.
-

Unlock a protected document
Having permission to make changes in the document is not the same as having permission to remove protection from the document. Even in a document where everyone has permission to make changes to the content, only those individuals who are authenticated owners or who type the correct password have permission to remove protection.
If you are an authenticated owner of the document, or if you know the password for removing document protection, do the following:
-
On the Review tab, in the Protect group, click Protect Document, and then click Restrict Formatting and Editing.
-
In the Restrict Formatting and Editing task pane, click Stop Protection.
Make changes in a restricted document
When someone opens a protected document, Microsoft Office Word 2007 restricts changes based on whether the person has been granted permission to make changes to a specific part of the document. When the document is opened, the Restrict Formatting and Editing task pane displays buttons for moving to editable regions of the document. If permission has been granted for Everyone to be able to make changes to parts of the document, anyone who opens the document can move to the parts they can change by clicking Find Next Region I Can Edit.
If permission has been granted for only specific individuals to be able to make changes to parts of the document, only those individuals can move to the parts they can change. For everyone else, Office Word 2007 restricts editing and displays the message, «Word has finished searching the document» when they click the buttons in the Restrict Formatting and Editing task pane.
Open the Restrict Formatting and Editing task pane
If you close the task pane and then attempt to make changes where you do not have permission, Word 2007 displays in the status bar the following message:
This modification is not allowed because the selection is locked.
To return to the task pane and find a place where you have permission to edit, do the following:
-
On the Review tab, in the Protect group, click Protect Document, and then click Restrict Formatting and Editing.
-
Click Find Next Region I Can Edit or Show All Regions I Can Edit.
See also
Add or remove protection in your document, workbook, or presentation
- capricious
- fickle
- fluctuating
- mercurial
- protean
- shifting
- unpredictable
- unsettled
- unstable
- varying
- volatile
- changeful
- mutable
- agitated
- commutative
- convertible
- fitful
- flighty
- fluid
- impulsive
- inconstant
- indecisive
- irregular
- irresolute
- irresponsible
- kaleidoscopic
- mobile
- movable
- permutable
- restless
- reversible
- revocable
- skittish
- spasmodic
- transformable
- transitional
- uncertain
- unreliable
- unsteady
- vacillating
- vagrant
- variable
- variant
- versatile
- wavering
- whimsical
On this page you’ll find 128 synonyms, antonyms, and words related to changeable, such as: capricious, fickle, fluctuating, mercurial, protean, and shifting.
Roget’s 21st Century Thesaurus, Third Edition Copyright © 2013 by the Philip Lief Group.
TRY USING changeable
See how your sentence looks with different synonyms.
How to use changeable in a sentence
He’s an enigma as vast and changeable and cruel as the open sky, yet even he is capable of succumbing to enchantment, and Cumberbatch pulls off every azure-to-thundercloud shift with dazzling ease.
THE 10 BEST MOVIE PERFORMANCES OF 2021STEPHANIE ZACHAREKDECEMBER 14, 2021TIME
If the antibodies could bind to the stable protein “stem” instead of its changeable “head,” they could protect against any flu strain, and people wouldn’t need to get new shots year after year.
ONE-SHOT FLU SHOTKATIE MCLEANDECEMBER 18, 2020MIT TECHNOLOGY REVIEW
While it is true that on occasion an inspector will find an issue or two that might be of real concern not only for the buyer but for the seller, on most occasions home inspectors find issues that are fixable, livable, or changeable.
INSPECTIONS, ELECTRICAL PANELS, AND ROOFS, OH MY!JOSEPH HUDSONDECEMBER 11, 2020WASHINGTON BLADE
His temper is violent and changeable, but he has excellent manners and is full of tact.
PAUL PATOFFF. MARION CRAWFORD
SYNONYM OF THE DAY
OCTOBER 26, 1985
WORDS RELATED TO CHANGEABLE
- AC-DC
- adjustable
- all around
- alterable
- can-do
- changeable
- compliant
- conformable
- convertible
- ductile
- easygoing
- flexible
- hanging loose
- malleable
- modifiable
- moldable
- plastic
- pliable
- pliant
- resilient
- supple
- switch-hitting
- tractable
- variable
- versatile
- accommodating
- adaptable
- changeable
- conformable
- flexible
- malleable
- modifiable
- pliable
- tractable
- altering
- alternating
- changeable
- developing
- dynamic
- growing
- inconstant
- irresolute
- mobile
- modifying
- uncertain
- unstable
- unsteady
- wavering
- capricious
- changeable
- crazy
- empty-headed
- fatuous
- feather-brained
- fickle
- foolish
- frivolous
- giddy
- harebrained
- heady
- inane
- light-headed
- silly
- skittish
- unstable
- aberrant
- abnormal
- anomalous
- arbitrary
- bizarre
- capricious
- changeable
- desultory
- devious
- dicey
- directionless
- dubious
- eccentric
- fitful
- flaky
- fluctuant
- idiosyncratic
- iffy
- incalculable
- inconsistent
- inconstant
- irregular
- meandering
- mercurial
- nomadic
- oddball
- peculiar
- planetary
- rambling
- roving
- shifting
- spasmodic
- strange
- stray
- uncertain
- undirected
- unnatural
- unreliable
- unstable
- unusual
- vagarious
- variable
- volatile
- wayward
- weird
- whimsical
- capricious
- changeable
- changeful
- cheating
- deceitful
- dishonest
- double-crossing
- double-dealing
- doubting
- dubious
- false
- fickle
- fluctuating
- inconstant
- perfidious
- recreant
- skeptical
- traitorous
- treacherous
- two-faced
- two-timing
- unbelieving
- unconverted
- unfaithful
- unloyal
- unreliable
- unstable
- untrue
- untrustworthy
- untruthful
- wavering
Roget’s 21st Century Thesaurus, Third Edition Copyright © 2013 by the Philip Lief Group.
Loading
- Remove From My Forums
-
Question
-
I’ve been working on a document in Word 2016 for the past few days and, starting this morning, I’m no longer able to override the default table cell margins on a cell-by-cell basis. In more detail, I used to be able to do the following to change the margins
for one cell in a table:- In the document, place the cursor inside a table cell
- On the ribbon, click the Table Tools > Layout
tab - In the Table tool area, click Properties
- In the Table Properties dialog, click the Cell tab
- Click Options
- In the Cell Options dialog, for Cell margins, uncheck the
Same as the whole table checkbox - Change the margins for one or more of the Top, Bottom,
Left, or Right boxes - Click OK to dismiss the Cell Options dialog
- Click OK to dismiss the Table Properties dialog
As of today, this method does not work anymore. Instead, the workflow above does nothing, and repeating the workflow shows that the
Same as the whole table checkbox is automatically re-checked each time I get to that step.Fearing a corrupt document, I started a new document using the built-in
Blank document template, but experienced the same behavior. I checked for updates (there were none), rebooted, and started another blank document, to no avail. Finally, I deleted my Normal.dotm template and created a new blank document, but the behavior
persists.I’m assuming that I’m doing something differently than I’ve done in the past, but I can’t figure out what it is. Does anyone have any suggestions on what I can do differently to override the default cell margins for a Word table for an individual cell?
Thanks, in advance, for your help.
Users with normal vision may like to use their computer in light mode, whereas some users, especially people with contract problems may prefer dark mode. Also, it is better to work with the light mode in bright light conditions and dark mode at the night or in dark environments.
Now, Microsoft Office allows you to easily switch between dark, light, colorful, dark grey, and system themes. This feature is mostly available to Microsoft Office 365, Office 2019, and Office 2016. However, Office’s dark grey, colorful, and system themes are only available to Microsoft 365 version. Also, if you have Microsoft 365, you can use the new dark mode feature for your Office apps.
When you use the new black theme (dark mode) for the Word, it will not only change the theme of the toolbar and Ribbon but also the writing canvas of the Word document. The background and theme you apply in one Office app (e.g. Word) will change the theme and background of all the apps in the Office suite to provide a unified experience.
In this tutorial, we will show you how to personalize the theme and background of MS Word (Office apps), and change the Word to ‘light’ or ‘dark’ mode.
Change Word to Light Mode (applies to All Office Apps)
Most of the computer interfaces and software uses light theme/mode for displaying content because this mode resembles the look of ink on paper, making texts more readable than other themes.
Light Mode, also known as Positive contrast polarity, is the classic black text on white background. If you have normal vision or are in a bright environment, this mode helps you digest information much easier. In the light background, there’ll be more light, hence pupils don’t need to dilate more to let in more light, which makes it easy for your eyes to comprehend the information.
By default, the Office apps (including Word) are set to ‘use system settings’ (Windows theme) or ‘Colorful’, but you can change the look and feel of all your Office programs by changing the Office Theme or background. As we mentioned before, when you change the theme of one of the Office apps, it automatically carries your Office themes across the suite to all apps. To change the Microsoft Word theme to the ‘White’ theme (light mode), follow these steps:
Switch to Light Mode from Account Settings
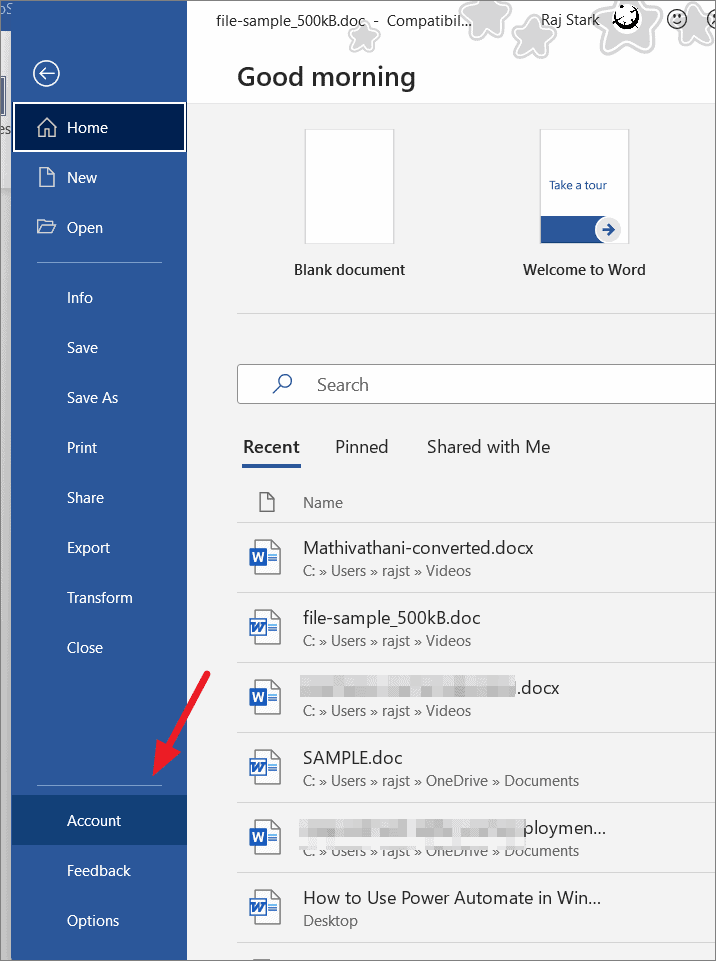
First, open the Microsoft Word application (or Excel, PowerPoint, OneNote, and Outlook), then click the ‘File’ menu at the top left corner of the program.

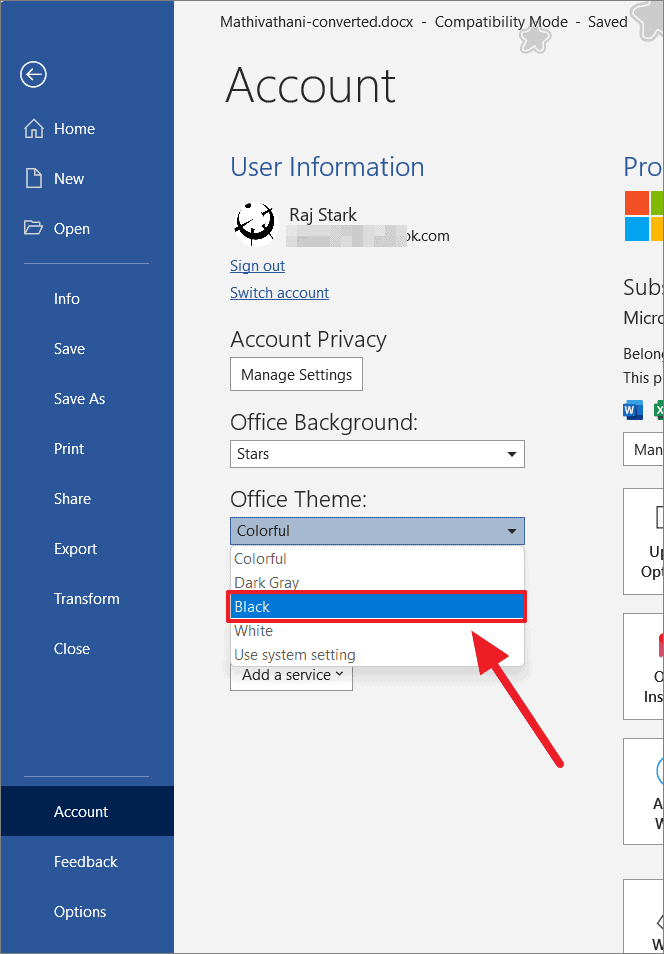
In the Word Backstage view, select ‘Account’ on the left panel.
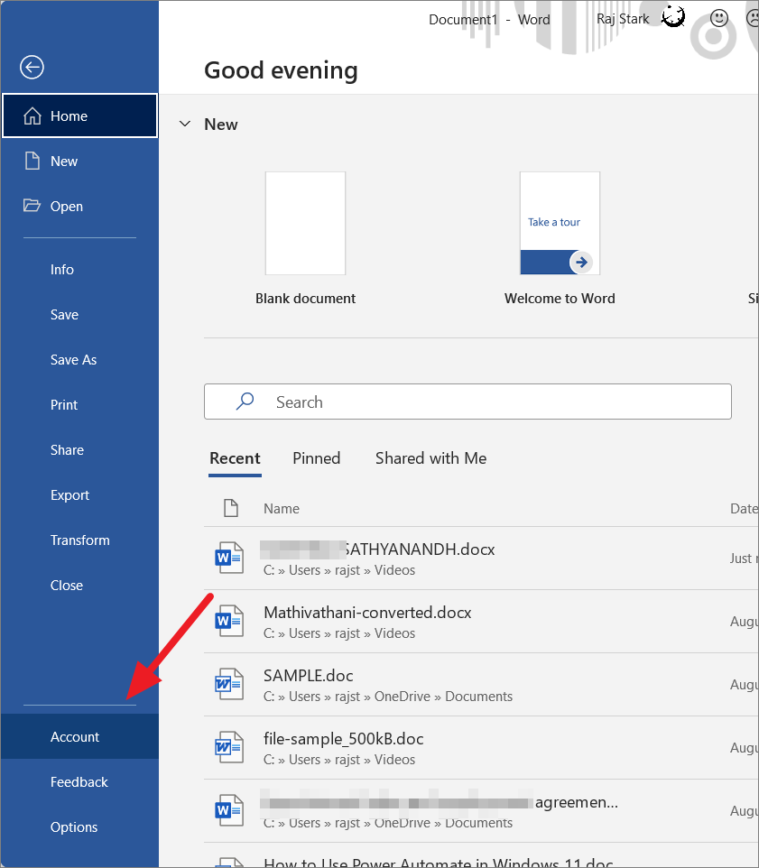
On the Account page, click or tap the ‘Office Theme’ drop-down list and choose the theme you want: Black, Dark Gray, Colorful, or White. Since we want light mode, we’re selecting the ‘White’ theme here.

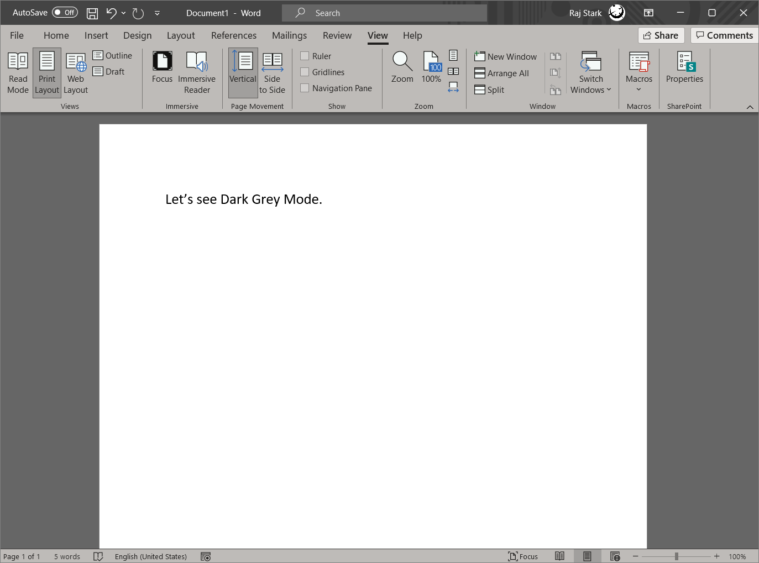
As you can see, the title bar, ribbon, canvas, borders, everything is in white now (light mode).
To be honest, the difference between the white theme and the default ‘Colorful’ theme is subtle. In the ‘Colorful’ theme, the title bar would be in blue and the ribbon and the window would be in light-grey (nearly white) color. On the ‘White’ theme everything would be in White color.
The real difference in the appearance of the app is when you change the theme to ‘Dark Grey’ and ‘Black’ (Dark Mode).
Switch to Light Mode from Word Options Screen
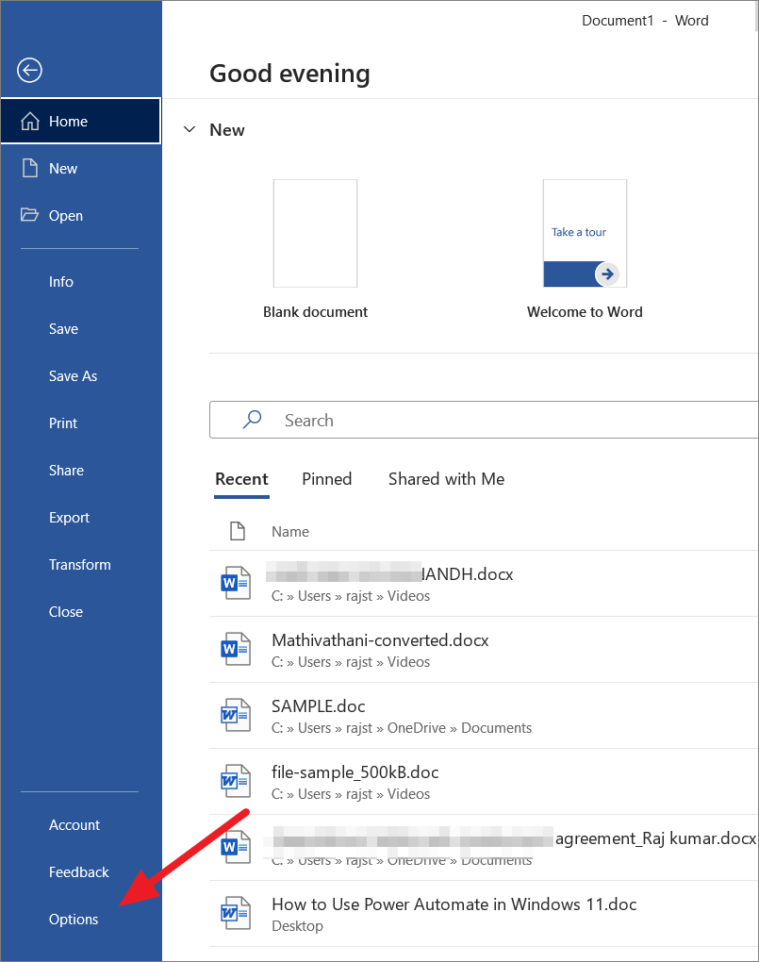
Open Microsoft Word, then click the ‘File’ menu in the Ribbon. Then, select ‘Options’ at the bottom of the left panel in the backstage view.
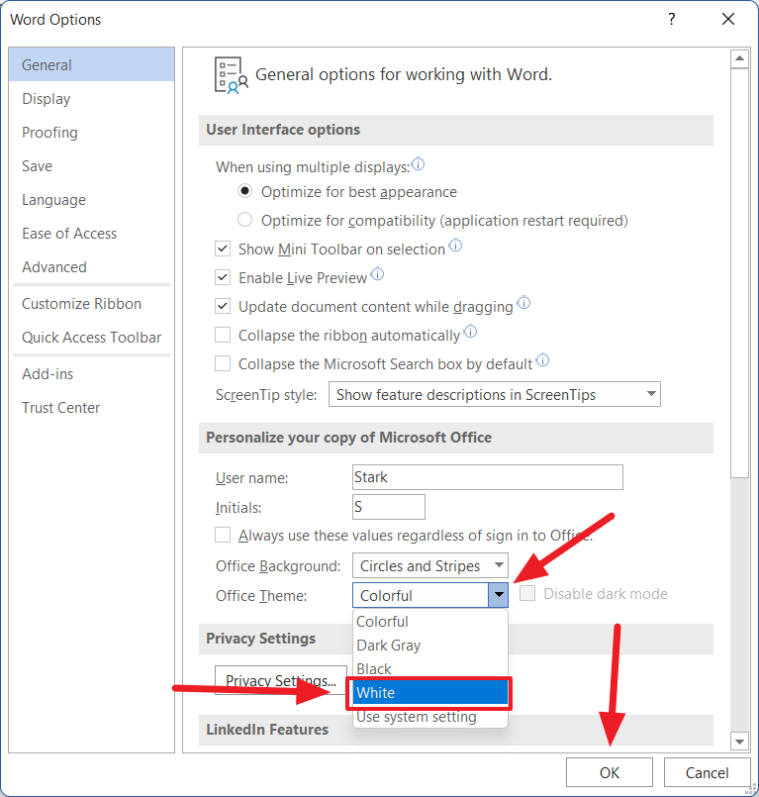
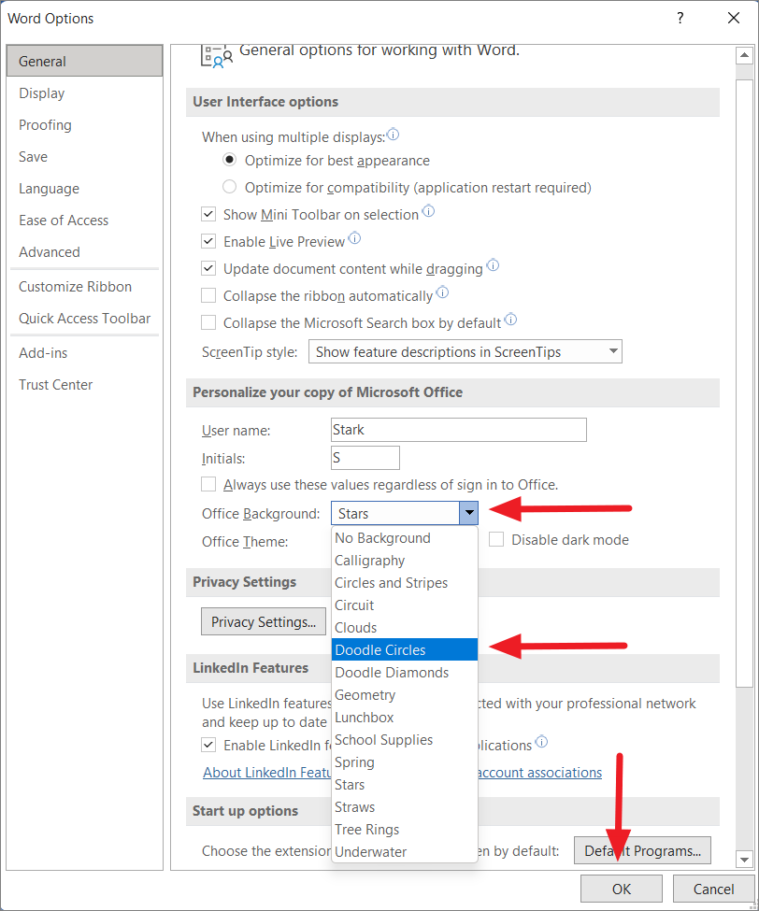
The Word Options window will appear. There, make sure the ‘General’ tab is selected in the left pane and look for the ‘Personalize your copy of Microsoft Office’ section on the right.

Under the ‘Personalize your copy of Microsoft Office’ section, click the drop-down menu next to the ‘Office Theme’ and choose ‘White’ for light mode. Then, click ‘OK’ to apply.
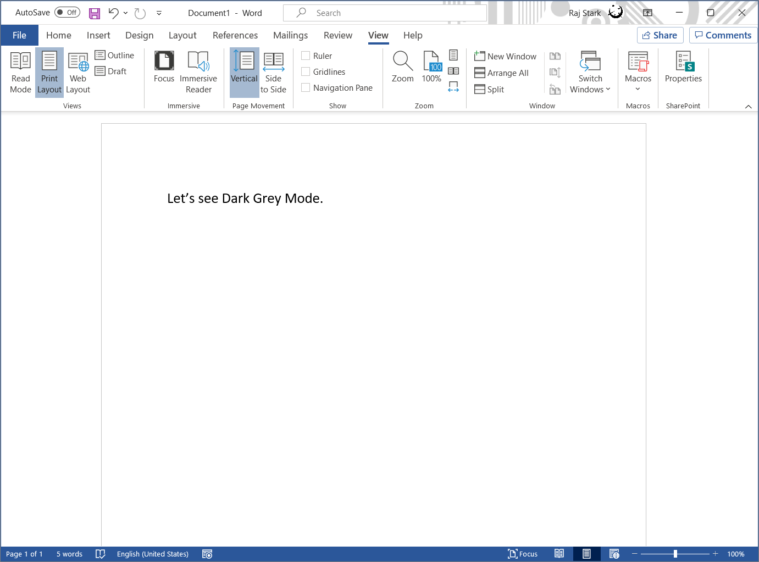
Try the Dark Grey Theme too
Let’s see how the ‘Dark Grey’ theme looks on Word. To do that, follow the same above instructions and choose the ‘Dark Grey’ theme from the ‘Office Theme’ drop-down.

This is how the Word looks in the Dark Grey theme.
How to Change Microsoft Word Background (applies to all Office apps)
Microsoft Office apps also allow you to change the background of your apps. There are several backgrounds pattern you can choose from like clouds, spring, underwater, and more.
To change the background, open Microsoft Word and click the ‘File’ menu. Next, click ‘Options’ from the left sidebar and select the ‘General’ tab. Then, choose a background pattern from the ‘Office Background’ drop-down list under the ‘Personalize your copy of Microsoft Office’ section.
How to Enable Dark Mode in Word
If you’re a night owl who tends to stay up until late at night, working on your Word documents, MS Word can strain your eyes and damage your retinas with its bright white coloring. To address this issue, Microsoft Office introduced a new black theme (dark mode).
For people with cataracts and related disorders or people who work in low light environments, the dark mode can reduce eye strain and accommodate light sensitivity. In the dark mode, you will read and write white texts on a dark background which makes it more stylish and appealing than the light mode. Also, Dark mode helps you reduces battery usage especially if you’re using an OLED screen.
The dark mode was also available in the previous version but it only changes the theme of the ribbon and toolbars, while the writing canvas stays bright white. But with the new Dark Mode, the dark theme includes the document canvas as well. Unfortunately, this full black theme is only available in Microsoft 365.
To turn on Dark Mode in the Word, Open Microsoft Word (or any other Office app) and click the ‘File’ menu in the ribbon. Then, click ‘Account’ in the sidebar.
On the right, change the dropdown below Office Theme to ‘Black’.
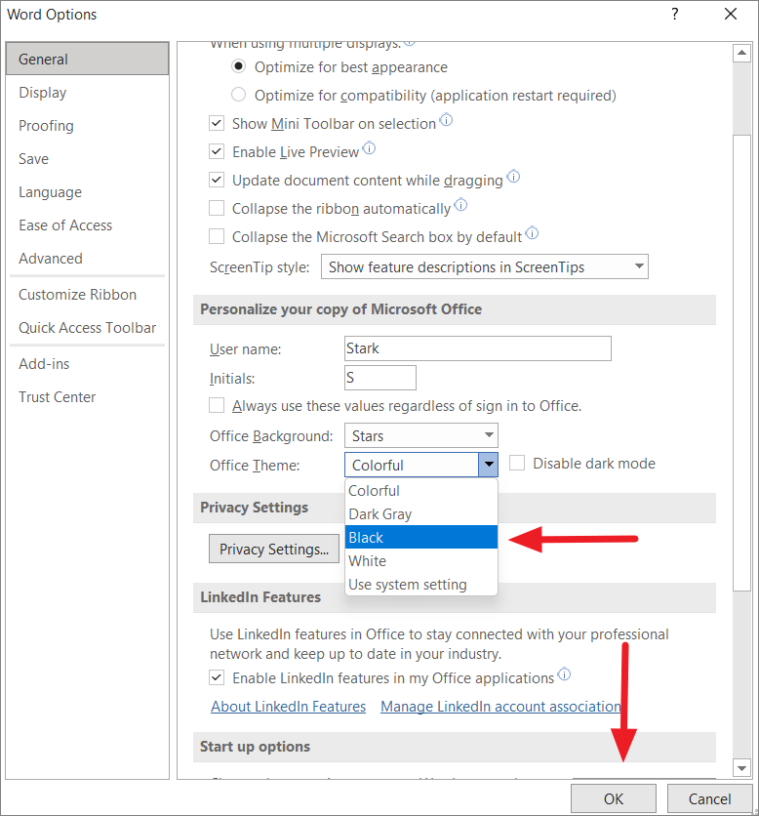
Alternatively, you can click the ‘Options’ in the backstage view. Then, choose the ‘Black’ theme from the drop-down menu next to the ‘Office Theme’ under the ‘Personalize your copy of Microsoft Office’ section in the Word options. Then, click ‘OK’ to apply
Now, Microsoft Word (and other Office apps) will automatically run in a dark mode as shown below. As you can see, the toolbar, ribbon as well as canvas are in full black color, and colors (texts) within your document will automatically adjust to accommodate the new color contrast.
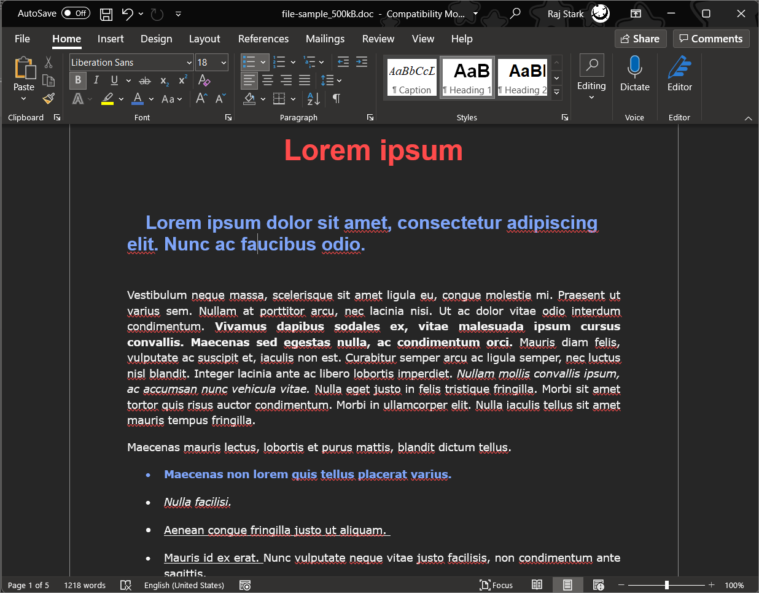
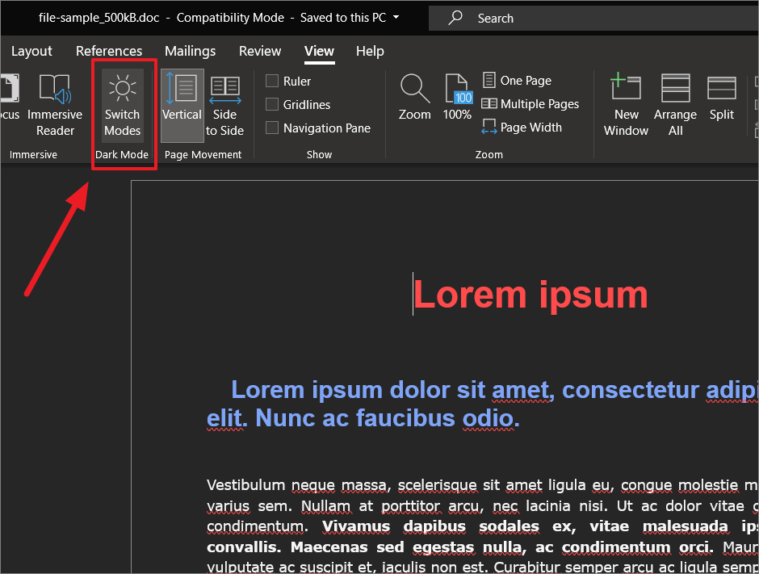
Quickly Switch Between Dark and Light Modes
Once you applied the Black theme, you can easily switch between the black and white page background colors without having to switch the theme. This is helpful if some of the contents of documents are not displayed correctly in the Black theme. Here’s how you do that:
After the black theme is selected, go to the ‘View’ tab in Word Ribbon, you’ll see a new button – ‘Switch Modes’ in the ‘Dark mode’ section. Click/Toggle the ‘Switch Modes’ (sun icon) to change the background page color to white.
Doing this will change the editor back to a light mode (temporarily) while leaving the ribbon, background, title bar, and status bars black (as shown below).
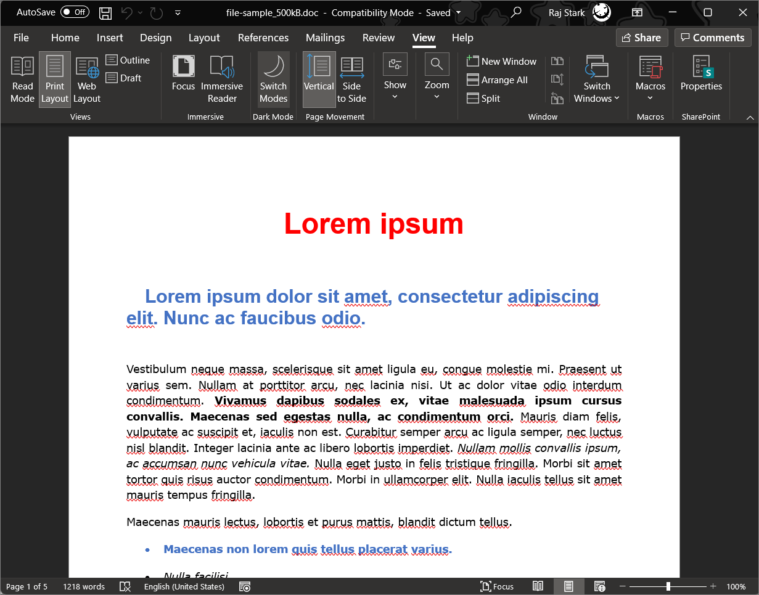
To turn the editor back to black (dark mode), click the ‘Switch Modes’ button again (this time, it will be a moon icon).

How to Disable Dark Mode (But Keep the Black Theme)
You can also change the editor back to white canvas (permanently) while keeping the black theme of ribbon, background, and status bars. Here’s how:
Go to File > Options > General, then check the ‘Disable dark mode’ box (next to Office Theme drop-down) under the Personalize your copy of Microsoft Office section.
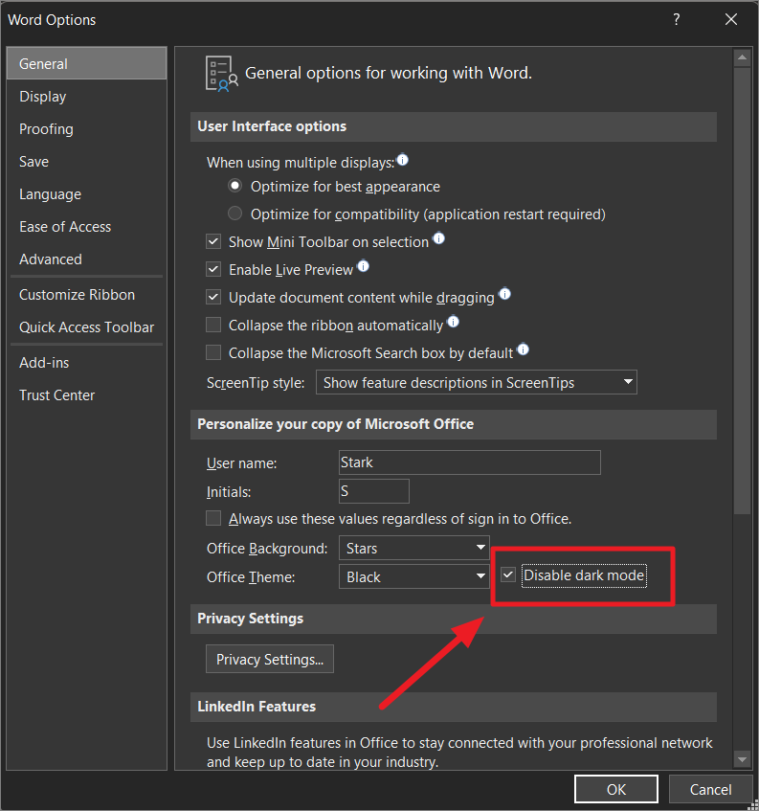
This will always keep the editor page color white while maintaining the black theme.
That’s it.