
‘MIX OF TWO SONGS INTO ONE’ is a 20 letter
Phrase
starting with M and ending with E
Crossword answers for MIX OF TWO SONGS INTO ONE
| Clue | Answer |
|---|---|
|
|
|
|
MIX OF TWO SONGS INTO ONE (6) |
MASHUP |
Synonyms for MASHUP
5 letter words
Top answer for MIX OF TWO SONGS INTO ONE crossword clue from newspapers
Thanks for visiting The Crossword Solver «Mix of two songs into one».
We’ve listed any clues from our database that match your search for «Mix of two songs into one». There will also be a
list of synonyms for your answer.
The answers have been arranged depending on the number of characters so that they’re easy to
find.
If a particular answer is generating a lot of interest on the site today, it may be highlighted in
orange.
If your word «Mix of two songs into one» has any anagrams, you can find them with our anagram solver or at this
site.
We hope that you find the site useful.
Regards, The Crossword Solver Team
More clues you might be interested in
- thousand years
- apple music player
- tap
- out-and-out
- african desert
- modern art
- semantic
- prepared for battle
- idiot
- made up one’s mind
- redoubt
- arcade game
- stretch out
- reach out
- yin’s opposite
- ex-president
- photography
- condescend
- express your view
- skin specialist
- plateau
- resignation
- customs duty
- before, in poetry
- heavy blow
- domed building
- witchcraft
- wilful
- stumpy
- gain
Generated music names
Mood: All Genre: All
You created a musical track or a beat and wondering how to name it? Beat Name Generator will give you amazing music names ideas for all kind of instrumental music and beats. Whether it’s an edm, trap, lo fi, drum, r&b, rap, hip-hop, pop, electronic or house. Our Beat Name Generator will help you get ideas fast and save time.
Music need good names to be easily remembered, but often coming up with perfect names for them is not easy, it can be tougher than creating them, and you don’t just want basic names for your music! This beat title generator will make this process easy for you and give you creative beat names, instrumental music names instantly.
You can choose a mood, a genre or both, and we will give you a list of cool and meaningful music names ideas to choose from with a random element to help mix things up.
Beat Name Generator is a very helpful tool for musicians who make a lot of music. For example, many musicians create Royalty Free music or beats and they sell it or give for free. Also instrumental music is created more and more these days, especially for background music like music to be played for relaxation or during study, work, etc.
If you are making music then most probably you need our Music Names Generator to help you ease the task of finding names for all the songs and beats you produce.
Music Name Generator is focused on instrumental music but many of the generated titles work perfectly as song names (non-instrumental) as well. So you can consider it as music name generator, or song name generator if you like.
How to use Beat Name Generator?
Simply choose a mood or a genre you want names for from the options (drop-down list) then click on the GENERATE button to get 20 creative random names at once in seconds. The music names will appear below, you can explore them and select the best for your beat/music piece. The generator convey 7 general moods and 10+ popular genres of music, but many names could fit various genres anyway.
You can generate names again as many times as you want until you find the perfect name for your beat/music.
By default, Beat Name Generator will create names from all genres and moods, so make sure you select the ones that you need from the drop down list at the top of the page.
We also added SEARCH SPOTIFY button under every generated name that helps you to find out whether your choice is unique or not. It also show you the similar tracks to your choice from Spotify platform if they exist. There are “Star” button to save names you like and “Copy” button as well.
The moods are as follows:
- Happy: Here the titles created by this generator will be about future, peace, adventure, having a good time, chilling and other similar themes.
- Romance: This mood has a lot of popularity. The titles in generator will be related to making it generally about waiting lovers, kisses, night, dreams and similar themes.
- Sleep: The titles here will have themes such as relax moments, beautiful dreams, and other smooth vibes.
- Party: One of the most popular moods. Most of titles will be about Celebration, having fun, party themes, energy themes and similar themes.
- Relax: Generated ideas for relaxing music names will be about relaxing and calming state of mind.
- Sad: This generator will generate titles about broken dreams, pain and hurt and other darker themes of sadness.
Genres you can choose from
- Pop: The generated names will be the most familiar since Pop is the most popular genre. Simple and cool music/song names.
- Rock: Popular words across Rock genre. Again simple names and a bit more strong expressions.
- Hip Hop/Rap: Music Names ideas that focus on self-expression and using street words.
- Electronic/Dance: Popular words and sentences in the Electronic/Dance genres about that are easy to remember.
- R&B/Soul: Smooth and simple song names from the Rock and Blues genre about love, independence, the future and similar themes.
- Jazz: Romantic, Love, Jazz music instruments, more focused on human feelings.
- Blues: Generated music names with pain and sorrow feelings.
- Country/Folk: Folk-related topics like love, family, values and life issues.
- Classical: It is known that old classical music have no real names like other genres, but contemporary classical music composers put names for their music pieces. The names generated are quiet and meaningful in general.
- Latin: Music names with passion words from Latin America and Spain about Flamenco, Bossa Nova and other genres.
How does Music/Beat Name Generator work?
Beat Name Generator generates random names by mixing up hundreds of words and short sentences that were been used for beat music over the past few years, Also every genre/mood has its specific words data with some nifty tweaks to get you thousands of possible choices to pick up or inspire the ideal name for your masterpiece .
Please note that all those names are 100% random and not copied from anywhere else. A few of the generated names may not be grammatically correct, or may not make much sense due to the randomization. However, this is sometimes also the case for real music names, but you can still use them for inspiration or you can substitute one word for a more beautiful one. Anyway, you can simply find other hundreds of good names with this beat name generator that will give you 20 random music names every single click.
Here are some creative names examples generated using this generator:
- Solo Decisions
- Endless Shop Loop
- Not Enough love
- Mozart Effect
- Love Doesn’t Need Valentine Day
- In Case Of hope
- Shadows Of Beauty
- Lost With Dreams
- Dreamy April
- Instrumental Taste
- True Color Of Life
- Missing Future
- Extreme Beauty
- Rhythm Of Hysteria
- School Of Rap
- Electro will
- Overused Feelings
- Cool Shuffle
- Blue Chicago Blues
- Classica Samba
- White Light
- Crazy Eyes
- Mess Of Soul
- Dark Ocean
Are you a frustrated DIY musician?
Irritated that the songs you’re cooking up in your home studio just aren’t sounding that good?
You need to learn the art of mixing. And you don’t need an expensive studio to do it.
You can learn to mix in your own bedroom!
By the end of this article, you’ll have everything you need to start mixing your own songs.
But before we get started, make sure to grab a copy of our FREE Mixing Cheat Sheet Essentials.
It’s got all of the how-to graphics from this guide, plus a few BONUS tips and tricks to help make your mixes sound like the pros.
Grab all 15 cheat sheets here:
What IS Mixing?
So before we get into how to mix a song, we need to figure out what mixing actually is.
When I first started mixing, I thought it was just about putting cool effects on the vocals and guitars. I’d spend hours tweaking my delays and phasers, only to be disappointed that my mix still sounded like trash.
It took me almost a year to realize that effects are only a small piece of the puzzle. What you’re doing with mixing is much, much bigger.
So what is mixing? Mixing is the process of using tools like volume faders, compressors, EQs, and reverbs to make the individual tracks of a song sound balanced and emotional.
In other words, mixing is the process of making your recordings sound like a song instead of a collection of raw tracks.
To learn about the two main goals of mixing, check out our video below:
ARVE Error: Invalid URL “https://www.youtube.com/watch?v=R6heNIvinN4” in url
To make your song ready for the radio, you need to learn how to mix it.
Luckily, that’s exactly what you’ll be learning today, step-by-step. Today we’ll be going over the 8 Steps of Mixing:
- Step 1: Prep
- Step 2: Volume Balance
- Step 3: Compression
- Step 4: EQ
- Step 5: Space (Panning, Reverb, and Delay)
- Step 6: Volume Automation
- Step 7: Effects
- Step 8: Final Checks
[A quick note: there will be a lot of words in this article that will likely be new to you! If you come across any that confuse you, check out our Audio Terms Glossary here for a little help.]
Step 1: Prep
Before you can begin to mix, you have to prep your session. The more organized you are, the faster you’ll mix.
It also keeps you from getting overwhelmed by the mess of audio files you have. A good prep will even improve the quality of the audio!
There’re 12 steps involved with prepping your session. Check them out below:
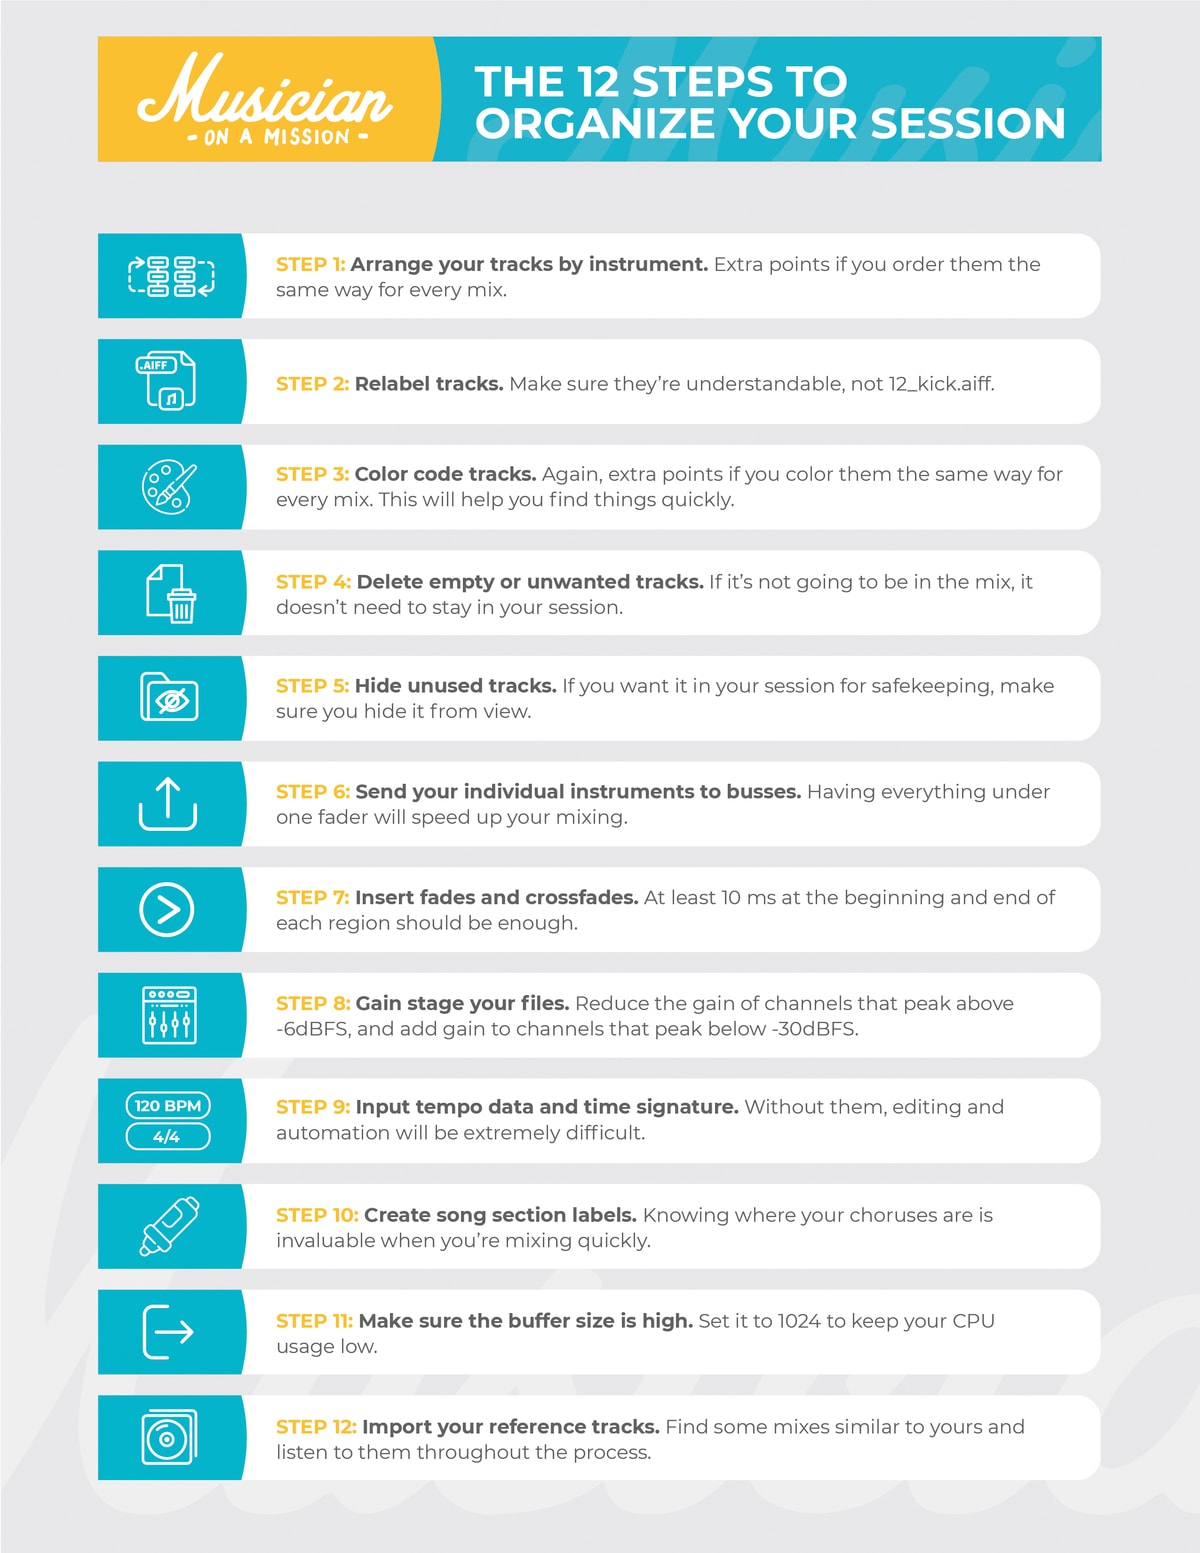
Most of these steps are pretty self-explanatory, but there are a few I want to elaborate on. Let’s check them out.
UPDATE: Want some tips on a great mix prep workflow? Check out our latest video:
What are Busses?
Bussing is a marvel.
If you’re unfamiliar, it’s when you change the outputs of each recording of a certain instrument to the same “bus.” All of the recordings are then directed to one aux track that you can use as a “master fader” for your instrument.
Think of it this way:
A school bus picks up each of the students at their houses and then takes them to a single place – the school. This is exactly what bussing is doing with your recordings.
Essentially, you are routing all of your recordings of an instrument into a single track.
From there, any plugins that you add get applied to every single one of those recordings.
Not only does it help “glue” your track together, but it massively cuts the number of plugins you need to finish a mix.
For example, imagine you had three different acoustic guitar parts, each with two microphones. You’d have to use six different compressors just to control their dynamics.
But with bussing, rather than six compressors, you just need one. That means you’re going to mix faster and you’re going to save a huge amount of CPU.
Not only that, but you’re compressing multiple parts at once. So it creates the feeling that all of the individual tracks are part of the same instrument.
It glues them together, so to say.
Do this with all of your instruments, and your mixes will get finished faster and sound better!
What Are Crossfades?
If you’re splicing two audio regions together, you’ll want to apply a crossfade. A crossfade will fade out the audio clip on the left at the same time as it fades in the clip on the right.
That means that any tracks you’ve cut together will transition smoothly. Without a crossfade, you’ll hear a nasty pop where the two audio regions meet.

When creating crossfades, use at least 10 ms. That should be enough.
Most DAWs have a way to apply fades and crossfades to an entire session. Do a little Google research to figure out how your DAW’s fade system works to save some time.
What Is Gain Staging?
Let’s take a quick trip back to the 1960s.
Back before computers, studios had sound consoles and “outboard gear” to mix their songs.
Because of the analog nature of this tech, you had to record your tracks at a certain volume level to make sure they didn’t sound too noisy.

Because of that, most of those old mixing tools were made to sound best when they processed audio at that level… This is what we now refer to as the Sweet Spot in mixing.
Let’s fast-forward to today.
Most of the mixing tools you will use – compressors, EQs, reverbs, and so on – are based on those old models from the analog age. That means their Sweet Spot still exists!
So the point of gain staging is to make sure your audio is the right volume to hit the all-coveted Sweet Spot.
So what is the Sweet Spot? 0 dBVU.
To learn how to gain stage your tracks, check out the step-by-step graphic below:
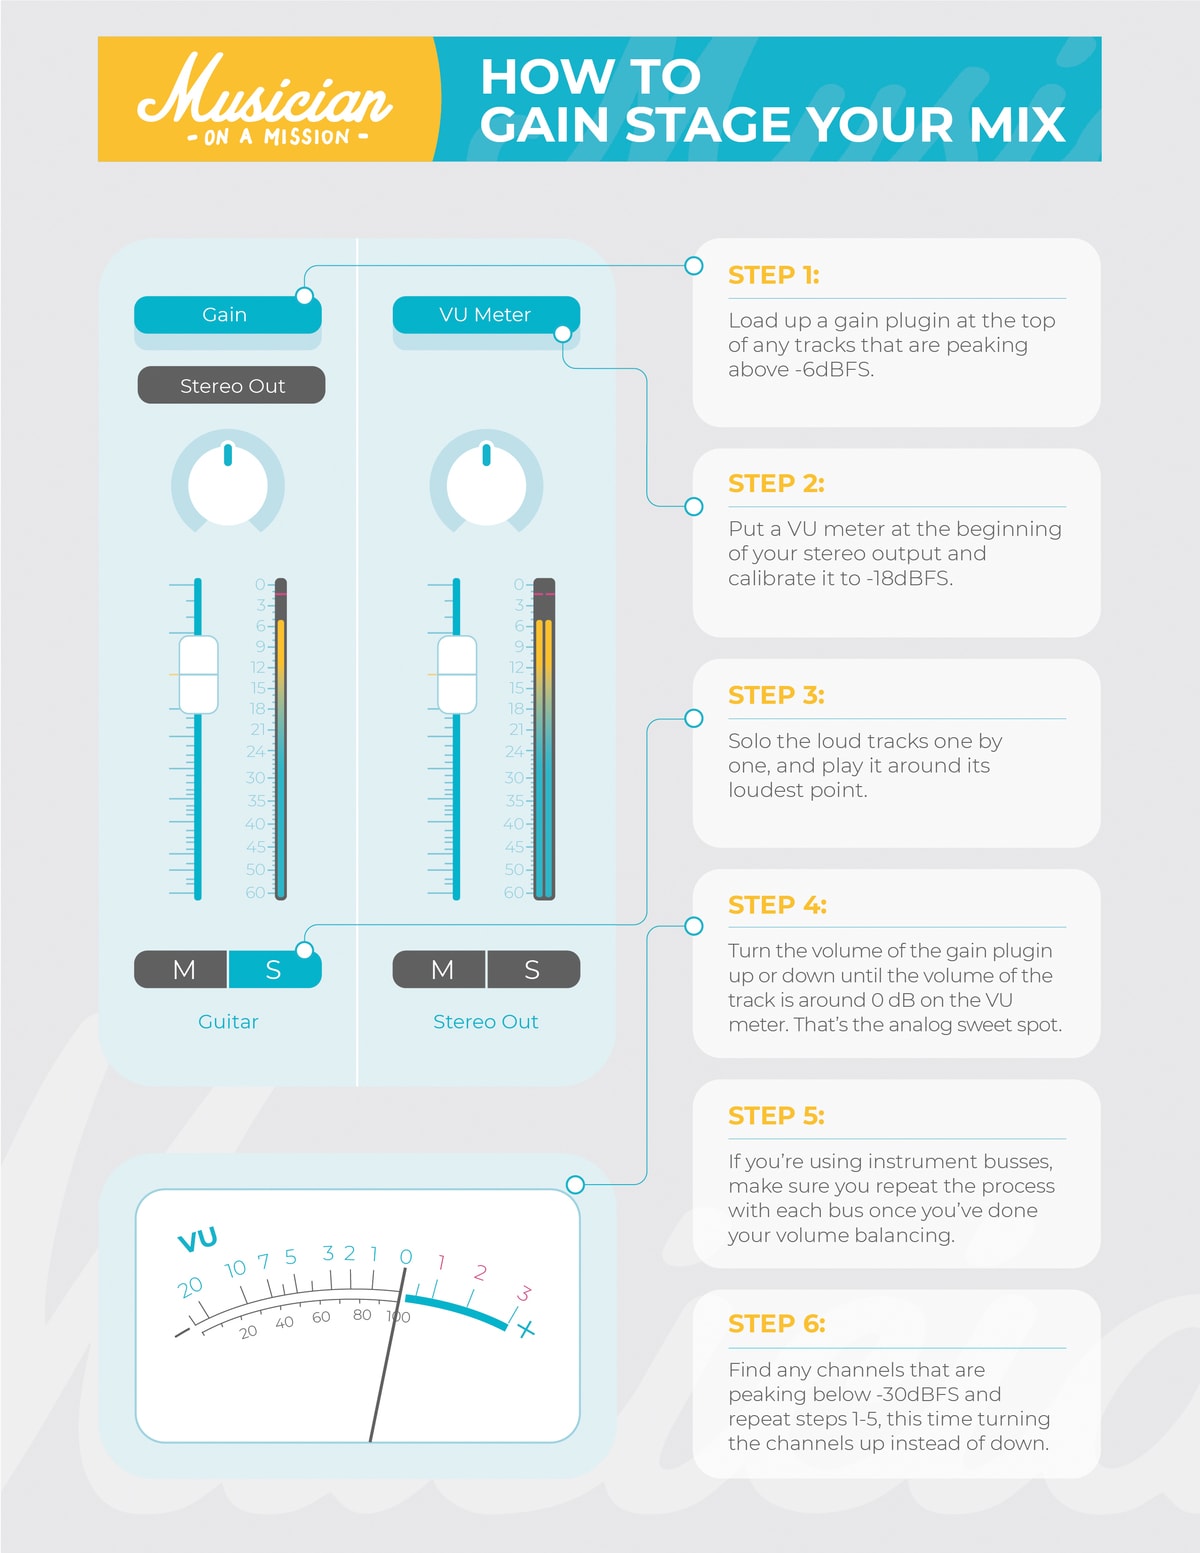
Now, most DAWs use dBFS meters for their volume meters. To do this trick properly, grab a FREE copy of TBProAudio’s mvMeter2.
I used it myself for several years. Just don’t forget to set it to VU mode!
What Are Reference Tracks?
A reference track is simple: it’s a professionally mixed song that you compare your mix to as you go along.
Imagine this:
You are a painter, trying to capture a beautiful countryside view.
You hike for miles and miles until you find the perfect view. After gazing out at it for a few minutes, you head back to your artist studio.
You then try to paint what you saw from memory.
How accurate do you think that painting is?
Now imagine you took a camera with you.
You take a photograph of exactly what you’re wanting to paint. Then you hike back to your studio and use your photo as a reference.
Between the two options… THAT will be the accurate painting.
That’s exactly what referencing is. It’s comparing your mix as you go to a professionally mixed track.
Without a reference track, it’s like you’re “mixing blind.”
You never want to mix from memory. Your mixes will end up sounding pretty good in your own speakers but will fall apart anywhere else.
Comparing every aspect of your mix to a reference track – the low end, the mids, the snare volume, the vocal reverb, and so on – will increase the quality of your mixes tenfold.
For more on how to find the right reference track for your song, check out our complete guide, or the video below:
ARVE Error: Invalid URL “https://www.youtube.com/watch?v=RwWJbb23aaw” in url
Now that your mix has been prepped, let’s move on to the actual first mixing step – the volume balance!
Step 2: Volume Balance
The most powerful tool in your mix toolkit isn’t compression or EQ… it’s volume.
The volume balance of your mix is the most important step to nail for a radio-ready song.
To get a great volume balance, try following these steps:

[Want the rest of these how-to graphics? Download all 15 guides from the FREE Mixing Cheat Sheet Essentials below.]
This volume balancing system is pretty simple, but it’s very powerful.
To learn more about volume balancing, check out this video:
ARVE Error: Invalid URL “https://www.youtube.com/watch?v=BoEVuq2Gy1k” in url
While working on your volume balance, I’d recommend listening to your monitors or headphones at a low level. That will keep your mix moves accurate.
The louder you listen to your mix, the better the mix sounds. That’s great in the moment.
But it means you can make some mixing decisions that sound crappy when played at quiet volumes!
You want to set your monitors at “conversation level.” Loud enough to hear the details of the mix but quiet enough that you can have a conversation with a friend while it’s playing.
Also, remember the reference tracks you set up in the last step? Now’s the time to use them!
Listening to reference tracks is one of the best ways to get a stellar volume balance. It helps you know how loud the vocals, drums, and bass are in most other songs.
Those are the instruments that are the most heard or the most “felt.” So getting their balance right is crucial to a mix that plays well on all speakers.
To learn how to use reference tracks in your songs, check out the video below:
ARVE Error: Invalid URL “https://www.youtube.com/watch?v=RwWJbb23aaw” in url
Now, let’s learn about our first mixing tool – compression.
Step 3: Compression
Compression levels out the dynamics of an instrument and shapes its tone.
In layman’s terms, it compresses the volume of an instrument. When an instrument gets too loud, a compressor turns it down.
Compression is used all over mixes to make your tracks more consistent, more exciting, and more cohesive.
Before we learn how to use a compressor, let’s start with the different parts:

Now that you know the different parts of a compressor, let’s learn how to use one:
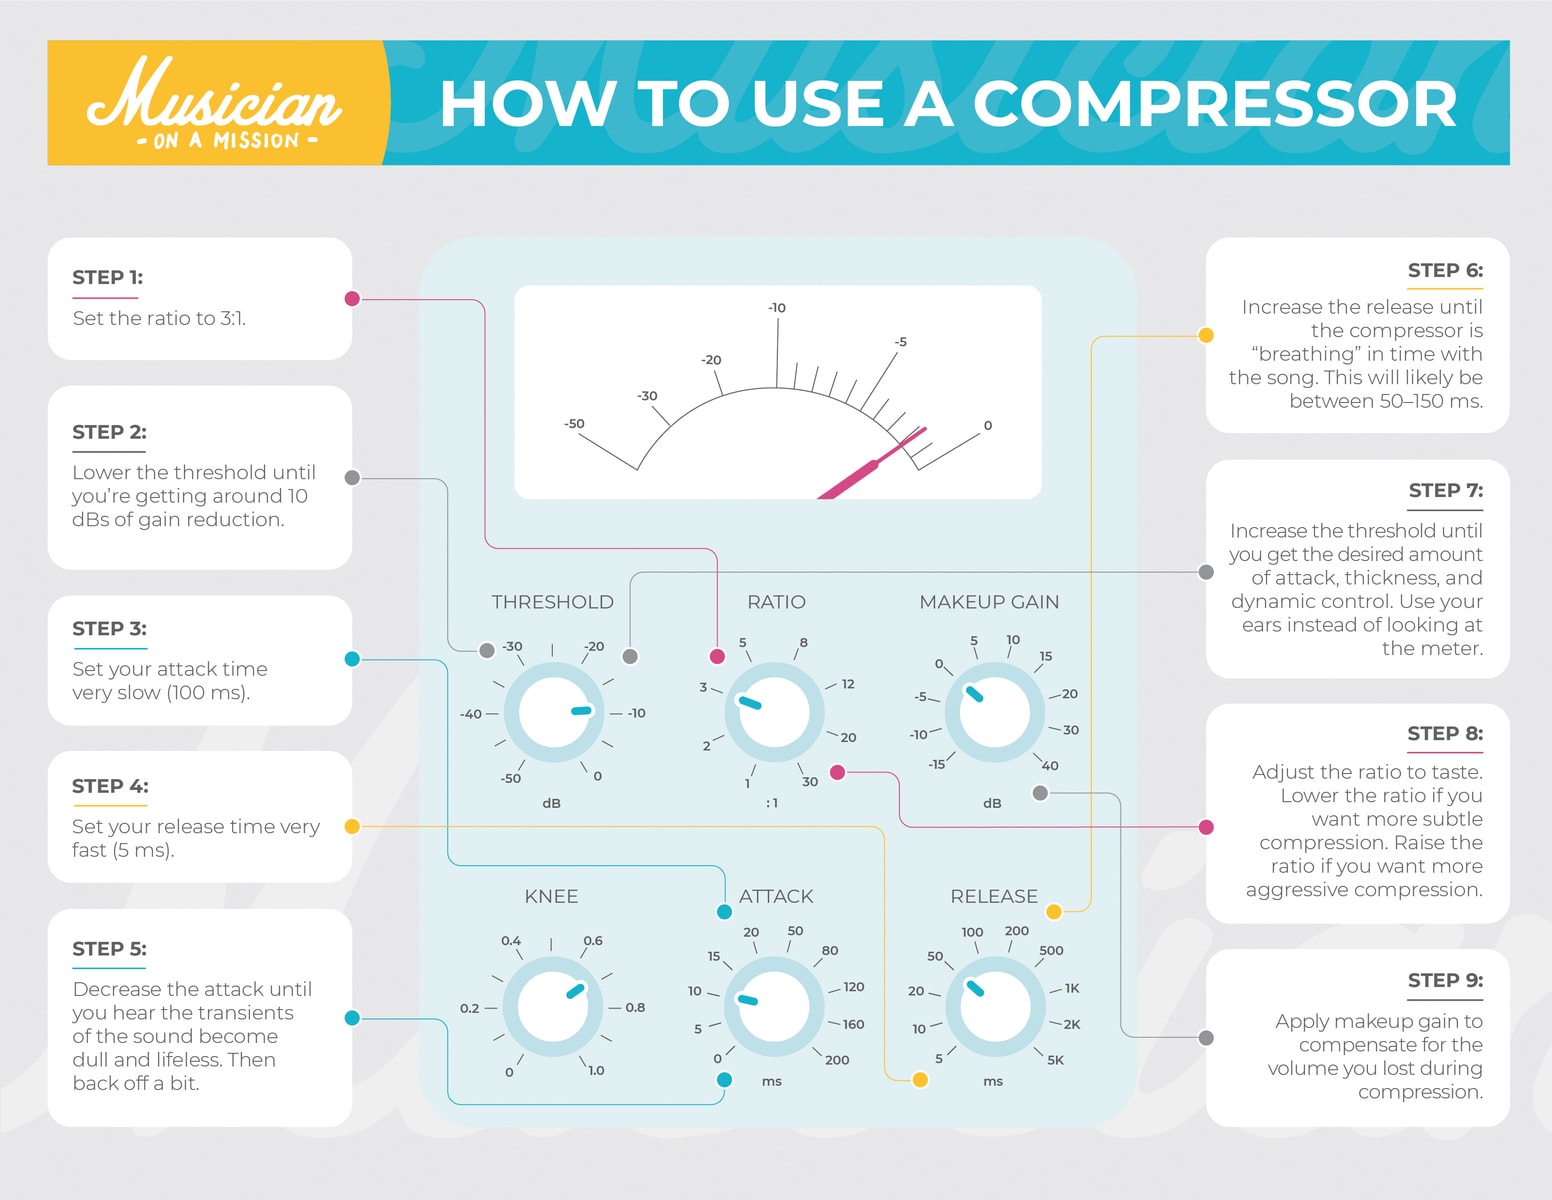
Compressors are subtle, but they make a big difference in your mix.
The key to using a compressor is practice. The more you do it, the more you can hear the changes you’re making in the sound.
Want to see what compression sounds like? Check out the video below:
ARVE Error: Invalid URL “https://www.youtube.com/watch?v=lu92jTzEs7o” in url
I’ll usually use compression on whatever instruments I feel need more control in the mix. If I want it to sound upfront-and-center, it’s likely going to need some compression.
Be aware, though, compression is different depending on what genre you’re mixing!
Some genres use heavier compression (like pop, rap, and rock) while others use barely any compression at all (like jazz, classical, and some folk).
Keep this in mind while learning to compress your mixes.
Before we move on to the next step, check out this video on how to avoid the most common mistakes that musicians make when compressing their mixes:
ARVE Error: Invalid URL “https://www.youtube.com/watch?v=t3zq8U1jdYY” in url
Up next, the frequency-fixer and tone-shaping master… the EQ.
Step 4: EQ
An equalizer (or EQ for short) is a mixing tool that helps to shape the tone of an instrument.
It’s essential to creating a mix that “fits” together.
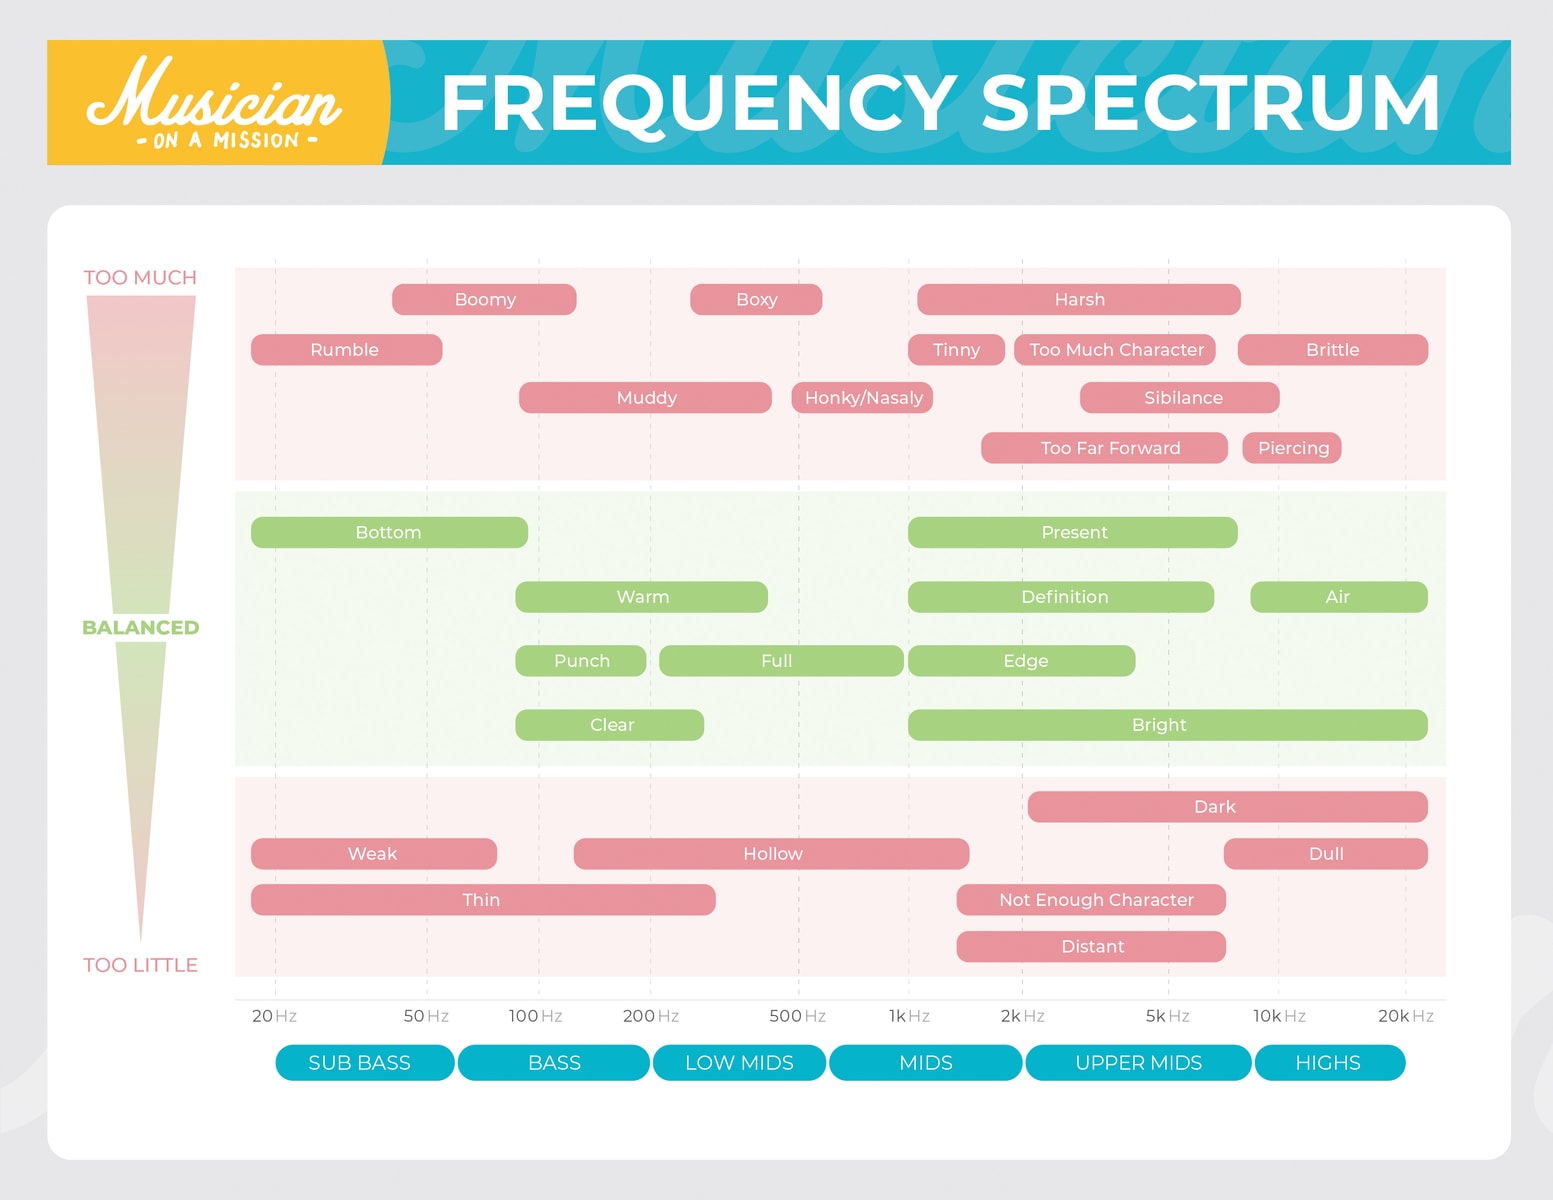
This may seem a little vague right now, but stick with me. Before you can learn what an EQ is, you need to understand the frequency spectrum.
Music is created by different sound waves interacting with each other in unique ways. Each individual sound wave is known as a “frequency,” which is measured in hertz (or Hz).
The lower the pitch of the sound, the lower the hertz of that sound. For example, a bass might play a note that resonates around 50 Hz.
Conversely, the higher the pitch of the sound, the higher the hertz of that sound. For example, a violin might play a note that resonates around 2,000 Hz, or 2 kHz.
So what is the frequency spectrum? The frequency spectrum is the entire range of human hearing.
So let’s take a look at an average parametric EQ plugin…
See how the spectrum starts at 20 Hz on the left, and ends at 20 kHz on the right?
That’s the range of human hearing. Inside of it are all of the sounds a human can possibly hear.
For me, this breaks down into five very distinct sections.
Sub-Bass (20–60 Hz)
The first area we’re going to focus on is sub-bass.
Everything below 60 Hz is sub-bass. Generally you need a subwoofer or a good pair of headphones (open-back headphones, for example) to hear that.
You should be able to hear it a little bit if you’re on monitors or headphones. But if you’re listening on a laptop or a phone, there’s no way you will hear it.
This is the part of the frequency range that you “feel” rather than hear.
Ever been to a club and felt the booming of the bass synth in your chest? Those are the sub-bass frequencies.

Bass (60–200 Hz)
After that, we get into what I would call bass. For me, this is everything between 60–200 Hz.
In this area, we’ve got lots of bass guitar. Lots of the low-end vocals as well, because male vocals are going to have the fundamental below 200 Hz in most cases.
The bass area is the foundation of a mix. Without bass, a song just feels… weird. Everything in your mix will be built on top of the bass frequencies.

Low Mids (200–600 Hz)
Next up, if you go from 200–600 Hz, this is what I would call low mids, and this is a really important area for mixing.
Now, this area is crucial for home recording. It’s where you get a lot of buildup with guitars, vocals, even the top end of the bass guitar, especially.
This is an area that’s really guilty for adding mud to a mix.

Mids (600 Hz–2 kHz)
The human hearing focuses mostly on this frequency range…
So it’s crucial to get this range right. You want the main focus of the track (e.g., vocals) to have lots of room in this range.
Be aware that this is also where you can start to get into harshness and aggressive tones.

Upper Mids (2–8 kHz)
Then we’ve got upper mids between 3–8 kHz, and this is where things really start to get harsh. This is where we have brittleness a lot of the time.
It’s also an important range for clarity and aggression, especially in vocals.

Highs (8+ kHz)
After that, we get to treble, or the highs. This is everything above 8 kHz. This is where we have air.
You could split this even further into 8–12kHz, that’s what I would call treble, and then 12+ kHz is what I would call air.
But for now, we’re just going to leave this as the highs, and this is everything above 8 kHz.

Here’s a breakdown of the entire frequency spectrum:
Frequency Range |
Description |
| 20 Hz to 60 Hz | Sub-bass |
| 60 Hz to 200 Hz | Bass |
| 200 Hz to 600 Hz | Lower mids |
| 600 Hz to 3 kHz | Mids |
| 3 kHz to 8 kHz | Upper mids |
| 8 kHz to 20 kHz | Highs |
So all that being said, what does an EQ do?
An EQ is like a volume fader for the frequency spectrum. It can turn up or down different parts of the spectrum to change the tone of an instrument.
Is a guitar sounding too bright? It may need a cut in the upper mids.
Is a vocal sounding too weak? It might need a boost in the low mids.
EQing is making these cuts and boosts in different instruments to enhance the sound of the song.
So now that you know what EQ is, let’s look at the different parts of the plugin:
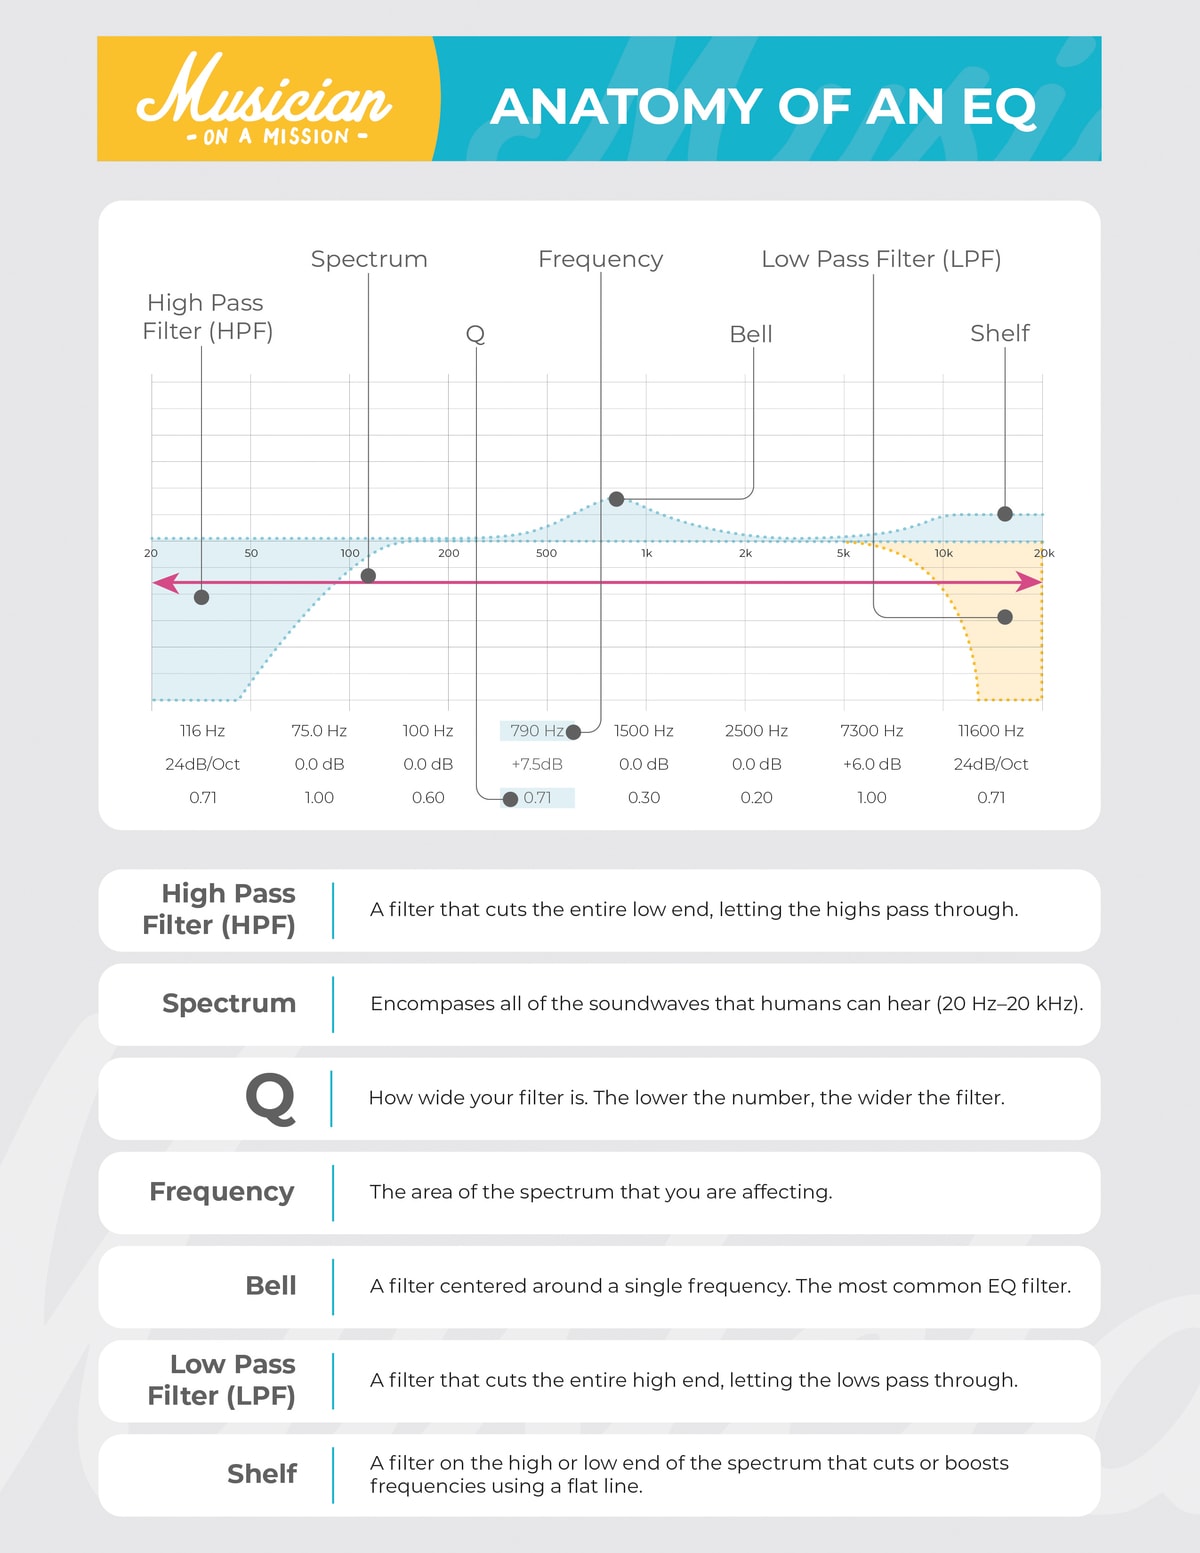
You’ll use “filters” to cut and boost different parts of the spectrum.
Which parts of the spectrum you cut or boost are up to you. Ask yourself the question: what are you trying to achieve with your EQ?
There’re four different problems you can solve with an EQ:
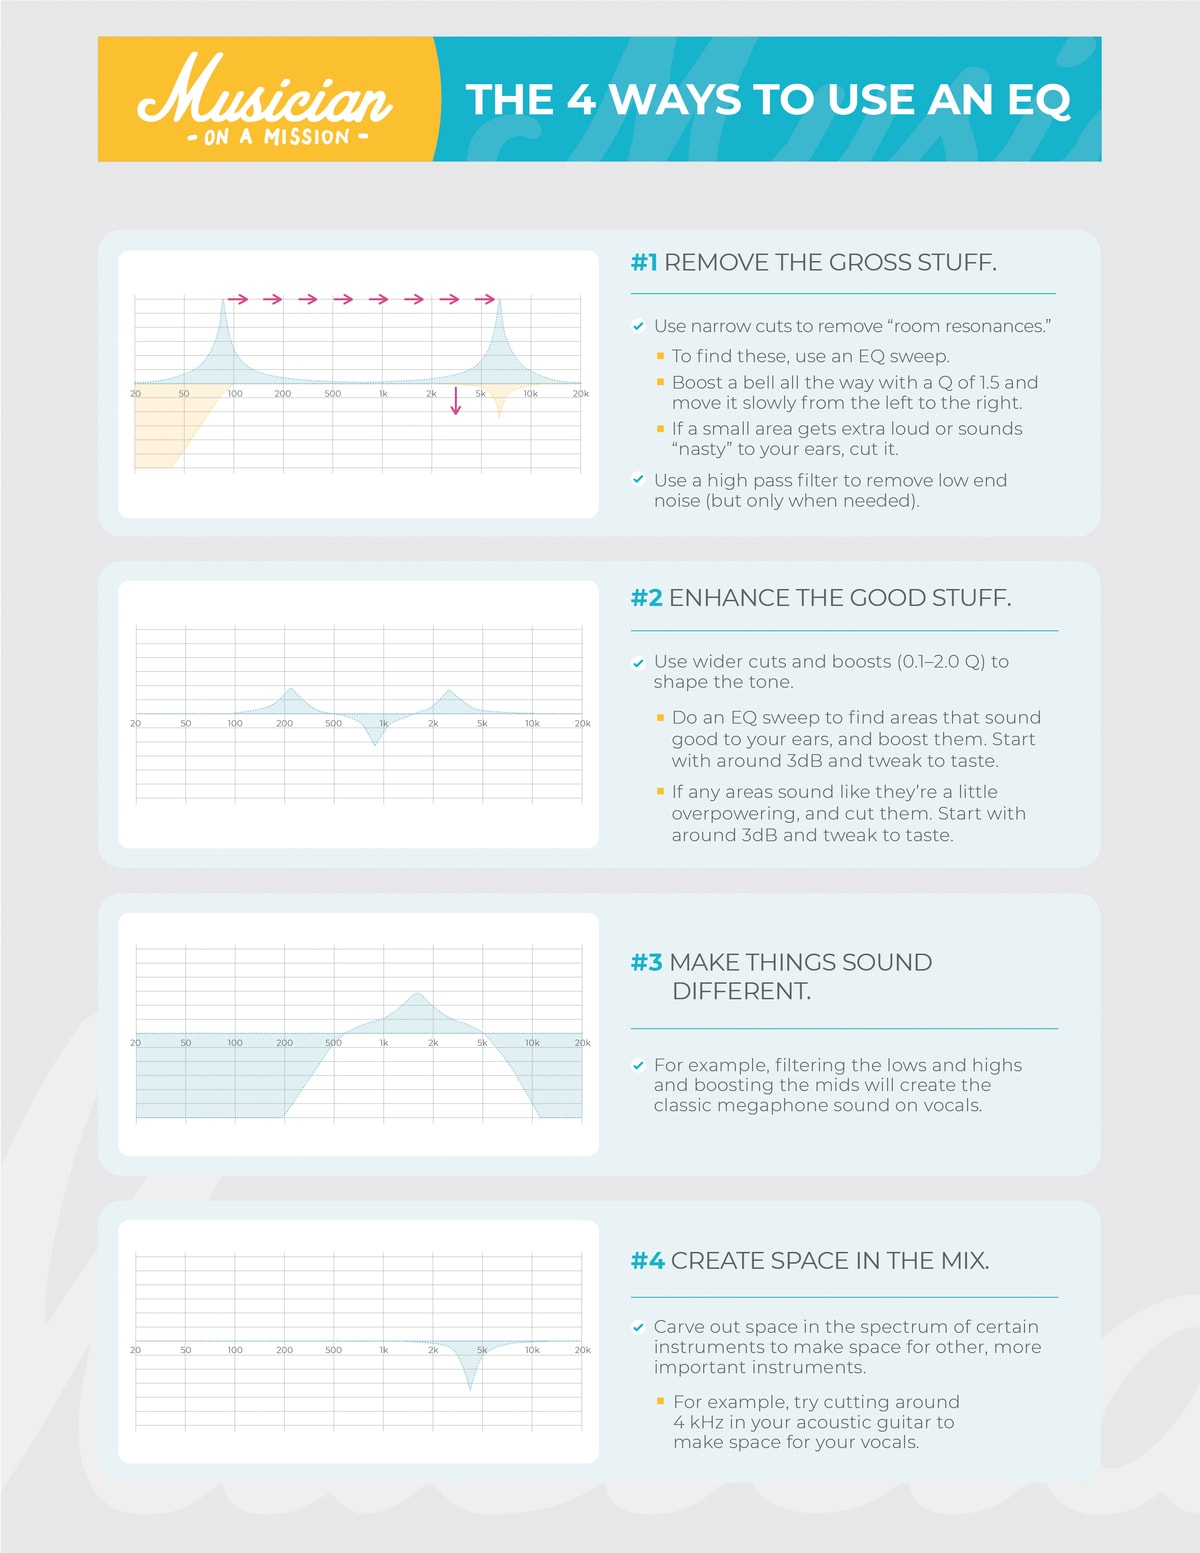
[Want the rest of these how-to graphics? Download all 15 guides from the FREE Mixing Cheat Sheet Essentials below.]
You’ll want to choose a direction before you start EQing. Always think, “What am I trying to achieve with this EQ?” rather than just slapping on an EQ and changing stuff just because you think you should.
And check out this handy diagram of frequency problems you might run into. It’s great at helping you identify what’s wrong with an instrument
Before we move on, check out this video we made on the worst EQ mistakes I’ve made over the years. Hopefully it will put you on the right track from the beginning:
ARVE Error: Invalid URL “https://www.youtube.com/watch?v=PJmOQiXmspc” in url
To learn more about how to EQ a mix, check out my complete guide to EQ.
NOTE: Here’s a great tip for getting really engaging and interesting mixes:
Step 5: Space (Panning, Reverb, and Delay)
By now, you’ve created a pretty decent mix using volume, compression, and EQ. But the instruments still feel like they’re competing for the same “space” in the mix.
What can you do?
Imagine a stage. The whole band is playing on it, and the listener is below in the crowd.

Right now, your mix is one-dimensional.
That means that every instrument in your band – the vocals, the drums, the guitars, the bass, and everything else – is squished together in the exact same spot on that stage. They’re all taking up the same point in space.
Because of that, everything sounds jumbled up! We need to give each instrument their own space on the stage to balance things out.
Let’s make our band 3D. The first thing to use is panning.
Panning
Panning is moving an instrument into the left or right speaker.
It allows you to make your mix two-dimensional. This lets you spread out your band to the left and right sides of the stage.
You pan an instrument by using the pan knob on the track’s channel strip.

To move something towards the left, turn the knob to the left. To move it towards the right, turn the knob to the right.
Simple as that!
Panning can be as simple or as complicated as you want it to be. To keep my mixes wide (but not too wide), I use the 50/50 Panning Method.
ARVE Error: Invalid URL “https://www.youtube.com/watch?v=Z-4PIE126oA” in url
Basically, I pan all my instruments to one of five places:
- 100% to the left
- 50% to the left
- right down the middle
- 50% to the right
- 100% to the right
Using this, the panning step is simple while creating a more cohesive stereo image.
One quick tip: make sure to keep the low end instruments and the melody in the center! Don’t pan your kick drum, bass, or vocal. Those need to keep the audience’s attention.
Now let’s add another dimension to our mix using Reverb.
Reverb
Let’s think about our band onstage again.
Right now, we’ve panned the instruments to the left and the right. So the whole band is now spread out at the very front of the stage.
But they’re still too crowded! They have width, but no depth.
It’s still hard for each musician to stand on the stage. We need to push some of them back so that everyone has their own place to stand.
This is what we’re going to do with our mix. We’re going to make the mix 3D by adding the final dimension: depth.
To do this, we’re going to use reverb and delay. Let’s start with reverb.
Reverb is the sound of the room. When reverberation is added to an instrument, that instrument sounds like it’s in a new space.
It could be a big concert hall, a tiny bedroom, or anything in between. It creates a “wash” of sound behind the instrument.
Plus, it creates the illusion that the instrument is farther away from the listener.
That means that instruments at the front of the stage should have only a little reverb. But instruments at the back of the stage should have a lot more.
To do this, we’re going to create two room reverbs to send each instrument in your mix. One to create depth, and another to create a cool tone:
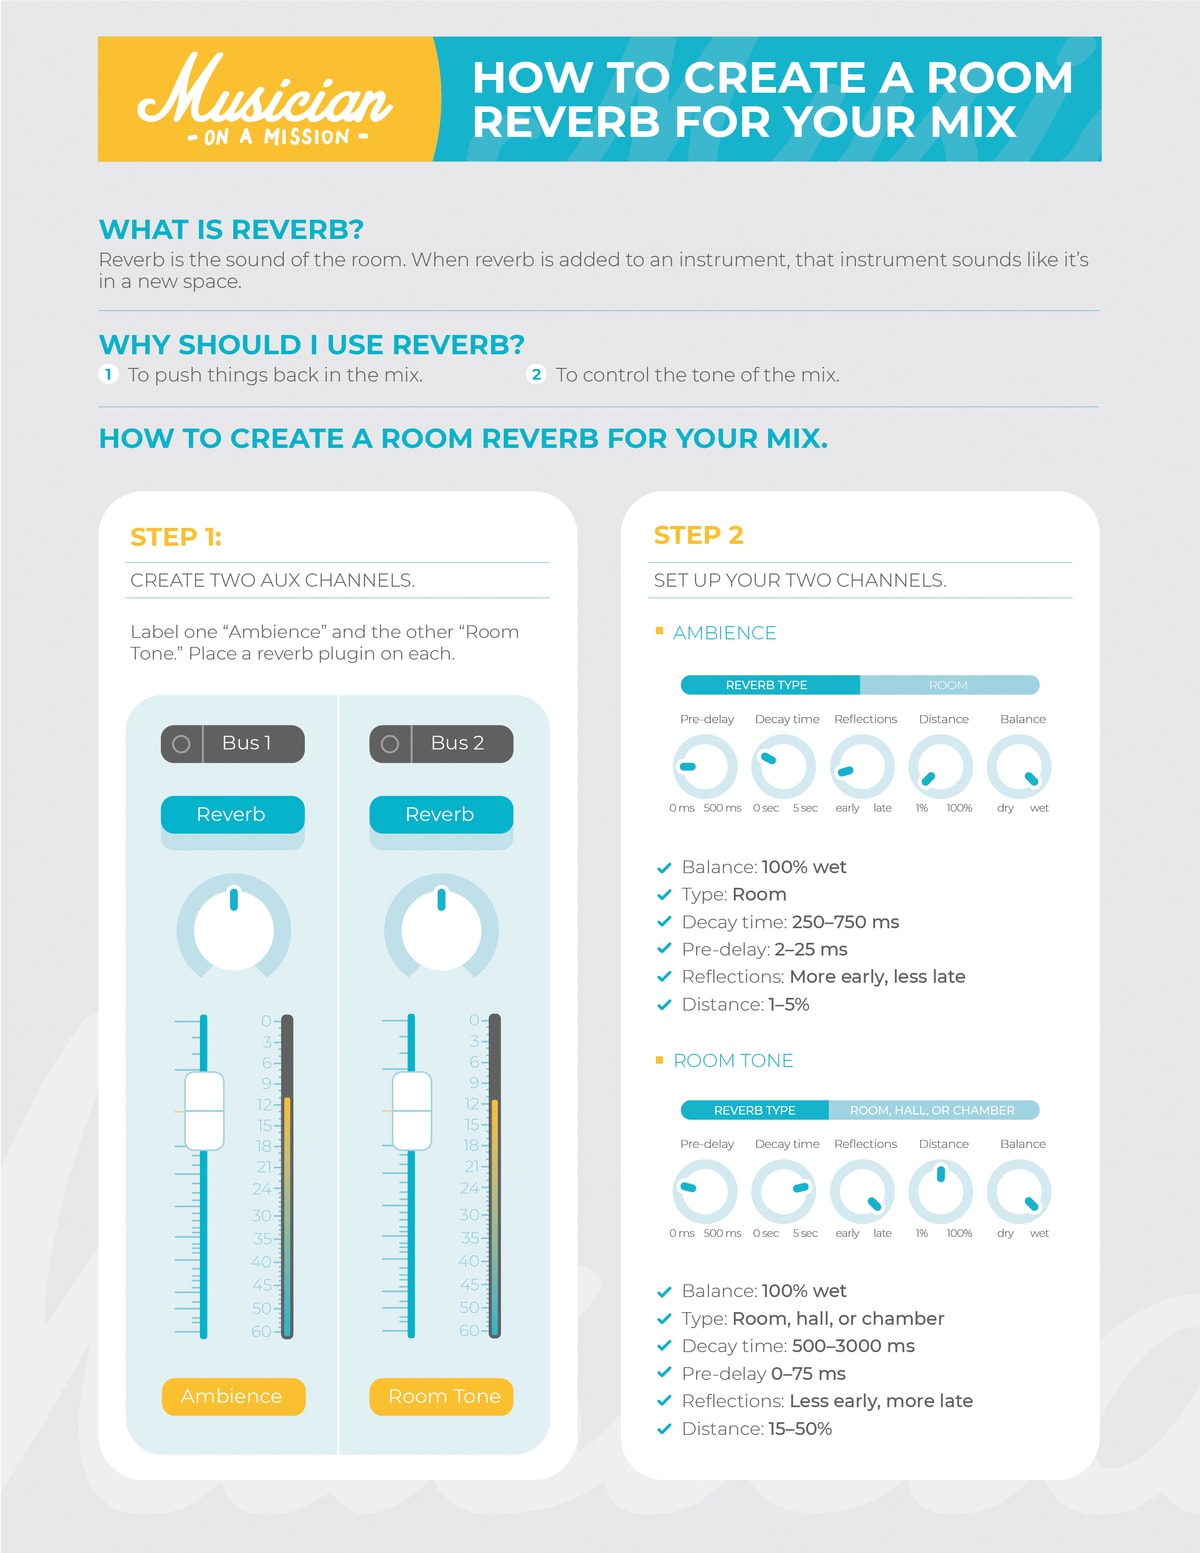
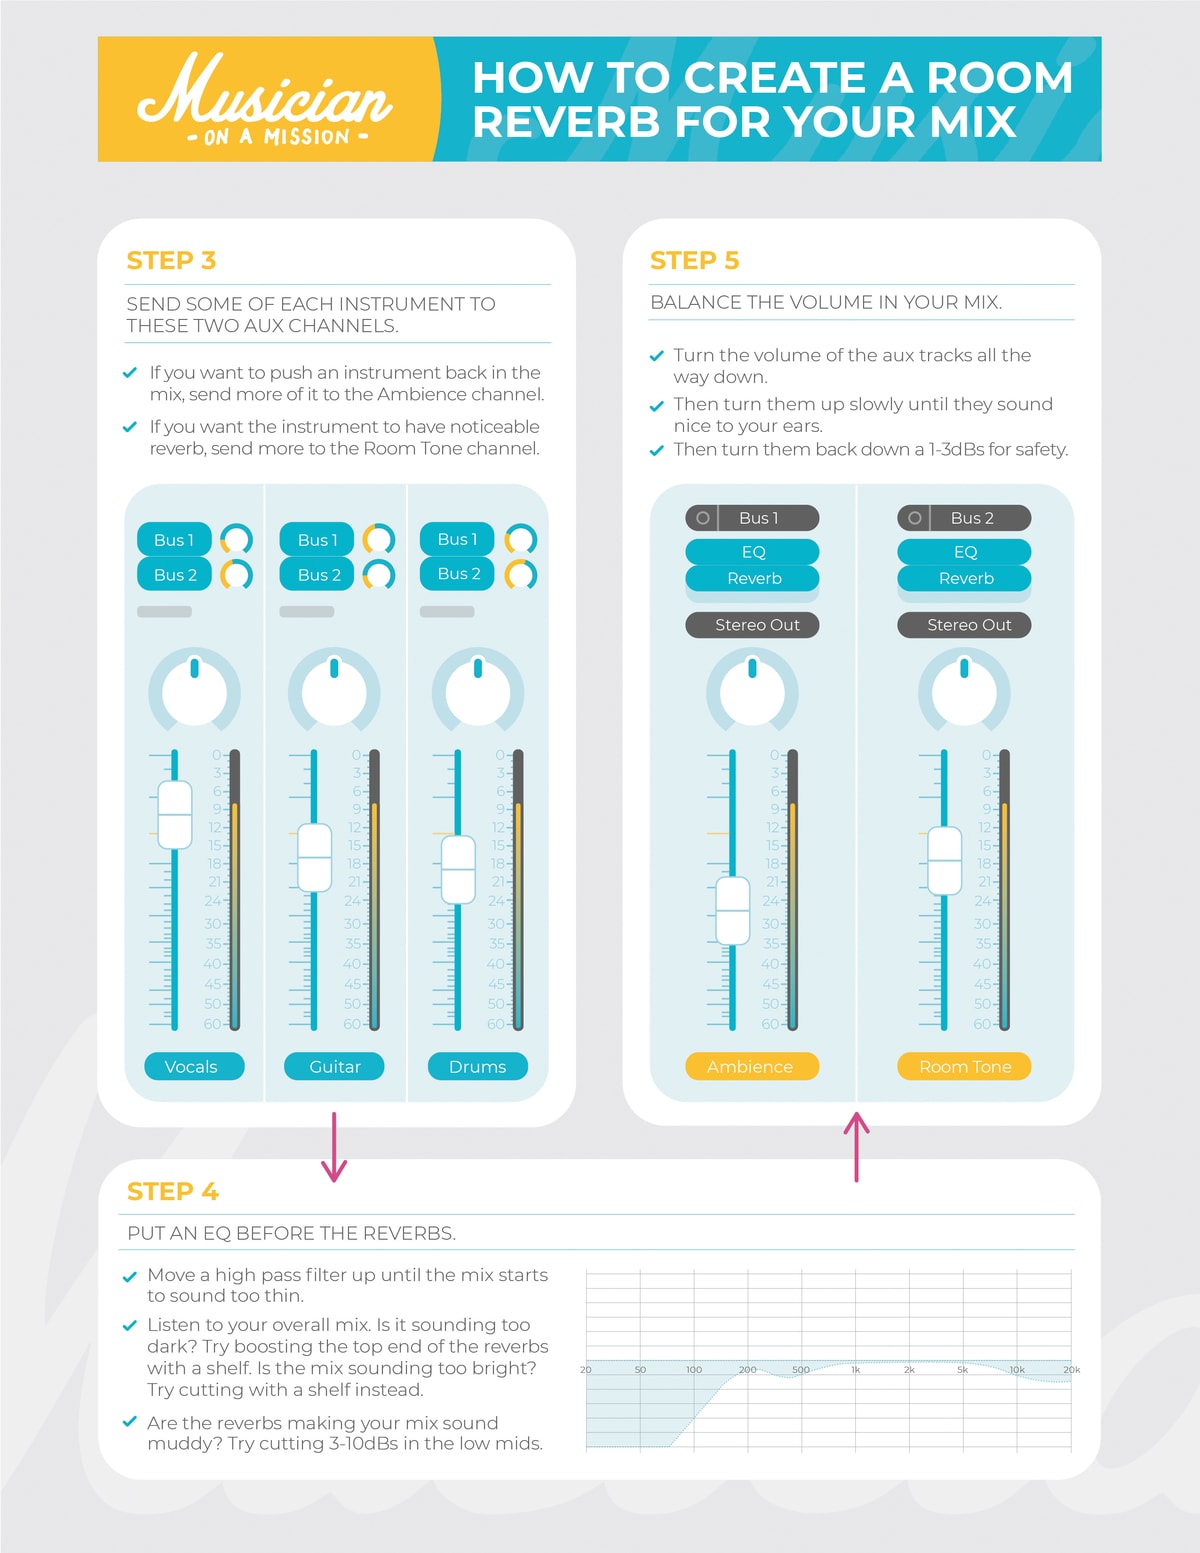
If you follow those steps, you should have a more cohesive-sounding mix already.
Sometimes, though, you want to give an instrument that “3D” sound without pushing it too far away from the listener. If that’s the case, then you’ll want to try delay.
Delay
Delay is much more precise than reverb. It’s just one repetition after another of the notes of an instrument.
Like the echo you’d hear if you yelled into the Grand Canyon.

Delay does a great job of creating a space around an instrument without pushing it too far back in the mix.
It’s especially great for vocals that you want to keep front and center.
To create a vocal delay, try out this method:
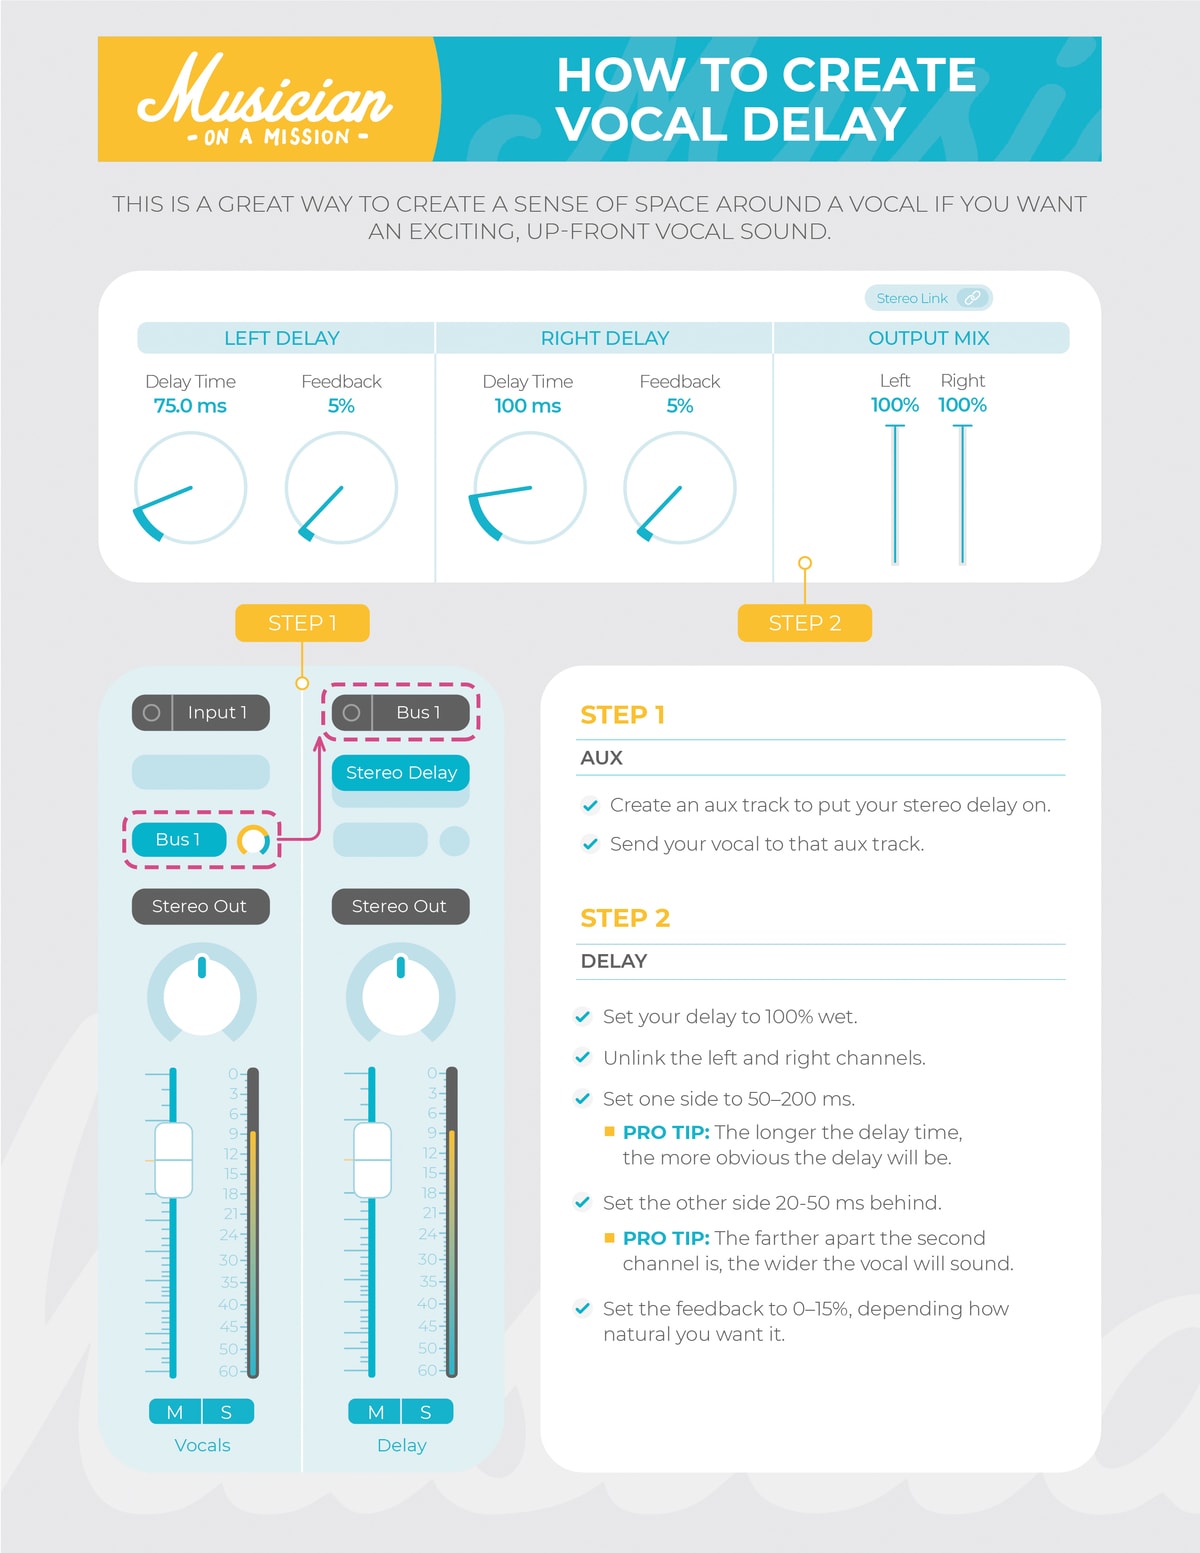

[Want the rest of these how-to graphics? Download all 15 guides from the FREE Mixing Cheat Sheet Essentials below.]
This “stereo slapback” delay works great on any melody instrument you have in your mix. I personally love using it on guitar riffs and solos as well!
Now that you’ve made your mix 3D, it’s time to work on the consistency of the entire mix.
Step 6: Volume Automation
Right now, the section you’ve been looping probably sounds great. You’re probably feeling pretty happy with it.
But if you listened through the entire song, you’d realize that every other section sounds… weird.
That’s because you’ve made your volume balance to fit the loudest section of the song. Not every second of the song will have the same volume balance.
So what we need to do is listen to the song beginning to end. Use automation to make the volume consistent throughout.
Before you start, I’d listen to your reference tracks again. You want to refresh your ears when you start creating the volume balance for the entire song.
The actual act of volume automation is pretty simple.
Open up your automation channel. Create points around the section you want to make louder, and pull that instrument’s volume up.

Make sure to spread the slope of the automation out a bit to make the transition more musical.

You can also use automation to catch the listener’s attention. For example, during spaces between the vocal, the audience’s interest tends to wane.
This video shows you how to use automation to highlight other instruments in those gaps between melodies.
ARVE Error: Invalid URL “https://www.youtube.com/watch?v=31a7933RRuw” in url
You can also use volume automation to build excitement in a song. I’ll often make the instruments grow a little in volume right before a big chorus to help build the energy of the song.

Keep in mind that this step is almost always mandatory. Unless it’s a very simple song or a live performance, it most likely won’t be consistent in volume for the entire song.
Don’t skip it!
Step 7: Effects
Now that your entire song is sitting well, it’s time to add something fun.
Effects are great to give your song a tonal edge. They help to create interest in the sound of the song, rather than relying on just the song itself.
There’re tons of different effects that you could add to different sections of a song. Far more than we can cover in one article.
So we’ll just be going over the most common ones.
Many people use delays as an effect. These delays are meant to be loud and obvious rather than the subtle delay you used for the vocals.
You’ll set them up in the same way as the vocal delay described above, but the delay time can be any length you want.
For a starting place, a quarter note delay often sounds cool as a vocal effect. And a dotted quarter note delay can sound very cool on an electric guitar.
Check out the video below for some other cool delay effect ideas, plus a few reverb effects as well:
ARVE Error: Invalid URL “https://www.youtube.com/watch?v=5P8KohiciSc” in url
Another effect that’s used often is distortion (also known as “saturation”).

You see this often used on electric guitars, vocals, and sometimes even drums.
This can be used either as a send (like delay or reverb) or put directly on the channel. It just depends on how aggressive you want the crunch to be.
Another popular effect is chorusing.
A chorus effect makes an instrument sound like it’s been doubled. If used aggressively, it’s like it’s swimming underwater:
ARVE Error: Invalid URL “https://www.youtube.com/watch?v=vabnZ9-ex7o” in url
You’ll hear this effect on guitars, vocals, and pianos.
Step 8: Final Checks
And with that, you’re almost done! Now it’s time to go through with a fine-tooth comb and make sure everything is fitting well.
During your final checks, anything is fair game. You may need to tweak the EQ of a guitar, or change the compression of a bass, or add more reverb to a vocal.
You may need to add more effects to the drums during the verses. Or turn up the synths in the bridge.
Anything we talked about in this guide can be tweaked.
This last step is important. Some of the tools in your mixing toolbox will affect the sound of other tools.
For example, compression often changes your volume balance. Because it’s making those soft sounds louder.
Adding distortion to a sound might make it sound too harsh, causing you to go and tame the top end in your EQ.
A few tips for using your final check step effectively:
- Give yourself at least a 12-hour break before starting. Let your ears reacclimate to the sound of the world. You’ll hear more problems with your mix with a set of fresh ears.
- Listen to the song from beginning to end and take notes. What would you change about this mix? That list is your guide to finishing this step up.
- Don’t forget to use your reference tracks. Listen to them every fifteen minutes or so to re-acclimate your ears to the sound of a professional mix. You’ll find more problems in your own mix that way… which means you can fix those problems!
Once you’ve finished up your final checks, you’re done! The mix has been completed.
Now all that’s left is to send the mix to a mastering engineer or a service like Landr or Aria to get mastered. Once you’ve got your mastered track in your hand, you’re ready to release your masterpiece.
UPDATE: If you feel like your Mixes are plateauing, then you need to watch this:
BONUS: Mixing Different Instruments
The basics of mixing are the same regardless of what instrument you’re working on.
But sometimes different sounds call for different solutions.
Here’s our little treasure trove of mixing tips for different instruments. Just click the button of the instrument you want to learn to mix. Enjoy!
Vocals
How to Make Vocals Sit In The Mix
ARVE Error: Invalid URL “https://www.youtube.com/watch?v=TIDfOKrpNrE” in url
How To Use a De-Esser
ARVE Error: Invalid URL “https://www.youtube.com/watch?v=CqRwY7WUi6o” in url
How to Do a Full Vocal Production
ARVE Error: Invalid URL “https://www.youtube.com/watch?v=lowaHVLRxgo” in url
How to Mix Background Vocals
Drums
How to Mix Drums
ARVE Error: Invalid URL “https://www.youtube.com/watch?v=OEgs7slOgSE” in url
How to Compress a Snare
ARVE Error: Invalid URL “https://www.youtube.com/watch?v=i78lUbeJa0A” in url
How to EQ a Kick Drum
ARVE Error: Invalid URL “https://www.youtube.com/watch?v=uz9ekLR_Myo” in url
Bass
How to Compress a Bass Guitar
ARVE Error: Invalid URL “https://www.youtube.com/watch?v=xFNMd1J8Bwc” in url
Guitars
Top 7 Tips for Mixing Guitar
ARVE Error: Invalid URL “https://www.youtube.com/watch?v=F3QuvtD3kd0” in url
One Last BONUS…
Sometimes, it’s nice to just have a few simple tips.
There’s been a ton of info in this article! I applaud you on making it this far.
This next video has 16 mixing tips that are simple, consistent, but powerful.
Using these tips on your songs will result in at least a 10% boost in quality. I guarantee it.
ARVE Error: Invalid URL “https://www.youtube.com/watch?v=_gDR0Pu66Kw” in url
UPDATE: We released another mixing tip video that demonstrates 21 mixing tips I wish somebody had taught me when I was a beginner.
CONCLUSION: Mixing
Phew. That was a lot, wasn’t it?
Congrats on making it all the way through this jam-packed article!
Next Steps
If you want to dig deeper into music production and learn what it actually takes to make mixes that sound pro…
And you’re an intermediate or advanced producer…
Be sure to check out the free masterclass:
Enjoy!

Songwriter and producer. Writer at Musician on a Mission. I’m here to help people make music that lasts.
![]()
Download Article
![]()
Download Article
Sound engineering gear and software can be intimidating with all its knobs, sliders, readouts, and jargon. Fortunately, for those of you just starting out with song mixing, there are some simple steps you can take to mix your songs so they sound just like you want them to.
-

1
Optimize your room’s acoustics. By creating an acoustically superior workstation, you’ll be able to hear the features of the tracks you are listening to with greater detail. This will allow you to draw out the features of your tracks with greater accuracy.[1]
One of the most important parts of mixing a song is knowing what to highlight and what to downplay, and being able to hear these features will help.[2]
To improve your work space’s acoustics:- Be aware of room modes, or how the shape your room can impact the frequencies of your sound. Room modes have been especially known to cause difficulty with low to low-mid frequency sounds playing on your system.
- Limit bouncing sound waves. As soon as sound leaves your speakers, it will reflect off the hard surfaces in your room, which can influence the stereo and frequency of your sound.
- Balance your speaker distance from hard surfaces, which can add low frequencies to your sound when too close.
- Be symmetrical in your set-up. This will allow you to hear the distribution of the sound between speakers most clearly.[3]
[4]
-
2
Find the right DAW for your situation. A DAW is a digital audio workstation, and unless you have a studio at your disposal, it’s likely going to be how you mix your music. There are many different kinds of DAW, some free and others costing over $800.[5]
Which of these will work best for your situation is a matter of preference.[6]
You’ll have to look into the features of each DAW, but some popular options are:- Ableton Live
- Cubase
- FL Studio 11
- Pro Tools[7]
[8]
Advertisement
-
3
Label your tracks for recognition. The mixer of your audio interface should be as orderly as possible. This will allow you to tweak and adjust your sound without any confusion or error. To save yourself time and improve your efficiency, you should label your tracks according to a system that makes sense to you.[9]
For example, you might:- Write out the full name like, «Snare Drum 7»
- Label according to your own abbreviations, like «SnD7.»
-
4
Devise a color code to improve your mix efficiency.[10]
If you have multiple tracks that you are trying to mix during your session, it can be difficult telling at a glance which track is which. By color coding your tracks according to basic categories, you’ll know your tracks immediately just by looking. An example of this might use:- Purple for bass
- Blue for drums
- Red for vocals
- Orange for Instruments
-
5
Save your ears whenever possible. When listening to a track over and over again, listening at lower volumes can protect your ears from unnecessary strain. Lower volume listening can also help you recognize subtle variations in instrument volume.
- A general rule of thumb: if you cannot talk over the volume of your playback, you should turn your volume down.[11]
- A general rule of thumb: if you cannot talk over the volume of your playback, you should turn your volume down.[11]
-
6
Clear your mind of distractions.[12]
The creative process of mixing a song can be complicated by poor organization or outside disturbances.[13]
Take steps to ensure you won’t be interrupted. Turn off your phone and set an editing routine for yourself so that you can keep your focus trained on your goal of a well mixed song.


Advertisement
-
1
Know the rough mix front to back. The «rough mix,» which is your reference, will clue you in on how you should proceed with your audio engineering.[14]
You should listen to the rough mix to become familiar with the features of the song you will be mixing.- While mixing, ask yourself: «What is the goal of the artist or producer who made the song?»
- The rough mix is also where problems with the mix will be most apparent. Take note of these features; you’ll need to smooth them later in the mixing process.[15]
-
2
Get the feel of the mix. Many producers and artists aim to accomplish a certain feeling or «vibe» through the expression of a mix. Listen to the rough mix repeatedly until you instinctively feel the direction of the music, its thrust, and how its component tracks work together.[16]
- When listening, start with your faders at center volume and then adjust tracks to see how each interacts with each other and the mix as a whole.
EXPERT TIP
Timothy Linetsky is a DJ, producer, and music educator that has been making music for over 15 years. He is a certified Ableton trainer and creates educational YouTube videos focused on producing electronic music. He has over 90,000 YouTube subscribers.

Use «reference tracks» in your genre to perfect your mix. Timothy Linetsky, DJ and Producer, tells us «I refer to the reference tracks and ask myself, ‘Do I have way more bass than the reference tracks?’ ‘Is my snare not punchy enough compared to what’s standard across all these reference tracks?’ ‘Do I have too much low end compared to all the reference tracks?’ I’m basically trying to see if I’m in the range of what’s standard in these reference tracks.»
-
3
Identify the features of the track you want to bring out.[17]
Listen to the rough mix again and write down the unique features and key elements you hear in it.[18]
You’ll need to accentuate these while mixing. This is also a good point to determine the kind of atmosphere you are trying to create. An upbeat and punchy atmosphere will require a different approach from one that is distant and haunting.[19]
- You may want to use an effect, like reverb, to create fullness in a melodic line.
- For faster, more rhythmic songs, you may need to bring out the bass line during build sections.
- Vocals should be clear and distinct from instrumental parts, unless used as a background chorus.
- Background and accent vocals are often treated as part of the ensemble, not the main attraction or key feature. Your mixing should reflect this.[20]
-
4
Determine relationships between your tracks.[21]
You should note parts that complement each other, like rhythm guitar tracks that create a «hand-off» every few beats. These will need to be highlighted or polished later for greater effect. If you cannot see the purpose a particular track, that may be a sign that you don’t need it at all.- Use your fader to subtract tracks to see the impact these have on the mix as a whole.
- Isolate parts of your mix that sound unclear and find the root track(s) causing the distortion. Later, you will need to balance the offending track, or maybe remove it completely.
-
5
Listen to similar music. By listening to similar songs you can hear how instruments are utilized to build a track. You may also get completely new ideas for effects that you could make use of in your own mix.[22]
Drawing inspiration from other songs can be a powerful tool for your mixing process. -
6
Plan to mix from the bottom up. It may help for you to think of your song as a pyramid. The lowest, heaviest parts (bass drum, bass guitar, etc.) form the foundation of your mix. The middle segments are filled out with guitars, keyboard, and other percussion. Lastly, your vocals and lead parts create the top. While learning the ropes, your mixing process should generally follow this order.
- Working from the bottom up can help create a more balanced sound and better defined EQ.[23]
- Working from the bottom up can help create a more balanced sound and better defined EQ.[23]


Advertisement
-
1
Evaluate the quality of your tracks while balancing volume. Poor track quality might not seem like a big deal in the beginning, but when you start adding more tracks to your mix, it can have a multiplier effect. This can be devastating to the quality of your mix as a whole. But since you’ll be listening to each track on its own while balancing volume, you’ll have an ideal chance do a quality check.[24]
[25]
- Replace low quality tracks when you are able to save yourself work later on, when you’ll have to smooth out negative features.
-
2
Balance the volume between tracks.[26]
Gain staging is one of the most important aspects of mixing.[27]
If a song is mixed «too hot,» the volume level is too high and the upper or lower portions of the frequency is lost, causing a phenomenon called «clipping.» Use your audio interface to listen to each track individually, and then adjust the volume.- By keeping your sound levels low, you can allow yourself more room to fine-tune the mix to your liking.
- A conservative sound level to start with is -10 dB on the master fader.[28]
- Generally, you can protect yourself from clipping by keeping your tracks out of the top limit, expressed by the red zone on your master.[29]
-
3
Group sounds together with a bus. When you group similar sounds together into a single track it’s referred to as «bussing.»[30]
This means that you can apply processes to all the tracks contained in your bus at the same time.- You’ll have to experiment with your particular tracks to find which can be grouped together in a bus.
-
4
Contemplate panning. Panning is the the movement of sound left and right through the stereo field of your mix. You should have a general idea of how you’ll use panning so that when it comes to placing your instruments you can work quickly. Plan on organizing heavy and low frequency sounds, like your bass, toward the center of your stereo field.[31]


Advertisement
-
1
Experiment with equalizers.[32]
EQs can be an incredible tool to focus the sound of your instruments. With EQs you can either strip or boost high or low frequencies, which can be particularly useful with drum kits. When drum kit sounds are recorded, the vibrations caused by its low frequencies can resonate with other parts of the kit. This might cause a rumble in the kits snare, for example. These sounds can be «rolled off» at the low end with an EQ, creating a purer sound.- Where percussion is concerned, snare drums generally sound more powerful with a boost in the lower frequencies, whereas hi-hats and toms often sound snappier and punchier with lower frequencies thinned out.
-
2
Use compression tools to ensure consistent volume. A compressor limits the amount of frequency expressed in your mix. It will raise the volume of quiet parts, lower the volume of loud parts, and maintain the volume of sounds in your ideal range.[33]
Due to human error, you can expect that no single instrument will not be perfectly constant throughout an entire recording. Compression can smooth these irregularities automatically for you. -
3
Check the sound of the drums and bass. Drums and bass form the rhythmic foundation of your song, so be sure you set aside some time to give these a careful listen. Lower frequency sound can be overpowering if you’re not careful.[34]
Every part should sound distinct, but also cohesive with the whole. If one instrument is excessively bright or dark, it will sound out of place.- Think of the tracks of your mix as members of a choir: each part is separately appreciable, but its goal is work together as a collective.
-
4
Use noise gates. Noise gates cut out all noise that doesn’t reach a minimum volume. This can be highly useful when a recording has been done in an area with background noise. The buzz of this noise can easily be cut out with a gate.[35]
- For specific instruments that aren’t as regularly occurring in your mix, it may be easiest to lower your fader.
- Filtering out unwanted lower volume percussion can be unreasonably difficult when trying to time fading with each sound’s “punch.» Gate’s are ideal for this situation.
- Experiment with noise gates to get a cleaner, crisper sound from your mix.
-
5
Play with your panning. How sound moves through the stereo field has a definite effect on the sound you produce in your mix. To find the perfect balance, you’ll have to experiment with how you distribute your tracks. Beginners should start with a centered bass part, but then might:[36]
- Switch off between sides with rhythm guitar and percussion
- Place a keyboard track so it is slightly off center.
- Add other tracks throughout the field to give your mix a richer, more realistic quality.[37]
-
6
Add effects. The chorus effect, for example, will add layers of slightly different timbres and intonations to a track, making it sound like multiple instruments are playing. As a general rule, this effect is useful for electric keyboards and guitar parts. Some other effects you might make use of while mixing:
- Reverb — creates a vibration in the sound, often added to guitars and voice to mask less desirable frequencies and create fullness.
-
Delay — sometimes called «echo,» creates one or more defined sound segments and repeats that segment.[38]
-
7
Use automation to create a more musical song. There are many different kinds of automation you can be use to improve the musicality of your mix. For example, you might automate your master bus to create louder choruses than your verses. This would create a more prominent chorus in your mix.[39]
- You can also automate effects returns, which can be useful if you want a reverb or a delay to be less prominent in certain sections of a song.
-
8
Put everything together. While you’re using your EQ, noise gates, and other effects, you should constantly be listening to your entire production. As you do, make small adjustments to each track while always keeping the whole in mind. With each change, listen to you mix anew. Even if individual parts sound great, the complete product has to sound great as well.
-
9
Break the rules and explore new techniques. There are many technical parameters and ranges defined by experts that can blind you to new approaches you might take to achieve your sound. Good sound is a matter of taste. Always trust your ears and never be afraid to break the rules.[40]
[41]


Advertisement
Add New Question
-
Question
What is the difference between a plugin sound and a recorded sound?

A recorded sound is a sound which you recorded using a microphone and it was performed live like vocals. The plug-in sound is the sound made virtually using a VST, like a synth or a sampler.
-
Question
Is Garage Band # sufficient?
Any recording platform is sufficient if it conveys a decent facsimile of your music vision.
-
Question
What software applications can I use to mix songs?
Virtual DJ 8 is the easiest out there, and it’s free. If you have a compatible DJ console, you can use Serato Intro, which is free as well.
Ask a Question
200 characters left
Include your email address to get a message when this question is answered.
Submit
Advertisement
-
EQ’s aren’t just used for fine-tuning; they also serve a far more practical purpose in the case of faulty or low-quality recording by cutting out high-pitched feedback (high-cut EQ) or eliminating infrasound (low-cut EQ).
-
Make sure to play your mix using different headphones/speakers (ex. iPhone speakers, AirPods, A car’s speakers…)
-
Be careful with your kick and bass mix. You should not let kick frequencies intervene with bass frequencies.
Show More Tips
Advertisement
References
About This Article
Article SummaryX
Once you adjust the frequencies in your songs with an equalizer, or EQ, use compression tools to give your songs a consistent volume. Use noise gates to cut out background noise in your recordings. Then, experiment with the different effects on your digital audio workstation, like chorus and reverb effects, to make them sound better. For more tips on mixing your own songs, like what equipment you should use, keep reading!
Did this summary help you?
Thanks to all authors for creating a page that has been read 211,703 times.
Reader Success Stories
-

«Thank you so much! Awesome ideas.There is no need to purchase a course for «How to mix a song, blah blah…» more
Is this article up to date?
The key to a professional-sounding song is a great mix. It gives the song balance, dynamics, and makes the
mastering process
so much more effective.
But mixing takes practice. Lots of practice. If you’re just starting out, you’re going to be bad at it. But it’s okay — you won’t get better until you first realize what you need to work on.
So to get you started on your lifelong journey of improving your mixing skills, here’s a starter guide on how to mix music. It’s tailored toward newbies, but I believe even intermediate mixers can learn from it.
Continue reading as we explain the ins and outs of how to mix music.
What Is Audio Mixing?
Mixing music is exactly what it sounds like — mixing sounds together in a way that makes them sound pleasant. By using things like EQ, compression, and levels, you can help the different tracks of your song blend together, to not cover each other up but help each other do their part.
Mixing is part of the creative process. This is where you shape the sounds you’ve recorded or sampled into what you’re hearing in your head. That’s why it’s so important you learn how to mix music on your own.
When you’re done with the mix, you render the multi-track recording into a WAV file (called “the mixdown”) so it can be mastered.
My point:
mixing is one of the most important aspects of a great recording
. People build their careers entirely on knowing how to mix.
So to properly tackle this topic, we’re going to get detailed (while still keeping it as simple as possible).
Set Up Your Home Studio To Mix Music
Having your
home studio set up properly
is the first thing you want to do as a beginner mixer. Your studio should be a place where you feel most creative, even if it is at home in your bedroom. It is almost impossible to get quality mixes without certain pieces of gear, such as mixing speakers (studio monitors), a decent computer or
laptop for producing music
, and a good listening environment.
You also want to make sure that the sound in your studio is high-quality. When putting your studio together, check for room resonances, reverb, or anything else that might affect your mixing.
I highly recommend
acoustically treating your studio before mixing
. If you begin mixing without treating your studio, you could end up making the wrong decisions in your mixes later down the line.
Some studio gear I highly recommend includes:
- Desktop or Laptop
- Studio monitors
- External Hard drives (To store large audio files)
- Microphone
- Headphones
Audio Mixing In Your DAW

In order to craft the right mix, you have to use a digital audio workstation (DAW) that can do what you need it to do (EQ, compression, reverb, crossfading, etc.). And then you have to know how to use your DAW really well, to use it to do those things and make quick mixing decisions.
Intimacy — that’s the word that comes to mind. Learn where everything is in your DAW before you even hit record.
Here are
the main things in your recording software that you should be familiar with
— I strongly recommend getting to know the keyboard shortcuts for these:
– Where the record button is
– Where you set the BPM
– How to expand the tracks and zoom in
– How to add a new track, both audio and
MIDI
– Undo recording
– Slice/cut recorded item
– Snap-To-Grid On/Off selection
– Copy/paste, specifically copying and pasting only certain sections of a song
It will take time to learn these things and make mixing decisions quickly. But the only way to familiarize yourself is to practice.
If you’re not totally set on a DAW yet,
check out our list of the best DAWs
, both paid and
free DAWs
before you mix .
Plan Before You Mix

Before you start mixing, all of
your tracks should be titled properly
. Some people even like to make tracks with similar instruments the same color, others (like me) simply put those tracks next to each other.
For example, all of the acoustic guitars might be arranged next to each other. All of the vocals could be grouped. And the bass and drums are neighbors. This allows your workflow to be smoother.
When you mix the vocals
, you can start with one template for all the vocal tracks — and if they’re together, it will be much easier to hop between them.
The point is,
try to stay as organized as possible
in whatever way you prefer.
It may also help to
imagine what you want the track to sound like
before mixing. Do you want it to sound spacey, or more in-your-face and human? What instrument do you want to feature?
Is there another artist’s track you want it to sound like? If so, you should
try mixing with a reference track
. It’s one thing that has drastically helped my mixing skills as well as my production skills. Grab a professionally mixed and mastered song from an artist you admire and drop it in your DAW project. Then you can easily switch between that song and your mix.
Also, you should decide on what will be the
main elements of the song.
When people say, “I like your one song that goes…”, what do they sing or hum? Is it the beat? The melody? A cool guitar lick? That’s the main element and should be your focus when mixing.
The 8 Steps of Mixing for Beginners
Here are the 8 steps of audio mixing for beginners:
- Step 1: Prep Your Mix (Editing, Fading, Gain Staging)
- Step 2: Get a Good Balance (Get the volume balance right)
- Step 3: Compression (Control dynamics)
- Step 4: EQ (Create Space, Accentuate Good Parts, Cut Bad Parts)
- Step 5: Creating Depth and Width (Pan and Use Reverb/Delay)
- Step 6: Automation (Automate Volume and Other Processing)
- Step 7: Add Effects (Chorus, Phaser, Flanger, Saturation, Distortion, etc.)
- Step 8: Finalizing (Tweak and Prepare For Mastering)

This is when things get fun. This is when you start shaping your sound using levels, panning, bussing, EQ, compression, reverb, and delay.
Follow this step-by-step audio mixing guide below to dial in the right mix for your song.
Step 1: Prep
One of the best things that you can do when starting the music mixing process is prep. If you can get all the tracks in your session nicely organized, you’ll have a far easier (and much faster) time when it comes to actually mixing.
Sessions can be quite large these days. Many sessions have hundreds of tracks to deal with. It is easy to feel overwhelmed when staring at hundreds of audio tracks without direction. Almost every DAW has a color code feature. You should color code your various tracks so that you can find them easily when scrolling.
The first thing you should do after that is
send similar tracks to busses
.
A bus, for those who don’t know, is a single output, which you can use to send multiple individual tracks to in order to group them and process them as a singular unit. You can think of a bus like you would a city bus. A city bus picks up multiple people and carries them to the same destination.
You can then
use plugins to affect
all of these individual tracks going into your bus together without having to overload your CPU with multiple instances of these plugins.
Think about it this way. Instead of using ten EQs and compressors to mix each of your background vocal tracks, you could bus them to a single destination and EQ and compress them together. Not only is this easier on your CPU, but it also helps
glue
your tracks together, making them sound as if they were one unit. You can buss all kinds of tracks together, though you might consider starting with the obvious ones:
- Drums
- Percussion
- Bass
- Guitar
- Keys
- FX
- Lead Vocals
- Background Vocals
You should also color code these busses to keep them organized.
What Is Crossfading In Music?
Creating fades and crossfades is incredibly important during the prep process, as it ensures you won’t hear any clicks or pops in the final mix. Crossfading is the act of splicing two audio clips together so they transition smoothly without clicks or pops.
A fade, on the other hand, is a simple volume reduction placed at the very beginning or end of an audio clip to quickly introduce or reduce the volume of a signal so that it doesn’t start suddenly and create harsh, transient noises like clicks or pops. Fades are typically very short (around 10ms), meaning you don’t even notice they’re there. However, they are an integral part of the mixing process.
Gain Staging — What Is It?
Gain staging
is the process of making sure your tracks are at the optimal volume level so that they enter plugins at the so-called «sweet spot.» The idea goes back to the days of analog gear, where engineers had to record signals at optimal levels so they didn’t introduce too much noise or too much distortion.
Because most of the same tools we use on the computer today are based on those old pieces of gear, it is crucial to make sure our audio is at the sweet spot. Plus, we don’t want to do impart digital distortion on our mixes, which is
known as clipping
.
The sweet spot is
0 dB VU.
To properly gain stage, you can use a stock gain plugin from your DAW, placing it on each track and turning up or down the volume until it is at 0 dB VU. Make sure to do this on both the single instrument tracks and the busses. While it seems mundane, it can make a big difference.
Step 2: Get a Good Balance
Volume is by far the most important thing to consider in your mix. In fact, a volume fader is the most powerful tool when you start mixing. If you can’t get your volume balance right, you’ll never have the radio-ready song you are looking for. Before you start adding effects like EQ and compressors, you need to create your rough volume balance. Follow these steps to do so:
-
Start With the Loudest Section:Loop the loudest section
of your track. In doing so, you can make this section the loudest it can be and eventually move your way to the quieter sections to create contrast. -
Get Ready With References:
Find a professionally mixed and mastered track that you can use as a reference. Listen to it before you start mixing to prime your ears. Try and listen to where certain important instruments are sitting in the mix, including kick, snare, bass, and vocals. -
Start Bringing In Instruments:
Start with your most important channel and bring it up to -5dB. It should not be clipping the master channel. Your most important channel will depend entirely on the song. For an EDM song, it might be the kick drum. For a
folk song
, it might be an acoustic guitar. -
Continue Bringing In Instruments:
Following the order of importance, continue bringing in instruments one by one with the volume faders until they are all sitting at their respective volumes. -
Get Your Rough Balance:
Once all the instruments are in, spend at least 10 minutes making sure your balance is correct. If you need to, take a break and come back to it so you don’t lose perspective.
During this process, it is a good idea to keep your studio monitors or headphones at a low volume. In doing so, your moves will have more accuracy. The rule of thumb is to keep your listening system at «conversation level,» meaning you could still have a conversation with anyone in the room.
Also, remember to keep checking your reference tracks to make sure your decisions make sense and all of your instruments are sitting in the right place.
Step 3: Compression
In order to control your dynamics and shape the overall tonal character of your mixes, you will want to
use compression
.
A compressor is there to even out the volume of a signal automatically, turning it down when it is too loud and turning it up when it is too quiet. In many ways, a compressor is like a volume fader. However, unlike a volume fader, compressors can also be used to add excitement and glue to a mix.
To understand how to use a compressor, you must understand the interface. Here are some of the most common controls you will find on a compressor and how to use them:
-
Threshold:
To determine when the compressor will kick in and begin working, we must use the Threshold. The threshold is a set volume parameter that turns the compressor on when the audio level running through it exceeds that set volume parameter. The lower you bring your threshold down, the more compressed your sound will be. -
Ratio:
The ratio determines how much the compressor reduces the volume. A higher ratio will create more aggressive compression. A 2:1 ratio, for example, means that for every 2dB the volume of a signal rises above the threshold, 1 dB will come out. 2:1 is a very mellow ratio compared to 10:1. -
Attack:
How quickly a compressor engages and clamps down on the signal is determined by the Attack. A fast attack time will clamp down on the initial transient, creating a much thicker and controlled sound. A slower attack time, on the other hand, will allow the transient to pop through, making the sound punchier and more exciting. -
Release:
How long it takes for the compressor to disengage and return to normal volume is controlled by the release. -
Knee:
Similar to the ratio, the knee determines how aggressive your compressor will sound. For subtle compression, you can use a soft knee (1.0). For much more aggressive or obvious compression, you can use a hard knee (0.0). -
Makeup Gain:
Because compressors turn the volume of signals down, we must use makeup gain to turn them back up so as not to disrupt our initial balance.
The way that you use a compressor depends completely upon the instrument you’re feeding into it. However, to give you a general sense as to how you might use a compressor, here are a few steps to follow:
-
Step 1:
Set your ratio. A good place to start is 3:1 or 4:1 for most instruments. -
Step 2:
Reduce your threshold until the compression becomes very obvious. Typically, you’ll want to go for at least 10dB of gain reduction. We will adjust this later, but dialing in a lower threshold will allow you to
hear
your other settings better. -
Step 3:
Dial in the slowest possible Attack setting and the fastest possible Release setting. -
Step 4:
Decrease your Attack until you hear the compressor start to clamp down on your transients. The moment the sound starts to feel squashed or lifeless, back the attack off. -
Step 5:
Increase your Release until the compressor «breathes» with your track. Your compressor will most likely have a VU meter needle. The idea here is that you want this needle to bounce back in time with your track. If it’s clamping down all the time or bouncing back too quickly, you can hurt the groove of your track. -
Step 6:
Start increasing your threshold until you get the amount of compression you are looking for. Remember to
listen
to what the compressor is doing. Don’t use your eyes to decide when enough is enough. Whether you need 10dB of compression for a single track to make it sit right in your mix or 3dB, it doesn’t matter as long as it sounds good. -
Step 7:
If you need more aggressive compression, consider adjusting your ratio to a higher number. -
Step 8:
Use your Makeup Gain or Output Gain knob to bring your newly compressed signal back to the normal level.
The first instruments you should use a compressor on are the ones that need dynamic control. Typically, live instruments like drums, bass, and vocals will require compressors to sit nicely in a mix. Some genres use heavier styles of compression, such as rap, rock, and pop. Others use very little compression if any at all. These genres include classical and jazz.
This is one of the hardest things in mixing to get used to and it will definitely take some time until you are able to hear your moves clearly. Keep practicing and don’t be afraid to go bold with your settings to get the sound you’re looking for.
Step 4: EQ
EQ is short for «equalizer.» As one of the most essential tools in your mixing toolbelt, you can
use an equalizer
to shape the frequency content of your instruments so they fit together like a puzzle.
We use an equalizer to manipulate certain portions of the frequency spectrum. The spectrum in human hearing goes from 20Hz to 20kHz (20,000Hz). Lower instruments sit lower on the spectrum, such as kick and bass, while higher instruments sit higher on the spectrum, such as cymbals or shakers.
Some instruments take up much larger portions of the spectrum, such as pianos, vocals, and synthesizers.
Let’s break up the spectrum into sections and define each of them.
-
Sub Bass (20-60Hz):
To hear sub-bass frequencies, you will likely need a subwoofer or a really strong pair of headphones. Humans mostly
feel
these sub frequencies rather than hear them. The thump of a deep kick drum or the earthquaking bass in a club is a result of sub frequencies. -
Bass (60-200Hz):
Low instruments often sit in this frequency range, such as kick, bass, and toms. However, the low end of male vocals and guitars can also sit here. -
Low Mids (200-500Hz):
The low mids give your mix BEEF. However, too much information in the low mids can lead to what we call a »
muddy
» mix. This area often needs special attention to make sure there isn’t too much frequency buildup with different instruments. -
Mids (500Hz-2kHz):
Humans have a deep relationship with the mids, as it is the area of the spectrum that we hear the most. When you talk to someone on the phone, this is the area of the frequency spectrum you hear. The main focus of the track should live here (vocals, guitar solo, etc.) Too many mids and your mix can start sounding harsh or aggressive. -
High Mids (2kHz-8kHz):
When it comes to clarity, the high mids are crucial. You can add presence to instruments with the high mids, though they can also make your mix harsh if they are overbearing. -
Highs (8kHz-20kHz):
Sweet, sweet air. The sparkle and shimmer of an expensive-sounding mix live in the highs.
How To Use EQ
So now that you understand the frequency spectrum, you may be wondering,
How do I put it to work in my mixes?
EQs allow you to turn the volume of these different parts of the frequency spectrum up or down. In doing so, we can alter the tone of an instrument and help it fit with other instruments.
Does your kick sound weak in your mix?
If so, you might consider boosting the sub-bass or bass frequencies.
Are those sawtooth synths sounding a bit harsh?
If so, you might consider turning down those high mids.
Any EQ plugin will typically have the same parameters as the next. Here are some of the
most typical EQ parameters that you need to know
:
-
Filters:
EQs often come with both
high-pass filters
(HPF) and low-pass filters (LPF). A high-pass filter will cut out the low end and allow the high-end to pass through, while a low-pass filter will cut out the high-end and allow the low-end to pass through. -
Q:
The «Q» represents how wide your particular filter is. A wider Q will affect a wider range in the frequency spectrum. -
Frequency:
You determine which area of the frequency spectrum you are affecting with the Frequency parameter.
There are many ways to use EQ when mixing, though we like to focus on three specific uses.
Maintenance Work
Maintenance work can sometimes be part of the prep phase. The idea here is to remove any «bad» parts of a particular piece of audio. Typically, these «bad» parts are resonances, modes, or noise. You can use the «sweep and destroy» technique to get rid of these resonances in your mixes. Start with an extremely narrow Q and boost your desired frequency all the way up.
Sweep through the spectrum carefully listening for resonances that pop out of your recording. If you notice a resonance that is present throughout the entire song, it might be the room it was recorded in or the instrument itself. If you notice this resonance is getting in the way of the sound, cut it by pulling the frequency point down.
Otherwise, you may consider leaving it alone to maintain the natural recording. There is nothing wrong with allowing nasty resonances to pop through.
During this maintenance work, we will typically use high-pass filters and low-pass filters to get rid of any unnecessary noise or fizz.
Change The Tone
We can also use EQ to change the tone of an instrument. Typically, you’ll use wider boosts and cuts during the tone-altering processes for a more «musical» sound.
Let’s take a vocal for example.
We might want to get rid of any boxiness or muddiness in the low mids and boost a bit of the high-mids and highs to add air and presence.
For a bass guitar, we might want to boost the lows or low-mids to get a bit more meat while cutting the mids or high-mids to get rid of honkyness or finger sound.
Puzzling the Mix Together
Audio mixing is a puzzle with many different pieces that must fit together. We can carve out certain points of the spectrum in certain instruments to help them fit better with others.
For example, we might cut the lows of an electric guitar to help it sit better atop a bass, which already has control of the lows. In the same way, we might cut the high-mids of an acoustic guitar to help the vocals dominate that range.
Before you ever make any moves with EQ, you’ll want to ask yourself,
What is my end goal?
Just because someone online told you to boost a vocal at 3kHz does not mean YOUR vocal will benefit from a 3kHz boost.
If your vocal sounds like it needs more presence in your mix, you might consider boosting at around 3kHz. However, your vocal might just sound like it needs presence because you have another instrument covering it up that could maybe benefit from a 3kHz reduction.
You might also consider taking out some low-mids in your vocal to create presence, as fewer lows and mud will help the «presence» frequencies stand out more.
It is important to note that you can even employ EQ during the recording process to get the sound you are looking for right out the gate.
Step 5: Depth and Width
To create depth and width in a mix, you will need to use a combination of spatial effects and panning.
Let’s start with making our mix three-dimensional using one of your DAWs most basic tools: the panners.
What Is Panning?
Panning is the process of placing an instrument in certain places
throughout the stereo field in either the left or right speaker. By using the pan knobs in your DAW, you can create a soundstage where each individual instrument sits.
Some engineers use the LCR method, keeping all of the instruments panned either 100% to the left, 100% to the right, or completely center. This is an old-school method that works for a lot of people. There are others that use a very detailed approach, giving every instrument in their mix a very particular space on the stereo spectrum.
It is best to imagine your instruments on a stage and pan them accordingly. For example, you might choose to keep your vocal, kick, snare, and bass panned center to hold down the foundation. You can then pan your stereo electric guitars 100% to the left and 100% to the right. Your keyboards, percussion, or any additional instruments might then fit at the halfway point between left or right and center.
Using Reverb To Create Depth
Now that your mix has width thanks to panning, you will use reverb to create three-dimensional, front-to-back depth.
Think about it this way, musicians don’t typically stand on a two-dimensional line straight across the stage. The singer is usually front and center, the guitars, bass, and keys are pushed a bit further back, and the drums are even further back than those instruments.
To create depth, we will start with using
reverb.
Reverb is an incredibly dense topic. If you want more details,
here’s our in-depth guide about reverb
.
In its most basic form, reverb is used to put certain instruments in a «room.»
You can use reverb to push instruments back in a mix, making them sound further away, or use reverb to control the overall tone of your mix.
Larger reverbs, such as halls or cathedrals, create a more grandiose sound. These reverbs are great for classical string sections, ballad vocals, or stadium-style drums.
Smaller reverbs, such as rooms or chambers, are great for a more intimate sound. Think folk-style acoustic guitars or roomy pianos.
While it is easy to create depth with reverb, it can sometimes feel as if this effect pushes a sound way too far back in the mix. A vocal, for example, might need some space without feeling like it’s sitting behind the other tracks.
In this case, we might want to use delay instead of reverb.
What Is Delay?
While
Delay might seem very similar to reverb
in many ways, it is a far more precise tool. Rather than hearing a jumble of echoes flying back and forth around a room, creating a single, unified reverberation, delay creates note repetition, allowing you to hear individual echoes. If you were to yell «Hello» into a cave, you would likely hear that «Hello» as an echo multiple times before dissipating.
While there are infinite ways to use Delay, let’s talk about the most simple technique: slapback delay.
Slapback delay has been used since the 50s to create depth without pushing instruments too far back in the mix. Listen to Elvis Presley’s records from the 50s and you’ll likely hear slapback delay on his voice. You can typically find slapback delay presets in the plugins in your DAW. Start there and adjust the parameters as you feel fit.
Step 6: Automation
At this point, that loudest section of your song that you’ve been looping likely sounds pretty good.
Of course, not every section of your song sounds the same, meaning the parameters you set for this section might not sound right for the others.
This is where automation comes in handy.
In mixing, we use volume automation to create a sense of consistency throughout a song. Every DAW comes with volume automation channels, which you can use to turn the volume of a particular instrument or bus up or down during specific parts of the song.
For example, the kick might be rockin’ in the
chorus
, but it sounds
way
too loud in the
verses
. In this case, you may consider turning it down using volume automation.
You can also use automation on your plugins as well.
For example, that 10dB of compression that you were using on your vocals might have sounded great during the chorus, though it’s sound over-compressed during the verse. If so, you can automate the threshold on your compressor so that it’s not compressing as much during the verse.
In another example, your acoustic guitar might have benefitted from low-mid cuts during the chorus, as it was interfering with other tracks. However, the verses are much sparser and feel kind of weak without those low mids.
In that case, you might automate your EQ so that it is only cutting the low-mids out during the choruses and leaving it in during the verses.
You can also use automation to add interest and capture the attention of the listener. You might consider turning up important words in a vocal line to accentuate them or turning down the bass during the pre-chorus so that you can bring it back hard in the chorus.
In many ways, volume automation is just as much a part of the performance as the instruments in the mix. As a mix engineer, you can add dynamics to a mix using volume automation that would otherwise feel flat and lifeless.
Step 7: Add Effects
Here is where you can start to get creative.
Everyone loves experimenting with effects. There is no better way to give your song a creative edge than with cool and different effects. Because there are so many effects out there, it would be impossible to go into them in a single article. However, here is a small list of effects that you might consider using in certain parts of your mix:
- Chorus
- Flanger
- Phaser
- Saturation
-
Distortion
- Throw delays
- Vibrato
- Pitch Shifting
If you want an in-depth explanation of each of these creative effects and more, head over to our article:
Audio Effects Explained
Step 8: Finalizing
You’re so close, don’t stop now!
At this point, your mix is sounding pretty slamming. It’s time to carefully go through it a couple of times and make sure everything is sitting properly so it’s ready for the mastering stage.
During the finalizing process, you might consider making any last-minute EQ or compression tweaks. You might also consider re-balancing your sounds or altering the volume of your effects.
To make the most out of the finalizing process, we recommend taking a break first. If you can, try and come back to this step the next day so that you have a fresh set of ears to work with.
Pull out a pencil and a notepad and listen to your mix from front to back a few times. Take notes on anything you hear that you’d want to change.
During this process, refer to your reference tracks to make sure you’re heading in the right direction. While you don’t want to copy your reference track, it can be helpful to make sure your frequency and volume balances are on point.
One of my favorite plugins for referencing professional tracks is Reference by Mastering the Mix.
Once you feel like your mix is ready to rock, you can bounce it out or export it in WAV format to listen to it in different environments, such as your car, your laptop, your AirPods, etc.
When you feel it is ready for mastering, you might consider uploading your song to
eMastered
for professional mastering.
FAQs
What Is The Best App To Mix Songs Together?
When it comes to mixing songs together,
Djay Pro
is one of my absolute favorite apps. This app can be used on Android, iOS, Mac, and Windows. It even features Spotify integration!
Should I Mix My Own Music?
If you can’t afford to hire a great mixing engineer or you don’t believe that someone else can mix your music better than you can, then there is nothing wrong with trying to mix your own music! However, you must also be able to remove yourself from the emotional aspects of the music to make clear, technical decisions.
Is Mixing a Song Hard?
Learning how to mix a song isn’t necessarily hard, but it does take a lot of time to get used to. We recommend spending some time watching YouTube videos, reading
blogs
, and joining online groups to learn more before diving in. Have a plan in mind and understand the tools you have in front of you so that you can make the process as easy as possible.
How Do You Get Better At Mixing Music?
As with getting better at anything, practicing is the best way to get better at mixing music. Implement the techniques that you learn until they become second nature. Mix different types of music by offering to mix songs for free. Do everything you can to practice mixing as much as possible and you will get better with each mix.
Is Garageband Good For Mixing Music?
While Garageband isn’t necessarily a professional DAW, it has pretty incredible mixing features considering the fact that it is free. If you’re just getting started in the world of mixing, Garageband is a great place to start.
Can Mastering Fix A Bad Audio Mix?
Mastering cannot fix a bad mix. Mastering is the final step before release that is only there to polish and enhance a good mix. A mastering engineer only deals with songs at a macro level, meaning they can’t pick apart the entire song and manipulate bad volume balance choices, too much compression on certain tracks, or wonky reverb effects.
You need to get a good balance, panning, EQ, and all other processing right during the mixing stage for the best results.
What Should You Not Do When Mixing?
While there are plenty of things you should never do during the mixing process, here are the five most important things that we see beginners doing way too often:
- Mixing instruments in solo or not in the context of the mix
- Not using reference tracks
- Mixing at very loud levels
- Overprocessing tracks
- Not having intentions with processing moves
How Do You Make Your Mix Sound Professional?
There are many things you can do to make your own mix sound professional, though when it comes to modern music, there are 7 things that you should almost always do to get a more professional sound. Employ these in your mix and watch it shine:
-
Gain Staging:
Make sure you have enough headroom when mixing. -
Top-End Boosts:
Does your mix sound flat? Maybe just one track sounds like it could use some love? Try a high-shelf boost around 10kHz. -
Resonance Removal:
Get rid of room resonances with the boost-and-sweep EQ technique -
Get Rid of Sibilance:
Use a de-esser to get rid of harsh sibilance in your vocals -
Use Automation to Control Dynamics:
Compression can’t deal with dynamics alone. To make sure your tracks are sitting right and feeling consistent, you’ll want to use automation. -
Use Saturation To Add Life:By using saturation plugins
, such as tape machines, you can add a unique, analog vibe to your mix, helping to fill out the harmonic series and give character to your tracks. -
Clear Up the Low End:
It is typically a good idea to high-pass any instrument that doesn’t need a ton of energy in the low end to make space for the instruments that do need it, such as kick and bass.
How Much Is It To Mix A Song?
A freelance mixing engineer will likely charge anywhere from $100 to $1,000 per mix, while a professional studio might charge up to $1,500 or more per mix.
Do Rappers Mix Their Own Music?
While not many rappers mix their own music, there are plenty of rappers that produce their own beats. Some of the most popular rappers than produce their own beats include:
- Kanye West
- T-Pain
- Tyler, the Creator
- Eminem
- Logic
- Chief Keef
How Do You Know If Your Mix Is Good?
There are a few telltale signs that your mix is good and finished, including:
- You can hear each instrument in the track clearly
- The vocals sound consistent
- The mix sounds glued and balanced
- There aren’t any technical problems, such as pops, clicks, or noise
- The mix is dynamic and interesting
- It sounds on par with some of your favorite songs
- It sounds good on different sound systems
How Long Does It Take To Mix A Song?
For a song with multiple instrumental and vocal tracks that requires complex editing, processing, and automation, a mix could easily take up to eight hours or more. You can shorten this time by using mix templates and having a reference track to continuously check your mix with.
How Do I Make My Mix Sound Clearer?
In my experience, there are a few techniques that you can employ with just about any mix to make it sound cleaner and clearer. These techniques include:
-
High Pass Filtering:
Get rid of any unnecessary low-end in instruments that don’t need it, such as vocals, guitars, keyboards, etc. -
Use Delays Instead of Reverb:
If reverb is taking up too much space in your mix and making it sound washy, you might considering swapping it out for a delay instead. -
Sidechaining:Sidechaining is an excellent way
to carve out space for certain instruments when they’re playing at the same time. -
Puzzle Piece EQ:
Decide where each of your recorded tracks will sit in the EQ spectrum and boost and cut frequencies accordingly so that everything has its own space without overlapping. Instruments with the same frequency content should not feel as though they are overlapping.
Mixing Music — Making Your Own Songs Sound Great
It’s easy to get lost in the details of mixing, so remember this: it’s all about the song. Try to zoom out and remind yourself of the overall sound you want.
Where is this track going? Does it sound like your reference track? Are you getting the sounds you’re hearing in your head?
Again, I highly recommend using a reference track when mixing. It’s sort of like a map you use to make sure you’re on the right path to a professional-sounding song.
Also, mixing is not a quick thing. You might eventually find yourself going back to your rough mix because your new mix doesn’t sound good. You’ll find yourself making little tweaks, listening, making more tweaks, listening again, and making even more adjustments. All of that is okay! It is part of the mixing process.
Just know you shouldn’t get discouraged if this is your workflow — that’s a sign you’re moving toward a great mix.
Once you’ve learned all these “mixing rules” and you’re comfy with them, break them. Be creative and experiment. Trust your ears, even if what you’re seeing on the screen is unfashionable. Use other tools to create mixes that are all your own.
The whole point is to end up with an amazing mix, which is the key to a great master and a song that can stand up to any other.
Happy mixing!