
Set Multiple Paper Sizes
1. First, add enough pages to your document. For example, add 8 or more pages as shown in the picture below.

2. For example, if you would like to keep the first 1 page as it is (Default Size) and want to change the next 3 pages (2nd, 3rd, and 4th pages) are as other sizes. Then click at the beginning of the first line of the 2nd page to start the new section from here.

3. On the Layout tab, in the Page Setup group, click on the Breaks, and then select “Next Page” under the “Section Breaks”.

4. Now, to stop the previous page Section Break at the 4th page (Previous Size) or start a new section from the 5th page, click at the beginning of the first line on the 5th page.

5. Again, go to the Layout tab, click on the Breaks in the Page Setup group, and then select “Next Page” under “Section Breaks”.

6. To stop the previous page Section break at the 7th page (Previous Page Size) or start a new section from the 8th page, click at the beginning of the first line on the 8th page.

7. Again, go to the Layout tab, click on the Breaks in the Page Setup group, and then select “Next Page” under “Section Breaks”.

8. To change the default page sizes (The default page size in Word is Letter Size) to other page sizes you want from the 2nd to the 4th page, do the following.

9. Go to the Layout tab, in the Page Setup group, click the drop-down arrow of the Size, and then select More Page Sizes.

10. On the Page Setup dialogue, select “Custom Size” → Change “Width and Height” → Make sure the ” This Section” Option is under preview. (To Set Multiple Page Sizes in MS Word).
11. Then click OK.

12. After the above steps, your document pages will change as given in the picture below. (To Set Multiple Page Sizes in MS Word).

13. The next section breaks have been applied in between the 5th and 7th pages so leave them as the Letter Size pages which are default.
14. If you would like to change the 8th page to the default page (Letter size), click the 8th page because you have started the new section here.
15. After that, on the Layout tab, in the Page Setup group, click on the drop-down arrow of the Page and then select More Page Sizes.
16. On the Page Setup dialogue, select “Custom Size” → Change “Width and Height” → Make sure the ” This Section” Option is under preview.
17. Then click OK to Set Multiple Page Sizes in MS Word.
Set Mixed Page Sizes
Firstly, insert as many pages as you want into the Word document.
For example, if you want to convert two pages or more than two or fewer pages in the same size in a Word document. Do the following.
Click on the beginning of the first line of a page (excluding the first page) to apply the “next page” section break from where you want to start a different page size.
And click near the beginning of the first line of any next page to stop the section break, which was given on the previous page or to start the new section here as well as the next page section break.
Go to the Layout tab, in the Page Setup group, click the drop-down arrow of the Size, and then select More Page Sizes.
On the Page Setup dialogue, select “Custom Size” → Change “Width and Height” → Make sure the ” This Section” Option is under preview. (To Set Multiple Page Sizes in MS Word).
Then click OK.
You can use Microsoft Word to create documents in different formats and sizes. You can choose from the standard sizes built into Word. The other possibility is to customize the dimensions according to your requirements.
By default, a new Word document uses an A4 size sheet, measuring 8.27 inches by 11.69 inches. Schools and offices use the A4 size most for printing presentations. But documents can be larger or smaller in comparison to A4. Also, the user might want to change the page size of the document for printing.
It is always possible to print on a larger paper using a special printer setting. But if your printer does not allow that, the only option is to change the size of the document in Word.
The process is very simple and you only have to follow the steps in our instructions. You can change the size of all the pages while working on a Microsoft Word document. Sometimes, you may want to change the size of a specific page inside a document.
Thus, you may set up a custom page size for:
- All pages in a document
- Specific pages in a document
We will show you both the methods.
Let us begin.
Method #1: Custom page size for all pages in a document.
Step #1: Open the document
Open the Word document for which you want to change the page size. The document could be new or an existing one. The process is the same for both.
Click on the Layout tab on the top menu bar to change the ribbon.

Step #2: Select a standard page size
In the Page Setup section, click on the Size icon. This will open various selections for page size.

You can select from standard sizes like:
- Letter (8.5” x 11”)
- Tabloid (11” x 17”)
- Legal (8.5” x 14”)
- Statement (5.5” x 8.5”)
- Executive (7.25” x 10.5”)
- A3 (11.69” x 16.54”)
- A4 (8.27” x 11.69”)
- A5 (5.83” x 8.27”)
- B4(JIS) (10.12” x 14.33”)
- B5(JIS) (7.17” x 10.12”)
Step #3: Select a non-standard page
Click on More Paper Sizes. This will open the Page Setup dialog.

Click on the Paper tab.
Under Paper size, click on the downward arrow. Scroll down and click on Custom Size.
Enter your desired Width and Height of the page in inches.
Click on the downward arrow next to Apply to:. Word offers two options:
- Whole document—The page size applies to all the pages in the document.
- This point forward—The page size applies to all pages following the cursor.
Click on Whole document.
Click on Ok to exit the dialog.
Word changes all the pages in your document to your custom size.

Method #2: Custom page size for specific pages in a document
Step #1: Open the document
Click on the View tab on the top menu bar to change the ribbon.
Step #2: Increase the number of pages on display
In the Zoom section, click on Multiple Pages.

Drag the Zoom slider in the bottom right-hand corner of your screen to the left side.

This will increase the number of pages Word is displaying on the screen.

Place the cursor at the beginning of the page you want to change.
Step #3: Change the page size
Click on the Layout tab in the top menu bar to change the ribbon.
In the Page Setup section, click on Size.

This will open various selections for page size.

Click on More Paper Sizes. This will open the Page Setup dialog.

Click on the Paper tab.
Under Paper size, click on the downward arrow. Scroll down and click on Custom Size.
Enter your desired Width and Height of the page in inches.
Click on the downward arrow next to Apply to:. Word offers two options:
- Whole document—The page size applies to all the pages in the document.
- This point forward—The page size applies to all pages following the cursor.
Click on This point forward.
Click on Ok to exit the dialog.
Word changes the size according to your choice for all pages following the cursor.

Step #4: Revert to original page size for the rest of the document
Place the cursor at the beginning of the page from where you want to revert to the original size.
Repeat Step #3, only this time enter the original Width and Height of the pages.
Word changes the rest of the pages in the document to their original size.

Conclusion
We have shown you how to change to a custom page size for all pages or for a few pages of your document. Follow our instructions step by step for easily implementing the change in page size.
If you want to learn how to setup custom page size in Google Doc, check out this tutorial.
In Word for Mac, you can choose a predefined paper size from a list and change the paper size for all pages in your document, for a specific page, or for a specific section. You can also change the default paper size used for new documents.
When you create a new document, Word applies the default paper size and margins that are stored in a template (normal.dotm). If you frequently use a paper size that differs from the default size (for example, US Legal), you can set new defaults that Word uses when you create a new document. If your current document is set up with the margins that you want, you can use this document to set your new default margins.
In Word 2016 for Mac, you can also create a custom paper size and you can choose different paper sources for pages in your document. Choosing different paper trays allows you to use different paper for your first page, which could be a different color or heavier weight than the other pages.
-
On the File menu, click Page Setup.
-
In Page Setup, select a size from the Paper Size list.

If you select Manage Custom Sizes from the list, you can define a custom paper size; click the plus sign to create a new paper definition, and then enter sizes for width, height, and non-printable area.
-
When you have finished selecting your paper size, click OK.
-
Select the text on the pages that you want to change.
-
On the Format menu, click Document > Page Setup.
-
Select a paper size from the Paper Size list, and then click OK.
-
On the Document page, on the Apply to list, click Selected text, and then click OK.
Word inserts section breaks as needed before and after the text that you selected and changes the paper size for that section.
-
On the View menu, click Print Layout.
-
To display nonprinting characters, such as paragraph markers (¶), click Show all nonprinting characters
on the Home tab. -
Select the section break for the section that you want to change.
-
On the Format menu, point to Document, and then click Page Setup.
-
On the Paper Size list, select a paper size and then click OK.
-
On the Apply to list, click Selected sections.
 on the Home tab.
-
On the Format menu, click Document.
-
Click Default, and then click Yes.
Note: If you change the preferred paper size or margins for the template that Word bases new documents on (normal.dotm), all future documents that use the normal.dotm template use the new settings. If you change the preferred paper size or margins for a document that is based on another template, only new documents that are based on that template use the new settings.
Choose a paper source for your document’s first page, and then for all subsequent pages. The list of available sources is provided by the printer driver on your computer and may be different from those shown here.
If a page source is set to Auto Select, Word will automatically choose a paper source based on the size of the page and the information about paper sizes provided by your printer driver.
-
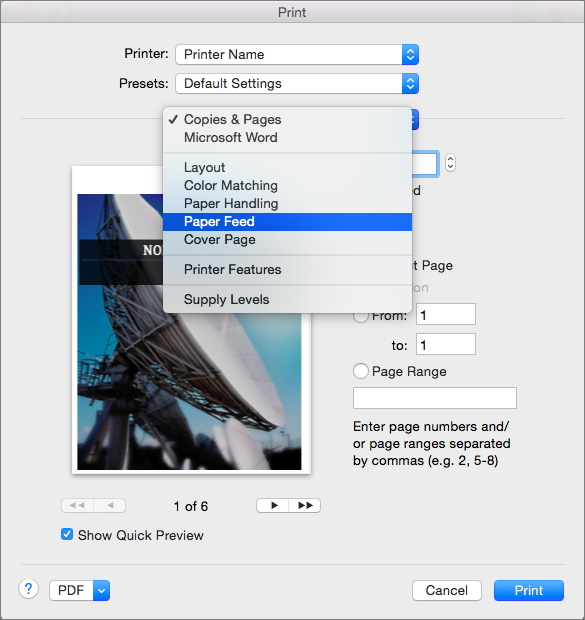
On the File menu, click Print.
-
In Print, select Paper Feed.
Word displays Paper Feed settings.
-
To specify a paper source for the first page in your document, select First Page From, and then select a source from the First Page From list.
-
To change the paper source for all pages in your document after the first page, select a source in the Remaining From list.
-
If you are ready to print, click Print.
Otherwise, change Paper Feed to another category of settings to make additional changes.

-
On the Format menu, click Document.
-
Click Page Setup.
-
On the Paper Size pop-up menu, select a paper size.
-
Click OK.
-
On the Apply to pop-up menu, click Whole document, and then click OK.
-
Select the text on the pages that you want to change.
-
On the Format menu, click Document.
-
Click Page Setup.
-
On the Paper Size pop-up menu, select a paper size.
-
Click OK.
-
On the Apply to pop-up menu, click Selected text, and then click OK.
Word inserts section break as needed before and after the text that you selected and changes the paper size for that section.
-
On the View menu, click Print Layout.
-
To display nonprinting characters, such as paragraph markers (¶), click Show all nonprinting characters
on the Standard toolbar. -
Select the section break for the sections that you want to change.
-
On the Format menu, point to Document, and then click Page Setup.
-
On the Paper Size pop-up menu, select a paper size.
-
Click OK.
-
On the Apply to pop-up menu, click Selected sections.
-
On the Format menu, click Document.
-
Click Default, and then click Yes.
Note: If you change the preferred paper size or margins for the template that Word bases new documents on (normal.dotm), all future documents that use the normal.dotm template use the new settings. If you change the preferred paper size or margins for a document that is based on another template, only new documents that are based on that template use the new settings.
See also
Print a document
Insert, delete, or change a section break
Use headers and footers
Need more help?
Changing the Paper Size in Word
You aren’t tied to letter-size paper and documents in Word
Updated on January 4, 2021
What to Know
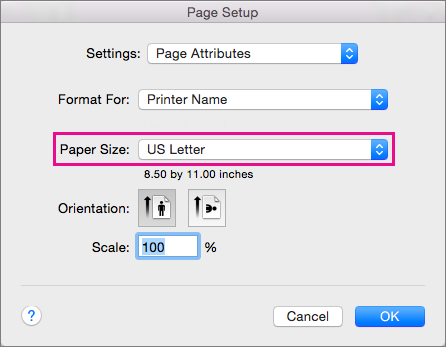
- Mac: Go to File > Page Setup, choose Page Attributes from the drop-down menu, then set the Paper Size.
- Word 365: Go to File > Print > Page Setup, select the Paper tab, then set the Paper Size.
- If you don’t see the size you want, select Custom or Manage Custom Sizes to set your own margins and define a nonprintable area.
This article explains how to change paper size in Word. Instructions apply to Word for Mac and Microsoft 365.
How to Change a Document Paper Size for Printing
You can change a document paper size for a new file or for an existing one.
-
Open a new or existing file in Microsoft Word.
-
On a Mac, choose the File menu and select Page Setup.
-
In Word 365, choose File.
-
Select Print in the left pane, then click the Page Setup link at the bottom of Settings.
-
On a Mac, when the Page Setup dialog box appears, it should be set on Page Attributes. If not, click the drop-down selector at the top of the box and select Page Attributes.
-
For Word 365, you may need to click the Paper tab at the top of the dialog.
-
Using the drop-down menu next to (or under) Paper Size, select the size paper you want from the available options. When you make a selection, the Word document on-screen changes to that size. For example, if you pick US Legal on the menu, the document size changes to 8.5 by 14.
Paper Size Limitations in Word
For U.S. versions of Microsoft Word, the default paper size is 8.5 inches by 11 inches. While you probably print most of your letters, reports, and other documents on this size paper, changing the page size in Word to use a different-size paper is a straighforward task.
Word does not place many limitations on page size or orientation. There is a good chance that your printer sets greater limitations on the paper you use than Word does, so before you make any changes to the page size, you should consult your printer documentation. It may save you a lot of frustration in the long run.
How to Set Up a Customized Paper Size
If you don’t see the size you want in the drop-down menu, set up any specific size you want.
-
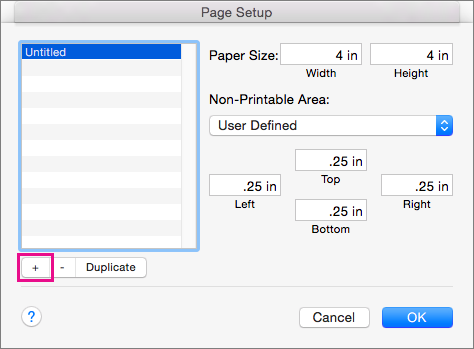
On Mac and non-Microsoft 365 versions of Word, click Manage Custom Sizes at the bottom of the list of paper size options.
-
Click the plus sign to add a new customized size. The fields populate with the default measurements, which you will change.
-
Highlight untitled in the customized size list and change the name to something you’ll remember or recognize by typing over it.
-
Click in the field next to Width and enter a new width. Do the same in the field next to Height.
-
Set a Non-Printable Area by choosing User Defined and filling in the margin amounts in the Top, Bottom, Left, and Right fields. You can also select your printer to use its default non-printing areas.
-
Click OK to return to the Page Setup screen.
-
Select Other or the name you gave the customized size in the drop-down paper size menu. Your document changes to that size on the screen.
Word 365 is a bit different. Set the Paper size to custom, and then set the various parameters in the Paper, Margins, and Layout tabs. Then Click OK.
If you enter a paper size that the chosen printer cannot run, the name of the customized paper size is grayed out in the paper size drop-down menu.
Thanks for letting us know!
Get the Latest Tech News Delivered Every Day
Subscribe

on
December 3, 2007, 4:00 PM PST
Scale Word documents for different page sizes without reformatting
You realize that your Word document will fit in a smaller-sized sheet and doesn’t need to take up a letter-size memo. The good news is that you don’t have to reformat your Word document — simply print to scale. Here’s how.
You realize that your Word document detailing new company policies will fit in a smaller-sized sheet and doesn’t need to take up a letter-size memo. The good news is that you don’t have to reformat your Word document — you can simply print to scale. Here’s how:
- Open the document containing the announcement.
- Press [Ctrl]P.
- In the Zoom section, click the Scale To Paper Size drop-down arrow.
- Scroll to and select the desired sheet size.
- Enter how many copies you want and then click OK.
Note that changing the size in the Print dialog box will not reformat your original document; the new paper size will apply to this printout only.
You can scale your document to print to any paper size listed; or, if your printer supports it, you can create your own size. Click the Properties button in the Print dialog box to access your printer’s menus and create a custom paper size.
Miss a Word tip?
Check out the Microsoft Word archive, and catch up on other Word tips.
Help users increase productivity by automatically signing up for TechRepublic’s free Microsoft Office Suite newsletter, featuring Word, Excel, and Access tips, delivered each Wednesday.
-
Software