
Vocabulary Builder Courses
Here’s a question – do you know what color these words describe: maroon, fuchsia, hazel, and ivory?
You probably learned simple colors like red, yellow, and blue in your first year of English… but the language has a lot more color words than these basic ones!
Today you’ll learn 12 interesting vocabulary words for different colors.
One quick note: If you search online, you’ll often find very long lists of color words – but many of these are NOT in used in everyday English. So you might see 50 terms for various shades of red – but please don’t try to memorize all of those. Those hundreds of color words are typically used to describe different colors of paint, nail polish, or makeup, but they are not common in daily life.
The words I’ll teach you today are some of the more common ones. Let’s get started.
Maroon
Maroon is a dark red color, like this:

Beige & tan
Tan is a light brown:

And beige is an extremely light brown:

Turquoise & teal
Turquoise is a color in between blue and green:

And teal is a darker version of it:

ivory
The noun ivory refers to the material of an elephant’s tusks, and it also refers to their color – a slightly yellowish-white:


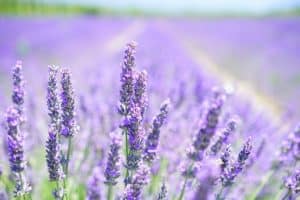
lavender
Lavender is a flower that has a nice smell, and it also describes the color – a light purple:

fuchsia
The color fuchsia is a bright color, somewhere between red and purple:

amber
Amber is the name of a hardened substance that comes from trees – and also the color of yellow-brown.

coral
Coral is a pink-orange-red color that is characteristic of the substance that grows under the sea.


auburn
This color is a dark brown with hints of red/orange. It is typically used to describe hair of this color.


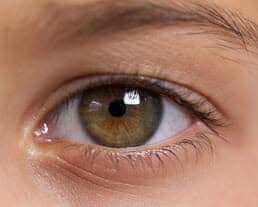
hazel
Hazel is a golden-brown color that is typically used to describe eyes of this color.
Expanding your vocabulary is a great way to become more fluent in English – because when you know more words, you can express yourself better and say exactly what you want to say.
I created two great courses to help you improve your vocabulary – they’re called the Vocabulary Builder Course Level 1 and Level 2. You’ll learn and practice more than 1000 useful words in each level.
Level 1 is good for learning the basics, the essential English words we use to talk about everyday objects, activities, hobbies, and more. And Level 2 is more advanced – you’ll learn words that will help you express more complex ideas.
In this article, we will give you 5 ways to set different background colors for different pages in your Word document.
Word allows us to set a background color for our document. However, it will apply the same color for all pages. But, sometimes we may need to print a document with multiple background colors, or highlight important pages with different background colors. In such cases, we need some workarounds to set different background colors for different pages.
Method 1: Insert a Text Box
- First and foremost, click “Insert” and choose “Text Box”.
- Next choose “Draw Text Box” on the drop-down menu.

- Then draw a text box to cover the entire page.
- Now right click on the outline of text box. Move cursor on “Wrap Text” and click “Behind Text” on its submenu. You will be able to see the texts then.

- Next, right click on text box outline again. This time choose “Format Shape”.
- In “Format Shape” dialog box, click “Fill” and then choose a fill color.

- Then in the same box, click “Line Color” tab.
- And select “No line”. Close the box.


Now if you need to print the document, go to open “Word Options” by clicking “File” and “Options”. Next click “Display” and check “Print drawings created in Word” and “Print background colors and images” boxes. Click “OK”.
Here is the effect:
Method 2: Insert a Shape
- Firstly, click “Insert” and choose “Shapes”.
- Then select “Rectangle”.

- Next your cursor will change to a cross sign. Use it to draw a rectangle to cover the page.
- Likely, right click on the shape.
- Repeat from step 4 to 8 in method 1.

Ensure the print options are properly set if you need to print the document.
The above 2 methods are best used to apply colors for individual pages. If you have multiple pages which need to be in the same color, you may consider the following solutions.
Method 3: Copy the Color to More Pages
- After employing method 2, click on colored page and press “Ctrl+ D” to copy the color.
- Next drag the shape to another page and release your cursor. You will see the color is perfectly pasted.


Method 4: Insert Section Breaks
- If you need to apply a color for a number of pages in order, you can create a section first. Move cursor to the start of the first page in the section, click “Page Layout”, click “Breaks” and choose “Continuous”. This inserts a section break.

- Move cursor to the end of the last page in the section. Use the same way to insert a section break.
- Then double click on the header of the first page in the section to enter header and footer mode.
- Deselect the “Link to Previous”.

- Go to the first header of the next section. Repeat step 4.
- Then use either method 1 or 2 to color the pages.
- Lastly, click “Design” and click “Close Header and Footer” to exit header mode.


Method 5: Split a Document
There is one last way that is to split a document into several subdocuments. Then click “Page Layout”, click “Page Color”, and choose a color.
Fix the Annoying Word Issues
As most Word users have noticed, Word is susceptible to errors and mistakes. This is excusable but something needs to be fixed. Otherwise our treasurable data would be on the line. Thus, it’s necessary to find a utility to fix Word.
Author Introduction:
Vera Chen is a data recovery expert in DataNumen, Inc., which is the world leader in data recovery technologies, including fix xls and pdf repair software products. For more information visit www.datanumen.com
Document themes make it easy to coordinate colors, fonts, and graphic formatting effects across your Word, Excel, and PowerPoint documents and update them quickly. This video show you how-to change the entire theme, read below to just customize theme fonts, colors, or effects.

I want to
-
Choose a standard color theme
-
Create my own color theme
-
Change theme fonts
-
Change theme effects
-
Switch or remove a theme
-
Save a custom theme for reuse
-
Make my changes the new default theme
-
Learn more about themes
Choose a standard color theme
-
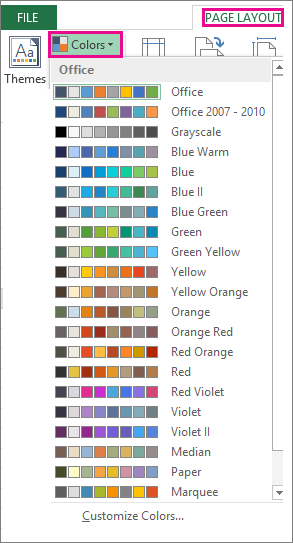
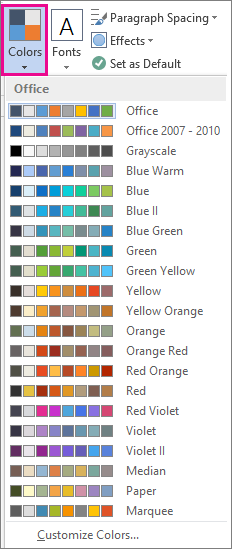
On the Page Layout tab in Excel or the Design tab in Word, click Colors, and pick the color set you want.
Excel

Word
Tip: The first group of colors are the colors in the current theme.
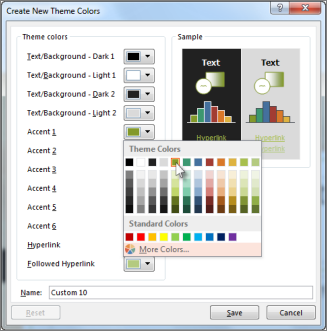
Create my own color theme
-
On the Page Layout tab in Excel or the Design tab in Word, click Colors, and then click Customize Colors.
-
Click the button next to the theme color you want to change (for example, Accent 1 or Hyperlink), and then pick a color under Theme Colors.
To create your own color, click More Colors, and then pick a color on the Standard tab, or enter numbers or select a color on the Custom tab.
-
In the Sample pane, preview the changes that you made.
-
Repeat this for all the colors you want to change.
-
In the Name box, type a name for the new theme colors, and click Save.
Tip: To return to the original theme colors, click Reset before you click Save.
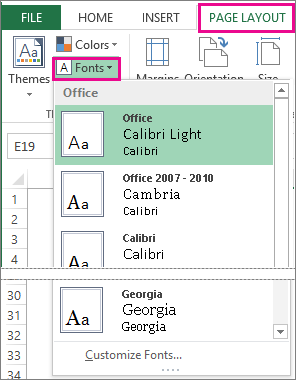
Change theme fonts
-
On the Page Layout tab in Excel or the Design tab in Word, click Fonts, and pick the font set you want.
Excel
Word
Tip: The top fonts are the fonts in the current theme.
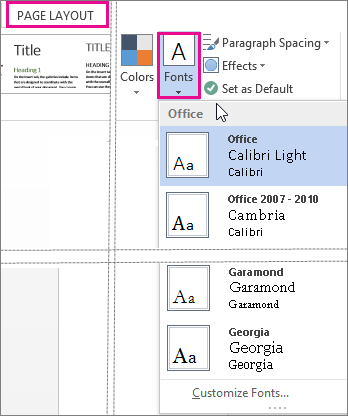
-
To create your own set of fonts, click Customize Fonts.
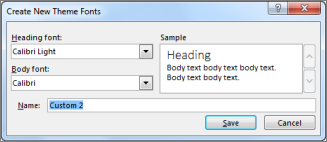
-
In the Create New Theme Fonts box, under the Heading font and Body font boxes, pick the fonts you want.
-
In the Name box, enter a name, and click Save.
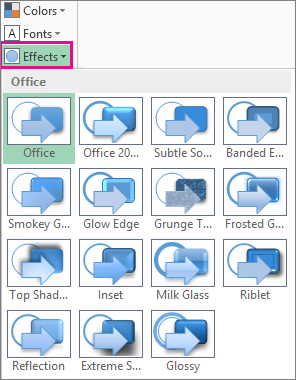
Change theme effects
Theme effects include shadows, reflections, lines, fills, and more. While you cannot create your own set of theme effects, you can choose a set of effects that work for your document.
-
On the Page Layout tab in Excel or the Design tab in Word, click Effects.
. -
Select the set of effects that you want to use.
 .
.
Switch or remove a theme
-
To change themes, simply pick a different theme from the Themes menu. To return to the default theme, choose the Office theme.
-
To remove theme formatting from just a portion of your document, select the portion you want to change and change any formatting you like, such as font style, font size, color, etc.
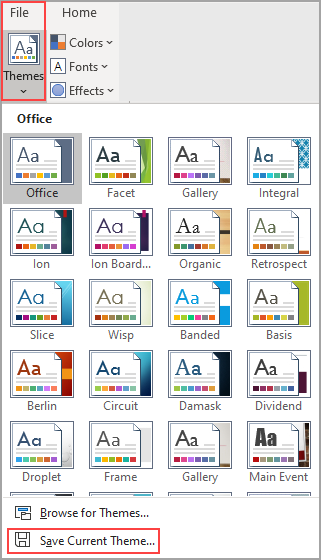
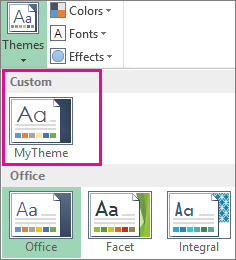
Save a custom theme for reuse
Once you’ve made changes to your theme, you can save it to use again. Or you can make it the default for new documents.
-
On the Page Layout tab in Excel or the Design tab in Word, click Themes > Save Current Theme.
-
In the File name box, enter a name for the theme, and click Save.
Note: The theme is saved as a .thmx file in the Document Themes folder on your local drive and is automatically added to the list of custom themes that appear when you click Themes.
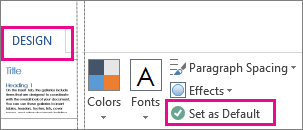
Make my changes the new default theme
After saving your theme, you can set it so it’s used for all new documents.
Excel
Apply your custom theme to a blank workbook and then save it as a template named Book.xltx.
Word
-
On the Design tab, click Set as Default.
More about themes
A document theme is a unique set of colors, fonts, and effects. Themes are shared across Office programs so that all your Office documents can have the same, uniform look.
You can also change the Office theme. The Office theme is the color scheme for your entire Office program, while document themes are more specific (they show up in individual Word documents or Excel spreadsheets).

In addition, you can add a pattern to your Office program, by changing the Office Background.
See Also
-
Change the font size in Word, Excel or PowerPoint
-
Change the line spacing in Word
-
Insert subscript or superscript text in Word
-
Add or remove a sheet background in Excel
-
Create your own theme in PowerPoint
-
Customize and save a theme in Word 2016 for Mac
Hi !
I hope this will be helpful for you
Polish
blady = pale
jasny = bright
ciemny = darkgranatowy
or ciemnoniebieski = dark blue , navyamaranowy = amaranthine
beżowy = beige
bordowy = bordeaux
bursztynowy = amber
bury = dark grey with specks of browncynobrowy = vermillion
fuksja = magenta
groszkowy = pea-green
grynszpan = verdigriskarmazynowy = crimson
kasztanowy = horse chestnutlila = lilac
mahoń = mahogany
marchewkowy = carotene
modry = deep blue , cornflower bluepłowy = fawn
rudy = ginger , redsiny = grey-blue , livid
szafirowy = sapphireturkusowy = turquoise
Thank you for the list, @Włoskipolak 72 , however, like Awwal12 pointed out, I am indeed interested in basic colours.
I still appreciate it very much, because I’m taking my first steps in the Polish language.
English color words for blue:
indigo
blue
ultramarine
aqua/aquamarineFor red:
crimson
scarlet
red
rose
pinkpurples:
purple
lavender
mauve
violet
Cheers, Roxxxannne! But like I just told Włoskipolak 72, it’s basic, general colours that I’m concerned with right now, not the more or less wide array of varying hues that all languages naturally have.
But since you brought not only red and pink into the equation, but purple and violet, as well, that gives me the opportunity to say that, for some strange reason, I’ve never considered the latter as one of those basic colours, with purple being good enough for both.
And yet, when it comes to the colours of a rainbow, for instance, I invariably see violet is the favored term, and indigo is mentioned, as well, alongside blue, whereas to me, both of them would simply be blue!
True. But well, in Spanish you can use celeste for light blue and turquí for the dark one:
Los colores del cordón de seda que sujete la medalla serán los siguientes: turquí y morado, para la Escuela general preparatoria; turquí y verde mar, para las de Comercio; rojo, celeste y turquí, para las Normales
Turquí shouldn’t be confused with turquesa or aturquesado, for the greenish blue.
We’ve also got zarco (or garzo) for the light almost whitish blue, specially for waters and eyes.
alejarse de aquel hombre cuyos ojos zarcos brillaban como cristales con fuego
There is cerúleo too, defined as the colour of a clear sky or the open sea.
Se ponía el sol de abril en un cielo cerúleo y limpio.
Granted that they are usually reserved for literature, but hey, they exist.
I am well aware such hues and shades of different colours exist in Spanish, far be it from me to pretend they don’t , but once more, it’s not really such things that I’m interested in for now, but just basic, general colours.
So, for instance, I know all those shades of blue that you mentioned in Spanish, though, admittedly, I’d forgotten about zarco, but if asked about the colour of, say, some atoll’s coast in the Pacific, the sky on a clear, cloudless day, that of the French flag, a sapphire’s and that of , I would more than likely just say azul, unless for some reason I wanted (or had) to be more specific.
For some reason, Spanish preferred the Arabic azul to the Germanic blao which, unlike other colours, didn’t really survive the Middle Ages.
Tomaron a Maria Lopes de Liendo una capa de blao apreçiada en çiento e treynta e tres maravedis.
You know, I did wonder if the Germanic colour designation had ever made its way into Spanish’s vocabulary! But yeah, azul had the last laugh there, as it did in Portuguese and Galician, too.
The Welsh chameleon — glas /gla:s/.
Meanings: ‘blue’, ‘green’, ‘grey’, ‘silver’.
Now that’s quite a chameleon, to be sure, and I am quite a dunce for forgetting about that one, which I’d already come across!
I knew about the ‘blue’ and ‘green’ meanings, thanks to Gareth King’s Modern Welsh Dictionary, which states its meaning as «blue», but adds the following:
«! glas is also used to refer to the green of vegetation; in this use it is much more restricted, though of common occurrence in place names.»
But I had no idea it could also mean ‘grey’ and ‘silver’.
Multicolor texts can make your website more attractive and interesting for visitors. This snippet will help you to learn how to create such texts for your website.
There are 3 ways of creating a multicolor text. Let’s dive in and try it together.
You can create a multicolor text with the help of image editors such as Pixelmator, Photoshop and so on. So, you can create a multicolor image and embed it into your website.
The multicolor text will not be searchable with this method.
As a result, your code will look like the following:
<img src="multicolortext.png" alt="multi color text"/>Another way is creating a text with separate elements by using the HTML <span> tag, which is an empty container. This means that you create a multicolor text by putting each letter in a separate element to define a different color for each letter of your text.
Example of creating a multicolor text with separate elements in HTML:
<!DOCTYPE html>
<html>
  <head>
    <title>Title of the document</title>
  </head>
  <body>
    <span style="color:#FF0000">H</span>
    <span style="color:#66CC66">e</span>
    <span style="color:#FF9966">l</span>
    <span style="color:#FFCCCC">l</span>
    <span style="color:#FF0066">o</span>
  </body>
</html>
Result
And finally, you can use CSS. This is the easiest way of creating such kind of text.
Put your text in a <span> tag and give it a class name «multicolortext». Then, you need the CSS background-image property to add a gradient background to your text with its «linear-gradient» value, where you put the names of your preferred colors.
To get multicolor text instead of the multicolor background, you need to use the background-clip property, which lets you control how far a background image or color extends beyond the element’s padding or content. This step gives some colors to your text, but not exactly what you want.
You can get the final result by making your text color transparent with the color property so that the background color will be reflected in the text.
Example of creating a multicolor text with HTML and CSS:
<!DOCTYPE html>
<html>
  <head>
    <title>The title of the document</title>
    <style>
      .multicolortext {
        background-image: linear-gradient(to left, violet, indigo, green, blue, yellow, orange, red);
        -webkit-background-clip: text;
        -moz-background-clip: text;
        background-clip: text;
        color: transparent;
      }
    </style>
  </head>
  <body>
    <h1>
      <span class="multicolortext">Let’s be creative!</span>
    </h1>
  </body>
</html>
Let’s get modern!
I think you’re like me in that previous examples are not something we want to do in this day and age (Although they were good enough to grasp ways to do it).
So let’s do it in a more modern way. Here comes the magic of linear-gradient! Now we start our example, going step by step, and extend this!
We have just one h1 tag and will make it alive soon with an animation!
Also, you can read the comments in front of each closing line of CSS styles to help you understand even better.
We start implementing our text with some basic styling.
<!DOCTYPE html>
<html lang="en">
  <head>
    <title>Linear Gradient</title>
  </head>
  <body>
    <style>
      h1 {
        font-size: 10vw; /* make our h1 tag larger */
        font-family: sans-serif; /* choosing our font */
      }
    </style>
    <h1>W3DOCS</h1>
  </body>
</html>
Here we’ll add background and our linear-gradient value.
h1 {
  font-size: 10vw;
  /* make our h1 tag larger */
  font-family: sans-serif;
  /* choosing our font */
  background: linear-gradient(to right, rgba(255, 215, 255, 0) 0%, rgba(225, 255, 255, 0.5) 20%, rgba(255, 255, 255, 0) 61%), linear-gradient(rgb(97, 183, 217) 52%, rgb(224, 246, 255) 60%, rgb(78, 99, 132) 61%);
  /* you can change the colors based on your preference */
}
Let’s see what we’ve got now:

Now, let’s add background-clip and -webkit-text-fill-color properties to have the linear-gradient take effect on our text.
h1 {
  font-size: 10vw;
  /* make our h1 tag larger */
  font-family: sans-serif;
  /* choosing our font */
  background: linear-gradient(to right, rgba(255, 215, 255, 0) 0%, rgba(225, 255, 255, 0.5) 20%, rgba(255, 255, 255, 0) 61%), linear-gradient(rgb(97, 183, 217) 52%, rgb(224, 246, 255) 60%, rgb(78, 99, 132) 61%);
  /* you can change the colors based on your preference */
  background-clip: text;
  /*add this line, it defines how far the background should extend within an element, here we set it to text */
  -webkit-background-clip: text;
  /* add this line, for browsers compatibility */
  -webkit-text-fill-color: transparent;
  /* specifies the fill color of text characters. We use transparent to use the background value as our text fill */
}
Now it looks like this:

Much better. Let’s take it a step further and give it some wavy animation to make it even cooler!
h1 {
  font-size: 10vw;
  /* make our h1 tag larger */
  font-family: sans-serif;
  /* choosing our font */
  background: linear-gradient(to right, rgba(255, 215, 255, 0) 0%, rgba(225, 255, 255, 0.5) 20%, rgba(255, 255, 255, 0) 61%), linear-gradient(rgb(97, 183, 217) 52%, rgb(224, 246, 255) 60%, rgb(78, 99, 132) 61%);
  /* you can change the colors based on your preference */
  background-clip: text;
  /*it defines how far the background should extend within an element, here we set it to text */
  -webkit-background-clip: text;
  /*for browsers compatibility */
  -webkit-text-fill-color: transparent;
  /* specifies the fill color of text characters. We use transparent to use the background as our text fill */
  animation: wave 2000ms ease alternate infinite;
  /* add this line */
  transition: all 0.4s ease;
  /* add this line */
}
@keyframes wave {
  0% {
    background-position: 0 0;
  }
  100% {
    background-position: 50vw 10px;
  }
}
/* add this line */
We defined a custom animation named wave here, which will be run every 2 seconds, and during this time, it will change our background-position 50vw on the x-axis and 10px on the y-axis. You’re free to change that values and get your desired result as well!
We also declared a transition to smooth this movement a little bit!
Here’s the final code and result:
<!DOCTYPE html>
<html lang="en">
  <head>
    <title>Linear Gradient</title>
  </head>
  <body>
    <style>
      h1 {
        font-size: 10vw; /* make our h1 tag larger */
        font-family: sans-serif; /* choosing our font */
        background: linear-gradient(to right, rgba(255, 215, 255, 0) 0%, rgba(225, 255, 255, 0.5) 20%, rgba(255, 255, 255, 0) 61%), linear-gradient(rgb(97, 183, 217) 52%, rgb(224, 246, 255) 60%, rgb(78, 99, 132) 61%); /* you can change the colors based on your preference */
        background-clip: text; /*it defines how far the background should extend within an element, here we set it to text */
        -webkit-background-clip: text; /*for browsers compatibility */
        -webkit-text-fill-color: transparent; /* specifies the fill color of text characters. We use transparent to use the background as our text fill  */
        animation: wave 2000ms ease alternate infinite;
        transition: all 0.4s ease;
      }
      @keyframes wave {
        0% {
          background-position: 0 0;
        }
        100% {
          background-position: 50vw 10px;
        }
      }
    </style>
    <h1>W3DOCS</h1>
  </body>
</html>
Cool! I hope you’ve enjoyed it!